Struggling to make your festive nails look chic and not childish? You’ve tried painting those cute Christmas bows, but they end up looking clunky, asymmetrical, or just plain messy. It’s frustrating when you want sophisticated holiday style but end up with a manicure that feels anything but minimal.
Minimal Christmas bow nails are a sophisticated nail art aesthetic that uses micro-sized bow motifs, sheer base polishes, and precise line work to achieve a festive look without the bulk or visual clutter of traditional holiday designs. This approach favors elegance and restraint for a modern, clean finish.
Leveraging tested frameworks and data-driven insights, this guide breaks down the secrets to mastering dainty holiday nail art. You’ll discover 9 distinct, trend-aligned styles, complete with the step-by-step instructions and pro tips needed to create them flawlessly at home. Get ready to elevate your festive look with precision.
Are Your Christmas Bow Nails Too Clunky? The Secret to Mastering Dainty, Minimalist Detail
The frustration is real: you envision delicate, sophisticated Christmas bows, but the reality is often thick lines, wobbly loops, and a design that feels more clumsy than chic. The secret to achieving truly minimal christmas bow nails isn’t just about painting a smaller bow; it’s a complete shift in approach. It requires mastering semantic restraint and precision. The core principle is allowing negative space and sheer bases—like milky pink or a clean nude—to do most of the talking. This creates a clean canvas where an ultra-fine, perfectly placed motif can truly shine. To achieve this professional level of micro-detail, technical proficiency with specialized tools, particularly a high-quality fine liner brush, is non-negotiable. This is how you transform a potentially bulky holiday theme into an elegant, understated festive accent.
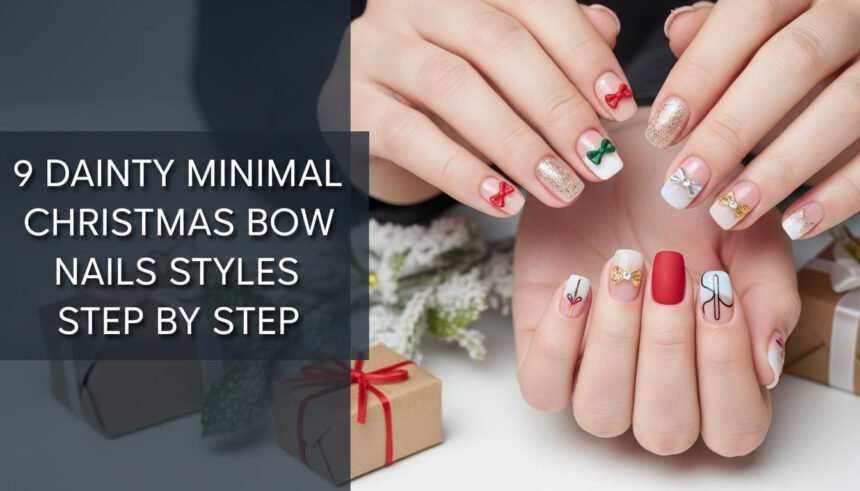
9 Dainty Minimal Christmas Bow Nail Styles Step By Step: The Ultimate Guide to Precision Holiday Art
Moving beyond the theory, let’s dive into the practical application. Discovering specific, trend-aligned designs is key to feeling inspired and confident. Here, we present 9 distinct minimal Christmas bow nail styles, curated and tested for both their aesthetic appeal and their technical feasibility, even on short, natural nails. Each style incorporates elements of the popular Coquette and Balletcore nail trends, balancing classic festive colors with the elegant restraint of minimalism. From a sheer Balletcore micro bow to a two-tone gift bow, these designs are broken down into highly actionable steps. The two-part structure—listing necessary Products & Tools before detailing the Application Steps—is designed to give you a clear, proven roadmap for achieving professional results at home.
1. The Sheer Balletcore Micro Bow

Pin this genius hack to your ‘Dream Holiday Nails’ board!
Products & Tools Used:
- Sheer milky pink builder gel or polish (BIAB is recommended for structure)
- Highly pigmented white gel art paint (low viscosity, non-running)
- 000 Fine Liner Brush with 5mm bristle length
- Dotting tool (smallest size)
- UV/LED curing lamp and non-wipe gel top coat
Application/Styling Steps:
- Prepare the nail plate and apply two thin coats of the sheer pink polish/BIAB base, curing fully between each layer.
- Stabilize your hands using the ‘Tripod Method’ (resting your pinky on the table or nail rest) to minimize wobble.
- Dip the 000 Fine Liner Brush lightly into the white art paint; use a palette to ensure the brush is loaded only at the tip.
- Place a tiny dot for the central knot using the smallest dotting tool on the ring finger accent nail.
- Using the fine liner brush, gently pull two loops outward and upward from the dot, forming symmetrical Vs, then fill the tiny loops.
- Draw the two descending ribbon tails from the central knot, ensuring the lines are uniform and crisp.
- Flash cure the finished bow art for 10 seconds to lock the lines in place before applying the final top coat.
Pro-Tip: If your white polish runs, thin it slightly on a palette or switch to a dedicated, high-viscosity nail art gel paint for ultimate line control.

2. Metallic Gold Outline French Tip Bow

Save this clever organization idea!
Products & Tools Used:
- Opaque white polish or gel for the French tip
- Highly pigmented metallic gold art gel or paint
- Striping brush for the French tip and a 00 Fine Liner Brush for the bow
- Clean-up brush and acetone/cleaner solution
Application/Styling Steps:
- Complete your minimal French tip (or reversed French tip for extra minimalism) base, ensuring the white line is thin and uniform. Cure fully.
- Visualize the bow placement directly above the French tip line, allowing a small amount of negative space between the bow and the tip.
- Using the 00 Fine Liner Brush, draw the four lines of the bow outline (two loops, two ribbons) in the metallic gold polish.
- Avoid coloring in the center; the ‘minimalist’ element here is the transparency within the outline.
- Use the clean-up brush to instantly refine the bow edges and ensure the metallic lines are crisp and fine.
- Cure the metallic outline art completely. Seal with a high-shine top coat to maximize the metallic effect.
Pro-Tip: For the cleanest metallic outline, use a dedicated metallic art gel rather than standard shimmer polish, as art gels have higher pigment density for single-pass line work.
3. Matte Red Knot Accent Nail

Try this sophisticated matte look!
Products & Tools Used:
- Neutral opaque nude gel or lacquer polish (for the base)
- Highly pigmented opaque red polish or art paint
- Smallest size dotting tool (Size 00 or 000)
- High-quality matte gel or lacquer top coat
Application/Styling Steps:
- Apply two coats of the opaque nude base color to all nails, ensuring full coverage. Cure/dry completely.
- On the accent nail (ring finger recommended), locate the vertical center line for symmetry.
- Dip the smallest dotting tool into the red polish. Place two small, adjacent dots slightly above the center of the nail (these will form the bow loops).
- Immediately use the same dotting tool, or a micro liner brush, to pull the polish down slightly into the V shape, connecting the top of the dots.
- Add a tiny dot in the center to create the knot and draw two micro ribbon tails extending downwards.
- Apply a standard glossy top coat, cure, and then finish with a thin layer of matte top coat over the entire nail to emphasize the red’s flat texture.
Pro-Tip: Using an opaque nude base ensures the red color pops even when applied minimally. The matte top coat prevents the festive color from looking overly flashy.

4. Reflective Cat Eye Ribbon Accent

Watch the full video tutorial for this look!
Products & Tools Used:
- Silver or white reflective cat eye gel polish
- Cat eye magnetic tool (strong cylindrical magnet)
- Black or white specialized nail art gel paint (for the bow)
- Detail brush (size 0) for the ribbon lines
Application/Styling Steps:
- Apply one coat of the cat eye gel polish and immediately hold the magnet close to the nail for 10-15 seconds to pull the metallic particles into the desired reflective line or stripe. Cure fully.
- Apply a second coat of cat eye polish, magnetize again for a bolder effect, and cure fully.
- Using the detail brush and the contrasting bow color (black or white), paint a delicate ribbon design (two loops, two long descending tails) near the cuticle line of the accent nail.
- Ensure the ribbon lines are extremely thin to maintain the “minimal” aesthetic and allow the shimmer of the cat eye base to dominate.
- Flash cure the black/white art for 10 seconds. Apply a top coat and cure completely.
Pro-Tip: The cat eye effect provides enough visual interest on its own; keep the bow motif ultra-small and simple (e.g., just the ribbon outline) to avoid visual clutter.

5. True Negative Space Outline Bow

Save this ultra-minimal design for later!
Products & Tools Used:
- High-quality clear base coat (optional: strengthening treatment)
- Highly pigmented black art gel or stamping polish
- Precision tweezers for clean-up
- 000 Fine Liner Brush and a steady hand
Application/Styling Steps:
- Ensure the natural nail plate is perfectly prepped (dehydrated and clean). Apply one layer of clear base coat and cure/dry.
- Using the 000 brush, define the center of the nail where the bow will sit (typically on the middle finger).
- Draw two tiny, sharp Vs for the bow loops using the black polish, connecting them with a micro-dot knot.
- Immediately use the precision tweezers wrapped in a piece of paper towel to scrape away any accidental polish smears before they dry or cure.
- The true minimalist definition requires the center of the bow loops and the base of the nail to remain completely clear (negative space).
- Seal the entire nail with two thin coats of high-shine top coat, ensuring the art is fully encapsulated.
Lesson Learned: Mastering negative space art requires using the least amount of product possible. Use a palette and only load the very tip of the brush to prevent polish pooling and blurring the clear space.

6. Beginner-Friendly Decal Bow for Perfect Symmetry

Decals are the secret to beginner symmetry!
Products & Tools Used:
- Thin, flexible white or metallic bow nail decals (water-slide or vinyl stickers)
- Small cup of water (for water-slide decals)
- Sharp, angled precision tweezers
- Leveling top coat (necessary for sealing decals)
Application/Styling Steps:
- Apply and cure your base coat color (sheer pink or nude) completely. Ensure the surface is non-sticky (if gel, wipe the inhibition layer).
- Cut the decal as closely as possible to the bow image. If water-slide, soak briefly, then slide the image gently onto the nail.
- Using the precision tweezers, gently tap and maneuver the decal into the desired final position, ensuring it lies flat on the nail curve without bubbles or wrinkles.
- Once placed, press down gently with a silicone tool or lint-free wipe to remove excess water/air bubbles.
- Apply a ‘leveling’ or slightly thicker top coat over the decal, brushing gently over the image to ensure the edges are fully sealed and encapsulated. Cure fully.
- Repeat with a second thin layer of top coat to guarantee the decal won’t lift, which is the key to longevity.
Pro-Tip: Decals should be placed only after the base color is cured/dried and the surface is slightly tacky (if lacquer) or completely non-tacky (if cured gel). This prevents the decal from sliding while you adjust it.

7. Micro Glitter Encapsulated Bow

Add subtle festive sparkle with this look!
Products & Tools Used:
- Clear or sheer base gel (BIAB or structure gel recommended)
- Ultra-fine silver or gold micro-glitter flakes (non-chunky)
- Red or black highly pigmented gel art paint (for the bow outline)
- Fan brush or silicone tool for glitter pickup
Application/Styling Steps:
- Apply and cure the clear base coat. Do not wipe the inhibition (sticky) layer if using gel.
- Using the red art paint, draw only the outline of the tiny bow (loops and ribbons) on the accent nail, but DO NOT cure yet.
- Gently sprinkle or tap the micro glitter flakes only inside the uncured bow outlines using a fan brush or silicone tool. Use only enough glitter to fill the outline, keeping the glitter contained.
- Cure the glitter-filled bow outlines completely. Brush away any excess loose glitter.
- Apply a medium-thickness clear gel (builder gel or thick top coat) over the entire nail to fully encapsulate the glitter and create a smooth, durable surface. Cure fully.
Pro-Tip: Encapsulation is crucial when using glitter. If the glitter flakes stick out, they will snag and cause the top coat to lift. Use a file to gently smooth the surface before the final top coat if needed.

8. The Cream Coquette Cuticle Bow

Get the coquette aesthetic with this trick!
Products & Tools Used:
- High-quality, opaque cream or off-white polish/gel
- Sheer nude or pink base coat
- 000 Fine Liner Brush
- Cuticle oil for post-application cleanup
Application/Styling Steps:
- Apply two coats of a sheer nude base and cure/dry. This is essential for the Coquette, natural-looking foundation.
- Locate the precise center of the nail, close to the cuticle line (leaving enough space so the design isn’t pushed into the skin).
- Using the cream polish and the fine liner brush, paint the two small, symmetrical loops of the bow, ensuring the cream color is fully opaque in two passes.
- Instead of long ribbon tails, simply paint a small, rounded knot dot below the loops. The placement near the cuticle is the primary identifier of this trend.
- Use a small, flat clean-up brush dipped in polish remover to carve the edges, ensuring the bow shape is sharp against the cuticle line.
- Finish with a high-gloss top coat and apply a generous amount of cuticle oil after curing/drying to enhance the healthy, polished look.
Pro-Tip: Placing the bow near the cuticle is not only on-trend but also protects the art from daily wear and tear, improving longevity.

9. Two-Tone Simple Gift Bow

Pin this look for Christmas Day!
Products & Tools Used:
- Clear builder gel or structured base coat
- Opaque sheer white or cream gel polish (for the inner fill)
- Metallic gold or silver gel polish (for the outline)
- Detail brush (size 00) and fine micro dotting tool
Application/Styling Steps:
- Apply and cure the structured base coat. Wipe the inhibition layer to ensure a clean surface.
- Using the metallic gold or silver, draw the thin outline of the bow (loops and knot) in the desired micro size, ensuring perfect symmetry. Flash cure immediately (10 seconds).
- Using the sheer white/cream polish and the micro dotting tool, gently fill the inner space of the gold loops. Be careful not to let the white touch the gold outline—the two colors should meet without blending.
- Cure the white fill completely (30 seconds).
- Draw the ribbon tails in the metallic gold polish.
- Finish with a medium-thickness top coat to smooth over the subtle difference in polish layer height and provide maximum shine and protection.
Pro-Tip: The two-tone effect requires excellent control. Ensure your gold outline is cured before filling with the white polish. This technique is called “reverse filling” and prevents colors from bleeding.

Mastering Precision: Essential Techniques and Tools for Micro Nail Art
Having inspiring designs is the first step, but flawless execution is what transforms a good idea into a great manicure. Achieving the crisp, clean lines that define minimalist nail art comes down to mastering a few core techniques and using the right tools. This section moves beyond inspiration to provide the expert-level knowledge needed to solve common problems like wobbly lines, smudging, and a lack of symmetry. We’ll explore the ‘Tripod Method’ for hand stabilization, the critical importance of polish viscosity, and why a Builder Gel (BIAB) base is the superior foundation for protecting your delicate, dainty art.
The Key to Symmetry: Hand Stabilization and Brush Control
The “Tripod Method” of hand stabilization is mandatory for symmetry and precision. Anchor your non-dominant hand and your painting hand together, then rest your elbows on a stable surface. This acts as a fixed pivot point, minimizing natural tremors. Use the smallest possible brush (000 or 00) and load only the very tip, ensuring the polish viscosity allows for easy flow without pooling. The less polish on the brush, the better your line control.
Preventing Smudging: The Critical Flash Cure Technique
Smudging occurs when the top coat brush drags the uncured/undried art. If using gel polish, you must flash cure each individual color element of your tiny bow art for 5-10 seconds immediately after application and before applying the final top coat. This semi-cures the art layer, locking the lines in place so the top coat brush passes over them without disturbance. For lacquer, allow 5 full minutes of air drying before the top coat.
Why Builder Gel (BIAB) is the Best Base for Dainty Art
Builder Gel in a Bottle (BIAB) or structure gel is the preferred base because it provides a strong, inflexible foundation that prevents the natural nail from flexing. Since tiny lines are prone to cracking when the nail bends, the rigidity of BIAB protects the delicate art, significantly increasing the longevity of your minimalist bow design through the busy holiday season.
FAQs About minimal christmas bow nails
How long should I cure small gel art to prevent smudging?
For micro nail art details like tiny bows, a brief “flash cure” of 10-15 seconds is often enough to set the design and prevent the final top coat from smudging the lines. After the flash cure, you can proceed to the final top coat, which should be cured for the standard 60-120 seconds, depending on your lamp’s wattage, to fully harden and protect the art.
What is the difference between minimal bow nails and simple bow nails?
Minimal bows define an aesthetic constraint: they utilize negative space, subtle colors (sheer, nude, metallic outline), and micro-sizing (consuming less than 15% of the nail surface) to achieve sophistication. Simple bows, conversely, refer only to the ease of application; they may still be large, solid-color designs that lack the aesthetic restraint required for the true minimalist look.
Where can I buy the smallest nail art brushes for tiny details?
Look specifically for brushes labeled Size 000, 00, or a short-bristled detail/liner brush (4-7mm bristle length). These are available through specialized nail art suppliers or online retailers. Avoid standard craft store brushes, as they typically lack the necessary fine, sharp tip required for perfect micro-detail symmetry and line control in bow designs.
How can I safely remove gel-based bow art at home without damaging my nails?
Always buff the top coat lightly first to break the seal, then soak your nails in pure acetone (not regular nail polish remover) wrapped in foil for 10-15 minutes. Gently push off the softened art with an orange wood stick; never pick or peel, as this damages the natural nail plate. Recondition nails with cuticle oil afterwards.
Final Thoughts: Your Perfect Holiday Precision Manicure
The secret to the perfect minimalist manicure for Christmas 2026 lies in mastering restraint: use fewer colors, choose smaller tools, and let negative space be your friend. By applying precision techniques like the flash cure and hand stabilization, you can confidently create dainty, sophisticated bow nails that elevate your festive style. Which of the 9 minimal bow styles will you try first this June? Tell us in the comments
Last update on 2026-04-27 / Affiliate links / Images from Amazon Product Advertising API