Struggling to create Christmas bow nails that look elegant, not childish? You’ve tried the tutorials, but the result is often bulky, disproportionate, and far from the sophisticated holiday manicure you envisioned. It’s a common frustration that leaves you wondering what the secret is to a truly classy design.
To ensure Christmas bow nails are classy, focus on three pillars: precise symmetry, non-bulky application (using micro charms or thin gel paint), and utilizing sheer or neutral base coats to emphasize delicacy and refinement. This approach moves away from chunky, oversized elements and toward a more professional, high-end aesthetic.
Drawing from established best practices and professional nail art standards, this guide demystifies the art of the elegant bow. We’ll break down the exact proportionality rules, non-bulky application methods, and sophisticated color pairings you need. Get ready to master the techniques that transform a simple motif into a high-fashion holiday statement.
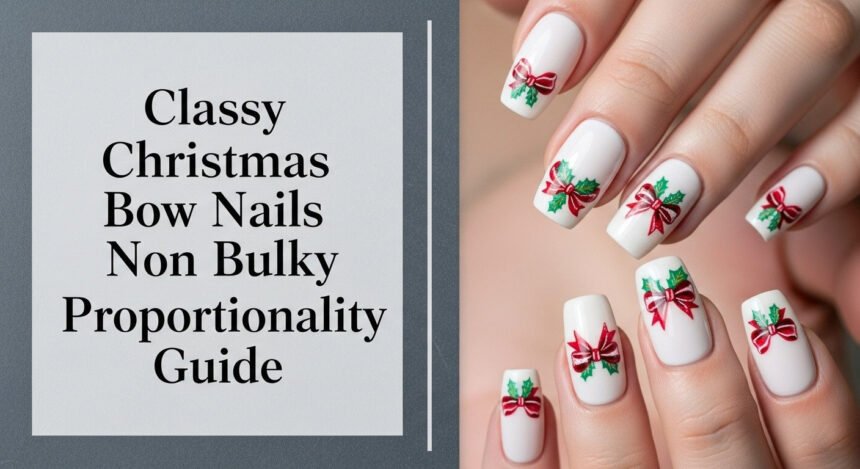
Are Your Christmas Bow Nails Classy or Chunky? Mastering Elegance for 2026
The line between a chic holiday manicure and a chunky, unprofessional one is surprisingly thin, especially when it comes to bows. Many DIY attempts fail not because of the bow motif itself, but because they overlook the foundational principles of scale, placement, and material choice. Oversized charms, thick painted lines, and opaque, loud base colors can instantly downgrade the look from sophisticated to juvenile. This guide is your definitive roadmap to avoiding those common pitfalls. We will introduce a professional aesthetic formula built on proportionality and refined technique. By understanding how elements like a sheer base, a micro charm’s size, and the precision of a painted line interact, you’ll gain the expertise to create elegant Christmas bow nails that are intentionally dainty and impeccably styled for any holiday event.
The Classy Bow Proportionality Guide: Why Scale Matters
The secret to a high-end bow manicure isn’t complexity; it’s proportionality. The size and placement of the bow in relation to your nail’s shape and length are what separate an elegant design from a clumsy one. A bow that looks perfect on a long coffin nail will overwhelm a short, square nail. According to professional nail art standards, the bow should not exceed one-third the width of the nail bed for short nails. This principle ensures the motif acts as a delicate accent rather than a bulky centerpiece. Mastering this balance is the first step toward achieving a consistently classy look.
Classy Bow Aesthetic Checklist:
* Micro-Size is Key: Use bows that are a maximum of 1-3mm for short to medium-length nails. This ensures the design remains dainty and sophisticated.
* Sheer or Neutral Bases: Opt for milky white, nude, or soft pink gel polishes. These sheer bases create an illusion of delicacy and allow the bow to be the refined focal point.
* Accent Focus: To maintain an elegant balance, limit 3D bows or detailed painted bows to just one or two accent nails per hand, typically the ring finger.
* Prioritize Symmetry: Whether painted or applied as a charm, the bow’s loops and tails must be perfectly balanced. Geometric precision is the hallmark of a professional, high-end finish.
11 Classy Christmas Bow Nail Designs & Non-Bulky Tutorials for January 2026
Ready for inspiration that you can actually execute? Moving beyond just pretty pictures, this section provides 11 distinct, sophisticated Christmas bow nail designs, each paired with an actionable tutorial. We’ve curated these styles to ensure every option prioritizes a non-bulky, elegant finish suitable for any holiday occasion. From the ultra-minimalist decal on a sheer nude base to a sculpted 3D gel bow, you’ll find a design that matches your skill level and aesthetic preference. Each tutorial focuses on professional techniques, like using specialized charm adhesive and flash-curing for precision, bridging the gap between a beautiful idea and a flawless, long-lasting manicure.
1. Minimalist Micro-Bow Decals on a Sheer Nude Base

Pin this genius hack to your ‘Elegant Holiday Manicure’ board!
This is the ultimate entry point for a classy bow look. Using a high-quality micro decal eliminates the challenge of hand-painting while ensuring perfect symmetry. The key to its sophistication lies in the sheer nude base, which creates a “your nails but better” foundation, allowing the tiny, crisp bow to serve as a delicate, high-impact accent. It’s a low-maintenance, non-bulky design that reads as effortlessly chic.
Materials Needed:
- High-quality, non-yellowing sheer nude gel polish (e.g., milky white)
- Box of assorted micro bow nail decals (1-2mm size, vinyl preferred)
- Fine tip reverse-grip tweezers for precision placement
- Non-wipe gel top coat (crucial for sealing decal edges)
- Standard UV/LED curing lamp
Step-by-Step Directions:
- Prepare the nail plate, applying base coat and curing according to lamp instructions.
- Apply 1-2 thin layers of the sheer nude polish, curing between each layer until desired translucency is achieved.
- Use tweezers to lift the micro bow decal and position it precisely near the cuticle line or center of the nail, pressing firmly to remove air bubbles.
- Apply a generous layer of non-wipe top coat, focusing on completely encapsulating the edges of the decal to prevent lifting.
- Cure the final top coat for 60 seconds and apply a drop of cuticle oil once cooled.
Pro-Tip: If the sheer base is too thin, the color of your natural nail bed will show through unevenly. Aim for 70% opacity for a truly professional, elegant base.

2. Balletcore Sheer Pink Nails with Dainty Pearl Charms
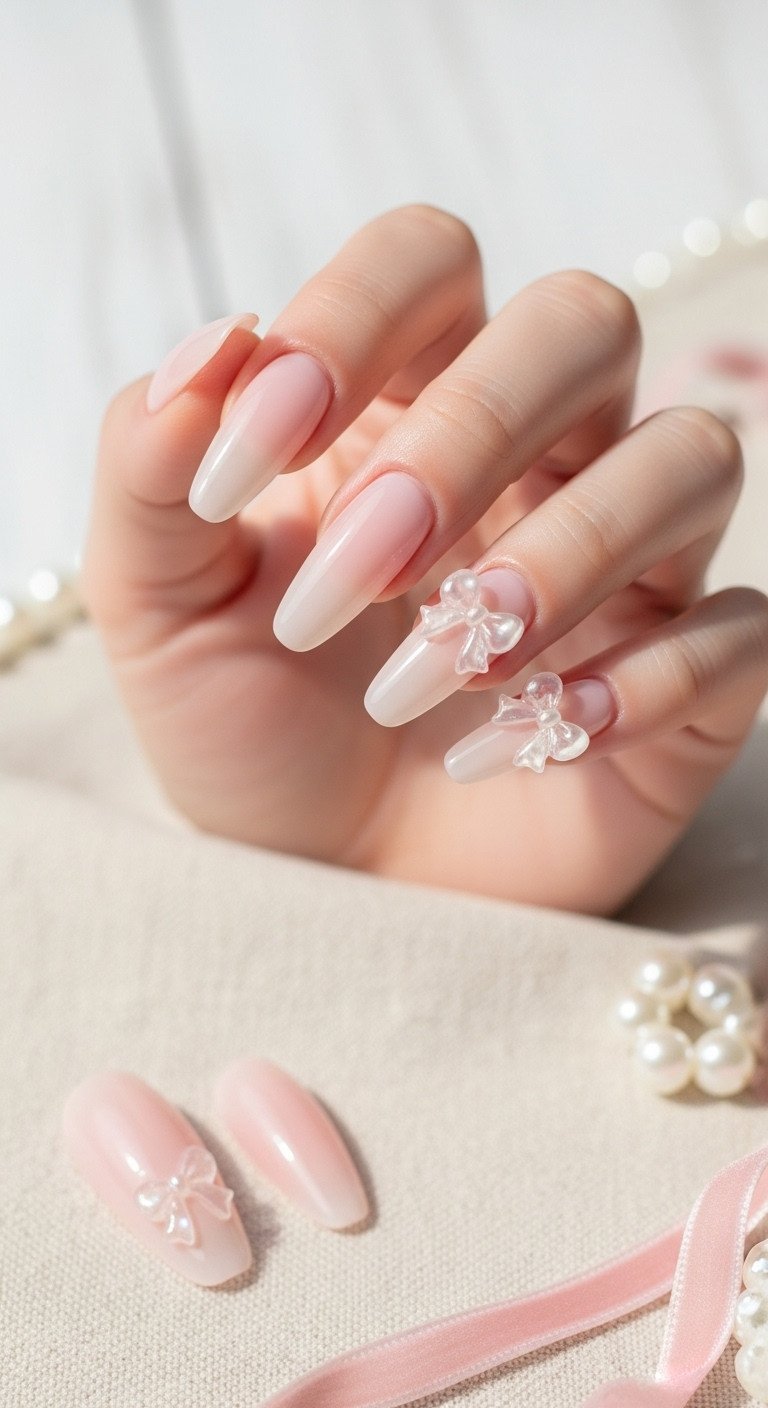
Save this clever organization idea!
Embrace the hyper-feminine Coquette and Balletcore trends with this delicate design. The combination of a milky, translucent pink base and a dainty pearlized bow charm creates a look that is soft, romantic, and incredibly sophisticated. This style is perfect for holiday parties and winter weddings, offering a festive feel without relying on traditional red and green. Using Builder-in-a-Bottle (BIAB) not only provides the perfect sheer color but also adds crucial strength to support the 3D charm.
Materials Needed:
- High-quality Builder-in-a-Bottle (BIAB) in a milky pink shade
- Dainty pearlized 3D resin bow charms (3mm recommended)
- Specialized rubberized charm adhesive gel (thick viscosity)
- Fine tip tweezers or wax tool
- Non-acidic primer and dehydrator
Step-by-Step Directions:
- Prep the natural nail, applying dehydrator and non-acidic primer for maximum adhesion.
- Apply 1-2 thin layers of the BIAB (structure coat), building a slight apex for strength, and curing fully.
- Apply a thin layer of top coat to all nails, but DO NOT CURE the nails receiving charms.
- Place a small dot of the charm adhesive gel exactly where the charm will sit (use sparingly to avoid bulk).
- Press the pearlized bow charm into the adhesive using tweezers, ensuring it is perfectly centered and flat against the surface.
- Flash cure the charm for 10-15 seconds to lock the position, then fully cure the whole hand for 60 seconds.
- Pro Tip: Use a tiny amount of top coat around the charm base to seal the edges without coating the pearl finish itself.
Pro-Tip: Applying a structural layer like BIAB beneath the charm is essential for long-term wear and prevents the heavy charm from causing stress fractures on weak natural nails.

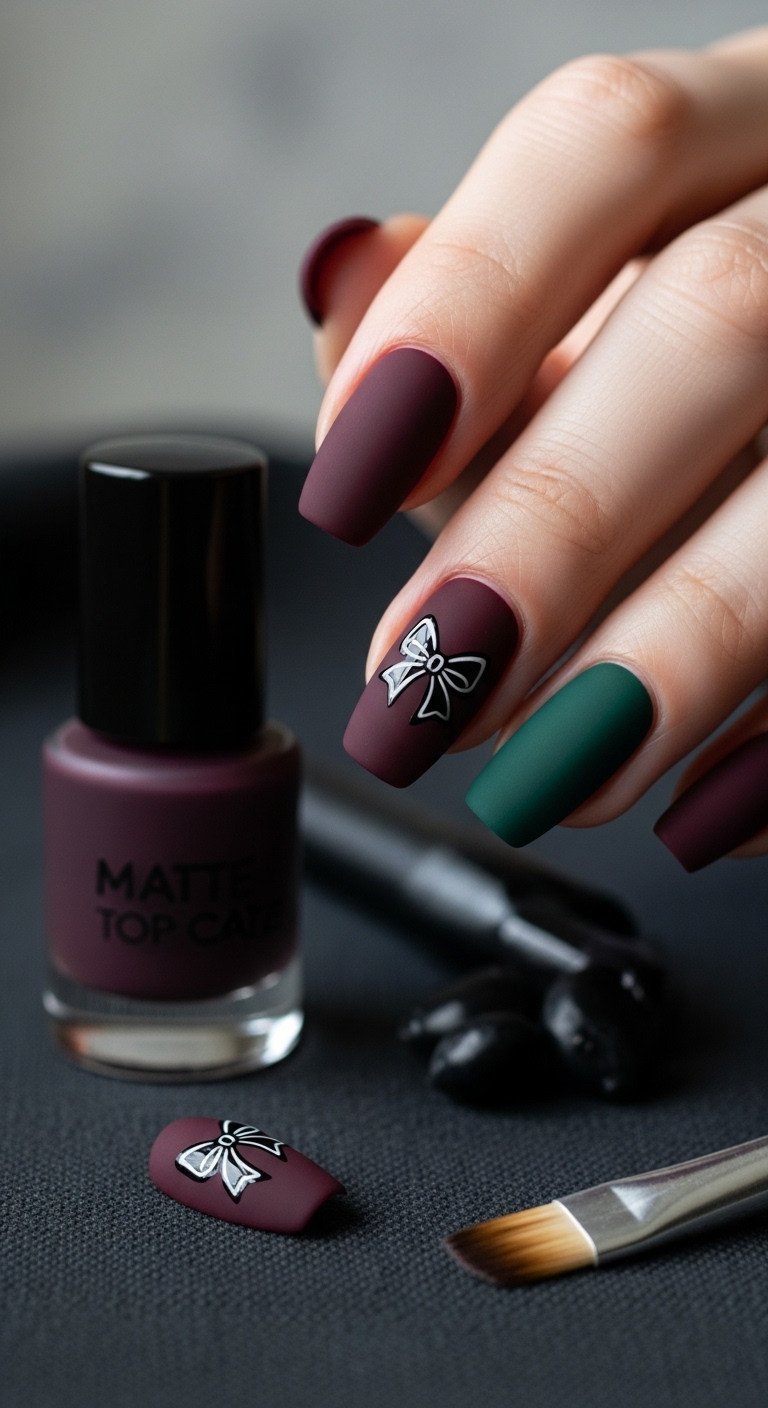
3. Hand-Painted Black Bows for Ultimate Geometric Symmetry

Save this sophisticated painted bow tutorial!
For those who value precision, the hand-painted bow offers unparalleled control over size and placement. This method is the definition of non-bulky elegance, relying on skill rather than dimensional add-ons. The key to a professional result is using a high-pigment, non-bleeding gel paint and an ultra-fine detail liner brush. The classic black bow on a crisp white or ivory base is a timelessly chic combination that feels festive yet remains perfectly appropriate for any professional setting.
Materials Needed:
- High-pigment black gel paint (thicker consistency for no-run precision)
- Professional detail liner brush (5mm or shorter bristles, size 000)
- Wipe-off solution (isopropyl alcohol or acetone) and clean-up brush
- Dotting tool (smallest size) for the center knot
- Matte or high-gloss top coat
Step-by-Step Directions:
- After applying and curing your base coat, use the dotting tool and a tiny amount of black gel paint to place a small dot for the bow’s central knot where you want the bow to sit.
- Using the detail liner brush, paint the first ‘triangle’ loop, starting from the knot dot and sweeping outward and back towards the dot, mimicking the shape of one side of a figure-eight.
- Repeat the process on the opposite side, ensuring the two loops are symmetrical in size and angle; use the clean-up brush dipped in wipe-off solution to sharpen any edges before curing.
- Paint the two short tails extending downward from the knot.
- Flash cure the design for 10 seconds to lock it in place, then cover the entire nail with your chosen top coat (matte for contrast, gloss for shine). Cure fully.
Lesson Learned: Use the “pinky rest” technique: anchor your dominant hand’s pinky finger on the table or against your non-dominant hand’s wrist while painting for maximum stability and minimal tremor.

4. Sculpted 3D Gel Bows for Custom Non-Bulky Dimension
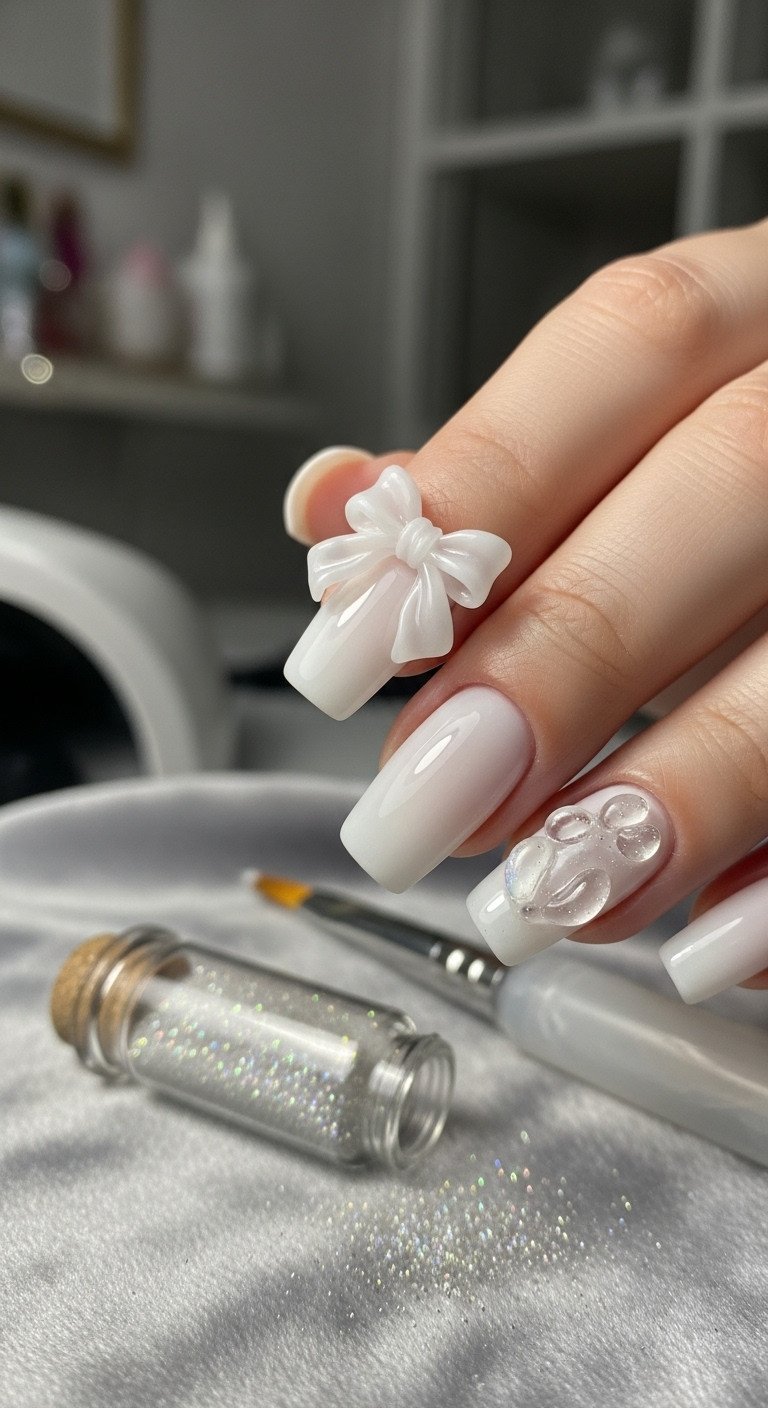
Pin the ultimate 3D bow technique!
This is the most advanced and customizable technique, offering unparalleled durability and a truly bespoke, high-end look. Using a non-leveling sculpting gel allows you to create a 3D bow with sharp, defined edges directly on the nail, controlling its exact size, shape, and profile. While it requires practice, mastering this method means you can create perfectly proportioned, low-profile bows that are seamlessly integrated into the manicure, offering a more durable and refined alternative to pre-made charms.
Materials Needed:
- Clear or white non-leveling sculpting hard gel (or specialized 3D gel paste)
- Specialized 3D gel sculpting brush (silicone or paddle brush)
- Isopropyl alcohol or slip solution (for wetting the brush and shaping)
- Small craft mat or palette (for pre-sculpting the bow off the nail, if preferred)
- UV/LED lamp (at least 48W recommended for full cure)
Step-by-Step Directions:
- Apply and cure the base and color coats, ensuring the nail is clean and ready.
- Scoop a small bead of the sculpting gel and place it on the nail, or pre-sculpt the bow off the nail on a silicone mat.
- Using the alcohol-dampened sculpting brush, gently push the gel into the desired bow shape: two perfect loops and a central knot. Focus on sharp edges and a low-profile thickness (less than 1mm).
- Cure the sculpted bow fully (at least 60-90 seconds, depending on the lamp wattage and gel brand).
- Once cured, apply a thin layer of top coat around the bow, not over it, to seal the base color. Alternatively, apply a high-shine top coat to the sculpted bow only and a matte top coat to the rest of the nail for texture contrast.
Pro-Tip: If sculpting directly on the nail feels too difficult, sculpt the bow on a non-stick surface, cure it completely, and then glue it onto the finished nail using the rubberized charm adhesive gel (as described in H3-2).

5. Oxblood Red and Gold Metallic Accent Bows
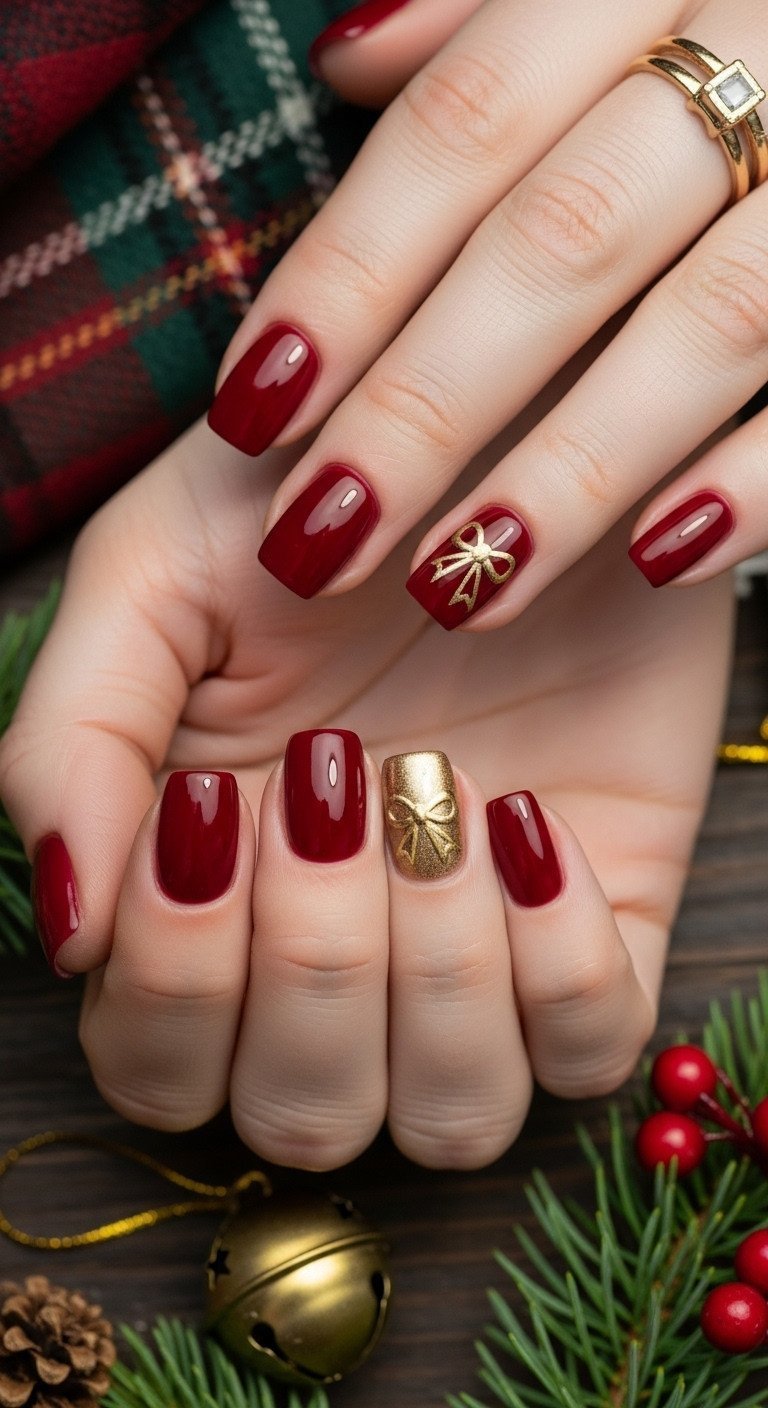
Save this upscale holiday nail idea!
For a traditional yet undeniably sophisticated holiday look, pair a deep, muted oxblood red with a delicate metallic gold bow. This color combination is rich, luxurious, and perfect for formal Christmas parties. The key is restraint: the deep, saturated base provides the festive feel, while a single, small, and precisely painted gold bow on an accent nail adds the perfect touch of elegance. A high-gloss top coat is essential to give the dark color a glass-like finish, enhancing its opulence.
Materials Needed:
- High-pigment oxblood red gel polish (or deep burgundy)
- Highly concentrated metallic gold gel paint (ensure it cures opaque)
- Fine tip liner brush (5mm or less)
- Glossy, non-yellowing top coat
- Detail clean-up brush
Step-by-Step Directions:
- Apply 2-3 coats of the oxblood red gel, curing fully after each layer.
- Load the liner brush with a minimal amount of gold gel paint, wiping off excess to prevent bleeding.
- Paint the small bow design using the figure-eight method (as in H3-3) on the accent nail(s). Keep the bow small (micro/mini size) relative to the dark base color.
- You may add two thin, vertical gold lines on the other nails to mimic the ribbon wrapping effect (optional).
- Flash cure the gold design for 10 seconds.
- Apply a thick, even layer of high-gloss top coat over all nails and cure fully for maximum shine.
Pro-Tip: Because dark colors show imperfections, use a high-viscosity top coat that self-levels to ensure a glass-like finish that enhances the ‘classy’ aesthetic.

6. Sophisticated Matte Velvet Flocking Bows
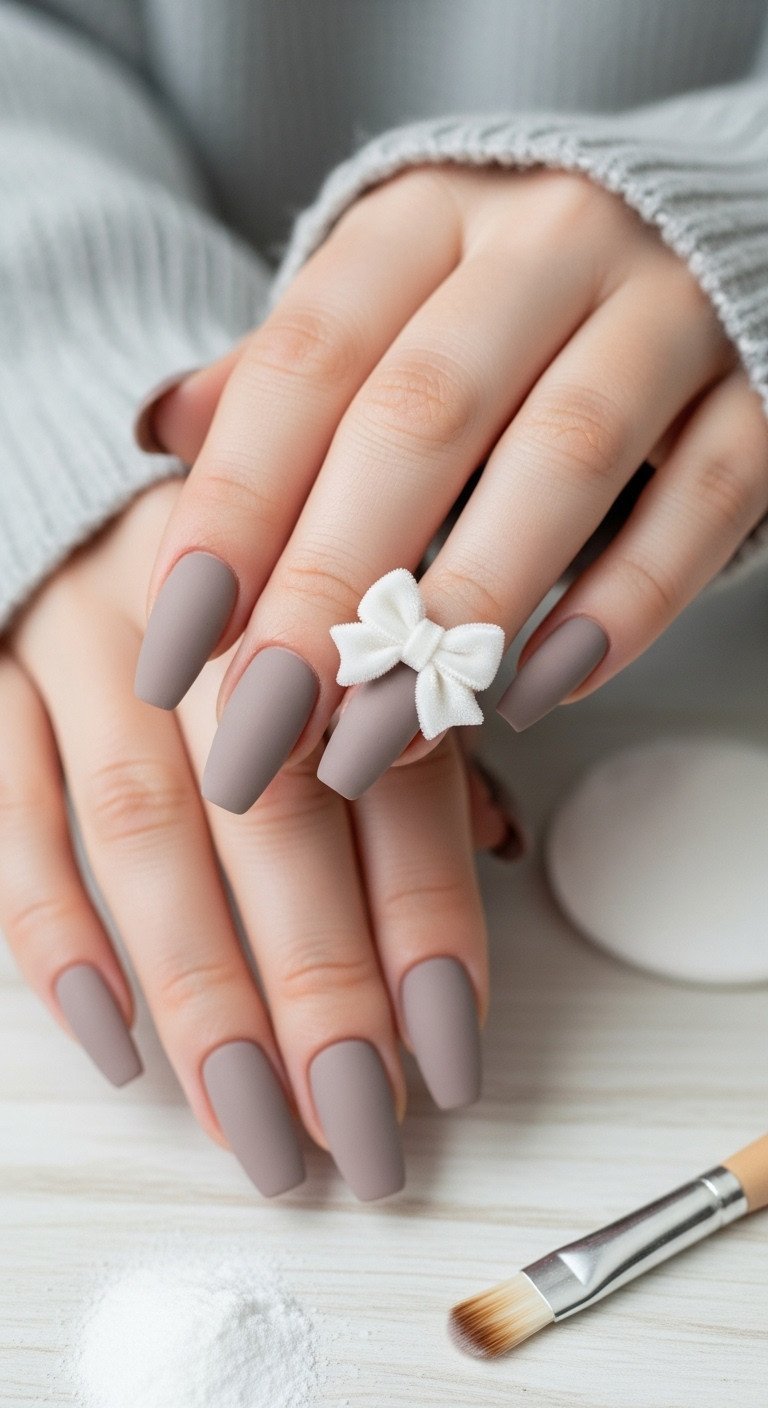
Pin this elegant texture contrast idea!
Elevate your holiday manicure by incorporating texture. This design pairs a sophisticated, smooth matte neutral base (like taupe or soft gray) with a tactile, raised velvet bow. The contrast is visually stunning and feels incredibly luxurious. Using flocking powder creates a soft, dimensional bow that isn’t bulky or shiny, offering a unique take on the trend. This is a high-impact look best suited for special events, as the texture requires a little extra care.
Materials Needed:
- High-quality matte top coat (non-yellowing)
- Matching neutral gel polish (taupe, beige, or soft gray)
- White or cream velvet flocking powder (fine grain)
- Clear building gel or thick gel top coat (for adhesion)
- Small fan brush (for cleaning excess powder)
Step-by-Step Directions:
- Apply base coat, color coat, and cure fully. Apply the matte top coat to the entire nail and cure fully.
- Using the clear building gel or thick top coat, paint a small, simple bow design (loops and knot) onto the matte finish. Do not cure.
- Immediately sprinkle or dunk the wet bow generously into the velvet flocking powder, ensuring full saturation.
- Cure the nail fully (the flocking powder will stick to the uncured gel).
- Use the fan brush to gently sweep away all excess flocking powder from the nail plate, revealing the soft, raised velvet bow texture. Do not apply top coat over the velvet.
Lesson Learned: The velvet bow will naturally attract lint and dirt over time, making this a design best suited for a 1-2 week wear period during major holiday events. Avoid applying top coat over the velvet as it will ruin the texture.

7. Holiday French Tips with Micro Bow Accents
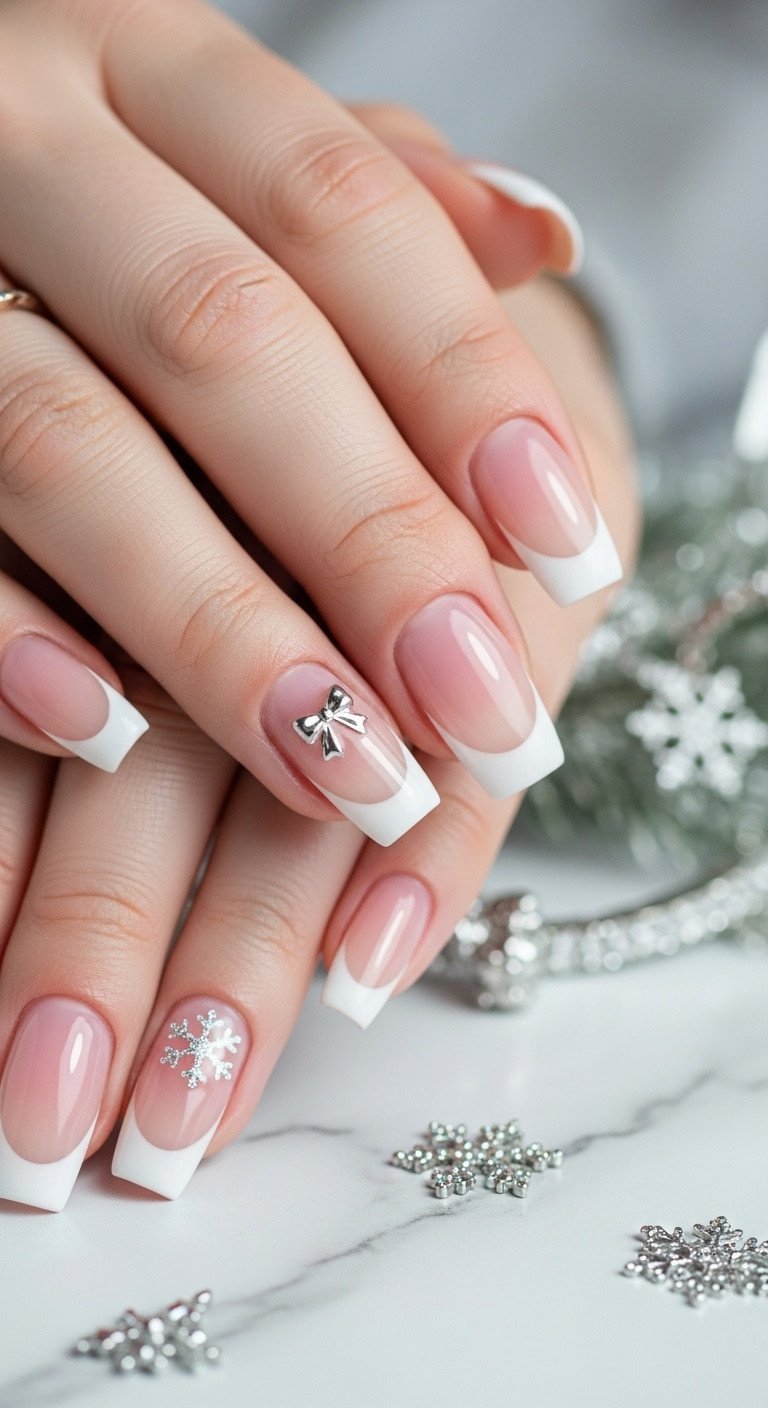
Save this classic, versatile bow design!
Combine two timelessly elegant looks with this simple yet stunning design. A classic French manicure provides a clean, polished base, while a single, perfectly placed micro bow adds a subtle festive touch. The key to keeping this look classy is the bow’s size and placement. A tiny (1mm) metallic silver or gold bow decal placed exactly at the center of the smile line on an accent nail is the most sophisticated composition. It’s a versatile look that’s perfect for the entire holiday season.
Materials Needed:
- Sheer pink or nude base gel polish
- Crisp, opaque white gel polish for the tips
- Fine liner brush (for smile line definition) or French tip stencil
- Micro metallic silver or gold bow charms/decals (1mm size)
- Charm adhesive gel (for charms) or regular top coat (for decals)
Step-by-Step Directions:
- Apply base color (sheer pink) and cure.
- Use a liner brush or stencil to apply the white tip polish, ensuring a clean, symmetrical smile line. Cure.
- Decide on placement: The classiest option is placing one micro bow exactly at the center of the smile line intersection on the accent nail.
- Apply a minute dot of charm adhesive gel (if using a charm) or regular top coat (if using a decal) at the focal point.
- Use tweezers to carefully place the micro bow, centering it perfectly over the smile line. Cure fully.
- Seal the entire nail with a high-gloss top coat, ensuring the micro bow (if a decal) is fully encapsulated.
Pro-Tip: If using a metallic charm, apply top coat around the charm base, but avoid covering the metallic finish, as some top coats can dull or cloud the metal over time.

8. Negative Space Bows for Ultra-Minimalist Elegance
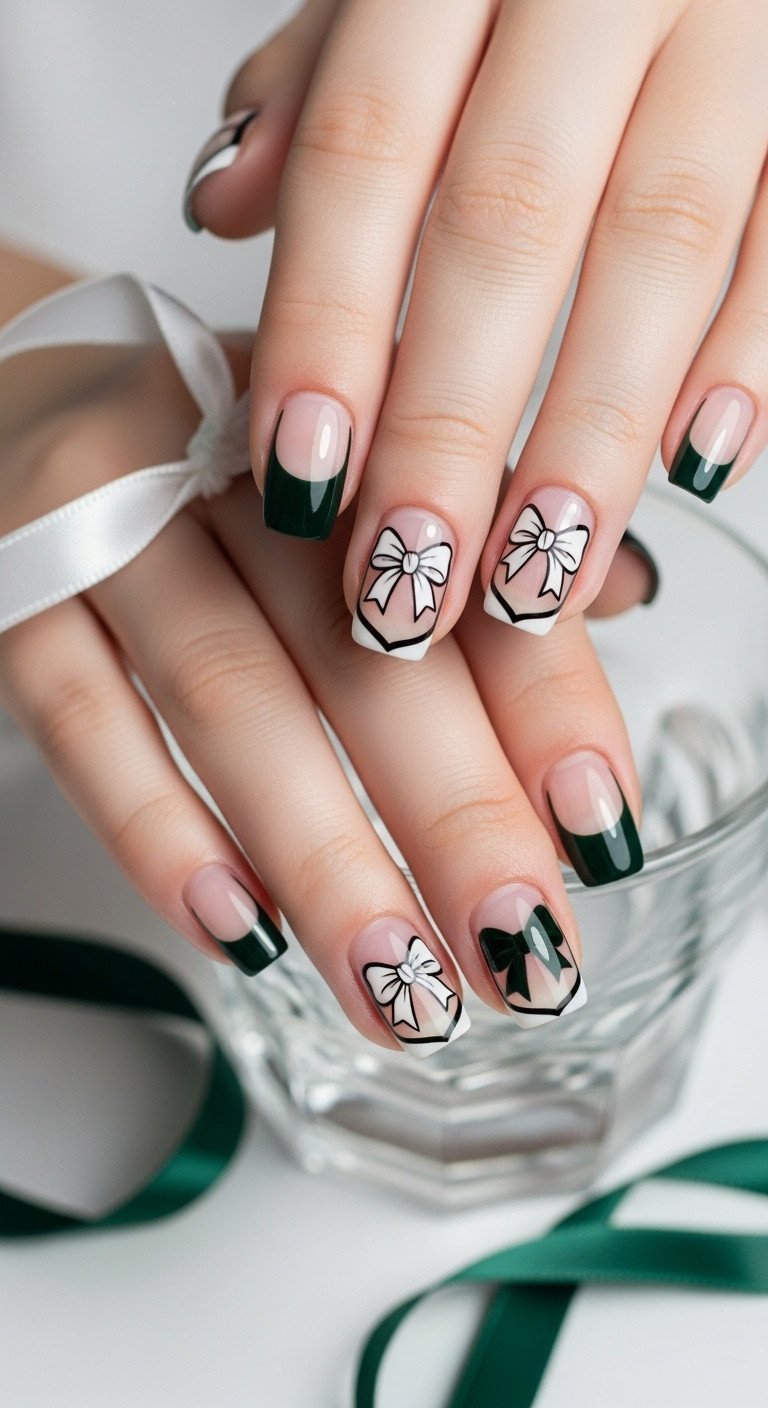
Pin this ultra-classy technique for work!
For the ultimate in sophisticated, minimalist nail art, the negative space bow is unmatched. This design uses the natural nail as its canvas, featuring only the crisp outline of a bow painted in a classic color like black or a deep forest green. The effect is modern, airy, and exceptionally chic. It’s a high-impact look that relies on precision and clean lines, making it perfect for professional settings where a festive touch is desired without any fuss or dimension.
Materials Needed:
- High-quality base coat (for natural nails)
- Black or deep forest green gel paint (thick consistency)
- Detail liner brush (ultra-thin, 5mm or less)
- Nail cleaner solution and clean-up brush
- Glossy top coat (optional: use matte top coat for a bolder contrast outline)
Step-by-Step Directions:
- Prep the natural nail, apply a layer of clear base coat, and cure fully. This seals the negative space.
- Load the detail brush with a very small amount of your chosen gel paint color.
- Paint the outline of the bow (two loops and tails) on the accent nail, ensuring the lines are thin and crisp. Use the clean-up brush to instantly sharpen any lines.
- If you wish for a partially filled bow, color in the loop borders only, leaving the center transparent.
- Flash cure the design for 10 seconds.
- Apply a smooth layer of top coat over the entire nail (including the natural nail) and cure fully.
Lesson Learned: Negative space art works best when the clear base is impeccable. Invest time in filing and buffing the natural nail perfectly before applying the base coat.

9. White Pearlized Acrylic Powder Bows

Pin this professional salon look!
For maximum durability and a custom 3D effect, sculpting bows with acrylic powder is the gold standard for nail professionals. This technique allows for incredible precision and results in a hard, matte-textured bow that won’t chip or snag. Using a white pearlized powder adds a subtle, festive shimmer that is incredibly elegant against a neutral taupe or beige base. While this method requires significant skill and practice with monomer-to-powder ratios, it yields the most permanent and professional non-bulky 3D bow.
Materials Needed:
- Clear or white pearlized acrylic powder
- Low-odor professional EMA liquid monomer
- Kolinsky sable acrylic brush (small size #6 or #8)
- Dappen dish (glass) and lint-free wipes
- High-gloss top coat (optional: apply only to base coat)
Step-by-Step Directions:
- Ensure the base and color coats are complete and sealed with a top coat.
- Dip the brush in the monomer, tap off excess, and pick up a small, wet bead of pearlized powder.
- Place the bead on a non-stick surface or directly on the nail where the knot will sit.
- Using the tip of the brush, mold and flatten the bead to create the first loop, then repeat with a second bead for the second loop, ensuring precise symmetry.
- Use a tiny bead for the center knot. If the beads look chunky, adjust your liquid-to-powder ratio (aim for a medium, non-runny consistency).
- Allow the acrylic to fully air-dry and harden (do not cure under UV/LED). Seal the base nail with a top coat, avoiding the acrylic bow itself to maintain the powder texture.
Pro-Tip: Proper ratio is crucial for a non-bulky look. Too much monomer leads to a runny, flat bow; too little leads to a dry, crumbling bow. Aim for the “snowball” consistency where the bead holds its shape without spreading.

10. Gift-Wrapped Ribbon Line Bows
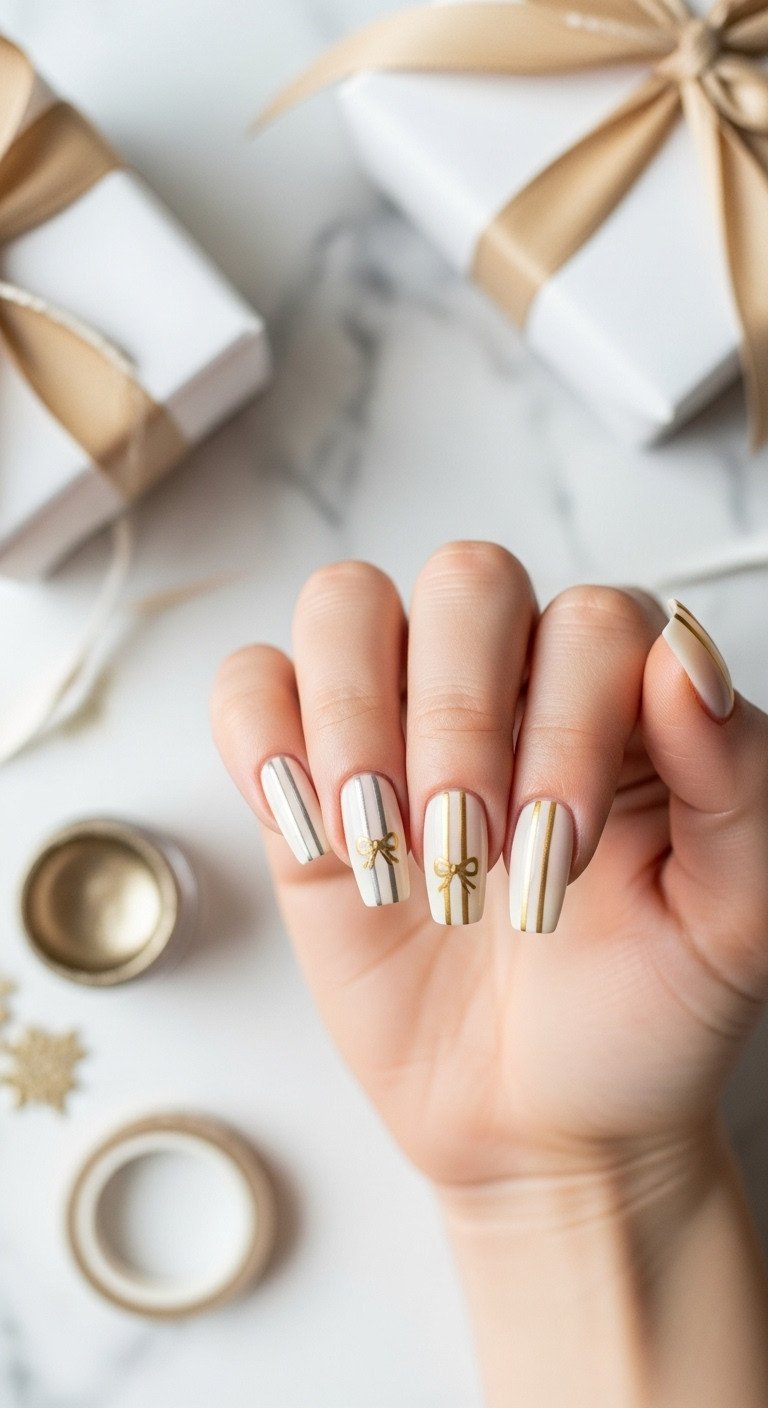
Save this unique, sophisticated ribbon hack!
This design creatively captures the “Christmas gift” theme in a structured and elegant way. By painting two thin, parallel metallic lines down the center of the nail to mimic a ribbon, and finishing with a small bow at the cuticle or tip, you create a cohesive and sophisticated motif. Using an opaque ivory or crisp white base keeps the look clean and modern. For perfectly straight lines, metallic striping tape is an excellent tool for beginners.
Materials Needed:
- Opaque white or ivory gel polish
- Metallic silver or gold striping tape (or highly pigmented metallic gel paint)
- Fine, long striping brush (if painting lines)
- Glossy non-wipe top coat
- Scissors (if using striping tape)
Step-by-Step Directions:
- Apply 2 coats of the ivory base color, curing after each, then apply a layer of top coat and cure.
- Using Striping Tape: Apply two thin parallel lines of tape down the center of the nail, running from the cuticle to the free edge. Ensure the lines are perfectly straight and flush.
- Creating the Bow: At the cuticle, use a small piece of tape to create the knot of the bow, and two small curved pieces for the loops (or use a small painted bow).
- Apply a layer of clear gel or top coat over the tape and cure (this holds the tape).
- Gently peel the tape off immediately after curing the top coat, revealing clean negative space lines, or leave the tape on for a metallic look.
- If leaving the tape on, apply a final thin layer of top coat over the entire nail to seal the edges and prevent snagging.
Lesson Learned: If using metallic striping tape, ensure your top coat fully seals the edges, or the ends of the tape will catch and lift within a day, ruining the sophisticated look.

11. Matte Finish Bows with Glossy Outlines for Texture Contrast
Pin this elegant texture hack!
One of the most effective ways to achieve a high-end look is through texture contrast. This technique pairs a rich, deep jewel-toned base (like burgundy or forest green) with a velvet matte top coat. The bow itself is then “drawn” onto the matte surface using a high-shine glossy top coat. The resulting contrast between the deep, non-reflective base and the bright, shiny bow is subtle yet incredibly impactful, creating a design that is both festive and exceptionally sophisticated.
Materials Needed:
- Deep jewel-tone gel polish (burgundy, forest green, or deep blue)
- High-quality velvet matte top coat (must cure completely matte)
- High-shine, non-wipe gel top coat
- Fine detail brush
- Nail cleaner solution
Step-by-Step Directions:
- Apply 2-3 thin coats of the color polish, curing fully between each, and ensure the base is perfect.
- Apply the matte top coat evenly over the entire nail and cure fully for 60 seconds (do not touch the surface after curing).
- Using the high-shine top coat and a fine detail brush, paint the small bow design onto the matte surface. You are essentially drawing with the glossy top coat.
- Alternatively, paint a solid, small bow using the glossy top coat, or simply outline a painted matte bow with the glossy top coat.
- Cure the glossy bow design fully for 60 seconds. The contrast between the matte base and the shiny bow creates the sophisticated effect.
Pro-Tip: The matte finish is fragile. If you accidentally get matte top coat on your skin or smudge it, clean and reapply the entire matte layer before proceeding with the glossy bow design.

Key Takeaways: Your Quick Guide to Non-Bulky Bow Elegance
| Classy Bow Essential | Action Rule | Why It Matters |
|---|---|---|
| Proportionality | Micro bows (1-3mm) are mandatory for short nails; never exceed 1/3 nail width. | Prevents the design from looking bulky or juvenile. |
| Base Color | Opt for sheer nudes, milky whites, or pale pinks (Balletcore) over opaque, vibrant bases. | Sheer bases naturally enhance the delicacy and sophistication. |
| Application | Use specialized charm adhesive gel or hard gel for 3D elements; avoid standard nail glue. | Ensures longevity and prevents charms from falling off or snagging. |
| Symmetry | Utilize the figure-eight painting method or temporary guide dots to ensure perfectly balanced loops. | Geometric precision is the hallmark of a high-end, classy finish. |
| Durability | Apply a structural coat (like BIAB) underneath 3D charms to prevent nail plate damage and stress fractures. | Protects nail health and guarantees 3-4 weeks of chip-free holiday wear. |
People Also Ask About Classy Bow Nail Longevity and Safety
How can I make my bow nail art last for the entire holiday season (4 weeks)?
To maximize longevity, start with a structural base like Builder Gel (BIAB) or hard gel, especially if applying 3D charms. Secure all dimensional elements using a specialized, rubberized charm adhesive gel and ensure a full 60-second cure under a high-wattage lamp. Weekly reapplication of a fresh top coat prevents dullness and small chips.
Are large bow nails ever considered classy, or will they always look bulky?
Large bows (over 4mm) are rarely considered classy on natural nails; they tend to look bulky and disproportionate. They can only be executed elegantly on long, enhanced nail extensions (like coffin or stiletto) provided the entire base design is otherwise minimalist, such as a clear base or negative space design.
What is the safest way to remove 3D bow charms without damaging the natural nail?
The safest removal method is filing down the bulk of the 3D element gently with a 100-grit file or e-file until it is nearly flush with the base coat. Never attempt to peel, pry, or rip the charm off, as this will tear layers from your natural nail. Once the bulk is removed, follow the standard gel polish soak-off process for the remaining structure coat.
Should I use regular polish or gel polish for detailed classy bow art?
Gel paint is superior for detailed bow art because its thicker consistency prevents running and it allows for unlimited time to perfect the lines before curing. Regular polish will dry too quickly, making precise symmetry and thin, clean lines significantly harder to achieve, often resulting in a less ‘classy’ finish.
What are the key elements of the current “Coquette” aesthetic for Christmas bow nails?
The Coquette aesthetic emphasizes delicacy, hyper-femininity, and a soft color palette. For Christmas bow nails, this translates to using sheer pinks and whites, micro pearl or diamond accents, velvet flocking, and small, delicate bows placed strategically near the cuticle line or incorporated into a micro-French tip design.
Final Thoughts
Mastering the classy Christmas bow nail is less about the motif itself and more about the precision of the execution. By adhering to the principles of proportionality, prioritizing non-bulky application techniques, and utilizing sophisticated sheer and matte finishes, you can elevate a simple holiday accessory into a high-end fashion statement. This 2026, let your nails be the epitome of holiday elegance.
Which of the 11 classy bow techniques are you excited to try first—the high-impact 3D charm or the sophisticated minimalist micro-bow? Share your plans below
Last update on 2026-01-17 / Affiliate links / Images from Amazon Product Advertising API