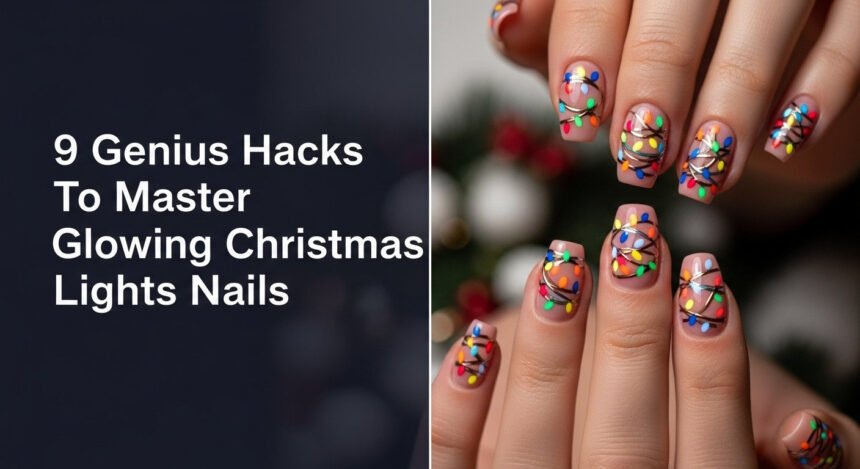
Struggling to paint those tiny, perfect Christmas lights on your nails? Wobbly wires and flat, lifeless bulbs can quickly turn a festive idea into a frustrating mess. You’ve seen the flawless, glowing designs online and wonder what secret you’re missing.
The key to glowing Christmas lights nails is a technique that layers contrasting finishes: applying a matte top coat over the entire design, then adding a tiny, targeted dot of high-shine gloss or reflective gel polish directly onto the center of each colored bulb. This simple trick creates the illusion of dimension and realistic light reflection.
Drawing from proven methodologies used by professional nail artists, this guide will walk you through nine genius hacks. You will learn the exact steps to eliminate shaky lines, create a true 3D glowing effect, and ensure your festive nail art lasts for weeks. Get ready to master this holiday look.
Are Wobbly Lines Ruining Your Christmas Lights Nails 2026?
There’s nothing more defeating than spending an hour on your holiday manicure only to have shaky, uneven wire lines spoil the final look. This is a common challenge that even experienced nail artists face, as it requires significant fine motor control. The good news is that the problem isn’t a lack of talent—it’s a lack of the right technique and foundational prep.
This guide moves beyond basic tutorials to give you nine specific, tested hacks that address the core issues of wobbly lines, smudging, and achieving that professional, glowing effect. We’ll cover everything from hand stability and polish consistency to the material science secrets behind a truly dimensional, long-lasting string lights manicure.
9 Genius Hacks To Master Flawless Glowing Christmas Lights Nails
Ready to transform your festive nail art from amateur to amazing? These nine curated hacks are based on professional standards and the principles of material science, designed to solve the most common challenges you face when creating Christmas lights nails. Whether you use gel polish or traditional nail lacquer, these techniques will help you achieve a flawless, durable, and truly glowing holiday manicure that looks like it came straight from a salon.
1. The Perfect Base Coat Protocol for 14-Day Longevity

Pin this genius hack to your ‘Flawless Manicure Tips’ board!
Before you even think about the art, a perfect foundation is non-negotiable. Proper nail prep and base coat application are what separate a 3-day manicure from one that lasts over two weeks without chipping. This protocol creates the ideal surface for adhesion and seals the edges against wear.
Products & Tools Used:
- Isopropyl Alcohol (or dedicated nail dehydrator/cleanser)
- 180 Grit Nail Buffer block
- High-quality long-lasting base coat gel or lacquer (acid-free preferred)
- Cuticle Pusher and Nippers
Application/Styling Steps:
- Prep and Dehydrate: Gently buff the nail surface with the buffer to remove shine, then wipe thoroughly with isopropyl alcohol to remove all dust and oils.
- Apply Thin Layer: Apply a single, ultra-thin layer of your base coat, ensuring you do not touch the cuticle area or surrounding skin.
- Cap the Free Edge: Lightly run the brush over the very tip of the nail (the free edge) to seal the polish layers and prevent edge chipping.
- Cure/Dry Completely: Cure the base coat fully under the lamp (30-60 seconds for gel) or allow 5 minutes air dry time for lacquer before continuing.
Pro-Tip: Always push back the cuticles before buffing and dehydrating; polish that touches skin will guarantee lifting in a matter of days.

2. The Hand-Anchoring Technique to Eliminate Wobbly Wire Lines

Save this clever organization idea!
This is the single most important physical technique for fine detail work. Wobbly lines are caused by micro-movements in your hand. By creating a stable anchor point, you eliminate these tremors and gain precise control over your detail brush.
Products & Tools Used:
- 5mm-7mm fine detail nail brush set (ensure firm, sharp tips)
- Highly pigmented opaque black polish or gel paint
- Curing lamp (if using gel)
Application/Styling Steps:
- Find Your Anchor: Before starting, rest the pinky finger of your dominant hand (the one holding the brush) firmly on the table or against a nail on the opposite hand. This provides a crucial stability point.
- Load the Brush Minimally: Dip the brush into the paint, then wipe off almost all the excess product against the container edge, using only the remaining minimal polish on the very tip.
- Draw in Segments: Instead of attempting one long, shaky line, draw the curve in 2-3 short, controlled segments, lifting your brush only slightly between each segment.
- Cure/Dry: If using gel, cure the black wire line completely (60 seconds) before adding the colored bulbs to prevent smudging or bleed.
Lesson Learned: Trying to pull the line from the tip of the brush results in wobbly lines; focus on moving your whole anchored hand/wrist, not just your fingers.

3. The Matte-Gloss Layering Secret for Realistic Glowing Light Effect

Pin this glow hack to your ‘Viral Nail Art’ board!
This is the professional secret to making your lights look genuinely illuminated. By creating a non-reflective matte background, a single tiny dot of high-gloss top coat acts as a lens, catching the light and creating a powerful illusion of a glowing 3D bulb.
Products & Tools Used:
- High-quality, truly matte top coat non-wipe gel
- Separate, highly reflective high shine top coat or builder gel
- Micro dotting tool (or clean toothpick)
- Colorful gel polish for the base bulbs (Red, Green, Yellow, Blue)
Application/Styling Steps:
- Apply Bulbs and Seal: Paint your colored light bulbs (ensure 2 thin, cured coats for opacity). Apply a standard glossy top coat over the entire nail and cure.
- Matte the Surface: Apply a single, even layer of the matte top coat over the entire nail surface, covering the colored bulbs and wire, and cure until completely matte. This removes all initial reflection.
- Create the Focus: Dip the micro dotting tool in your high-gloss clear coat (or clear reflective gel).
- Targeted Gloss Dot: Precisely place a tiny, perfect dot of the high-gloss coat directly onto the center of each colored bulb. Do not let it spread.
- Final Cure: Cure the high-gloss dots completely. The contrast between the matte base and the single glossy spot creates the powerful 3D illumination effect.
Pro-Tip: If using reflective glitter gel in Step 4, mix it with a clear, high-viscosity gel to prevent the glitter from spreading into the matte area.

4. Using Builder Gel to Create Realistic, Raised 3D Bulbs

Save this 3D texture idea for your next holiday set!
To take the realism to the next level, use a high-viscosity builder gel to create a physical, raised dome over each bulb. This gives the design a palpable texture and an incredible 3D effect that goes far beyond flat nail art.
Products & Tools Used:
- High-viscosity clear builder gel for nails (or structured gel)
- Colored gel polishes (Red, Green, Yellow)
- Tiny detail brush or micro-dotting tool
Application/Styling Steps:
- Paint Flat Bulbs: Complete the base art: cured wire line and two thin, cured coats of your colored gel polishes for the bulbs.
- Load for Volume: Dip a micro-dotting tool or detail brush into the builder gel, ensuring you have a significant, but not dripping, bead of product.
- Place the Dome: Gently touch the bead of builder gel down onto the center of a colored bulb. As the gel self-levels, it will form a small, clear dome. Do one nail at a time.
- Flash Cure Immediately: Flash cure each dome for 10-15 seconds to set the shape before moving to the next bulb. Cure all nails fully (60 seconds) once finished.
- Final Seal: Skip the final top coat over the domes, as the builder gel is already cured to its desired high-shine, 3D finish.
Pro-Tip: Builder gel is sticky! Use a non-wipe top coat before applying the builder gel domes; this prevents the 3D bulb from adhering to the sticky inhibition layer left by your color coats.

5. Controlling Polish Viscosity for Ultra-Fine Wire Lines (Lacquer & Gel)

Pin this technical tip to your ‘Advanced Nail Art’ board!
The consistency of your polish is directly related to the quality of your lines. If your lacquer is too runny, it will create thick, bleeding lines. This hack teaches you how to assess and adjust the viscosity of your polish for ultimate control.
Products & Tools Used:
- Detail brush and highly pigmented polish (lacquer or gel)
- Dedicated professional nail polish thinner (if using lacquer)
- Small mixing palette (foil or ceramic tile)
Application/Styling Steps:
- Assess Viscosity: Dip your brush; if the polish immediately runs down the bristles toward the handle (high running viscosity), it’s too thin for fine lines. If it clumps and doesn’t flow (too high viscosity), it’s too thick.
- For Lacquer: Put 1-2 drops of black lacquer onto the palette. Add 1-2 drops of nail polish thinner (NEVER acetone) and mix slightly. This increases the flow without compromising drying speed.
- For Gel: If your gel is too thick, place a drop of the gel color on the palette and let it sit for 30 seconds to allow the product to relax slightly before loading your brush.
- Wipe and Load: Use the edge of the palette to pull the excess product from the brush, leaving only a tiny, controlled bead of polish directly on the very tip of the bristles for drawing.
Pro-Tip: High-viscosity gel art paints are engineered specifically for detail work and require no thinning; they are worth the investment for the wire line alone.

6. Scaling the Design Down for Short Nails and Small Surfaces

Save this beautiful short nail inspiration!
An intricate design can quickly look cluttered and messy on a small nail. The key to success on short nails is scaling down every single element and strategically using negative space to create an elegant, minimalist version of the design.
Products & Tools Used:
- Micro dotting tool set (under 1.5mm head)
- Extra-fine detail brush (under 5mm bristles)
- High contrast base coat (white or sheer nude)
Application/Styling Steps:
- Reduce Bulb Count: Plan to paint a maximum of 3-4 bulbs per nail, running the string diagonally from one corner of the cuticle to the opposite free edge tip, utilizing negative space.
- Thin the Wire: Use the smallest amount of product on the finest detail brush possible (Hack #5) to ensure the wire line is barely visible—this provides room for the bulbs.
- Use the Micro Tool: Only use the smallest dotting tool head to apply the colored bulbs. The bulb size should be no larger than one-fifth the width of the nail plate.
- Prioritize Detail: Focus on making the line quality and the glossy bulb center (Hack #3) perfect, as the small scale amplifies any mistakes.
Pro-Tip: For very short nails, consider painting the string only on accent nails (e.g., ring finger and thumb) and leaving the rest a solid color to prevent visual clutter.

7. The Clean-Up Brush Precision Method for Razor-Sharp Lines

Save this clean-up secret for a professional finish!
Even professionals make small mistakes. A dedicated clean-up brush is your secret weapon for correcting them. This tool, dipped in acetone, allows you to “erase” imperfections, sharpen wobbly lines, and create a perfectly clean cuticle area for a flawless finish.
Products & Tools Used:
- Angled clean up brush acetone resistant (with firm, synthetic bristles)
- 100% pure acetone
- Small glass or ceramic dipping dish
Application/Styling Steps:
- Prep the Tool: Pour a small amount of 100% acetone into the dish. Dip the angled brush into the acetone, then firmly blot the excess solvent on a lint-free wipe. The brush should be damp, not dripping.
- Sharpen the Wire: Use the sharp edge of the angled brush to slowly and gently trace alongside the wobbly or thick sections of your cured/dried black wire line. The acetone will dissolve the excess polish, sharpening the line.
- Refine the Perimeter: Use the same technique to trace around the perimeter of the entire nail, ensuring no color is touching the cuticle or skin.
- Wipe and Redip: After each sharpening swipe, wipe the brush clean on a paper towel and re-dampen it with fresh acetone. Do not put a dirty brush back in the acetone dish.
Lesson Learned: This is essential for the perimeter, but if you used regular lacquer for the art, the clean-up brush will smear the line rather than sharpen it; ensure the lacquer is fully dry (10+ minutes) first.

8. The Latest Trend: Reflective Cat-Eye Powder Bulbs for Hyper-Glow

Pin this trending hyper-glow nail idea!
Want the most intense, eye-catching glow possible? Incorporate the latest nail trend: reflective cat-eye polish. This specialized gel contains magnetic pigments that, when activated with a magnet, create a concentrated line of intense shimmer that looks incredible under any light source.
Products & Tools Used:
- Clear or tinted reflective cat eye gel polish
- Mini magnet tool (typically included with the polish)
- High pigment color base polishes (Red, Green, etc.)
Application/Styling Steps:
- Prep the Area: Cure your wire line. Paint your colored bulbs, but instead of curing the final color coat, keep it wet (if using reflective gel).
- Apply Reflective Layer: Immediately dot a small amount of the reflective cat-eye polish onto the center of the wet color coat bulb.
- Activate the Glow (Optional): If using magnetic cat-eye polish, hold the small magnet directly over the bulb for 15-30 seconds. This pulls the reflective pigments to the center, creating an intense, concentrated glow line.
- Cure and Seal: Cure the reflective polish completely (60 seconds). Seal the entire design with a final, thin layer of top coat and cure again.
Pro-Tip: If you only have loose reflective powder, mix a tiny amount into a high-shine non-wipe top coat to create your own intense glow polish for dotting (use Hack #3 for best contrast).

9. Securing the Design: The Final Top Coat Seal and Edge Capping

Save this final step to prevent chipping!
The final step is just as critical as the first. A proper top coat application not only adds shine but also creates a durable, protective shield over your delicate art. Re-capping the free edge at this stage is the ultimate insurance against premature chipping.
Products & Tools Used:
- High-quality, thin non-wipe high-shine top coat gel or quick-dry lacquer top coat
- UV/LED lamp (if using gel)
Application/Styling Steps:
- Use Thin Coats: Apply the top coat thinly and evenly over the entire nail art, taking care not to drag the polish or press too hard, which could smear the design if using lacquer.
- Cap Everything: Use the brush to lightly brush the top coat over the very edge of the nail tip (the free edge). Ensure the top coat fully wraps around the tip to encapsulate all the art layers beneath it.
- Wipe Inhibition Layer (If Needed): If using a traditional top coat (not non-wipe), wipe the sticky inhibition layer that remains after curing with a cleanser (isopropyl alcohol).
- Final Cure/Dry: Ensure the final seal is fully cured (60-120 seconds for gel) or completely dried (10-15 minutes for lacquer) to harden the protective layer.
Pro-Tip: If using a regular lacquer top coat, apply a thin coat and wait 5 minutes, then apply a second, thicker coat for maximum durability and shine.

Key Takeaways: Your Quick Guide to Flawless Light Bulbs
Feeling ready to start painting? Here’s a scannable summary of the core process to keep you on track. Following these five essential steps will guarantee a professional, glowing, and long-lasting result for your festive nail art.
- The 5 Essential Steps for Glowing Christmas Lights Nails:
- Prep & Cap: Thoroughly dehydrate the nail and apply a thin base coat, ensuring you “cap the free edge” for longevity.
- Anchor the Wire: Use the hand-anchoring technique (resting your pinky) and minimally load your detail brush to achieve razor-thin wire lines.
- Layer the Bulbs: Apply 2-3 thin, opaque coats of color for the bulbs (curing/drying between each).
- Create the Glow: Apply a matte top coat over the cured art, then add a tiny, targeted dot of high-gloss or reflective gel polish to the center of each bulb.
- Final Seal: Apply a second layer of glossy top coat over the entire design, remembering to cap the free edge once more for maximum durability.
People Also Ask About Christmas Lights Nail Art
Here are answers to some of the most common questions about creating the perfect Christmas lights nail design.
What is the best color for the base coat to make the lights pop?
The base color choice should prioritize contrast and context. Traditionally, opaque white provides the highest contrast for the vibrant bulb colors. However, using a sheer nude base offers a modern, sophisticated look, while a deep green or black base effectively mimics a festive night sky, intensifying the appearance of the glow effect.
How long does it take to cure or dry the entire Christmas lights design?
The time commitment varies significantly by polish type. A full set using the gel method (base, color layers, wire, bulbs, and top coat) typically requires 5–7 minutes of total curing time under a 48W+ LED lamp. The traditional lacquer method, however, requires careful air-drying for 30–45 minutes to prevent smudging and ensure the intricate detail layers fully set.
Can I use regular acrylic paint instead of polish for the fine lines?
Yes, water-based acrylic craft paint is an excellent alternative for the fine wire line. Acrylic provides superior precision and opacity for detail work, but because it is not polish, it must be completely dry before you apply your final top coat, as it will smear easily. It requires immediate and thorough encapsulation under a durable top coat for chip resistance.
What is the proper technique for removing the design if I used gel polish?
Gel polish requires specialized removal (soak-off or filing). Do not peel the gel off, as this can severely damage the nail plate. For soak-off, gently break the top coat seal with a file, then soak cotton balls in 100% acetone, place on the nail, and wrap tightly in foil for 10-15 minutes until the gel flakes away.
Do I need a special UV/LED lamp, and are there safety precautions?
Yes, a UV or LED lamp is mandatory for gel polish, and proper use is crucial for safety. Ensure your lamp is at least 48W and meets safety standards. Critically, avoid getting uncured gel on your skin, as this can lead to contact dermatitis or chemical sensitization. Always wipe the sticky layer (inhibition layer) with alcohol if your top coat is not “non-wipe.”
Final Thoughts
Now that you have these 9 genius, professional-level hacks, the perfect glowing Christmas lights manicure is within your reach this 2026. Remember the core principles: thin coats, proper anchoring, and the matte-gloss dimension secret. Stop worrying about wobbly lines and start focusing on the festive joy of your finished, long-lasting holiday set.
Which of these 9 hacks will you be trying first for your Christmas lights manicure this July? Let us know your favorite technique in the comments below
Last update on 2026-04-27 / Affiliate links / Images from Amazon Product Advertising API