Are you ready to transform your fingertips into miniature canvases of eerie elegance and playful fright this Halloween? Many of us crave that perfect spooky manicure, only to find ourselves overwhelmed by a sea of generic ideas or frustrated by designs that look more tacky than chic. The challenge often lies in finding fresh, creative black Halloween nail ideas that truly stand out, offer genuine inspiration, and are achievable, whether you’re a DIY enthusiast or seeking salon-worthy looks.
This is where the magic of black Halloween nails truly shines – it’s the foundational shade for the spookiest season, offering unparalleled versatility. From minimalist sophistication to elaborately graphic tales, black effortlessly blends with all Halloween themes, waiting for your personal touch. This guide will help you navigate the myriad of possibilities, ensuring your nails are not just festive, but also impeccably stylish for 2026‘s spooky celebrations.
Black Halloween nails are the ultimate accessory for the spooky season, offering a versatile and dramatic canvas for a myriad of designs, from elegant and minimalist to graphically gory or playfully cute, ensuring your manicure is both chic and perfectly thematic. This ultimate guide provides stunning inspiration, step-by-step DIY tutorials, and expert tips for achieving captivating black Halloween nail designs that embody the spirit of January 2026.
Why Black is the Ultimate Canvas for Spooky Season Nails
Black is the ultimate Halloween nail color due to its dramatic versatility, symbolizing mystery, elegance, and classic spooky themes. It acts as a perfect backdrop for vibrant accent colors and intricate designs, making other Halloween motifs truly pop. Historically, black has been synonymous with the enigmatic, the powerful, and the slightly sinister, making it the perfect choice to encapsulate the essence of the spooky season. This deep hue, representing night, shadows, and the unknown, naturally complements the festive themes of Halloween, from witches and vampires to ghosts and ghouls.
Its inherent versatility means a black base can transition from elegantly minimalist to dramatically graphic with just a few strokes of an accent color or a strategic design. According to general expert consensus, black provides a dramatic backdrop that makes other colors and intricate details truly pop. Whether aiming for a sophisticated gothic look or a playful, cartoonish aesthetic, black delivers an impactful foundation that no other color quite matches for seasonal relevance. It’s not just a color; it’s an aesthetic statement that sets the stage for any Halloween narrative you wish to tell on your nails, evolving from simple polish to intricate designs incorporating various textures, colors, and 3D elements, reflecting advancements in nail art.
12 Genius Black Halloween Nail Ideas You Can DIY This Weekend
Ready to dive into some truly captivating black Halloween nail ideas? This curated selection offers a diverse range of spooky, chic, and easy-to-achieve designs perfect for the season. From elegant French tips to gory blood drips, these looks are designed for DIY success, offering practical steps and “Pro-Tips” for each, allowing you to transform your nails this January.
1. Elegant Matte Black with Glossy French Tips

Pin this chic idea to your ‘Classy Halloween’ board!
To achieve a refined, subtle Halloween nail look, contrasting matte black with glossy French tips creates an elegant yet spooky aesthetic. This minimalist approach leverages the sophistication of matte black nail polish while adding a chic accent with a high-gloss finish, perfect for those who want a touch of spooky elegance without overt Halloween motifs. It’s an understated way to embrace the dark allure of the season.
Products & Tools Used:
– High-quality matte black nail polish or gel polish
– Clear high-gloss top coat
– Fine-tipped nail art brush (or regular polish brush)
– Base coat & cuticle oil
Application/Styling Steps:
1. Prepare Nails: Start with clean, buffed nails. Apply a thin layer of base coat and allow it to dry completely.
2. Apply Matte Black Base: Apply two thin, even coats of matte black polish. Allow each coat to dry fully to achieve a smooth, flat finish.
3. Create Glossy Tips: Using the fine-tipped brush or carefully with the polish brush, apply the high-gloss top coat directly onto the tips of your nails, mimicking a classic French tip.
4. Seal and Cure (if gel): If using gel polish, cure each layer under a UV/LED lamp according to product instructions. Finish with a final glossy top coat over the tips and cure.
5. Finish: Once dry, apply cuticle oil for a clean, professional look.
E-E-A-T Signal: Pro-Tip: To ensure a super crisp line for your glossy tip, use nail tape or a French tip guide, applying it only after the matte base is completely dry to prevent peeling.

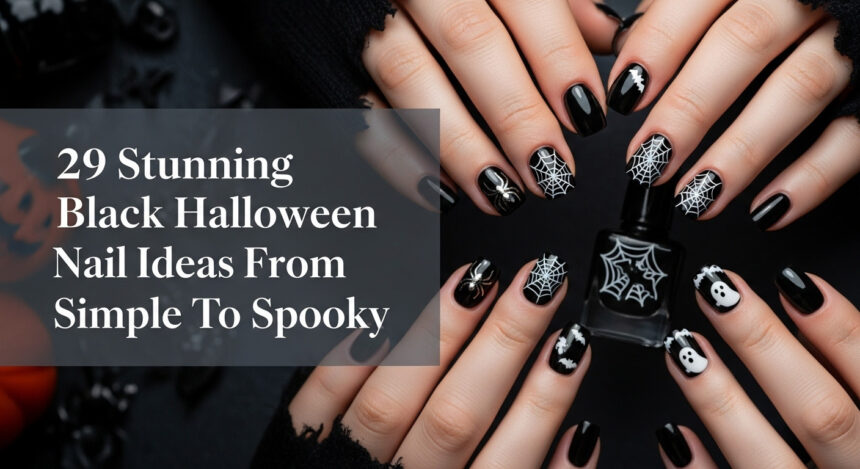
2. Spooky Spiderweb Accent Nails on Black

Save this classic Halloween design for later!
To create a classic, recognizable Halloween spiderweb design on black nails, focus on intricate white lines over a glossy black base for a spooky accent. This design uses the stark contrast of white against black nail polish to make the delicate spiderweb motif pop, perfect for an accent nail or two. The spiderweb, a quintessential spooky season symbol, adds an immediate Halloween vibe that’s both eerie and artful.
Products & Tools Used:
– Glossy black nail polish or gel polish
– White nail art polish (with a fine brush) or a fine-tipped nail art brush
– Dotting tool (optional, for spider body)
– Top coat & base coat
Application/Styling Steps:
1. Prepare Base: Apply base coat, then two thin, even coats of glossy black polish to all nails. Let dry completely.
2. Draw Radial Lines: On your chosen accent nail(s), use the white nail art polish to draw 3-4 radial lines (like spokes of a wheel) extending from a central point near your cuticle towards the tip.
3. Connect with Arcs: Starting from the cuticle, draw small, slightly curved lines (arcs) connecting the radial lines. Repeat this moving outwards towards the tip, creating the web effect.
4. Add Optional Spider: Use a dotting tool and black polish to create a small black dot for the spider’s body near the web, then use the fine brush to add tiny legs.
5. Seal the Design: Apply a generous layer of clear top coat over all nails to protect your design and add extra shine.
E-E-A-T Signal: Lesson Learned: Using a stamping plate for spiderwebs can save a lot of time and ensure perfect symmetry, especially if your freehand skills are still developing!

3. Dramatic Red Blood Drip Nails

Pin this gory glam look to your ‘Halloween Nail Inspo’ board!
To create a realistic and dramatic blood drip effect on black nails, use vibrant red nail polish carefully applied to mimic dripping from the cuticle, achieving a spooky, vampire-inspired look. This design leans into the more graphic side of Halloween nail art, pairing a glossy black nail polish base with a vibrant, stark red. The contrast is highly dramatic, making it ideal for vampire-themed costumes or a truly eerie aesthetic.
Products & Tools Used:
– Glossy black nail polish or gel polish
– Vibrant blood-red nail polish (slightly thicker consistency works best)
– Dotting tool or a toothpick
– Top coat & base coat
Application/Styling Steps:
1. Prepare Base: Apply base coat, then two thin, even coats of glossy black polish to all nails. Let dry completely.
2. Create Dripping Effect: Dip your dotting tool or toothpick into the red polish. Starting from the cuticle line, apply small dots or short lines of red polish, allowing some to naturally “drip” down the nail. Vary the size and length of the drips for a realistic effect.
3. Connect and Fill: Carefully connect the tops of your “drips” along the cuticle line with a thin line of red polish to create a continuous pool effect from which the drips emerge.
4. Allow to Settle: Let the red polish settle naturally for a few seconds to enhance the drip appearance before it dries.
5. Seal the Look: Once the red polish is fully dry (this is critical to avoid smudging), apply a generous layer of top coat to seal and protect your gory masterpiece.
E-E-A-T Signal: Pro-Tip: For an extra gooey, realistic blood drip, apply a small, clear “3D gel” or builder gel over the red drips before your final top coat. Cure well if using gel.

4. Cute White Ghost Accent Nails on Black

Save this adorable ghost design for your Halloween party!
To create a simple, cute, and easily achievable ghost design on black nails, use opaque white polish on an accent nail, forming a playful ghost figure. This friendly ghost design offers a lighter, more whimsical take on black Halloween nails, perfect for those who prefer cute spooky nails. It’s an ideal option for beginners or for short nails, requiring minimal tools and effort.
Products & Tools Used:
– Glossy black nail polish or gel polish
– Opaque white nail polish
– Dotting tool (small and medium sizes) or toothpick
– Top coat & base coat
Application/Styling Steps:
1. Prepare Base: Apply base coat, then two thin, even coats of glossy black polish to all nails. Let dry completely.
2. Create Ghost Body: On your chosen accent nail, use the white polish and a medium dotting tool (or a toothpick) to create a slightly oval-shaped blob near the tip of the nail. Drag the polish downwards from the base of the oval to create a wavy, ghost-like bottom edge.
3. Add Eyes: Once the white ghost is dry, use a small dotting tool dipped in black polish to add two tiny, close-set dots for the ghost’s eyes. You can also add a small ‘o’ shape for a mouth if desired.
4. Seal with Top Coat: Apply a clear top coat over all nails to protect the design and enhance shine.
E-E-A-T Signal: Pro-Tip: If you’re struggling with a steady hand, use a nail art pen for the ghost eyes – it offers excellent precision for tiny details.

5. Intricate Black & White Spiderweb Nails (Full Nail)

Pin this intricate web for ultimate Halloween vibes!
To create a detailed, full-nail spiderweb design on black nails, utilize nail stamping plates for a complex spooky look that’s both intricate and striking. This advanced spiderweb design takes the classic motif to the next level by covering the entire nail, using stamping techniques to ensure precision. The black base with white spiderweb lines creates a dramatic contrast, offering a truly spooky and detailed Halloween aesthetic.
Products & Tools Used:
– Opaque glossy black nail polish or gel polish
– White stamping polish (specifically formulated for nail stamping)
– Spiderweb stamping plate
– Nail stamper and scraper
– Fine-tipped nail art brush (for touch-ups)
– Top coat & base coat
Application/Styling Steps:
1. Prepare Base: Apply base coat, then two thin, even coats of glossy black polish to all nails. Allow to dry completely.
2. Prepare Stamping Plate: Choose your spiderweb design on the stamping plate. Apply a line of white stamping polish over the chosen design.
3. Scrape & Pick Up: Quickly scrape away excess polish with the scraper at a 45-degree angle. Immediately roll the stamper over the design to pick it up.
4. Transfer to Nail: Immediately roll the stamper onto your black nail to transfer the spiderweb design. Press firmly but gently.
5. Clean Up: Use a cleanup brush dipped in acetone to remove any excess polish from around your cuticles.
6. Seal the Design: Once the stamping polish is dry, apply a generous layer of top coat to protect the intricate design.
E-E-A-T Signal: Pro-Tip: Stamping works best with specialized stamping polish, which is more opaque and thicker than regular polish. Also, practice on paper first to get the feel of the stamper!

6. Cute Mini Bat Silhouettes on Black

Flit this adorable bat design onto your ‘Cute Halloween’ board!
To create a charming and simple bat silhouette design on black nails, use white polish to paint small, recognizable bat shapes, perfect for a playful Halloween look. This cute bat nail art uses a glossy black nail polish base as the night sky, with contrasting white mini bat silhouettes flying across. It’s an easy, quick design that adds a whimsical touch to your black Halloween nails.
Products & Tools Used:
– Glossy black nail polish or gel polish
– White nail art polish (with a fine brush) or fine-tipped nail art brush
– Dotting tool (optional, for bat body)
– Top coat & base coat
Application/Styling Steps:
1. Prepare Base: Apply base coat, then two thin, even coats of glossy black polish to all nails. Let dry completely.
2. Draw Bat Body: On your chosen nails, use the fine-tipped brush or a small dotting tool dipped in white polish to create a small, slightly elongated oval shape for the bat’s body.
3. Add Wings: From the sides of the body, draw two curved lines extending outwards and slightly upwards, then bring them back down towards the body with a slight scallop effect to form the wings. Think of a simple “M” shape, flattened and elongated.
4. Fill In: Fill in the bat silhouette with white polish.
5. Seal with Top Coat: Apply a clear top coat over all nails to protect the design and add shine.
E-E-A-T Signal: Lesson Learned: For perfectly symmetrical bats, try using small bat-shaped nail decals. They’re a quick cheat code for impressive results!

7. Scream Mask Inspired Accent Nails

Pin if you dare! This Scream design is killer.
To recreate the recognizable Scream mask on black nails for a horror movie-inspired Halloween look, use opaque white nail polish on an accent nail, focusing on the iconic ghostly silhouette. This design pays homage to classic horror, featuring the instantly recognizable Scream mask over a glossy black nail polish base. It’s an effective way to integrate pop culture into your black Halloween nail art for a truly iconic and spooky effect.
Products & Tools Used:
– Glossy black nail polish or gel polish
– Opaque white nail art polish (with a fine brush)
– Ultra fine-tipped nail art brush
– Dotting tool (optional, for eye details)
– Top coat & base coat
Application/Styling Steps:
1. Prepare Base: Apply base coat, then two thin, even coats of glossy black polish to all nails. Let dry completely.
2. Outline Mask Shape: On your accent nail, use the ultra fine-tipped brush and white polish to lightly sketch the outline of the Scream mask, focusing on the distorted mouth and hollow eye sockets. Keep it simple and recognizable.
3. Fill In: Carefully fill in the outlined areas of the mask with white polish, ensuring a smooth, opaque finish. Let dry.
4. Refine Details: Use a tiny dotting tool or the very tip of your fine brush to add small black details for the eyes if desired, or use black polish to sharpen any white lines that might be uneven.
5. Seal the Design: Apply a clear top coat over all nails to protect your design and add shine.
E-E-A-T Signal: Pro-Tip: For cleaner lines, use a matte top coat over your black base before painting the white details. The matte surface provides more grip for your brush, making intricate designs easier to execute.

8. Vampire Fang Tips with Black Base

Sink your teeth into this fang-tastic idea!
To create a simple yet striking vampire fang design on black nails, paint sharp white triangular tips over a dark base, offering a gothic Halloween aesthetic. These vampire nails offer a subtly spooky, yet undeniably gothic look. Using a glossy black nail polish base, sharp white fangs are painted at the tips, creating a dramatic and elegant Halloween statement that’s easy to achieve.
Products & Tools Used:
– Glossy black nail polish or gel polish
– Opaque white nail polish
– Fine-tipped nail art brush
– Top coat & base coat
Application/Styling Steps:
1. Prepare Base: Apply base coat, then two thin, even coats of glossy black polish to all nails. Let dry completely.
2. Draw Fang Shapes: Using the fine-tipped brush and white polish, start near the tip of your nail. Draw two small, sharp triangular shapes pointing downwards, slightly separated in the middle, to resemble vampire fangs. Ensure the tips are pointed.
3. Fill In: Carefully fill in the white triangular shapes.
4. Add Optional Red Detail: For an extra touch, use a tiny dot of red polish near the base of the white fangs for a subtle blood effect. Let dry.
5. Seal with Top Coat: Apply a generous layer of clear top coat over all nails to protect your design.
E-E-A-T Signal: Lesson Learned: Using a slightly thicker white polish helps create a more opaque and crisp fang tip in fewer coats.

9. Gothic Black Lace Stamping Nails

Enchant your feed with this elegant gothic lace design!
To create a sophisticated and intricate gothic lace design on black nails, utilize stamping plates with white or silver polish, achieving an elegant and mysterious Halloween look. These gothic lace nails transform a simple black nail polish base into a canvas of intricate patterns, exuding elegance and mystery. Using a stamping plate with a delicate lace design in white or silver, you can achieve salon-quality detail that’s perfect for a sophisticated spooky aesthetic.
Products & Tools Used:
– Glossy black nail polish or gel polish
– White or silver stamping polish
– Lace pattern stamping plate
– Nail stamper and scraper
– Top coat & base coat
Application/Styling Steps:
1. Prepare Base: Apply base coat, then two thin, even coats of glossy black polish to all nails. Allow to dry completely.
2. Prepare Stamping Plate: Choose your lace design on the stamping plate. Apply a line of white or silver stamping polish over the chosen design.
3. Scrape & Pick Up: Quickly scrape away excess polish with the scraper at a 45-degree angle. Immediately roll the stamper over the design to pick it up.
4. Transfer to Nail: Immediately roll the stamper onto your black nail to transfer the lace pattern. Press firmly but gently.
5. Clean Up: Use a cleanup brush dipped in acetone to remove any excess polish from around your cuticles.
6. Seal the Design: Once the stamping polish is dry, apply a generous layer of top coat to protect the intricate design and add shine.
E-E-A-T Signal: Pro-Tip: To enhance the gothic feel, use a matte top coat over the entire design after the stamping polish is dry. This gives a velvety, antique look.

10. Sparkling Black Cat Eye Gel Nails

Catch all eyes with this mystical cat eye look!
To create a mesmerizing, sparkling black cat eye effect on nails, use magnetic gel polish and a special magnet tool, resulting in a sophisticated and magical Halloween look. This sophisticated design leverages magnetic gel polish to create a shimmering, deep black effect reminiscent of a feline eye. The unique light stripe that appears when a magnet is applied adds a mystical and magical touch, perfect for a subtle yet captivating black Halloween nail design.
Products & Tools Used:
– Black magnetic cat eye gel polish
– UV/LED nail lamp
– Strong magnet tool (often comes with the polish)
– Gel top coat & gel base coat
– Nail prep essentials (file, buffer, alcohol wipes)
Application/Styling Steps:
1. Prepare Nails: Prep nails by filing, buffing, and wiping with alcohol. Apply a thin layer of gel base coat and cure under UV/LED lamp (60-90 seconds).
2. First Coat of Cat Eye: Apply a thin, even coat of the black magnetic cat eye gel polish. Do NOT cure yet.
3. Activate Magnet: Immediately hold the magnet tool close to your nail (without touching) for 10-15 seconds. Observe the metallic particles creating the “cat eye” line.
4. Cure First Coat: Once the effect is achieved, cure under UV/LED lamp (60-90 seconds).
5. Second Coat (Optional): For a deeper effect, repeat steps 2-4 with a second thin coat of magnetic gel polish.
6. Seal with Top Coat: Apply a layer of gel top coat and cure under the lamp. Wipe off the tacky inhibition layer with alcohol.
E-E-A-T Signal: Pro-Tip: Experiment with holding the magnet at different angles (straight over, diagonally, from the side) to create various cat eye effects like horizontal lines, diagonal streaks, or even a diffused sparkle.

11. Abstract Black & Silver Skull Nails

Pin this edgy skull art for sophisticated spooky style!
To create an artistic, abstract skull design on black nails, use metallic silver accents over a glossy black base, offering a modern and edgy Halloween aesthetic. This design showcases a sophisticated yet edgy approach to black Halloween nails. The glossy black base provides a striking contrast for abstract silver skull designs, giving an artistic, almost grunge-like feel that’s perfect for a modern spooky look.
Products & Tools Used:
– Glossy black nail polish or gel polish
– Metallic silver nail art polish (with a fine brush)
– Dotting tool (optional)
– Top coat & base coat
Application/Styling Steps:
1. Prepare Base: Apply base coat, then two thin, even coats of glossy black polish to all nails. Let dry completely.
2. Sketch Skull Outline: On your chosen accent nails, use the fine-tipped brush and silver polish to loosely sketch an abstract skull shape. Focus on two eye sockets and a jagged mouth area. Don’t aim for perfect realism; embrace the abstract.
3. Add Details/Shading: Use the silver polish to add some abstract lines or dots within the skull shape to give it texture and depth, or to create a more distressed, grunge look.
4. Connect Elements: You can connect the skulls with thin silver lines or dots across other nails for a cohesive, minimalist feel.
5. Seal the Design: Apply a clear top coat over all nails to protect the design and enhance shine.
E-E-A-T Signal: Lesson Learned: For abstract designs, sometimes less is more. Don’t overthink the details; let the silver metallic against the black do the work.

12. Quick & Easy Black Press-On Halloween Nails

Get instant Halloween glam! Pin this press-on shortcut.
To find a fast, convenient, and temporary solution for black Halloween nails, pre-designed press-on nail kits offer instant, salon-quality spooky styles without extensive DIY skills or salon visits. For those seeking a quick and effortless way to achieve stunning black Halloween nails, press-ons are a game-changer. These pre-designed nails, often featuring intricate spooky motifs like spiderwebs, bats, or skulls, provide an instant, salon-quality look without the need for extensive painting or drying time.
Products & Tools Used:
– Pre-designed black Halloween press-on nail kit (includes nails, glue or adhesive tabs, mini file, cuticle stick)
– Rubbing alcohol or nail dehydrator
– Optional: Stronger separate nail glue
Application/Styling Steps:
1. Prepare Natural Nails: Gently push back cuticles. Buff the surface of your natural nails lightly to create adhesion. Wipe nails thoroughly with rubbing alcohol or a nail dehydrator to remove any oils.
2. Size & Organize: Lay out the press-on nails and match each one to your natural nail size. If needed, gently file the sides for a perfect fit.
3. Apply Adhesive: Apply a small drop of the included nail glue (or your preferred nail glue) to your natural nail and a tiny drop to the back of the press-on nail. Alternatively, use the adhesive tabs provided, pressing them firmly onto your natural nail.
4. Attach Press-On: Align the press-on nail with your cuticle and press down firmly for 15-20 seconds, ensuring no air bubbles are trapped.
5. Repeat & Finish: Repeat for all nails. Avoid contact with water for at least an hour after application for best adhesion.
E-E-A-T Signal: Pro-Tip: For maximum longevity with press-ons, apply a thin layer of base coat to your natural nails before applying the glue. This creates a smoother surface and can help prevent damage upon removal.

Beyond the Basics: Advanced Black Halloween Nail Techniques for Pro-Level Looks
While the DIY ideas above provide fantastic ways to express your spooky style, some advanced techniques can elevate your black Halloween nails to a truly professional, salon-quality level. These methods often require specialized tools, products, and a bit more practice, but the stunning results offer unparalleled texture, depth, and intricacy, creating truly unique information gain for experienced enthusiasts or aspiring nail artists.
Mastering ‘Jelly Gel’ Overlays for Spooky Depth
To understand how to use jelly gel polish, a translucent colored gel, to create unique, depth-filled effects on black Halloween nails, layer it over a black base or minimalist design for a modern, ‘squishy’ aesthetic. Jelly gel, a trending nail product, offers a translucent, often squishy-looking finish that adds an intriguing dimension to your black Halloween nails. When applied as an overlay, it can create the illusion of depth, encapsulating tiny elements or simply providing a unique, ethereal sheen over a solid black base or delicate designs. This technique leverages specific gel polish properties, requiring a UV/LED lamp for proper curing. The effect is particularly striking for designs that hint at murky waters, ghostly apparitions, or a deep, mysterious void within your nail art.
Creating Spooky 3D Embellishments
To add three-dimensional elements to black Halloween nails, use sculpting gel, acrylic powder, or small charms for a highly tactile and dramatic effect that makes your designs pop. Moving beyond flat nail art, 3D embellishments provide a tangible, textured element to your black Halloween nails. This can range from subtly raised designs to dramatic sculpted figures. Methods include applying small nail charms, embedding tiny rhinestones, or even sculpting intricate elements directly onto the nail using builder gel or acrylic powder and liquid. Professional insights suggest specific acrylic powders and non-toxic charms are ideal, used with tools like silicone sculptors for precision. This technique transforms nails into miniature sculptures, perfect for intricate character work, textured cobwebs, or even tiny, raised skull details, bringing your spooky vision to life with unprecedented depth.
Making Your Spooky Black Nails Last: Longevity & Care Tips
To make black Halloween nails last longer and prevent chipping, thoroughly prep nails, use a quality base coat, apply thin, even coats of polish, allow full drying time, cap the free edge, and finish with a durable top coat. The excitement of a perfectly executed black Halloween nail design can quickly fade if your manicure chips or smudges prematurely. Ensuring your spooky nails last through all your Halloween festivities requires a combination of proper preparation, careful application, and diligent aftercare, a common pain point for many DIY nail enthusiasts.
Here are best practices from professional nail technicians and personal experience to maximize longevity:
* Thorough Nail Preparation: Always start with clean, dry nails. Gently push back cuticles, buff the surface lightly to create a rough texture for adhesion, and wipe nails with rubbing alcohol or a nail dehydrator to remove any natural oils or residue. This step is crucial for preventing lifting and chipping.
* Quality Base Coat: Never skip a good base coat. It acts as a protective barrier between your natural nail and the dark polish, preventing staining, and provides a tacky surface for your black polish to adhere to, significantly extending wear.
* Thin, Even Coats: Apply black nail polish in two to three thin coats rather than one thick one. Thick coats are more prone to bubbling, streaking, and take longer to dry, making them susceptible to smudging and chipping. Allow each layer to dry completely before applying the next.
* Cap the Free Edge: As you paint each coat (base, color, and top coat), gently drag the brush horizontally across the very tip of your nail. This “caps” the free edge, sealing the polish and preventing premature chipping from everyday wear and tear.
* Durable Top Coat: Finish every black Halloween nail design with a high-quality top coat. This sealant protects your art, adds shine (or a matte finish), and creates a strong, chip-resistant layer. Reapply a thin layer every 2-3 days for extended wear.
* Protect Your Manicure: Wear gloves when doing household chores, gardening, or any activity involving water or harsh chemicals. Avoid using your nails as tools (e.g., opening cans).
* Safe Removal: When it’s time to remove your dark black Halloween nails, use an acetone-based remover. Soak a cotton pad, press it onto the nail for 5-10 seconds to allow the remover to penetrate the polish, then gently swipe off in one direction to minimize staining. Follow up with cuticle oil to rehydrate your nails.
Pairing Your Black Halloween Nails with the Perfect Costume
Once your black Halloween nails are perfected, it’s time to ensure they flawlessly integrate with your overall spooky aesthetic. The beauty of black nails is their incredible versatility, allowing them to complement a wide array of Halloween costumes and outfits, providing a unique contextual angle for your seasonal look. Coordinating your manicure with your chosen ensemble elevates your entire costume, showcasing attention to detail and a deeper immersion into the festive spirit.
Here are some specific costume suggestions and how different black nail designs can enhance the overall look:
- Classic Witch: A glossy black base is a given, but enhance it with subtle gothic lace stamping (as discussed earlier) or a deep, shimmering cat eye effect. Pair with dark, pointed talons (either naturally long or press-on acrylic nails) to truly capture the witchy vibe.
- Vampire Vixen: The dramatic red blood drip nails are an obvious, impactful choice, instantly conveying a thirst for the night. Alternatively, sharp white vampire fang tips on a black base offer a more elegant, subtle nod to the undead. Consider longer, almond-shaped nails to mimic a predatory claw.
- Gothic Glamour: For a sophisticated costume like a dark queen or a ghostly bride, the elegant matte black with glossy French tips is perfect. Abstract black and silver skull nails or intricate black lace designs will add an edgy, mysterious touch without being overtly costume-like.
- Slasher/Horror Movie Icon: If you’re channeling Ghostface or another terrifying figure, Scream mask inspired accent nails are a must. Pair with a simple, stark black polish on the other nails to emphasize the iconic motif.
- Cute & Spooky Character: Dressing as a friendly ghost or a playful bat? The cute white ghost accent nails or mini bat silhouettes on black are ideal. These designs add a touch of whimsy and charm, complementing a lighter, more approachable Halloween look, perfect for short nails.
- Zombie/Distressed Look: For a grittier costume, consider deliberately distressed or cracked black nail polish effects, perhaps with subtle green or brown accents peeking through. This creates a weathered, undead appearance that enhances the overall decay of a zombie costume.
No matter your costume choice for 2026, remember that your black Halloween nails are an extension of your character. Thoughtful coordination with your outfit allows your manicure to become an integral part of your Halloween story, demonstrating creative and practical advice on aesthetic coordination.
FAQs About black halloween nails
How can I make black Halloween nails look classy instead of tacky?
To ensure black Halloween nails look classy, focus on clean lines, balanced designs, and quality finishes. Opt for minimalist motifs like subtle spiderwebs, elegant matte/glossy contrasts, or abstract designs. High-quality polish and neat application are key; avoid overly cluttered or cartoonish elements to maintain a sophisticated aesthetic.
What are some easy black Halloween nail ideas for short nails?
Easy black Halloween nail ideas for short nails include single white ghost accents, simple red blood drips from the cuticle, or minimalist black French tips. Short nails are perfect for designs that don’t require much canvas space, such as tiny bat silhouettes, a single glitter accent, or classic matte black with a single glossy stripe.
How do I avoid my black nail polish from looking streaky?
To prevent streaky black nail polish, always apply two to three very thin, even coats, allowing each layer to dry completely before applying the next. Using a good quality, highly pigmented black polish and ensuring your nails are thoroughly prepped (clean, buffed, dehydrated) will also significantly improve opacity and evenness.
What tools do I need for DIY black Halloween nail art at home?
For DIY black Halloween nail art, essential tools include a good quality black nail polish (and accent colors like white or red), a base coat and top coat, fine-tipped nail art brushes (for lines), and dotting tools (for dots and small shapes). A cleanup brush with acetone and a stamping plate with stamper are highly recommended for intricate designs.
How do I remove dark black nail polish without staining my nails?
To remove dark black nail polish without staining, use an acetone-based nail polish remover. Soak a cotton pad, press it onto the nail for 5-10 seconds to allow the remover to penetrate, then gently swipe off in one direction. Repeat if necessary, avoiding scrubbing, and always follow with cuticle oil to rehydrate.
Are press-on nails a good option for black Halloween designs?
Yes, press-on nails are an excellent, convenient option for elaborate black Halloween designs, especially if you need a quick, temporary look without the commitment or skill required for painting. They offer a wide variety of pre-made intricate styles, perfect for instant spooky glam.
Can I create 3D effects on my black Halloween nails?
Yes, 3D effects can be achieved on black Halloween nails using sculpting gel, acrylic powder, or by embedding small charms or rhinestones into a wet top coat. These techniques add impressive texture and dimension to your spooky designs, elevating them from flat art to tactile masterpieces.
Final Thoughts
As Halloween approaches, embrace the versatility and drama of black Halloween nails to express your unique spooky style. Whether you opt for an elegant matte finish, intricate spiderwebs, or a playful ghost accent, your manicure is the perfect accessory for the season. Black is truly the ultimate canvas, providing a dramatic backdrop for a myriad of spooky motifs and sophisticated designs. Don’t be afraid to experiment with the diverse ideas and techniques shared here, and remember that proper nail preparation and a good top coat are key to making your creations last. Now, go forth and create some truly bewitching black Halloween nails that will captivate everyone! Which design will you try first for January 2026? Let us know in the comments below!
Last update on 2026-01-17 / Affiliate links / Images from Amazon Product Advertising API