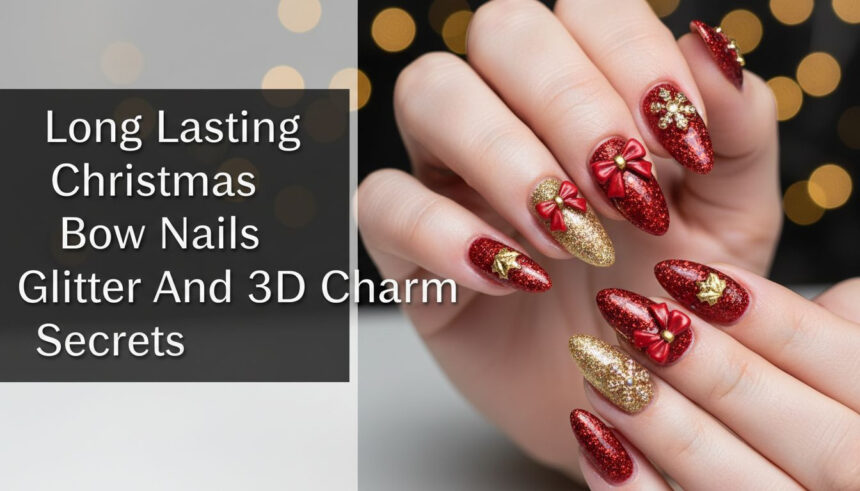
Struggling to keep your festive nail art looking perfect? You spend hours on a stunning Christmas bow design, only for a 3D charm to snag and pop off, or for that beautiful glitter to turn rough and start peeling within days. It’s a frustrating cycle that makes DIY holiday manicures feel impossible.
Long lasting Christmas bow nails require three critical components: proper nail plate dehydration, structural builder gel support for 3D elements, and complete glitter encapsulation under a durable topcoat. This isn’t just about pretty polish; it’s about the application science that separates a two-day look from a two-week masterpiece.
Leveraging tested frameworks and professional application standards, this guide reveals the secrets to creating durable, salon-quality Christmas bow nail designs at home. You’ll discover the exact techniques and materials needed to ensure your festive manicure lasts through every holiday party. Prepare to create stunning, long-lasting holiday nails with confidence.
Are Your Christmas Bow Nails Falling Off? The Durability Problem Solved
There’s nothing more disappointing than a beautiful holiday manicure failing you halfway through the season. You’ve likely experienced the main culprits: a gorgeous 3D bow charm catching on a sweater and falling off, or a high-sparkle glitter nail feeling rough and peeling at the edges. This isn’t a failure of your creativity, but a common problem rooted in application technique. Most online tutorials focus on the final look but completely miss the structural science needed for longevity.
Based on professional standards, this guide solves that problem. We’re moving beyond simple inspiration to give you the technical secrets for durable, long-lasting bow nail art that can withstand the realities of the holiday season. From the critical foundation of nail prep to the chemistry of securing heavy charms, we will cover the verified methods that ensure your festive mani lasts for 2+ weeks, damage-free.
9 Expert Secrets for Long Lasting Christmas Bow Nails Glitter & 3D Charms
Ready to create a festive manicure that’s both beautiful and built to last? This is your ultimate guide, covering nine expert-verified secrets for achieving stunning Christmas bow nails. We’ll walk through everything from beginner-friendly 2D painting tricks to advanced 3D sculpting and the non-negotiable science of glitter encapsulation. Each method is grounded in professional standards to give you salon-quality results that last through every holiday event.
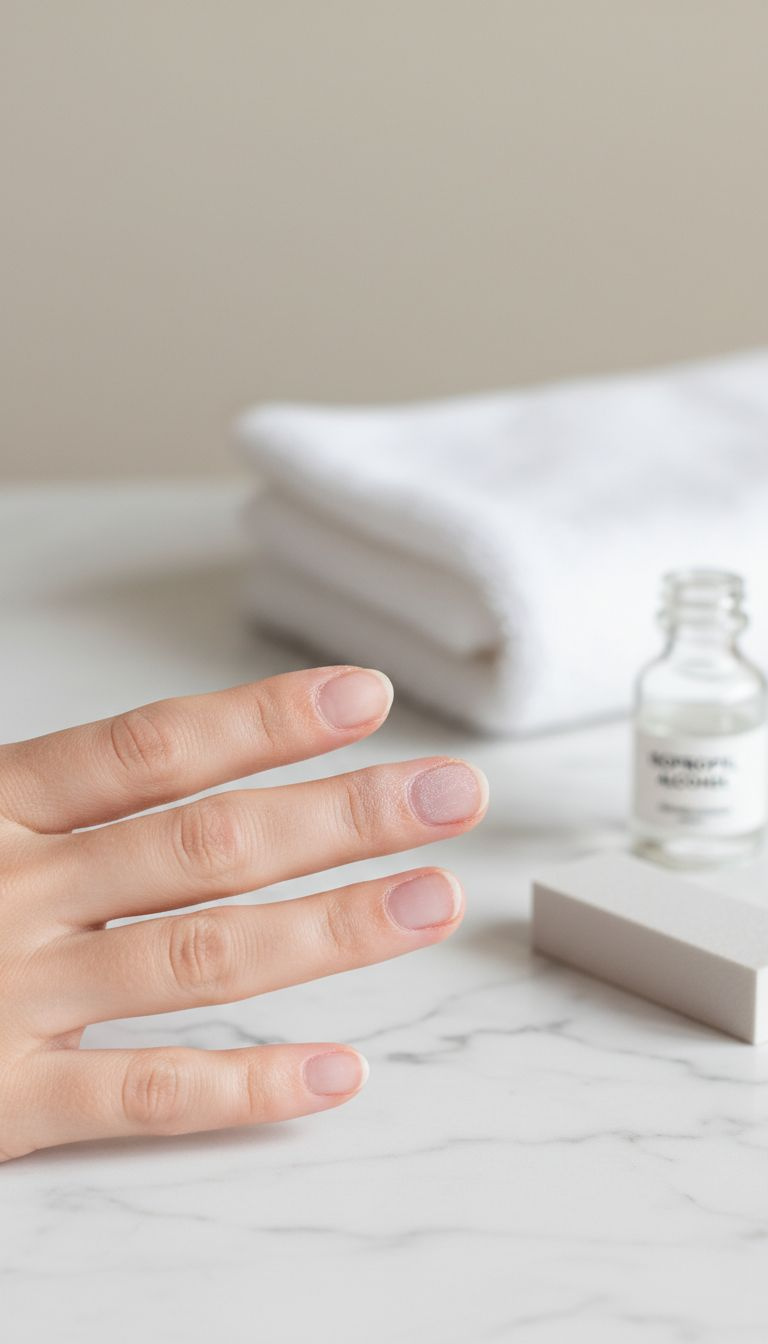
1. The Critical Foundation: Prepping Your Nail Plate for 3D Adhesion
Pin this genius hack to your ‘Long Lasting Mani’ board!
The most beautiful nail art will fail if the foundation isn’t perfect. Before you even think about polish or charms, proper nail preparation is the single most important step for ensuring longevity. This process removes surface oils and moisture, creating the ideal canvas for maximum adhesion and preventing premature lifting.
Products & Tools Used:
- Fine Grit Buffer Block (180/240 grit)
- Professional Cuticle Pusher (metal or orange wood stick)
- Specialized Nail Dehydrator (or 99% isopropyl alcohol)
- Lint-Free Wipes
- Quality Base Coat (specific product recommended for gel or lacquer)
Application/Styling Steps:
- Shape the Nail: Use a fine file to shape the nail (almond or oval recommended for this look).
- Gentle Cuticle Work: Apply cuticle remover and gently push back the skin using a specialized tool, being careful not to cut.
- Light Buffing: Lightly buff the entire nail surface with a fine buffer block to remove the surface shine and create optimal grip.
- Dehydrate the Plate: Saturate a lint-free wipe with the dehydrator/alcohol and thoroughly scrub the nail surface to remove all oils.
- Apply Base Coat: Apply a very thin, scrubbed-in layer of base coat, ensuring it cures fully (if gel) before proceeding.
Pro-Tip: Never skip the dehydration step—oils and moisture are the number one cause of lifting and adhesion failure, especially with structural gels used for charms.

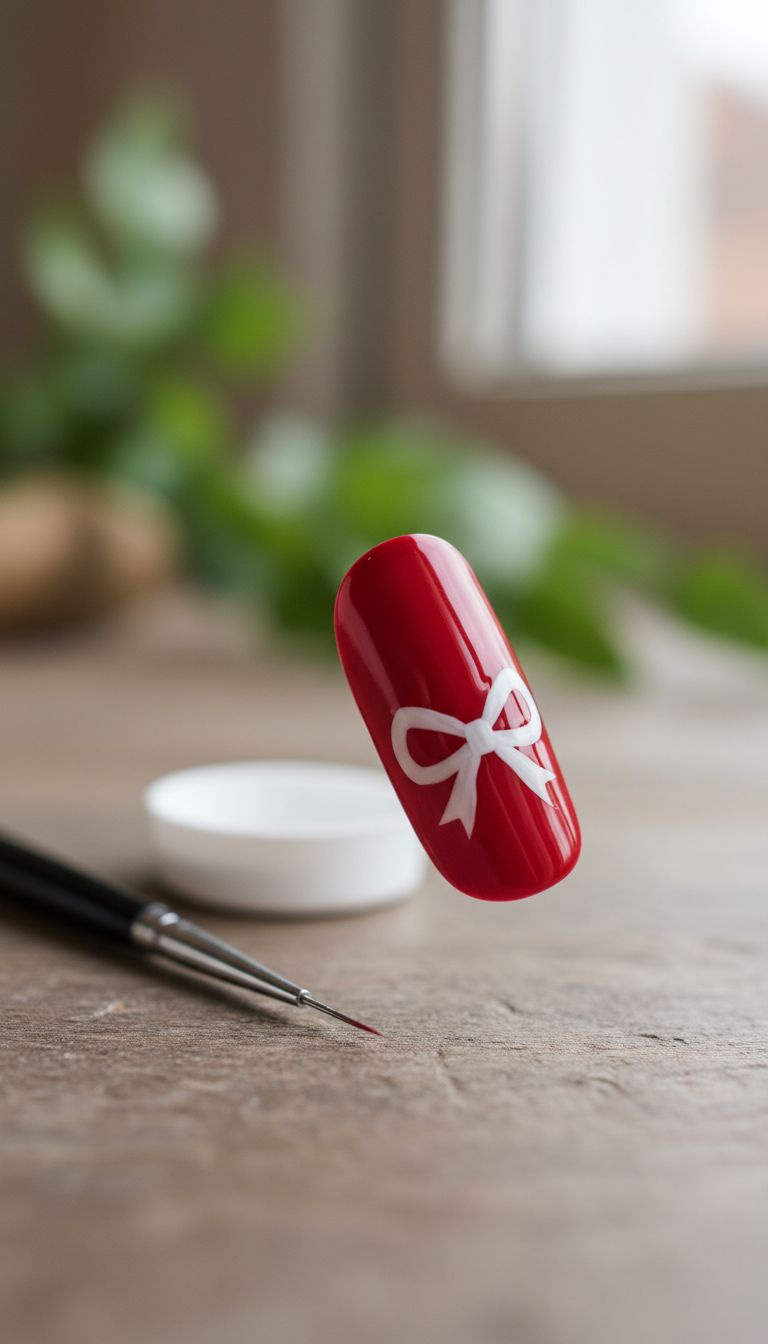
2. Painting Symmetrical 2D Bows Using the Dotting Tool Trick
Save this clever organization idea!
The biggest challenge with hand-painted bows is achieving perfect symmetry. This simple trick uses a dotting tool to map out the bow’s structure before you even pick up your striping brush, guaranteeing a balanced and professional-looking ribbon effect every time.
Products & Tools Used:
- Fine-Tipped Striping Brush (minimum 5mm bristles)
- Dotting Tool (smallest size recommended)
- Pigmented Art Polish (White or Gold for contrast)
- Base Color Polish (Cured red or nude gel recommended)
Application/Styling Steps:
- Base Prep: Apply and cure your base and background color (e.g., solid red glitter). Ensure the surface is tacky or use a matte topcoat.
- Mark the Center: Use the dotting tool to place a small dot for the center knot of the bow exactly where you want the art.
- Mark the Loops: Place two small dots, equidistant from the center dot, to mark the top corners of the bow loops. This sets the height and width.
- Connect the Dots: Dip your striping brush in art polish and, starting from the corner dots, draw curved lines inward to the center dot, forming the two symmetrical loops.
- Define the Tails: Use the striping brush to draw two small, angled V-shapes extending outward from the center dot to form the ribbon tails.
- Seal: Carefully seal the finished art with a thin, flexible topcoat, avoiding flooding the edges.
Pro-Tip: If using gel polish, flash cure for 10 seconds immediately after painting step 4 to lock the shape in before moving to the tails. This prevents the polish from running and losing symmetry.

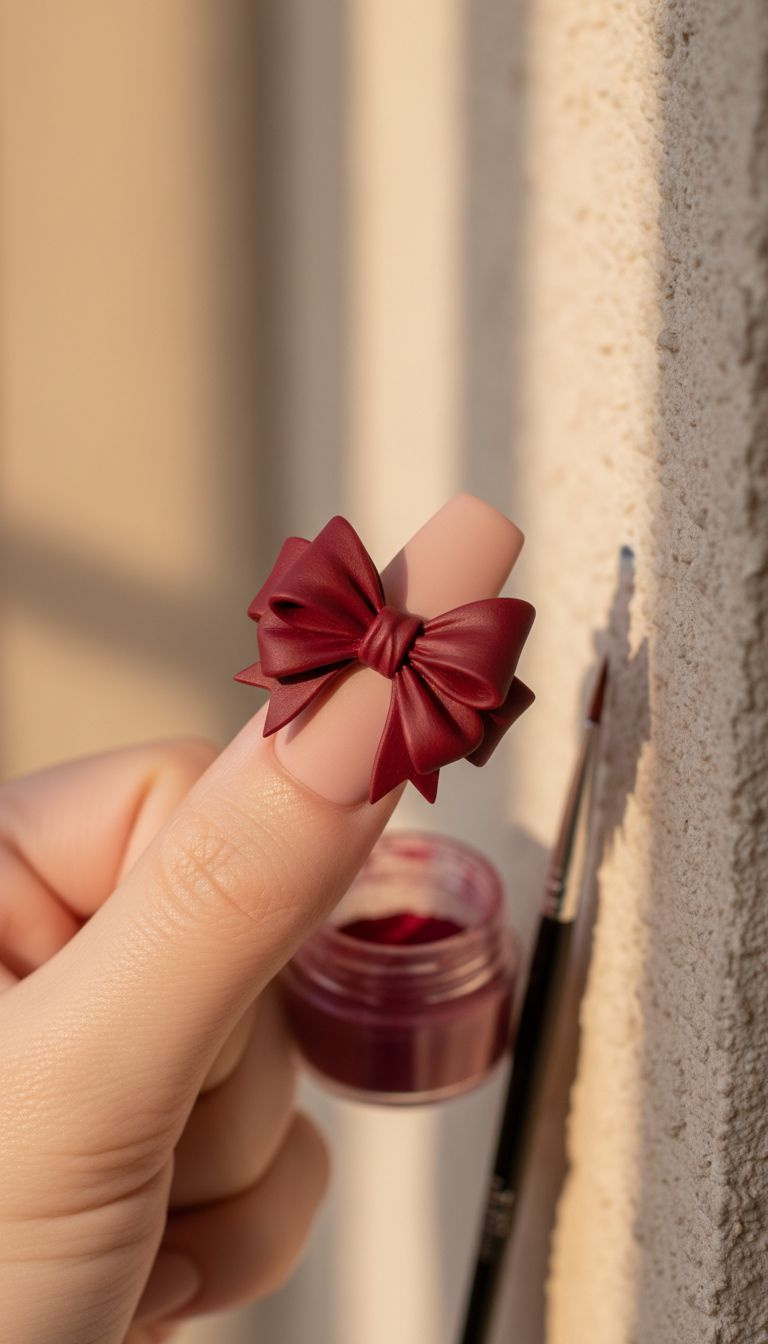
3. Sculpting a Dimensional 3D Acrylic Bow from Scratch (The Gift Bow Look)
Pin this amazing 3D tutorial to your ‘Advanced Nail Art’ board!
For a truly high-impact, dimensional “gift bow” look, sculpting it yourself with acrylic is the ultimate technique. This method gives you complete control over the size and shape, creating a lightweight yet incredibly durable 3D element that is perfectly customized to your nail.
Products & Tools Used:
- Colored Acrylic Powder (highly pigmented red or white)
- High-Quality Monomer Liquid
- Small, Pointed Acrylic Brush (#2 or #4)
- Dappen Dish
- Nail Prep (dehydrator/primer)
Application/Styling Steps:
- Prep & Prime: Apply dehydrator and a non-acid primer to the area where the bow will sit (usually the accent nail).
- Create the Loop Bead: Dip the brush in monomer, wick off excess, and pick up a small, wet bead of colored powder. Place the bead and gently manipulate it into a thick, elongated teardrop shape on the nail.
- Shape the Loop: Use the tip of the brush to gently press down the center of the teardrop and fold the sides inward to form the first open loop of the bow.
- Repeat: Repeat steps 2 and 3 for the second loop, ensuring it is mirrored and symmetrical to the first.
- Create the Knot: Use a small, firm bead to form the tight center knot, blending the edges where it meets the two loops.
- Curing: Allow the acrylic to fully air-cure (harden) completely—this usually takes 5-10 minutes, depending on the environment. Do NOT apply topcoat until fully cured.
Pro-Tip: Controlling the powder-to-monomer ratio is key. Aim for a medium, pliable bead—too wet and it will run; too dry and it will be crumbly and hard to shape. Practice on a nail tip first.

4. The Structural Secret: Securing Heavy 3D Charms with Builder Gel
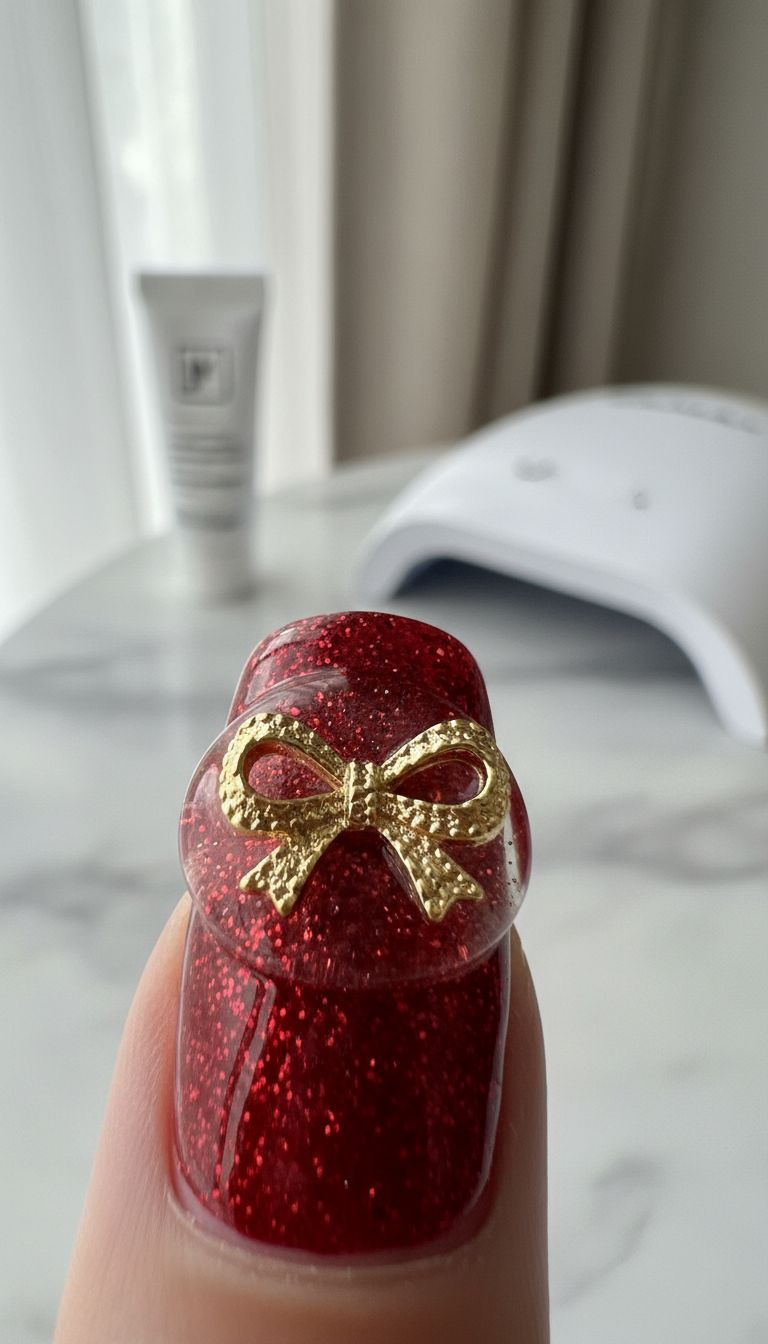
Pin this longevity secret now!
The number one reason 3D charms fall off is a lack of structural support. Standard nail glue isn’t strong enough. The professional secret is using a thick, clear structural gel, like Builder in a Bottle (BIAB), to create a rock-solid foundation that mechanically locks the charm to the nail for weeks of wear.
Products & Tools Used:
- High-Quality 3D Charm (Metal or Resin Bow)
- Clear, Thick Structural/Sculpting Gel (BIAB recommended for flexibility)
- Strong UV/LED Curing Lamp (at least 48W)
- Dotting Tool or Wax Picker for Placement
Application/Styling Steps:
- Nail Foundation: Ensure your base color and glitter are cured and sealed with a thin topcoat, but do NOT wipe off the tacky layer yet.
- Apply Structural Gel: Apply a generous bead of structural gel (like Builder Gel or a strong gem adhesive) exactly where the charm will sit. The bead should be thick enough to fully support the charm’s structure.
- Press & Set: Using a dotting tool or wax picker, firmly press the back of the 3D charm into the gel. Adjust placement quickly.
- Flash Cure: Cure the nail in the UV/LED lamp for a brief flash cure (10-15 seconds). This holds the charm in place without fully hardening the entire base.
- Seal Edges: Use a detail brush to meticulously bring the structural gel up and around the base edges of the charm without covering the intricate details of the bow.
- Full Cure: Cure the nail for the full duration (usually 60 seconds) to ensure the structural gel is rock-hard and the charm is permanently adhered.
Pro-Tip: If your charm has a concave back, fill the cavity with structural gel before placing it on the nail to eliminate air pockets, ensuring a stronger, more secure bond.

5. The Glitter Secret: Perfect Encapsulation for Smooth, Long-Lasting Texture
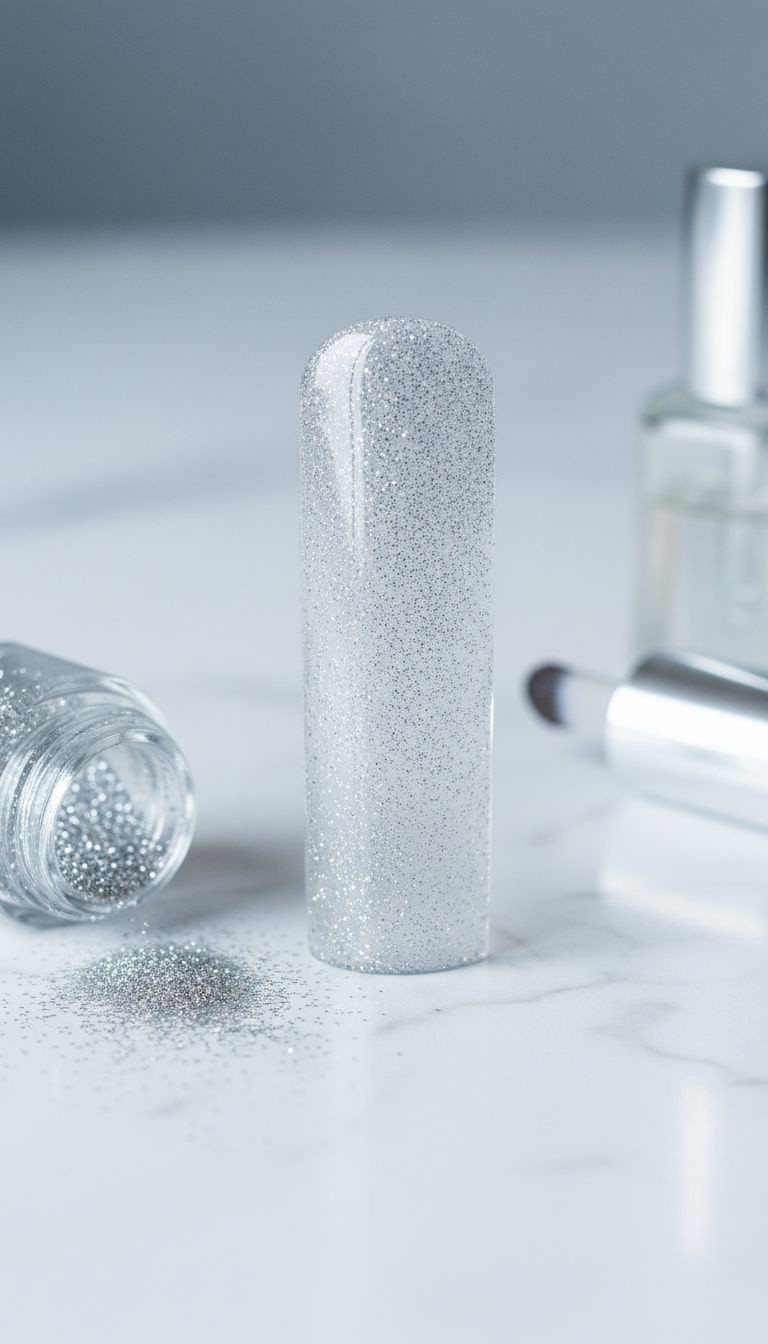
Pin this seamless glitter tutorial!
A glitter manicure that feels rough or peels at the edges is a sign of improper sealing. The key to a smooth, glass-like finish is encapsulation—the process of fully submerging the glitter particles between layers of clear gel or topcoat so they are locked in, creating a durable and perfectly smooth surface.
Products & Tools Used:
- Loose Cosmetic-Grade Fine or Chunky Glitter
- Clear Polish or Builder Gel (thick consistency)
- High-Quality No-Wipe Topcoat
- Small Fluffy Brush (for removing excess)
Application/Styling Steps:
- Glitter Layer: Apply a clear polish or a layer of clear gel (do not cure yet). Sprinkle or gently press the loose glitter onto the entire tacky surface.
- Remove Excess: Cure the glitter layer (if using gel). Use the fluffy brush to lightly dust away all excess, unattached glitter particles from the nail surface and cuticle area.
- First Encapsulation Layer: Apply a medium-thick layer of clear polish or thin builder gel (not topcoat yet). This layer acts as the initial seal. Cure completely (if gel).
- Leveling & Buffing (Optional but Recommended): If the chunky glitter creates high peaks, lightly buff the surface with a fine file (240 grit) to smooth out the texture. Wipe clean.
- Final Seal: Apply a generous, self-leveling layer of high-gloss no-wipe topcoat. Ensure the topcoat is applied edge-to-edge, fully submerging all glitter particles for a glass-like finish.
- Final Cure: Cure the final topcoat layer thoroughly (usually 60-120 seconds, depending on the lamp).
Pro-Tip: NEVER use craft glitter. It contains metal shards that can damage the nail bed and surrounding skin. Always verify your glitter is cosmetic grade.

6. Mastering the Delicate Coquette Micro-Bow Look
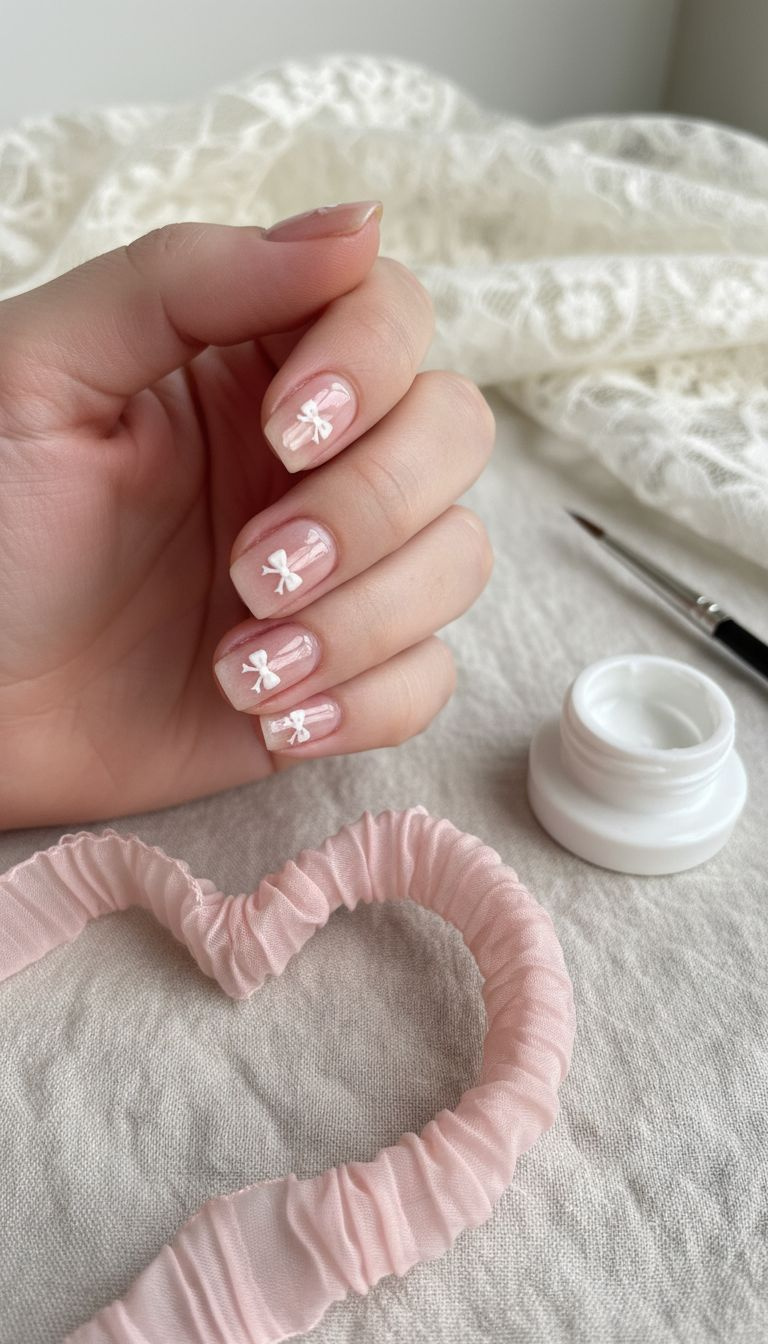
Pin this elegant micro-bow trend!
The Coquette aesthetic has brought the delicate, feminine micro-bow to the forefront of nail art trends. This look trades bold, festive colors for sheer pinks and milky whites, focusing on precision and subtlety. It’s the perfect way to wear the bow trend in a sophisticated, modern style.
Products & Tools Used:
- Sheer Pink or Milky White Gel Polish Base (BIAB/Builder Gel optional)
- Highly Pigmented White or Cream Art Gel
- Ultra-Fine Detail Brush (3mm or less bristles)
- High-Gloss Topcoat
Application/Styling Steps:
- Base Application: Apply 1-2 thin coats of the sheer pink or milky white base, curing fully.
- Prepare Art Gel: Place a small dot of the art gel on a palette or foil. Ensure your detail brush is clean and finely tipped.
- Create the Loops: Dip the tip of the brush and quickly draw two tiny, mirrored triangles (the loops) near the cuticle area. These should be incredibly small—less than 1mm wide.
- Define the Knot: Place a tiny dot between the two loops to form the knot.
- Thin Tails: Draw two small, thin lines extending from the knot to represent the ribbon tails.
- Final Seal: Cure the art layer. Apply the final glossy topcoat, focusing on maintaining the delicate look without flooding the cuticle.
Pro-Tip: For the ultimate Coquette look, substitute the white art gel with a metallic gold or silver chrome powder mixed with a drop of topcoat for a subtle shimmer outline.

7. Creating the High-Impact Festive Red Glitter Ombré Base

Pin this amazing high-sparkle look!
A glitter ombré provides a stunning, high-sparkle base for any bow charm or painted art. The key to avoiding a patchy, unprofessional finish is to use a makeup sponge for a seamless gradient. This technique allows you to build up the glitter density at the tip and feather it out perfectly.
Products & Tools Used:
- Deep Red Gel Polish
- Loose Chunky or Fine Gold/Silver Reflective Glitter
- Clear Polish or Clear Builder Gel
- Makeup Sponge (small, wedge type)
- Fluffy Dusting Brush
Application/Styling Steps:
- Base Coat: Apply and cure 2-3 thin layers of the deep red base color.
- Glitter Prep: Dab a small amount of clear polish/gel onto the edge of the makeup sponge. Dip the sponge into the loose glitter.
- Sponge Application: Gently press the sponge onto the free edge (tip) of the nail, pressing lightly.
- Feathering: Continue dabbing lightly, moving less glitter further down the nail towards the center, creating a feathered, soft transition (ombré).
- Cure and Dust: Cure the glitter layer. Use the fluffy brush to meticulously dust off all loose particles from the nail surface and surrounding skin.
- Encapsulate: Proceed directly to the full encapsulation process (see H3: 5) using structural gel or two layers of topcoat to ensure maximum smoothness and durability.
Pro-Tip: Using a clear builder gel for the base layer instead of clear polish gives the glitter deeper dimension and helps secure the chunky particles better before the final topcoat seal.

8. The Low-Commitment Hack: Optimizing Press-On Bow Nails for a Week of Wear

Pin this quick Christmas solution!
Need a gorgeous festive look in minutes? High-quality press-on nails are the perfect solution for a temporary but professional-looking manicure. The secret to making them last through a week of holiday events lies in meticulous preparation of your natural nail.
Products & Tools Used:
- High-Quality Pre-Designed Press-On Bow Nail Kit
- Strong Liquid Nail Glue
- Nail Dehydrator/Rubbing Alcohol
- Cuticle Pusher
Application/Styling Steps:
- Match Sizes: Lay out the press-ons and size them accurately to your natural nails, ensuring the width is perfect (never use a nail wider than your own).
- Natural Nail Prep: Complete the critical prep steps (H3: 1)—file, push back cuticles, light buffing, and thoroughly dehydrate the plate with alcohol.
- Glue Application: Apply a thin layer of liquid nail glue to both the back of the press-on and the natural nail (this “double-gluing” technique maximizes longevity).
- Application: Starting slightly beneath the cuticle line, press the false nail down at a 45-degree angle, then rock and hold firmly for 30 seconds to set the glue.
- Avoid Water: Do not submerge your hands in water for at least 2 hours after application, allowing the glue to fully cure.
Pro-Tip: If you know your event is only one night, use the adhesive tabs included in the kit instead of liquid glue. They are easier to remove and prevent damage.

9. Safe and Gentle Removal: Protecting Your Natural Nails from Glitter Gel Damage
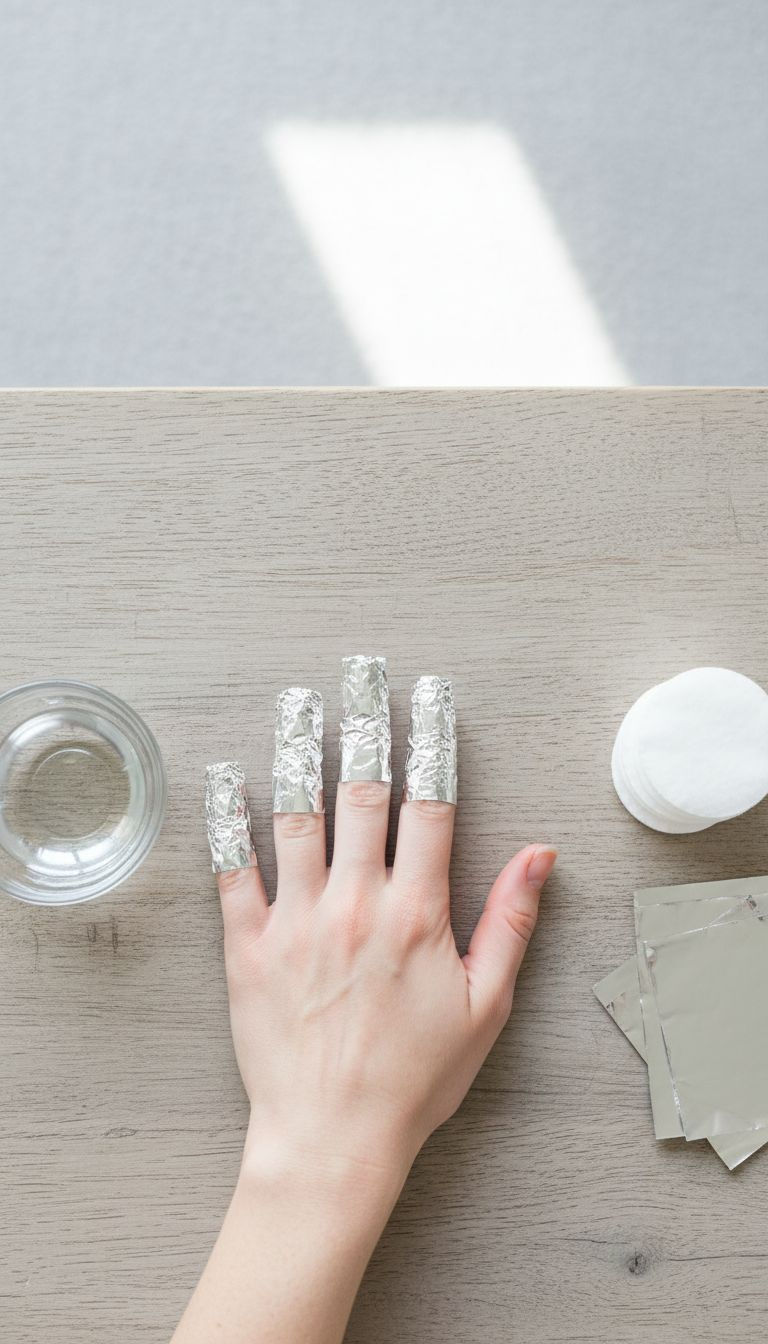
Pin this safe removal guide!
How you remove your manicure is just as important as how you apply it. Aggressively filing or peeling off glitter gel and 3D charms can cause serious damage to your natural nail plate. The professional standard is a gentle soak-off method that dissolves the product without harming the nail beneath.
Products & Tools Used:
- Coarse Grit Nail File (100/180 grit)
- 100% Pure Acetone (MANDATORY for gel/glitter)
- Cotton Balls or Squares
- Aluminum Foil Squares
- Orange Wood Stick or Metal Scraper
- Cuticle Oil
Application/Styling Steps:
- File Off Top Layers: Using the coarse file, gently file away the glossy topcoat and the first layer of encapsulation, stopping when you hit the glitter or charm adhesive. Do NOT file your natural nail.
- Prep the Foil: Soak small cotton balls in 100% acetone. Place one soaked cotton ball on the filed nail surface.
- Wrap Securely: Wrap a small square of aluminum foil tightly around the fingertip and cotton ball, creating a seal to trap the heat and acetone (like a tiny oven).
- Soak Time: Allow the nails to soak for 10-15 minutes. The foil wrap prevents the acetone from evaporating.
- Gentle Scrape: Unwrap the foil. Use the orange wood stick to gently push off the now-softened gel and glitter residue. If it resists, repeat the soak for 5 more minutes.
- Aftercare: Once clean, wash hands, gently buff any remaining residue, and generously apply cuticle oil to rehydrate the skin and nail plate.
Pro-Tip: Never peel, rip, or aggressively file off gel or acrylic enhancements. This strips layers of your natural nail plate, leading to painful thinning and permanent damage.

Key Takeaways: Your Quick Guide to Long-Lasting Holiday Nails
- Structural Foundation is Key: Always use a dehydrator on the nail plate before applying any art. For heavy 3D charms, a structural gel (like Builder Gel or BIAB) is mandatory for long-term wear.
- Master the Two Sides of Bows: Choose between the low-commitment symmetry of 2D painted bows (using the dotting tool trick) or the lightweight durability of 3D sculpted acrylic bows for maximum dimension.
- Glitter Must be Encapsulated: To prevent a rough texture and peeling, ensure loose glitter is fully saturated and sealed beneath two thin, cured layers of high-gloss topcoat.
- Use Cosmetic Grade Only: Avoid using craft glitter at all costs, as it poses health risks. Opt for high-quality, cosmetic-grade glitter for safety and superior sparkle intensity.
- Prioritize Safe Removal: Never peel off gel or acrylic. File off the top layer and use an acetone wrap soak, following up with generous cuticle oil to protect the natural nail integrity.
People Also Ask About Christmas Bow Nails
What is the easiest way to get symmetrical Christmas bows on my nails?
The easiest and quickest way to ensure symmetrical bows is to use a decal or stamp. If you prefer painting, the best method involves using a dotting tool to first mark the center knot and the two top corners of the bow loops, then connecting these three dots with a fine striping brush to guarantee evenness and balance.
Can I use normal nail polish over Builder Gel for my bow design?
Yes, you can use regular nail polish over cured Builder Gel, especially if you intend to add delicate 2D painted art. The Builder Gel (or BIAB) serves as the durable structural base. Ensure the Builder Gel is fully cured and clean before applying polish, and always seal the polish art with a final high-gloss topcoat for protection.
Why do my 3D nail charms keep falling off, even with nail glue?
Standard nail glue lacks the structural rigidity needed to secure heavy 3D charms long-term. Charms typically fall off due to leverage and friction. The professional solution is to use a specialized, thick structural gel (such as sculpting gel or gem adhesive), which is cured under a UV lamp to create a rock-hard, non-flexible foundation that fully encases the base of the charm.
What is the difference between Coquette and Balletcore bow nail art?
Both aesthetics are hyper-feminine and use bows, but they differ in color and scale. Balletcore focuses exclusively on sheer, milky, delicate colors (pinks and whites) with very thin ribbon details. Coquette is broader, incorporating small bows in slightly bolder holiday colors (like red or gold) but still maintaining a small, delicate scale for a sophisticated, trendy look.
How can I prevent my chunky glitter manicure from feeling rough?
Roughness occurs when glitter particles stick up above the topcoat layer. The solution is rigorous encapsulation. After applying the glitter, apply two separate, thin layers of clear structural or topcoat, curing after each. The dual layers ensure the glitter is fully submerged and the surface is perfectly smooth and glass-like, maximizing durability.
Final Thoughts
You now possess the insider knowledge—the technical secrets—to ensure your Christmas Bow Nails with glitter and 3D charms are not only stunningly festive but structurally sound enough to last for weeks, right through New Year’s 2026. By prioritizing preparation, using structural materials like builder gel for your 3D additions, and mastering the art of glitter encapsulation, you’ve moved beyond amateur attempts to professional-grade longevity. Which of the 9 secrets are you excited to try for your next festive manicure this January? Let us know in the comments
Last update on 2026-01-17 / Affiliate links / Images from Amazon Product Advertising API