Dreaming of a nail look that perfectly captures your rugged charm and love for country flair? Finding truly unique and on-trend designs that embody the spirit of the Western lifestyle can be a challenge.
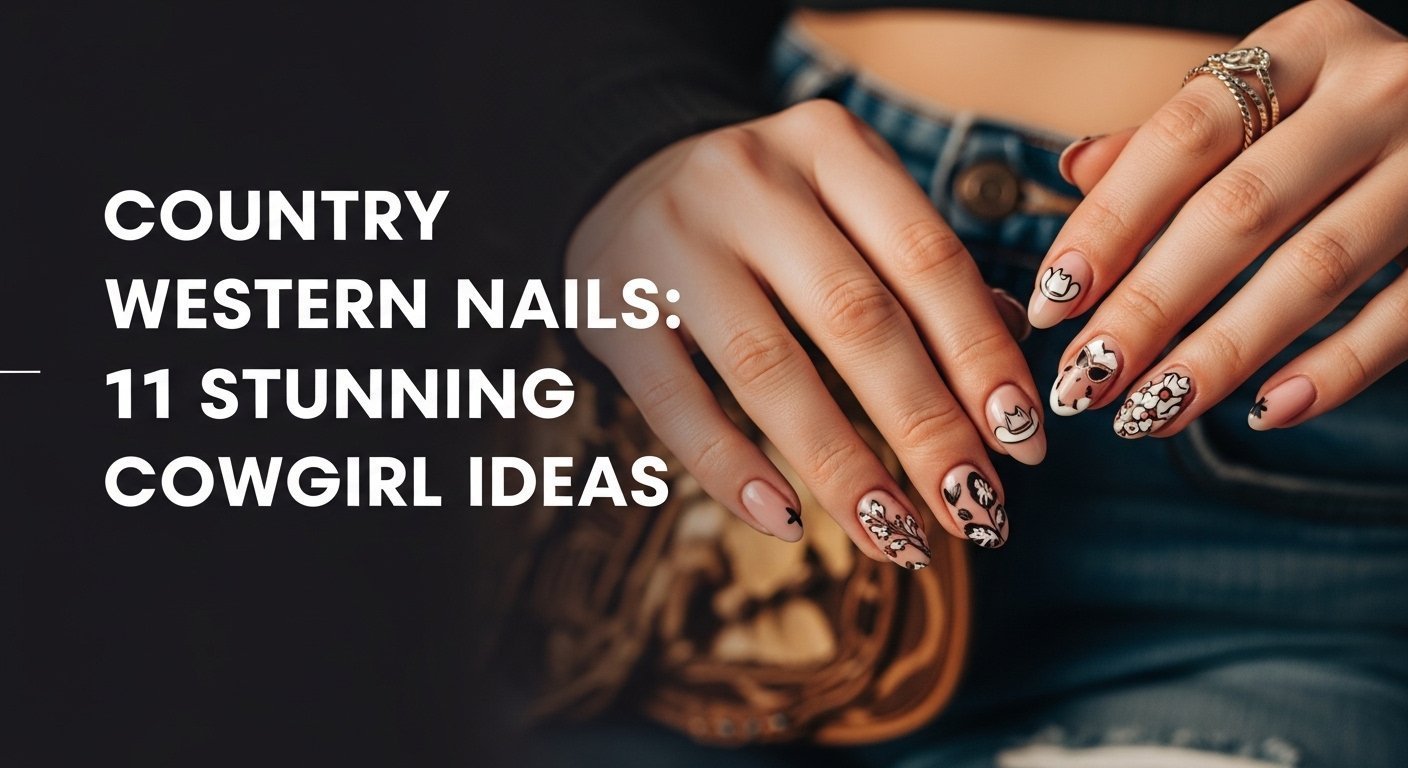
Country western nails are a popular nail art trend that blends rustic Americana motifs with modern nail techniques, often featuring designs like cowhide, turquoise, and bandana prints to complement Western fashion and lifestyle. This style is particularly sought after for country concerts, rodeos, and themed events, offering a unique way to express cowgirl chic. Drawing from comprehensive analysis of current data and proven methodologies, you’ll discover how to transform your fingertips with the distinct western nail aesthetic. This guide provides 11 expertly curated designs for 2026, ensuring your nails are as captivating as your favorite country tune.
Embracing the Wild West: Your Guide to Country Western Nails in 2026
The allure of country western nails goes beyond a simple manicure; it’s a bold statement that fuses traditional Western lifestyle elements with contemporary style. This evolving trend is heavily influenced by cultural phenomena like the enduring appeal of the “Yellowstone series” and the rise of the “Coastal Cowgirl” aesthetic, making western nail designs a must-have accessory for 2026. Whether you’re planning a Nashville trip, attending a rodeo, or simply want to infuse your everyday look with rustic country nails, these designs offer a versatile and captivating way to express your personal style. We’ve seen a surge in demand for cowgirl nails that perfectly pair with cowboy boots and turquoise jewelry, establishing them as a key component of modern Western wear.
11 Stunning Cowgirl Nail Designs for 2026
Ready to elevate your western nail aesthetic? This comprehensive guide dives deep into 11 stunning cowgirl ideas that blend classic motifs with contemporary flair, perfect for 2026. Each design offers a unique way to showcase your love for country western nail art, providing not just inspiration but also detailed steps and product recommendations to help you achieve salon-grade results at home. From the iconic patterns of cowhide to the earthy elegance of turquoise, prepare to transform your nails into a canvas of western-inspired fingertips that are sure to turn heads at any country concert or festival.
1. Classic Cowhide Print Nails

Pin this iconic cowhide nail art to your ‘Western Style’ board!
Classic Cowhide Print Nails offer a timeless and bold statement, perfect for anyone embracing the cowgirl style. This design features authentic black and white irregular spots on a creamy white base, delivering a distinct western nail look. The cowhide motif, a key attribute, seamlessly connects to the broader Western lifestyle, ensuring your manicure complements western outfits and accessories like cowboy boots.
What You Need
- Creamy white gel polish (base color for a crisp background)
- Black gel polish (for the cowhide print)
- Fine detail nail art brush (for intricate lines)
- Matte or glossy gel top coat (to seal the design)
- UV/LED nail lamp (for curing gel polish)
- Lint-free wipes and rubbing alcohol (for cleaning)
Application Steps
- Prep natural nails by gently filing, buffing, and pushing back cuticles.
- Apply two thin coats of creamy white gel polish, curing each layer under the UV/LED lamp.
- Dip your fine detail brush into the black gel polish and begin to create cowhide print by drawing irregular, organic shapes across the nail. Vary the size and shape for a natural look.
- Fill in some of the shapes partially to simulate a blurred cowhide print.
- Cure the black design under the lamp.
- Finish with a layer of your chosen gel top coat, ensuring a smooth, durable finish. Cure one last time.
Pro-Tip: For the most authentic look, avoid making the cowhide spots too uniform. Practice on a nail swatch first to master the organic shapes and achieve that realistic weathered leather effect texture. Varying the size and spacing of the spots is key to a dynamic cowhide nail art design.

2. Turquoise Stone Embellishments

Save this turquoise western nail inspiration to your ‘Boho Chic’ board!
Turquoise Stone Embellishments bring the vibrant essence of the Southwest to your fingertips, making your nails pop with authentic country western style. Turquoise, a prominent color and material in Western aesthetic nails, is an entity attribute that perfectly matches turquoise jewelry, highlighting rustic themes. This design allows you to replicate the raw, beautiful appearance of genuine turquoise, defining a sophisticated cowgirl aesthetic.
What You Need
- Turquoise blue gel polish (main turquoise western nails color)
- Dark blue or black gel polish (for marbling veins)
- Gold or silver foil flakes (for authentic shimmer)
- Fine detail nail art brush or toothpick
- Clear gel top coat
- UV/LED nail lamp
Application Steps
- Apply two thin coats of turquoise blue gel polish as your base, curing each layer.
- While the last coat is still tacky (or apply a thin layer of top coat, then don’t cure), dab small amounts of dark blue/black gel polish onto the nail.
- Using a fine detail brush or toothpick, gently swirl the dark polish into the turquoise base to create natural-looking veins, mimicking a turquoise stone.
- Before curing, add small flakes of gold or silver foil strategically onto the wet design for a mineral effect.
- Cure the design under the lamp.
- Finish with a clear gel top coat to seal and add durability. Cure once more.
Pro-Tip: For truly convincing turquoise stone nails, don’t over-blend the darker polish. A subtle swirl creates the most realistic marble effect. Consider using a matte top coat over one or two nails for variety, as a matte finish application can enhance the raw stone look.

3. Matte Bandana Print Design

Pin this rustic country nails design for your next festival look!
The Matte Bandana Print Design offers a rugged yet charming aesthetic, making it an ideal choice for country western nail art. This design utilizes the classic bandana print, an entity attribute often found in Western wear, and is finished with a crucial matte top coat to achieve its characteristic rustic effect. The matte bandana print perfectly complements western outfits and enhances festival looks, giving your cowgirl nails an authentic touch.
What You Need
- Red or navy blue gel polish (base color for bandana)
- White gel polish (for the intricate pattern)
- Fine detail nail art brush
- Matte gel top coat (crucial for the authentic look)
- UV/LED nail lamp
Application Steps
- Apply two coats of your chosen base color (red or navy blue), curing each layer.
- Using the white gel polish and a fine detail brush, carefully paint bandana design elements. Common elements include paisley swirls, dots, and small starbursts. Work section by section for precision.
- Cure the white design under the lamp.
- Apply a generous layer of matte gel top coat over the entire nail to transform the glossy finish into the characteristic matte bandana print. Cure.
Pro-Tip: Consistency in line thickness is key for an authentic bandana print. If freehanding is challenging, consider using western nail decals or a stamping plate for a crisp matte bandana print pattern. Remember to apply the matte top coat evenly to avoid streaks.

4. Glitter Horseshoe Accents

Add a touch of luck to your look! Pin these western glitter nails!
Glitter Horseshoe Accents offer a charming and symbolic addition to any country western nail art design. The horseshoe, an iconic Western symbol, is elegantly enhanced with glitter, which serves as an entity attribute to boost visual appeal. This design allows you to incorporate a touch of sparkle and good luck into your western manicure, perfect for complementing western outfits or bringing extra flair to festival nail survival.
What You Need
- Base color gel polish (e.g., neutral beige or denim blue)
- Gold or silver glitter polish (or loose glitter)
- Horseshoe nail charms or decals (for easy application)
- Clear gel top coat
- Nail art glue (if using charms)
- Fine detail nail art brush (if painting)
- UV/LED nail lamp
Application Steps
- Apply two coats of your chosen base color, curing each layer.
- For painted designs: Using a fine detail brush and glitter polish, carefully paint horseshoe design outlines. For charms/decals: Apply a thin layer of nail art glue or clear gel where you want the horseshoe.
- Carefully place the horseshoe nail charms or decals onto the wet glue/gel.
- Cure the nails under the lamp to secure the design.
- Apply two layers of clear gel top coat, ensuring it encapsulates the glitter or charms to prevent snagging and provide long-lasting durability. Cure each top coat layer.
Pro-Tip: When using 3D horseshoe charms, ensure they are flush with the nail surface by building up layers of top coat around them. For a subtler shimmer, mix fine glitter into your top coat and apply it over your base color for a western glitter nails effect.

5. Distressed Leather Effect Nails

Capture the rustic vibes nails look! Pin this distressed leather effect!
Distressed Leather Effect Nails bring a unique, rugged elegance to your country western nails, expertly mimicking the look and feel of aged leather. This effect, an entity attribute, directly relates to the concept of leather, a staple in Western wear. This design highlights rustic themes and defines a sophisticated cowgirl aesthetic, offering a truly unique western nail aesthetic that pairs wonderfully with denim fashion and turquoise jewelry.
What You Need
- Dark brown or maroon gel polish (base color)
- Black gel polish
- Sheer matte top coat
- Fine detail nail art brush or crumpled plastic wrap/sponge
- UV/LED nail lamp
- Alcohol wipe
Application Steps
- Apply two coats of dark brown or maroon gel polish, curing each layer.
- Apply a thin, uneven layer of black gel polish over the base. Before curing, gently dab or drag a crumpled piece of plastic wrap or a dry sponge over the wet black polish to create a distressed, textured appearance.
- Cure the design under the lamp.
- Optionally, apply a thin layer of sheer brown polish to unify the tones and add depth. Cure.
- Finish with a sheer matte top coat to give the nails a realistic weathered leather effect. Cure again.
Pro-Tip: The key to a great distressed leather effect is imperfection. Don’t aim for uniformity; the more varied the texture, the more realistic it will look. You can also mix a small amount of black pigment into your top coat for a subtle smoky overlay that enhances the aged look of rugged chic nails.

6. Cactus & Desert Sunset Ombré

Pin this vibrant desert aesthetic nails look to your ‘Travel & Adventure’ board!
The Cactus & Desert Sunset Ombré design transports the majestic beauty of the Southwestern landscape right to your fingertips, offering a stunning western themed manicure. The cactus (an entity) and the desert sunset (an entity attribute) are central to this desert aesthetic nails. This design represents country charm by depicting natural elements and highlights rustic themes with its warm, earthy color palette, defining a unique western nail aesthetic.
What You Need
- Ombré gel polish kit (containing sunset colors: yellow, orange, red, purple)
- Black gel polish (for cactus silhouettes)
- Makeup sponge or ombré brush
- Fine detail nail art brush or cactus stencils
- Clear gel top coat
- UV/LED nail lamp
Application Steps
- Apply a light base color (e.g., pale yellow) and cure.
- Apply thin stripes of your ombré colors (yellow, orange, red, purple) onto a makeup sponge.
- Gently dab the sponge onto the nail, creating a seamless ombré desert sunsets blend. Repeat until desired opacity, curing between layers.
- Using black gel polish and a fine detail brush (or stencil), paint or apply cactus silhouettes and desert landscapes onto the cured ombré.
- Cure the black design.
- Finish with a clear gel top coat to protect and add shine. Cure.
Pro-Tip: For a vibrant desert sunset, ensure your ombré colors are highly pigmented. Use a clean sponge for each layer to avoid muddying the colors. A small dotting tool can also help create tiny, distant desert elements, enhancing the realism of your western nail art.

7. Western French Tip Manicure

Give your tips a cowgirl twist! Pin this elegant western French tip idea!
The Western French Tip Manicure redefines a timeless classic, infusing it with undeniable country western style. This design takes the traditional French tip (a classic nail design entity) and gives it a western twist by incorporating elements like cowhide print or turquoise for the tip itself. This creates a sophisticated yet playful cowgirl chic nails look, making it a perfect western manicure for those who love elegance with a hint of frontier spirit.
What You Need
- Nude or sheer pink gel polish (for base)
- White, black, turquoise, or brown gel polish (for the western French tip)
- Fine detail nail art brush or French tip guides
- Clear gel top coat
- UV/LED nail lamp
Application Steps
- Apply two thin coats of nude or sheer pink gel polish, curing each layer.
- Decide on your western twist:
- Cowhide Tip: Using black polish and a fine brush, paint cowhide print along the tip line.
- Turquoise Tip: Apply turquoise gel polish to the tips.
- Classic with Accent: Apply white gel polish for a traditional tip, then add a tiny horseshoe charm or small metallic dot at the base of the tip on one or two accent nails.
- Carefully create the French tip line with your chosen color/design. For crisp lines, use French tip guides or a steady hand with a fine brush.
- Cure the tips under the lamp.
- Finish with a clear gel top coat for shine and protection. Cure.
Pro-Tip: For the cleanest western French tip, ensure your base coats are perfectly smooth before applying the tip color. Using a “thin line nail art brush” allows for superior precision when drawing intricate patterns like small cowhide prints on the tip, demonstrating true “micro-painting western scenes.”

8. Aztec Geometric Patterns

Embrace the Southwest! Pin these stunning Aztec pattern nails!
Aztec Geometric Patterns are a captivating choice for country western nails, bringing a rich cultural heritage and intricate artistry to your manicure. Aztec patterns (an entity) are a key attribute of Southwestern nail art, which is a related entity within the broader western nail aesthetics. This design integrates striking Aztec designs to create a distinct boho western manicure, perfect for those seeking detailed and vibrant western nail ideas.
What You Need
- Base color gel polish (e.g., cream, terracotta, or sage green)
- Contrasting gel polishes (e.g., black, white, and turquoise)
- Fine detail nail art brush or Aztec nail stamping plates
- Stamping polish and stamper (if using stamping plates)
- Clear gel top coat
- UV/LED nail lamp
Application Steps
- Apply two coats of your base color and cure.
- Using contrasting polishes and a fine detail brush, carefully paint aztec geometric patterns. Start with basic shapes like triangles, lines, and dots, then build complexity. For easier application, use Aztec nail stamping plates and stamping polish.
- Cure the intricate patterns under the lamp.
- Optionally, for a negative space Aztec effect, leave certain areas of the base color visible within the design.
- Finish with a clear gel top coat, ensuring a smooth, protected surface. Cure.
Pro-Tip: When tackling intricate Aztec geometric patterns, planning your design on paper first can save time and polish. For crisp lines with freehand, use a small amount of polish and let each section dry slightly before moving on. Using a strong “nail art stamping plate” is often the easiest way to achieve precise and repeatable designs for southwestern nail art.

9. Rustic Wood Grain Nails

Bring the outdoors in! Pin these authentic wood grain nails for a rustic country touch!
Rustic Wood Grain Nails offer a deeply authentic and earthy vibe to your country western nails, perfectly capturing the essence of a cozy homestead. The wood grain texture (an entity attribute) directly connects to the rustic themes and country charm inherent in country western nails. This design highlights natural elements and contributes to a comprehensive western nail aesthetic, making your manicure feel grounded and organically stylish.
What You Need
- Light brown gel polish (base color)
- Medium brown and dark brown gel polishes (for grain details)
- Thin nail art striper brush or a dry brush
- Clear gel top coat (matte or glossy)
- UV/LED nail lamp
Application Steps
- Apply two coats of light brown gel polish as your base and cure.
- Apply a thin, even coat of medium brown gel polish. Before curing, drag the fine striper brush or a dry brush through the wet polish in wavy, irregular lines to start creating the wood grain texture.
- Cure this layer.
- Repeat step 2 with the dark brown gel polish, adding more definition and depth to the natural wood grain texture.
- Cure the final design.
- Finish with either a matte top coat for a raw, natural wood look, or a glossy top coat for a polished finish. Cure.
Pro-Tip: For the most realistic rustic wood grain nails, use very thin layers of polish for the grain lines. Don’t worry about perfection; natural wood has imperfections. You can even add a small “hand-painted cattle brands” or other western symbols over the wood grain for a truly personalized homestead nails touch.

10. Yellowstone-Inspired Brand Art

Show your Yellowstone pride! Pin this cattle brand nail art for true fans!
For fans of the iconic TV show, Yellowstone-Inspired Brand Art offers a powerful and personalized way to rock country western nails. The Yellowstone series (a related entity) directly inspires this cattle brand art (an entity attribute), which integrates distinct western symbols. This design clearly defines a bold cowgirl aesthetic and allows you to wear your loyalty to the Dutton Ranch right on your fingertips, making a statement with your western nail art designs.
What You Need
- Base color gel polish (e.g., rust, deep red, or cream)
- Black or dark brown gel polish (for the brand art)
- Ultra-fine detail nail art brush
- Clear gel top coat (matte or glossy)
- UV/LED nail lamp
- Reference image of Yellowstone cattle brands
Application Steps
- Apply two coats of your chosen base color, curing each layer.
- Using the ultra-fine detail brush and black/dark brown gel polish, carefully hand-paint cattle brands onto one or two accent nails. Refer to your Yellowstone cattle brands reference image for accuracy.
- Cure the brand art under the lamp.
- Finish with a clear gel top coat. A matte top coat can enhance the rugged, branded look. Cure.
Pro-Tip: Precision is paramount for Yellowstone-inspired brand art. Use a steady hand and load your brush with minimal polish to prevent bleeding. For an advanced touch, consider “custom western nail decals” if freehanding intricate symbols like a cattle brand feels too challenging, ensuring a professional and crisp look that aligns with western nail art designs.

11. Boho Feather & Dreamcatcher Design

Capture your free spirit! Pin these bohemian western nails to your ‘Dream Nails’ board!
The Boho Feather & Dreamcatcher Design offers a softer, more ethereal interpretation of country western nails, blending rustic charm with bohemian grace. The feather and dreamcatcher (entities) are common motifs in bohemian fashion and are key attributes of boho western nails. This design represents country charm with a spiritual touch and defines a more romantic cowgirl aesthetic, perfect for those seeking delicate and artistic western aesthetic nails.
What You Need
- Light neutral or pastel gel polish (base color)
- Black, white, or metallic gel polish (for details)
- Ultra-fine detail nail art brush or feather/dreamcatcher decals
- Fine glitter (optional)
- Clear gel top coat
- UV/LED nail lamp
Application Steps
- Apply two coats of your chosen base color and cure.
- Using the ultra-fine detail brush and black, white, or metallic gel polish, delicately paint feather and dreamcatcher designs. Focus on thin, flowing lines for the feathers and intricate webbing for the dreamcatchers. Alternatively, apply feather nail art decals or dreamcatcher nail stickers.
- If adding glitter, apply a thin layer of top coat (do not cure), sprinkle fine glitter onto the wet polish, then cure.
- Cure the designs under the lamp.
- Finish with a clear gel top coat to seal and protect the art. Cure.
Pro-Tip: For the most ethereal boho feather and dreamcatcher design, use very thin, slightly translucent lines for the feathers to give them a delicate appearance. Consider a soft ombré base to complement the design, blending earth tone nails for a harmonious backdrop for your bohemian western nails.

FAQs About Country Western Nails
What are country western nails?
Country western nails are a popular nail art trend that draws inspiration from the rustic charm and iconic motifs of Western culture and fashion. This aesthetic typically incorporates designs like cowhide print, turquoise stone embellishments, bandana patterns, and rustic textures. It’s a way to express cowgirl chic and complements Western wear for events like country concerts or rodeos.
How to do cowhide nail art at home?
To do cowhide nail art at home, start with a creamy white or nude base polish. Once dry, use a fine detail brush and black or dark brown polish to paint irregular, organic splotches, varying their size and shape to mimic natural cowhide. You can create a blurred cowhide print by gently dabbing a sponge over wet areas. Finish with a matte or glossy top coat to seal your country western nail art.
Are western nails in style for 2026?
Yes, western nails are very much in style for 2026, especially with the continued popularity of Western fashion and cultural influences like the ‘Yellowstone’ series and the ‘Coastal Cowgirl’ aesthetic. Trends include sophisticated takes on classic motifs, such as elegant western French tip nail designs and realistic turquoise western nails, along with modern interpretations for short western nails.
What colors are best for country western nails?
The best colors for country western nails often reflect natural, earthy tones found in the desert and Western landscapes. This includes classic whites, blacks, and browns for cowhide print, vibrant turquoise and coral, deep reds and maroons for bandana prints, and metallic silvers or golds for accents like horseshoe glitter. Earth tone nails and ombré desert sunsets are also popular choices.
How to make nails look like turquoise?
To make nails look like turquoise, apply a vibrant turquoise blue gel polish as your base. While still tacky or after a thin layer of non-cured top coat, dab small amounts of dark blue or black polish onto the nail. Use a fine detail brush or toothpick to gently swirl and marble the darker polish into the turquoise, creating natural-looking veins. Incorporating gold or silver foil flakes before curing enhances the mineral effect of turquoise western nails.
Can you do western nails on natural nails?
Absolutely, you can do western nails on natural nails, though results may vary based on nail length and strength. Many simple country western nails designs, such as painted patterns or decals, work beautifully on natural nails. For more intricate or long-lasting designs, a gel overlay can add durability. Short western nails are a popular choice for practicality while still embracing the aesthetic.
What is the coastal cowgirl nail trend?
The coastal cowgirl nail trend is a softer, more bohemian interpretation of country western nails, blending rustic elements with a relaxed, beachy aesthetic. It often features lighter color palettes, delicate shell or wave accents alongside classic western motifs like feathers or subtle cowhide print. This trend emphasizes a natural, effortless look that still defines cowgirl aesthetic.
Where to buy western nail stickers and wraps?
Western nail stickers and wraps are widely available from various online retailers specializing in nail art supplies, Etsy for unique handmade designs, and larger e-commerce platforms like Amazon. Many brands offer a range of western nail art designs, from cowhide print nails to Aztec patterns, providing convenient options for DIY country western nail art at home.
What are some simple western nail ideas for beginners?
Simple western nail ideas for beginners include classic cowhide spots on accent nails, a solid turquoise or rust-colored manicure, or using easy-to-apply western nail stickers. A basic western French tip with a single color accent, or simple horseshoe glitter on a neutral base, are also great ways to dip your toes into country western nails without complex techniques.
How much do western acrylic nails cost?
The cost of western acrylic nails can vary significantly based on location, salon expertise, and the complexity of the chosen design. Basic acrylics with a simple western manicure might range from $50-$80, while intricate hand-painted cowhide print nails, turquoise stone embellishments, or 3D horseshoe charms could push the price to $100 or more due to the specialized “award-winning nail art” and time involved.
Key Takeaways
- Embrace the Versatility of Country Western Nails: From classic cowhide print nails to delicate boho feather designs, the country western nail art trend offers a wide array of styles to match any mood or occasion, proving its adaptability for modern western nails.
- Prioritize Actionable Design Elements: Achieving stunning cowgirl nails often involves key elements like vibrant turquoise stone embellishments, matte bandana print, or rustic distressed leather effect nails. Focus on clean lines and authentic textures for the best results.
- DIY or Professional: Options for Every Cowgirl: Whether you prefer to apply western nail wraps at home or seek salon-grade results for complex designs like Yellowstone-inspired brand art, there are methods and products available for every skill level, ensuring accessibility for all western nail enthusiasts.
- Leverage Pinterest for Endless Inspiration: The visual nature of western nail ideas makes platforms like Pinterest invaluable for discovering new trends and collecting country western nail inspo. Remember to save your favorite ideas for easy reference.
- Product Selection is Key for Quality & Longevity: For the best results, invest in high-quality polishes, fine detail brushes, and durable top coats. Proper nail care basics also contribute to the long-lasting durability of your western manicure designs.
- Don’t Forget the Details: Pro-Tips Make the Difference: Incorporating pro nail artist tips, such as mastering the “weathered leather effect” or achieving seamless “ombré desert sunsets,” elevates your country western nails from good to gallery-worthy.
Last update on 2026-02-21 / Affiliate links / Images from Amazon Product Advertising API


