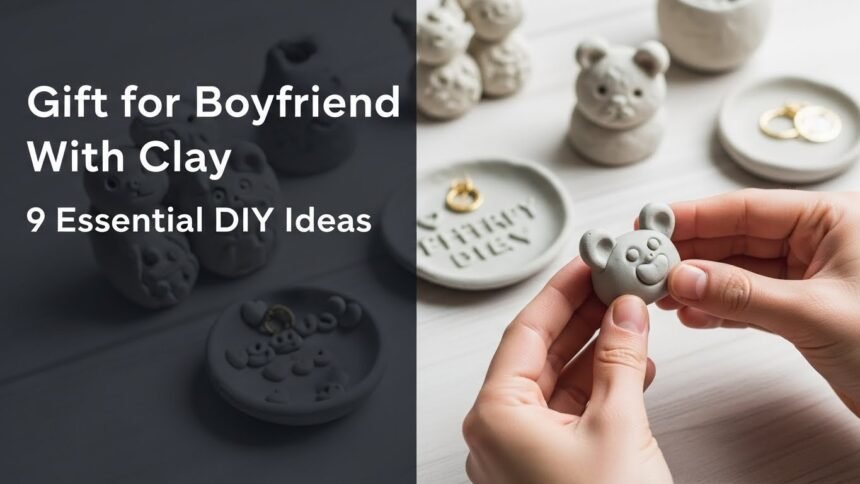
Struggling to find a unique gift that truly shows you care? A handmade gift for boyfriend with clay is a thoughtful way to move beyond generic presents and create something one-of-a-kind. It’s a personal touch he’ll definitely appreciate.
A thoughtful, personalized gift for your boyfriend can be easily crafted using versatile materials like air dry or polymer clay, offering a unique way to express affection through DIY projects. This guide provides 9 essential step-by-step ideas to inspire and empower you to create a memorable present he’ll actually use and love.
Drawing from proven crafting techniques and tested DIY methods, this guide makes clay accessible for all skill levels. We’ll show you exactly how to transform simple modeling clay into a creative and heartfelt gift. Get ready to discover your new favorite way to make presents.
How to Craft a Thoughtful Gift for Boyfriend with Clay That Shows You Care
Choosing to make a handmade clay gift for boyfriend is about more than just the final product; it’s about the effort, thought, and love you pour into it. In a world of mass-produced items, a custom clay gift stands out as a deeply personal gesture. Whether you’re a seasoned crafter or a complete beginner, the process of molding and shaping clay into something special is an incredibly rewarding experience. This guide will walk you through the essential steps, from choosing the right type of clay to adding those perfect finishing touches. We’ll address common challenges like air dry clay cracking and provide clear, reliable project instructions to ensure your creation is both beautiful and durable.
9 Essential DIY Ideas for Gift for Boyfriend with Clay for 2025
Ready to get your hands dirty? Here are 9 essential DIY ideas that range from easy clay crafts to more intricate projects, ensuring there’s something perfect for your boyfriend’s style and your crafting comfort level. We’ll cover everything from practical desk accessories to sentimental keepsakes. Each idea includes a full supply list and step-by-step directions to guide you. You’ll find inspiration using both air dry clay for its simplicity and polymer clay for its strength and vibrant colors. Let’s dive in and find the perfect creative homemade gifts to make.
1. Craft a Personalized Catch-All Dish with Air Dry Clay
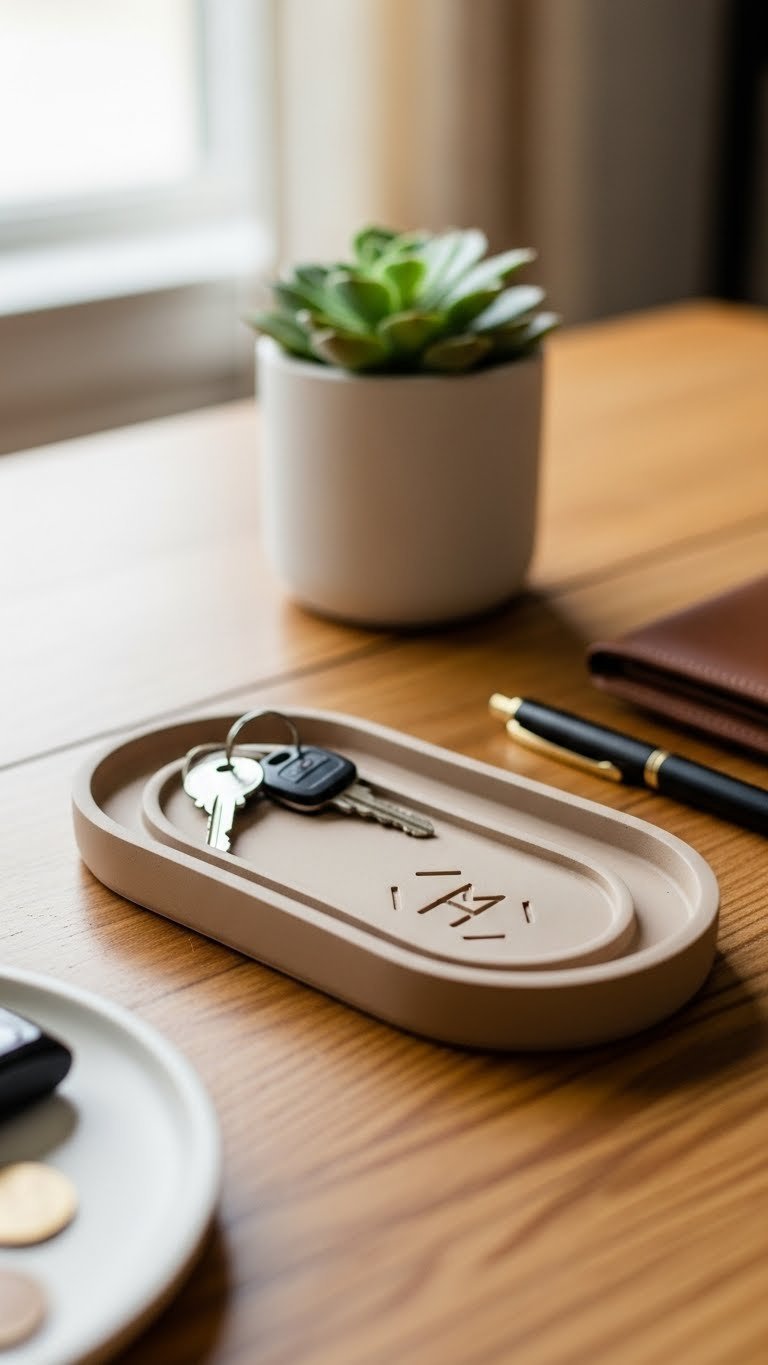
Pin this genius hack to your ‘DIY Gifts for Him’ board!
Supplies Needed
- Air dry modeling clay (at least 1 lb, smooth texture, white or gray for easy painting)
- Non-stick mat or parchment paper
- Rolling pin or smooth bottle
- Small, sharp craft knife or plastic cutting tool
- Small bowl or round object (for shaping template)
- Alphabet stamps or carving tools (for personalization)
- Fine-grit sandpaper (optional, for smoothing)
- Acrylic paints and brushes (optional, for decoration)
- Clear acrylic sealant (matte or gloss finish)
Step-by-Step Directions
- Prepare your workspace: Lay out parchment paper or a non-stick mat on a clean, flat surface.
- Condition the clay: Knead the air dry clay until it’s pliable and smooth, removing any air bubbles.
- Roll out the clay: Use a rolling pin to flatten the clay evenly to about 1/4 inch thickness.
- Cut the shape: Place a small bowl or use a template to cut out your desired dish shape (round, oval, square) with a craft knife.
- Form the dish: Gently lift the clay and place it over the outside of an inverted bowl or cup to create the desired concave shape. Smooth the edges.
- Personalize (optional): While the clay is still wet, use alphabet stamps or carving tools to add initials, a date, or a small design to the bottom or inside of the dish.
- Dry thoroughly: Allow the clay to dry completely, typically 24-72 hours, flipping it occasionally to ensure even drying and prevent cracking.
- Smooth and paint (optional): Once dry, gently sand any rough edges. Paint with acrylics if desired, then let dry.
- Seal for durability: Apply 2-3 coats of clear acrylic sealant, allowing each coat to dry fully to ensure a durable clay gift that lasts.
Pro-Tip: In my experience, allowing air dry clay to dry naturally and slowly in a well-ventilated area, rather than rushing it, is crucial to prevent cracking and ensure a strong, durable clay gift. Flipping it every 12 hours helps maintain an even drying process.

2. Design a Custom Phone Stand Using Polymer Clay
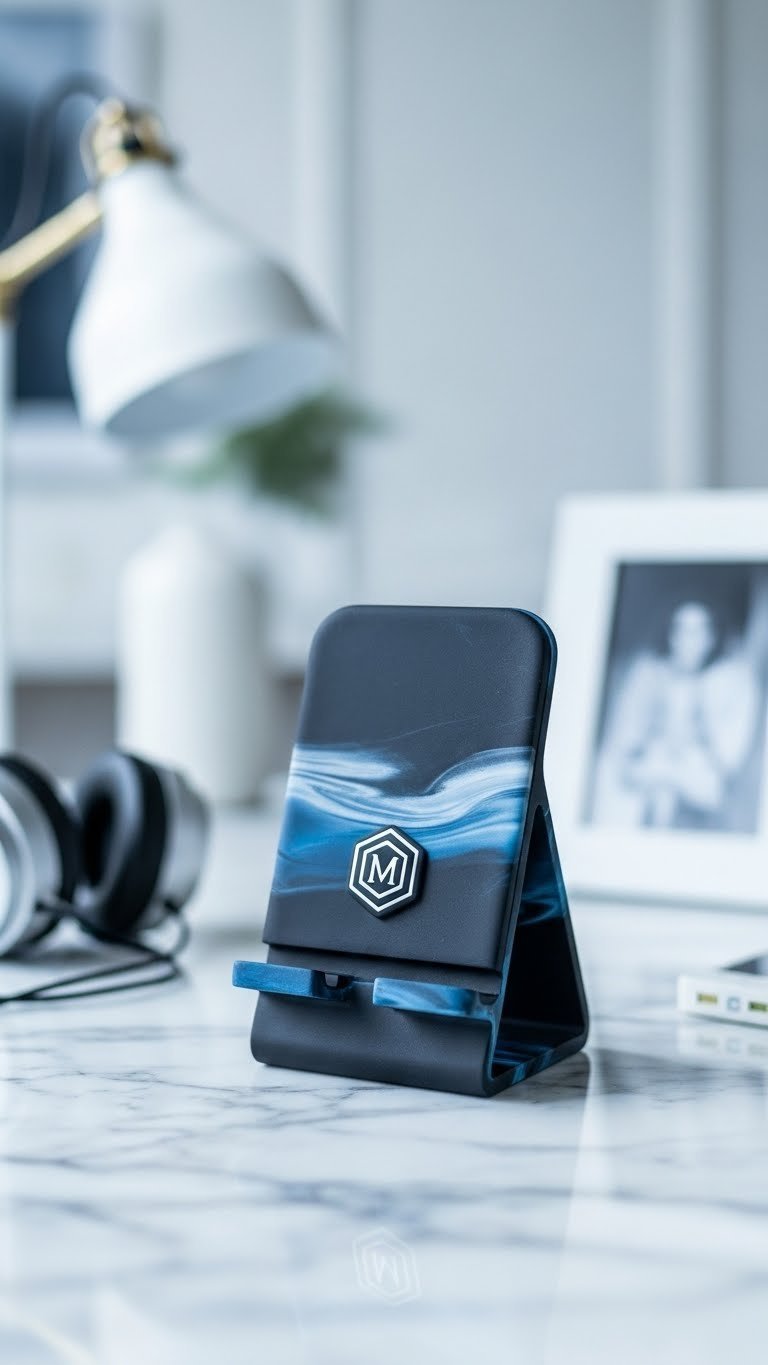
Save this unique tech accessory idea to your ‘Boyfriend Gifts’ board!
Supplies Needed
- Polymer clay (2-3 blocks, chosen colors for design)
- Acrylic rolling pin or clay conditioning machine
- Clay cutting tool or craft blade
- Non-stick work surface (e.g., ceramic tile, glass)
- Oven-safe baking sheet lined with parchment paper
- Oven thermometer
- Smartphone (for sizing and testing)
- Optional: texture mats, embossing tools, clear gloss glaze
Step-by-Step Directions
- Condition the polymer clay: Knead each block of polymer clay until it’s soft, pliable, and free of cracks.
- Form the base: Roll out one color of clay into a thick, flat rectangle (approx. 4×3 inches, 1/2 inch thick) for the base.
- Create the support: Roll out another piece of clay, or a different color, into a slightly thinner, trapezoidal shape (wider at the bottom) to serve as the back support.
- Assemble the stand: Score the contact points on both the base and the support, then firmly press the support onto the back of the base at an angle (approx. 60-70 degrees). Use your finger or a tool to smooth the seam.
- Add phone ledge: Create a small, thin strip of clay and attach it to the front edge of the base to form a lip that will hold the phone in place.
- Test for stability: Place your boyfriend’s smartphone (or one of similar size) on the stand to ensure it’s stable and holds the phone at a good viewing angle. Adjust if necessary.
- Preheat oven: Follow the polymer clay package instructions for specific baking temperature (typically 275°F / 130°C) and preheat your oven with an oven thermometer for accuracy.
- Bake the stand: Carefully transfer the stand to the lined baking sheet. Bake for 30-45 minutes, depending on thickness. Do not overbake.
- Cool and finish: Let the stand cool completely. Once cool, it will be hard and durable. Optional: apply a clear gloss glaze for a finished look.
Pro-Tip: For maximum strength and to prevent cracking, always use an oven thermometer when baking polymer clay to ensure the temperature is accurate. Undercooking leads to brittle clay, while overcooking can cause discoloration or burning.

3. Mold Unique Coasters for His Desk with Oven-Bake Clay
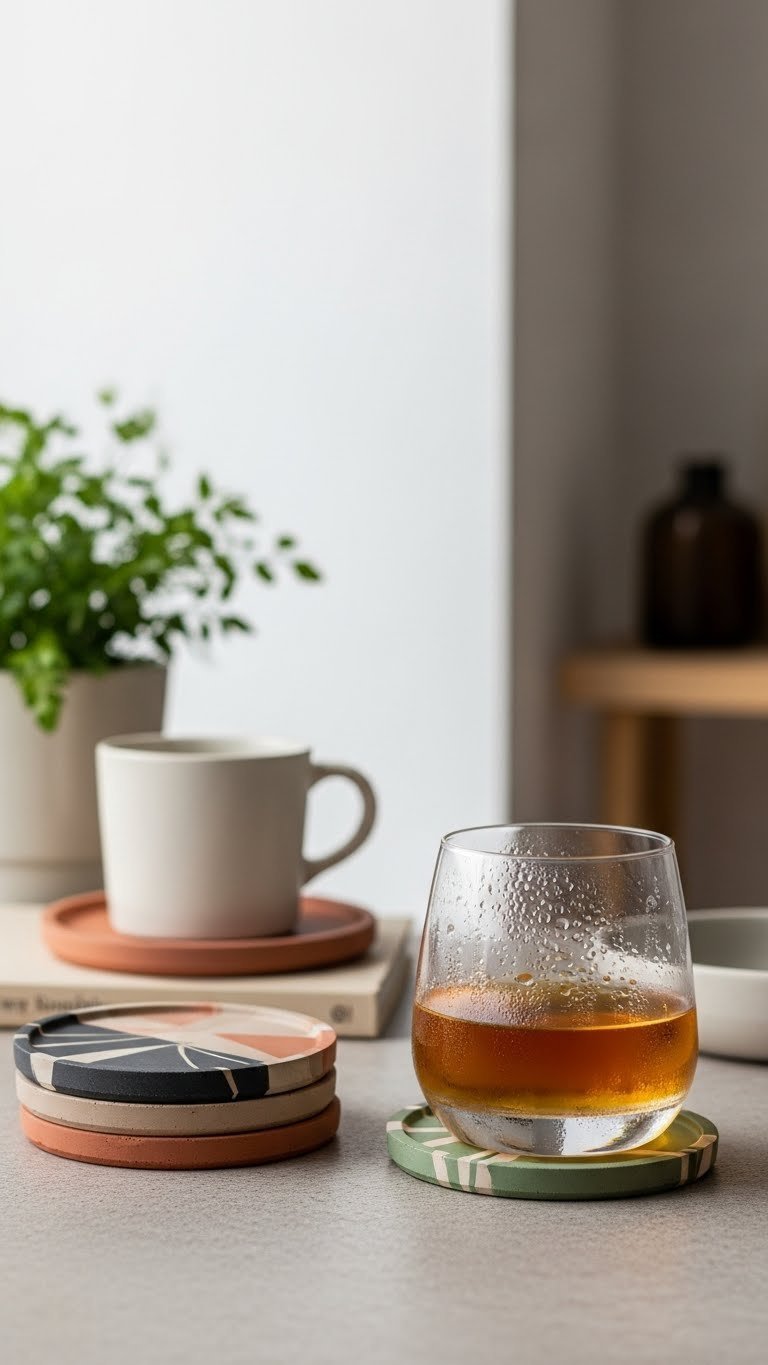
Pin these cool coasters to your ‘Gifts for Guys’ board!
Supplies Needed
- Oven-bake clay (multiple colors for marbling or solid colors for texture, e.g., Sculpey or Fimo)
- Non-stick work surface or parchment paper
- Acrylic rolling pin
- Circular cookie cutters or a round template
- Texture tools (e.g., stamps, lace, sandpaper for concrete effect)
- Craft knife or clay cutter
- Baking sheet lined with parchment paper
- Clear, water-resistant glaze or sealant (e.g., resin or polyurethane)
- Optional: small cork feet or felt pads
Step-by-Step Directions
- Condition the clay: Knead individual colors of oven-bake clay until soft. For marbling, gently twist two colors together before rolling.
- Roll out the clay: Roll the clay to about 1/4 inch thick on your non-stick surface.
- Cut coaster shapes: Use a circular cookie cutter or a template and craft knife to cut out your coaster shapes. Aim for 3-4 inches in diameter.
- Add texture (optional): Press texture tools or household items into the clay to create desired patterns (e.g., wood grain, geometric designs).
- Smooth edges: Gently smooth the edges of each coaster with your finger or a damp sponge.
- Bake according to package directions: Place coasters on the lined baking sheet. Bake in a preheated oven at the temperature and time specified by your oven-bake clay brand (usually 275°F / 130°C for 20-30 minutes).
- Cool completely: Remove from oven and let cool fully. The clay will harden as it cools.
- Seal for protection: Apply 2-3 coats of clear, water-resistant glaze or sealant to all surfaces, allowing adequate drying time between coats to create durable clay gifts.
- Add backing (optional): Attach small cork feet or felt pads to the bottom of each coaster to prevent slipping and protect surfaces.
Pro-Tip: When applying a water-resistant sealant to oven-bake clay coasters, ensure the clay is completely cool and clean. Applying multiple thin coats provides better protection and a smoother finish than one thick coat, preventing streaks and ensuring durable clay gifts.

4. Sculpt a Gaming Controller Holder from Polymer Clay
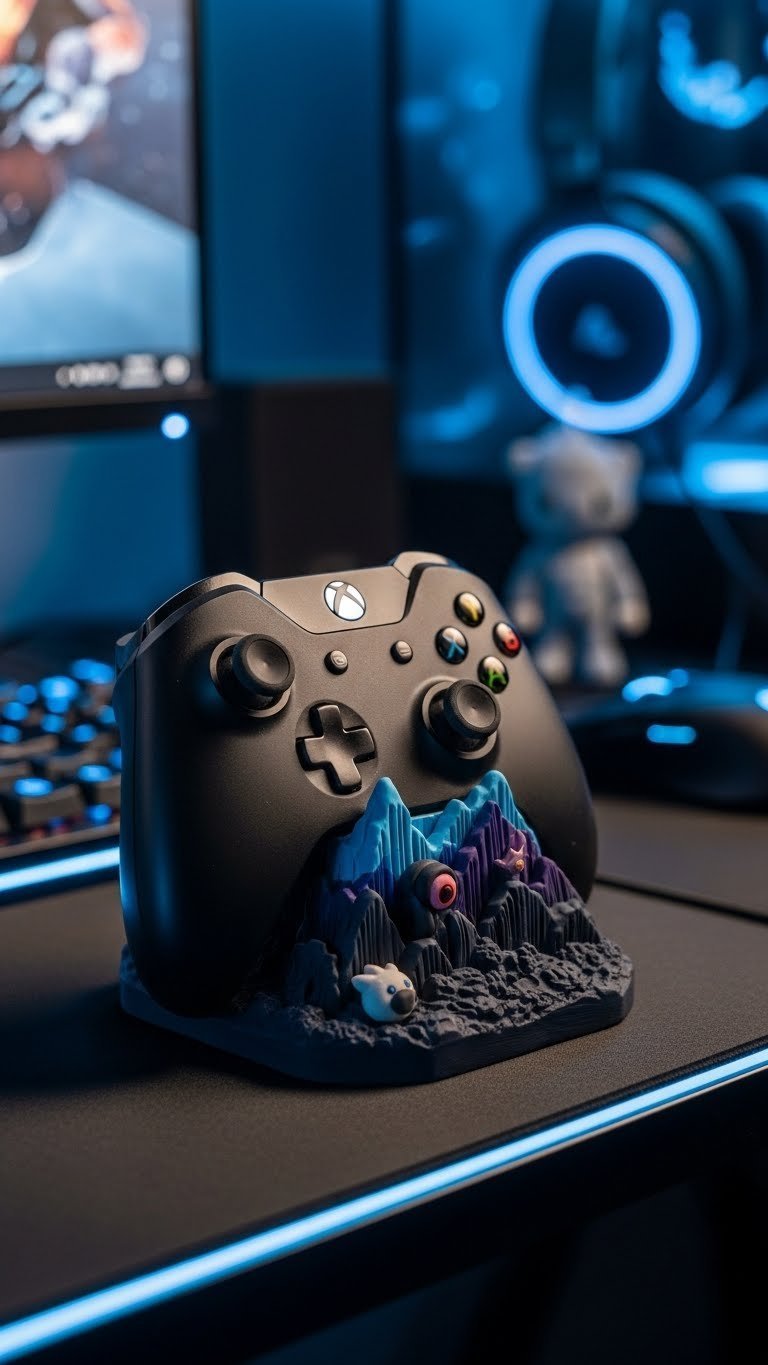
Level up his gaming space! Pin this DIY to your ‘Gamer Gifts’ board!
Supplies Needed
- Polymer clay (various colors, at least 4-6 blocks, based on desired design)
- Basic clay sculpting tool set
- Non-stick work surface
- Oven-safe baking sheet lined with parchment paper
- Oven thermometer
- Boyfriend’s gaming controller (for accurate sizing)
- Optional: clear gloss glaze, small felt pads for base
Step-by-Step Directions
- Condition the polymer clay: Thoroughly knead and soften all chosen polymer clay colors.
- Measure controller: Carefully measure your boyfriend’s gaming controller to understand its dimensions and contact points for the stand.
- Build the base: Create a solid, flat base that is wide enough to be stable. This might be a simple rectangle or an abstract shape.
- Form the cradle/support: Begin to sculpt the vertical elements that will hold the controller. You can shape these into arms, a character, or a minimalist arch. Ensure these supports are thick enough to bear weight.
- Integrate the cradle: Continuously test the controller’s fit as you sculpt, ensuring it rests securely without wobbling. Create a slightly concave area or two upward-facing prongs for the controller to sit on.
- Smooth and refine: Use sculpting tools and your fingers to smooth out any seams, add details, or refine the shape.
- Preheat oven: Follow the polymer clay instructions for specific baking temperature (typically 275°F / 130°C) and preheat your oven.
- Bake the holder: Place the sculpted holder on the lined baking sheet. Bake for 45-60 minutes, or as per package instructions for thicker pieces, using an oven thermometer.
- Cool and finish: Let the holder cool completely. Once hardened, it will be a robust, durable clay gift. Optional: apply a clear gloss glaze for added shine and protection, and felt pads to the bottom.
Pro-Tip: When sculpting a gaming controller holder with polymer clay, prioritize stability and a precise fit. Use the actual controller for frequent test fittings during the sculpting process to ensure the design is both functional and secure once baked.
5. Create Minimalist Keychain Duo from Air Dry Clay
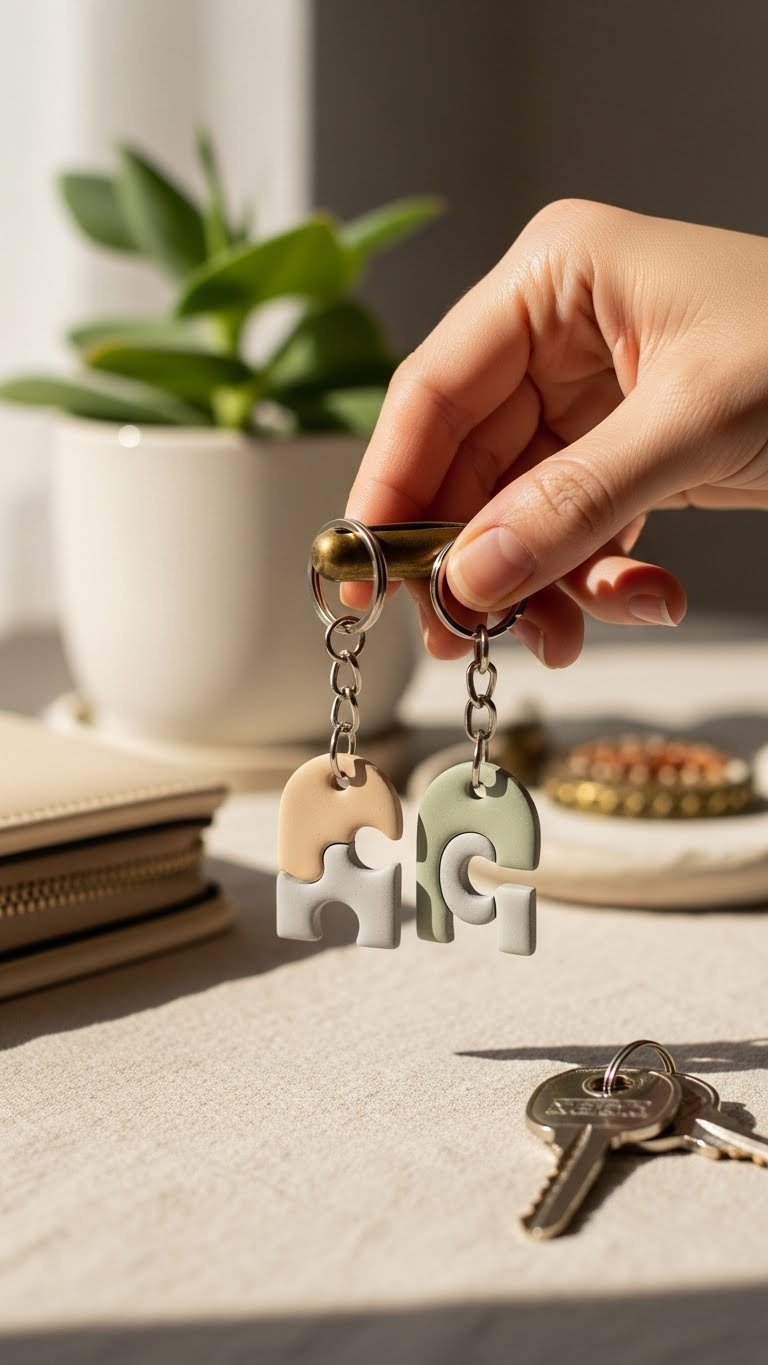
Match your styles! Pin this cute DIY to your ‘Couples Craft Ideas’ board!
Supplies Needed
- Air dry modeling clay (small amount, chosen color)
- Non-stick mat or parchment paper
- Rolling pin
- Small cookie cutters (for simple shapes) or craft knife
- Small hole punch or skewer
- Fine-grit sandpaper
- Clear acrylic sealant
- Keychain rings (2 sets)
- Strong adhesive (e.g., E6000 or super glue)
Step-by-Step Directions
- Prepare clay: Knead a small portion of air dry clay until soft and smooth.
- Roll and cut shapes: Roll the clay to about 1/8 inch thickness. Use cookie cutters or a craft knife to cut two identical or complementary shapes (e.g., two halves of a heart, puzzle pieces, simple rectangles with initials).
- Punch holes: Use a small hole punch or skewer to create a clean hole at the top of each clay piece where the keychain ring will attach. Ensure the hole is large enough for the ring but not too close to the edge.
- Smooth and dry: Gently smooth any rough edges with your finger. Allow the clay pieces to dry completely (24-72 hours), flipping occasionally.
- Sand (optional): Once dry, lightly sand any remaining rough spots for a professional finish.
- Seal for protection: Apply 2-3 coats of clear acrylic sealant to both sides of each clay piece, allowing each coat to dry completely. This makes them more durable and water-resistant.
- Attach keychain rings: Thread a keychain ring through the hole of each clay piece. Use a small drop of strong adhesive to secure the ring in place if desired, especially if the hole is slightly loose, creating durable clay gifts.
Pro-Tip: For air dry clay keychains, drying time is critical. Ensure the clay is completely dry before sealing and attaching hardware to prevent future breakage. Placing them in a warm, dry area can accelerate the process slightly, but avoid direct heat.

6. Decorate a Hand-Painted Mug with Clay Accents (Oven-Bake Clay)

Sip with style! Pin this custom mug idea to your ‘Unique Gifts for Him’ board!
Supplies Needed
- Plain ceramic mug (dishwasher and microwave safe, if desired)
- Oven-bake clay (small amounts, chosen colors)
- Clay cutting tool or craft knife
- Small cookie cutters (optional, for simple shapes)
- Non-stick work surface
- Baking sheet lined with parchment paper
- Oven thermometer
- Strong, waterproof adhesive suitable for ceramic and clay (e.g., E6000)
- Optional: fine-tip paint brushes, ceramic paints, clear gloss sealant
Step-by-Step Directions
- Condition the clay: Knead small portions of oven-bake clay until soft and pliable.
- Create clay accents: Roll clay thinly (1/8 inch) and cut out small shapes (initials, symbols, small creatures) or sculpt tiny, flat designs.
- Bake accents: Place clay pieces on a lined baking sheet. Bake according to oven-bake clay package instructions (e.g., 275°F / 130°C for 15-20 minutes, depending on thickness). Allow to cool completely.
- Prepare mug: Ensure the ceramic mug is clean and dry. Lightly sand the area where the clay will attach for better adhesion.
- Attach accents: Apply a small amount of strong, waterproof adhesive to the back of each baked clay accent. Carefully press it onto the desired spot on the mug. Hold firmly for a few seconds.
- Cure adhesive: Allow the adhesive to cure completely, following the product’s instructions (often 24-72 hours), before handling or washing the mug.
- Paint (optional): If desired, paint additional designs directly onto the mug using ceramic paints after the clay accents are securely attached and adhesive cured.
- Seal (optional): Apply a clear gloss sealant over the entire design for added protection, ensuring it is food-safe if it will contact the lip of the mug.
Pro-Tip: When attaching baked oven-bake clay accents to a ceramic mug, use a high-quality, waterproof adhesive like E6000. For best results, allow at least 72 hours for the adhesive to fully cure before the first wash to ensure maximum durable clay gifts.

7. Build a Small Desktop Planter with Air Dry Clay

Bring some green to his desk! Pin this DIY planter to your ‘Home Decor’ board!
Supplies Needed
- Air dry modeling clay (at least 2 lbs, natural or chosen color)
- Non-stick mat or parchment paper
- Rolling pin
- Clay cutting tool or craft knife
- Small bowl of water (for smoothing and joining)
- Skewer or drill bit (for drainage hole)
- Acrylic paints and brushes (optional)
- Clear, waterproof sealant (e.g., outdoor-grade acrylic sealant or resin)
- Optional: small succulent or plant, potting soil
Step-by-Step Directions
- Prepare clay: Knead a generous amount of air dry clay until soft and pliable.
- Form the base: Roll out a thick slab (1/2 inch) for the base and cut it into a circle or square (approx. 4-5 inches diameter).
- Build the walls (coil method): Roll long, even coils of clay (approx. 1/2 inch thick). Score and dampen the edge of your base, then attach the first coil, pressing firmly. Continue adding coils, scoring and dampening each joint, until the desired height (approx. 4-6 inches) is reached. Smooth the inside and outside seams.
- Create drainage hole: Use a skewer or small drill bit to create a drainage hole in the center of the base.
- Smooth and dry: Smooth the entire exterior and interior of the planter with damp fingers. Allow the planter to dry completely (3-5 days), turning it periodically to ensure even drying and prevent cracking.
- Sand and paint (optional): Once fully dry, lightly sand any rough areas. Paint with acrylics if desired, then let dry.
- Seal thoroughly: Apply 3-4 coats of a clear, waterproof sealant to the inside and outside of the planter, ensuring all surfaces are covered and each coat dries completely. This is crucial for creating durable clay gifts suitable for plants.
- Add plant: Once the sealant is fully cured, add a small layer of drainage material (e.g., pebbles), potting soil, and your chosen succulent or plant.
Pro-Tip: When making an air dry clay planter, selecting an appropriate waterproof sealant is paramount. Opt for an outdoor-grade acrylic sealant or a resin coating to genuinely protect against moisture and ensure the planter’s longevity, making it a truly durable clay gift.

8. Form Intricate Clay Jewelry (Pendant or Cufflinks) with Polymer Clay
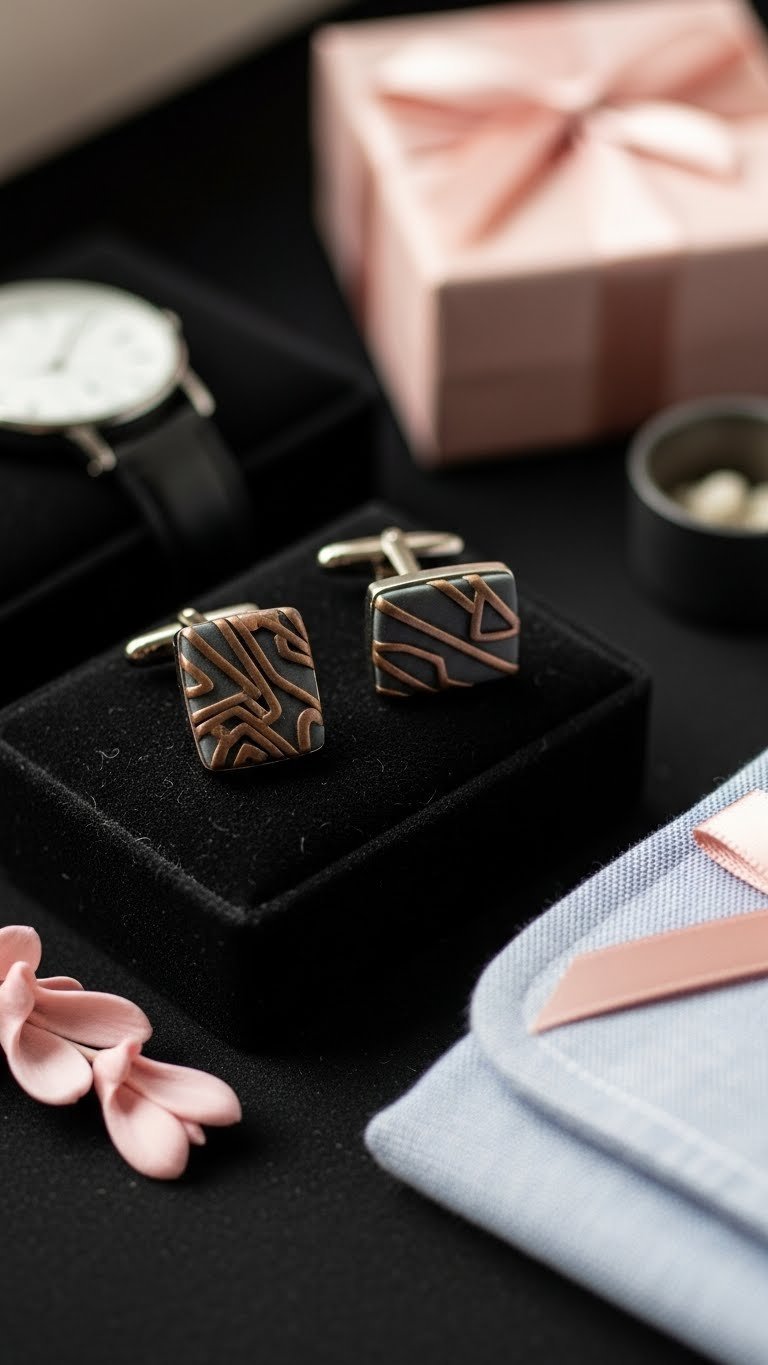
Elevate his style! Pin this sophisticated DIY to your ‘Mens Accessories’ board!
Supplies Needed
- Polymer clay (various colors for design, or metallic clay)
- Clay conditioning machine or acrylic rolling pin
- Precision clay cutting tools or craft knife
- Texturing tools or small stamps (optional)
- Jewelry findings (e.g., pendant bail and chain, or cufflink blanks)
- Strong, quick-drying adhesive (e.g., E6000 or super glue)
- Non-stick work surface
- Baking sheet lined with parchment paper
- Oven thermometer
- Optional: fine-grit sandpaper, clear gloss glaze
Step-by-Step Directions
- Condition polymer clay: Thoroughly knead and condition the chosen polymer clay colors until very pliable.
- Design and form: Create your intricate design. This could involve small abstract shapes, geometric patterns, texturing with tools, or even creating a “mokume gane” effect with layered clays.
- Shape jewelry pieces: For a pendant, shape your design and create a small hole at the top for a jump ring (or plan to attach a bail after baking). For cufflinks, create two identical, flat, small designs that will fit the cufflink blanks.
- Refine details: Use precision tools to smooth edges and perfect any intricate details.
- Bake the clay: Carefully transfer pieces to the lined baking sheet. Bake according to polymer clay package instructions, using an oven thermometer for accuracy (e.g., 275°F / 130°C for 20-30 minutes). Allow to cool completely.
- Sand and glaze (optional): Once cool, lightly sand any rough edges. Apply a clear gloss glaze for a polished, finished look, and allow to dry.
- Attach findings: Use a strong adhesive to attach the baked clay piece(s) to your chosen jewelry findings (e.g., glue a pendant bail to the back of a pendant, or glue the clay design to the flat pad of a cufflink blank).
- Cure adhesive: Allow the adhesive to cure fully, typically 24-72 hours, before handling or wearing the durable clay gift.
Pro-Tip: Achieving intricate details in polymer clay jewelry requires very well-conditioned clay and patience. For small pieces like cufflinks, using a pasta machine for even clay thickness and a sharp craft blade for precise cuts ensures a professional finish.

9. Make a Sentimental Keepsake Box with Air Dry Clay
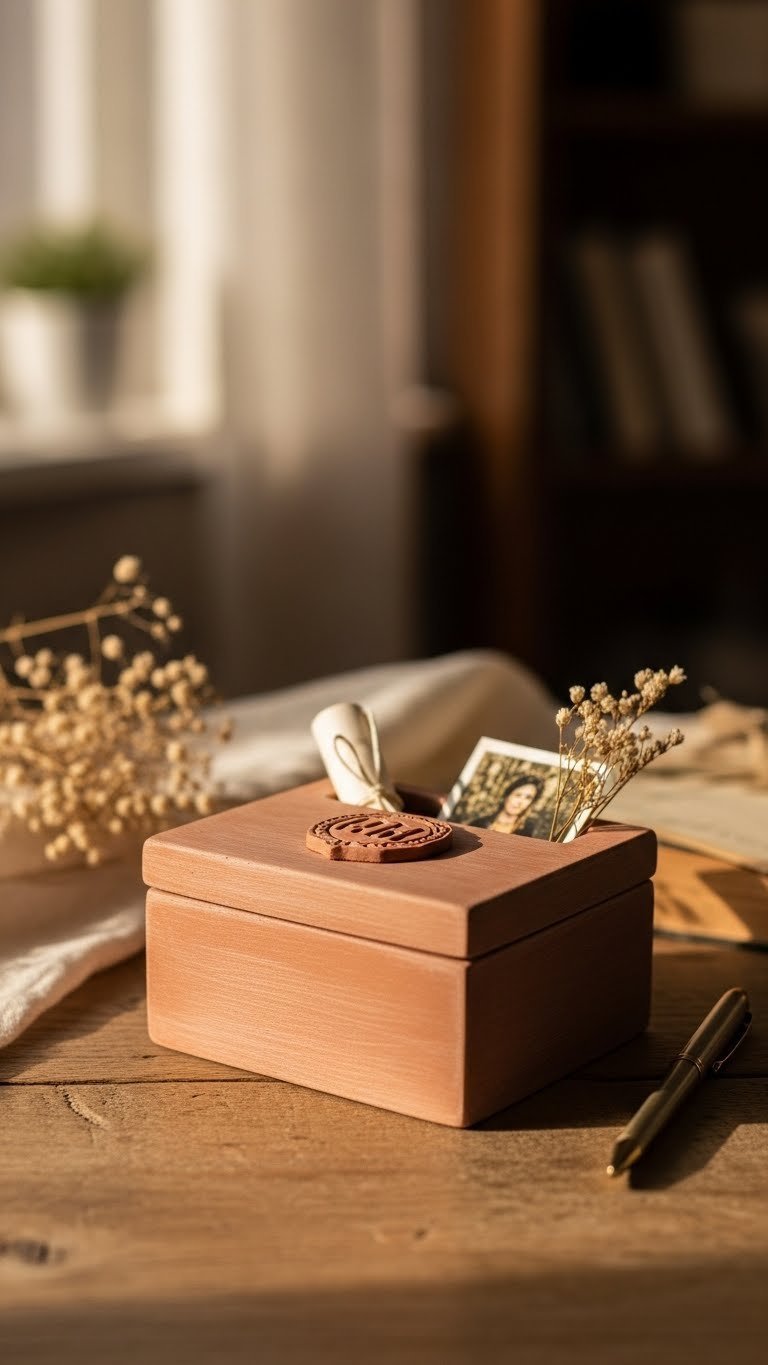
Store memories with love! Pin this sentimental DIY to your ‘Personalized Gifts’ board!
Supplies Needed
- Air dry modeling clay (at least 2-3 lbs, chosen color)
- Non-stick mat or parchment paper
- Rolling pin
- Ruler and craft knife or clay cutting tool
- Small bowl of water (for smoothing and scoring)
- Texturing tools (e.g., fabric, stamps, carving tools)
- Clear acrylic sealant (matte or gloss)
- Optional: acrylic paints, fine-grit sandpaper, small wooden box (as a mold guide)
Step-by-Step Directions
- Condition the clay: Knead a large portion of air dry clay until soft and free of cracks.
- Roll out slabs: Roll out clay into even slabs (approx. 1/4 inch thick). You’ll need one base, four sides, and one lid.
- Cut pieces: Using a ruler and craft knife, cut out:
- 1 base piece (e.g., 4×6 inches)
- 2 side pieces (e.g., 4 inches tall x 6 inches long)
- 2 end pieces (e.g., 4 inches tall x 4 inches wide)
- 1 lid piece (slightly larger than base, e.g., 4.25×6.25 inches, for an overhang)
- Add texture (optional): Before assembling, press desired textures or patterns into the clay slabs.
- Assemble the box: Score and dampen all edges that will be joined. Attach the side pieces to the base first, then the end pieces, pressing firmly to create strong seams. Smooth all inside and outside seams with damp fingers.
- Create lid details: On the lid piece, add any personalized details like initials or dates using stamps or carving tools.
- Dry thoroughly: Allow the box structure (without the lid) to dry for at least 24 hours to gain some rigidity. Then, place the lid loosely on top for it to dry, ensuring it fits well but doesn’t fuse. Allow the entire box and lid to dry completely (3-5 days), turning occasionally.
- Sand and paint (optional): Once completely dry, lightly sand any rough edges. Paint with acrylics if desired, then let dry.
- Seal for durability: Apply 2-3 coats of clear acrylic sealant to the inside and outside of both the box and the lid, allowing each coat to dry fully to create a durable clay gift that protects its contents.
Pro-Tip: When constructing a keepsake box with air dry clay, ensure all scoring and slipping is done thoroughly at every joint. This creates a stronger bond and prevents cracks as the clay dries, resulting in a more robust and durable clay gift.
Key Takeaways: Your Quick Guide to a Thoughtful Gift for Boyfriend with Clay
- Choosing the right clay type is crucial: Air dry clay is ideal for beginners and less functional items, while polymer clay offers greater durability and intricate detail after baking, ensuring durable clay gifts.
Personalization elevates any gift: Incorporating initials, significant dates, or designs specific to his interests transforms a simple clay craft into a truly meaningful clay item that shows you care.
Preparation and patience are key: Thoroughly conditioning clay and allowing ample drying or baking time, coupled with proper sealing, are essential for creating durable clay gifts that last.
Functionality adds value: Beyond aesthetics, consider making practical clay crafts like phone stands, coasters, or planters that he can use daily, integrating seamlessly into his routine.
Don’t forget the finishing touches: Sealing your handmade clay gift for boyfriend protects it from wear, moisture, and ensures its longevity, making it a lasting keepsake.
DIY gifts are budget-friendly and thoughtful: Creating a gift for boyfriend with clay allows for a deeply personal expression of affection without breaking the bank, offering a unique alternative to store-bought presents.
People Also Ask About Gift for Boyfriend with Clay
What are easy clay gift ideas for a boyfriend?
Easy clay gift ideas for a boyfriend often include personalized items like catch-all dishes, custom keychains, or simple coaster sets, which require basic shaping techniques. These projects are ideal for beginners and can be made quickly, especially when using air dry clay, allowing for thoughtful customization without complex steps.
What kind of clay is best for making gifts for him?
The best clay type depends on the gift’s intended use and desired durability; air dry clay is excellent for decorative pieces and beginners, while polymer clay is superior for functional, highly durable items. Polymer clay is baked for strength, making it ideal for phone stands or jewelry, whereas air dry clay requires thorough sealing to achieve reasonable durability.
Are air dry clay gifts durable for everyday use?
Air dry clay gifts can be reasonably durable for everyday use if properly sealed with multiple coats of a strong, waterproof sealant, but they are generally less robust than baked polymer clay. They are best suited for items not subject to heavy wear, moisture, or impact, like trinket dishes or decorative pieces.
How can I personalize a clay gift for my boyfriend?
Personalize a clay gift by incorporating his initials, a significant date, a small symbol reflecting his hobbies, or even a custom color palette that he favors. These details can be embossed, carved, painted, or sculpted directly into the clay, transforming a generic item into a unique clay creation that holds special meaning.
What tools do I need for clay crafting beginner projects?
For beginner clay crafting projects, essential tools typically include a non-stick work surface, a rolling pin, a craft knife or cutting tool, and a small bowl of water for smoothing. Depending on the project, you might also need a skewer for punching holes, sandpaper for finishing, and acrylic paints or clear sealant for decoration and protection.
How long does air dry clay take to dry completely?
Air dry clay typically takes 24-72 hours to dry completely, depending on the thickness of the piece and the humidity of the environment. Thicker creations may require up to a week, and it’s crucial to turn the piece periodically to ensure even drying and prevent cracking for a truly durable clay gift.
Is polymer clay safe for making functional gifts?
Yes, polymer clay is generally safe for making functional gifts, especially once baked, as it becomes hard and durable. It’s recommended to use food-safe sealants if the item will come into contact with food, such as the lip of a mug, to ensure complete safety and longevity.
How do I prevent clay gifts from cracking while drying or baking?
To prevent clay gifts from cracking, ensure even thickness throughout your piece, dry air dry clay slowly and evenly by turning it, and use an oven thermometer for precise polymer clay baking. Avoid forcing drying with heat, and for polymer clay, don’t overbake; follow package instructions diligently.
Where can I find more inspiration for masculine clay gift ideas?
For more inspiration on masculine clay gift ideas, explore online crafting communities on platforms like Pinterest and Reddit, which offer a wealth of creative projects and design aesthetics. Focus on neutral or earthy color palettes, strong geometric shapes, and practical items that align with common male interests for masculine clay ideas.
What’s the difference between air dry clay and polymer clay for gifts?
Air dry clay hardens through evaporation and doesn’t require an oven, making it beginner-friendly for decorative items, but it’s generally less durable and water-resistant. Polymer clay, however, requires oven baking to cure, resulting in a significantly stronger, more durable, and often waterproof finish, making it ideal for functional or long-lasting gifts.
Final Thoughts on Creating a Gift for Boyfriend with Clay
Creating a gift for boyfriend with clay transcends a simple exchange of items; it’s an investment of time, creativity, and heartfelt effort that culminates in a truly unique and meaningful clay item. Throughout this guide, we’ve explored 9 essential DIY ideas, from practical phone stands to sentimental keepsake boxes, demonstrating the incredible versatility of both air dry clay and polymer clay. Each project, when executed with care and personalized touches, transforms from a craft into a cherished token of affection.
Remember that the true value of these handmade clay gifts for boyfriend lies not in perfection, but in the thought and dedication behind them. By following our step-by-step instructions and incorporating the pro-tips, you’re not just making a gift; you’re crafting a memory and showing a level of care that no store-bought item can replicate. Embrace the process, enjoy the creation, and present your personalized clay gift for him with pride. Your effort will undoubtedly be appreciated.
What gift for boyfriend with clay are you most excited to make first? Share your project ideas and experiences in the comments below
Last update on 2025-12-28 / Affiliate links / Images from Amazon Product Advertising API