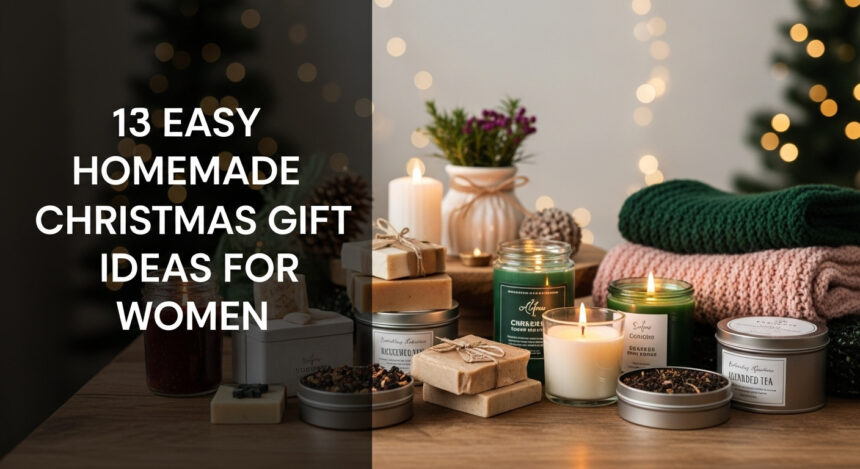
Struggling to Find a Christmas Gift That Truly Says “I Care”?
The holiday season is full of joy, but it can also bring the stressful hunt for the perfect gift. It’s easy to get lost in crowded stores or endless online pages, only to end up with something that feels generic and impersonal. You want to give the special women in your life—your mom, sister, wife, or best friend—a gift that shows you truly put thought and heart into it, something a store-bought item just can’t replicate.
A handmade Christmas gift shows true thoughtfulness because it requires your time, effort, and personal touch. It moves beyond a simple transaction to become a memorable experience, creating a unique item tailored specifically to the recipient’s tastes and personality. We’ve spent countless hours testing and curating DIY projects that deliver a high-end result with beginner-friendly steps, ensuring your gift is both beautiful and cherished. Forget gifts that scream “cheap DIY”; this list is packed with simple, elegant, and budget-friendly ideas that look and feel absolutely luxurious.
13 Easy Homemade Christmas Gift Ideas for Women They’ll Absolutely Adore (2025)
Get ready to be inspired! This list is your go-to guide for creating stunning handmade presents that she’ll actually use and love. We’ve handpicked a variety of projects, from pampering self-care treats to chic home decor, ensuring there’s something for every woman on your list. Each idea is chosen for its simplicity and gorgeous results. Each idea includes our pro-tips for presentation and customization, helping you elevate your handmade gift from simple to stunning.
1. Luxurious Personalized Hand Scrubs
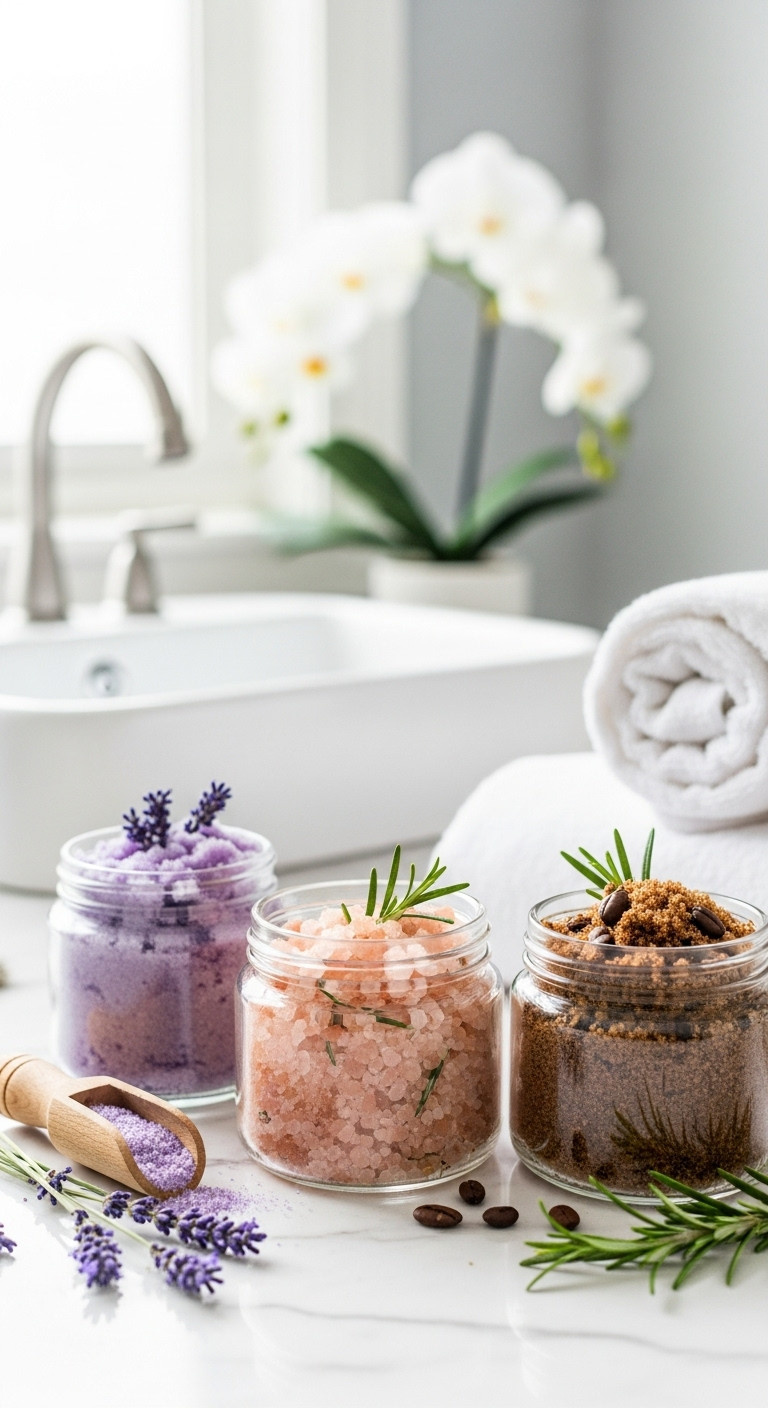
Save this pampering gift idea to your ‘DIY Beauty’ board!
You can create a luxurious, spa-quality hand scrub with just a few simple kitchen ingredients. This gift is perfect for providing a moment of pampering during the dry winter months. It’s incredibly easy to customize with different scents and textures.
- Materials Needed: 1 cup granulated sugar (or Himalayan pink salt), 1/2 cup carrier oil (coconut, almond, or olive), 10-15 drops of essential oil (lavender, rosemary, peppermint), Optional: dried lavender buds, rosemary sprigs, or coffee grounds for texture. You’ll also need attractive, airtight containers; small glass cosmetic jars with bamboo lids give a very high-end, spa-like feel.
- Step-by-Step Directions:
- In a medium bowl, combine the sugar or salt with the carrier oil. Mix until it has the consistency of wet sand.
- Stir in your chosen essential oils and any optional textural elements.
- Carefully spoon the scrub into your clean, dry jars.
- Seal the jars and add a custom label or a ribbon for a finishing touch.
Pro-Tip: For a two-tone layered effect, mix half the scrub, place it in the jar, then add a drop of food coloring to the remaining half before adding the second layer. It looks incredibly professional.

2. Cozy DIY Scented Candles

Pin this cozy candle tutorial for a perfect winter afternoon project!
A homemade scented candle offers a personalized touch of warmth and coziness that everyone appreciates. Using natural soy wax creates a clean-burning candle, and you can tailor the scent profile perfectly to the recipient’s preferences, from festive pine to calming lavender.
- Materials Needed: Natural soy wax flakes, candle wicks with bases, fragrance oil or essential oils, heat-proof containers (like mason jars), a pouring pot or microwave-safe bowl, clothespins or wick centering tools. A complete soy wax candle making kit for beginners is the easiest way to get everything you need in one box.
- Step-by-Step Directions:
- Secure the wick to the bottom center of your container using a dab of melted wax or a wick sticker.
- Melt the soy wax flakes in a double boiler or in the microwave in 30-second intervals until fully liquid.
- Let the wax cool slightly, then stir in your chosen fragrance oil. A general rule is 1 oz of fragrance per pound of wax.
- Carefully pour the scented wax into your container. Use a clothespin laid across the top of the jar to hold the wick straight and centered.
- Let the candle cool and cure for at least 24 hours before trimming the wick to 1/4 inch.
Lesson Learned: Don’t overheat your wax! Overheating can burn off the fragrance. Use a thermometer to ensure you add the fragrance at the correct temperature specified on your wax packaging, usually around 185°F (85°C).

3. Elegant Customized Stationery Set

Save this thoughtful & classic gift idea to your ‘Handmade Gifts’ board!
A customized stationery set is a timeless and sophisticated gift that encourages the lost art of letter writing. With a simple monogram stamp, you can transform a basic set of notecards into a deeply personal and elegant present that feels incredibly high-end.
- Materials Needed: A set of blank notecards and envelopes (A2 size is classic), a high-quality ink pad in a classic color like black or navy, and the star of the show: a personalized stamp. Look for a custom initial monogram stamp kit online which often includes the stamp and ink.
- Step-by-Step Directions:
- Practice on a scrap piece of paper first to get a feel for the pressure needed for a clean impression.
- Press the monogram stamp firmly onto the ink pad, ensuring even coverage.
- Carefully press the stamp onto the corner or top center of a notecard. Apply even pressure and lift straight up.
- Repeat for all notecards. You can also stamp the flap of the envelopes for a coordinated look.
- Let the ink dry completely before stacking. Tie the finished set together with a beautiful silk ribbon.
Pro-Tip: For a touch of luxury, use an embossing heat tool and embossing powder after stamping. This creates a raised, glossy finish that looks incredibly expensive.

4. Chic No-Sew Monogrammed Pillows
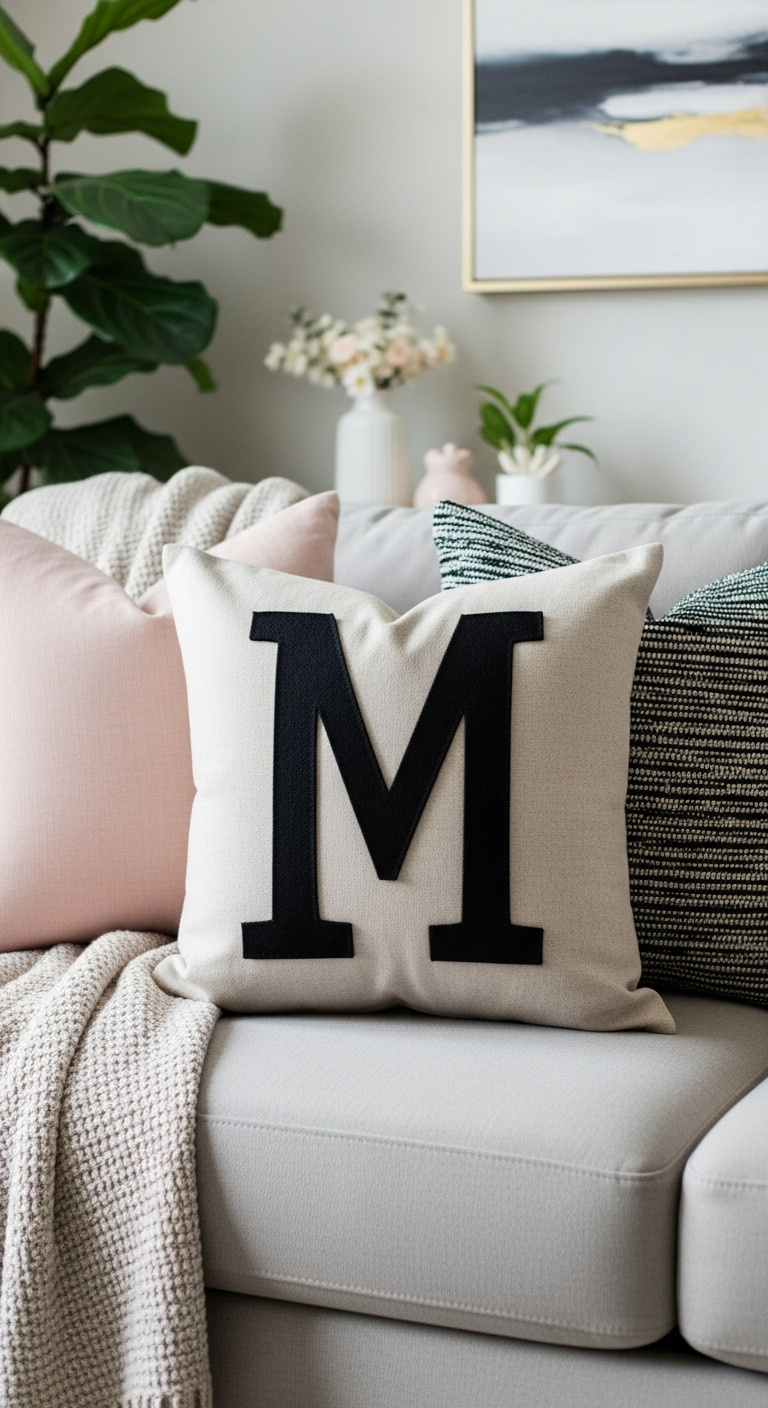
No sewing machine? No problem! Pin this easy pillow idea now.
Create a stylish, personalized decorative pillow without touching a sewing machine by using permanent fabric glue. This project allows you to make a custom piece of home decor that looks like it came from a high-end boutique in under an hour.
- Materials Needed: A blank pillow cover in a neutral color, a pillow insert, a sheet of felt in a contrasting color, a large letter stencil of the desired initial, a fabric pencil, sharp scissors, and high-quality permanent fabric glue.
- Step-by-Step Directions:
- Place the stencil on the felt sheet and trace the letter with a fabric pencil.
- Carefully cut out the felt letter.
- Position the felt letter on the front of the pillow cover. Use a ruler to ensure it’s centered.
- Apply a thin, even line of fabric glue to the back of the felt letter, paying close attention to the edges.
- Firmly press the letter onto the pillow cover. Place a heavy book on top and let it dry completely according to the glue’s instructions.
- Once dry, insert the pillow form into the cover.
Pro-Tip: Use painter’s tape to create a small, temporary border around where you’ll place the letter on the pillow cover. This helps prevent any accidental glue smudges on the visible fabric.

5. Rejuvenating Homemade Bath Salts
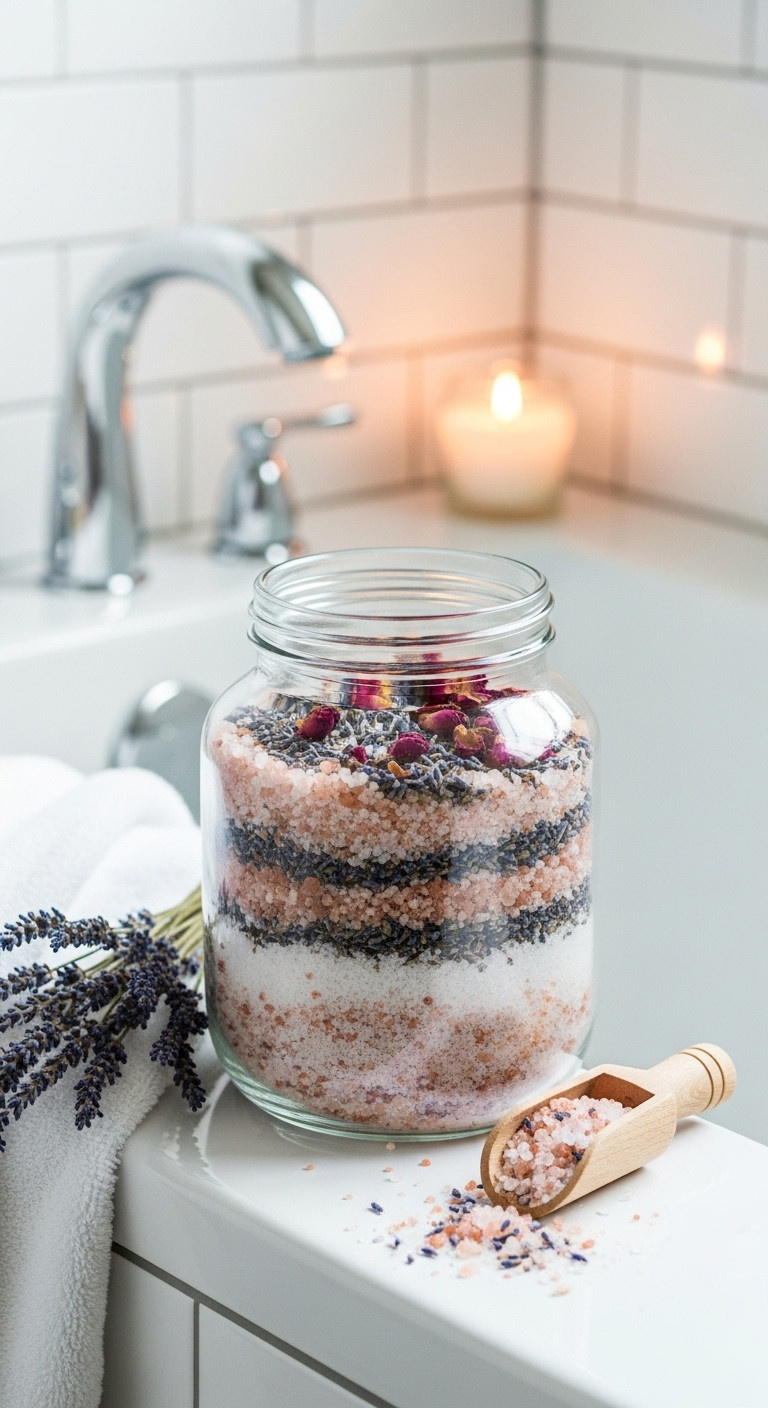
Give the gift of relaxation! Save this simple bath salt recipe.
A jar of homemade bath salts is a beautiful and therapeutic gift that encourages rest and self-care. Combining mineral-rich salts with calming essential oils and delicate dried flowers creates a visually stunning mix that turns a simple bath into a luxurious escape.
- Materials Needed: 2 cups of plain unscented Epsom salt, 1/2 cup coarse sea salt or pink Himalayan salt, 15-20 drops of calming essential oils (like lavender or chamomile), 2 tablespoons of dried flower petals (lavender, rose, or calendula), a large mixing bowl, and an airtight jar for storage.
- Step-by-Step Directions:
- In the large bowl, combine the Epsom salt and sea salt.
- Add the essential oils and mix thoroughly with a spoon or whisk to break up any clumps and distribute the scent evenly.
- Gently fold in the dried flower petals.
- Transfer the mixture into a clean, dry airtight jar.
- Add a ribbon and a tag with instructions: “Add 1/2 cup to a warm bath, relax, and enjoy.”
Lesson Learned: Always add essential oils to the salt before adding delicate dried flowers. The vigorous mixing required to distribute the oil can crush the petals if they are added too early.

6. Personalized Drink Stencils for Coffee Lovers

The perfect gift for a coffee addict! Pin this unique idea.
For the woman who loves her morning latte, a set of custom drink stencils is a unique and creative gift. This allows her to add a personal, cafe-style touch to her coffee or hot cocoa, making her daily ritual feel a little more special.
- Materials Needed: A Cricut or similar cutting machine, a sheet of food-safe stencil plastic, and a design idea (an initial, a simple shape like a heart or star). Alternatively, you can purchase a reusable coffee stencil set and repackage it beautifully.
- Step-by-Step Directions:
- (If making your own) Design your simple shape or letter in your machine’s software. Make sure it’s small enough to fit on top of a mug.
- Follow your machine’s instructions to cut the design from the food-safe stencil plastic.
- Carefully weed the design, leaving the negative space.
- To gift, package one or more stencils with a small shaker of high-quality cocoa powder or cinnamon and a beautiful mug. Include a small instruction card.
Pro-Tip: When designing, avoid overly intricate details. Bold, simple shapes work best for creating a clear image with cocoa powder or cinnamon. A simple, bold initial is always a winner.

7. Practical & Chic Monogrammed Tote Bag

Save this stylish and useful DIY gift idea!
Transform a plain canvas bag into a chic, personalized tote with a simple painted monogram. This practical gift is perfect for trips to the farmer’s market, the library, or for daily errands, and the custom initial makes it uniquely hers.
- Materials Needed: A high-quality, blank heavy-duty canvas tote bag, an adhesive letter stencil, fabric paint in a classic color, and a stencil pouncer or sponge brush.
- Step-by-Step Directions:
- Place a piece of cardboard inside the tote bag to prevent any paint from bleeding through.
- Position the adhesive stencil firmly on the front of the bag.
- Pour a small amount of fabric paint onto a paper plate. Dab your sponge pouncer into the paint, then blot off the excess.
- Use an up-and-down dabbing motion to apply the paint over the stencil. Applying thin layers is better than one thick one.
- Once covered, carefully peel off the stencil while the paint is still wet.
- Let the bag dry completely, and heat set it with an iron according to the paint instructions.
Pro-Tip: To avoid paint bleeding under the stencil edges, make sure your pouncer is relatively dry. It’s better to build up the color with 2-3 light coats than to use a brush overloaded with wet paint.

8. Modern DIY Clay Earrings
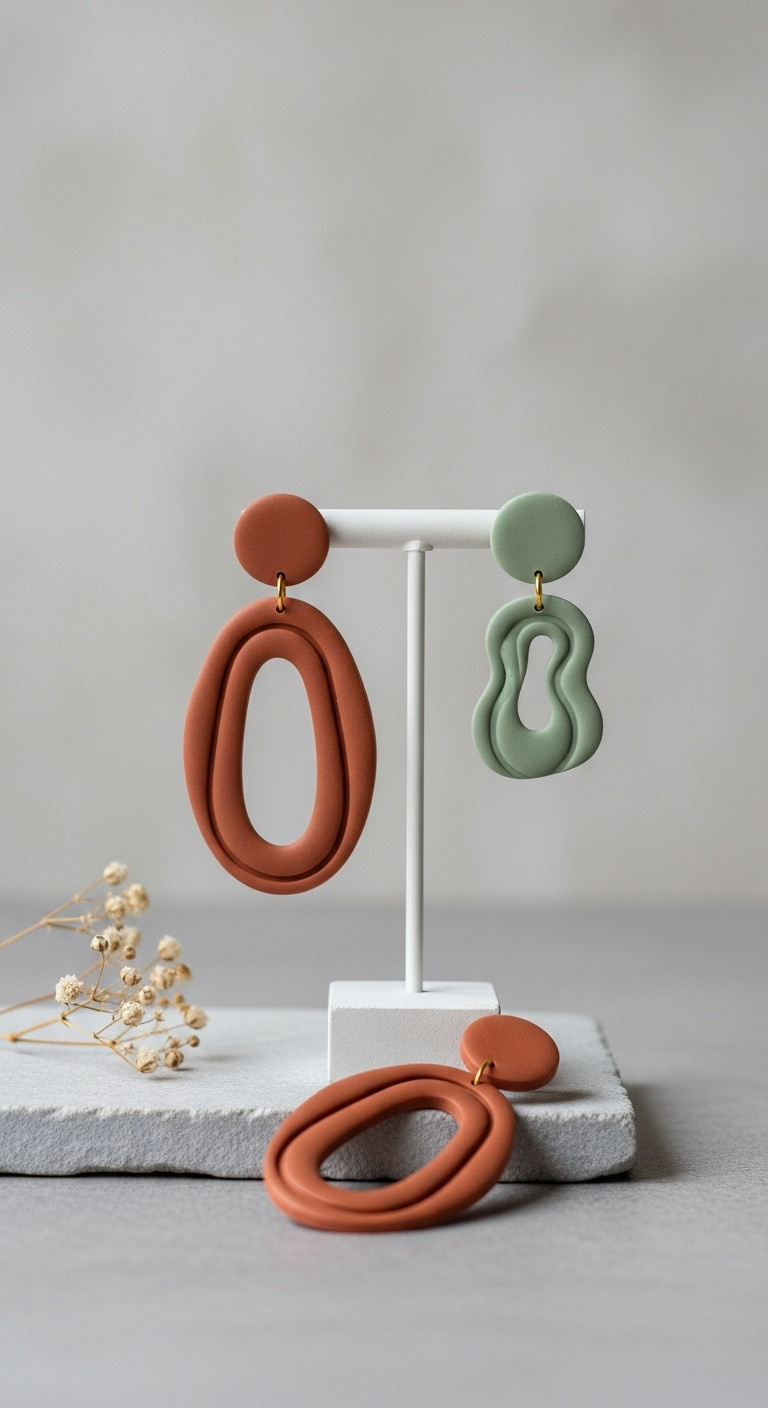
Pin this trendy DIY jewelry idea for a truly unique gift!
Polymer clay is an incredibly beginner-friendly medium for creating modern, lightweight, and stylish earrings. You can easily create custom shapes and colors to match her unique style, resulting in a one-of-a-kind accessory she’ll be proud to wear.
- Materials Needed: Several colors of polymer clay, a small acrylic roller, shape cutters or a craft knife, earring posts, jump rings, super glue, and pliers. The easiest way to start is with a complete polymer clay earring making kit that includes tools and findings.
- Step-by-Step Directions:
- Condition the clay by kneading it until it’s soft and pliable.
- Roll the clay out to your desired thickness (about 1/8 inch).
- Use cutters or a knife to create your desired shapes.
- Use a small pin or needle to poke holes where you will attach jump rings later.
- Bake the clay pieces on a parchment-lined baking sheet according to the package directions.
- Once cooled, assemble the pieces using jump rings and pliers. Glue earring posts to the back of the top pieces.
Lesson Learned: To avoid fingerprints on your clay, you can wear thin latex gloves or gently wipe the unbaked pieces with a cotton swab dipped in rubbing alcohol to smooth the surface before baking.

9. Charming Aged Book Bundles
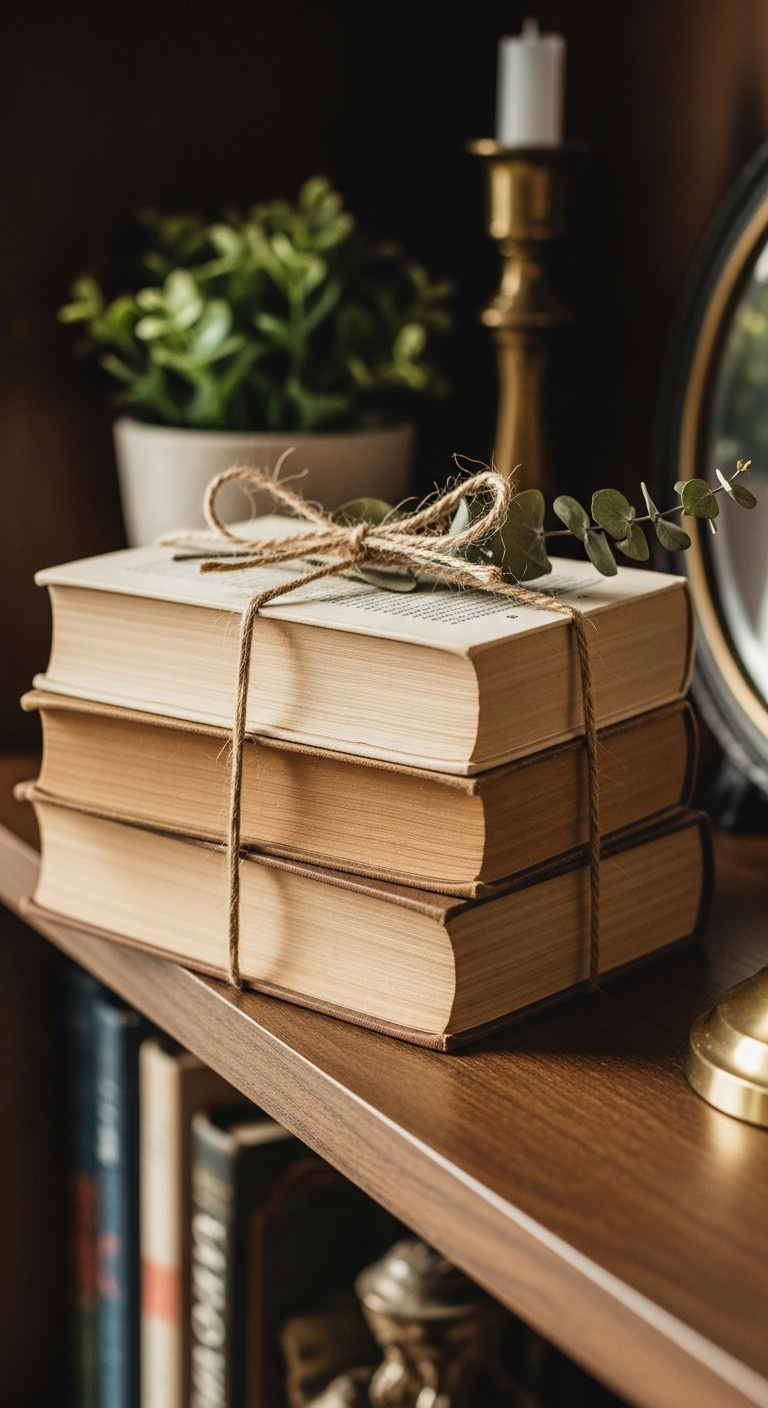
Add this simple, rustic decor idea to your ‘Farmhouse DIY’ board!
For the woman who loves rustic, farmhouse-style decor, a bundle of aged books is an incredibly simple yet charming gift. By removing the covers from thrifted hardcover books, you can create a beautiful, neutral decor piece that adds texture and warmth to any shelf or coffee table.
- Materials Needed: 3-5 old hardcover books from a thrift store, a utility knife, and a roll of natural jute twine.
- Step-by-Step Directions:
- Source inexpensive hardcover books. The content doesn’t matter, only the size and the color of the pages.
- Carefully use a utility knife to slice along the inside seams where the cover attaches to the book block.
- Gently peel the front cover, back cover, and spine away from the pages, leaving just the bound pages.
- Stack the books with the spines facing out. Arrange them so they look pleasingly rustic.
- Wrap a long piece of jute twine around the bundle several times and tie it securely in a knot or a simple bow.
Pro-Tip: For a more authentically aged look, you can lightly brew some black tea, let it cool, and use a sponge to gently dab the edges of the book pages. Let them dry completely before stacking and tying.

10. Aromatic Holiday Simmer Pots
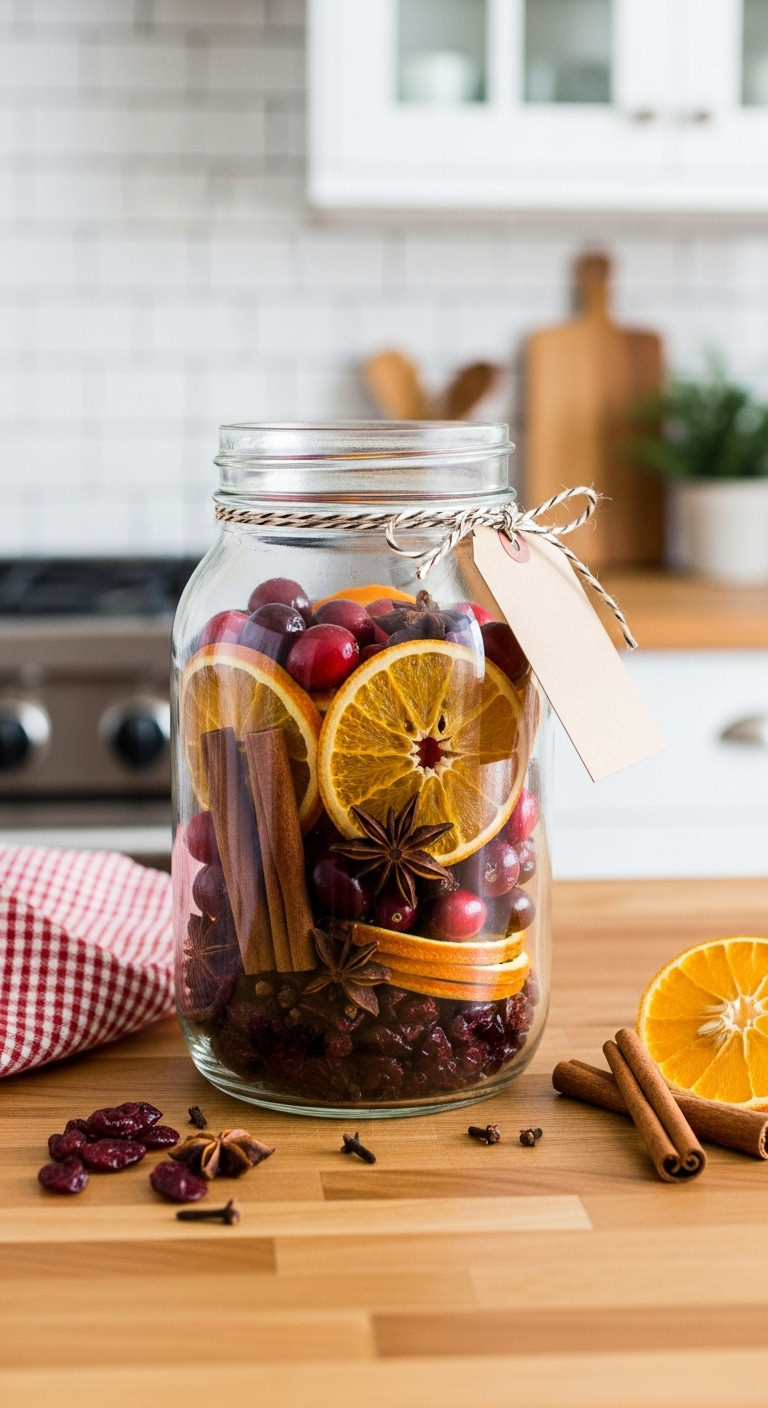
The easiest gift that makes a home smell like Christmas! Pin it now.
A simmer pot jar is the perfect gift for filling a home with the natural, nostalgic scent of the holidays. By layering aromatic ingredients like dried oranges, cinnamon, and cloves in a glass jar, you create a beautiful, “just add water” gift that’s both a treat for the eyes and the nose.
- Materials Needed: Dried orange slices, fresh or dried cranberries, cinnamon sticks, whole cloves, star anise, a sprig of fresh rosemary or pine, and a large glass jar. You can also package smaller individual servings in small muslin drawstring bags for spices.
- Step-by-Step Directions:
- Ensure all your ingredients are completely dry if you plan to gift this for later use. You can dry fresh orange slices in a dehydrator or on low heat in the oven.
- Artfully layer the ingredients in a clear glass jar, alternating colors and textures for the best visual appeal.
- Seal the jar tightly.
- Create a gift tag with instructions: “Add contents to a small pot, cover with water, and simmer on low heat to fill your home with the scent of the holidays. Add more water as needed.”
Pro-Tip: To make the gift extra special, include a small, inexpensive saucepan as part of a gift basket, making it a complete, ready-to-use present.

11. Rustic Stenciled Decorative Tray
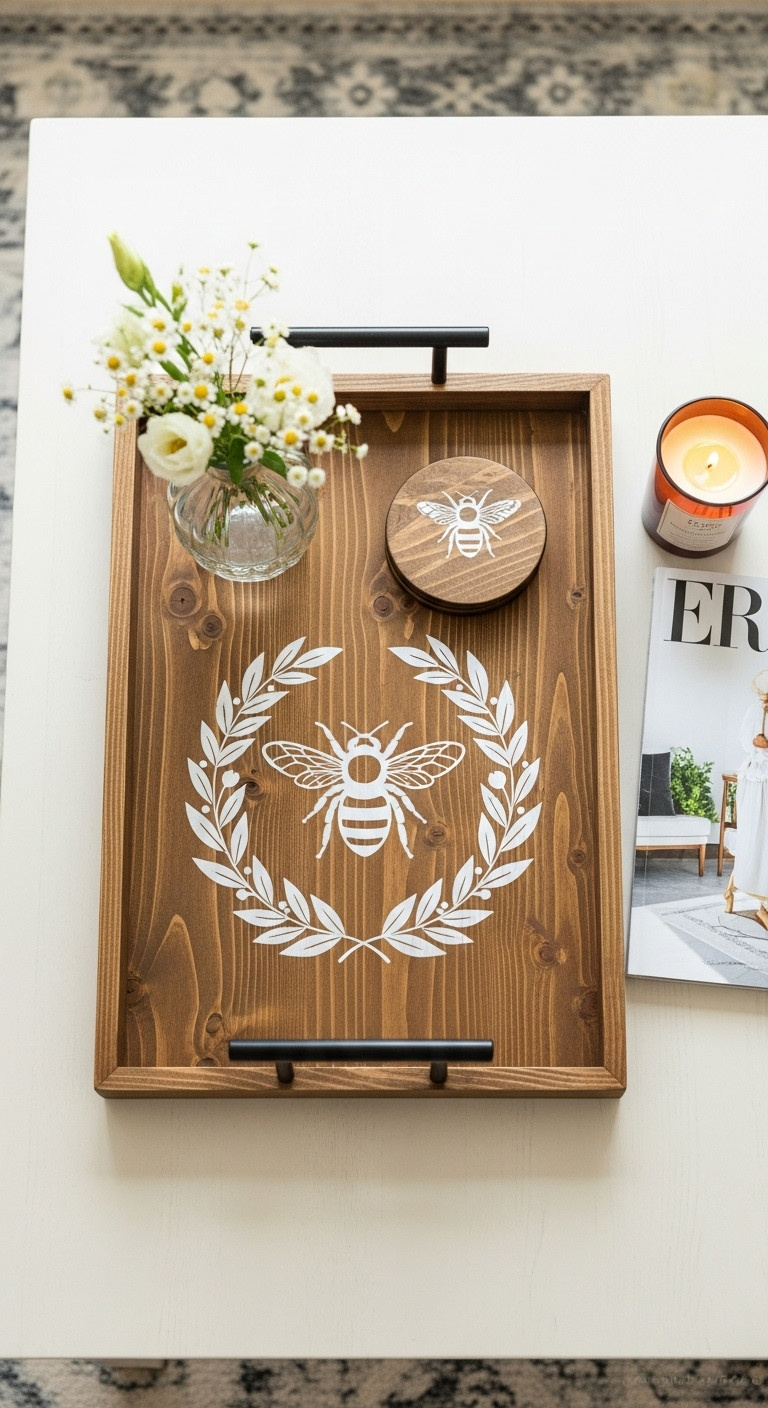
A beautiful and functional gift idea! Save this tray tutorial.
You can transform a simple, unfinished wooden tray into a custom, high-end decor piece with a little stain and paint. This versatile gift can be used for serving drinks, organizing items on a coffee table, or as a decorative base for candles and vases.
- Materials Needed: An unfinished wood serving tray, wood stain, acrylic craft paint, a decorative stencil, a stencil brush, and a clear sealant.
- Step-by-Step Directions:
- Lightly sand the unfinished tray and wipe it clean.
- Apply a coat of wood stain according to the product directions and let it dry completely.
- Position your stencil in the center of the tray’s surface. Use painter’s tape to secure it.
- Using a stencil brush with very little paint on it, pounce the paint onto the stencil in an up-and-down motion.
- Carefully remove the stencil and let the paint dry.
- Apply one or two coats of clear sealant to protect the design, especially if it will be used for serving.
Pro-Tip: For crisp stencil lines, offload almost all the paint from your brush onto a paper towel before you start pouncing. A “dry brush” technique is key to preventing paint from bleeding under the stencil.

12. Charming Indoor Container Gardens
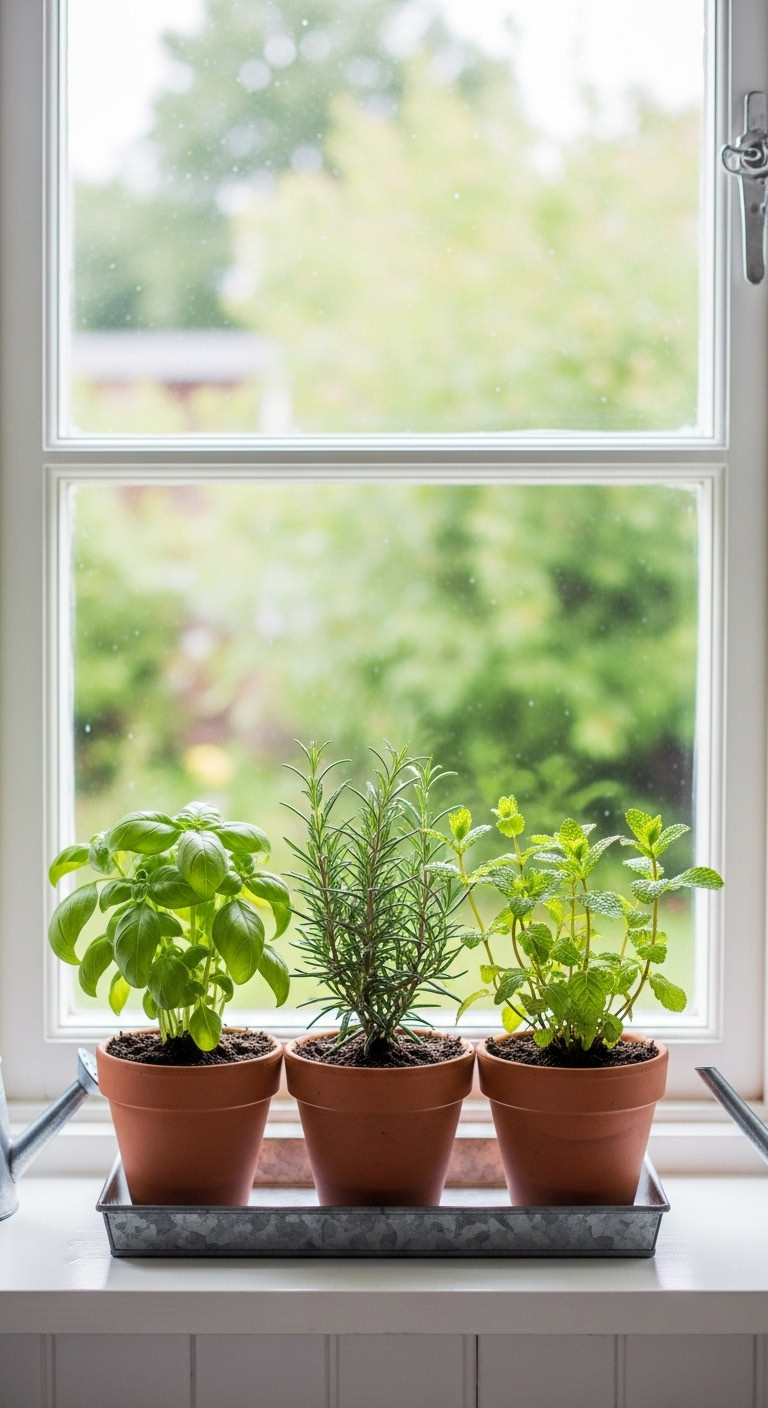
The perfect gift for the plant lover or home cook! Pin this idea.
Give a living gift by creating a small indoor herb garden. This is a wonderful present for anyone who loves cooking with fresh ingredients or simply enjoys having greenery in their home. It’s a gift that continues to grow and give long after the holidays are over.
- Materials Needed: 3-4 small terracotta pots with saucers, high-quality potting mix, small starter herb plants (like basil, mint, rosemary, or thyme), and a tray to hold them.
- Step-by-Step Directions:
- Fill each pot about two-thirds full with potting mix.
- Gently remove a starter herb plant from its nursery container and place it in the center of the pot.
- Add more soil around the plant until it is secure, pressing down lightly.
- Water the plants thoroughly.
- Arrange the potted herbs on a decorative tray for a beautiful and contained presentation. You can also add cute, hand-written plant markers.
Pro-Tip: Choose herbs that have similar water and light requirements to make care easier for the recipient. A trio of Mediterranean herbs like rosemary, thyme, and oregano is a great choice as they all love sun and drier soil.

13. Thoughtful Custom Embroidered Art
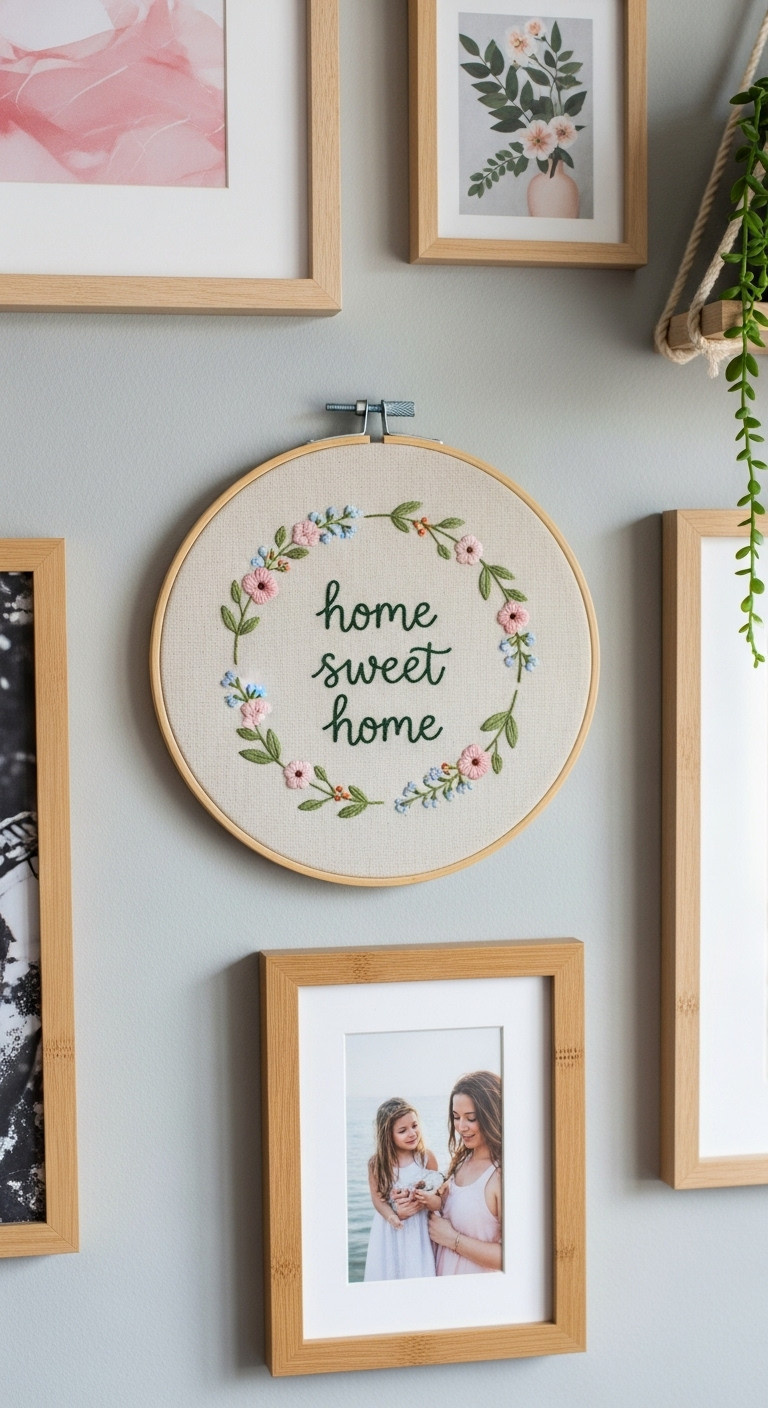
A truly personal gift from the heart. Save this embroidery idea.
Embroidery is a deeply personal way to create a lasting piece of art. Even with basic stitches, you can create a beautiful piece featuring a meaningful quote, a special date, or a simple, modern design. It’s a heartfelt gift that shows immense care and patience.
- Materials Needed: An embroidery hoop, a piece of light-colored linen or cotton fabric, embroidery floss in various colors, an embroidery needle, and a water-soluble transfer pen. For a total beginner, an embroidery starter kit with patterns is the perfect entry point.
- Step-by-Step Directions:
- Choose a simple design or quote. Trace it onto the center of your fabric using the transfer pen.
- Secure the fabric tightly in the embroidery hoop.
- Thread your needle with your chosen color of floss and begin stitching over your traced design. Simple stitches like the backstitch for lettering and a satin stitch for filling shapes are great for beginners.
- Once finished, trim the excess fabric around the back of the hoop and glue it down, or finish the back with a piece of felt.
Pro-Tip: To easily transfer a printed pattern, tape your pattern to a bright window or lightbox, then tape your fabric over it. The light will shine through, allowing you to trace the design perfectly.

Key Takeaways: Your Quick Guide to home made christmas gift ideas for women
- Personalization is Key: Gifts like monogrammed totes, custom stationery, and embroidered art show you made it just for them.
- Focus on Pampering: Self-care items like homemade bath salts, candles, and sugar scrubs are always appreciated and feel luxurious.
- Presentation Matters: Elevate any simple DIY gift by packaging it beautifully in high-quality jars, boxes, or with elegant ribbons and tags.
- Don’t Overcomplicate: The best homemade gifts are often the simplest. Choose a project that fits your skill level and timeline to ensure a fun, stress-free experience.
FAQs About home made christmas gift ideas for women
What are some good homemade Christmas presents on a budget?
Some of the best budget-friendly homemade gifts are simmer pot jars, aged book bundles, and personalized sugar scrubs. These projects use inexpensive, often bulk ingredients or thrifted items but result in a thoughtful and impressive final product. The key is to focus on creative presentation to elevate the perceived value of the gift.
What is the 5 gift rule for Christmas?
The 5 gift rule is a popular minimalist approach to holiday gifting designed to reduce clutter and encourage thoughtfulness. You give five presents, each fitting a specific category: something they want, something they need, something to wear, something to read, and a special “fifth” gift, which could be something to do (an experience) or a surprise.
What makes a DIY gift feel special and not “cheap”?
A DIY gift feels special when it shows high attention to detail and is packaged thoughtfully. Using quality materials (e.g., nice jars for scrubs, good fabric for pillows), ensuring a clean and professional finish, and adding personalized touches like custom labels or monogramming are key. The goal is to create something that is not just handmade, but well-made.
Final Thoughts
This holiday season, remember that the most cherished gifts are the ones that carry a piece of you with them. Crafting something by hand is a beautiful way to show someone how much they mean to you. We hope these ideas have inspired you to create something wonderful!
What’s your favorite homemade gift you’ve ever received? Share it in the comments below
Last update on 2025-12-03 / Affiliate links / Images from Amazon Product Advertising API