Dreaming of the perfect manicure to express your romantic spirit this Valentine’s Day? Many find themselves scrolling endlessly, overwhelmed by the sheer volume of intricate designs and wondering how to achieve that salon-quality look at home. The challenge lies in finding a style that is both stunning and durable enough to last through all your February celebrations.
Valentine’s Day acrylic nails are long-lasting, durable nail enhancements that provide the perfect canvas for intricate, festive nail art like 3D roses, encapsulated glitter, and detailed heart designs using various vibrant red and pink polymers. They are highly sought after for their ability to maintain complex shapes (coffin, almond) throughout the holiday period. Leveraging tested frameworks and data-driven insights, this guide will unlock the secrets to choosing and creating nine essential acrylic designs trending in 2025, ensuring your nails are a true celebration of love and style.
Why Choose Valentines Day Nails Acrylic for 2025‘s Most Romantic Look?
When it comes to celebrating love with stunning nail art, valentines day nails acrylic stand out as the top choice for 2025. Their unparalleled versatility makes them the ideal medium for expressing festive and romantic themes, from subtle elegance to vibrant, detailed declarations of affection. Unlike natural nails or even some gel applications, acrylics provide a strong, durable foundation capable of supporting elaborate designs, ensuring your manicure looks pristine throughout February. This robust nature is why acrylic nails for valentine's day are a go-to for many seeking cute valentines day acrylic nails that truly last.
The preference for acrylics isn’t just about aesthetics; it’s about superior structural integrity and design capacity. According to industry standards for acrylics, the composite material, formed by mixing a liquid monomer and powder polymer, creates a hard, protective layer over your natural nail. This means intricate heart nail designs or even delicate 3D elements can be sculpted without fear of chipping or breakage, offering information gain over competing content that might overlook the crucial benefits of the application technique. What are valentines day acrylic nails specifically? They are nail extensions and overlays meticulously crafted with acrylic materials to feature themes, colors, and embellishments perfectly suited for the romantic holiday. The proven acrylic techniques allow for a wide range of shapes, from long acrylic nails to short acrylic nails, providing a durable coating for creative self-expression. Expert nail technician advice often highlights acrylics for their sculptability, allowing for the precise ‘apex placement in nail design’ crucial for both aesthetics and longevity. This durability, coupled with endless design possibilities, makes acrylics the preferred medium for intricate, long-lasting holiday designs, especially for February 14th.
9 Essential Acrylic Valentines Day Nails Designs Trending in 2025
Ready to transform your fingertips into a canvas of love? This comprehensive listicle provides specific, actionable, and inspirational design concepts for valentines day nails acrylic, ensuring you find the perfect match for your style. Each design includes detailed product lists and application steps, transforming complex ideas into achievable DIY projects or informed salon requests.
1. Sculpting Elegant Coffin Acrylic Nails with Pink Ombre
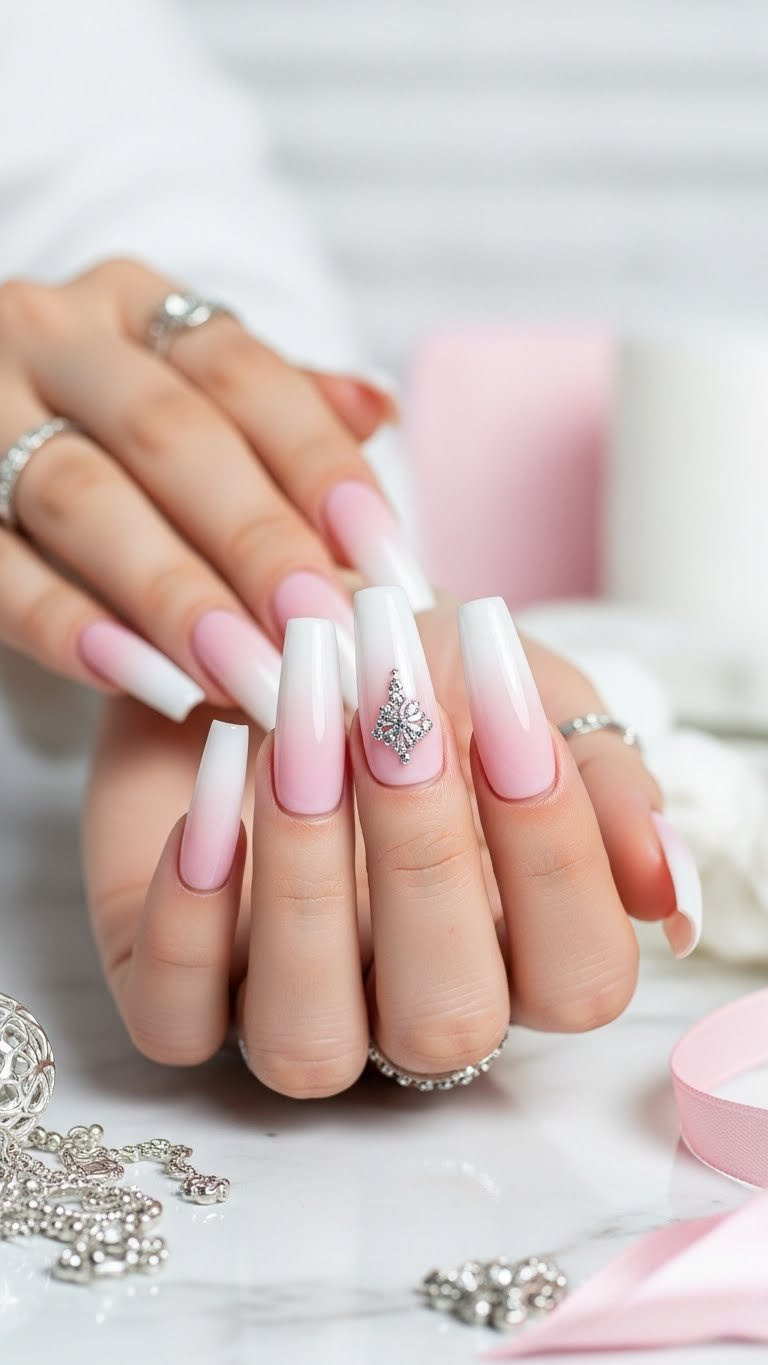
Pin this elegant pink ombre look to your ‘Valentine’s Nail Inspo’ board!
For a sophisticated and trending look this February, consider coffin valentines day acrylic nails featuring a soft pink ombre. This design beautifully combines the classic elegance of the coffin shape with the delicate transition of an ombre effect, creating a truly enchanting aesthetic. The durability of acrylic makes this medium to long length design robust, ensuring a flawless appearance for all your Valentine’s plans.
Products & Tools Used
- Clear or natural coffin nail tips (pre-shaped tips)
- High-quality acrylic liquid monomer (low odor, HEMA-free)
- White and soft pink acrylic polymer powder (finely milled, fast setting)
- Acetone-resistant glass dappen dish
- Large acrylic brush (size 10 or 12, Kolinsky style)
- Medium grit e-file bit (for shaping and refining)
Application Steps
- Prepare: Apply nail primer and attach the coffin tips securely to the natural nail plate, trimming and filing to the desired length.
- Apply Base: Sculpt a clear or nude acrylic base bead, ensuring proper ‘apex placement in nail design’ near the stress area for strength.
- Blend Pink: Apply the soft pink acrylic bead to the cuticle area, feathering the wet edge down toward the middle of the nail.
- Create Ombre: Immediately place the white acrylic bead at the free edge and use the tip of the brush to gently blend the line where the pink and white meet, using tapping motions to achieve a seamless ‘ombre effect’.
- Cure & File: Allow the acrylic to fully cure (harden). Use an ‘e-file techniques for acrylic shaping’ to refine the coffin edge and surface until perfectly smooth.
- Finish: Apply a glossy UV gel topcoat and cure under a lamp for durable shine.
Pro-Tip: Achieving a smooth ombre effect requires controlling the ‘polymer-monomer ratio in acrylics’. If the bead is too wet, the colors will run together; too dry, and blending is impossible. Aim for a medium consistency bead that holds its shape.

2. Creating Perfect Heart Nail Designs with Stamping Gel
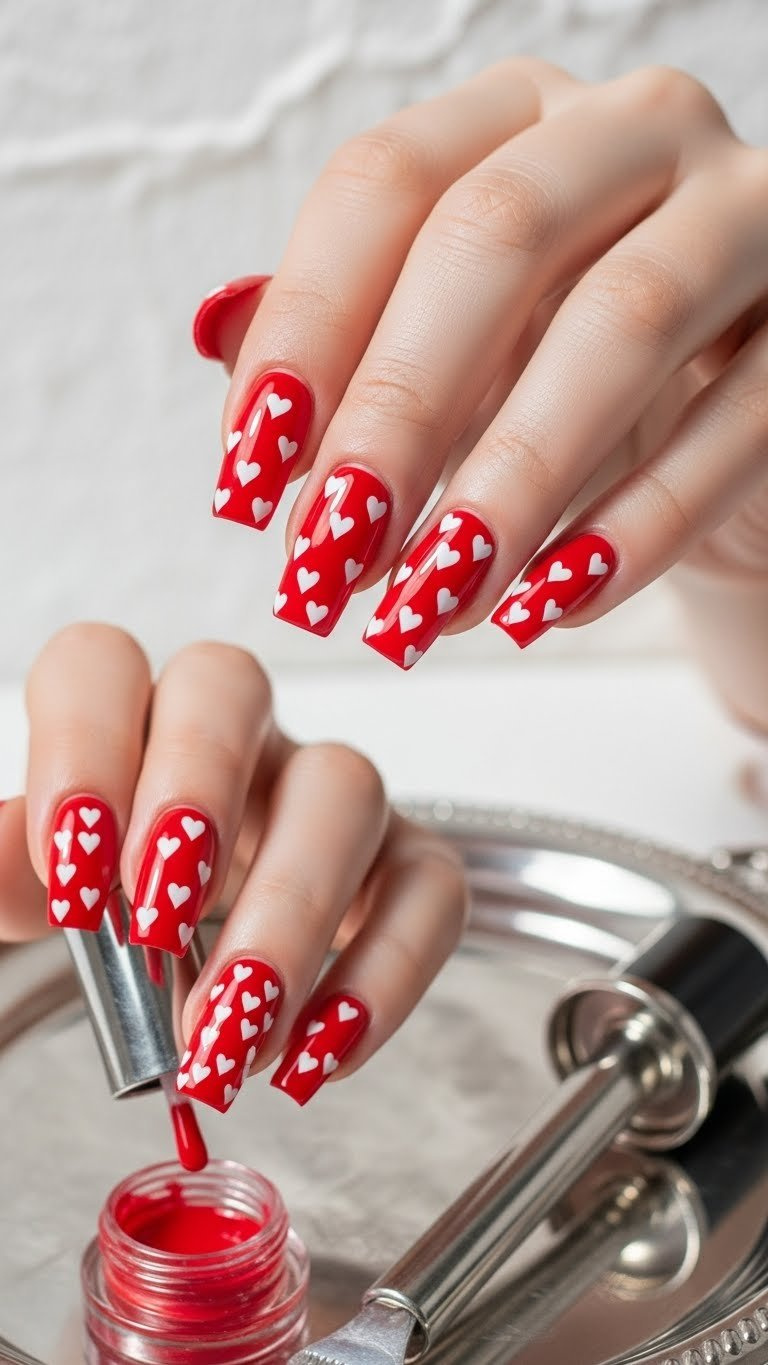
Save this ‘perfect heart’ stamping tutorial for your next nail session!
For those who desire crisp, uniform heart nail designs without the fuss of freehand drawing, stamping gel is a game-changer. This method allows you to apply perfect heart shapes onto your square acrylic nails with incredible precision. It’s a clean and efficient way to add repetitive, high-quality patterns, ensuring your cute nail designs are flawless.
Products & Tools Used
- Red or pink cured acrylic base (square shape recommended)
- High-pigment stamping gel polish (white or black recommended)
- Nail stamping plate with various ‘heart nail designs’
- Clear jelly nail stamper and scraper
- Lint roller or sticky tape (for cleaning stamper)
- UV/LED lamp (to cure the stamping gel)
Application Steps
- Prep Base: Ensure your acrylic nails are filed, buffed, and wiped clean of dust. Apply a matte or glossy topcoat and cure, but skip the final topcoat if doing stamping.
- Apply Polish: Swipe the ‘high-pigment stamping gel polish’ quickly over the chosen heart design on the stamping plate.
- Scrape: Use the scraper at a 45-degree angle to remove excess polish, leaving the gel only in the etched design.
- Stamp: Immediately roll the jelly stamper firmly but quickly over the design to pick it up. The goal is a clean, crisp transfer of the ‘perfect heart’.
- Transfer: Gently roll the stamper onto the prepared acrylic nail, positioning the design carefully.
- Cure: Cure the stamped design under the UV/LED lamp for 60 seconds. Crucial: Do not touch the design before curing.
- Seal: Apply a final glossy or matte topcoat over the cured stamping art and seal the free edges. Cure fully.
Pro-Tip: Using stamping gel (which requires curing) instead of traditional stamping polish (air dry) allows you infinite time to transfer and position the design without it drying prematurely, achieving much better precision, essential for intricate ‘heart nail designs’.

3. Designing Vibrant Red Glitter Acrylics with Bling Accents
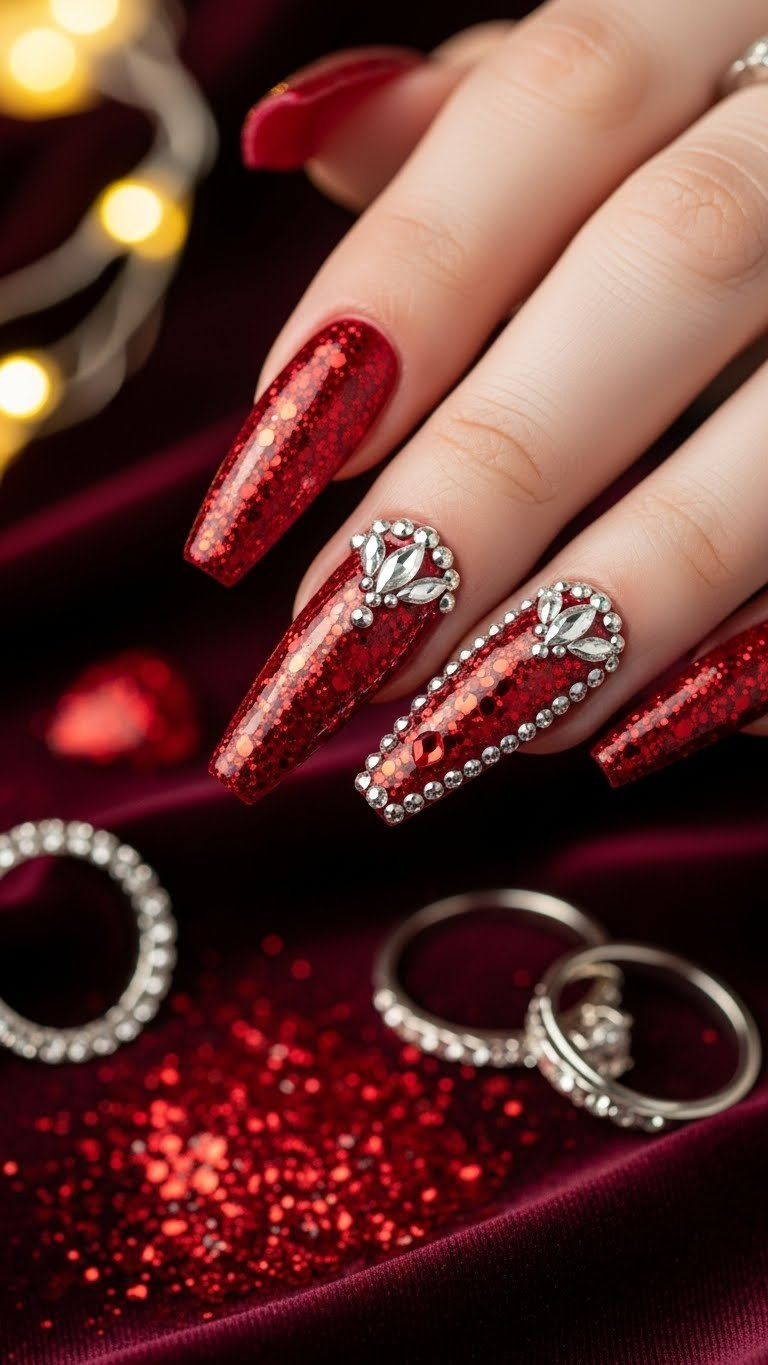
Get ready for compliments! Pin this glamorous ‘bling valentine’ look now.
For a truly show-stopping look this Valentine’s Day, opt for red valentines day acrylic nails adorned with eye-catching glitter and sparkling bling accents. This design is perfect for those who want to make a bold statement, combining the passionate hue of red with the undeniable glamour of shimmer. These long acrylic nails in an elegant almond shape will definitely catch attention with their vibrant valentine acrylics.
Products & Tools Used
- Red acrylic polymer and liquid monomer
- High-shine red cosmetic grade glitter (chunky and fine mix)
- Small flat-back silver or iridescent rhinestones (various sizes)
- Specialized rhinestone gel adhesive or thick builder gel
- Wax pencil or tweezer tool (for stone placement)
- Detailed liner brush
Application Steps
- Base Color: Apply the red acrylic base layer. While the acrylic is still slightly damp, press the mixed red glitter onto the surface, ensuring full coverage, using a technique called ‘encapsulated acrylic valentine nails’.
- Encapsulate: Apply a clear acrylic overlay layer over the glitter to seal it completely and smooth the surface. File and buff the shape (almond shape recommended).
- Stone Placement: Using the liner brush, place a small dot of the rhinestone gel adhesive where you want the main stones (often near the cuticle).
- Bling Application: Use the wax pencil to pick up the silver rhinestones and carefully place them into the adhesive in a cluster or line pattern.
- Secure: Cure the nail under a UV/LED lamp (if using UV adhesive). If using a builder gel, ensure the stone bases are completely covered by the gel for long-term security.
- Topcoat (Optional): Apply a topcoat around the rhinestones, but avoid coating the stones themselves, as this dulls their shine.
Pro-Tip: When applying glitter acrylics, always finish with a layer of clear acrylic (encapsulation). This protects the pigment and glitter from the topcoat and makes the surface perfectly smooth, reducing the need for aggressive filing, which can dull the ‘glitter valentine nails acrylic’.

4. Achieving Simple Almond Shape Acrylic Nails with French Tips

Pin this timeless ‘simple elegant’ look for a minimalist Valentine’s celebration.
Sometimes, simplicity speaks volumes. For a refined and sophisticated Valentine’s Day, consider simple acrylic valentine nails in a classic French tip style. This design, particularly striking on almond shape acrylic nails valentine, offers a timeless elegance. The combination of a sheer pink base and a crisp white smile line creates a simple elegant aesthetic that is understated yet perfectly festive.
Products & Tools Used
- Clear or sheer pink acrylic polymer and liquid monomer
- Bright white acrylic polymer powder (for the tip)
- Fine grit nail file (180/240 grit) for shaping
- Professional almond nail form guides or tips
- Cuticle pusher and nippers (for prep)
- Clear UV topcoat
Application Steps
- Prep & Prime: Prepare the natural nail and apply the ‘almond nail form guides’ precisely.
- Reverse Application: Use the white acrylic powder to build the free edge tip first, sculpting the perfect deep ‘smile line’ (this is the ‘reverse application technique’). Let this set partially.
- Build Base: Fill the remaining nail bed area with the sheer pink acrylic, blending it over the white powder edge to encapsulate and seal the tip color cleanly.
- Shape: Once cured, remove the form. Begin filing to refine the ‘almond shape acrylic nails valentine’, ensuring a gentle taper to a rounded point.
- Smooth: Buff the surface smooth and apply a coat of clear UV topcoat.
- Finish: Cure the topcoat fully under the lamp, achieving a classic and ‘simple elegant’ look.
Pro-Tip: When filing for an almond shape, always file the sidewalls inward toward the center and keep the center point perfectly aligned. This ‘almond shape acrylic nails valentine’ is popular because it elongates the fingers and requires careful filing to ensure symmetry.

5. Encapsulating Romantic Dried Flowers in XL Acrylics
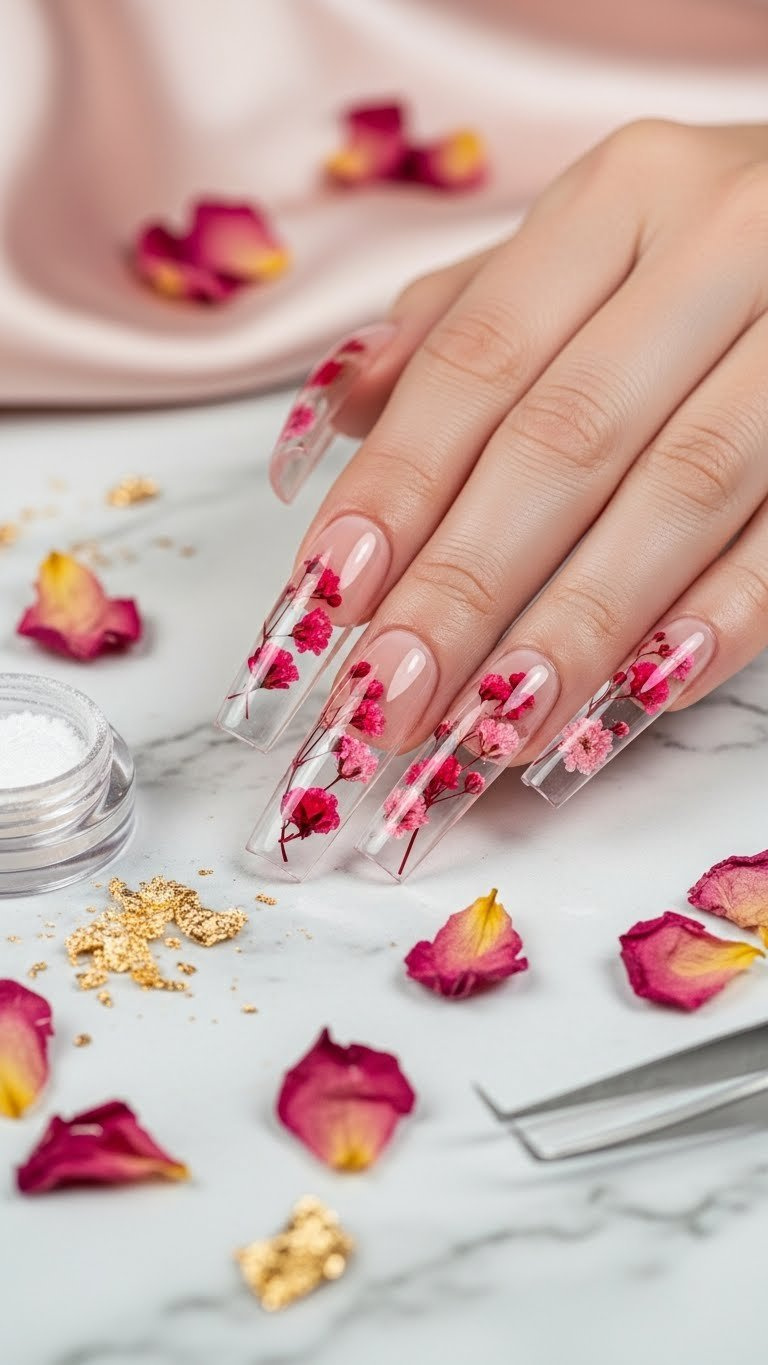
For a truly unique and artistic statement, consider XL valentine acrylic nails featuring encapsulated dried flowers. This design allows for creative valentine acrylic nails that literally embed romantic, natural elements within the durable acrylic. The result is a stunning, three-dimensional effect where delicate pink and red dried flowers for nail art appear suspended in crystal-clear acrylic, especially striking on long valentines day acrylic nails.
Products & Tools Used
- Clear or blush nude acrylic powder and monomer
- Small, colored real ‘dried flowers for nail art’ (pinks, reds, and whites)
- Fine tweezers
- High-grit buffing block
- Professional nail forms or long tips (for XL length)
- Specialized clear UV topcoat
Application Steps
- Base Layer: Apply the first thin layer of clear acrylic to the prepared nail and tip. Cure if using a hybrid system, or allow to set slightly if traditional acrylic.
- Flower Placement: Use the fine tweezers to pick up the ‘dried flowers’ and strategically place them onto the tacky acrylic layer, pressing them down gently to ensure they adhere and lay flat.
- Encapsulation: Apply a second, thicker layer of clear acrylic over the flowers. This step is critical; you must use enough product to fully cover the flowers without distorting their shape or creating air bubbles, achieving ‘encapsulated acrylic valentine nails’.
- Sculpting: Build the nail structure and C-curve, especially important for the ‘XL length’, ensuring sufficient product at the apex for strength.
- Refining: File the nail using the e-file and buffing block until the surface is perfectly smooth, with no flowers sticking out, then apply the UV topcoat and cure.
Pro-Tip: The key to clean encapsulation is using a slow-setting, wet acrylic bead, which gives you time to manipulate the product and avoids creating micro-bubbles around the flowers. Also, ensure the flowers are paper thin and completely dry to prevent future discoloration or lifting.

6. Applying Cute Short Square Acrylic Nails with Matte Finish

Short, square, and stylish! Pin this matte burgundy look for V-Day.
For a practical yet festive Valentine’s look, consider short valentines day acrylic nails with a sophisticated matte finish. Short square acrylic nails offer durability and functionality, making them a popular choice for those with active lifestyles. When combined with a matte top coat for acrylic nails, these cute valentines day acrylic nails exude a modern elegance.
Products & Tools Used
- Red or burgundy acrylic polymer and monomer
- High-quality UV-cured ‘matte top coat for acrylic nails’
- Dotting tool (small size)
- White gel polish (for polka dots)
- Thin gold nail foil (optional accent)
Application Steps
- Sculpt: Apply and sculpt the acrylic to the natural nail or short tip, shaping immediately into a clean ‘short square acrylic nails’ shape, ensuring the corners are crisp.
- Color Layer: Apply the color layer. Cure and remove the inhibition layer.
- Dotting Art: Dip the small dotting tool into the white gel polish and create two adjacent dots to form a simple heart shape on the accent nail(s).
- Cure Art: Cure the polka dot hearts under the lamp.
- Matte Finish: Apply the specialized matte topcoat evenly over all nails, ensuring thorough coverage of the entire nail surface.
- Final Cure: Cure the matte topcoat fully under the UV/LED lamp according to product directions to achieve the ‘velvety matte texture’.
Pro-Tip: Matte topcoats are easily stained by heavy creams, makeup, or strong pigments. To maintain the ‘matte valentine acrylic nails’ look, wipe the nail surface daily with a quick swipe of rubbing alcohol or non-acetone remover.

7. Mastering the White and Black Contrast Valentine Acrylics
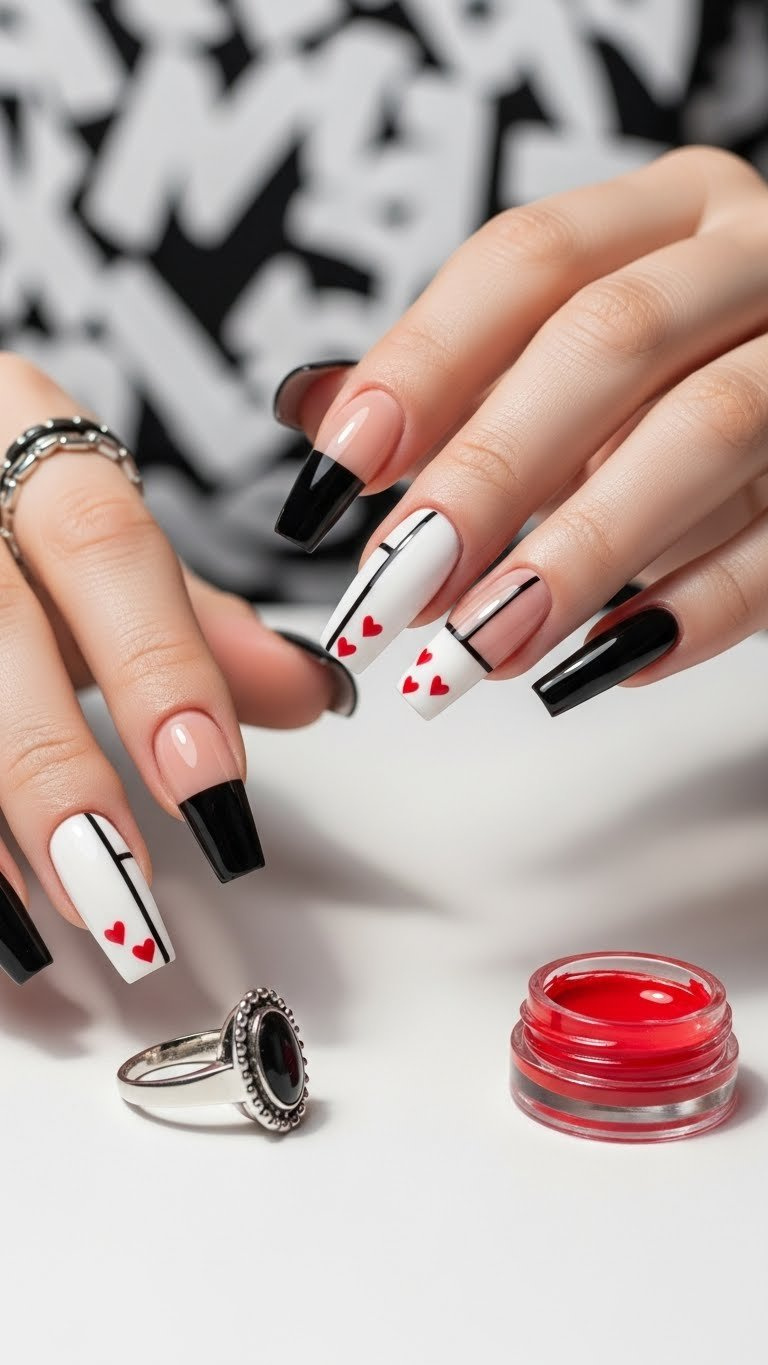
Pin this edgy black and white ‘anti-Valentine’ look to your style board!
Break away from traditional pinks and reds with funky acrylic valentine nails featuring a bold black and white contrast. This sophisticated yet edgy design offers a unique valentine acrylic nails aesthetic, perfect for those who prefer a more modern take on the holiday. Small red heart accents at the base add a subtle nod to the romantic theme, making these creative valentine acrylic nails truly stand out.
Products & Tools Used
- Pure white acrylic polymer and jet black acrylic polymer
- Quality monomer (low yellowing formula)
- Fine detail nail art brush (00 or 000 size)
- Red gel paint (highly pigmented)
- Stiletto nail forms or tips
Application Steps
- Prep & Tip: Apply the stiletto tips or forms.
- Color Block: Apply the black acrylic to one half of the nail bed and the white acrylic to the other half, using precision to ensure a clean vertical or diagonal line where the colors meet.
- Sculpt: Encapsulate the entire nail in a clear acrylic overlay for strength, sculpting the ‘stiletto shape’ precisely.
- Heart Art: After filing and buffing, use the ‘fine detail nail art brush’ and the red gel paint to carefully paint small, minimal heart accents at the base of the nail.
- Cure & Seal: Cure the red gel paint, then apply a final clear glossy topcoat to seal the design and enhance the contrast.
Pro-Tip: To keep the white acrylic from yellowing, especially in the sun or under certain topcoats, use only non-yellowing, high-quality monomer and avoid applying pigmented topcoats directly to the white area. This preserves the ‘crisp white’ look of the design.

8. Doing DIY Press-On Full Cover Nails for Temporary Wear

Need a quick change? Pin these press-on ‘temporary valentine nails’ steps!
For a convenient, commitment-free Valentine’s Day manicure, press-on nails valentine are an excellent choice. These full cover nails offer the look of acrylic extensions without the salon time or long-term commitment. They are the perfect temporary valentine nails vs permanent solution for a quick style change or a single special occasion, making them a popular alternative for February 14th.
Products & Tools Used
- High-quality ‘full cover glossy glue-on acrylic’ press-on nail set
- Strong liquid ‘best glue for press on nails’
- Mini nail file and buffer block
- Alcohol prep pads or nail cleanser
- Cuticle stick
Application Steps
- Prep Natural Nails: Gently buff your natural nail surface to remove shine and wipe with an alcohol prep pad. Push back cuticles. Proper prep is key for maximizing ‘glue on nails’ longevity.
- Size Selection: Select the correct size press-on nail for each finger. If between sizes, size down slightly.
- Glue Application: Apply a thin layer of liquid nail glue to both your natural nail and the back of the press-on nail (avoiding flooding the skin).
- Attach: Press the ‘full cover nails’ onto your natural nail, starting from the cuticle line and holding firmly for 30 seconds to ensure strong adhesion.
- Shape & Finish: If needed, use the mini file to adjust the shape or smooth any edges. Avoid submerging hands in water for the first 2-3 hours.
Pro-Tip: For maximum adhesion, especially for ‘temporary valentine nails’, apply a layer of base coat or bonder to your natural nails before the glue application. This creates a stronger surface for the glue to bond to, significantly improving wear time.

9. Designing Custom 3D Rose Embellishments on Acrylic Overlay
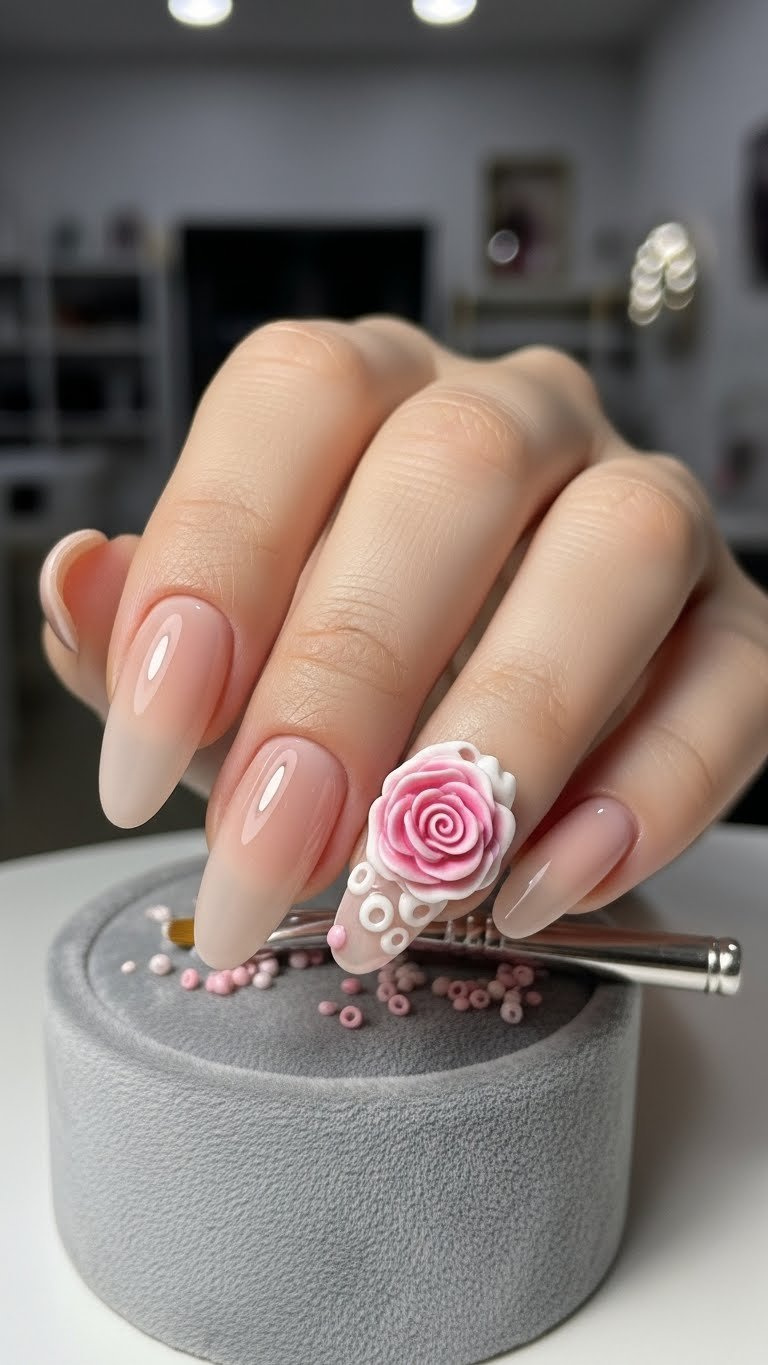
Ready for a challenge? Pin this expert 3D rose tutorial for your Valentine’s set.
For the ultimate expression of unique valentine acrylic nails, delve into the world of 3D nail art techniques with sculpted roses. This advanced method transforms your nails into miniature works of art, ideal for an oval shape acrylic nails valentine base. Using specialized 3D acrylic sculpting brush and colored acrylic powder, you can create intricate, raised floral designs that offer unparalleled texture and visual depth, showcasing true artistic acrylic designs.
Products & Tools Used
- Clear or nude acrylic overlay base (oval shape recommended)
- Pink and white colored acrylic powder (highly pigmented for art)
- Liquid monomer (regular speed, not fast set)
- Small detail ‘3D acrylic sculpting brush’ (short bristles, firm shape)
- Dotting tool (for placing initial center bead)
- Specialized clear seal coat for 3D elements
Application Steps
- Base: Ensure the acrylic overlay base is fully cured, filed, and buffed.
- Center Bead: Pick up a small, wet bead of pink acrylic and place it where the rose center will be. Shape it into a small cone using the tip of the brush.
- Inner Petals: Use increasingly smaller, drier beads of pink acrylic. Press the bead slightly flat onto the nail next to the cone center. Clean the brush and use the edge to push and curl the edge of the bead to form a small petal.
- Outer Petals: Continue building layers of petals around the center, slightly overlapping them and varying the size to create a realistic ‘3D rose sculpture’. Use white powder for variation if desired.
- Cure & Seal: Once the rose is set (it will air dry), apply a specialized seal coat or topcoat only around the base of the 3D element, not covering the rose itself, to avoid dulling the texture.
Pro-Tip: The secret to effective ‘3D nail art techniques’ is using small, dry beads of acrylic, which give you better control and prevent the petals from melting into each other. Use a tiny drop of monomer for each petal and wipe your brush constantly to keep it sharp.

FAQs About Valentines Day Nails Acrylic
How long do Valentine’s Day acrylic nails typically last?
Professionally applied acrylic nails should last between two to three weeks before requiring a fill or maintenance, provided they are properly cared for. The longevity depends heavily on the quality of the ‘acrylic polymerization’, the technician’s skill, and the client’s home care, especially avoiding excessive moisture and impact.
What is the difference between acrylic and gel nails for Valentine’s designs?
Acrylic nails are formed by mixing a liquid monomer and a powder polymer that cures naturally, providing superior hardness and sculpting ability for 3D art and extreme lengths. Gel nails, by contrast, are a pre-mixed oligomer that must be cured under a UV or LED lamp; they are generally more flexible and less durable for ‘XL valentine acrylic nails’.
What nail shapes are currently popular for Valentine’s Day acrylics?
The most popular nail shapes for Valentine’s Day are the ‘coffin shape acrylic nails’ and the ‘almond shape acrylic nails’, both favored for their elegant, elongating silhouette. However, the ‘short square acrylic nails’ remain trendy for those seeking a more practical, minimalist aesthetic.
How much do Valentine acrylic nails cost at a salon?
The cost of Valentine’s Day acrylic nails can range significantly, typically between $45 and $120, depending on the salon’s location and the complexity of the design. Specialized art like ‘3D nail art techniques’, encapsulation, or intricate hand-painted ‘heart nail designs’ will incur extra charges due to the time and ‘expert nail technician advice’ required.
Can you put gel polish over acrylic nails?
Yes, you can safely apply ‘gel polish on acrylics’ as a finishing color or topcoat, but the underlying acrylic structure remains the foundation. This is a common practice to achieve high shine or a durable color layer, provided the acrylic surface is properly buffed and cleansed before application.
Are press-on nails a good alternative to permanent acrylics for February 14th?
High-quality ‘press-on false nails’ are an excellent, affordable alternative for ‘temporary valentine nails’, especially if you only need the look for a single event like February 14th. They minimize the risk of ‘acrylic nail damage’ and allow for quick changes, though they typically do not last as long as salon acrylics.
How do I prevent my acrylic nails from lifting prematurely?
Preventing lifting acrylics requires excellent natural nail preparation, including thorough buffing and priming, and ensuring zero moisture or oils remain on the nail plate before application. Additionally, avoid using your nails as tools, as this places stress on the edges, leading to premature separation of the acrylic from the natural nail.
How do nail technicians achieve a smooth ombre effect on acrylics?
Nail technicians achieve a smooth ‘ombre effect’ using a medium-wet bead of acrylic and blending the colors (e.g., pink and white) with a gentle tapping motion where they meet before the product fully sets. This technique requires controlling the ‘polymer-monomer ratio in acrylics’ to ensure a soft transition rather than a stark line.
What are the safest ways to remove acrylic nails at home?
The safest way to remove acrylics at home is to soak them fully in pure acetone until the product softens and dissolves, avoiding aggressive prying or filing that can harm the natural nail plate. Following specific ‘safety guidelines for acrylics’ ensures the ‘removing acrylics safely’ process minimizes ‘weak nails after acrylics’.
Should I choose a glossy or matte topcoat for Valentine’s Day acrylics?
The choice between a glossy or ‘matte topcoat for acrylic nails’ depends purely on the aesthetic desired for your ‘valentines day nails acrylic’. Glossy is classic and enhances glitter and bling, while matte provides a modern, sophisticated, velvety finish that works well with simple, elegant designs and dark colors.
Final Thoughts on Valentines Day Nails Acrylic
Embracing valentines day nails acrylic allows for a stunning and enduring celebration of the holiday right at your fingertips. From romantic heart nail designs to shimmering pink glitter nails, the versatility and structural integrity of acrylics ensure your chosen aesthetic remains flawless throughout February. Whether you opt for an elegant coffin acrylic nails or a more practical short square acrylic nails, the right technique and professional care are paramount.
- The Versatility of Acrylics for V-Day Designs is Unmatched – Acrylics provide the necessary structural integrity for complex designs like XL length, 3D embellishments, and ‘encapsulated acrylic valentine nails’ that traditional gel or polish cannot easily support.
- Shape and Length Determine Impact and Durability – ‘Coffin acrylic nails’ and ‘almond acrylic nails’ are currently the most popular shapes, but ‘short square acrylic nails’ are ideal for practical, low-maintenance wear.
- Mastering the Reverse Application Technique is Essential for French Tips – Using the ‘reverse application technique’ with white acrylic powder for the tip creates a crisp, flawless smile line, which is crucial for achieving ‘simple elegant’ French tip designs.
- Precision Tools are Required for Advanced Art – For intricate details like ‘heart nail designs’ and small accents, always invest in specialized tools like fine detail liner brushes and quality jelly stampers for the most professional result.
- Ensure Safe Removal and Preparation to Prevent Damage – Proper natural nail preparation (buffing, priming) before application, and careful, safe ‘removing acrylics safely’ afterward, are the most critical steps in preventing nail damage.
- Press-Ons Offer a Perfect Temporary Alternative – If commitment is a concern, high-quality ‘press-on false nails’ provide an excellent, temporary, and easy way to enjoy the ‘valentine’s day nail art’ look without the commitment of traditional acrylic extensions.
- Final Curing and Sealing Maximizes Longevity – Always ensure UV-cured elements (gel polish, matte topcoat) are fully cured according to ‘industry standards for acrylics’ to prevent lifting, chipping, and dullness, especially around high-impact glitter or 3D art.
Ultimately, choosing acrylic nail designs for Valentine’s Day empowers you to express your unique style with confidence and lasting beauty. Which of these trending designs will you try first to make your 2025 Valentine’s Day truly unforgettable?
Last update on 2025-12-03 / Affiliate links / Images from Amazon Product Advertising API