Dreaming of the perfect manicure to celebrate love and express your unique style this Valentine’s Day? Many find themselves lost in a sea of inspiration, unsure how to achieve that adorable yet chic look, especially when it comes to intricate character designs. It’s a common challenge to translate dreamy ideas into a flawless, DIY reality.
Hello Kitty Valentine nails are themed manicures combining the iconic Sanrio character with traditional Valentine’s Day motifs like hearts, bows, and pink or red colors. They allow fans to express fandom and seasonal creativity through popular techniques like 3D charms, gel polish, or easy press-on applications. Leveraging tested frameworks and data-driven insights, this guide unpacks everything you need to confidently create amazing Hello Kitty Valentine nails, defining their charm and versatility. You’ll discover nine easy-to-follow ideas, ensuring your nails are perfectly festive and uniquely you for 2026.
Design Your Love Story: 9 Easy Hello Kitty Valentine Nail Ideas To Create This 2026
Ready to infuse your nails with the sweetest charm? This 2026, design hello kitty nails that truly speak to your heart and embrace the festive spirit of Valentine’s Day. From classic pink and red to innovative 3D elements and modern twists, these 9 easy hello kitty valentine nail ideas are curated to help you create a stunning look that’s both trending and uniquely yours.
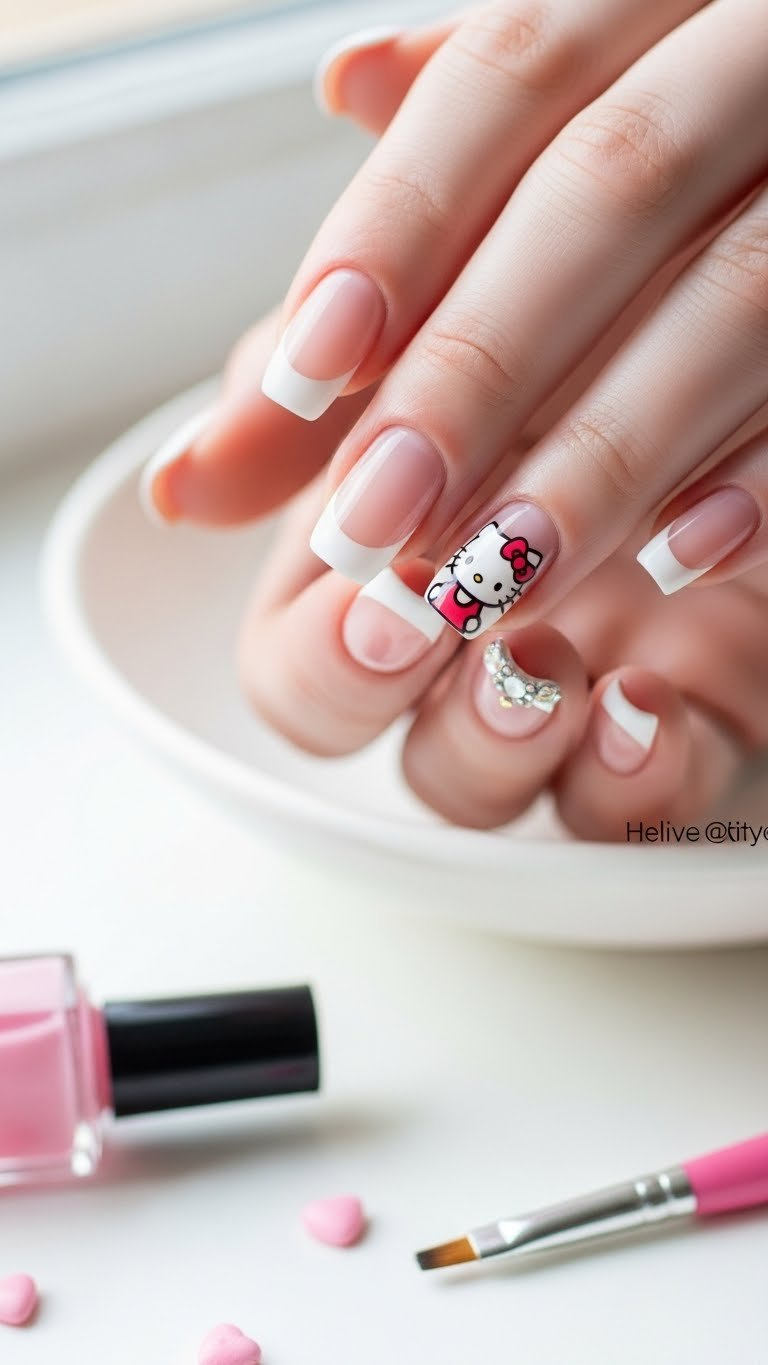
1. Classic Pink & Red Hello Kitty Bow Accents (Simple DIY)

Pin this genius hack to your ‘Valentine Nail Ideas’ board!
For simple hello kitty designs that are perfect for beginners, focus on the iconic bow and a small, recognizable face. This look allows you to incorporate festive pink and red hello kitty nails without requiring extensive nail art experience. The charm of this design lies in its sweet simplicity, making it one of the easiest hello kitty valentine nail designs at home.
Products & Tools Used
- Detail brush set (00/000 size) for drawing the face and bow outlines
- Clean white gel polish for the base of the face (highly pigmented)
- Bright red gel polish for the iconic bow and accent nail
- Pastel pink gel polish for the remaining nails
- UV/LED lamp for curing
- Dotting tool (small size) for the eyes
Application/Styling Steps
- Prepare your nails by filing and applying a durable base coat, curing under the UV/LED lamp.
- Paint hello kitty nails base colors: two coats of pastel pink on four nails and two coats of bright red on the ring finger, curing between each coat.
- Using the white polish and the dotting tool, create a large oval shape for the Hello Kitty face on the red accent nail, curing lightly.
- Using the 00 detail brush and red polish, draw hello kitty on nails by creating the small bow shape on the white face, curing thoroughly.
- Finish the design using black polish and the smallest dotting tool for the tiny eyes and whiskers. Apply a glossy top coat to seal and protect the art.
Pro-Tip: For the easiest application, use a silicone mat to practice drawing the Hello Kitty face shape first. This allows you to perfect the details before applying to your actual nail bed, ensuring a more professional hello kitty nail art look.

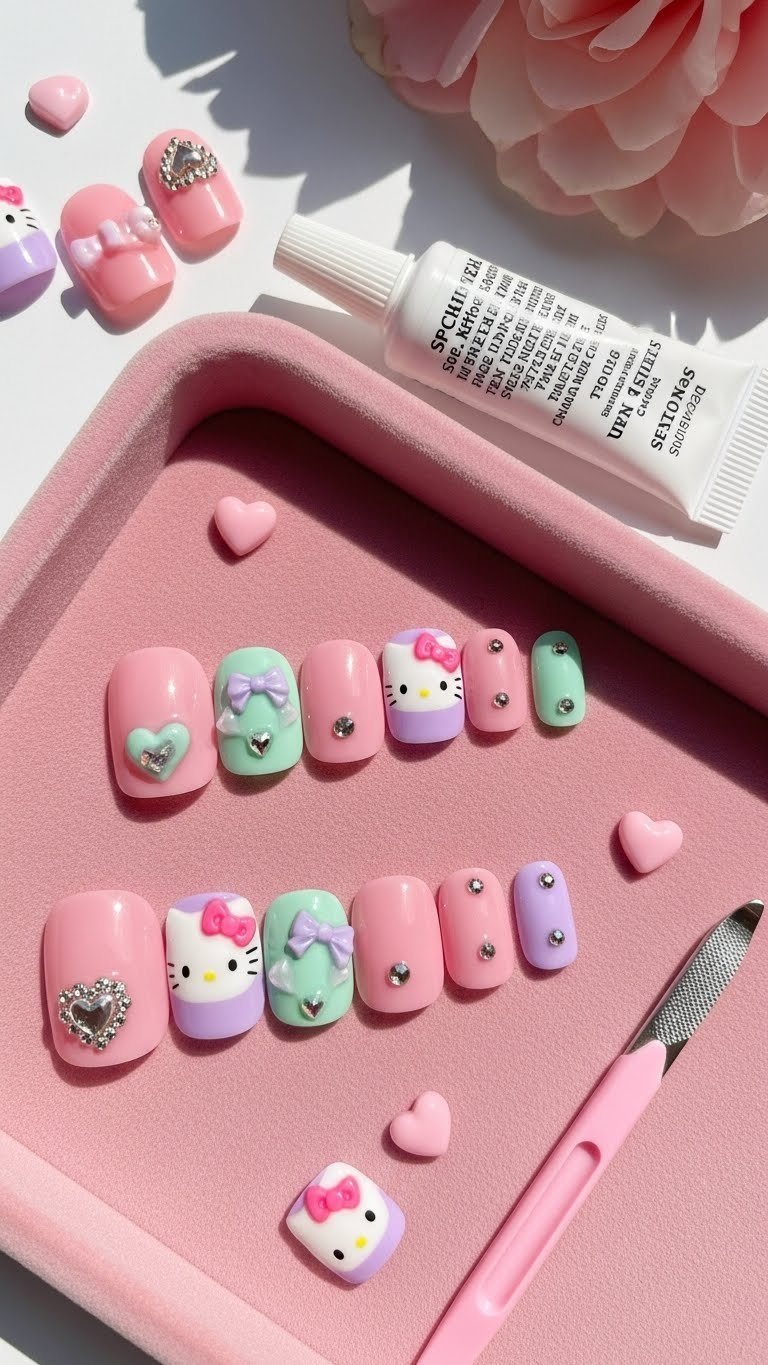
2. Sculpt 3D Puffy Heart & Kitty Head Charms (Advanced Gel)

Save this intricate 3D design for your next salon visit!
Sculpting 3D hello kitty nails elevates your manicure to an intricate, gyaru-inspired level, perfect for making a bold statement. This advanced technique involves using specialized gels to build adorable puffy heart accents and kitty head charms directly onto the nail. Achieving the structural integrity of 3D hello kitty nails requires precision and the right products to ensure they last.
Products & Tools Used
- Clear or white 3D sculpting gel (non-wipe formula)
- Specific gel glue for securing charms
- Silicone-tipped nail sculpting tool
- Small white resin Hello Kitty charms or pre-sculpted heads
- Assorted red 3D heart rhinestones or puffy molds
- Milky sheer pink gel polish base
- Small container of acetone and wooden cuticle pusher (for removal)
Application/Styling Steps
- Apply and cure two layers of the milky sheer pink gel base polish. Ensure the surface is completely clean.
- Integrate hello kitty charms: Using the specialized gel glue, apply a thin layer to the back of the white Hello Kitty charm and press firmly onto the desired nail. Cure for 60 seconds.
- To create the 3D puffy heart, use the sculpting tool to pick up a bead of the 3D gel and carefully mold the shape onto an adjacent nail, building up the volume gently. Cure for 90 seconds.
- If using pre-made 3D hearts, secure them using the same specialized gel glue technique.
- Finish by applying non-wipe top coat around the base of the charms and heart, avoiding coating the charms themselves to maintain their texture.
Pro-Tip: For maximum structural integrity of 3D hello kitty nails, always use a high-viscosity nail art glue or builder gel beneath the charm and cure twice the recommended time. This prevents premature lifting and ensures a professional finish.

3. Glitter Ombre & Sweetheart Gradient (Blending Technique)
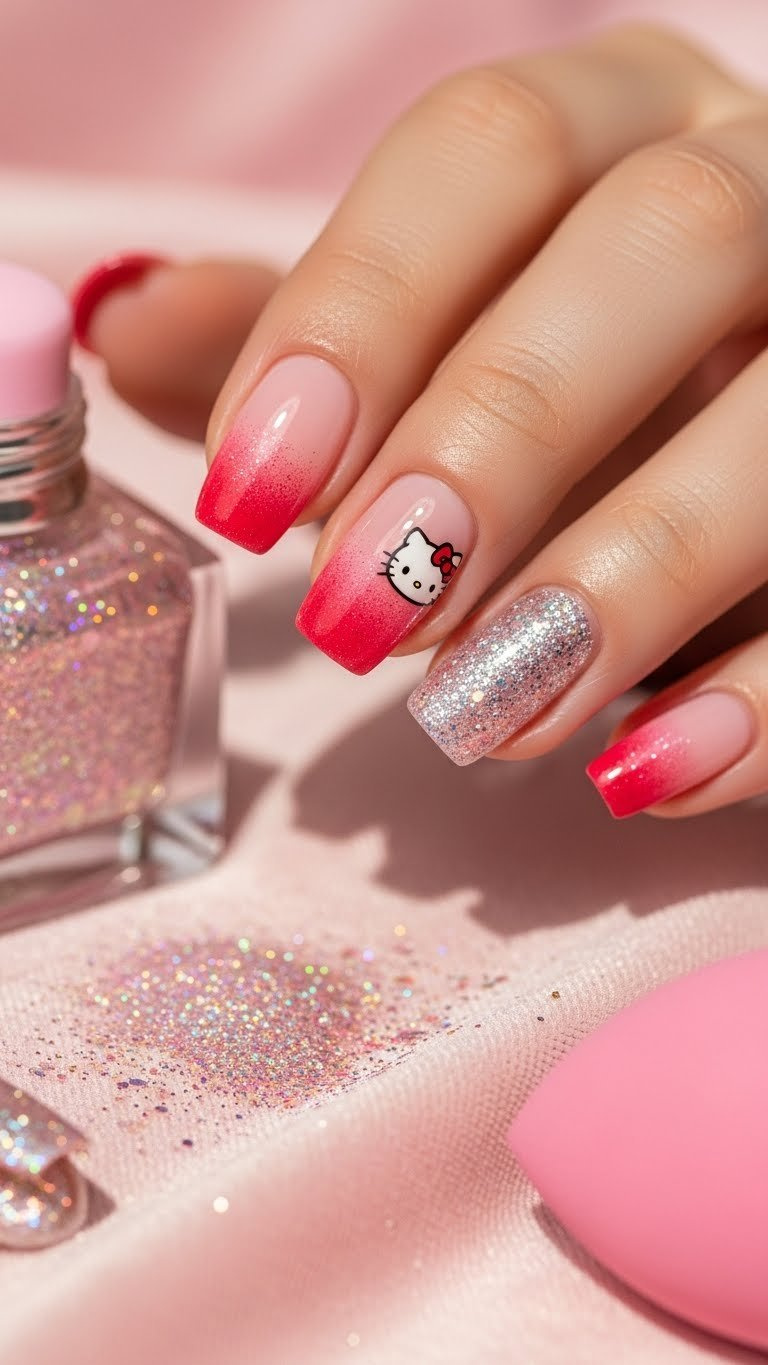
Get the secret to the perfect gradient blend—save this now!
Mastering hello kitty ombre nails with a glitter accent creates a dreamy and vibrant look perfect for Valentine’s Day. This design expertly blends pink and red hues, often topped with a shimmering layer of glitter hello kitty nails. It’s an ideal way to explore how to add glitter to hello kitty valentine nails while showcasing a sophisticated blending technique.
Products & Tools Used
- Vibrant red and soft pink gel polish (must be complementary shades)
- Small makeup sponge or specialized nail art blending sponge
- Fine, loose holographic glitter powder
- Fan brush (for dusting off excess glitter)
- Liquid latex or skin guard (to protect cuticle area)
Application/Styling Steps
- Prepare and apply your base coat, then apply one thin coat of the lighter pink polish, curing lightly.
- Apply liquid latex around your cuticles to protect the skin from excess polish and glitter.
- Apply a thin line of the red polish and a thin line of the pink polish onto the blending sponge, ensuring they slightly overlap.
- Gently but quickly stamp the sponge repeatedly onto the nail to create hello kitty nails with a blended gradient effect. Repeat this layer until opacity is achieved, curing between each stamping application.
- While the final layer is still tacky (or use a dedicated glitter adhesion layer), gently pat the holographic glitter over the ombre area using a fan brush, focusing heavily on the tip.
- Cure the glitter layer, then carefully peel off the liquid latex and finish with a strong top coat, capping the free edge.
Pro-Tip: Utilizing encapsulation in hello kitty nails is key when using loose glitter. Apply a thin layer of builder gel over the glitter before the final top coat to ensure the glitter doesn’t scratch or chip off, making the manicure last much longer.

4. Effortless Kawaii Press-On Collection (Product Focus)
Need instant glamour? Pin these press-on secrets!
Luxury press-on hello kitty nails offer an effortless and quick solution for achieving adorable kawaii hello kitty nails without the salon commitment. These press on nails provide a fantastic alternative to time-consuming acrylic designs, delivering instant glamour. This option is ideal for those seeking easy hello kitty nail fixes and a reliable answer to “how long do hello kitty valentine nails last” with minimal effort.
Products & Tools Used
- Set of luxury Hello Kitty press-on nails (sized for multiple fit options)
- High-quality nail adhesive or specialized gel glue for tips
- Mini nail file and buffer block
- Wooden or plastic cuticle pusher
- Alcohol prep pads or nail cleanser
Application/Styling Steps
- Prepare nails for hello kitty: Use the buffer to gently rough up the natural nail surface and clean thoroughly with the alcohol prep pad to remove all oils.
- Size each press-on nail to fit your natural nail plate perfectly, setting them aside in order.
- Apply a small dot of the nail adhesive to your natural nail and a tiny dot to the back of the press-on.
- Starting just beneath the cuticle, slowly slide the press-on down and press firmly for at least 30 seconds to apply hello kitty nails securely, ensuring no air bubbles are present.
- If using gel glue, cure the nails under a UV lamp for a more durable, longer-lasting application.
- Gently file the edges of the applied press-ons if needed to refine the shape.
Pro-Tip: To ensure hello kitty nail art adheres securely, always push back your cuticles and avoid submerging your hands in hot water for the first four hours after application. This guarantees the strongest bond and prevents premature lifting.

5. Chic Matte Black and Red Outline Kitty (Modern Twist)
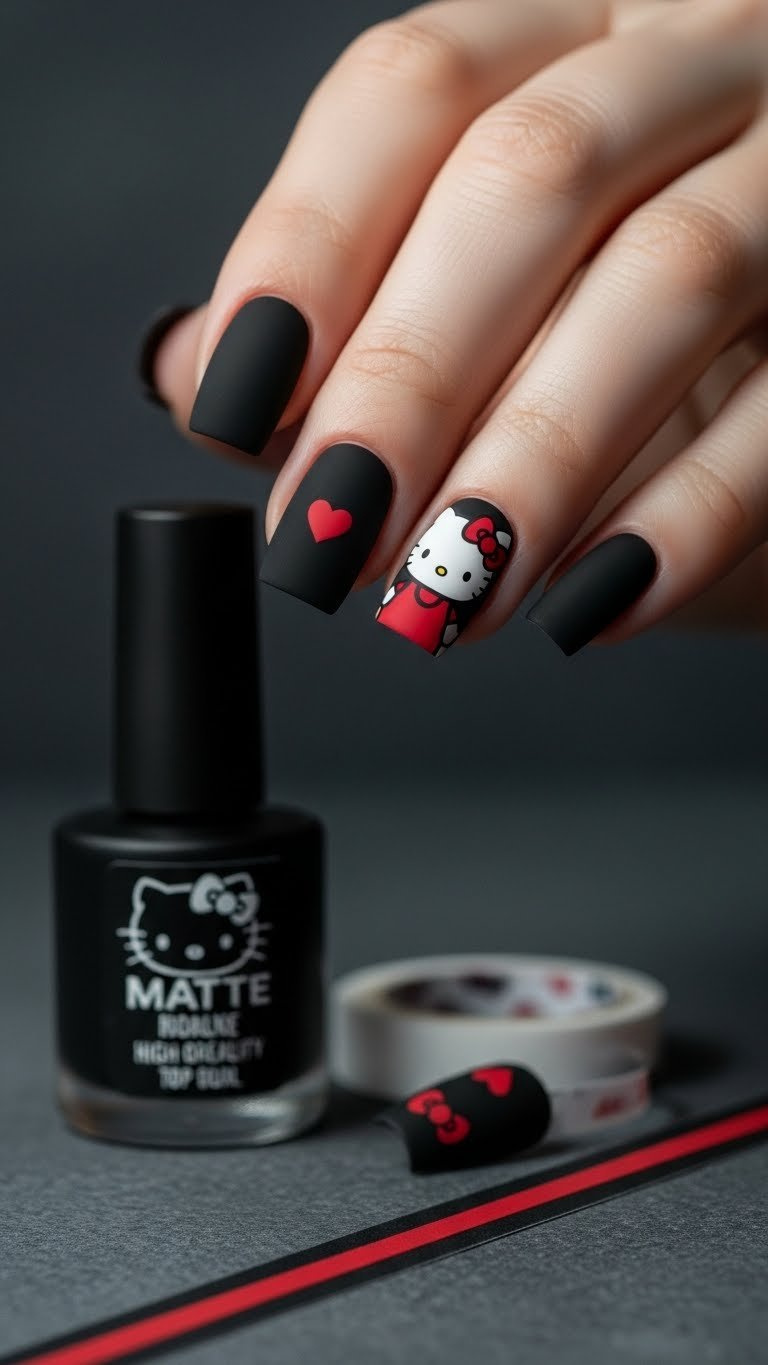
Love this high-fashion, matte Hello Kitty look? Pin it!
For a refined aesthetic, matte hello kitty nails offer a modern twist on traditional Valentine’s Day designs. This sophisticated look features hello kitty valentine nails with a subtle design, using crisp hello kitty outlines against a matte black base. It’s an elegant way to incorporate the character without being overly playful, making it perfect for those seeking a more adult-friendly expression of fandom.
Products & Tools Used
- Rich, highly pigmented black gel polish
- High-quality, non-wipe matte top coat
- Vibrant red gel polish (for the outline)
- Ultra-fine long striping brush (10mm or longer)
- Small piece of striping tape (optional, for straight lines)
Application/Styling Steps
- Apply two coats of black gel polish to all nails, curing completely.
- Apply the matte top coat to all nails, curing for the full time required (usually 120 seconds). This makes the canvas non-tacky.
- Using the long striping brush dipped in red gel polish, carefully draw hello kitty on nails by creating the thin outlines of the face and bow on your chosen accent nail. The long brush helps achieve a smooth, steady line.
- Cure only the red outline lightly (30 seconds). The outline should remain glossy against the matte black base, creating the contrast.
- Apply a final, thin coat of matte top coat to the entire nail, ensuring it doesn’t dull the red outline too much, if desired, or skip the final matte coat to maintain the glossy red contrast.
Pro-Tip: To get crisp hello kitty outlines, ensure your black matte base is fully cured and wiped clean before adding the glossy red detail. Use a dotting tool to mark the general proportions of the face before connecting the lines with the ultra-fine brush.

6. Cupid Kitty with Glittery Arrow Accents (Intricate Hand-Painting)
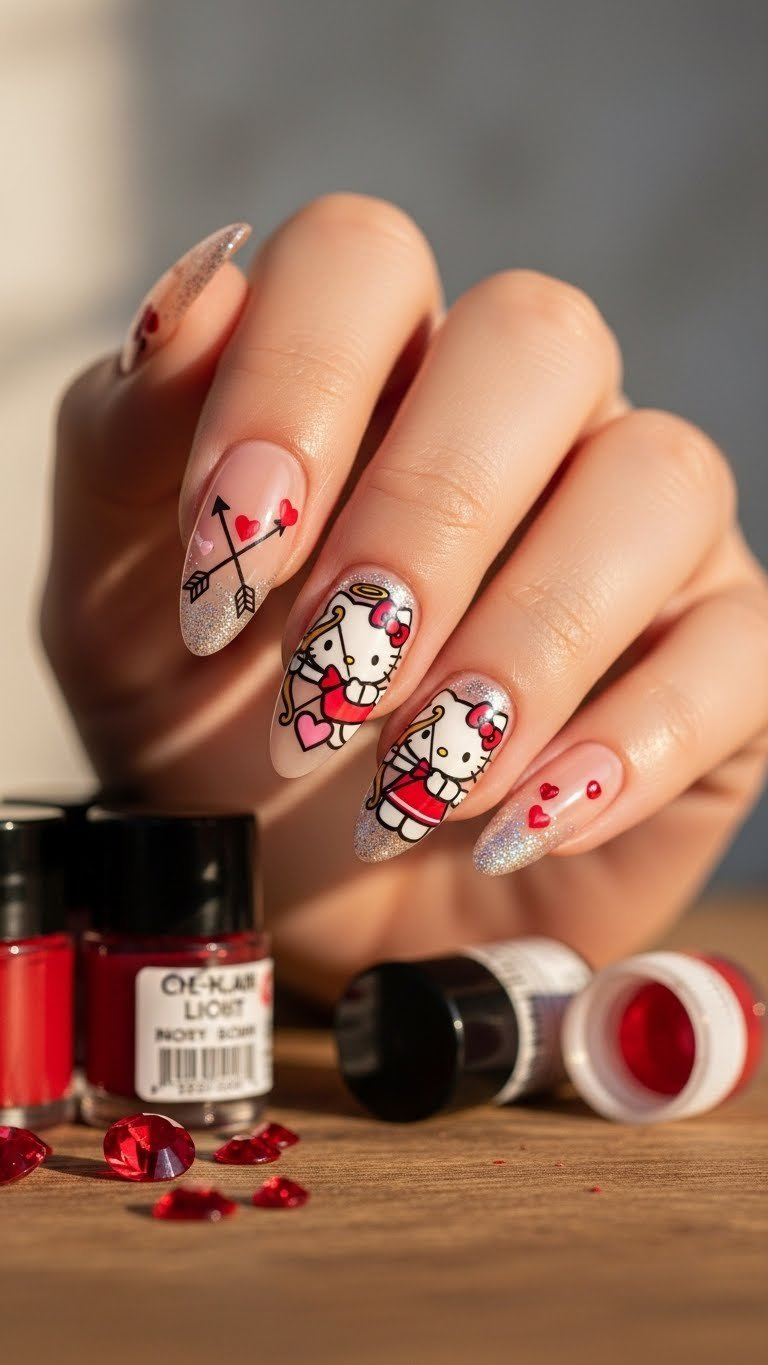
Obsessed with intricate details? Pin this advanced Cupid Kitty tutorial!
For those seeking intricate hello kitty nail art, a Cupid Kitty design with glittery arrow accents offers a truly custom, hand painted hello kitty valentine’s day nails experience. This sophisticated look requires micro-detailing hello kitty characters and incorporating romantic elements like hearts. It’s a testament to advanced hello kitty techniques, perfect for Hello Kitty nails that feature hearts and a unique narrative.
Products & Tools Used
- Highly pigmented white, black, pink, and gold nail art gel paints (not polish)
- Very fine 000 detail brush (for micro-detailing)
- Sheer nude or pink builder gel base
- Liner brush for the glitter arrows
- Fine silver glitter gel polish or metallic paint
Application/Styling Steps
- Apply and cure the nude builder gel base coat to provide a smooth, sturdy surface.
- Using the white gel paint, draw the basic shape of the Cupid Kitty body and head on the accent nail, curing lightly.
- Using the 000 detail brush and the pigmented paints, perfect hello kitty details by adding the miniature wings, the tiny bow, and the facial features. Cure immediately after each color to prevent blending.
- Using the silver glitter liner, draw two delicate, crossing arrows over the hearts on adjacent nails. This decorates nails with hello kitty related motifs.
- Apply a high-shine top coat to all nails, ensuring the coat doesn’t drown the fine details of the Cupid Kitty figure.
Pro-Tip: Photorealistic hello kitty nail painting requires using a palette to dilute the gel paint with a small drop of top coat. This creates a more controllable, watercolor-like consistency, preventing your micro-details from looking chunky or uneven.

7. French Tip with Miniature Hello Kitty Faces (Subtle Elegance)
Pin this perfect blend of elegance and character art!
For an elegant hello kitty nails look, combine the timeless French tip with miniature Hello Kitty faces, offering a subtle yet charming touch. This simple hello kitty valentine manicure for beginners provides a sophisticated approach to character art, and it’s also a fantastic solution for the hello kitty nails for short nails problem. The classic hello kitty nails aesthetic is gently reinterpreted here, ensuring a polished finish.
Products & Tools Used
- Sheer nude or pink builder gel base
- Highly pigmented white gel polish (for the tips)
- Fine detail brush (00 size)
- Pink and yellow polish (for the bow and nose accents)
- French tip guide stickers (optional, for shaping)
Application/Styling Steps
- Apply the sheer nude base coat to all nails and cure.
- Use the white gel polish and a striping brush (or guide stickers) to achieve hello kitty look by creating crisp, traditional French tips on all nails except one accent nail. Cure.
- On the accent nail, use the white gel and the fine detail brush to create the miniature Hello Kitty face shape along the free edge (this replaces the white tip). Cure.
- Add the small pink bow and yellow nose detail using corresponding polishes and the fine detail brush.
- Finish with a high-gloss top coat, ensuring the clean line of the French tip and the tiny character are protected.
Pro-Tip: When dealing with hello kitty nail art for short nails problem, use a shallow curve for the French tip and keep the Hello Kitty face very small and close to the nail edge. This prevents the design from overwhelming the nail plate.

8. Marbled Love Potion Design with Kitty Silhouette (Artistic Fluidity)
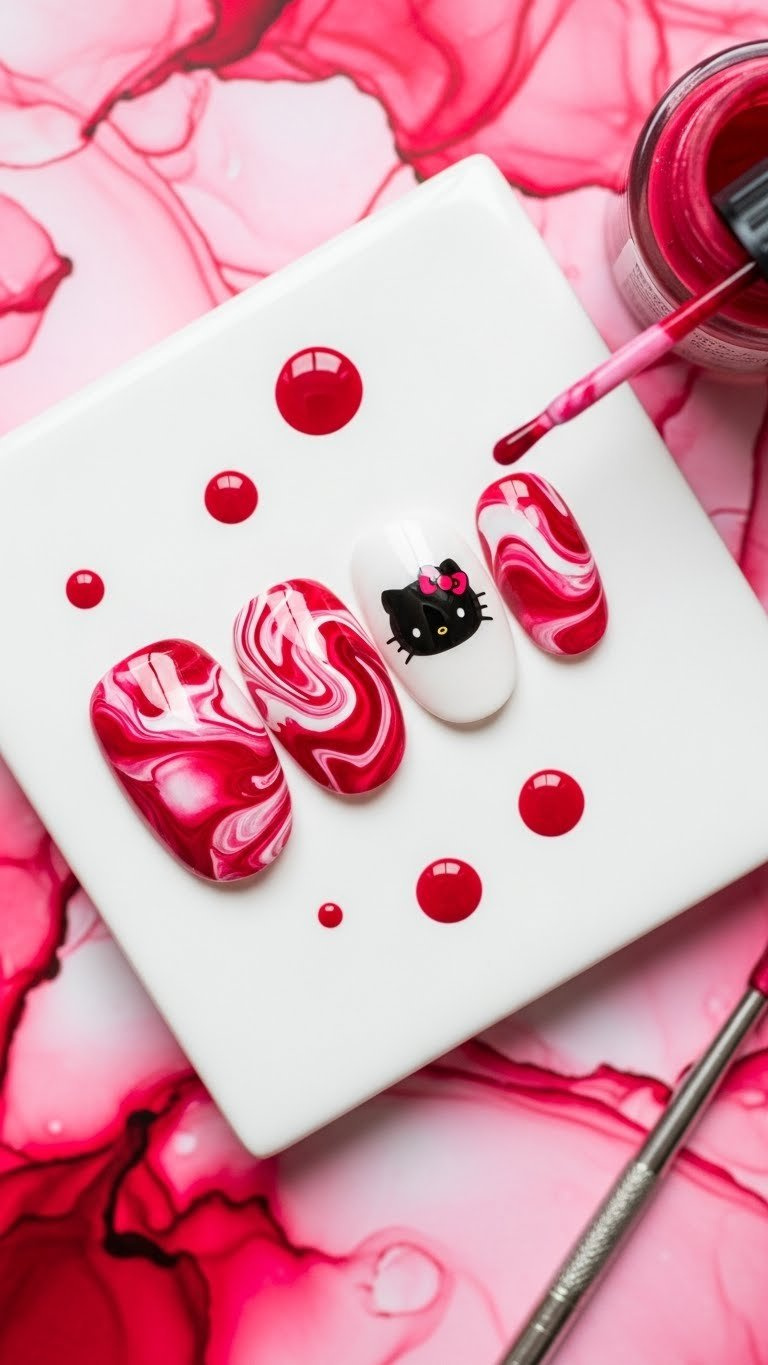
Get the look of marbled luxury! Pin this artistic hack!
A marbled “Love Potion” design with a clean kitty silhouette offers unique hello kitty patterns, showcasing creative hello kitty nail art with artistic fluidity. This advanced hello kitty application allows you to draw hello kitty on nails in an abstract yet recognizable way. The swirling red, white, and pink marble provides a sophisticated backdrop, demonstrating experienced hello kitty nail design.
Products & Tools Used
- Red and pink alcohol inks (or pigmented blooming gel)
- Clear solution or 91% Isopropyl alcohol (for spreading the ink)
- Black Hello Kitty silhouette water decal or sticker
- Small, pointed brush or stylus (for guiding the marble)
- Opaque white gel base
Application/Styling Steps
- Apply one coat of white gel polish to the nails you want to marble and cure. Apply a second coat but DO NOT CURE.
- While the second coat is tacky, drop small dots of red and pink alcohol ink onto the nail.
- Dip the pointed brush into the clear spreading solution and gently touch the colored inks to make hello kitty nails with a marbled effect. Allow the ink to bloom slightly. Cure once the desired effect is achieved.
- Apply a thin layer of top coat over the cured marble. Apply the Hello Kitty silhouette decal onto the marble, ensuring it is centered.
- Seal the decal by applying a robust top coat over the entire nail, focusing on the edges of the decal.
Pro-Tip: When using blooming gel for marbling, ensure the base coat is fully cured before applying the blooming gel. If using alcohol inks, always work in a well-ventilated area due to the fumes. This attention to detail demonstrates comprehensive hello kitty nail guide knowledge.

9. Galaxy Glitter and Star Charms Kitty (Alternative Aesthetic)
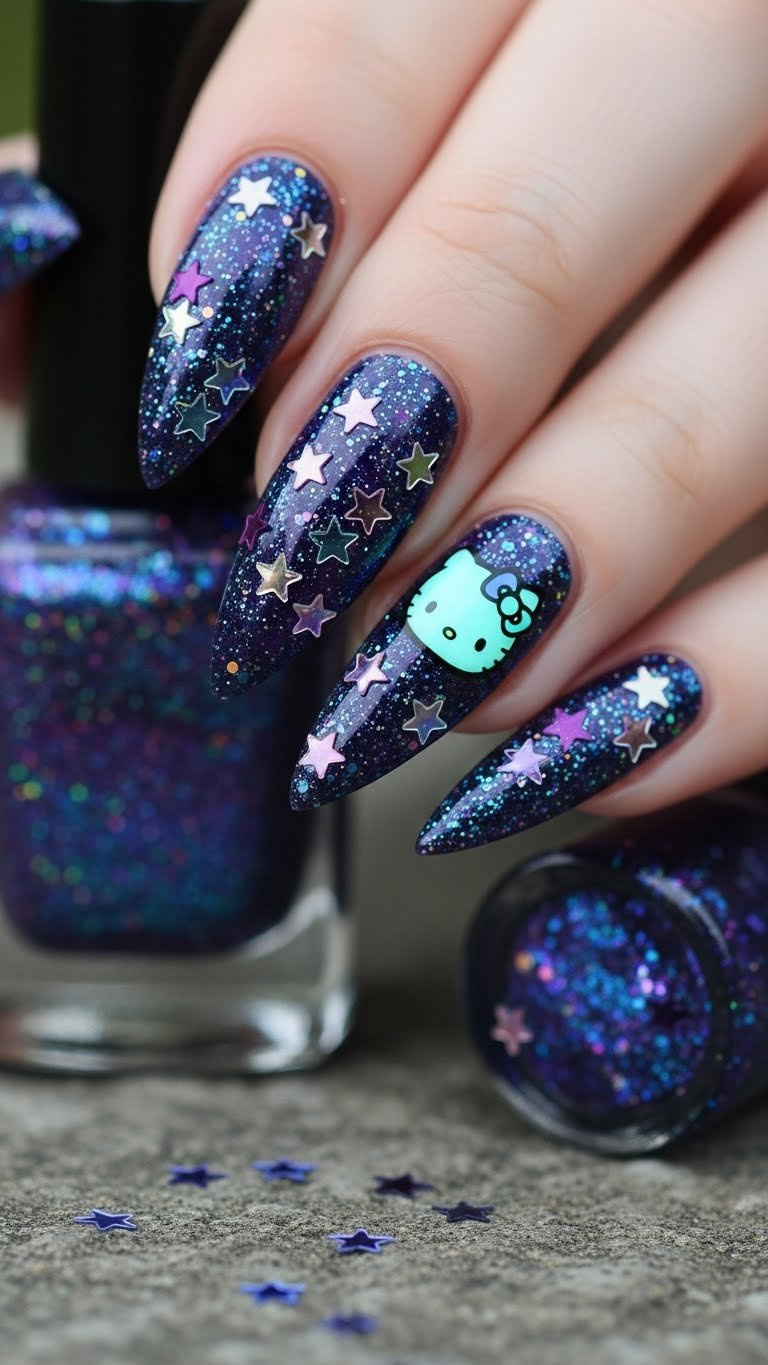
Reach for the stars with this unique Valentine’s set—save this cosmic look!
For a truly vibrant hello kitty nails experience, combine glitter hello kitty nails with a galaxy aesthetic and star charms. This creative hello kitty nail art offers an alternative approach to traditional Valentine’s Day themes. It allows you to transform a cosmic manicure by having hello kitty nails integrate with fashion elements, using pink/red galaxy colors and star charms to give it a festive twist.
Products & Tools Used
- Deep black, purple, and blue gel polishes
- Silver and holographic fine glitter polish
- Stamping plate or small sponge (for galaxy blending)
- Tiny star or moon nail charms
- Specialized nail charm adhesive or builder gel
Application/Styling Steps
- Apply two coats of deep black gel polish to all nails and cure.
- Using a small sponge, dab and blend small, irregular patches of purple and blue polish onto the black base to start the galaxy effect. Cure lightly.
- Layer the silver/holographic fine glitter polish over the galaxy patches to decorate nails with hello kitty related motifs (stars/glitter). Cure.
- Using the charm adhesive, secure the tiny star charms onto the accent nail and other nails as desired.
- Finish with a thick top coat, ensuring the star charms are sealed along the edges to prevent snagging.
Pro-Tip: To ensure the tiny charms do not fall off, cover the entire nail with a layer of builder gel after securing the charms. This process, known as light encapsulation, provides the necessary depth and stability to wear expressive art with ease.

FAQs About valentines day nails hello kitty
What do I need for easy Hello Kitty Valentine nail art?
For easy DIY Hello Kitty Valentine nails, you primarily need high-pigment polish in pink/red/white, a fine detail brush (like a 00 size), a small dotting tool, and a robust top coat. Beginners should also consider using specialized nail art stickers or decals to quickly create the iconic Hello Kitty face and bows without intricate hand-painting. Investing in a good LED/UV lamp is essential if you opt for long-lasting gel polish over traditional lacquer, as most complex designs require the durability of gel.
How do I ensure my 3D Hello Kitty charms don’t fall off quickly?
To ensure structural integrity and prevent 3D Hello Kitty charms from falling off, use a specialized, thick gel glue or builder gel, not standard liquid nail adhesive. Apply a bead of the adhesive to the back of the charm, press it firmly onto the nail (which should have a cured base color), and cure it for a full 90-120 seconds. Industry standards recommend using a clear builder gel to fully encapsulate the base of the charm for extra durability, minimizing the risk of lifting or snagging.
Are press-on Hello Kitty Valentine nails durable enough for a week?
Luxury press-on Hello Kitty Valentine nails are highly durable and can easily last 7 to 14 days when applied correctly. Durability depends on proper nail preparation—buffing the natural nail and cleaning it with alcohol is mandatory—and using high-quality liquid nail glue or professional gel glue, which cures under UV light for an extra-strong bond. Avoid soaking your hands in hot water for extended periods, especially immediately after application, to maximize wear time.
How much do custom Hello Kitty Valentine nails cost at a salon?
Custom, hand-painted Hello Kitty Valentine nails can range from $80 to over $200, depending on the complexity, materials used, and the nail technician’s expertise. Designs incorporating 3D sculpting, intricate micro-detailing, or unique materials like specialized glitter acrylic will always fall on the higher end due to the increased time and technical skill required for professional application. Always confirm pricing beforehand, as character art usually incurs an extra fee per nail.
What are the best colors for Hello Kitty Valentine’s Day nails?
The best and most popular colors for Hello Kitty Valentine’s Day nails are classic pinks, vibrant reds, and clean white, often paired with accents of black or gold. Pastel pinks and creamy whites are ideal for a soft, kawaii aesthetic, while deep reds and glossy black provide a more romantic, sophisticated feel, as seen in the chic matte outline designs. Incorporating heart-themed glitter or iridescent flake polish is also key to signaling the festive season.
How do gel and acrylic Hello Kitty nails compare in terms of detail and durability?
Acrylic nails, often using advanced polymer powders, are better suited for extremely durable, large-scale 3D hello kitty sculpting, offering incredible structural integrity. Gel nails, particularly soft gel or pigmented gel paint, offer higher precision for flat, hand-painted micro-detailing like the Cupid Kitty or thin outlines, and they cure instantly, reducing the risk of smudging. Both options, when applied by an expert, can last 3-4 weeks.
Can I use regular polish to paint intricate Hello Kitty designs?
While possible, regular polish makes intricate designs significantly more difficult due to its slow drying time, which increases the risk of smudging and overlapping. Professional hello kitty nail artists highly recommend using specialized, highly pigmented gel or acrylic paint because these materials do not set until cured, allowing unlimited time for precision hello kitty nail art and micro-detailing of faces and bows.
What are popular alternatives to the classic red and pink Hello Kitty aesthetic?
Popular alternatives to the classic red and pink Hello Kitty aesthetic include the chic matte black and glossy red designs, or the dreamy pastel lavender and mint kawaii looks. Other unique patterns involve incorporating holographic effects, negative space outlines, or even the subtle inclusion of other Sanrio characters, providing a modern twist while still maintaining the friendly cat theme. These variations appeal to those seeking a more adult or high-fashion look.
How do I safely remove 3D Hello Kitty nail art without damaging my natural nails?
Safely removing 3D Hello Kitty nail art requires filing the bulky charm down significantly with a coarse grit file before soaking the remainder in acetone or wrapping the nail. If the charm was secured with hard gel or acrylic, the filing process will take longer. Never attempt to forcefully peel or rip off 3D elements, as this can cause severe damage and lift layers of your natural nail plate.
How can I make my DIY Hello Kitty manicure look more professional?
To make your DIY Hello Kitty manicure look more professional, focus on perfecting two elements: crisp outlines and flawless application near the cuticle. Use a high-quality liner brush and ensure the polish or gel is applied thinly to prevent bubbling. Always clean up the edges and cuticles before curing the final layer, and apply a thick, non-wipe top coat to add salon-quality high shine and smooth out minor imperfections.
Key Takeaways: Your Quick Guide to Mastering Hello Kitty Valentine Nails
Mastering amazing Hello Kitty Valentine Nails means embracing creativity and precision. Here are the key points to ensure your Hello Kitty themed valentine nails are flawless:
- Choose Your Method Wisely: The approach depends on skill level: press-ons offer express hello kitty manicure solutions, while gel and acrylic allow for advanced hello kitty nail sculpting.
- Prioritize Secure Adhesion for 3D Elements: Whether using charms or hand-sculpted 3D hello kitty, specialized high-viscosity glue or builder gel is crucial to prevent the design from lifting, addressing the solution for 3D nail art falling off problem.
- Master the Detail Brush: For intricate designs like Cupid Kitty or miniature faces, invest in a 000 detail brush and use diluted, highly pigmented gel paint for precision hello kitty nail art that prevents clumping.
- Embrace Seasonal Aesthetics: Utilize the descriptive attributes like pink and red, hearts and bows, and glitter acrylic to ensure your design clearly communicates the Valentine’s Day theme alongside the character element.
- Always Cap the Free Edge: Applying top coat beneath and over any decorations, especially loose glitter or decals, and capping the nail’s free edge ensures maximum longevity and durability for your hello kitty themed valentine nails.
Final Thoughts on Hello Kitty Valentine Nails
Achieving the perfect set of Hello Kitty Valentine Nails is completely within reach, regardless of whether you’re a beginner seeking the simplicity of luxury press-ons or an experienced artist mastering the complex layering of 3D sculpting. This timeless aesthetic offers incredible versatility, allowing you to transition effortlessly between cute, kawaii pink and red bows and sophisticated, modern matte outlines. The critical takeaway is that success lies in mastering the right tools—from the finest detail brushes for the micro-detailing of the Kitty’s face, to the specialized gel glues that ensure your 3D charms remain secure. By applying these proven hello kitty nail techniques and prioritizing quality materials, you can confidently design hello kitty nails that showcase your creativity and spread the love this 2026.
Which of these 9 easy Hello Kitty Valentine nail ideas will you try first? Let me know in the comments below!
Last update on 2026-01-17 / Affiliate links / Images from Amazon Product Advertising API