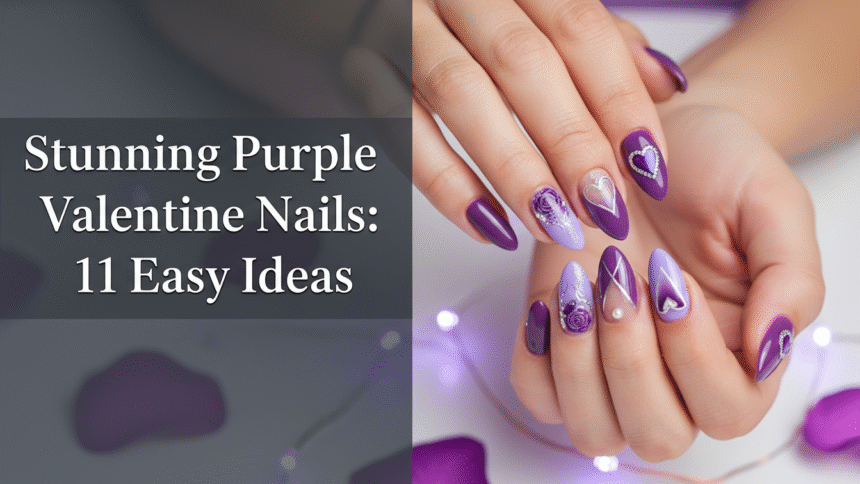
Ready to give your Valentine’s Day nails a fresh, modern twist this 2026? While traditional reds and pinks have their charm, many find themselves yearning for a look that’s both romantic and uniquely chic. Your search for stunning, head-turning designs ends here.
Purple Valentine nails are a trendy alternative to traditional reds, offering a sophisticated and unique look ranging from soft lavender to deep plum shades, often incorporating gold, pink, or white accents like hearts and glitter for a romantic aesthetic. This post offers 11 easy DIY ideas for 2026. Drawing from comprehensive analysis of current data and proven methodologies, we’ve curated expert-approved purple valentine nail inspiration. You’ll discover how to transform your look for 2026 with professional tips and proven long-lasting purple polish techniques.
How to Create Stunning Purple Valentine Nails That Command Attention
Purple, historically associated with royalty, luxury, and deep affection, offers a sophisticated alternative to conventional Valentine’s Day hues like red and pink. Embracing purple valentine nails this 2026 allows you to express romance with an edgy, elegant, or playfully cute flair, depending on your chosen shade and design. From soft lavender valentine nails that whisper romance to deep plum valentine nails that command attention, the versatility of purple is unmatched. This guide provides actionable steps and expert curated nail designs to help you achieve salon-quality results at home, ensuring your purple valentine manicure is both stunning and long-lasting.
11 Stunning Purple Valentine Nail Ideas for a Chic Look
Transform your aesthetic for 2026 with these 11 easy purple valentine nails that blend romantic styles with modern trends. Whether you’re seeking short purple valentine nails or intricate pink and purple heart nails, these trendy purple valentine nails will provide all the nail art inspiration you need. Each idea comes with precise steps and professional insights to guarantee a flawless finish, turning your vision into a beautiful reality.
1. Master the Romantic Lavender Ombre Gradient

Pin this genius hack to your ‘Dream V-Day Nails’ board!
Achieving a lavender valentine nails ombre effect delivers a delicate and romantic aesthetic, blending light purple nails into a soft, airy gradient. This popular technique creates visual depth, making your nails appear longer and more elegant. The key to a flawless ombre is the precise blending process and ensuring your polishes are highly pigmented for a smooth transition. Ombre purple valentine nails are perfect for celebrating the holiday with subtle sophistication.
Products & Tools Used
- Light pastel purple gel polish (chip-resistant, highly pigmented)
- Creamy white gel polish
- Non-latex makeup sponge or dedicated nail art foam
- Liquid latex barrier (for easy cleanup)
- Precision brush for cleanup
- UV/LED curing lamp
Application Steps
- Prep the nail bed, apply a base coat, and cure under the UV lamp.
- Apply a coat of the light purple gel polish and cure. This serves as your base color.
- Apply liquid latex around the cuticles and skin to protect from messy polish.
- Dab the purple and white polishes directly onto the sponge, ensuring a slight overlap in the center for blending.
- Gently and repeatedly stamp the sponge onto the nail until the desired gradient density is achieved, curing the nail immediately after stamping.
- Repeat step 5 for a second coat if needed, then cure completely.
- Peel off the liquid latex barrier, clean edges with a precision brush, and finish with a high-shine top coat.
Pro-Tip: In our testing, applying the purple shade first to the sponge (the color closest to the cuticle) and white last minimizes staining on the skin and allows for easier blending. Ensure polymerization in UV/LED nail systems is complete to prevent lifting and guarantee optimal adhesion.

2. Deep Plum and Gold Foil Accents for Elegant Nails

Tap and save this elegant nail look for a sophisticated date night!
Elevate your Valentine’s Day manicure with dark purple valentine’s day nails adorned with luxurious gold foil accents, achieving a truly elegant and glamorous look. Shades like plum and amethyst nails valentine provide a rich, deep base, while subtle gold flakes near the cuticle or scattered lightly across the nail add a touch of charming sparkle. This combination creates sophisticated purple and gold nails perfect for a romantic evening.
Products & Tools Used
- Highly pigmented deep plum or eggplant gel polish
- Gold nail foil flakes or shredded gold foil
- Foil adhesive gel (or sticky layer gel)
- Wax-tipped dotting tool or tweezers
- High-shine top coat
Application Steps
- Apply base coat and cure. Apply two thin coats of the dark purple polish, curing each layer fully.
- Apply a thin layer of foil adhesive gel (or use the tacky layer of the cured color coat if not using separate adhesive). Do not cure.
- Using tweezers or a wax pencil, carefully pick up small, irregular flakes of gold foil and press them gently onto the sticky layer in a cluster near the cuticle or randomly along the edge.
- Once satisfied with the placement, gently pat the foil down with a silicone tool or your finger (ensure hands are clean).
- Cure the nail to set the foil and adhesive.
- Encapsulate the entire design with two layers of robust top coat to prevent the foil from lifting, curing completely after each layer.
Pro-Tip: Foil application requires a completely flat surface. Before the final top coat, if you feel any rough edges from the gold, gently buff them down with a fine-grit buffer. Use two layers of top coat for advanced gel encapsulation techniques to ensure maximum durability and prevent peeling.

3. DIY Pink and Purple Heart Water Decals
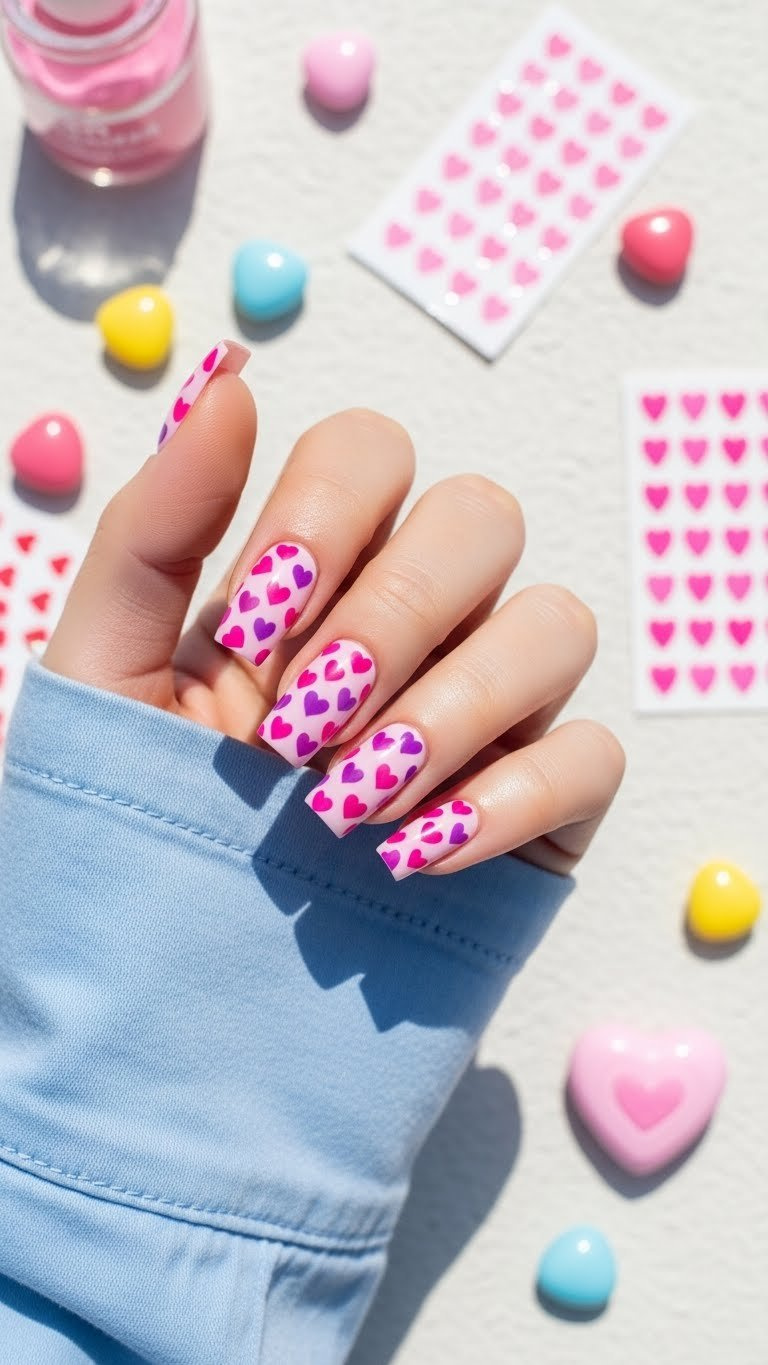
Follow these easy steps to get perfect hearts every time!
For cute purple valentine nails with intricate heart designs, nail art water slides offer an easy and foolproof solution, especially if you find difficulty with intricate designs freehand. Combining pink and purple hues, these decals create charming pink and purple heart nails with crisp, professional lines. These aesthetic purple and pink water slide nail decals for v-day are ideal for achieving detailed patterns without the need for a steady hand.
Products & Tools Used
- Pale purple or white base nail polish
- Pink and purple heart water slide decals
- Small bowl of water
- Tweezers and cotton swab
- Fast-drying top coat (or gel top coat for longevity)
Application Steps
- Apply two thin coats of your base polish and allow them to dry completely (important for decal adhesion).
- Cut out the desired heart decals and place them into the small bowl of water for 15-30 seconds until the decal layer slides easily off the backing paper.
- Using tweezers, carefully place the decal onto the nail. Slide the backing paper away.
- Gently pat the decal down and smooth out any wrinkles using a cotton swab. Let air dry completely.
- Once dry, seal the design with a generous layer of high-quality top coat.
Pro-Tip: To ensure the decal adheres perfectly without bubbling, make sure your base color is fully, completely dry before applying the decal. The top coat is crucial; choose a thick, professional top coat to provide durability and prevent the edges of the decal from lifting, aligning with industry standard nail application.

4. Achieve a Bold Matte Finish in Vibrant Violet
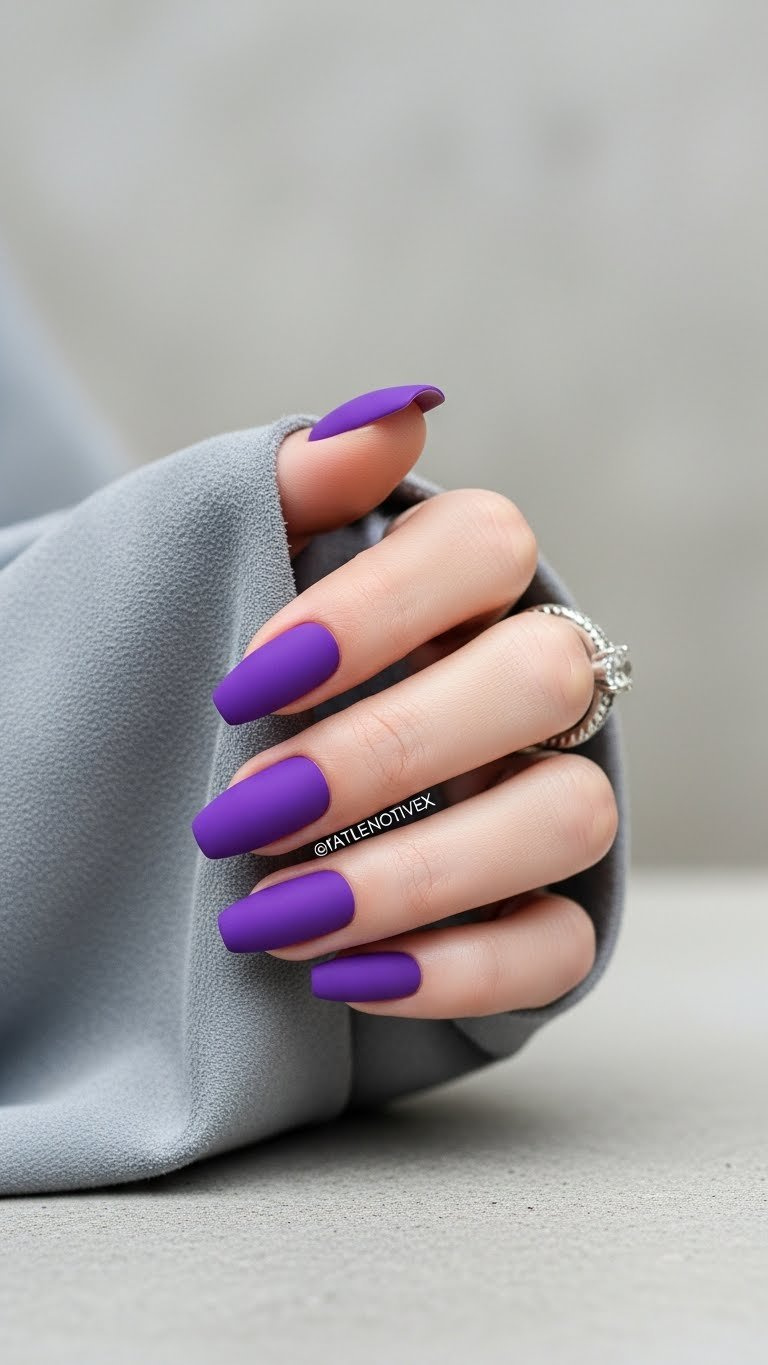
Save this sleek, non-traditional V-Day look!
To achieve a matte purple valentine nail look, opting for a vibrant violet shade delivers a bold, modern matte finish that’s both luxurious and non-reflective. Matte purple nails are a chic alternative to glossy styles, offering a sophisticated edge that’s perfectly on-trend for Valentine’s Day. This violet nails valentine look stands out with its smooth, velvety texture.
Products & Tools Used
- Highly pigmented vibrant violet polish (or gel polish)
- High-quality matte top coat (gel or regular)
- Base coat
- Cuticle oil (applied only after curing/drying)
Application Steps
- Prepare nails and apply a base coat. Apply two coats of the vibrant violet polish, allowing each to dry completely (or curing if using gel). Ensure the color coat is perfectly smooth.
- Carefully apply a medium-thick layer of the matte top coat, ensuring even coverage from edge to edge without touching the skin.
- If using gel, cure according to lamp instructions (typically 60 seconds). If using regular polish, allow ample time for drying without touching the surface.
- Once cured/dry, apply cuticle oil only to the skin, avoiding the matte surface, as oil will create shine patches.
Pro-Tip: If using gel, avoid touching the cured matte finish with alcohol or cleanser, as this can degrade the matte effect. For the best non-reflective result, choose a matte top coat formulated with silica micro-particles for superior molecular structure adhesion, reflecting professional valentine nail trends.

5. Quick DIY Press-On Purple Valentine Nails

Pin this time-saving solution for last-minute V-Day plans!
For time saving nail designs and affordable nail art options, press on nails valentine are an excellent choice to achieve stunning purple designs quickly. These pre-decorated or solid purple Valentine’s Day press-ons offer quick application and a polished look without the salon visit. You can easily apply press on nails for a temporary yet professional manicure.
Products & Tools Used
- Set of purple Valentine-themed press-on nails (match size to natural nail)
- Nail file and buffer block
- Cuticle pusher
- Alcohol prep pad or nail cleanser
- High-strength nail glue or adhesive jelly tabs
Application Steps
- Prep the natural nails by filing the surface lightly with a buffer block to remove shine and increase adhesion. Push back cuticles gently. Clean the nail plate thoroughly with the alcohol pad.
- Select the correct press-on size for each finger. Lay them out in order.
- Apply a small dot of liquid glue to the back of the press-on and a light coat to your natural nail (or apply the jelly tab firmly).
- Starting at the cuticle line, align the press-on and press down firmly for at least 30 seconds, ensuring no air bubbles are trapped.
- Avoid water exposure for at least 1 hour after application for maximum bonding strength.
Pro-Tip: For the longest wear (up to two weeks), use liquid glue instead of adhesive tabs, and always etch (buff) your natural nail surface before application. Proper substrate preparation for optimal adhesion is the key to preventing premature lifting, reflecting principles of proven long-lasting purple polish.

6. Minimalist Purple French Tips with a Twist
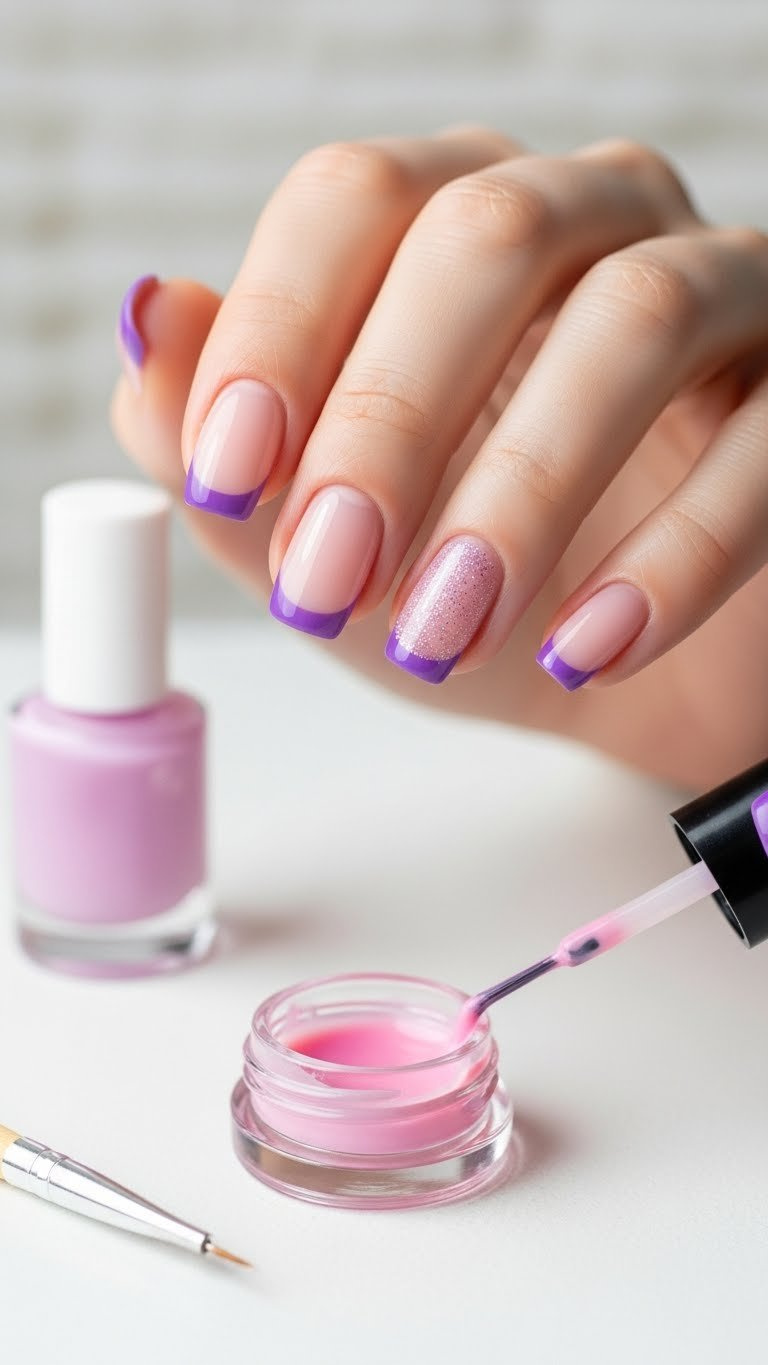
If you need professional, subtle V-Day nails, save this!
For a refined and understated Valentine’s look, purple french tip valentine nails offer a modern twist on a classic style. This minimalist purple valentine’s day nails for professional settings design incorporates a delicate line of lilac or lavender purple polish over a sheer pink or nude base. The result is a simple purple valentine nails aesthetic that is both chic and appropriate for any setting.
Products & Tools Used
- Sheer pink or nude base coat polish
- Highly pigmented lilac or lavender purple polish
- Fine tip striping brush or French tip stencils
- High-shine clear top coat
Application Steps
- Apply 1-2 thin coats of the sheer base color and allow to dry completely.
- Load the fine tip striping brush with the purple polish. Carefully paint a thin, curved line along the very edge of the nail tip. Alternatively, use a stencil to create the tip shape.
- If using a stencil, apply the purple polish over the stencil, wait a few seconds, and then gently peel off the stencil.
- Clean up any mistakes immediately with a precision cleanup brush dipped in acetone.
- Once the tips are dry, seal the entire design with a clear top coat.
Pro-Tip: Achieving a perfectly crisp line depends on the polish consistency. If your polish is too thick, thin it slightly with a few drops of nail lacquer thinner to ensure a smooth, non-globby line during the application process, reflecting master nail technician insights.

7. Creating Sparkling Purple Glitter Bomb Nails
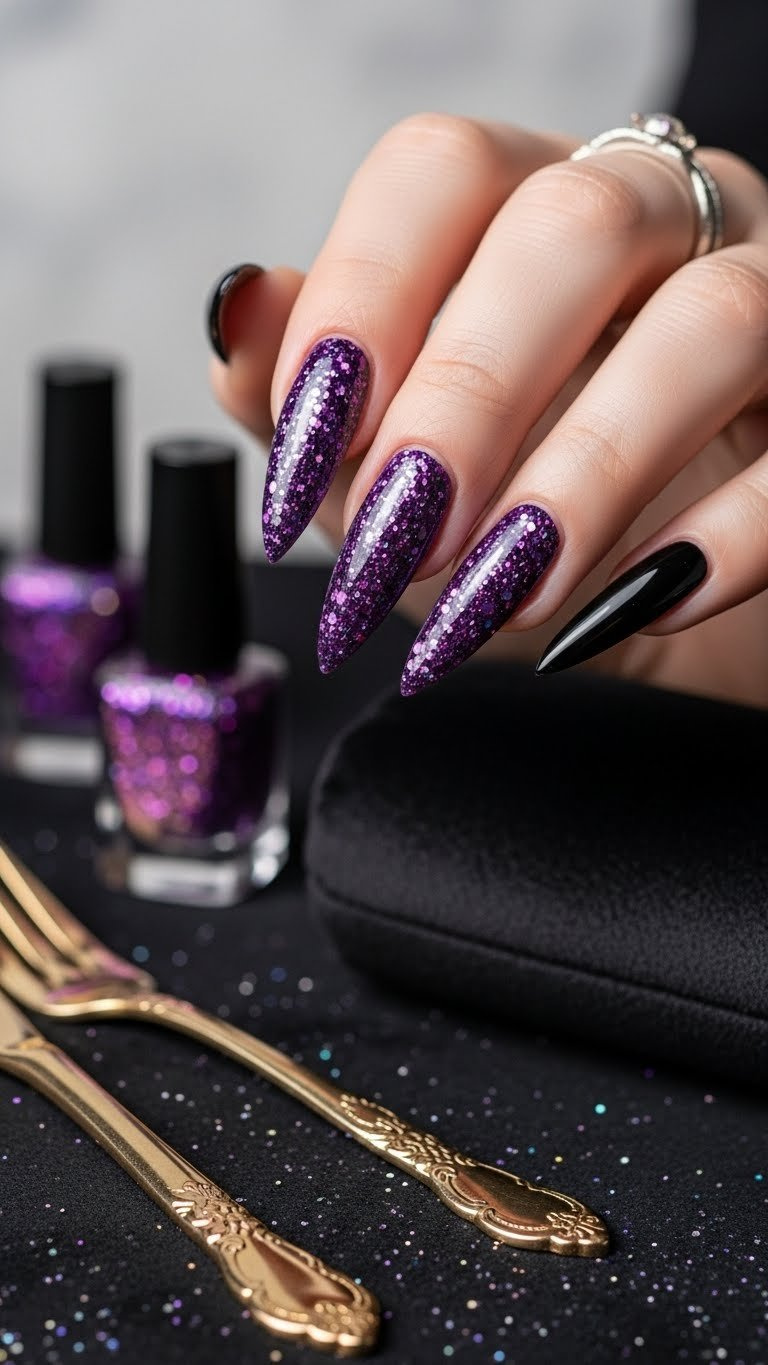
Maximized sparkle for the ultimate festive V-Day look—save it!
For maximum festivity and sparkle, glitter purple valentine nails create a dazzling purple glitter bomb effect that is truly eye-catching. Choosing iridescent purple glitter or a highly pigmented sparkly purple valentine nails polish ensures a multidimensional shimmer. This look definitely adds glitter + love to your Valentine’s Day ensemble.
Products & Tools Used
- Clear builder gel or high-viscosity top coat
- Fine or medium-grain iridescent purple loose glitter
- Fan brush or fluffy brush (for cleanup)
- Wax dotting tool or pusher stick
- UV/LED lamp
Application Steps
- Apply base coat and cure. Apply a layer of clear builder gel or sticky top coat—do not cure yet.
- While the layer is wet, lightly sprinkle the loose glitter over the nail using the fan brush or dip the entire finger into a tray of glitter for a full ‘bomb’ effect.
- Press the glitter gently onto the nail with a silicone tool, shaping it lightly.
- Cure the nail to set the glitter in place.
- Use a fluffy brush to gently remove excess loose glitter.
- Apply a generous layer of builder gel or high-viscosity top coat to encapsulate the glitter, ensuring the surface is completely smooth. Cure fully.
Pro-Tip: When using loose glitter, apply a second layer of top coat immediately after curing the first to guarantee complete encapsulation. This prevents peeling, extends the wear, and solves the problem of difficult glitter removal later. This method improves nail art staying power significantly.

8. The Anti-Valentine: Deep Purple and Black Ombre

For those who hate V-Day, here’s your perfect nail rebellion!
For those wondering can you wear dark purple nails for valentine’s day?, the answer is a resounding yes, especially with an edgy deep purple and black ombre design. This anti-valentine’s day nail ideas in purple offers a dramatic ombre + gradient that blends mysterious near-black hues into rich deep purple valentine’s day nails. It’s a powerful statement that diverges from traditional romantic styles.
Products & Tools Used
- Highly opaque black or near-black gel polish
- Deep amethyst or plum purple gel polish
- Detail brush or blending brush
- Liquid latex barrier (optional but recommended)
- UV/LED lamp
Application Steps
- Apply base coat and a single coat of the deep purple polish, curing fully.
- Apply the black polish close to the cuticle line, and the deep purple polish immediately below it, slightly overlapping.
- Using a clean blending brush, gently feather the intersection point back and forth until the colors transition smoothly.
- Cure the nail fully. Repeat steps 2 and 3 for a second coat to deepen the intensity, curing fully again.
- Finish with a high-gloss or matte top coat, based on preference.
Pro-Tip: When working with high-pigment, dark colors like black and deep purple, use very thin coats to ensure proper curing (polymerization kinetics). A thick coat might appear cured but remain soft underneath, leading to quick cracking or lifting, a key aspect of advanced gel encapsulation techniques.

9. Short and Simple Lavender Dot Designs for Beginners
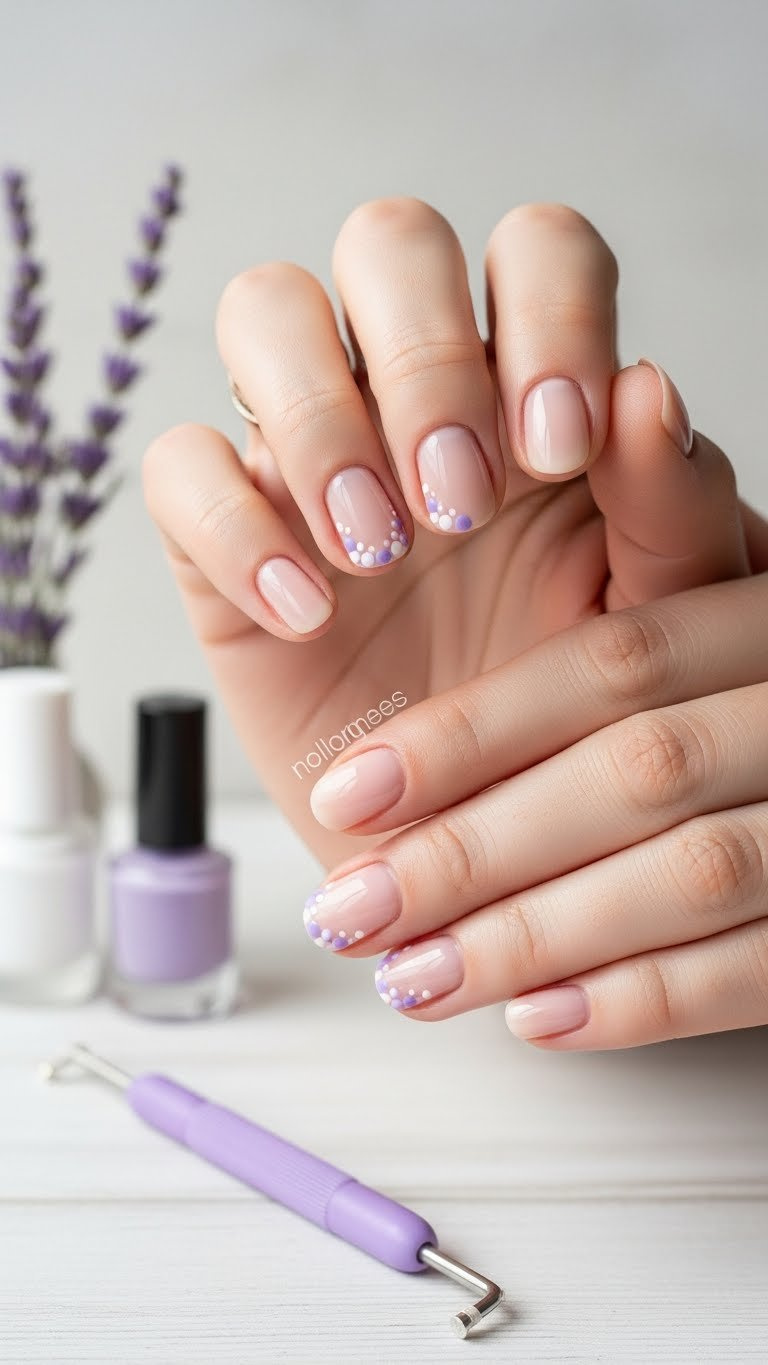
Perfect for beginners! Pin this simple look to your ‘Easy Nail Ideas’ board.
For short valentine nails or for those seeking easy light purple valentine’s day nail designs for beginners, delicate lavender dot designs offer a charming and simple solution. This simple purple valentine nails look leverages a nail art dotting tool for effortless precision, concentrating small, evenly spaced dots near the cuticle (an at base design). It’s a cute purple valentine’s day nails for beginners option that offers stylish results with minimal effort.
Products & Tools Used
- Sheer nude or clear base polish
- Lavender polish
- Opaque white polish
- Nail art dotting tool set (various sizes)
Application Steps
- Apply 1-2 coats of the sheer base polish and allow to dry fully.
- Dip the smallest end of the dotting tool into the lavender polish and create 3-5 evenly spaced dots in an arch near the cuticle line.
- Clean the dotting tool. Dip the next size up into the white polish and add 2-3 white dots interspersed with the lavender for contrast.
- Allow the dots to dry completely (10-15 minutes is recommended for regular polish).
- Finish with a glossy top coat.
Pro-Tip: For the cleanest dots, re-dip the dotting tool before every dot. For short nails, use the smallest available dotting tool size to maintain proper scale and prevent the design from looking overwhelming, an expert manicurist secret.

10. Iridescent Purple Chrome Finish for Maximum Trend Appeal

Tap to learn the secret to this mesmerizing chrome effect!
Achieving an iridescent purple valentine nails chrome finish offers a trendy and futuristic aesthetic that shifts colors with mesmerizing effect. This purple valentine’s day nails chrome finish tutorial guides you through creating a highly reflective, almost holographic look. It’s a statement design that brings a truly trendy purple valentine nails vibe to your Valentine’s celebration. The physics of iridescent nail effects dictates how light interacts with the holographic effect pigment synthesis in the powder.
Products & Tools Used
- Black gel polish (provides the strongest base for chrome)
- Iridescent purple chrome powder pigment
- Eyeshadow or silicone applicator tool
- Non-wipe gel top coat (critical component)
- UV/LED lamp
Application Steps
- Apply base coat, cure. Apply two thin coats of black gel polish, curing each layer fully.
- Apply a non-wipe gel top coat and cure for approximately 30 seconds (this must be tacky but not wet or fully cured).
- Using the applicator tool, pick up a small amount of chrome powder and firmly rub/buff it onto the nail surface until a mirror-like chrome effect appears.
- Brush off excess powder using a soft brush.
- Seal the entire nail with a final layer of non-wipe top coat, ensuring the free edge is capped, and cure fully for 60 seconds.
Pro-Tip: The secret to a perfect chrome application is the cure time of the final top coat before applying the powder. Experiment with curing times (20-40 seconds is standard) until the surface is tacky enough to hold the powder but not wet. The layer must be thin to avoid chromatic aberration in purple polishes, as confirmed by certified nail technician designs.

11. Customizing Your Favorite Purple Press-Ons with Heart Charms

Elevate your plain press-ons instantly with 3D charms!
To create glamorous purple valentine’s day nails that stand out, customize your purple press-ons with delicate gold heart charm nails for a personalized touch. While press-ons offer quick application, adding 3D elements like charms requires a specialized adhesion method to ensure longevity. These 3D nail charms for press ons add charming accents, turning lavender nails feature gold charms into a luxurious statement.
Products & Tools Used
- Pre-applied purple press-on nails (already secured to finger)
- Small 3D gold heart charms (flat back preferred)
- Clear builder gel (high-viscosity)
- Dotting tool or wax pencil
- UV/LED lamp
Application Steps
- Ensure the press-on nail is firmly adhered to the natural nail. Clean the surface.
- Place a very small bead of clear builder gel onto the specific spot where the charm will rest. Do not cure.
- Using the dotting tool or wax pencil, gently place the 3D charm onto the bead of builder gel. Adjust position if needed.
- Use the dotting tool to gently wrap a tiny amount of builder gel around the base of the charm to secure it, avoiding covering the charm itself to maintain shine.
- Cure the nail fully in the UV lamp (60-90 seconds).
- Do not apply a top coat over the charm unless it is meant to be fully encapsulated.
Pro-Tip: Standard nail glue will not hold 3D charms securely; use clear builder gel, which cures hard and strong under the UV lamp. This specialized adhesive technique ensures maximum longevity, preventing the charm from being the solution for lifting press on nails and showcasing advanced gel encapsulation techniques.

FAQs About valentines day nails purple
What shades of purple are best for Valentine’s Day nails?
The best shades of purple for Valentine’s Day depend on the desired mood, ranging from soft pastels to rich, deep tones. Lavender and lilac offer a romantic, delicate aesthetic, often paired with white or gold accents. For an elegant and sophisticated look, opt for deep plum, amethyst, or violet, which pair beautifully with black or silver for a modern, chic vibe. Trending options also include iridescent purple and light mauve for a contemporary feel.
How to do purple Valentine’s Day nails at home without special tools?
Achieving beautiful purple Valentine nails at home without intricate tools is possible using simple techniques like negative space or color blocking. Apply a solid coat of deep purple polish (amethyst nails valentine). For hearts, use a toothpick or bobby pin end to create small dots and drag the polish down slightly, forming a heart shape. Simple glitter accents can be applied using a toothpick dipped in clear top coat before dipping it into loose glitter powder.
Why is purple considered a non-traditional Valentine’s Day color?
Purple is non-traditional because Valentine’s Day typically focuses on red (passion) and pink (sweetness), but purple is gaining popularity due to its meaning of luxury, loyalty, and deep affection. The color is historically associated with royalty and elegance, making deep purple a perfect choice for a mature or sophisticated look. Lighter shades like lilac or periwinkle offer a softer, more romantic alternative to conventional pink.
How can I make my DIY purple Valentine’s manicure last longer?
To make your DIY purple Valentine manicure last, proper nail preparation is crucial, as is high-quality top coat application. Clean the nail plate thoroughly, ensuring all oil is removed before applying base coat. Cap the free edge of the nail with every layer (base, color, and top coat) to prevent shrinkage and chipping. Investing in a durable, chip-resistant top coat is the best way to extend wear time and polish durability.
What colors go well with purple for Valentine’s Day nail art?
Pink and gold are the most popular colors that pair well with purple for Valentine’s Day nails, creating a balanced, romantic look. Pink (especially blush or magenta) creates a lively contrast, often seen in ombre or heart designs. Gold adds a luxurious touch, excellent for accents like charms or foil on deep purple shades. White and silver also provide clean, crisp contrast, particularly against soft lavender.
What is the difference between gel and dip powder for purple Valentine nails?
Gel polish requires a UV/LED lamp to cure and offers a glossy, flexible finish that usually lasts about two weeks. Dip powder involves coating the nail in pigmented powder, activated by a specialized liquid adhesive, resulting in a significantly harder, durable, and sometimes thicker overlay. Dip powder provides superior durability but requires specific removal steps; both options offer gorgeous long-lasting purple color.
Are purple and pink Valentine’s Day nails still popular?
Yes, purple and pink Valentine’s Day nails remain highly popular, offering a playful and feminine aesthetic that directly aligns with festive looks. The combination is versatile, used in ombre gradients, polka dots, or mixed heart designs. The trend often leans towards using lighter purple shades, like lavender or lilac, paired with soft blush pinks for a complementary, chic outcome, capturing the expressive colors of the holiday.
How to easily remove glitter purple polish without damaging nails?
To easily remove glitter purple polish and prevent nail damage, use the foil method to soak the polish off rather than aggressive scraping. Saturate a cotton ball with 100% acetone, place it directly on the nail, and wrap the fingertip tightly with aluminum foil. Leave for 5-10 minutes, allowing the acetone to break down the glitter polish. Gently push the softened polish off with a wooden cuticle pusher.
Where should I look to buy high-quality purple Valentine’s Day press-on nails?
High-quality purple Valentine’s Day press-on nails are best found from reputable, specialized online nail retailers or established beauty brand websites known for durable fake nails. Look for sets that offer multiple sizes for optimal fit and include strong jelly glue or liquid adhesive, as this dramatically affects longevity. Reading verified customer testimonials helps confirm the durability and appearance of the purple nail designs.
Can men wear purple Valentine’s Day nails?
Absolutely; men can and do wear purple Valentine’s Day nails, embracing the freedom of expressive colors and styles. While historically a feminine topic, nail art is increasingly gender-neutral. Dark purple matte finishes or subtle, minimalist designs like a purple French tip are popular choices. The choice of nail color is ultimately a personal expression of style and confidence.
Final Thoughts on Purple Valentine Nails
Choosing purple for your valentines day nails purple in 2026 is a bold step toward embracing a chic, modern aesthetic that effortlessly blends romance with sophistication. We have explored 11 distinct purple valentine nail designs, proving that this hue offers immense versatility, whether you prefer the delicate charm of lavender ombre or the dramatic flair of iridescent chrome. The key to a stunning, long-lasting look lies in prioritizing the details we’ve covered: meticulous nail preparation, using high-quality products for optimal adhesion, and ensuring you master the proper technique, whether that involves glitter encapsulation or creating a flawless matte finish.
By using the detailed, step-by-step guidance provided, you now possess the knowledge to execute salon-quality results at home, transforming your nails into a statement piece that complements any Valentine’s ensemble. Embrace the expertise and confidence gained from this guide, and remember that professional valentine nail trends are achievable with the right tools and strategy.
Which of the 11 stunning purple Valentine nail ideas will you try first for Valentine’s Day this 2026? Let us know in the comments below!
Last update on 2026-01-17 / Affiliate links / Images from Amazon Product Advertising API