Tired of feeling like short nails limit your festive nail art options for Valentine’s Day? It can be frustrating to find designs that truly pop on a smaller canvas, often leading to simple block colors instead of creative expressions. This guide unlocks the potential of your shorter length.
Short Valentine’s Day nails can be both cute and easy to achieve with the right designs and techniques. This guide provides 11 simple ideas, perfect for at-home application, focusing on minimalist styles, hearts, and trendy colors suitable for shorter lengths. Drawing from comprehensive analysis of current data and proven methodologies, we’ll show you how to transform your valentines day nails short into captivating mini-masterpieces. You’ll discover actionable, step-by-step guidance and expert tips to create beautiful, on-trend looks that celebrate the season of love with effortless charm and sophistication.
Valentines Day Nails Short: 11 Cute and Easy Designs for 2026
Valentines day nails short offer a chic and practical canvas for expressing your festive spirit this 2026. Forget the misconception that intricate designs are only for long nails; a well-executed short valentine manicure can be incredibly striking and elegant. This section will guide you through 11 distinct, actionable ideas, carefully curated to look fantastic on shorter lengths while remaining simple enough for anyone to achieve at home. Each design features specific supplies, clear step-by-step directions, and invaluable pro-tips to ensure your cute valentines day nails short are nothing short of perfect.
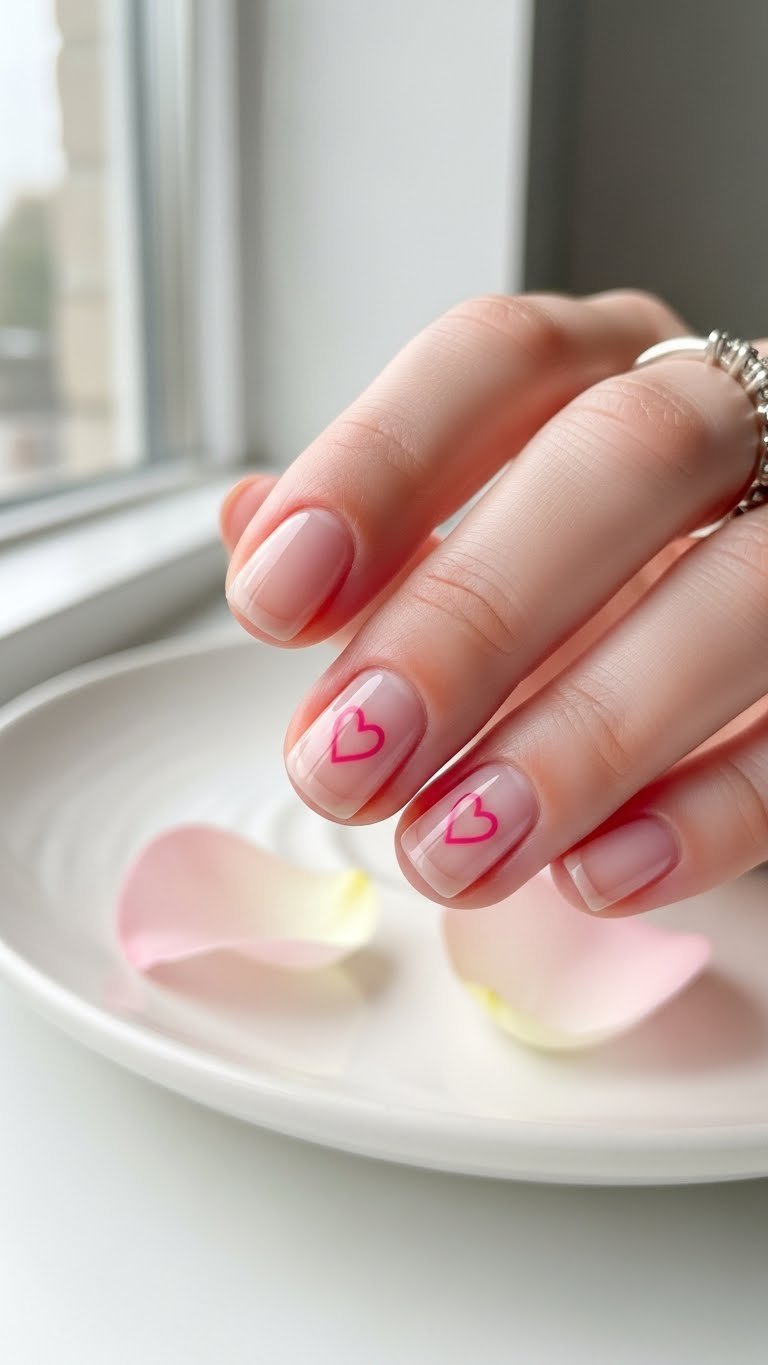
1. Paint Delicate Red Mini Hearts on a Nude Base
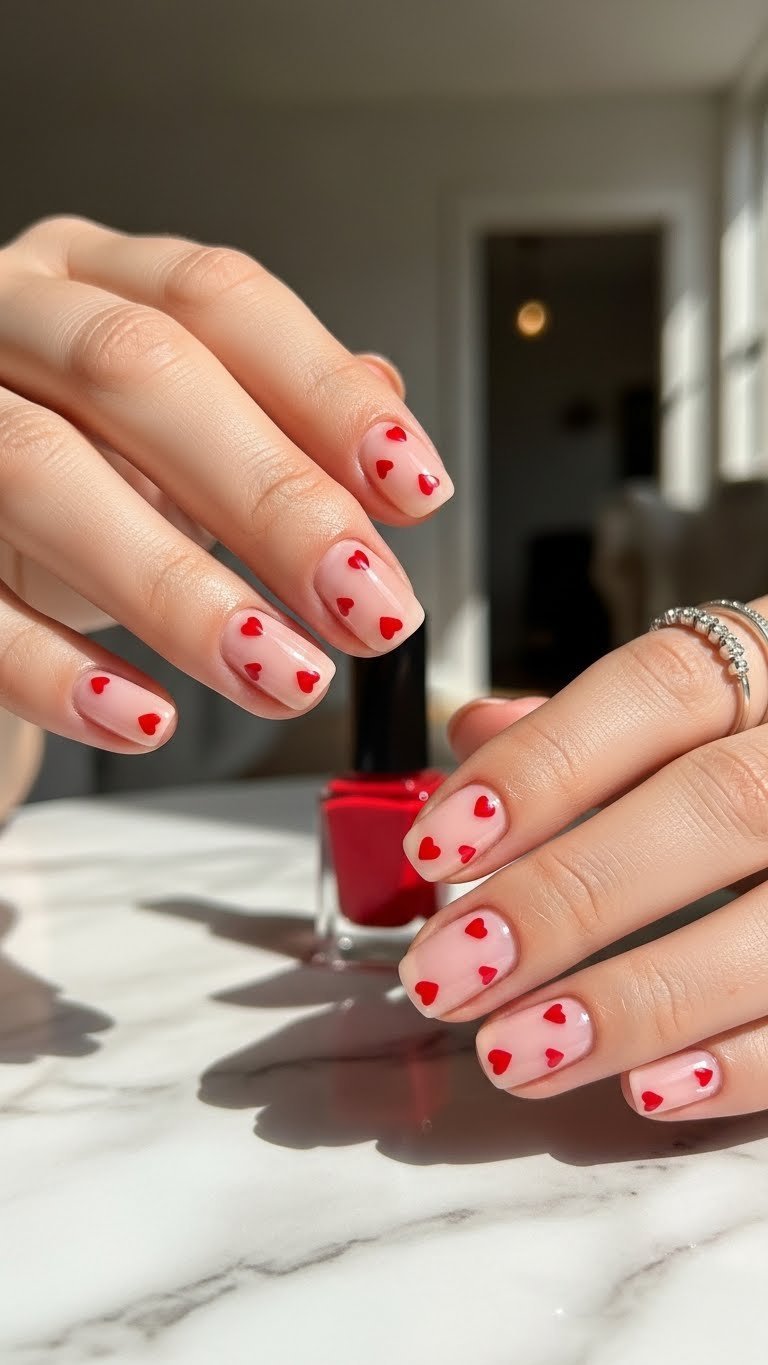
Pin this simple, adorable heart nail art to your ‘Valentine’s Day Nail Inspo’ board!
For a truly cute short nails look that’s both understated and festive, delicate red mini hearts on a nude base are a perfect choice. This design leverages the small canvas of short nails to create a refined and charming aesthetic. The neutral background ensures the red hearts pop without overwhelming the nail, making it an easy valentines day nails short option that always looks polished.
Supplies Needed
- Sheer nude or light pink nail polish (base coat)
- Bright red nail polish (for hearts)
- Small dotting tool or toothpick
- Clear top coat (glossy or matte)
Step-by-Step Directions
- Prep Nails: Start with clean, filed short nails. Apply one to two coats of your sheer nude or light pink base polish and let dry completely.
- Create Dots: Dip your dotting tool into the red polish. Place two small, close-together dots where you want the top curves of your heart to be.
- Form Heart: While the dots are still wet, use the tip of the dotting tool to gently drag down from the center of the two dots, connecting them to form the bottom point of the heart.
- Repeat & Dry: Create as many hearts as desired on each nail. Allow the red hearts to dry fully.
- Seal Design: Finish with a generous layer of clear top coat to protect your design and add shine.
Pro-Tip: For perfectly symmetrical tiny hearts on short nails, wipe your dotting tool clean after each heart to prevent polish buildup. If your nails are extra short, consider placing just one small heart on the ring finger for a subtle accent.

2. Craft Cute Pink French Tips with a Tiny White Accent
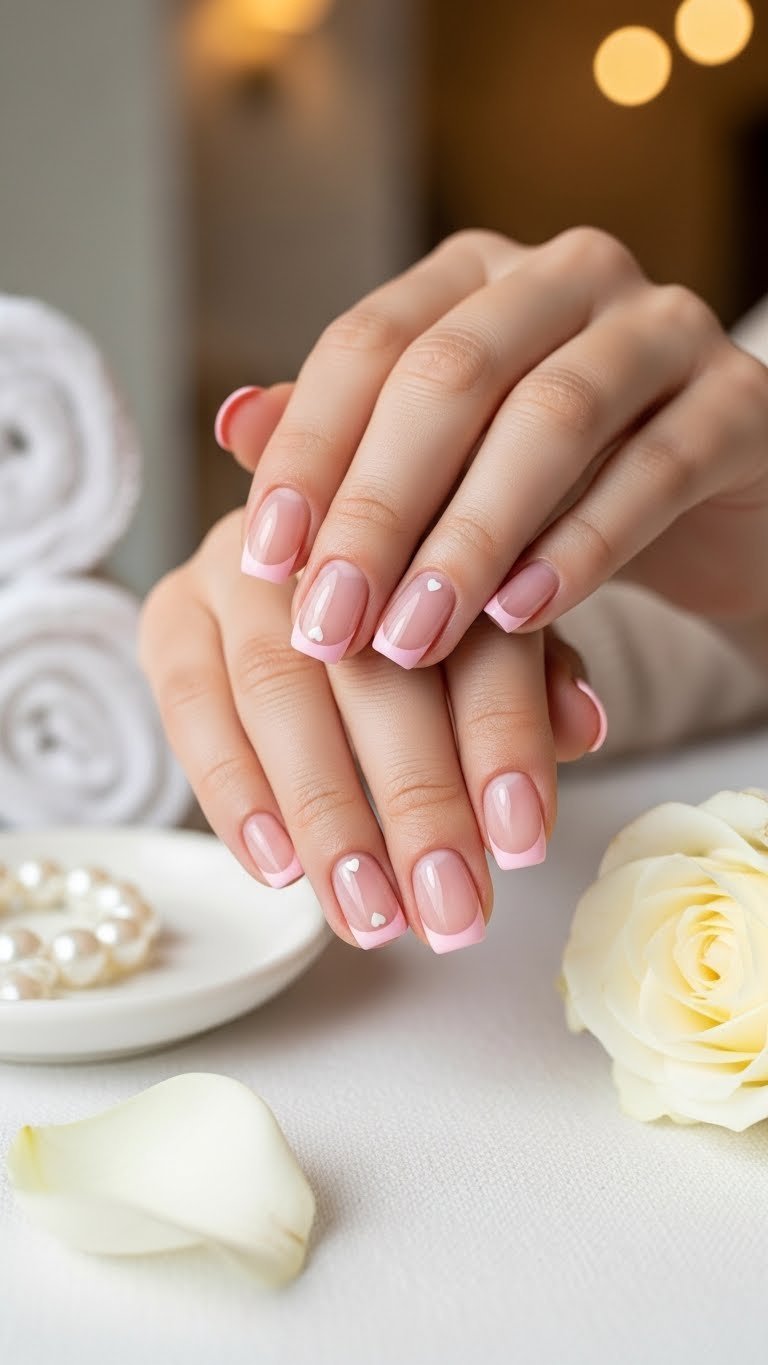
Save this elegant pink French tip design for your next V-Day mani!
The classic French tip gets a romantic update perfect for short valentine nails with a soft pink hue and a tiny white accent. This design offers a sophisticated and elegant look without requiring long nails, making it a timeless choice for Valentine’s Day. The key is to keep the pink tip subtle and clean, which is entirely achievable on short nail designs valentines.
Supplies Needed
- Sheer natural or clear base coat
- Soft pink nail polish (for tips)
- White nail art polish or fine-tip nail art pen
- Thin striping brush (optional, for French tip line)
- Clear top coat
Step-by-Step Directions
- Base Layer: Apply one coat of sheer natural or clear base coat and allow it to dry.
- Define Tips: Using the soft pink polish, carefully paint a thin line across the tip of each nail. If using a striping brush, dip it in the pink polish and draw the line from one side to the other.
- Clean Up: Use a small brush dipped in nail polish remover to clean up any wobbly lines, creating a crisp French tip.
- Add Accent: Once the pink tips are dry, use a dotting tool or the fine tip of a white nail art pen to create a tiny white dot or a micro-heart near the base of one or two nails for a subtle accent.
- Finish: Apply a clear top coat to seal the design and add a glossy finish.
Pro-Tip: For a perfect French tip line on short nails, try applying a base coat, then paint the pink tip by gently “swiping” the brush across the free edge of your nail, using the natural curve as a guide. Clean up with a flat brush dipped in acetone for crispness.

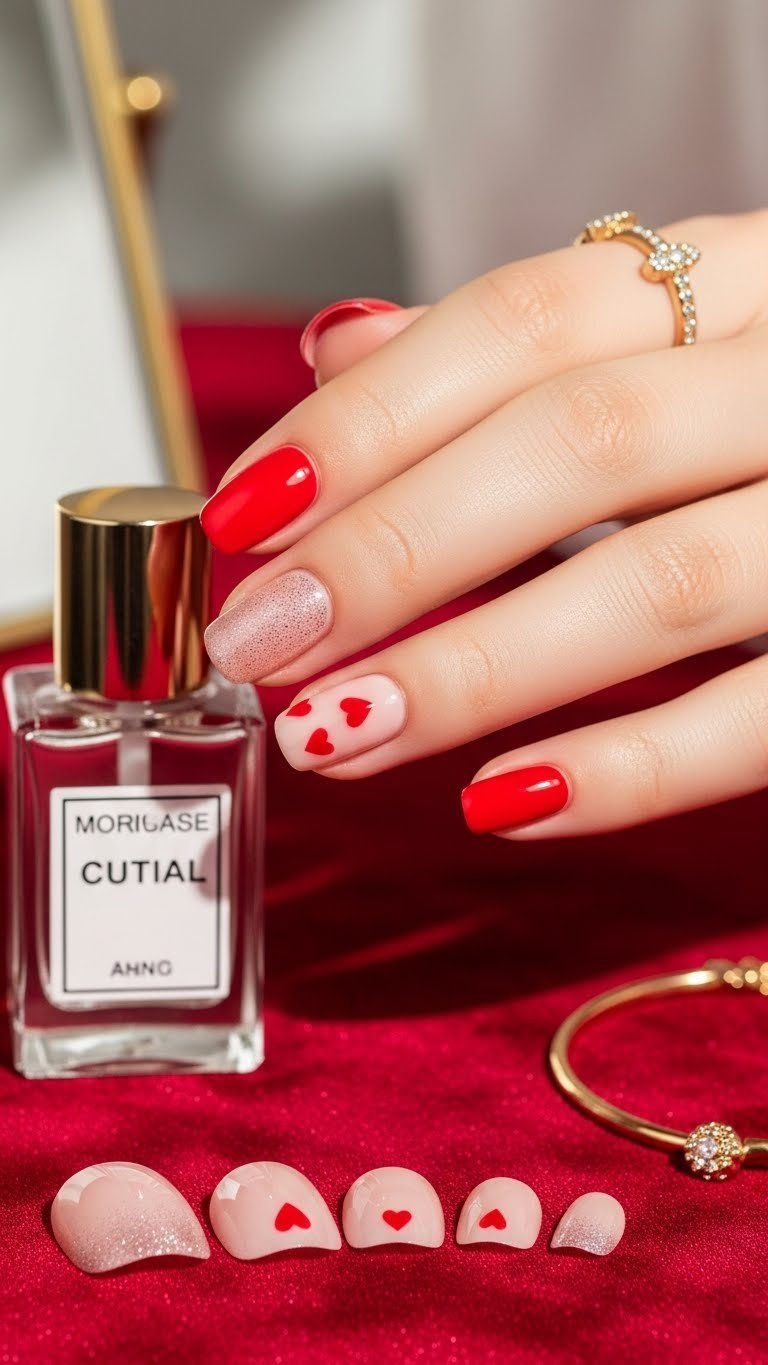
3. Apply Sparkly Glitter Gradient on Pink Short Nails
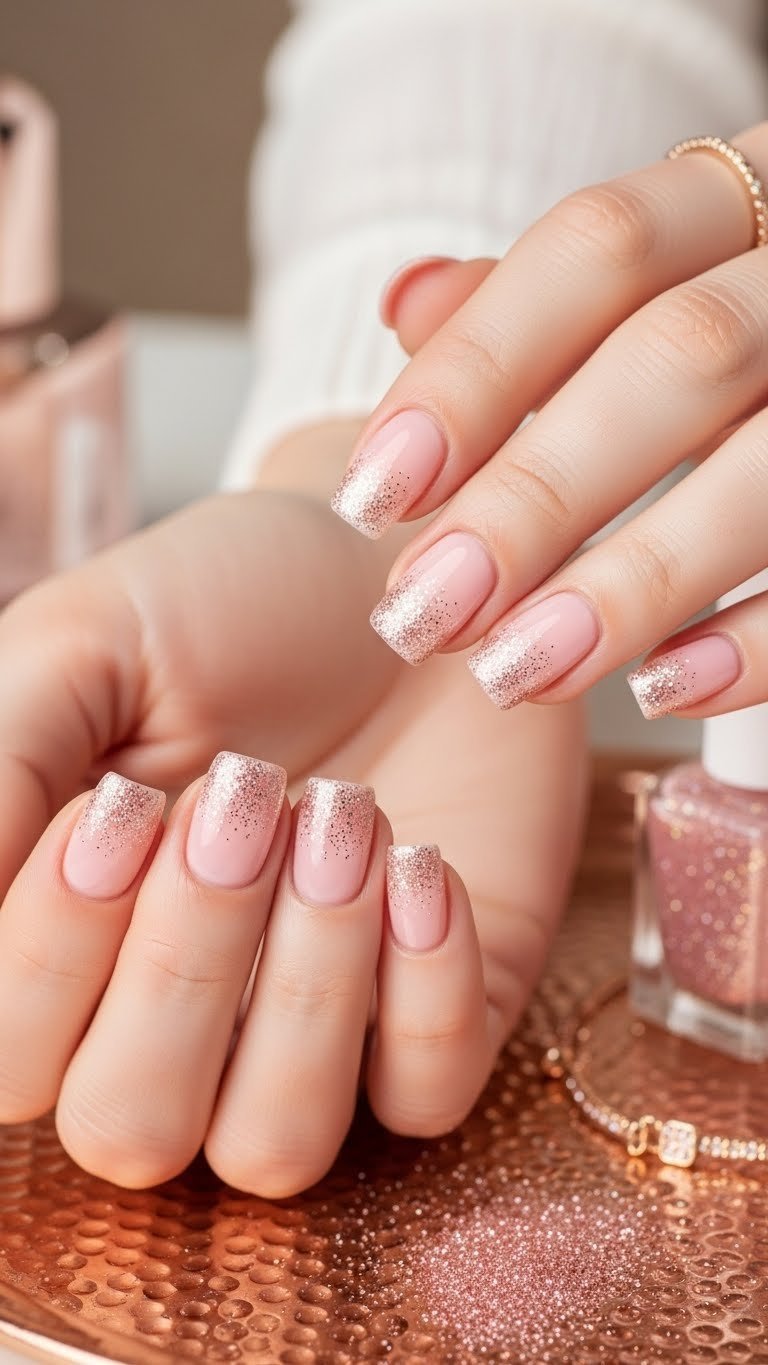
Add some sparkle to your V-Day with this glitter gradient – pin it now!
A sparkly glitter gradient is a fantastic way to add glamour to your short pink valentines nails without requiring intricate hand-painting. This design is surprisingly easy to create using a simple sponge technique and delivers a dazzling, festive look. The soft transition from a solid pink base to a shimmering glitter tip creates a romantic and trendy effect that’s perfect for valentines day nails short.
Supplies Needed
- Opaque pink nail polish (base color)
- Fine glitter nail polish (matching or complementary color, e.g., rose gold, silver)
- Small makeup sponge or eyeshadow applicator
- Clear top coat
Step-by-Step Directions
- Base Coat: Apply two coats of your opaque pink nail polish to all nails and let dry completely.
- Prep Glitter: Apply a generous amount of the glitter nail polish directly onto one edge of your small makeup sponge.
- Create Gradient: Lightly dab the glitter-loaded sponge onto the tips of your nails, focusing the most glitter at the very edge.
- Fade Effect: Continue dabbing, moving slightly downwards towards the center of the nail, but with less pressure, creating a faded, gradient effect. Build up intensity in layers if needed.
- Seal It: Once dry, apply a thick layer of clear top coat to smooth out the glitter texture and seal the design.
Pro-Tip: To make the glitter really pop and ensure it adheres well, apply a clear polish to the tip of your nail before dabbing on the glitter. This sticky layer will help grab the glitter particles for a more concentrated and lasting effect.

4. Design Subtle Negative Space Hearts for Minimalist Appeal
Achieve chic elegance with this negative space heart nail art – perfect for short nails!
For a chic, understated look, negative space hearts short nails offer a modern twist on Valentine’s Day art. This design utilizes the natural nail as part of the artwork, creating a minimalist yet impactful statement that is perfect for easy valentines day nails short. It’s a sophisticated way to show your festive spirit without a bold color commitment.
Supplies Needed
- Clear base coat
- Sheer pink or nude nail polish (optional, for subtle tint)
- Heart-shaped nail vinyls or thin striping tape and small scissors
- Nail polish in your chosen accent color (red, pink, or white)
- Clear top coat
Step-by-Step Directions
- Base Prep: Apply a clear base coat to all nails. If you want a slight tint, apply one coat of sheer pink or nude polish and let it dry completely.
- Apply Stencil/Tape: Place a heart-shaped nail vinyl onto your nail, or use small pieces of striping tape to carefully outline a heart shape where you want the negative space to be. Press down firmly to seal the edges.
- Paint Around Heart: Apply your accent nail polish color around the stencil/tape, covering the area outside the heart.
- Remove Stencil: Immediately and carefully peel off the nail vinyl or striping tape while the polish is still wet. This prevents jagged edges.
- Dry & Top Coat: Allow the design to dry completely, then apply a clear top coat to seal.
Pro-Tip: If using striping tape to create your own heart stencil, ensure the tape is firmly pressed down, especially at the points where lines meet, to prevent polish from bleeding underneath. A little clear base coat applied over the tape first and allowed to dry can also help seal edges.

5. Achieve Romantic Ombre Effect with Pink and Red

Fall in love with this pink and red ombre! Pin it for your romantic V-Day look.
An ombre effect blending pink and red creates a romantic and dreamy look, perfectly suited for short valentine nails. This gradient technique, often perceived as complex, is surprisingly simple to achieve at home with the right tools. The seamless transition of colors adds depth and sophistication, making your valentines day nails short stand out.
Supplies Needed
- Clear base coat
- Light pink nail polish
- Vibrant red nail polish
- Small makeup sponge (cosmetic wedge)
- Liquid latex barrier or petroleum jelly (for cleanup)
- Nail polish remover and small cleanup brush
- Clear top coat
Step-by-Step Directions
- Base Color: Apply a clear base coat. Then apply one coat of the light pink nail polish to all nails and let it dry. This helps the ombre colors pop.
- Protect Skin: Apply a liquid latex barrier around your cuticles and the skin surrounding your nails. Alternatively, apply a thin layer of petroleum jelly.
- Prep Sponge: Paint a strip of the light pink polish next to a strip of the red polish directly onto a flat side of your makeup sponge. Slightly overlap the colors where they meet.
- Sponge onto Nail: Gently and quickly dab the sponge onto your nail, moving it slightly up and down to blend the colors. Repeat two to three times for each nail until you achieve the desired opacity and blend.
- Clean Up: Immediately remove the liquid latex (if used) or clean around your cuticles with a small brush dipped in nail polish remover.
- Seal Ombre: Let your ombre design dry completely, then apply a generous layer of clear top coat to smooth and protect the gradient.
Pro-Tip: For a smoother ombre, dampen your makeup sponge slightly before applying the polish to it. This helps the polish absorb and blend more evenly without drying too quickly. Don’t press too hard when dabbing!

6. Create Dainty White Dot Accents on Red Short Nails
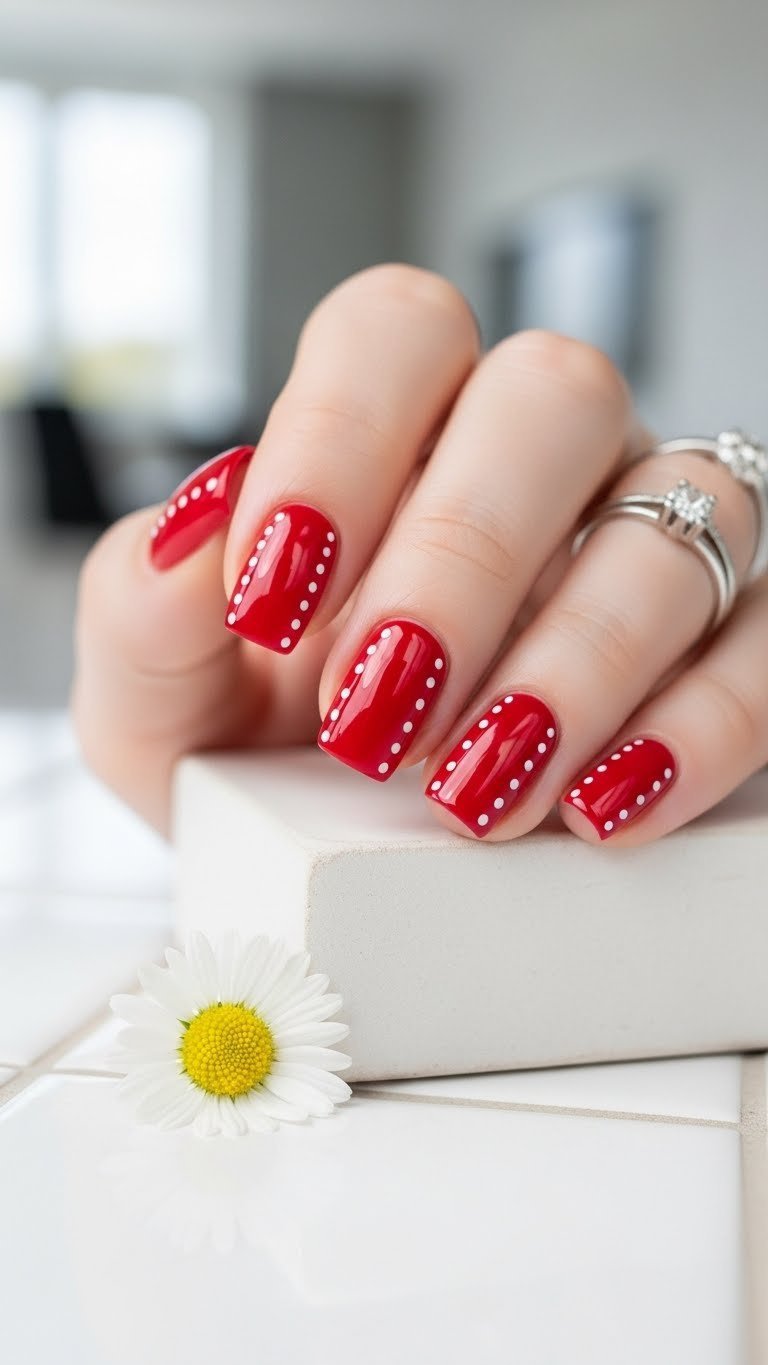
Simple, bold, and cute! Pin this red and white polka dot look for Valentine’s Day.
For a classic yet playful look, dainty white dot accents on a vibrant red base are an effortless way to create cute valentines day nails short. This design offers a striking contrast and an air of timeless romance, making it one of the simplest yet most effective easy valentines day nails short options. The small scale of the dots works beautifully on shorter nail beds.
Supplies Needed
- Clear base coat
- Vibrant red nail polish
- Opaque white nail polish
- Small dotting tool (or a bobby pin end)
- Clear top coat
Step-by-Step Directions
- Red Base: Apply a clear base coat, then two coats of vibrant red nail polish. Allow each coat to dry completely.
- Dotting Prep: Pour a small puddle of white nail polish onto a piece of foil or a palette.
- Create Dots: Dip your small dotting tool into the white polish and gently place tiny dots onto your red nails. You can create a pattern (e.g., a line of dots near the cuticle, scattered dots, or a single large dot) or keep them uniform.
- Dry Thoroughly: Ensure the white dots are completely dry before proceeding.
- Seal It: Apply a final layer of clear top coat to protect your design and add a glossy finish.
Pro-Tip: For perfectly round dots, ensure you pick up a fresh, small amount of polish with your dotting tool for each dot. If the polish is too thick or you use too much, the dots can become uneven or smudged.
7. Try Trendy Geometric Shapes in Pink, Red & White
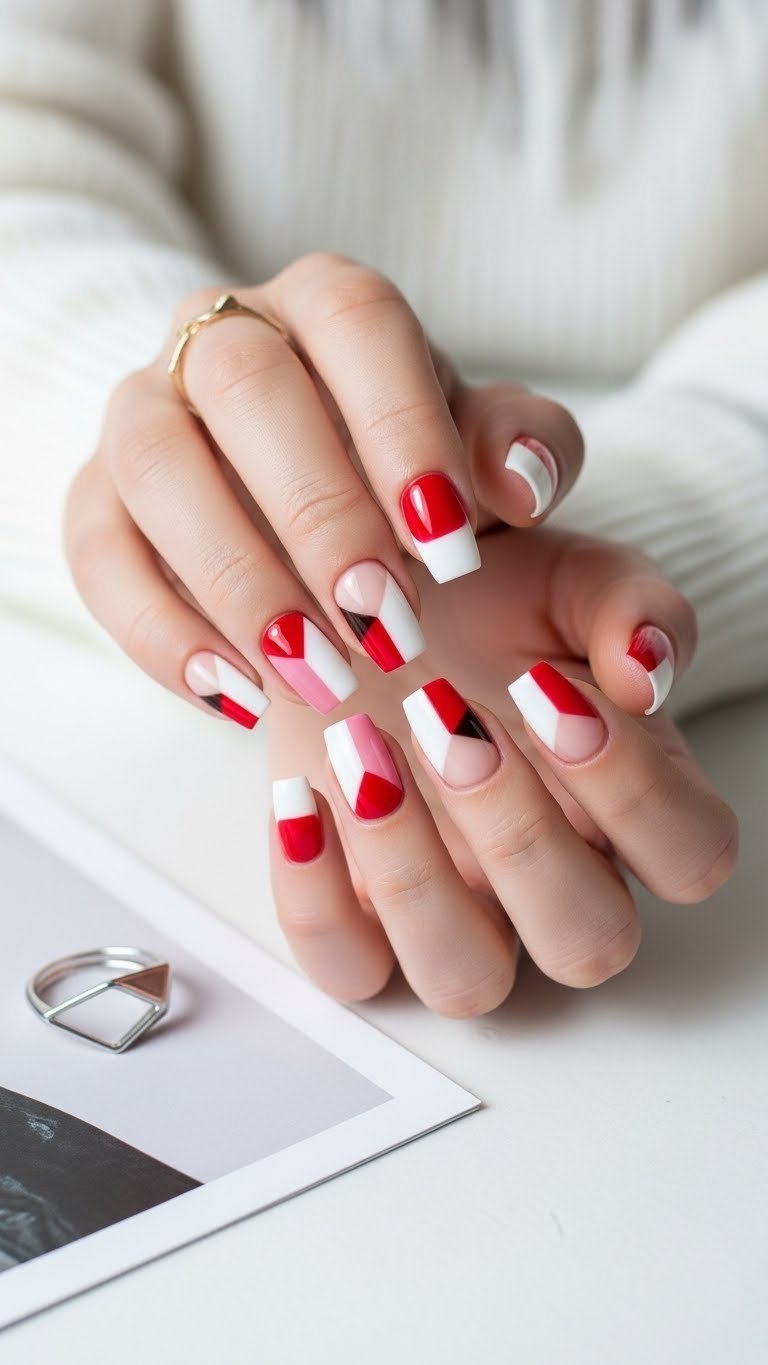
Modern V-Day vibes! Pin these geometric short nails for a trendy look.
For a contemporary and edgy Valentine’s Day statement, trendy geometric shapes in pink, red, and white are perfect for short nails. This design utilizes clean lines and bold color blocks to create an artistic look that is both modern and festive. It’s a fantastic option for those seeking short nail designs valentines that break away from traditional hearts while still embracing the holiday palette.
Supplies Needed
- Clear base coat
- Nail polish in white, light pink, and red
- Thin nail art striping tape or painter’s tape cut into thin strips
- Small scissors or craft knife
- Tweezers
- Clear top coat (glossy or matte)
Step-by-Step Directions
- Base Layer: Apply a clear base coat. Then paint all nails with one or two coats of white polish and let dry completely.
- Apply Tape: Once the base color is bone dry, use tweezers to carefully apply thin strips of nail art tape to create your desired geometric patterns (e.g., triangles, diagonal lines, criss-cross). Ensure all edges are pressed down firmly.
- Paint Colors: Fill in the open sections with your pink and red polishes. You can alternate colors between nails or within a single design.
- Remove Tape: Immediately and gently peel off the striping tape while the polish is still wet. This reveals the crisp, unpainted lines.
- Seal It: Allow the design to dry fully, then apply a clear top coat to seal and protect your geometric creation.
Pro-Tip: Make sure your base coat is completely dry before applying the striping tape. If it’s even slightly tacky, the tape can lift the base polish when removed, ruining your crisp lines. Waiting at least 30 minutes, or even an hour, is ideal.

8. Use Easy Press-On Nails for Instant Glam
No time? No problem! Pin these gorgeous press-on nails for instant Valentine’s glam.
For those seeking an immediate, salon-quality look without the time commitment of painting, easy press on nails valentines are a game-changer for short nails. High-quality press-on sets come in an array of festive designs and lengths, offering instant glam with minimal effort. They are a fantastic solution for achieving stunning valentines day nails short quickly and effectively.
Supplies Needed
- High-quality short press-on nails with a Valentine’s Day design
- Nail file and buffer (usually included in press-on kit)
- Alcohol prep pad or nail cleanser
- Cuticle pusher (usually included)
- Nail glue or adhesive tabs (often included, or purchase separately for stronger hold)
Step-by-Step Directions
- Nail Prep: Gently push back your cuticles with the cuticle pusher. Lightly buff the surface of your natural nails to create a rough texture for better adhesion. Cleanse your nails with an alcohol prep pad to remove oils.
- Size & Organize: Lay out all the press-on nails and match them to your natural nails, ensuring a snug fit from side wall to side wall without overlapping your skin.
- Apply Adhesive: Apply a small drop of nail glue to your natural nail or apply an adhesive tab directly to the press-on nail, ensuring full coverage.
- Press On: Align the press-on nail with your cuticle and press down firmly, holding for 15-20 seconds to secure. Repeat for all nails.
- Finish: File the edges if necessary to achieve your desired shape or length for a completely customized look. Avoid water for at least an hour after application.
Pro-Tip: To ensure your press-on nails last longer, choose a size slightly smaller than your natural nail for a more natural look and a better seal around the edges. Also, applying a thin layer of nail dehydrator before glue can significantly extend wear time.

9. Master Simple Red French Tip Hearts on Nude Short Nails
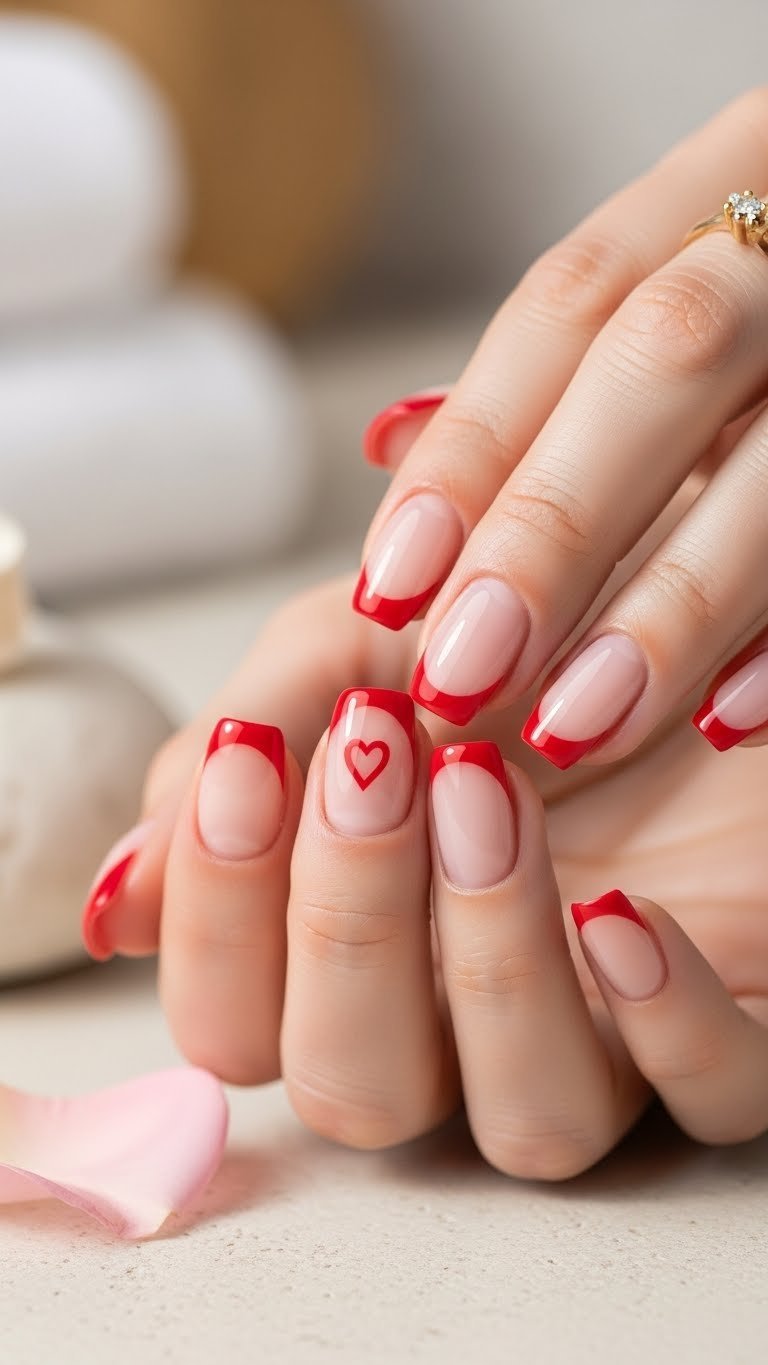
A heart with a twist! Pin this clever French tip heart design for your V-Day nails.
Taking the classic French tip and infusing it with a Valentine’s twist, the simple red French tip heart on nude short nails is both clever and romantic. This design creates the illusion of a heart at the very tip of your nail, making it a sophisticated and unique choice for short valentine nails. The nude base provides a clean canvas, allowing the subtle heart detail to truly shine.
Supplies Needed
- Clear base coat
- Sheer nude or light pink nail polish
- Vibrant red nail polish
- Fine nail art brush or a small dotting tool
- Nail polish remover and a small cleanup brush
- Clear top coat
Step-by-Step Directions
- Base Prep: Apply a clear base coat, then two thin coats of sheer nude or light pink polish. Let dry completely.
- First Heart Lobe: Dip your fine nail art brush into the red polish. On the very tip of your nail, paint a small, rounded curve starting from one side of the nail’s free edge, sweeping slightly towards the center.
- Second Heart Lobe: Repeat on the other side, creating a second matching curve that meets the first curve in the center, forming the top of a heart at your nail tip.
- Fill In: Fill in the space below the two curves with red polish to complete the heart-shaped French tip.
- Clean & Dry: Clean up any mistakes with a cleanup brush dipped in remover. Let the red design dry thoroughly.
- Seal: Finish with a high-gloss clear top coat for protection and shine.
Pro-Tip: Instead of painting a freehand curve, you can place two small dots at the tip of your nail with a dotting tool, then use a fine brush to connect them downwards into a heart shape. This can offer more control on short nails.

10. Play with Asymmetrical Color Blocks on Square Short Nails
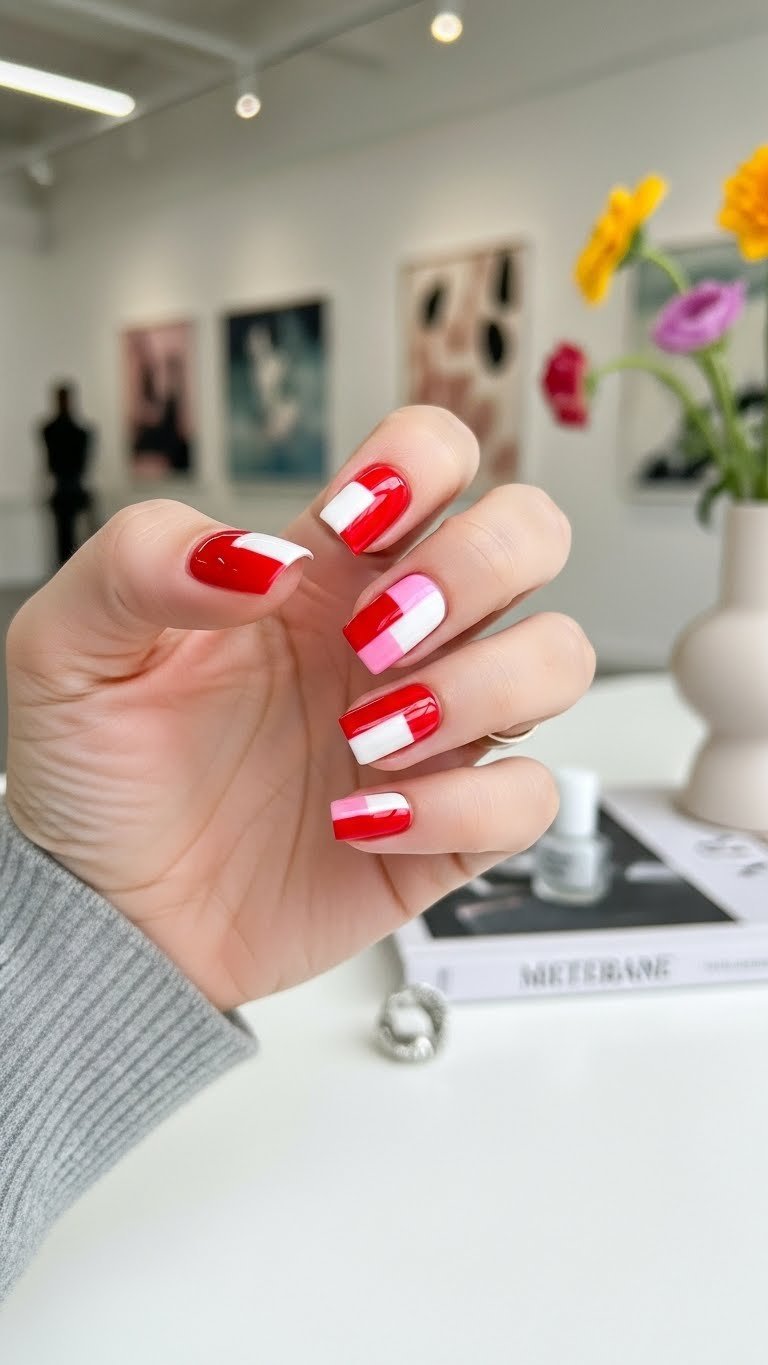
Unleash your inner artist! Pin these asymmetrical color block nails for a fun V-Day statement.
For a modern and artistic take on valentines day nails short, asymmetrical color blocks on square nails are an eye-catching option. This design utilizes clean lines and bold sections of pink, red, and white to create a unique and playful look. The inherent geometry of short square valentine nails provides an excellent foundation for these graphic and dynamic patterns, making it a trendy choice for 2026.
Supplies Needed
- Clear base coat
- Nail polish in white, red, and pink
- Thin nail art striping brush
- Nail polish remover and a small cleanup brush
- Clear top coat
Step-by-Step Directions
- Base Coat: Apply a clear base coat. Then paint all nails with two coats of white nail polish and let them dry completely.
- Define Sections: Using your thin striping brush and the red polish, paint a sharp, clean line diagonally across a portion of your nail, or create an L-shape in a corner. You can make each nail different for an asymmetrical look.
- Fill Red: Carefully fill in one of the sections created by your red line with more red polish.
- Add Pink: Once the red is dry, use the pink polish and your striping brush to create another line or fill another section, ensuring it either connects or contrasts with the red.
- Clean Up: Use a small brush dipped in nail polish remover to tidy up any stray lines.
- Seal: Allow all colors to dry thoroughly, then apply a clear top coat to finish.
Pro-Tip: When doing color blocks, ensure each color layer is completely dry before applying the next color or tape. This prevents colors from mixing and helps achieve those crisp, defined lines essential for a modern geometric look.
11. Embellish with Minimalist Glitter Lines or Dots
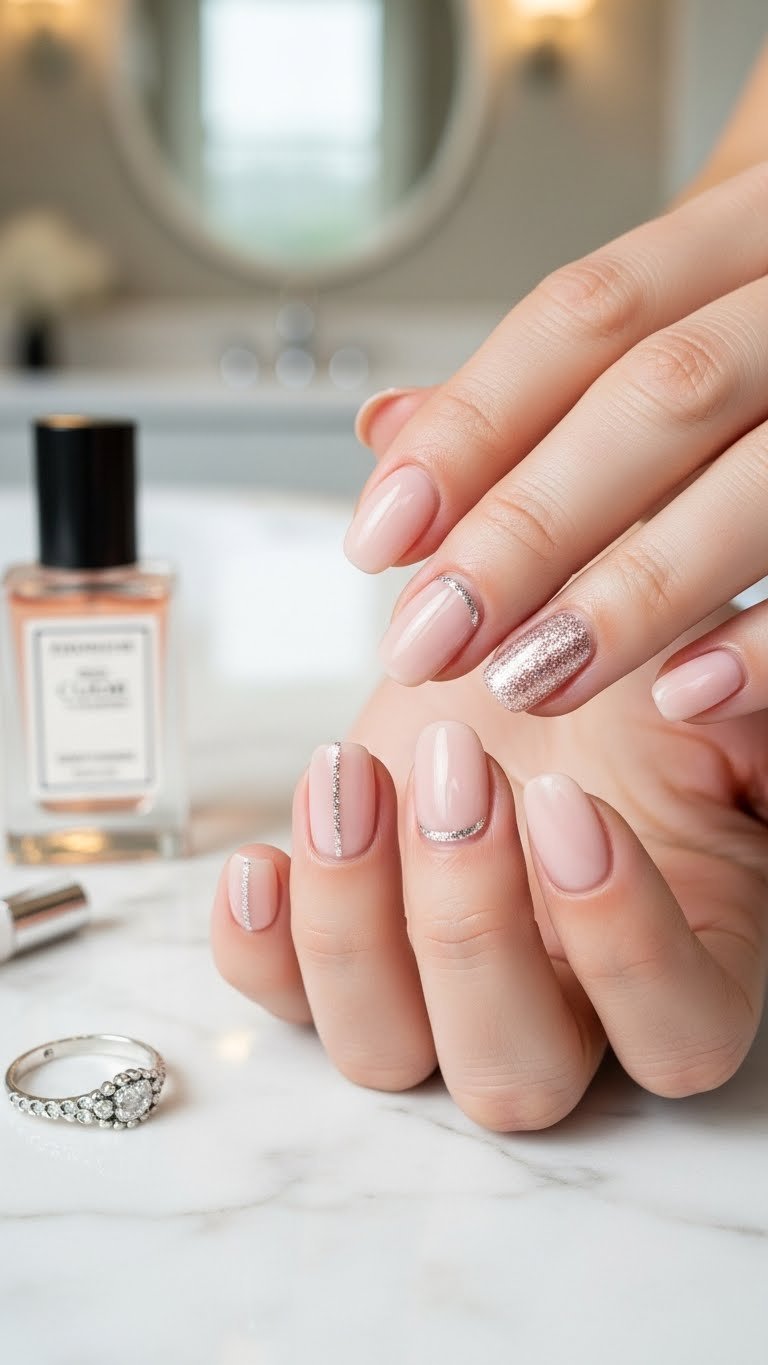
Subtle sparkle for your short V-Day nails! Pin this minimalist glitter look.
For a touch of elegance and sparkle, minimalist glitter lines or dots are a sophisticated choice for valentines day nails short. This design adds a delicate shimmer without being overpowering, making it ideal for those who prefer a subtle yet festive look. The precision of fine glitter details is perfectly suited for the compact canvas of short nails, offering an elegant short valentines day nails aesthetic.
Supplies Needed
- Clear base coat
- Sheer nude or light pink nail polish
- Fine glitter nail polish (silver, gold, or rose gold)
- Thin nail art striping brush or small dotting tool
- Clear top coat
Step-by-Step Directions
- Base Layer: Apply a clear base coat, followed by one or two coats of sheer nude or light pink nail polish. Let dry completely.
- Choose Your Accent:
- For Glitter Lines: Dip your thin striping brush into the fine glitter polish. Carefully paint a thin line across the base of your nail, a diagonal line, or a vertical line down the center of the nail.
- For Glitter Dots: Dip your small dotting tool into the glitter polish. Place one or two tiny dots strategically (e.g., at the base of the cuticle, or a single dot near the tip).
- Build if Needed: If you want more sparkle, allow the first layer of glitter to dry, then apply a second thin layer.
- Seal It: Once the glitter is fully dry, apply a clear top coat to smooth and protect the design, ensuring no glitter flakes lift off.
Pro-Tip: When working with glitter polish for fine details on short nails, apply a drop of glitter polish to a palette, then pick up the glitter particles with your striping brush or dotting tool rather than dipping directly into the bottle. This gives you more control and prevents excess polish.

FAQs About Valentines Day Nails Short
What are the best valentines day nails for short nails?
The best Valentine’s Day nails for short nails often feature minimalist designs, small-scale patterns, and classic colors like red, pink, and white. Hearts, glitter gradients, delicate dots, and subtle French tips are particularly effective as they don’t require extensive nail length to shine. Focus on clean lines and precision for an elegant and impactful look that complements shorter nail beds.
How to do easy valentines day nails on short nails?
Achieving easy Valentine’s Day nails on short nails involves simple techniques like dotting tools for hearts, makeup sponges for ombre, or striping tape for clean lines. Start with a well-prepped base, apply thin coats of polish, and utilize quick-drying topcoats. Press-on nails are also an excellent, effortless option for instant designs without complex application.
What short nail shapes are best for valentines day?
For short Valentine’s Day nails, classic square, soft round, and slightly oval shapes are generally best as they are practical and provide a stable canvas for designs. These shapes are easy to maintain and complement a wide range of minimalist and intricate nail art. Avoid overly pointed or extreme shapes which can be difficult to achieve and maintain on short lengths.
Can I do french tip valentines nails on short nails?
Yes, French tip Valentine’s nails are perfectly achievable on short nails and can look incredibly chic and elegant. The key is to create a thinner, more subtle white or colored tip than you would on longer nails, often using a fine brush or even a dotting tool to gently curve the tip line. A heart-shaped tip offers a creative twist.
What colors are popular for short valentines day nails?
The most popular colors for short Valentine’s Day nails remain the classic red and pink, often paired with crisp white for contrast or a neutral nude base. Soft pastels, rose gold glitter, and even subtle black accents can also be trendy choices, providing a modern twist while maintaining a festive and romantic feel for short lengths.
Are press on nails good for short valentines day nails?
Yes, press-on nails are an excellent option for short Valentine’s Day nails, especially if you’re seeking a quick, polished look without the effort of DIY nail art. High-quality press-ons come in various short lengths and festive designs, providing instant salon-quality results. Proper application and sizing are crucial for a natural and lasting wear.
How to make short valentines day nails look longer?
To make short Valentine’s Day nails appear longer, opt for vertical designs like a single central stripe or V-shaped tips. Using a sheer nude base with designs placed closer to the cuticle can also create an illusion of length. Oval or almond shapes, even subtly filed on short nails, can also contribute to a lengthening effect.
What nail art tools do I need for short valentines nails?
For short Valentine’s Day nail art, essential tools include a small dotting tool (for hearts and dots), a thin striping brush (for lines and French tips), and a makeup sponge (for ombre and glitter gradients). A good quality base and top coat, along with an effective nail polish remover and cleanup brush, are also critical for professional results.
How to care for short valentines day nails?
To care for short Valentine’s Day nails, ensure you apply a quality base coat to protect your natural nails and prevent staining, and a durable top coat to minimize chipping and extend wear. Moisturize your cuticles daily with oil, wear gloves for chores, and avoid using your nails as tools to keep your festive designs looking fresh and intact.
What are some unique short valentine nail ideas?
Unique short Valentine’s nail ideas include minimalist negative space hearts, asymmetrical color blocks in festive hues, or subtle glitter accents strategically placed on a nude base. Consider abstract lines in pink and red, or a single statement nail with a delicate, hand-painted floral or Cupid’s arrow design for a personalized touch on short nails.
Key Takeaways
- Embrace Your Short Length: Short nails are ideal canvases for cute valentines day nails short designs, often making intricate art look more sophisticated and less prone to chipping than on longer nails. The key is choosing designs that complement, rather than fight, the nail’s natural length.
- Simplicity is Key: Focus on easy nail designs like mini hearts, simple dots, or minimalist lines. These looks are quick to create and apply, perfect for a beautiful short valentine manicure at home.
- Tools Make It Easy: Invest in a fine dotting tool or nail art striping brush for precision. These nail art tools turn complex-looking designs into simple valentines day nails short projects you can master quickly.
- Pink and Red Ombre is Achievable: Don’t shy away from trendy looks like an ombre effect on short pink valentines nails. With a makeup sponge and our step-by-step directions, you can get salon-quality results.
- Press-Ons Offer Instant Glam: For easy valentines day nails short with no fuss, high-quality short press on nails valentines are a game-changer. Proper application steps ensure a natural look and lasting finish.
- Clean Lines Elevate Designs: Whether geometric nail art or negative space hearts, achieving crisp lines and preventing smudged polish is critical for a professional finish. Our expert tips can help you achieve this.
- Don’t Forget the Top Coat: A good clear top coat is essential for all valentines day nails short designs, providing both shine and chip prevention for your festive look.
Final Thoughts on Valentines Day Nails Short
As we’ve explored, valentines day nails short are anything but limiting. They offer a chic, practical, and incredibly versatile canvas for expressing your festive spirit. From the classic elegance of delicate red hearts and pink French tips to the modern allure of geometric patterns and subtle glitter accents, each of our 11 cute and easy designs demonstrates that you don’t need long nails to make a stunning statement this Valentine’s Day. The key lies in choosing designs that complement your nail length and utilizing simple yet effective tools and techniques for a professional-looking finish at home.
Remember, the goal is to have fun and express your personal style. Whether you opt for the instant glam of press on short valentines nails or embrace the therapeutic process of DIY nail art, the confidence that comes with a beautifully manicured hand is truly unmatched. We’ve armed you with the step-by-step directions, expert tips, and product recommendations to ensure your short valentine nails are nothing short of perfect for January 2026.
Which of these easy valentines day nails short designs will you try first to celebrate the season of love?
Last update on 2026-01-17 / Affiliate links / Images from Amazon Product Advertising API