Struggling to find a Valentine’s Day nail look that truly stands out? Tired of the same old predictable hearts and reds that lack personality and edge?
Y2K Valentine’s Day nails are characterized by a highly expressive, maximalist style that combines romantic elements (hearts, pink, red) with iconic early 2000s motifs like 3D gel sculpting, chrome or metallic finishes, bold use of black, encapsulated glitter, and playful designs like butterflies or flames. Leveraging tested frameworks and data-driven insights, this guide will unlock the secrets to truly iconic valentines day nails y2k, ensuring you discover designs that reflect your unique flair. Prepare to dive into a world where nostalgia meets modern nail artistry, offering an authentic Y2K aesthetic for your Valentine’s celebration.
Decoding the Y2K Aesthetic: What Makes These Valentine’s Day Nails Iconic?
The allure of y2k valentine nails stems from a potent blend of early 2000s nostalgia and playful maximalism. This distinct style transcends traditional romantic themes by infusing them with the bold, often futuristic, and sometimes edgy elements that defined the turn of the millennium. It’s an aesthetic that dares to mix unexpected textures like chrome and glitter with sweet imagery such as hearts and butterflies, setting it apart from simpler trends.
What are y2k valentine’s day nails? They are characterized by a highly expressive and often layered approach to nail art. Think beyond basic polish; we’re talking about tangible textures, eye-catching finishes, and intricate detailing. Key attributes include vibrant, high-contrast colors like bubblegum pink and black, the prominent use of metallic or iridescent finishes, and the incorporation of 3D nail art elements. These designs often feature futuristic y2k valentine nails motifs, incorporating playful imagery that evokes early digital graphics and pop culture. This authentic y2k aesthetic offers a refreshed take on classic Valentine’s themes, making them feel current and exciting for 2026.
The appeal of y2k aesthetic valentine nails lies in their distinct visual language. Unlike the understated elegance of some modern trends, early 2000s designs favored an “anything goes” attitude, embracing maximalism. This means official y2k nail trends often incorporate elements like elaborate nail charms, shimmering glitter, and eye-catching holographic finishes. The goal is to create a captivating visual story on your fingertips, offering more information gain than merely applying a solid color. By focusing on these specific visual attributes, you can distinguish genuine Y2K styles from mere general trends, creating an unmistakable and memorable look.
11 Y2K Valentine’s Day Nail Designs To Achieve The Ultimate Aesthetic
This section provides specific, actionable design y2k valentine nails ideas and tutorials to replicate the Y2K aesthetic for Valentine’s Day. Each design highlights unique aspects of the era, from specific motifs to innovative application techniques, catering to your desire for unique and trending y2k heart nails. Prepare to discover the best ways to create y2k valentine nails with this comprehensive guide.
1. Sculpting 3D Hearts with Chrome Powder Accents

Pin this genius Y2K 3D heart look to your “Valentine’s Nail Inspo” board!
To get 3D hearts on y2k valentine’s nails, you’ll utilize solid builder gel to create miniature, perfectly sculpted charms, often finished with a metallic sheen. This technique elevates your best y2k valentine’s nails with 3d hearts by adding a tangible, dimensional element. The fusion of 3d hearts defining y2k nails and a sleek chrome finish captures the signature texture and shine of the early 2000s, showcasing advanced 3d nail sculpting y2k skills.
Products & Tools Used
- Clear or Pink Solid Builder Gel
- Fine silver chrome powder (iridescent finish)
- Gel top coat (no-wipe formula)
- Dotting tool or precision sculpting brush
- UV/LED curing lamp (54W or higher)
- Alcohol wipes
Application Steps
- Prepare: Apply base coat and cure. Paint nails the desired base color (e.g., bright pink or black) and cure.
- Sculpt: Scoop a small amount of solid builder gel and roll it into a ball. Place it gently on the nail.
- Form: Use the dotting tool or brush, dipped in alcohol, to sculpt the shape of a heart, making it slightly puffy.
- Cure: Flash cure the heart shape for 15 seconds to hold the form, then fully cure for 60 seconds.
- Chrome Application: Use a sponge applicator to rub the iridescent y2k valentine nails chrome powder onto the cured gel surface of the nail and/or the 3D heart itself.
- Seal: Brush off excess powder and apply a thick, high-shine top coat to encapsulate the charm and the chrome, curing for 120 seconds for maximum durability.
Pro-Tip: For the best chrome effect, ensure the base gel is completely cured but still slightly tacky (the ‘inhibition layer’). Avoid touching the chrome powder directly with your fingers to maintain the mirror-like shine and prevent smudging. Use precision y2k detailing tools for sharp edges.

2. Bubblegum Pink and Black French Tips

Save this bold pink and black design to your ‘Edgy Valentine’s Mani’ board!
To achieve bubblegum pink and black French tips, you’ll use contrasting opaque polishes on a sheer base, shaping your nails into the classic short square Y2K style. This design combines the bold color pairings indicative of Y2K with a sophisticated twist on the classic French tip. The y2k colors influencing valentine’s style often incorporate an edgy black alongside the sweet bubblegum aesthetic nails, making for a striking statement.
Products & Tools Used
- Sheer Pink or Milky White Base Coat Gel
- Opaque bubblegum pink nail polish (gel or lacquer)
- Opaque Black Nail Polish (gel or lacquer)
- Thin, long liner brush or French tip stencils
- UV/LED lamp (if using gel)
Application Steps
- Prep Base: Apply sheer pink base coat and cure (if gel). Shape nails into a sharp short square (y2k style).
- First Tip: Using a liner brush, carefully draw a thick, clean French tip line in the opaque black polish on all nails and cure/dry.
- Second Tip (Optional): On alternating nails, add a second, thinner tip line directly above the black one using the bubblegum pink nail polish. Cure/dry.
- Accent: Use the liner brush and black polish to draw a small, edgy detail (like a tiny star or a single line) on a few accent nails.
- Seal: Apply a glossy top coat, ensuring the tips remain crisp and defined. Cure/dry completely.
Pro-Tip: Achieving getting perfect y2k nail lines for French tips is easier using a square silicone brush dipped in acetone/cleanser to sharpen the lines immediately after application before curing/drying. This ensures the precise y2k nail art finish.

3. Holographic Glitter Flame Nails
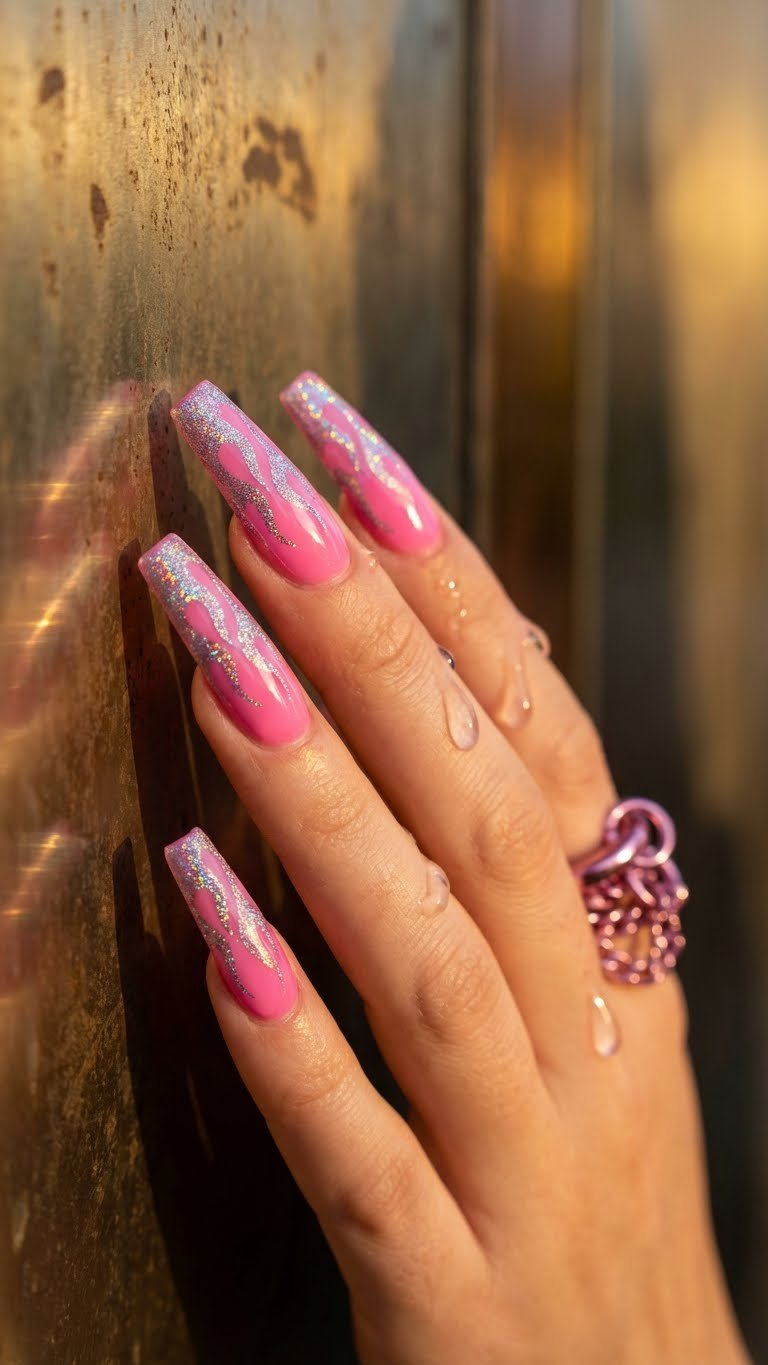
Grab this fiery y2k flame look for V-Day! Pin it now!
To create holographic glitter flame nails, you’ll paint stylized flame designs on a vibrant base, using highly reflective glitter polish to achieve the iconic Y2K sparkle and edge. This design emphasizes the popular flame nails y2k motif, combining it with the era’s love for all things shimmering. The holographic y2k valentine nails effect ensures your nails catch every light, making this a truly vibrant y2k valentine nails statement.
Products & Tools Used
- Vibrant Pink Gel Polish
- Black or White base (optional for high contrast)
- Holographic nail glitter polish (fine or chunky)
- Detail brush (short bristles)
- Peel-off liquid latex or stencil (optional)
Application Steps
- Base Coat: Apply base color (Vibrant Pink) and cure.
- Outline (Optional): Apply liquid latex around the cuticles for clean-up. Use a black or white polish and the detail brush to sketch the flame outlines starting at the tip. Cure/dry.
- Fill: Use the holographic y2k valentine nails polish to fill in the flame shapes. Apply two thin coats for maximum glitter application.
- Detail: If using loose glitter, pat it directly onto the wet flame shape before curing, then dust off the excess.
- Seal: Apply two layers of top coat to fully encapsulate the glitter, preventing snagging or dullness. Cure completely.
Pro-Tip: If you struggle with freehand y2k nail art, use a thin, flexible flame stencil or a piece of medical tape cut into a wavy pattern to guide your brushwork, ensuring the flames are sharp and uniform.

4. Airbrushed Ombre Sweetheart Nails
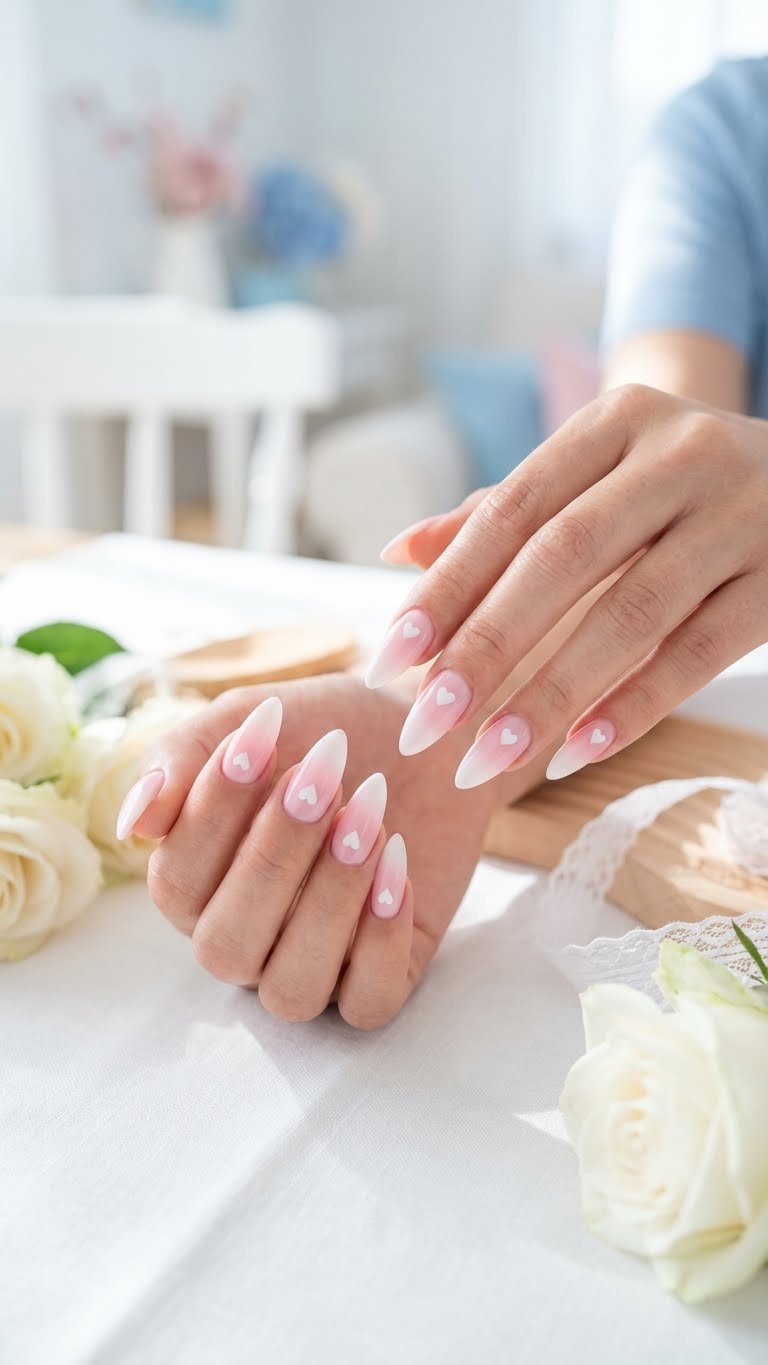
Want the smoothest V-Day ombre? Pin this airbrush tutorial!
To achieve airbrushed ombre sweetheart nails, you’ll use an airbrush gun or sponge for a seamless gradient, then apply a stencil to create a sharply defined heart motif. This aesthetic y2k mani captures the smooth, almost digital-looking gradients popular in the early 2000s. The airbrush technique creates a futuristic y2k valentine nails effect, a hallmark of the era’s cutting-edge nail art.
Products & Tools Used
- Nail Art Airbrush Compressor and Gun (mini)
- Specialized Airbrush Stencils (small heart shapes)
- Airbrush Ready Pink and White Acrylic Paint (or thinned gel polish)
- Peel-Off Liquid Latex (for skin protection)
Application Steps
- Protection: Apply liquid latex around the cuticle and sides of the finger.
- Airbrush Base: Load the airbrush gun with white paint and spray the bottom half of the nail lightly.
- Ombre Effect: Load the pink paint and spray the tip, overlapping slightly with the white to create a seamless gradient (airbrush gradients y2k style). Allow to dry slightly.
- Heart Motif: Carefully place the small heart stencil in the center of the nail. Spray a contrasting color (like white) lightly over the stencil area.
- Reveal: Immediately remove the stencil and the liquid latex.
- Seal: Apply high-gloss top coat to secure the delicate airbrush artwork.
Pro-Tip: If using gel polish, ensure it’s thinned properly with gel cleanser before airbrushing. To minimize overspray and create a sharp gradient, keep the airbrush running consistently while moving the nozzle quickly across the nail. This is crucial for structural gel applications y2k techniques.

5. Bedazzled Silver Ball Outline Hearts
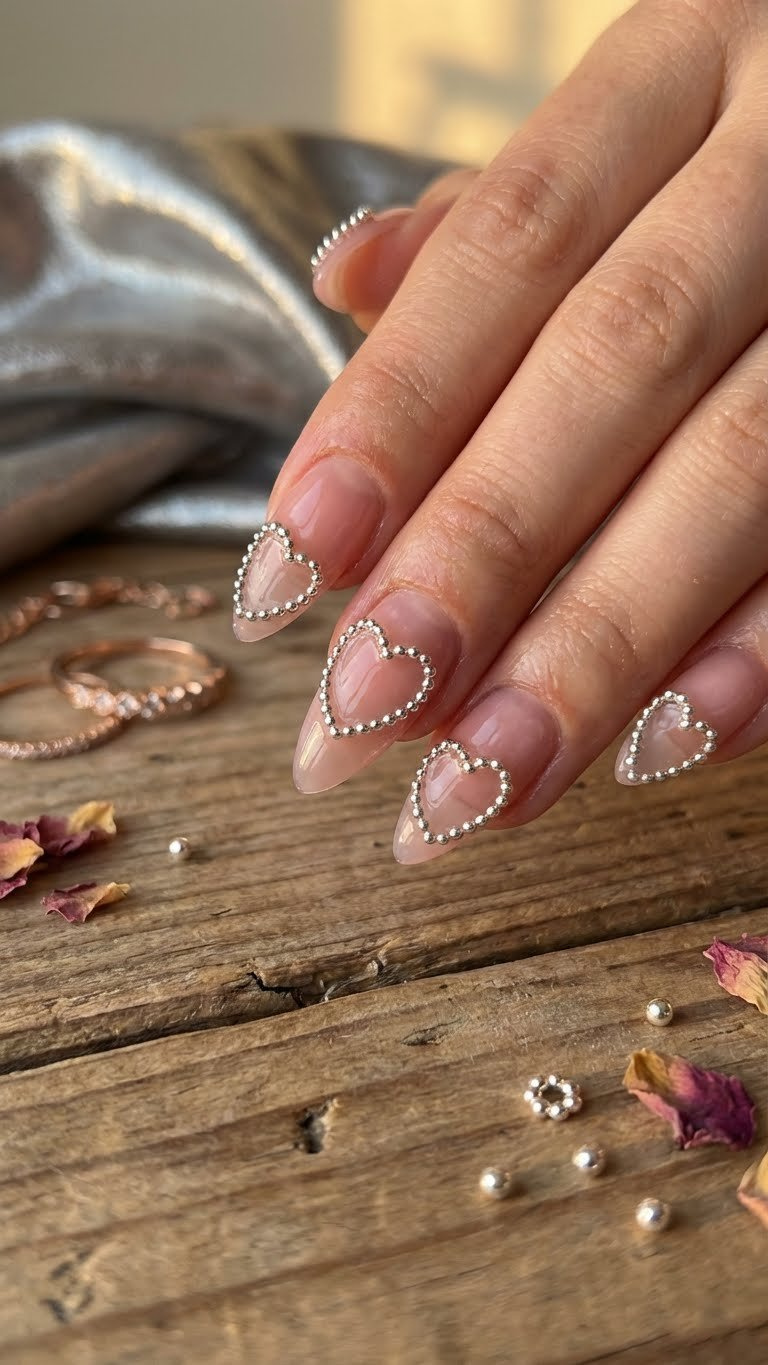
Maximize the bling factor this V-Day! Save this silver ball tutorial!
To create bedazzled silver ball outline hearts, you’ll meticulously trace a heart shape on your nails using tiny silver micro-balls, adhering them with strong builder gel or specialized glue. This bling y2k nails effect is a direct nod to the era’s love for embellishment and texture. The silver balls enhancing y2k nails by outlining the heart motif exemplify the essential Y2K maximalism, making them a standout rhinestone y2k valentine nails choice.
Products & Tools Used
- Clear Builder Gel or Specialized Nail Charm Glue
- Silver nail art micro-balls (caviar beads, 0.6mm recommended)
- Wax-tipped picker tool or precision tweezers
- Clear or Jelly Pink Base Coat
Application Steps
- Base: Apply base color (Clear or Jelly Pink) and cure. Do not wipe the tacky layer.
- Adhesive: Apply a thin line of Builder Gel or specialized Charm Glue in the shape of a heart outline where you want the design. Do this for only one nail at a time.
- Placement: Using the wax-tipped picker tool, carefully pick up the silver balls and gently drop them onto the wet adhesive line, pressing lightly to secure the heart outline.
- Cure (if using gel): Cure the nail for 60 seconds to set the adhesive and balls.
- Sealing: Carefully apply a thin top coat around the balls and over the surrounding nail, but do not brush heavily over the balls themselves, which can dull the metallic shine. Cure completely.
Pro-Tip: To ensure long lasting y2k valentine nails with micro-balls, use the ‘well’ method: build a slight well of builder gel around the base of the bead outline before the final top coat to lock them in without covering the sparkle entirely. This ensures intricate y2k design mastery and longevity.

6. Kawaii Cartoon Character Accents
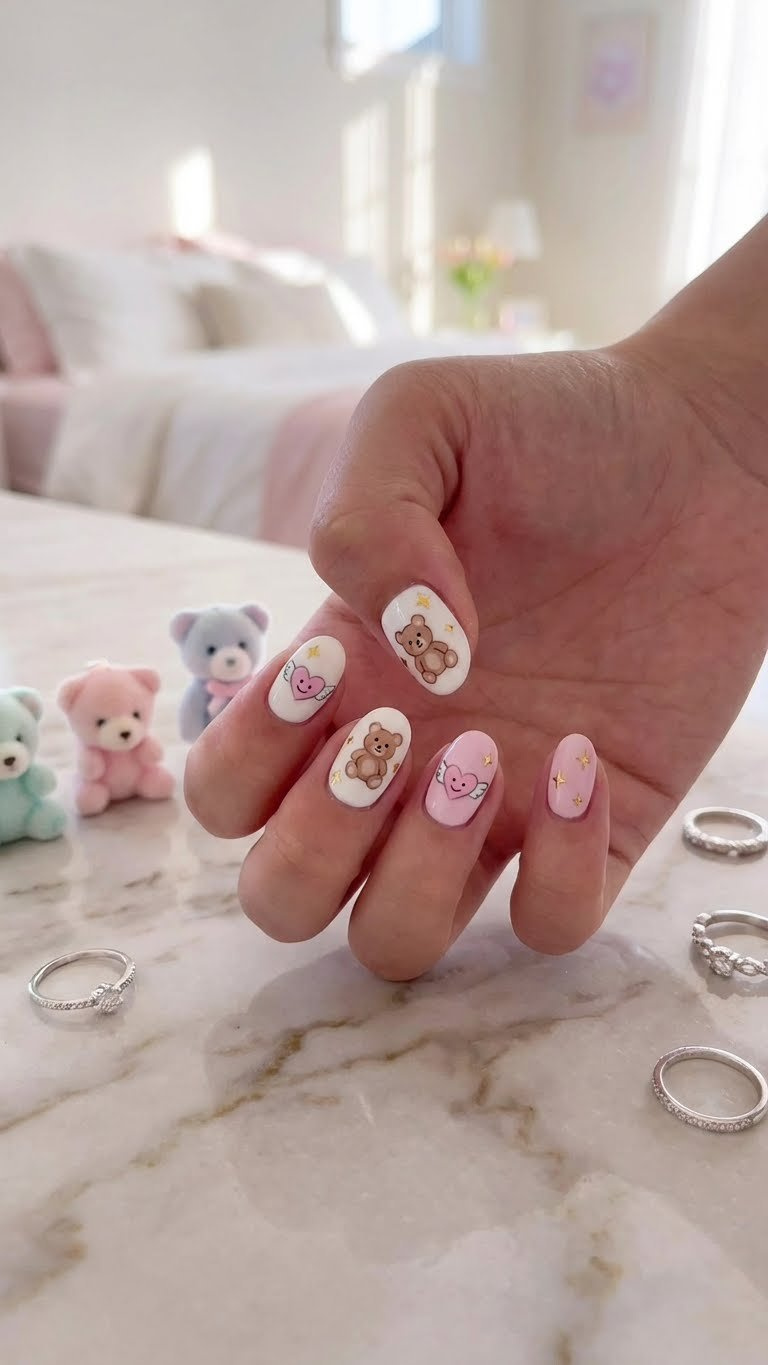
Ready for the cutest Valentine’s look? Pin this kawaii design now!
To create kawaii cartoon character accents, you’ll hand-paint tiny, playful characters like angels or hearts with faces on a pastel base, or use small character decals for an easier application. This playful y2k valentine nails style directly channels the Japanese street fashion influence on the early 2000s. The artistry of hand painted artwork truly brings these cartoon y2k valentine nails to life, embracing the vibrant and expressive side of the aesthetic.
Products & Tools Used
- Pastel Pink and White Gel Polishes
- Micro-detail nail art brush (Size 00 or shorter)
- Black and contrasting color polishes for outlining and details
- Small star or character decals (optional)
Application Steps
- Base: Apply the desired pastel base color (e.g., lavender, mint, or pink) and cure.
- Sketch: Dip the micro-detail brush into black or white polish and lightly sketch the outline of the cartoon face, angel, or character onto the nail.
- Color Block: Fill in the color blocks using a slightly larger detail brush. Cure after each color layer if needed to prevent bleeding.
- Detailing: Use the black polish and the micro-detail brush to add eyes, mouths, and outlines, emphasizing the detailed y2k valentine nails look.
- Decals (Optional): If using decals, apply them to the final cured color layer using a thin layer of top coat as adhesive.
- Seal: Encapsulate the design completely with two layers of glossy top coat.
Pro-Tip: If the cartoon design requires very intricate detail, use highly pigmented, gel paint rather than standard polish, as it doesn’t run and allows for micro-painting y2k nail motifs with greater control, crucial for top-rated y2k valentine nails.

7. Cyber Y2K Matrix Green and Pink
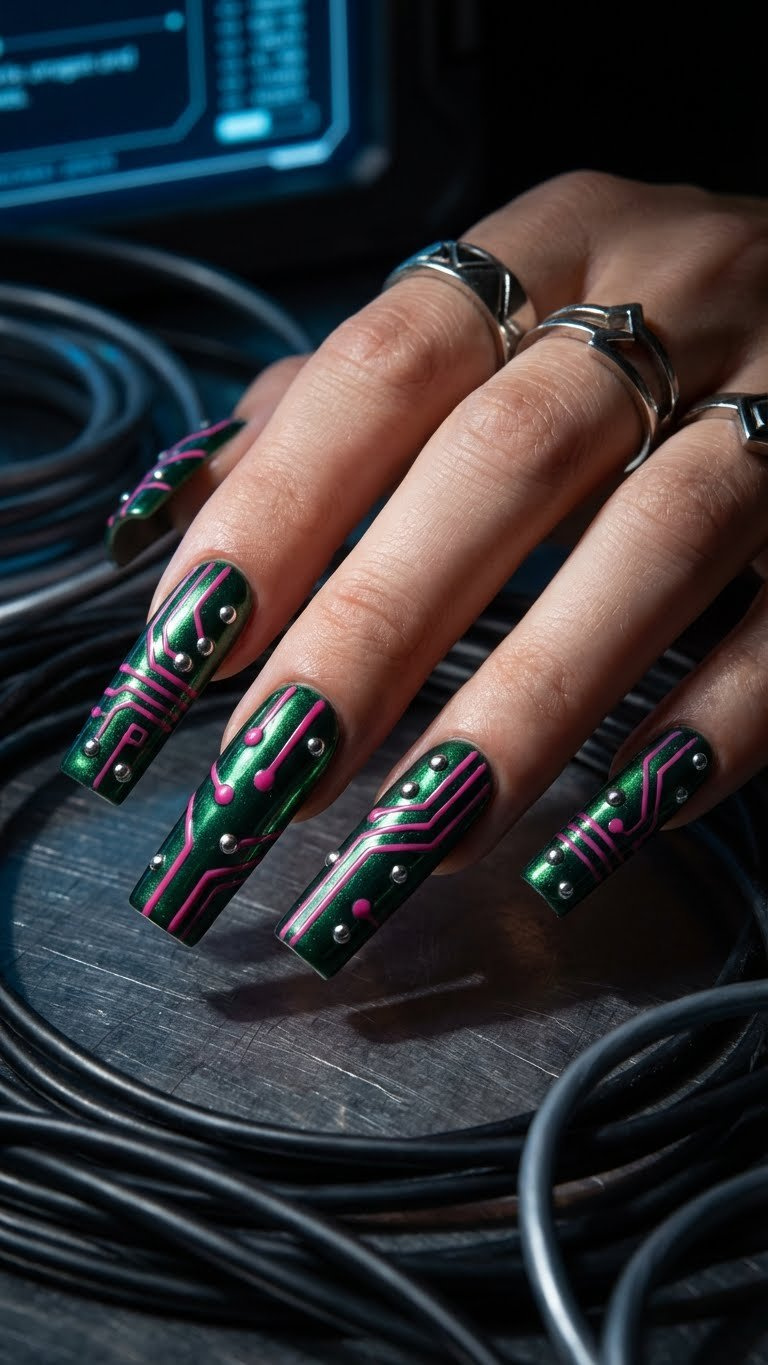
Embrace the cyber aesthetic! Pin this Matrix-inspired Valentine’s mani!
To achieve Cyber Y2K Matrix Green and Pink nails, you’ll use a deep metallic green base accented with hot pink, graphic circuit board-like lines, often incorporating small silver studs. This design fully embodies the futuristic y2k valentine nails aesthetic, drawing inspiration from early 2000s technology and sci-fi. The sharp contrast and geometric nails y2k patterns reflect how y2k fashion influencing nail art pushed boundaries with bold, digital-inspired looks.
Products & Tools Used
- Deep Metallic Green Nail Polish (gel or lacquer)
- Hot Pink or Neon Pink Gel Polish
- Fine-tip striping brush or nail decals (circuit board pattern)
- Nail art tape (optional for straight lines)
- Small silver studs (for accent dots)
Application Steps
- Base: Apply two coats of the metallic green polish and cure/dry completely.
- Striping: Using the fine-tip brush and the hot pink polish, draw precise, intersecting lines to create circuit-board-like patterns. Keep the lines thin and sharp.
- Detail: If desired, use small silver studs or silver balls placed at the intersection points of the lines for added metallic bling. Use glue or builder gel to adhere.
- Cure/Seal: Cure any gel components fully, then apply a high-shine top coat to lock in the detailed y2k valentine nails design.
Pro-Tip: The key to achieving y2k valentine look precision with striping is to work slowly and ensure your brush is not overloaded. If the line is imperfect, quickly clean it with a liner brush dipped in acetone before curing.

- 【Dazzling Mirror Metallic Effect】 With a special mirror silver effect, achieve a captivating, high-gloss reflective finish that shimmers like polished metal, instantly elevating your nails into eye-catching accessories for any special event or daily glamour.
- 【Lasting Effect】Enjoy long-lasting, brilliant color and shine. Lightweight and portable, it complements any outfit or occasion, making you stand out effortlessly.
- 【Easy to Use】Designed for everyone! It is easy to apply on natural or artificial nails without any professional skills, perfect for both salon artists and DIY beginners at home. Need to apply with Base Gel and Top Coat to achieve a high saturation and high gloss finish.
- 【Gift Perfection】With multiple stunning color options, it's the ideal, stylish gift for birthdays, holidays, or celebrations, delighting any fashion-conscious individual.
- 【Warm Tips】Keep out of the reach of children. Affected by various factors such as display brightness, light brightness, etc., the actual color may be slightly different from the website picture.
8. Glossy Encapsulated Butterfly Charms
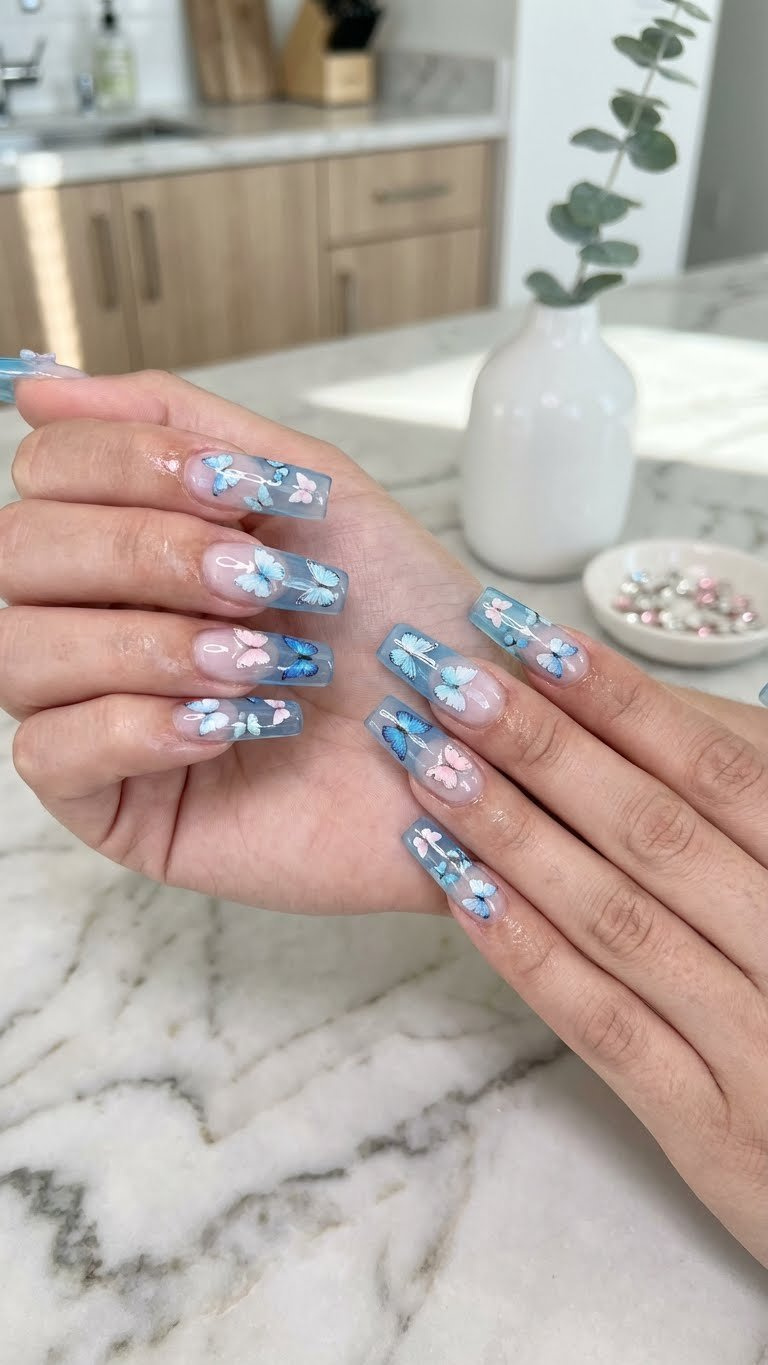
Capture the nostalgic Y2K butterfly trend! Pin this encapsulation method!
To achieve glossy encapsulated butterfly charms, you’ll embed miniature butterfly decals or small 3D charms within a thick, clear layer of builder gel, ensuring a seamless, high-shine finish. This design perfectly captures the butterfly nails y2k trend, a sweet yet stylish motif of the era. Utilizing y2k nail encapsulation techniques ensures these y2k charms complementing nails are durable and completely smooth, preventing snagging or chipping.
Products & Tools Used
- Clear Builder Gel (medium to high viscosity)
- Miniature butterfly nail charms or decals
- Precision tweezers
- UV/LED Curing Lamp
- Nail buffer and file
Application Steps
- Base and Placement: Apply base coat and color (optional clear or sheer pink). Cure. Apply a thin layer of builder gel (the ‘slip layer’) where the charm will go.
- Secure Charm: Using tweezers, place the butterfly nails y2k charm onto the slip layer and gently press. Flash cure for 10 seconds.
- Encapsulate: Apply a generous bead of builder gel over the entire charm, building up a slightly thick layer to fully bury the charm and create a smooth arch.
- Shape: Using a liner brush, guide the gel toward the edges without touching the cuticle. Cure for 60 seconds.
- Refine: Wipe off the inhibition layer. File and buff the surface until it is perfectly smooth and level, ensuring the charm is fully encapsulated and the shape is sharp (advanced e-file techniques y2k).
- Seal: Apply a final high-shine top coat and cure.
Pro-Tip: Proper y2k nail encapsulation techniques require using a clear builder gel that is not too runny, preventing the charm from floating. For large charms, apply a slightly larger bead of gel at the center and let it self-level slightly before curing.

9. Checkerboard Pink and Red Press-Ons

Need a quick V-Day fix? Pin this checkerboard press-on kit guide!
To apply checkerboard pink and red press-ons, properly prep your natural nails by buffing and dehydrating, then use strong liquid nail glue for a secure and long-lasting application. This method offers a quick y2k valentine nail solutions for achieving intricate designs like the checkerboard nails y2k without extensive salon time. High-quality press on y2k nails are an excellent alternative to salon services, providing a y2k aesthetic valentine nails quickly.
Products & Tools Used
- High-quality Y2K checkerboard press-on nail kit (short square style)
- Strong liquid nail glue
- Mini nail buffer and file
- Alcohol wipe or nail dehydrator
- Cuticle pusher
Application Steps
- Prep: Push back cuticles. Buff the natural nail surface slightly to create grip. Wipe all nails with an alcohol wipe or dehydrator.
- Size: Select the correct size press-on nail for each finger; ensure it doesn’t overlap the skin or cuticles.
- Glue: Apply a generous dot of strong liquid nail glue to the center of your natural nail and a small amount on the back of the press-on nail.
- Apply: Align the press-on nail with your cuticle line (do not press on the cuticle). Press down firmly for at least 30 seconds, ensuring no air bubbles are trapped.
- Finish: File the free edges if needed to refine the shape. Avoid contact with water for at least one hour to allow the glue to fully set.
Pro-Tip: When choosing y2k valentine’s press-ons vs salon acrylics, high-quality press-ons are the best alternative, lasting 1-2 weeks if the natural nail is properly buffed and dehydrated prior to application, preventing premature chipping or popping off.

10. Micro-Painting Tattoo Heart Nails
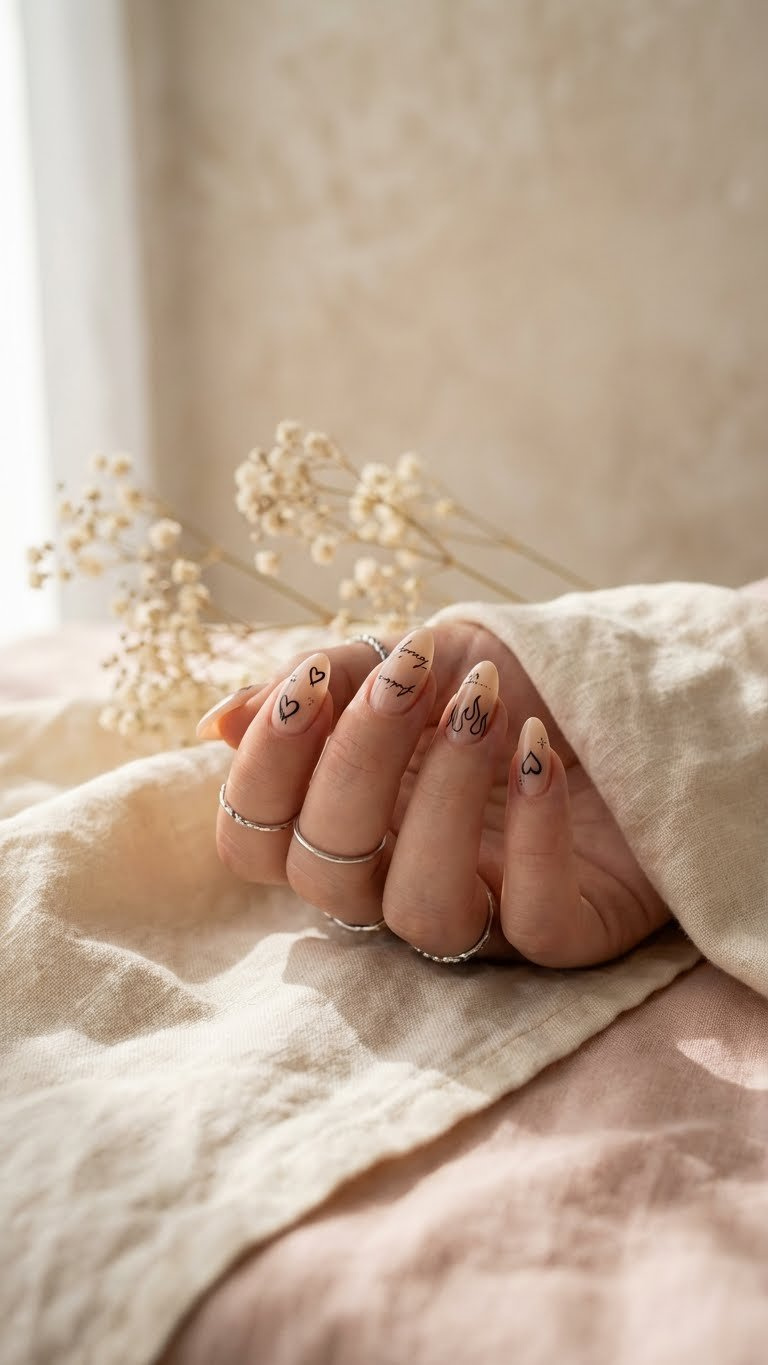
Master the intricate tattoo nail look! Pin this micro-painting technique guide!
To create micro-painting tattoo heart nails, you’ll use a highly pigmented black gel paint and an extreme fine detail micro brush to draw intricate tattoo-style hearts and script on a sheer base. This high-skill design embodies the tattoo nails y2k trend, showcasing detailed artwork and an edgy romance. The goal is to achieve hyper-realistic y2k nail art through precise micro-painting y2k nail motifs.
Products & Tools Used
- Sheer Nude or Pink Base Coat Gel
- Highly pigmented Black Gel Paint (essential for crisp lines)
- Extreme fine detail micro brush (000 size)
- Pallete or mixing surface
- Matte or Glossy Top Coat
Application Steps
- Base: Apply sheer base color and cure. Wipe the tacky layer to create a dry canvas.
- Paint Prep: Dip the micro-detail brush into the black gel paint, wiping off excess until the brush is barely saturated, leaving only a fine tip.
- Draw: Carefully sketch the small tattoo hearts, flames, or script details onto the nail using very light pressure. Work quickly, one detail at a time.
- Cure: Once the design is complete on one nail, cure for 60 seconds to lock in the intricate y2k design mastery.
- Finish: Apply a glossy or matte top coat, depending on the desired finish (matte often enhances the tattoo look). Cure completely.
Lesson Learned: Getting perfect y2k nail lines relies heavily on the gel paint consistency; ensure it’s not too thin, which causes running, or too thick, which creates bumpy lines. Only use a tiny amount of pigment for hyper-realistic y2k nail art.

11. Iridescent Fairy Grunge Aesthetic
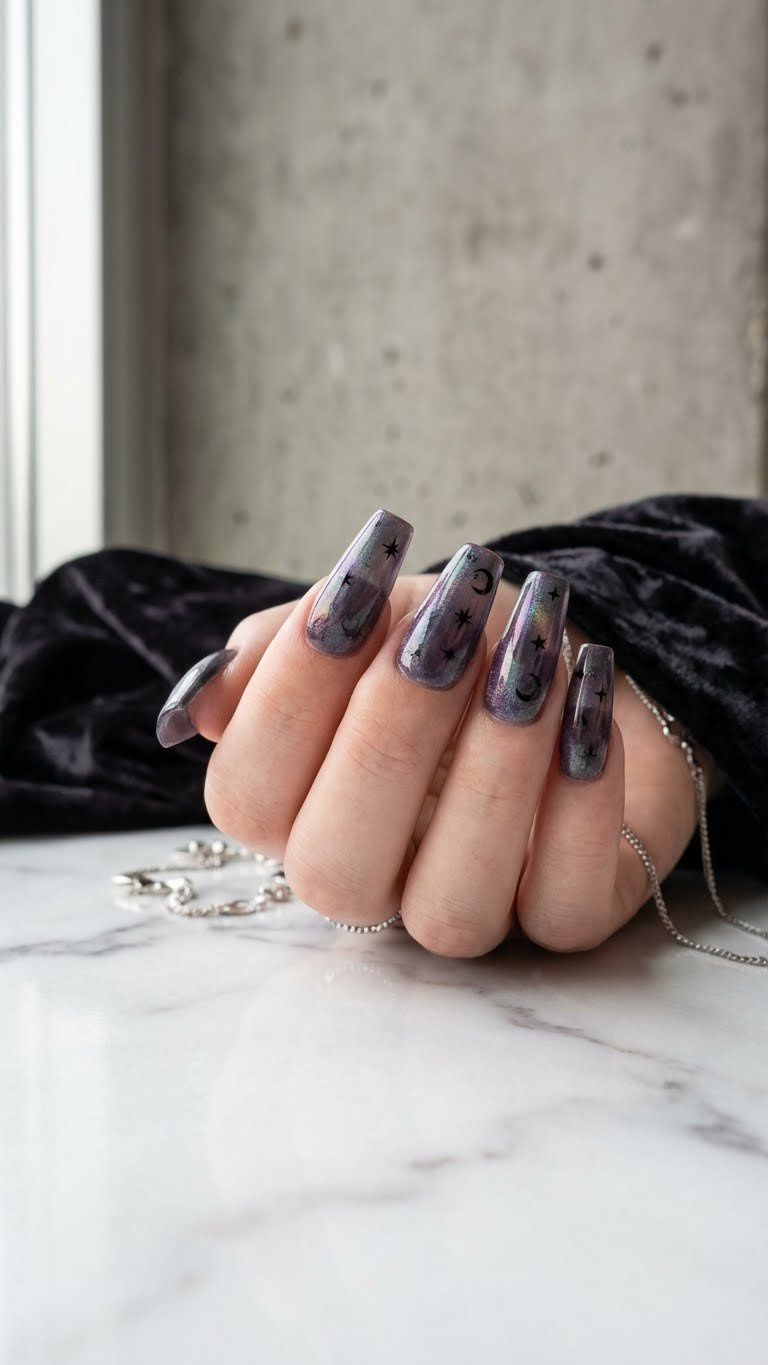
Dare to try dark romance? Pin this moody Y2K aesthetic for V-Day!
To achieve an iridescent fairy grunge aesthetic, you’ll apply color-shifting pigment powder over a dark, smoky base, accented with small star motifs for an edgy, ethereal Y2K look. This design leans into the darker, more mysterious side of the Y2K aesthetic, providing an edgy y2k valentine nails option. The iridescent y2k valentine nails effect creates a shifting, almost holographic shimmer that’s more nuanced than simple glitter, capturing a unique aspect of valentine’s designs incorporating y2k.
Products & Tools Used
- Dark Smoky Purple or Black Gel Polish
- Iridescent/Color-Shifting Pigment Powder
- Sponge applicator or silicone tool
- Small black or silver star stickers/decals
- No-Wipe Gel Top Coat
Application Steps
- Base: Apply two coats of the smoky purple/black base color. Cure.
- Pigment Application: Apply a thin layer of no-wipe top coat and cure for half the normal time (15-30 seconds). This ensures the surface is tacky but not fully cured.
- Rub: Dip the sponge applicator into the iridescent pigment powder and rub firmly onto the partially cured surface until the color shift appears.
- Clean: Dust off excess powder using a soft brush.
- Detail: Apply small, pre-cut black or silver star stickers onto the surface for the ‘grunge’ detail.
- Seal: Apply a final, thick layer of high-shine top coat to fully seal the pigment and decals. Cure completely.
Pro-Tip: The key to true iridescent y2k valentine nails color shift is applying the powder over a partially cured top coat (the ‘tacky but smooth’ stage). If the surface is too sticky, the powder looks grainy; if it’s too hard, it won’t adhere properly.

FAQs About valentines day nails y2k
How to do Y2K Valentine’s nails at home without special tools?
To create simple Y2K Valentine’s nails at home, focus on bold colors, high contrast, and using nail stickers or decals instead of 3D sculpting. Apply a high-shine base of pink or red and use black polish with a toothpick or a fine art brush to create small heart designs or graphic lines, like a thick French tip. Finish with two coats of clear top coat for the characteristic glossy y2k valentine nails aesthetic. This achieves the core aesthetic without professional equipment.
What is the difference between Y2K and 90s nail art?
The primary difference lies in the finish and technique; 90s nail art was typically grunge, minimalist, or featured simple French tips, whereas Y2K nail art embraces maximalism, high gloss, and texture. Y2K designs often incorporate 3d nail art, chrome, bright, contrasting colors (like pink and black), and chunky glitter. The 90s focused more on dark, understated colors or simple, classic shapes, while early 2000s valentine nail designs are more animated and expressive.
Are Y2K Valentine’s press-on nails worth the investment?
Yes, high-quality Y2K Valentine’s press-on nails are an excellent, low-commitment investment, especially for achieving intricate designs like short square y2k valentine’s nails or detailed airbrush looks quickly. Press-ons are a great alternative to y2k valentine’s acrylic vs gel if you need a temporary style. If applied correctly using nail glue over a properly prepped surface, they provide a durable y2k nail application that can last one to two weeks.
What colors define the Y2K Valentine’s aesthetic?
The Y2K Valentine’s aesthetic is defined by high-contrast, often vibrant colors, blending traditional Valentine hues with unexpected metallic and digital tones. Key colors include bubblegum y2k valentine nails pink, cherry red, bright white, and high-shine black, frequently accented by metallic y2k valentine nails elements like silver or chrome. These bold pairings create the characteristic playful and sometimes edgy y2k valentine nails look.
How can I make my Y2K Valentine’s nail charms stay on longer?
To ensure your **charm y2k valentine nails stay on longer, you must use a strong adhesive, typically a medium-viscosity builder gel or a professional charm glue.** After placing the charm, ensure the adhesive cures completely. For small charms, apply a thin layer of top coat around the edges (avoiding going over the top of metallic pieces) and cure thoroughly to enhance long lasting y2k valentine nails.
How do you get the 3D heart look without specialized UV builder gel?
If you don’t have specialized UV builder gel, you can achieve a softer 3D effect using a very thick, sculpting polygel or a high-viscosity clear top coat, though the durability may be reduced. To apply, dispense a small bead of the sculpting material, shape the heart with a fine-tipped tool dipped in alcohol, and ensure it cures completely. This technique allows doing y2k valentine nails with existing nail art tools.
What nail shapes are most popular for Y2K Valentine’s designs?
The most popular nail shapes for Y2K designs are the short, sharp square and the long, tapered coffin or stiletto, capturing both the classic Y2K square look and the dramatic 2000s extension trend. The short square nails y2k shape is versatile for designs like checkerboard nails y2k, while longer shapes are preferred for showcasing 3d heart nails or encapsulated elements.
What is the meaning of the Cyber Y2K aesthetic in nail art?
The Cyber Y2K aesthetic in nail art is the style’s edgier, futuristic counterpart, inspired by early digital graphics, video games, and the Matrix. This style for valentine’s designs incorporating y2k often uses metallic or chrome greens, deep purples, black, and hot pink, often featuring geometric nails y2k patterns like circuit boards or abstract lines. It represents a futuristic y2k valentine nails interpretation.
Is it better to use gel polish or acrylics for intricate Y2K designs?
For intricate Y2K designs involving encapsulation and heavy 3D elements, acrylics or hard gel systems offer the best structure, while gel polish is superior for detailed color work and micro-painting. Acrylic allows for advanced 3d nail sculpting y2k directly into the material. Gel polish is essential for achieving the glossy, highly saturated colors and thin lines required for hand painted nail art.
Where can I find professional Y2K Valentine’s nail kits?
You can find professional Y2K Valentine’s nail kits online from specialized beauty supply retailers, particularly those offering products for **certified nail technician y2k applications, or reputable Etsy vendors specializing in high-end, custom press-on sets.** Look for kits that explicitly include specialized items like y2k valentine nail polish sets, nail charms, and high-quality liquid glue for buying y2k valentine nails supplies.
Key Takeaways: Your Quick Guide to Y2K Valentine’s Day Nail Art
The Y2K Valentine’s aesthetic proves that fashion is cyclical, bringing together the sweetness of Valentine’s Day and the maximalist energy of the early 2000s. We’ve explored 11 distinct, highly detailed designs, from the best y2k valentine’s nails with 3d hearts to the edgy iridescent y2k valentine nails for a darker romance. The key takeaway for executing any of these iconic y2k valentine nails is the intentional blending of textures—high-shine gloss, metallic chrome, and precise 3D placement—all adhering to the signature aesthetic. Remember that whether you opt for the convenience of press on y2k nails or commit to professional y2k nail art with gel, successful application hinges on thorough nail preparation and attention to detail as outlined in our tutorials.
Choosing your final design depends entirely on your personal expression: will you embrace the soft pink bubblegum y2k valentine nails aesthetic, or lean into the bold y2k valentine nails look of cyber green and black? Regardless of your choice, these designs demonstrate topical authority advanced artistry and guarantee a unique, nostalgic look for 2026‘s holiday.
Which of the 11 Y2K Valentine’s Day nail designs are you most excited to try first, and why? Share your favorite Y2K motif in the comments below!
Last update on 2026-01-17 / Affiliate links / Images from Amazon Product Advertising API