Tired of hair that just falls flat, with no life or personality? You’re not alone. Many of us struggle to get that gorgeous, bouncy look we see online, ending up with hair that just…sits there. It’s a frustrating cycle of trying new products and styles only to get the same limp results.
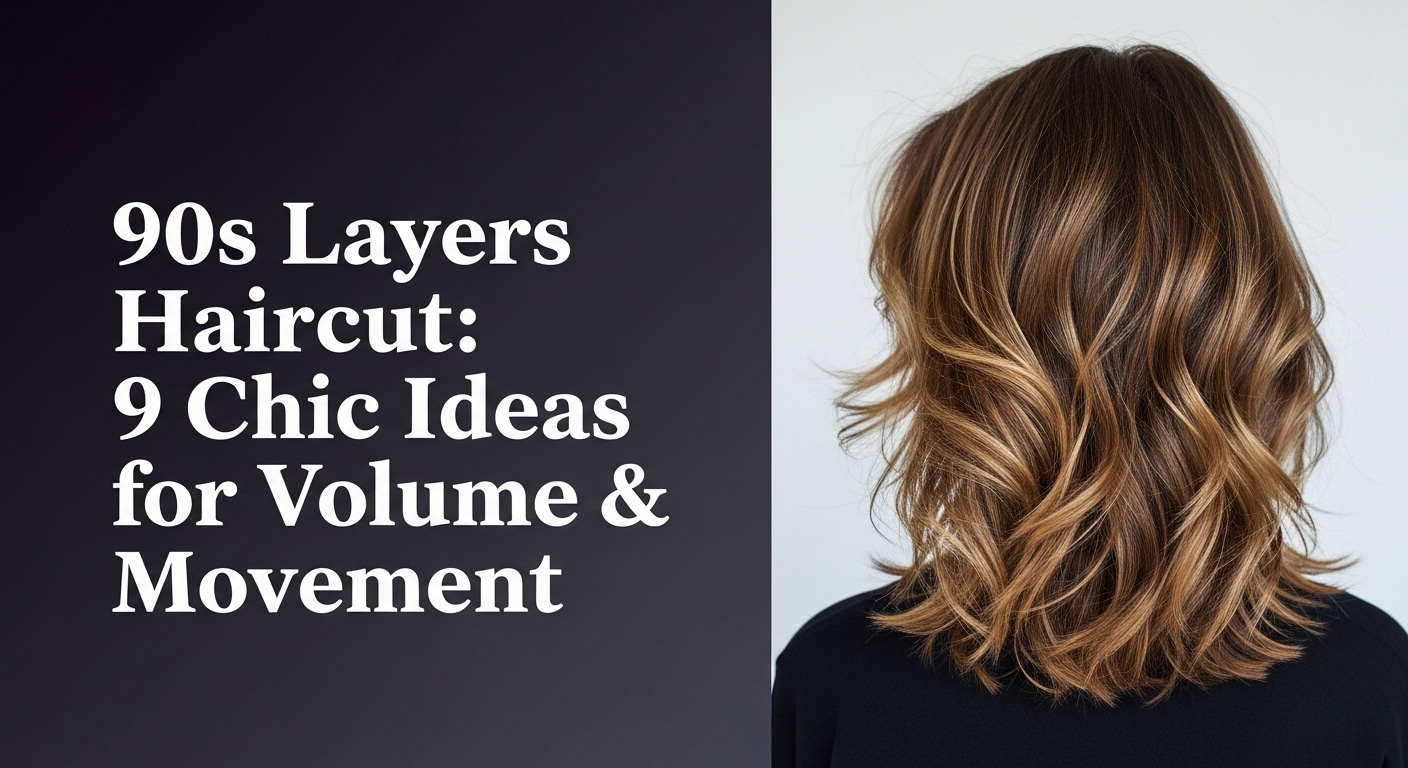
The 90s layers haircut is a vintage hairstyle defined by heavy, voluminous layers strategically cut to create maximum bounce, body, and face-framing movement. Unlike modern soft layers, it often features a distinct ‘flicked out’ look achieved with a round brush blowout, making it the ultimate solution for adding volume to otherwise flat hair.
Drawing from proven stylist techniques and the latest trend analyses for 2026, this guide breaks it all down. We’ll explore chic variations of this iconic cut that you can show your stylist. Get ready to discover how to achieve incredible volume and bring that supermodel energy to your look.
What Is The 90s Layers Haircut & Why Is It Back In 2026?
The 90s layers haircut is all about creating dramatic shape and volume and movement. Unlike the soft, blended layers popular today, this retro style features more distinct, heavy layers that are strategically cut to create a bouncy, full-bodied effect. The hallmark of the cut is its ability to be styled into a classic 90s blowout style, complete with flicked ends and significant lift at the roots. It’s a style built on a foundation of expert cutting, specifically using techniques like 90-degree elevation to build a uniform, voluminous shape. Its resurgence in 2026 isn’t surprising, fueled by a collective nostalgia for the 90s supermodel aesthetic seen all over social media platforms like TikTok. According to professional stylists, this haircut is the ultimate flat hair solution because the layering technique removes weight in a way that encourages lift and body, creating a look that is both glamorous and full of life. It’s less about a subtle, “lived-in” texture and more about a polished, intentional shape that makes a statement.
9 Chic 90s Layers Haircut Ideas for Ultimate Volume & Movement
The beauty of the 90s layered haircut revival is its modern adaptability. It’s not just about recreating “The Rachel” exactly as it was. Today, stylists are blending classic 90s techniques with contemporary tastes to create looks that feel both nostalgic and fresh for 2026. From the iconic 90s supermodel blowout to the edgier grunge-inspired choppy layers, there is a version of this trend for every hair type, length, and personal style. This section will break down nine distinct ideas, providing not just inspiration but also the specific styling steps, tools, and pro tips you need to achieve the look. Whether you have thick, curly hair that needs shaping or fine hair that needs a volumetric boost, you’ll find a practical and chic option to bring to your next salon appointment or even try at home.
1. Create The Classic 90s Supermodel Blowout

Pin this iconic supermodel look to your ‘Hair Goals’ board!
Products & Tools Used
- High-hold volumizing mousse applied to damp hair
- A powerful blow dryer with a concentrator nozzle
- A large (2-inch diameter) ceramic round brush
- A set of jumbo Velcro rollers (3-4 inches)
- Root lifter spray for extra height at the crown
- Flexible-hold hairspray to finish
Application/Styling Steps
- Apply a golf-ball-sized amount of volumizing mousse from roots to ends on towel-dried hair.
- Section the hair into three main parts: top, middle, and bottom.
- Blow dry each section using the round brush, pulling upwards and away from the scalp at a 90-degree angle to create lift.
- While each section is still hot, roll it tightly into a jumbo Velcro roller and secure.
- Let the rollers cool completely for at least 20-30 minutes.
- Gently remove the rollers, shake out your hair, and set with a light mist of hairspray.
Pro-Tip: The secret to salon-quality results is over-direction. When blow-drying the top sections, pull the hair forward over your face. This technique, used by professional stylists, creates maximum volume at the root when the hair is flipped back.

2. Style The Modern “Rachel” 2.0

Want that iconic look? Pin this modern ‘Rachel’ tutorial!
Products & Tools Used
- High-quality heat protectant spray
- A 1-inch flat iron or a multi-styler (like the Dyson Airwrap with the round brush attachment)
- A medium (1.5-inch) round brush
- Shine serum or light oil for finishing
Application/Styling Steps
- Prep clean, dry hair by misting generously with a heat protectant spray.
- Using a round brush and blow dryer, dry the hair focusing on creating a slight bevel (curve under) at the ends.
- Take a 1-inch section of hair from the top layers. Clamp the flat iron near the root.
- Pull the flat iron down the hair shaft, and as you approach the end, twist your wrist inward to create a soft, face-framing C-shape curve.
- Repeat this motion on all the front, shorter layers, directing them towards your face.
- For the back, create a softer, less pronounced bevel. Finish with a drop of shine serum.
Pro-Tip: The key to modernizing this look is avoiding a stiff, overly-styled finish. The convex layering geometry of the cut does most of the work. Your job in styling is just to enhance that shape, not force it. Use a light hand and focus only on the most prominent layers around the face.

3. Perfect The Soft, Wispy Face-Framing Layers

Save this for a soft, romantic hairstyle idea!
Products & Tools Used
- A light-hold styling cream
- Texturizing spray
- Your fingers (the best tool for this look!)
- A blow dryer with a diffuser (optional)
Application/Styling Steps
- Work a pea-sized amount of styling cream through damp hair to prevent frizz.
- Let your hair air-dry about 80% of the way. If you’re short on time, use a blow dryer with a diffuser on a low setting.
- Once mostly dry, flip your hair upside down and spritz texturizing spray throughout the roots and mid-lengths.
- Flip your hair back and use your fingers to gently guide the face-framing pieces into place.
- Avoid brushes or excessive heat. The goal is to enhance your natural texture and the shape of the cut.
- For a final touch, gently scrunch the ends to encourage a slight bend.
Pro-Tip: For this style, the cut is more important than the styling. Ask your stylist for “internal” or “sliding cut layers” around the face. This technique removes weight from the inside of the hair section, creating a soft, seamless effect rather than a chunky, obvious layer.

4. Rock The 90s Layered Bob with Flicked Ends

Pin this if you’re ready for a chic short hair transformation!
Products & Tools Used
- A smoothing blow-dry cream
- Strong-hold hairspray
- A 1-inch or mini flat iron
- A fine-tooth comb for clean sectioning
Application/Styling Steps
- Blow dry your hair as smooth as possible, using a comb to create a sharp center or side part.
- Lightly mist the bottom two inches of your hair with a strong-hold hairspray. This is the key to a crisp, all-day flip.
- Take a 1-inch section of hair. Clamp the flat iron about 2-3 inches from the end.
- Pull the flat iron down, and as you reach the last inch, sharply twist your wrist outwards and away from your face.
- Hold for a moment to set the shape, then release. The hairspray will create a defined, piecey flip.
- Repeat around the entire head for a uniform, polished look reminiscent of Topanga Lawrence.
Pro-Tip: The success of this style depends on precision cutting. The bottom line of the bob must be sharp, with subtle layers cut in to allow for the movement. Ask your stylist for a “graduated bob with point-cut ends” to create the perfect canvas.

5. Combine 90s Layers with Long Hair & Curtain Bangs

The perfect blend of trends! Pin this curtain bangs + 90s layers inspo.
Products & Tools Used
- A blow dryer or a multi-styler like the Dyson Airwrap
- A small (1-inch) round brush for the bangs
- A large (2-inch) round brush for the layers
- Dry shampoo for root lift and texture
Application/Styling Steps
- ALWAYS style your curtain bangs first on damp hair. Use the small round brush to lift them up and away from your face, drying them in an outward sweeping motion.
- Once the bangs are set, proceed to dry the rest of your hair in sections.
- Use the larger round brush for the longer layers. As you dry, roll the brush away from your face to create a soft, cascading effect that blends with the bangs.
- The key is to have all the layers moving in the same outward direction for a cohesive, flowing look.
- Once dry, lift the hair at the crown and spray dry shampoo at the roots for instant 90s volume.
- Use your fingers to marry the ends of the bangs with the start of the layers.
Pro-Tip: To get that perfect sweep, use a traveling guide when cutting. The end of the curtain bang should be the starting point for the first face-framing layer. This creates a geometric and seamless flow from the fringe to the lengths, a hallmark of expert hair design.

6. Embrace The Grunge-Inspired Choppy Layers

For the cool, low-maintenance look. Pin this grunge hair guide!
Products & Tools Used
- Sea salt or texturizing spray
- A matte-finish hair pomade or wax
- A blow dryer with a diffuser (optional, for speed)
Application/Styling Steps
- Start with towel-dried hair. The goal is not to fight your natural texture, but to enhance it.
- Liberally spray a sea salt or texturizing spray all over, scrunching the hair as you go to encourage waves and texture.
- Let your hair air-dry completely. If in a hurry, use a diffuser on low heat, but don’t aim for a smooth finish.
- Once 100% dry, take a pea-sized amount of matte pomade. Rub it between your palms until it’s warm and transparent.
- Rake your fingers through the mid-lengths and ends of your hair, focusing on twisting and separating the choppy layers to define them.
- Don’t aim for perfection. The beauty of this look is its perfectly imperfect, lived-in feel.
Pro-Tip: To achieve this look, ask your stylist to use a razor or point cutting techniques. This removes weight from the ends of the hair, creating that shattered, piecey texture that is essential for the grunge aesthetic and impossible to get with blunt scissor cutting.

7. Achieve Voluminous Layers on Thick or Curly Hair

Curly girls can rock 90s layers too! Pin this for your next salon visit.
Products & Tools Used
- A moisturizing leave-in conditioner
- A high-definition curl cream
- A strong-hold gel
- A blow dryer with a large diffuser attachment
Application/Styling Steps
- Start with soaking wet hair; this is non-negotiable for frizz-free definition. Apply a generous amount of leave-in conditioner.
- Section your hair and apply the curl cream using the “praying hands” method to smooth it over every strand.
- Glaze a layer of strong-hold gel over the curl cream. This will lock in moisture and create a “cast.”
- Scrunch gently towards the scalp to encourage curl clumps. Do not touch your hair after this point!
- Diffuse on low speed and medium heat, holding the diffuser still on each section for a few minutes before moving. Hover the diffuser around your roots for lift.
- Once 100% dry, “scrunch out the crunch” with a bit of oil on your hands to break the gel cast, revealing soft, defined cascading layers.
Pro-Tip: The key to successful layers on curly hair is a dry cut. Ask for a stylist who cuts the hair curl by curl when it’s dry. This allows them to see how each curl will fall and to cut for shape, preventing the dreaded pyramid effect and removing weight from the peripheral weight distribution of the hair.

8. Master The Ponytail “Butterfly Cut” at Home

Feeling brave? Pin this DIY Butterfly Cut tutorial for later!
Products & Tools Used
- Professional hairdressing shears (this is non-negotiable for a clean cut)
- A fine-tooth comb for precise parting
- Four hair ties
- A mirror
Application/Styling Steps
- Start with clean, dry, straight hair. Use your comb to create a sharp part down the middle, from your forehead to the nape of your neck.
- Section your hair. Create a part from the top of your ear, over your head, to the other ear. You now have a front section and a back section.
- Ponytail 1 (Face-Framing Layers): Gather all the hair from the front section into a tight, smooth ponytail at the very top of your forehead.
- Ponytail 2 (Long Layers): Gather all the hair from the back section into a second ponytail at the crown of your head.
- Cut Ponytail 1: Pull the front ponytail straight out in front of you. Decide how short you want your shortest layer to be (e.g., chin-length). Slide a hair tie down to that point to mark it. Cut straight across, just below the guide tie. Start by trimming only an inch. You can always cut more.
- Cut Ponytail 2: Pull the back ponytail straight up. Decide your overall length and use a guide tie. Cut straight across.
- Release both ponytails and shake out your new Butterfly cut layers.
Pro-Tip: For a softer, less blunt finish, after your main cut, hold the scissors vertically and do small, upward snips into the ends of the ponytail. This technique, called point cutting, will texturize the ends and help the layers blend more seamlessly.

9. Get The “Barely-There” Layered Look

The ultimate understated style. Pin this for a chic, minimalist hair idea.
Products & Tools Used
- A lightweight leave-in conditioner or detangling spray
- A wide-tooth comb
- Anti-frizz finishing cream
Application/Styling Steps
- This style is all about a beautiful, healthy-looking air-dry. Start by gently detangling damp hair with a wide-tooth comb and a light mist of leave-in conditioner.
- Create your desired part (center or side) while the hair is wet.
- Allow the hair to air-dry without touching it to minimize frizz.
- Once fully dry, take a tiny amount of anti-frizz finishing cream, rub it between your palms, and smooth it over the surface of your hair.
- The internal layers will create movement and shape on their own without requiring any heat styling or complex techniques.
Pro-Tip: The magic words to use with your stylist are: “I want long, stationary guide layers.” This professional term means the stylist will bring all the hair down to one single point at the bottom to cut it, creating very long, seamless layers that are invisible when the hair is still. It’s the secret to removing bulk while maintaining a one-length appearance.

Key Takeaways: Your Quick Guide to 90s Layers
Now that you’ve explored the chic world of 90s layers, let’s consolidate the most important points. Achieving this iconic look is a partnership between the right cut from your stylist and the right technique at home. Here are the essential takeaways to remember.
- Volume is Created by Cut & Styling: The 90s layers haircut provides the shape, but a round brush blowout and tools like Velcro rollers are required to achieve the iconic volume and movement.
-
Face-Framing is Key: The most crucial element is the shorter layers around the face. Ask your stylist for “face-framing layers” that start at the chin or cheekbone to get the authentic look.
-
Communicate with Your Stylist: Don’t just ask for “90s layers.” Use specific language like “convex layers,” “point cutting for texture,” or “stationary guide for invisible layers” to get the exact result you want.
-
Modern Tools Make It Easier: While the look is retro, modern tools like the Dyson Airwrap or ceramic flat irons can make styling the flicked ends and soft curves easier and with less damage.
-
Product is Not Optional: Achieving the look requires the right foundation. A volumizing mousse before drying and a texturizing spray or pomade for finishing are essential process steps.
-
There’s a Version for Every Hair Type: Whether you have fine hair needing wispy layers or thick, curly hair that needs weight removal, the 90s layered cut can be adapted by a skilled professional.
People Also Ask About The 90s Layers Haircut
What is the difference between 90s layers and a butterfly cut?
The main difference is that the butterfly cut is a specific DIY-friendly cutting method, while 90s layers describe the final style and aesthetic. The butterfly cut (using two ponytails) is a simplified way to create heavy layers and face-framing similar to a 90s look. However, a salon-created 90s layered haircut often involves more complex convex layering and over-direction techniques that are customized to your head shape for a more precise, professional result.
How do I ask my stylist for 90s layers?
Bring photos and use specific descriptive words. Instead of just saying “90s layers,” say “I’m looking for a voluminous, bouncy, 90s supermodel blowout style.” Be specific about the details you like: “I love these heavy face-framing layers that start at the chin,” or “I want those soft, flicked ends.” Using keywords like volume, movement, and face-framing will ensure you and your stylist are on the same page.
Are 90s layers high maintenance?
The styling can be, but the cut itself is versatile. To get the full, high-volume 90s blowout style, yes, it requires time with a blow dryer and round brush or rollers. However, the layers can also be air-dried with some texturizing spray for a more low-effort, grunge-inspired shaggy look. The maintenance level depends on the specific finish you want each day.
Will 90s layers make my thin hair look thinner?
No, when cut correctly, they can actually make thin hair look fuller. The key is to ask for strategic, volumizing layers that focus on the top and around the face, rather than removing too much weight from the ends. A stylist should use techniques to create internal layers and texture, which gives the illusion of more body and solves the flat hair solution many seek.
What is a 90 degree haircut?
This refers to the elevation angle at which the hair is held when cut. A 90 degree haircut, also known as a uniform layer cut, involves lifting the hair straight out from the head (at a 90-degree angle) and cutting. This is a foundational technique for creating classic, even layers and is a hallmark of many 90s layered haircut styles, as it builds consistent volume and movement throughout the hair.
What products are essential for styling 90s layers?
At a minimum, you need a volumizing mousse and a flexible-hold hairspray. The volumizing mousse is applied to damp hair to build a foundation of body and lift before you even start styling. The hairspray is used at the end to lock in the bouncy shape of your blowout without making it stiff or crunchy. A good heat protectant is also crucial.
90s layers vs modern layers: what’s the difference?
90s layers are typically heavier, chunkier, and styled for maximum volume with a distinct “flick.” Modern layers, in contrast, are often softer, more “invisible,” and blended to create seamless texture and movement with an air-dried finish. Think of a 90s blowout versus a modern beachy wave; the former is “styled,” while the latter is “effortless.”
Can I get 90s layers on short hair?
Yes, absolutely. The classic example is the 90s layered bob with flicked ends, often called the “Topanga” haircut. Layers are cut into a bob length to add movement and shape, preventing the dreaded “helmet” look. The key is to incorporate layers that are proportional to the shorter length.
How do you do a 90s blowout at home?
The key is using a round brush on hot hair and then letting it cool in that shape. Work in sections, applying volumizing mousse to damp hair. Use a round brush to lift the roots and create tension as you dry. For the most authentic look, while each section is still hot from the blow dryer, roll it up in a large Velcro roller and let it cool completely. This sets the bouncy, curved shape.
What face shape do 90s layers suit?
90s layers are incredibly versatile and can be customized for any face shape. Because the style is defined by its face-framing layers, a skilled stylist can adjust the starting point of the shortest layer to flatter your features. For a round face, layers that start below the chin can add length. For a square jaw, soft, wispy layers can add softness.
Final Thoughts on Nailing the 90s Layers Haircut
Ultimately, embracing the 90s layers haircut in 2026 is about harnessing the power of a great cut to create volume, shape, and movement. It’s a testament to the idea that a haircut is not just about length, but about architecture. As we’ve explored, this iconic look is not a monolith; it’s a versatile concept that can be adapted into a supermodel blowout, a soft wispy frame, or even an edgy choppy style.
The key to achieving salon-quality results lies in the combination of a skilled stylist who understands techniques like convex layering and your own at-home styling prowess with tools like a round brush and Velcro rollers. By communicating clearly with your hairdresser and choosing the right products to support your style, you can confidently revive this beloved trend and make it entirely your own. Which 90s layers look will you be trying first?
Last update on 2026-03-29 / Affiliate links / Images from Amazon Product Advertising API