Struggling to create a festive manicure that lasts all season? You’ve seen stunning Christmas bow acrylic nails, but worry the 3D art will slump, crack, or lift before the holidays are over. It’s frustrating when intricate designs don’t live up to their promise.
3D Christmas Bow Acrylic Nails are a durable and safe seasonal nail art design, lasting 3-4 weeks when applied correctly. The key is using professional-grade EMA monomer, ensuring proper ventilation during application, and mastering precise bead control to create a fully polymerized, structurally sound 3D bow. This prevents lifting and ensures your festive look remains flawless.
Drawing from established best practices and Licensed Nail Technician (LNT) verified techniques, this guide unlocks the secrets to flawless holiday nails. You’ll discover 9 stunning bow designs, from dainty coquette styles to bold statement pieces. Get ready to master the art of 3D acrylic sculpting and create a durable, beautiful manicure.
Are 3D Christmas Bow Acrylic Nails Safe? Pro Secrets to Mastering Festive Nail Art in 2026
3D Christmas Bow Acrylic Nails are safe and highly durable (3-4 weeks) when applied with professional-grade EMA monomer, proper ventilation, and precise bead control to ensure complete polymerization and structural integrity. Many people worry about the chemicals and longevity of such dimensional art, but professional techniques mitigate these risks entirely. The use of high-quality, HEMA-free products is crucial for preventing allergic reactions, while proper application ensures the 3D element won’t lift or snag. All the methods in this guide are reviewed against LNT best practices, focusing on safe chemical handling and creating a beautiful, long-lasting festive design. This guide will walk you through 9 distinct designs and provide the technical secrets to execute them perfectly and safely.
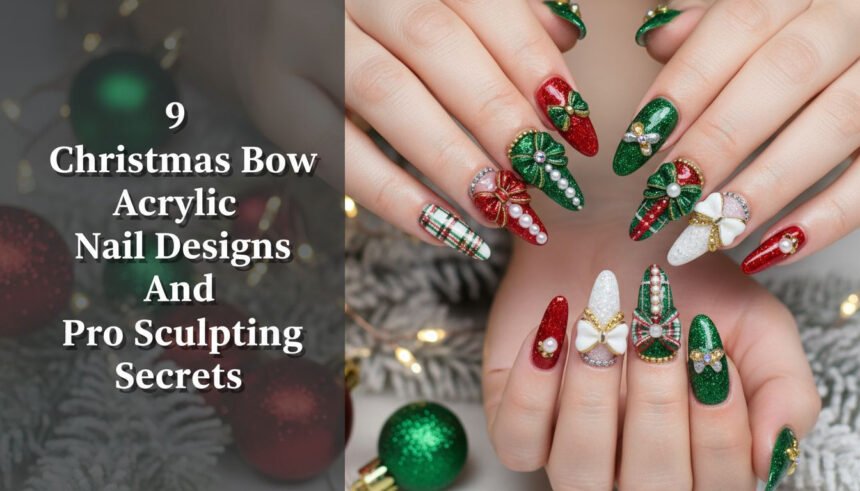
9 Christmas Bow Acrylic Nail Designs And Pro Sculpting Secrets for 2026
Here are nine distinct Christmas bow acrylic nail designs, ranging from subtle and elegant to bold and festive. Each concept includes the specific products needed and the step-by-step method to achieve a professional, long-lasting result perfect for the holiday season.
1. The Dainty Coquette Bow: Small-Scale Sculpting Perfection

Pin this genius hack to your ‘Dream Holiday Nails’ board!
This subtle and elegant look aligns with the popular Coquette and Balletcore aesthetics, making it perfect for both festive occasions and everyday wear. Its small scale focuses on precision and delicate detail.
Products & Tools Used:
- High-Quality EMA Monomer (low-odor formula)
- Sheer Pink/Nude Acrylic Powder (for the base)
- Bright White or Sheer White Pigmented Acrylic Powder (for the small bow sculpt)
- Size #2 Kolinsky 3D Acrylic Brush (for fine detail and control)
- Fine Detail Liner Brush (for optional painted ribbon tails)
Application Steps:
- Complete the standard base overlay (sheer pink) and file/buff smooth.
- Using the #2 brush, pick up a very small, slightly drier bead of white acrylic.
- Place the bead and gently manipulate it into two tiny, symmetrical loops, pressing the brush belly quickly to define the shape.
- Use a minute bead for the center knot, ensuring sharp definition.
- Seal the entire perimeter of the tiny bow sculpt with a non-wipe topcoat and cure.
- Finish with a matte or glossy top coat over the entire nail (avoiding the top of the bow itself).
For the smallest beads, lightly dab your brush on a paper towel after dipping in the monomer to wick away excess liquid, preventing the bead from slumping.

2. Oversized Metallic Gift Bow Statement Set

Save this clever organization idea!
For a dramatic, high-impact look, this oversized metallic bow transforms your nail into a statement piece. It’s perfect for holiday parties and requires precise sculpting of larger acrylic beads.
Products & Tools Used:
- High-pigment Red Acrylic Powder (for the base)
- Gold or Silver Pigmented 3D Sculpting Powder (ensure it cures fully opaque)
- Low-Viscosity EMA Monomer (for precise control)
- Size #4 or #6 3D Acrylic Brush (for handling larger beads)
- Durable Non-Wipe Gel Top Coat
Application Steps:
- Apply and cure the red acrylic base overlay, filing the coffin shape precisely.
- Using the #4 brush, pick up a slightly larger, drier bead of metallic powder for the first loop; place and shape firmly before it sets.
- Repeat with an identical bead for the second loop, ensuring the loops are perfectly symmetrical and placed slightly off-center for movement.
- Secure the center knot with a medium-sized bead, creating distinct folds for a realistic ‘gift bow’ effect.
- File the edges of the bow gently to feather them into the nail plate.
- Apply a glossy topcoat to the nail around the bow and seal the bow’s perimeter.
Because the bead size is larger, work faster! If the acrylic starts setting too quickly, use a clean brush dipped in monomer to gently re-liquefy the edge for an extra second of manipulation time.

3. Glitter Ombre Base with Clear Sculpted Bow

Pin this dimensional holiday nail idea!
This design adds dimension without hiding a beautiful glitter background. By using a high-clarity clear acrylic, you create a “glass” bow that catches the light and lets the encapsulated glitter shine through.
Products & Tools Used:
- Fine Red and White Glitter Mix (for the ombre)
- High-Clarity Clear Acrylic Powder (MUST be non-yellowing)
- HEMA-Free Monomer (recommended for home use)
- Base Coat Gel and Gel Top Coat (for sealing the ombre)
Application Steps:
- Create the red-to-white glitter ombre design using traditional acrylic methods, ensuring the surface is smooth and free of lumps.
- Apply and cure a thin layer of topcoat over the ombre for protection, then buff lightly to etch the surface where the bow will sit.
- Using the clear powder and a slightly dry bead, sculpt the 3D bow directly onto the etched topcoat layer.
- Once cured, apply a very thin layer of topcoat ONLY to the perimeter of the clear bow to seal the contact point.
- Finish with a final layer of topcoat over the surrounding nail bed for maximum shine, avoiding the top plane of the clear bow.
Always ensure your clear acrylic powder is certified UV-stabilized and non-yellowing, as this will prevent discoloration from sun exposure over the 3-4 week wear period.

4. The Classic Red Velvet Bow Texture

Pin this velvet texture secret!
Achieve a unique, soft, and tactile finish with this velvet bow technique. Using flocking powder, you can transform a standard 3D acrylic sculpt into a cozy, textured centerpiece perfect for a classic holiday look.
Products & Tools Used:
- Deep Red Pigmented Acrylic Powder (or red gel polish base)
- Matching Shade of Red Flocking/Velvet Powder
- Clear or Red Sculpting Gel (used as the velvet base adhesive)
- Soft Fan Brush (for dusting off excess powder)
Application Steps:
- Apply and cure the base color (deep red or green) and apply a matte topcoat if desired.
- Sculpt the 3D bow shape using clear acrylic and monomer, ensuring the structure is solid.
- Instead of top-coating the sculpt, apply a layer of clear sculpting gel over the entire 3D bow. DO NOT CURE.
- While the gel is wet, heavily sprinkle the matching velvet/flocking powder over the entire bow surface.
- Cure the nail immediately in the UV lamp without touching the powder (this secures the flocking).
- Once cured, use a very soft fan brush to gently dust off the excess velvet powder. Avoid sealing with a top coat.
Ensure the gel layer underneath the velvet powder is thin but completely covers the acrylic. If the gel is too thick, the powder may clump and not provide a smooth velvet effect.

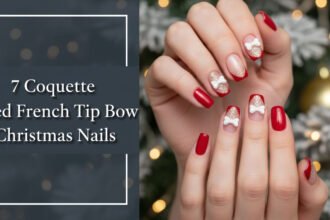
5. French Tip Bow Accent: Elegant Balletcore Style

Pin this elegant look for your next holiday party!
This design offers an elegant, understated way to wear the Christmas bow trend. By placing a small, flattened bow on the smile line of a classic French tip, it creates a clean, sophisticated look that fits the Balletcore aesthetic.
Products & Tools Used:
- High-Quality Sheer Pink/Nude Builder Gel or BIAB (for the base)
- Opaque White Acrylic Powder (for the tip and bow sculpt)
- Acid-Free Primer (for optimal adhesion)
- Fine Detail Liner Brush (for painting the crisp white tip line)
Application Steps:
- Build the nail structure using builder gel/BIAB and cure.
- Paint the crisp white French tip smile line and cure. Top coat and buff smooth.
- Using a small, slightly dry bead of white acrylic, sculpt a very small, flattened bow shape directly onto the smile line of the accent nail.
- The loops should be thin and look like ribbons sitting flat on the nail rather than a puffy bow.
- Secure the edges of the flat bow with a precision gel topcoat and cure.
The key to Balletcore is restraint. Use the smallest possible bead for the bow and ensure its edges are slightly flattened to minimize dimension and maximize elegance, making it feel integrated, not just glued on.

6. Aurora Icy Clear Bow with Crystal Accents

Save this frosty Aurora effect for your winter manicure!
Capture a frosty, luminous winter vibe with this aurora effect bow. By applying an iridescent chrome powder over a clear 3D sculpt and adding crystal accents, you create a shimmery, icy design that is perfect for the entire winter season.
Products & Tools Used:
- High-Quality Clear Acrylic Sculpting Powder
- Iridescent Aurora/Chrome Powder (White or Blue shift)
- Rhinestone Gel Adhesive (thick, non-runny formula)
- High-Quality Crystal Rhinestones (SS3-SS6 size recommended)
Application Steps:
- Complete the underlying acrylic base (e.g., solid white or pale blue). Top coat and cure, ensuring the finish is non-wipe.
- Sculpt the 3D bow using clear acrylic and seal the perimeter with topcoat. CURE the perimeter seal.
- Apply a thin layer of non-wipe topcoat (or a layer of chroming base) to the surface of the clear acrylic bow ONLY, and cure.
- Rub the Aurora/Chrome powder vigorously onto the bow surface using a silicone tool or sponge applicator.
- Secure any small crystal accents around the base of the bow using the rhinestone gel adhesive, placing them strategically to look like ice. Cure.
The aurora powder is only effective on a perfectly smooth, non-wipe surface. If your 3D sculpt is lumpy, the chrome finish will magnify every imperfection.

7. Sculpted Ribbon Tail Bow on a Full Glitter Set

Pin this dimensional holiday nail idea!
This advanced technique adds complexity and movement by sculpting not just the bow but also its flowing ribbon tails. Placed over a full-coverage glitter base, it creates a hyper-realistic, high-impact design.
Products & Tools Used:
- Chunky Silver or Multi-Colored Christmas Glitter (for the base)
- High-Pigment Red Acrylic Powder
- Clear Monomer and Polymer (for encapsulating the glitter)
- Fine-Tip Liner Brush (for painting the ribbon details/shadowing)
Application Steps:
- Complete the full acrylic overlay, encapsulating the glitter and filing/buffing the surface smooth.
- Sculpt the main 3D red bow near the tip using three larger beads (two loops, one knot).
- For the ribbon tails, use two very small, elongated beads of red acrylic, placing them immediately below the bow.
- Use the side of the 3D brush to drag and shape the tails, creating natural-looking folds and movement (the tails should taper and be thin at the ends).
- Once cured, optionally use a thin liner brush and dark red gel to paint subtle shadows under the sculpted folds to enhance the dimensional illusion.
The ribbon tails require a much wetter, smaller bead than the main bow loops. If the bead is too dry, it will look chunky; if too wet, it will spread out too much, losing the defined edges needed for the flowing look.

8. The Minimalist Nude Set with Single Green Bow

Save this sophisticated color pairing!
Perfect for an office setting or a clean aesthetic, this minimalist design uses a single, vibrant emerald green bow as a striking accent on an otherwise neutral nude manicure. The contrast is sophisticated and festive.
Products & Tools Used:
- Opaque Nude or Buff Acrylic Powder (for the base)
- High-Pigment Emerald Green 3D Powder (ensures the color pops)
- Detail Liner Brush (for sealing)
- Durable Glossy Top Coat
Application Steps:
- Build and finish the nude acrylic base overlay on all ten nails, ensuring a flawless, smooth finish that resembles natural color.
- On the accent nail (typically the ring finger), sculpt a medium-sized, symmetrical bow using the emerald green powder.
- Focus solely on the ring finger for the bow, leaving the remaining nine nails completely bare of 3D art.
- Apply a final glossy topcoat to all nails, carefully sealing the perimeter of the green bow.
For maximum impact, choose an emerald green pigment with blue undertones, which provides a richer, more luxurious contrast against the warm nude base than a standard grass green.

9. Beginner Friendly: Charms-Based 3D Bow Application

Pin this instant dimension hack!
For those who haven’t mastered 3D sculpting, pre-formed charms offer a quick and reliable way to achieve a high-dimension look. The key to longevity is using the right adhesive to anchor the charm securely.
Products & Tools Used:
- Pre-formed Christmas Bow Nail Charms (resin or metallic)
- Thick, Non-Runny Builder Gel or Jewelry Resin Adhesive
- UV/LED Curing Lamp
- Dotting Tool or Wax Picker (for handling the charm)
Application Steps:
- Complete the acrylic base and apply a color/top coat, buffing slightly where the charm will be placed.
- Using a dotting tool or liner brush, place a small, sufficient dollop of the thick builder gel or resin onto the desired placement spot.
- Immediately place the pre-formed charm on top of the adhesive, pressing gently but firmly to ensure the gel flows around the base perimeter.
- Cure the nail under the UV lamp for the recommended time (usually 60-120 seconds for thick adhesive).
- If necessary, use a fine liner brush and thin top coat to spot-seal any exposed charm edges where the adhesive did not reach fully. Cure again.
Using a thick, non-runny adhesive like builder gel is essential. Traditional liquid topcoats or glues will not provide the structural integrity required to keep the charm from falling off within days.

Pro Sculpting Secrets: The Essential Guide to Non-Slumping 3D Acrylic
Achieving a professional, symmetrical 3D bow requires more than just inspiration; it demands technical precision. The biggest challenge for both DIY enthusiasts and technicians is controlling the acrylic bead to prevent it from slumping or curing too quickly. These secrets focus on the core science of the materials to ensure a perfect sculpt every time.
Mastering the Monomer/Polymer Ratio for 3D Art
The single most important secret to non-slumping 3D acrylic art is a drier bead consistency than standard overlays. Aim for a ratio closer to 1.5 parts powder to 1 part monomer. The finished bead should feel firm and hold its shape immediately upon placement; if it spreads quickly, the bead is too wet. This control is the foundation of creating sharp, defined loops and knots that don’t look lumpy.
The Professional Three-Bead Bow Sculpting Method
This method breaks down the complex shape of a bow into three manageable parts, allowing for greater control and perfect symmetry.
Materials Needed:
- High-Quality Low-Odor EMA Monomer
- Pigmented 3D Acrylic Powder (Red, Green, or White)
- Size #4 or #6 Kolinsky Sable 3D Brush
- Acid-Free Primer and Dehydrator
Step-by-Step Directions:
- Nail Prep & Primer: Lightly buff the finished nail surface (top coat cured and buffed) to etch it, then apply dehydrator and acid-free primer only to the specific bow placement zone for maximal adhesion.
- Form the First Loop: Dip the brush into the monomer, wick off excess liquid slightly on a paper towel, and pick up a medium-sized, drier bead. Place the bead on the nail and immediately use the brush belly to flatten the center and push the sides into a loop shape.
- Sculpt the Second Loop: Repeat Step 2 immediately with an identical bead, placing it symmetrically next to the first loop. Ensure the loops meet at a central junction point and use the brush tip to define the folds and sharp edges before the acrylic sets (polymerizes).
- Create the Center Knot: Pick up a much smaller, extremely dry bead of the same or contrasting color. Place it directly over the junction of the two loops. Pat it firmly into a small, defined rectangle or square to create the knot, securing the bow structure.
- Add Tails (Optional): If adding tails, use two small, very thin beads, placing them directly under the knot. Use the brush to feather the edges and create flowing movement.
- Seal and Finish: Allow the acrylic to fully air-cure for 2-3 minutes. Carefully apply a thin line of gel top coat around the entire perimeter where the bow meets the nail plate and cure. Avoid placing top coat over the raised surface of the bow itself.
Temperature control is vital. Work in a cooler room, as high heat drastically shortens the working time of the acrylic, making it impossible to manipulate the bead into a symmetrical bow shape before it sets.
Longevity, Safety, and Troubleshooting 3D Acrylic Bows
Creating a beautiful 3D bow is only half the battle. Ensuring it lasts for weeks without lifting and protecting your health from chemical exposure are critical components of professional nail art. This section covers common problems and the industry-standard safety protocols you must follow.
Why Does My Acrylic Bow Slump or Crack? (Troubleshooting Guide)
Slumping is almost always caused by a bead that is too wet (too much monomer), which prevents the acrylic from holding its shape. Cracking often occurs if the bead is too dry (too much powder), leading to a brittle structure with incomplete polymerization. Ensure your ratio is closer to 1.5:1 powder to liquid for 3D work.
* If Lifting Occurs: Check if the nail was properly prepared (etched and primed) before placement, and ensure the entire base perimeter of the bow was sealed with top coat.
* If Edges Are Lumpy: Use smaller beads and manipulate them more quickly. Use the sharp tip of a clean, wet brush to define and sharpen the edges before curing.
Critical Safety Secrets: HEMA Warnings and Proper Ventilation
Always use 100% Ethyl Methacrylate (EMA) monomer and strictly avoid MMA (Methyl Methacrylate) monomer, which is banned in many states for use on the nail plate due to its potential to cause permanent damage. HEMA (Hydroxyethyl methacrylate) is a common allergen; choosing HEMA-free monomer greatly reduces the risk of developing painful skin sensitivities. Always work with strong ventilation (Local Exhaust Ventilation or a high-quality HEPA air purifier) to mitigate exposure to monomer odors and VOCs.
Safely Removing High-Dimension 3D Acrylic Art
Due to the thickness of 3D acrylic bows, standard acetone soaking is extremely slow (45+ minutes). The safest and most efficient method is to carefully file down the bulk of the 3D art using an electric file (e-file) with a ceramic safety bit (medium grit), followed by standard acetone soaking for the remaining thin layer of acrylic. Extreme caution must be used to avoid touching the natural nail plate with the e-file.
Key Takeaways: Your Quick Guide to Festive Bow Nails
- Ratio is Key: Use a drier Monomer/Polymer ratio (~1.5:1) for non-slumping 3D sculpting.
- Always Seal: Secure the 3D element by applying a thin topcoat line around the perimeter where it meets the nail to prevent lifting.
- Go HEMA-Free: Opt for EMA, HEMA-free monomer to minimize allergy risk and prioritize professional safety standards.
- Try Charms: For speed and ease, use pre-formed nail charms secured with builder gel instead of hand-sculpting.
- Define Loops: Use quick, firm pressure with a dedicated 3D brush (Kolinsky #4) to define the bow loops before the bead sets.
People Also Ask About Christmas Bow Acrylics
How long should a professional 3D acrylic bow last?
When sculpted correctly with quality EMA monomer and fully sealed at the base, a professional 3D acrylic bow should remain intact and firmly adhered for the standard duration of the nail enhancement, typically 3 to 4 weeks between fills. Longevity depends heavily on proper nail preparation (priming) and perimeter sealing.
Which is better for beginners: sculpted acrylic or carving gel for 3D bows?
Carving gel is generally better for beginners because it is virtually odorless, requires UV curing (giving you infinite working time until cured), and is often softer and easier to manipulate than fast-setting acrylic powder. Acrylic provides superior hardness and sharpness, but requires mastery of speed and bead control.
What is the latest trend in bow nail art for July 2026?
The latest trends merge the classic holiday theme with the elegant Coquette and Balletcore aesthetics, favoring small, dainty, white or sheer pink bows placed on French tips or nude bases, often finished with a soft matte topcoat. Oversized, highly metallic gift bows remain a popular option for statement nails.
Final Thoughts
Mastering 3D acrylic art takes practice, but by applying these pro sculpting secrets—especially focusing on the correct monomer/polymer ratio and prioritizing safety—you can achieve a durable, stunning Christmas Bow design that will last all holiday season. Now that you have the secrets, which of the 9 designs will you try first? Drop your choice in the comments
Last update on 2026-04-27 / Affiliate links / Images from Amazon Product Advertising API