Tired of spending hours on Christmas nail art only for it to look busy and clumsy? You’re not alone. Many festive designs promise holiday cheer but deliver cluttered results that chip in days. It’s frustrating when you want elegance but end up with a maximalist mess.
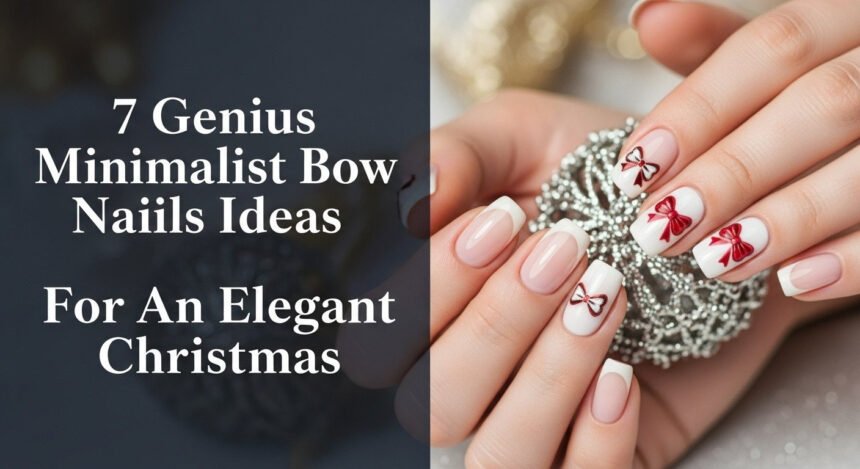
Minimalist Bow Nail Art is an elegant aesthetic characterized by the deliberate use of negative space, limited color palettes, and a singular, small bow motif placed precisely on an accent nail. This signals restraint over busy holiday designs, focusing on clean, polished execution. This approach prioritizes precision for a sophisticated, lasting manicure.
Drawing from established best practices and proven design principles, this guide breaks down the secrets to flawless minimalist bows. You’ll discover seven genius ideas and the exact techniques to achieve a professional-looking holiday manicure. Get ready to master the art of understated elegance.
Tired of Clumsy Holiday Nails? Why Minimalist Bows Are The Elegant Choice This Christmas
The frantic energy of the holidays often translates into our nail art choices—more glitter, more decals, more everything. The result can feel less like festive cheer and more like a cluttered craft project. This is where the minimalist bow design changes the game. It’s a sophisticated alternative that proves less is truly more, especially during a season of excess.
What defines this elegant Christmas bow design? It’s an aesthetic built on precision and restraint. Minimalist Bow Nail Art is an elegant aesthetic characterized by the deliberate use of negative space, limited color palettes (typically two colors plus the base), and a singular, small bow motif placed precisely on an accent nail, signaling restraint over maximalist holiday designs. Unlike simple designs that can look unfinished, true minimalist bow nail art requires professional-grade precision. The clean lines and perfect symmetry are intentional, achieved with specialized tools like a fine liner brush and a clear understanding of balance. This approach swaps clumsy excess for a subtle, high-impact statement that’s both festive and incredibly chic.
7 Genius Minimalist Bow Nails Ideas For An Elegant Christmas
Discover seven distinct, stunning, and achievable minimalist bow nail designs perfect for the holiday season. Each idea comes with a simple, step-by-step tutorial to give you the confidence to create a clean, elegant Christmas manicure at home. From a timeless nude accent to a modern texture-play, these looks prove that sophistication lies in the details.
1. The Nude Base Micro-Bow Accent

Pin this genius hack to your ‘Dream Christmas Nails’ board!
This is the quintessential minimalist Christmas manicure. The sheer nude base offers a clean, professional canvas, making the single, high-contrast red micro bow the star of the show. It’s a timeless and versatile look that is perfect for any holiday occasion, from office parties to family dinners.
Products & Tools Used:
- Sheer, neutral nude gel polish (or standard lacquer)
- Highly pigmented red gel or acrylic liner polish
- 0.5mm Fine liner brush
- Smallest size dotting tool
Application/Styling Steps:
- Prepare the nail plate (file, buff, dehydrate) and apply two thin coats of the nude base polish, curing fully between each coat (if using gel).
- Select the accent nail (typically the ring finger) and use the dotting tool to place two symmetrical dots where the outer edges of the bow loops will start.
- Using the 0.5mm fine liner brush, gently pull the polish inward from each dot, connecting them at the center to form the two loops and the central knot, ensuring sharp, crisp edges.
- CRITICAL STEP: Cure the design quickly (flash cure) for 15 seconds to lock the lines in place before applying the final top coat.
- Apply a high-quality top coat, ensuring you ‘float’ the brush over the bow detail to avoid smudging the fine lines.
Pro-Tip: For the cleanest lines, slightly thin your liner polish on a palette before dipping your brush—thick polish will bleed and look chunky, ruining the minimalist aesthetic.

2. Sheer Red French Tip with Tiny White Bow

Save this clever organization idea!
This design elevates the classic French tip with a festive, modern twist. The sheer red jelly base provides a delicate flush of color, while the crisp white tip and micro bow create a beautiful contrast. It’s the perfect way to wear red and white for the holidays without sacrificing sophistication.
Products & Tools Used:
- Sheer jelly red gel or standard polish
- Crisp white highly pigmented liner polish
- Fine, thin striping brush (or French tip stencil)
- Silicone tool for clean-up
Application/Styling Steps:
- Apply two coats of the sheer jelly red polish to all nails for a delicate, flushed base color. Cure fully.
- Use the striping brush (or stencil) and the white liner polish to paint a thin, clean French tip line. Cure the tip.
- On the ring finger accent nail, apply a micro-bow design directly over the intersection point where the white tip meets the sheer red base, using the white polish.
- Ensure the bow is perfectly symmetrical and scaled appropriately for the tip size.
- Seal with a durable top coat, making sure to cap the free edge for longevity.
Lesson Learned: A sheer red base is less visually heavy than an opaque red, helping maintain the minimalist constraint while delivering high Christmas festivity.

3. Negative Space Outline Bow

Try this negative space masterpiece!
For the ultimate modern and low-effort design, the negative space outline bow is a perfect choice. This technique focuses on what isn’t there, using a clear base to let the natural nail shine through. A single, crisp outline in black or silver creates a sharp, graphic look that is incredibly chic and fast to create.
Products & Tools Used:
- Clear base coat and high-shine top coat
- Black or dark silver highly pigmented liner polish (non-gel is okay if fast-drying)
- Extra-thin fine liner brush (0.3mm if available)
- Acetone and angled clean-up brush
Application/Styling Steps:
- Apply two coats of clear base coat for protection and shine; ensure they are fully dry/cured.
- Using the extra-thin liner brush, start by drawing a small, single-line outline of the bow near the center or just above the French tip line (if using).
- Ensure the bow is empty in the center—only the outline (loops and knot) should be visible.
- Immediately use the angled clean-up brush dipped in acetone to sharpen any wobbly edges and perfect the line work.
- Seal the entire design with a clear top coat, allowing ample drying time if using standard lacquer.
Pro-Tip: The cleaner the lines, the more minimalist the design reads. Use a magnifying glass if necessary to verify line sharpness before applying the top coat.

4. The Matte vs. Glossy Texture Contrast Bow

Pin this elegant texture contrast look for maximum sophistication!
This advanced technique is for those who want a truly sophisticated and understated look. Instead of relying on color, this design uses the contrast between a velvety matte base and a high-shine glossy bow to create visual interest. It’s a subtle, high-end finish that is perfect for non-traditional Christmas color palettes like sheer grey or winter white.
Products & Tools Used:
- Sheer grey or white base color polish
- High-quality matte top coat (UV cure recommended for longevity)
- High-gloss, no-wipe gel top coat (clear)
- Fine liner brush
Application/Styling Steps:
- Apply your sheer base color and cure. Apply one generous coat of the matte top coat over the entire nail and cure until completely matte.
- Use a highly pigmented white or same-color polish to draw your symmetrical micro-bow in the desired placement (e.g., near the cuticle).
- KEY TECHNIQUE: Using the high-gloss, no-wipe top coat, carefully paint over the drawn bow shape only, ensuring the gloss top coat does not touch the matte surrounding area.
- Cure the glossy layer fully. The matte/glossy contrast will define the bow shape.
- Do not apply any additional top coat to the entire nail, as this will destroy the matte finish.
Pro-Tip: The success of this design relies entirely on the quality of your matte top coat—cheap formulas often revert to glossy or develop a patchy finish over time.

5. Micro-Pearl 3D Bow Accent (Subtle)

Save this textured micro-bow tutorial for holiday parties!
If you want to add a touch of texture without a bulky, clumsy 3D charm, micro-pearls are the perfect solution. This technique uses tiny pearls (0.5mm or smaller) to build a delicate, non-intrusive 3D bow. The result is a subtle, elegant texture that catches the light beautifully, ideal for holiday parties.
Products & Tools Used:
- Sheer pale pink base coat/polish
- Clear builder gel or thick jewelry adhesive gel
- Wax pencil or tweezers for precise placement
- Micro pearls (size 0.5mm or smaller)
- UV/LED lamp (essential for curing adhesion gel)
Application/Styling Steps:
- Apply base color and top coat to the entire nail (except the accent nail where the bow will go).
- Apply a thin layer of the builder gel/adhesive only in the shape of the desired bow (the loops and knot). Do NOT cure yet.
- Using the wax pencil or tweezers, carefully pick up the micro pearls and place them along the lines of the gel to form the bow shape.
- Once satisfied with the placement, flash cure for 30 seconds to lock the pearls in place.
- Apply a thick layer of top coat or builder gel around the base of the pearls to prevent snagging, but try not to completely cover the tops of the pearls, as this diminishes the 3D effect. Cure fully.
Pro-Tip: True 3D minimalist designs require the pearls to be encapsulated around the base, not fully covered. This takes practice but guarantees a long-lasting, sophisticated finish.

6. White Cuticle Bow on Short Nails

Pin this elegant idea—perfect for short nails!
Minimalist designs are ideal for short nails, and this placement is particularly flattering. Placing a tiny white bow horizontally along the cuticle line creates an optical illusion that elongates the nail plate. Using a pre-made water slide decal makes this look incredibly fast and easy to achieve at home, with guaranteed perfect symmetry.
Products & Tools Used:
- Opaque white or pale pink base polish (for a clean backdrop)
- Pre-cut white water slide nail decals (micro bow size)
- Tweezers and small cotton swab
- Fast-drying, durable top coat
Application/Styling Steps:
- Apply two thin coats of the base color polish to all nails and let dry completely.
- Using the tweezers, soak a micro bow decal briefly in water, then slide it carefully onto the accent nail.
- Position the bow horizontally right along the upper edge of the cuticle line—this tricks the eye into thinking the nail plate is longer.
- Use a cotton swab or silicone tool to gently press out any water or air bubbles and ensure the decal is completely flat against the nail curve.
- Apply two thin layers of top coat, sealing the decal fully, and ensuring you cap the tip of the nail.
Lesson Learned: Placement near the cuticle is ideal for short nails because it utilizes the negative space that is less likely to chip and draws the eye up the nail plate.

7. Subtle Gold Outline Bow on Clear Base

Save this festive, low-effort New Year’s transition design!
Looking for a design that works for both Christmas and New Year’s Eve? This is it. A delicate gold metallic outline on a clean, clear base is the epitome of festive minimalism. The subtle shimmer is celebratory but restrained, making it a sophisticated choice that transitions seamlessly between holidays.
Products & Tools Used:
- Strengthening clear base coat
- Fine gold metallic liner polish (highly pigmented)
- Detail brush (0.5mm)
- Glossy, quick-dry top coat
Application/Styling Steps:
- Apply two coats of the clear base coat for a flawless, glossy, natural look.
- On the accent nail, use the detail brush to draw the micro bow outline using the gold metallic polish, focusing on a precise, thin line.
- SUBTLE GLITTER OPTION: Dip the fine liner brush lightly in loose micro gold glitter and tap a tiny amount into the center knot of the bow while the gold polish is still wet.
- Allow the design to air dry for at least 5 minutes before proceeding to the top coat stage (metallic polishes often require longer to dry).
- Apply a high-shine top coat, ensuring the entire design is fully sealed.
Pro-Tip: When using metallic polish for fine line work, ensure the formula is liquid enough to flow easily but pigmented enough to look solid in one stroke. Practice the shape on paper first.
Key Takeaways: Your Quick Guide to Minimalist Bow Manicures
Mastering the art of the minimalist bow comes down to a few core principles. Whether you’re a DIY beginner or looking to refine your technique, keep these pillars in mind for a flawless, elegant result every time.
- The Three Pillars of Minimalist Bow Success
- Precision Over Polish: Invest in a 0.5mm fine liner brush and use a dotting tool for perfect symmetry—precision is the non-negotiable standard for true minimalism.
- The Negative Space Mandate: Utilize sheer base coats and avoid placing the bow near other busy designs; the empty space around the bow is as important as the bow itself.
- Seal Everything: Always encapsulate decals and 3D micro-charms completely in a strong top coat (or builder gel) to ensure the delicate design lasts the entire Christmas season (10-14 days).
- Texture Contrast: Use a combination of matte and glossy finishes (H3 Idea 4) to add depth and interest without relying on heavy color or glitter.
People Also Ask About Minimalist Christmas Bow Nail Techniques
Even with simple designs, achieving a professional finish requires answering a few key technical questions. Here are the most common queries about executing the perfect minimalist bow.
How can I make my hand-drawn bow perfectly symmetrical?
Symmetry is achieved through strategic use of a dotting tool. Start by placing two identical, small dots of polish where the outer edge of the bow loops should meet, ensuring they are equidistant from the center. Then, use a fine liner brush to gently draw the lines from the planned center (the knot) outwards to these two dots, giving you a balanced visual reference point.
What is the best tool for creating micro bow details?
The best tool is a high-quality 0.5mm fine liner brush when paired with a highly pigmented gel polish (which bleeds less and allows for controlled curing). For beginners, perfectly symmetrical bow decals offer the fastest, cleanest result and require only careful sealing with a top coat.
Are 3D bow charms still considered minimalist?
Only micro-sized, highly subtle 3D elements are considered minimalist. If the charm is larger than 2-3 millimeters or has excessive ornamentation (like large rhinestones), it violates the principle of aesthetic restraint. Micro pearls or flat metallic charms are the best way to introduce subtle 3D texture while maintaining the minimalist aesthetic.
How do I prevent my tiny bow lines from bleeding into the base color?
Ensure your base color and any underlying coats are completely dry or cured before beginning the fine line work. Use a highly pigmented liner polish so only a very thin layer is required, and apply the top coat quickly but with a ‘floating’ motion that minimizes brush contact with the fresh bow design.
What base color works best for maximum elegance during the holidays?
Sheer nude, pale pink, or clear base coats work best as they maximize the use of negative space, which is a core tenet of minimalism. This clean backdrop ensures the small bow—whether red, white, or gold—stands out sharply without the overall manicure looking cluttered or heavy.
Final Thoughts
Achieving the perfect minimalist bow is a test of precision, not patience. By focusing on quality tools, maximizing negative space, and choosing high-contrast yet limited color palettes, you can confidently execute these 7 elegant designs for a sophisticated Christmas look that lasts well into 2026. Now that you have the blueprints, which of these genius micro-bow techniques will you be trying for your holiday manicure this June? Let us know in the comments below
Last update on 2026-04-27 / Affiliate links / Images from Amazon Product Advertising API