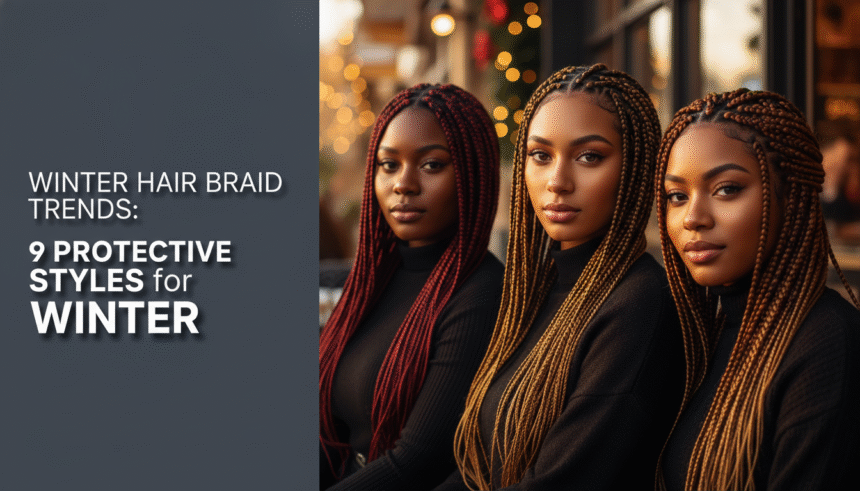
Is your natural hair secretly suffering under the cold, harsh winter air? Low humidity and drying winds are a major challenge, often leading to brittle strands and serious hair damage. Finding the right winter hair braid trends is the crucial step to keeping your hair healthy and protected all season long.
Winter hair braid trends, especially protective styles like Knotless Box Braids, Goddess Locs, and Feed-in Cornrows, are essential during the colder months because they minimize hair manipulation and lock in crucial moisture, shielding natural hair from drying winds and low humidity. These protective styles promote hair growth and retention by creating a barrier against the environmental stress of cold days.
Drawing from comprehensive analysis of current trends and certified stylist recommendations, we guide you through the latest, most effective winter protective styles. This guide leverages proven protective techniques and advanced hair care knowledge. You will discover nine durable, stylish, and functional braid ideas that support healthy hair growth through 2026.
Why Winter Hair Braid Trends Are the Ultimate Protective Styles for 2026
Choosing the right winter protective styles is vital because cold weather inherently compromises the hair’s protein-moisture balance, leading to dryness and breakage. Braids serve as a high-density, low-manipulation shield, preserving the hair’s natural oils and maximizing moisture retention against harsh seasonal changes.
The transition from fall to winter brings a dramatic shift in environmental conditions that severely impacts natural and afro-textured hair. Low outdoor humidity combined with drying indoor heating systems creates a constant threat of winter hair damage. This makes finding the perfect protective style not just a fashion choice, but a necessity for promoting healthy hair growth and retention. By adopting modern winter hair braid trends, you embrace a specialized winter hair care strategy that minimizes daily manipulation, a key cause of breakage.
Certified stylist recommendations confirm that the secret to successfully navigating cold weather hair damage lies in securing hair with low-manipulation styles that offer a barrier. Styles like Knotless Braids and Faux Locs are highly popular not just for their aesthetic appeal but for their functional winter hair care benefits. The following nine trendy options are recognized for their durability, versatility, and proven protective techniques.
9 Winter Hair Braid Trends: Protective Styles to Install for Optimal Health
1. Install Effortless Knotless Box Braids (Low Tension Focus)

Pin this gentle protective style to your ‘Natural Hair Goals’ board!
The low-tension approach of knotless braids makes them one of the best protective styles for the winter, as they minimize stress on the hair follicle, mitigating the risk of thinning edges and breakage. Traditional box braids often create tension at the root, but the knotless technique ensures a smoother transition, which is critical when hair is already delicate due to cold weather. This popular variation allows you to protect hair with braids while maintaining comfortable scalability.
Supplies Needed
- Pre-stretched braiding hair (reduces shedding and bulk)
- Lightweight, anti-itch scalp oil (like tea tree or peppermint oil)
- Cream-based hair moisturizer (essential for natural hair strands)
- Small, medium, or large sectioning clips
- Rattail comb for precise parting
- Mousse or foam for setting and shine
Step-by-Step Directions
- Prep hair for braiding by thoroughly cleansing and applying a protein-moisture balance treatment to strengthen strands.
- Section hair into desired parting size (clean parts are essential for longevity).
- Secure the base of the section using a detangled knotless technique, feeding in the pre-stretched extension hair slowly to avoid tension.
- Braid down the length of the hair, ensuring consistent tension but never pulling at the roots.
- Dip the ends in hot water (or use a steamer) to seal the braids, then blot dry and apply setting mousse.
Pro-Tip: Focus on the health of your scalp microbiome health. Use a lightweight serum on your parts every 2-3 days to avoid dryness and flake build-up, which is common in cold, dry air. Never neglect the underlying hair strands—they still need moisture!

2. Weave in Trending Bohemian Goddess Braids (Moisture Lock Technique)

Save this beautiful moisture-locking style to your ‘Winter Hair Inspo’ board!
Bohemian goddess braids are stylish winter braids that offer excellent moisture retention thanks to the combination of tight braiding and loose, curly pieces. This technique, which uses water wave or deep wave hair, creates a luxurious texture while securing your natural hair base. The elegant winter braids are popular in 2026 for providing both high fashion and high functional winter protection.
Products & Tools Used
- Pre-sectioned braiding hair (for the core braid)
- Water wave or deep wave curly hair (for the loose pieces)
- Braid sealant spray (alcohol-free is crucial)
- Wide-tooth comb for detangling curls before installation
- Edge control gel for sleek parts
- Silk or satin scarf/bonnet for night protection
Styling Steps
- Prepare the natural hair by detangling and moisturizing with a heavy sealant appropriate for cold days (hair + cold weather).
- Begin braiding, but strategically leave out small, equal sections of the curly hair extensions every 1-2 inches.
- Secure the ends of the braids with the curly hair pieces to create a natural, sealed look.
- Apply a generous amount of lightweight mousse to the loose curly sections immediately after installation to set the curl and reduce frizz.
- Maintenance Tip: Gently spritz the loose curls with a braid sheen spray daily, focusing only on the curly hair, avoiding the scalp.
Pro-Tip: The key to long-lasting bohemian braids in winter is using a curl refresher spray (not plain water) daily on the loose pieces and sealing them immediately afterward. This technique maintains hair cuticle integrity against harsh indoor heating systems.

3. Quick and Sleek Jumbo Ghana Cornrows (Time-Saving Protection)

Pin this efficient, chic style to your ‘Quick Winter Styles’ board!
Jumbo Ghana cornrows are a type of feed-in braid that offer maximum coverage and are a quick winter braids solution for short-term protection. Because the braids lie flat against the scalp, they are excellent for cold weather protection by minimizing friction against scarves and collars. This style leverages the feed-in technique to create a seamless, voluminous appearance that remains sleek and defined for weeks.
Supplies Needed
- High-quality braiding gel/wax (for sectioning and sleekness)
- Pre-stretched X-Pression braiding hair (for volume and lightness)
- Edge control brush
- Wide-tooth detangling comb
- Leave-in conditioner for pre-braid moisture base
Styling Steps
- Detangle and apply a rich leave-in conditioner base to clean, damp hair (prepare hair for braids).
- Create clean, symmetrical lines using a rattail comb and apply braiding gel along the parting line.
- Start the cornrow at the hairline, gradually feeding in small sections of extension hair to achieve the jumbo effect as you move backward.
- Braid tightly but without pulling at the root, securing the extension hair seamlessly.
- Finish by smoothing an anti-flaking mousse over the entire style and using a blow dryer on a cool setting to set the style and prevent frizz (taming flyaways braids).
Pro-Tip: Jumbo braids inherently expose more scalp surface area than micro-braids. This increases risk of dry scalp in braids during winter. Use a dropper bottle to apply specialized dermatologist-approved scalp care oil directly to your parts nightly.

4. Maximizing Protection with Trending Soft Faux Locs

Pin these long-lasting, protective locs to your ‘Long-Term Hair Protection’ board!
Faux locs are durable winter braids that offer maximum protection and longevity, making them an excellent choice for avoiding daily hair manipulation throughout the season. These styles, often lasting 8-10 weeks, are ideal for long winter braids protective goals, completely securing the natural hair. Experienced braiders guide the installation, ensuring that the natural hair is wrapped and sealed effectively against the dry winter environment.
Materials Needed
- Marley or Kinky Bulk hair (for wrapping the loc)
- Water Wave/Deep Wave hair (for the soft, natural ends)
- Crochet needle (if using the crochet method)
- Lightweight hair oil (to use on natural hair before wrapping)
- Liquid braid refresher spray
- Plastic wrapping strip or clips
Styling Steps
- Braid the natural hair into a secure base braid (either individually or using a cornrow pattern).
- Begin wrapping the Marley hair tightly around the base braid, starting close to the scalp but without excessive tension.
- Incorporate the Water Wave hair at the ends or along the shaft for the signature soft/distressed look.
- Continue wrapping evenly until the desired length and thickness is achieved, securing the end with a knot or glue.
- Maintenance Tip: Mist the scalp and entire length with a braid refresher spray (wash braids) 2-3 times per week to prevent natural hair dryness winter.
Pro-Tip: Faux locs are heavy and can cause thinning edges braids if installed too tightly or worn for too long. Limit the wear time to 8-10 weeks maximum. When moisturizing, focus on the base, where your natural hair is contained, to support follicular health winter.

5. Achieving Versatile Micro Braids (Elegant and Chic Winter Look)

Pin this versatile look to your ‘Professional Winter Styles’ board!
Micro braids are highly intricate winter braids, prized for their ability to be styled almost identically to loose hair, providing versatile winter braids without compromising hair elasticity protection. While they require significant micro-braiding precision and installation time, they offer long-term, sophisticated winter braid looks perfect for professional or formal settings throughout the season.
What You Need
- High-quality human or synthetic micro-braid hair extensions
- Anti-breakage leave-in spray (to apply to hair base)
- Light hold gel or cream for precise parting (micro-braiding precision)
- Tiny hair ties or thread (for securing ends)
- Fine-tooth comb for micro-parting
Styling Steps
- Prep: Ensure hair is deeply conditioned and detangled. Apply anti-breakage spray generously before starting.
- Section hair into very small, uniform squares or boxes—consistency is vital for the finished look.
- Braid the extension hair into the natural hair starting close to the root. Maintain gentle and even tension throughout the entire braid.
- Secure the end of the braid using a tiny rubber band or knotting with thread, ensuring the ends are sealed to prevent unraveling.
- Daily Routine: Style winter braids by wrapping tightly in a silk scarf overnight. Use a moisturizing mist every morning to refresh the length and keep the scalp hydrated.
Pro-Tip: Micro braids can stress the hair strand tensile strength during removal. To prevent breakage, never use scissors near your natural hair. Soak the braids in conditioner and oil for several hours before gently unraveling, strand by strand.

6. Design Seamless Feed-In Braids (Natural Look for Short Term Protection)

Pin this natural-looking protective style to your ‘Everyday Winter Looks’ board!
Feed-in braids are quick winter braids that use a clever technique to introduce extension hair seamlessly, resulting in natural hair winter braid styles with minimal tension at the hairline. These styles are a favorite for short-term protection, typically lasting 2-4 weeks. By securing braids close to the scalp, they offer excellent cold weather protection and are perfect for those who need frequent styling flexibility.
Supplies Needed
- High-density braiding hair (for the seamless feed-in)
- Liquid styling foam (to keep sections neat)
- Strong-hold edge tamer (for the perimeter)
- Fine-tipped oil applicator bottle (for precise scalp moisturizing)
- Thermal protector spray (for sealing the ends)
Styling Steps
- Apply edge tamer around the perimeter and use a rattail comb to create razor-sharp parts.
- Begin a small cornrow using only your natural hair for the first few stitches.
- Gently introduce a tiny piece of extension hair (the feed-in technique) after 3-4 natural stitches.
- Continue adding increasingly larger pieces of extension hair as you move down the braid, creating a gradual thickness change.
- Finish the ends by either braiding all the way down or wrapping them tightly and setting them with a thermal protector and a blow dryer.
Pro-Tip: The seamless look depends on perfectly clean parts. Before applying any extension hair, saturate your natural hair sections with a lightweight anti-frizz serum to keep the strands neat and ready for braiding. This prevents hair breakage from braids at the point of attachment.

7. Try Lightweight and Natural-Looking Marley Twists (Twist Alternative)

Pin these lightweight twists to your ‘Protective Twist Styles’ board!
Marley twists are an excellent alternative to box braids, providing a lightweight option among winter hair braid trends while effectively securing hair and promoting retention. Utilizing kinky bulk Marley hair gives these twists a natural texture and reduces the strain often associated with heavier braids. This style is especially valued for its low manipulation styling benefits and ease of installation.
Products & Tools Used
- Marley hair (kinky bulk, known for texture)
- Twisting butter or cream (to moisturize natural hair during twisting)
- Setting foam (for a smooth, defined finish)
- Wide-tooth comb
- Butterfly clips for sectioning
Styling Steps
- Prep: Fully detangle hair and generously apply a twisting butter or cream to each section of natural hair (apply hair products).
- Take a section of natural hair and twist it with two pieces of Marley hair, ensuring the natural hair is concealed within the twist.
- Use a two-strand twist technique (twists, not braids) down the entire length, twisting tightly enough to hold but loose enough to prevent tension.
- Secure the ends by rolling and sealing with a setting foam, or by dipping briefly in hot water (process action keywords: secure braids).
- Refresh Routine: Focus on moisturizing the base and shaft daily with a hydrating spray. The twists tend to absorb moisture quickly, making hydration critical during winter months (systems to moisturize).
Pro-Tip: The fuzzy texture of the Marley hair offers great protection against winter hair static and allows the style to blend more naturally with afro-textured hair. However, it requires a weekly application of setting foam to prevent frizzy winter braids.

8. Customize Your Look with Box Braids and Color Accents (Trending Variation)

Pin this fashionable color blend to your ‘Winter Braids Color Ideas’ board!
Classic box braid styles remain popular, but the newest trend involves customizing braids with color accents and accessories, offering a unique winter braid ideas without chemical processing. Using colored braiding hair, you can achieve a trendy winter braids look, such as a subtle ombre or dipped ends, ensuring your natural hair remains fully protected from harsh dyes and styling.
What You Need
- Regular braiding hair (base color)
- Colored braiding hair (for accents/ombre)
- Metal or wood hair accessories (beads, cuffs)
- Clear elastic bands
- Hair clips for sectioning
Customization Steps
- Install the core box braid using the base color extension hair, braiding down about two-thirds of the desired length.
- Introduce the colored extension hair when you want the color shift to begin (customize braids). Ensure the transition is smooth by overlapping the base and accent colors for several stitches.
- Finish the braid with the colored hair. If using a high-contrast color (like icy blue), ensure the ends are securely sealed to prevent the extension hair from fraying.
- Accessory Placement: Add braid accessories like gold cuffs or wooden beads starting about 2 inches down from the scalp, pushing them up gently to sit securely.
Pro-Tip: If you choose a dramatic color change, ensure the ends are sealed by dipping them in hot water or using a light glue sealant. This prevents the ends from becoming dry and brittle, especially when facing winter hair damage from friction with winter coats and scarves.

9. Master Styling and Protecting Braided Updos (The Refreshed Look)

Pin this easy braided updo to your ‘Braids Styling Hacks’ board!
Braided updos are the ultimate low manipulation styling benefits solution for refreshing long braids, offering a sophisticated look while providing necessary thermal protection braiding. Styling your braids into buns or chignons is the best way to protect hair ends from friction damage caused by high collars, scarves, and heavy winter coats. This is a crucial step in how to style long braids in winter.
Tools Required
- Strong, non-damaging hair ties (or Bunji bands)
- Extra-long hair pins (to secure the bulk)
- Flexible hold hairspray or sheen spray
- Satin or silk-lined hat (for outdoor protection)
Styling Steps
- Moisturize: Begin by misting the scalp and the first 2-3 inches of the braids with a hydrating spray (refresh braids).
- Gather all braids into a high or low ponytail, securing gently with a non-slip hair tie.
- Twist the entire ponytail section into a large rope, being mindful not to twist too tightly at the base (protect hair).
- Coil the rope around the ponytail base to form a bun or chignon.
- Secure the style using extra-long hair pins, pushing them into the base of the updo, not through the scalp. Finish with a light spritz of flexible hairspray.
Lesson Learned: The biggest risk of long braids in winter is friction against heavy wool coats and scarves, which can lead to rapid winter hair damage and frizzing of the ends. Always style your braids up and away from the neck/collar area, or wear a satin-lined hood or scarf to minimize this oxidative stress hair.

Key Takeaways: Your Quick Guide to Mastering Winter Protective Braiding
- Moisture is Non-Negotiable: During cold weather, apply a specialized, lightweight scalp oil and braid spray daily to prevent preventing hair dryness winter and breakage, as the dry air quickly absorbs hydration.
- Focus on Low Tension: Prioritize styles like Knotless Box Braids or Feed-in Braids to protect the delicate follicular health winter and prevent thinning edges.
- Seal Against Friction: Always style long winter braids away from heavy coat collars or wear a satin-lined scarf to mitigate the winter hair damage caused by friction.
- The Two-Part System: Successful winter braids require both high-quality materials/tools and diligent daily care for braided hair routines to maximize longevity.
- Longevity Limits: Even the most durable styles, like Faux Locs, should only be kept for a maximum of 8-10 weeks to prevent matting and excessive natural hair dryness.
- Address Scalp Health: Use a dropper bottle for precise application of anti-itch serum directly to the scalp partings to manage the scalp microbiome health and combat flakiness.
- Post-Braid Care: Preparing and removing braids safely is as critical as installation; use deep conditioning treatments immediately after removal to restore hair elasticity protection.
FAQs About winter hair braid trends
What are the top protective braid styles for winter?
The best protective braid styles for winter are those that minimize hair manipulation and allow easy access to the scalp for moisturizing, such as Knotless Box Braids, Jumbo Cornrows, and Faux Locs. These styles secure the natural hair strands, shielding them from the harsh, dry air that causes winter hair damage. We recommend choosing styles with less tension at the root, maintaining the integrity of the hair follicles during the cold months.
How to protect hair with braids in winter?
To protect hair with braids in winter, focus heavily on moisture retention and physical protection. Use a light, water-based braid spray daily to hydrate the mid-shaft and ends, and apply oil directly to the scalp using a dropper. When outdoors, cover your hair with a silk or satin-lined hat or hood, as this physical barrier is crucial for preventing friction and moisture loss due to cold, dry air.
Are knotless braids good for winter?
Yes, knotless braids are ideal for winter as they are one of the most gentle protective braiding styles, significantly reducing tension on the scalp and edges. The knotless technique minimizes the risk of thinning edges, which is crucial during winter when hair is already prone to brittleness. Their versatility also allows for easy styling into updos, further reducing friction damage from winter coats and scarves.
How long do winter braids last?
Most professional winter braids, such as box braids and faux locs, are designed to last between 6 to 10 weeks, depending on the hair’s natural growth rate and maintenance routine. Styles worn past the 10-week mark increase the risk of matting, dirt build-up, and breakage upon removal. For hair health, certified stylist recommendations suggest refreshing the edges and cleansing the scalp every 2-3 weeks to maximize longevity.
Can braids prevent hair damage in cold weather?
Braids can effectively prevent hair damage in cold weather by functioning as a physical shield against low humidity and harsh winds. When properly installed and maintained, braids minimize daily manipulation, which is a major cause of breakage. By sealing the natural hair within the extension, braids help maintain the protein-moisture balance necessary for hair strand tensile strength during the dry season.
How to keep scalp moisturized with winter braids?
To keep the scalp moisturized with winter braids, apply a lightweight, anti-itch oil blend directly to the parts using a narrow-tipped applicator bottle 3-5 times per week. Avoid heavy products that can clog pores or lead to product buildup, which exacerbates dry scalp in braids. Focus on specialized winter hair products that contain ingredients like peppermint, tea tree, or jojoba oil for soothing hydration.
What products should I use for winter braids?
The best products for winter braids include a leave-in braid spray, a lightweight sealing oil (like avocado or almond), and a non-flaking edge control. It is critical to use products specifically formulated for braided hair that are water-based and non-greasy to avoid product accumulation. These products work together to moisturize scalp and prevent the braids from becoming brittle during the cold days.
What is the difference between winter and summer braids?
The primary difference lies in the maintenance routine and focus: summer braids often prioritize lighter styles and frequent washing due to heat and sweat, while winter protective styles prioritize moisture retention and sealing against dry air. Winter braids require richer, though still light, moisturizing products, and require less frequent washing to preserve the natural oils against cold weather hair.
How to style long braids in winter?
The best way to style long braids in winter is to wear them in low-manipulation updos, buns, or twists that keep the ends tucked away from your coat and neck. When wearing them down, use a silk scarf to protect the mid-shaft and ends from friction. This practice of securing braids in high or low protective styles drastically reduces the risk of frizz and prevents damage to the hair cuticle integrity.
How to prepare hair for winter braids?
Preparation involves strengthening and moisturizing the hair’s foundation before installation. This includes a thorough clarifying wash, a deep conditioning treatment, and a protein treatment (if needed) to ensure the hair has the necessary hair elasticity protection. Hair must be fully detangled and slightly stretched before braiding to minimize tension and reduce the risk of breakage once the protective style is installed.
Final Thoughts on Winter Hair Braid Trends
Selecting one of these 9 winter hair braid trends is the first step toward a successful protective season. Whether you choose the low-tension ease of Knotless Box Braids or the elegance of Faux Locs, the core strategy remains the same: use your style as a shield. The goal is to minimize manipulation, maximize moisture, and adhere to a diligent care routine that addresses the challenges of low winter humidity.
Remember that even the most durable protective styles require proactive scalp health management and conscious avoidance of friction damage from heavy winter fabrics. By following these expert tips and prioritizing the health of your natural hair foundation, you can ensure your winter protective styles not only look beautiful and on-trend for 2026 but also promote healthy hair growth and retention throughout the cold months.
Which of these protective styles will you install protective styles first this April? Let us know your favorite winter braid ideas in the comments!
Last update on 2026-04-21 / Affiliate links / Images from Amazon Product Advertising API