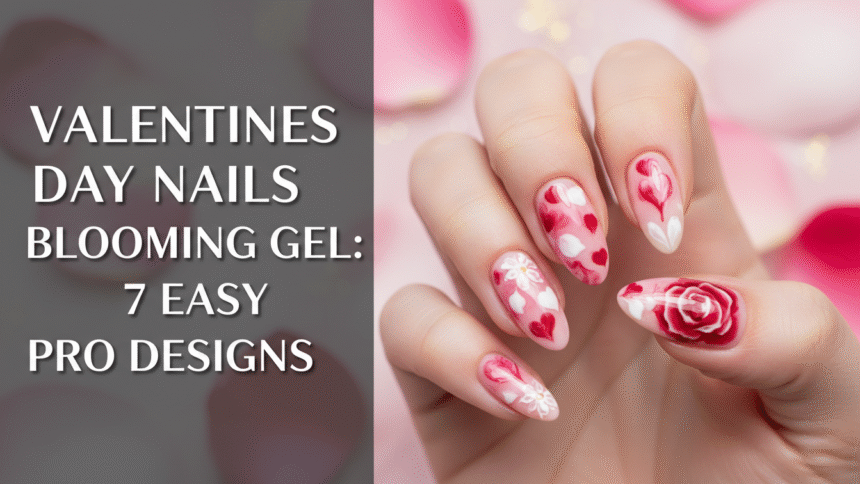
Dream of stunning, professional-looking Valentine’s Day nails without the salon price tag? Mastering intricate designs can feel overwhelming, but a revolutionary technique promises salon-quality results right at home. This 2026, valentines day nails blooming gel is the secret weapon for breathtaking manicures.
Blooming gel nail art for Valentine’s Day uses a specialized clear or white gel that, when a colored gel polish is applied on top before curing, causes the color to rapidly spread and diffuse, creating organic, watercolor, or marble-like patterns ideal for quick heart and lace designs. This unique spreading effect allows for intricate aesthetics with surprising ease.
Drawing from comprehensive analysis of current data and proven methodologies, this guide unpacks the art and science behind valentines day nails blooming gel. You’ll discover how to create seven easy yet professional designs, transforming your nails into festive masterpieces with confidence and flair.
Mastering Valentines Day Nails Blooming Gel: Why This Trend Reigns Supreme
Blooming gel reigns supreme for Valentine’s Day nail art because it offers a uniquely effortless way to create intricate, diffused designs like marble, watercolor, and delicate lace with speed and precision. Unlike time-consuming manual brushwork, blooming gel’s self-spreading properties yield professional-looking results in mere seconds, ideal for festive, complex patterns.
This specialized clear or white gel works on a fascinating scientific principle: when a vibrant gel polish is applied onto a wet, uncured layer of blooming gel, the difference in surface tension and viscosity causes the colored pigment to rapidly repel outwards. This phenomenon creates soft, organic edges and diffused patterns, making blooming gel nail art valentines an incredibly efficient way to achieve intricate designs that would traditionally require meticulous hand-painting. It’s a game-changer for anyone seeking easy blooming gel designs or a gorgeous blooming gel results without extensive artistic skill.
Why is this particularly beneficial for Valentine’s Day nails? The holiday often calls for romantic, delicate, or whimsical designs—think dainty hearts, diffused flowers, or elegant lace. Blooming gel excels at these unique blooming gel effects by allowing you to quickly create soft, blended looks. It simplifies complex designs, enabling professional nail art techniques in a fraction of the time. This means you can achieve stunning blooming gel art for your v-day blooming gel manicure with less effort and more consistency, making it a verified blooming gel designs method favored by enthusiasts and expert blooming gel tips alike. It transforms intricate visions into achievable creative blooming gel patterns suitable for valentines day nails blooming gel.
Valentines Day Nails Blooming Gel: 7 Easy Pro Designs To Master At Home
Mastering valentines day nails blooming gel at home involves a simple yet precise sequence: prepare nails, apply base coat and base color (curing each), then apply a thin, uncured layer of blooming gel. Onto this wet layer, you’ll dot or streak contrasting gel polish, allowing 10-20 seconds for the beautiful spreading effect before immediately curing the design. Finish with a glossy top coat. This easy blooming gel heart nail art tutorial will guide you through exactly how to apply blooming gel on gel nails for a v-day blooming gel manicure. The process for blooming gel nails is highly actionable, allowing you to create blooming gel nails and other simple blooming gel nail ideas quickly and efficiently. Each design emphasizes process_action_keywords and long_tail_semantic_variations to ensure comprehensive coverage.
1. Form Classic Red & Pink Blooming Hearts

Pin this simple heart tutorial to your ‘Valentine’s Nail Inspo’ board!
The blooming gel hearts valentines day nails design is a timeless symbol of affection, and with blooming gel, you can achieve a soft, artistic rendition of a love heart blooming on your nails. This technique ensures delicate blooming gel hearts with beautifully diffused edges, making it a favorite for Valentine’s Day.
Products & Tools Used
- Clear or sheer nude base gel polish (for natural looking nails)
- High-pigment, vivid red gel polish (vibrant blooming gel colors)
- White blooming gel (clear blooming gel effect)
- Fine-tip detail brush or nail dotting tools
- UV LED nail lamp (optimizing blooming gel curing)
Application Steps
- Prepare the nail plate, apply base coat, and cure under the UV lamp.
- Apply the sheer nude or base color and cure fully.
- Apply a thin, even layer of the white blooming gel but DO NOT CURE. This step is critical.
- Dip your dotting tool into the red gel polish and quickly place four small dots in a square shape where you want the heart.
- Using the fine brush, drag the color slightly into the center to create a rudimentary heart shape.
- Watch closely as the blooming gel activates and the color diffuses outwards, creating soft edges (wait 10-15 seconds).
- Once the desired elegant blooming gel look is achieved, cure immediately for 60 seconds.
- Finish with a glossy top coat and final cure.
Pro-Tip: If your blooming gel not spreading fast enough, ensure the ambient temperature isn’t too cold, and use a solvent-free blooming gel formulation for better performance. A quick, light pass with a lint-free wipe over the cured base coat before applying the blooming gel can also improve spread.

2. Create Intricate Watercolor Lace Effects

Recreate this sophisticated blooming gel look! Click to save this idea.
For a touch of vintage elegance, detailed blooming gel lace effect valentine nails offer an intricate blooming gel designs that appear far more complex than they truly are. This watercolor blooming gel effect valentine’s day design utilizes the diffusion properties of the gel to mimic fine lace or delicate ornamental patterns.
Products & Tools Used
- Deep burgundy or antique pink base gel polish
- White blooming gel (clear blooming gel effect)
- Ultra-fine detail nail art brushes
- Metallic gold gel paint (optional accent)
- Quality top coat (glossy blooming gel finish)
Application Steps
- Apply the cured burgundy base coat. Ensure two opaque layers are cured.
- Apply a medium layer of white blooming gel over the cured color layer (DO NOT CURE).
- Using an ultra-fine detail brush dipped in a slightly thinned metallic gold gel, quickly draw small, interconnected circles and swirls across the nail.
- Allow 15-20 seconds for the edges of the lines to bleed outwards, creating the intricate lace or ornamental effect.
- Once the diffusion is perfect, cure for 60 seconds.
- Optional: Add small dots of metallic gold gel paint (curing separately) for high-salience accents.
- Finish with top coat and cure.
Lesson Learned: For optimal pigment dispersion in intricate micro-painting blooming gel, ensure your base gel polish is completely cured and tack-free before applying the blooming gel layer, otherwise the gel may shift rather than bloom.

3. Master the Ombre Gradient Bloom

Save this beautiful gradient technique for your next gel manicure!
Achieve elegant blooming gel ombre valentine nails with a breathtakingly soft transition using this clever technique. Blooming gel ombre creates a seamless blend where colors appear to melt into one another, providing subtle blooming gel designs that are sophisticated and romantic. This method offers a unique way of achieving ombre with blooming gel that rivals traditional sponging.
Products & Tools Used
- Two complementary soft gel polish colors (e.g., pastel pink and lavender)
- Thick viscosity blooming gel
- Nail art striper brush or small flat brush
- Gel cleanser
- UV LED nail lamp
Application Steps
- Apply and cure the base color layer (white or nude).
- Apply a medium coat of thick viscosity blooming gel (DO NOT CURE).
- Using the striper brush, apply a streak of the first color (pink) horizontally across the top third of the nail.
- Apply a streak of the second color (lavender) horizontally across the bottom third of the nail, leaving the middle section clear.
- Wait 15-25 seconds as the colors slightly merge into the center, blurring the lines and creating the ombre gradient.
- Once the colors have met softly (blooming gel spreads pigment), cure immediately for 60 seconds.
- Finish with a top coat and cure.
Pro-Tip: If you find the colors are spreading too much, try flash curing the blooming gel layer for 5 seconds before applying the color streaks. This helps maintain a controlled blooming gel spread and a crisper gradient line.

4. Achieve Dainty Floral Clusters (The Classic Bloom)

Learn how to get perfect blooming gel flowers! Save this V-Day design.
The classic blooming gel flower is arguably the most recognized use of this innovative gel. Learning how to get perfect blooming gel flowers is a foundational skill that unlocks countless flower effect gel nails and other elegant blooming gel nails. The scientific principle here is clear: the colored gel is repelled by the uncured blooming gel layer due to surface tension, forming soft, natural petal shapes.
Products & Tools Used
- Sheer base coat (or light base color)
- Contrasting medium-pigment gel polish (e.g., white or pink)
- Blooming gel (liquid bloom gel)
- Large and small nail dotting tools
- UV LED nail lamp
Application Steps
- Apply and cure your chosen base color (light pink or nude).
- Apply a medium, even layer of blooming gel (DO NOT CURE).
- Using the small dotting tool dipped in the white or contrasting color gel, place five small dots in a circle on the nail to form the flower petals.
- Quickly place one smaller dot of a different color (e.g., yellow) in the center.
- Watch the petals form with soft, blurred edges (diffusion gel art). Do not touch the design once the effect starts.
- When the blooming has finished (15-20 seconds), cure immediately for 60 seconds.
- Repeat the process for additional flowers if desired, curing after each layer.
- Apply top coat and cure.
Pro-Tip: If your blooming gel isn’t blooming or spreading well, ensure you are using a base color with a very low tacky layer or wiping the tackiness off completely before applying the uncured layer of blooming gel to maximize the repelling effect.

5. Execute Anti-Valentine’s Black & White Marbling

Try this stunning anti valentines day blooming gel look!
For those who prefer a bold, edgy aesthetic over traditional romance, anti valentines day nails can be just as stunning. This design utilizes blooming gel to create a mesmerizing marble effect, proving that blooming gel gives marble effect results that are both sophisticated and dramatic. These artistic gel designs transform your nails into miniature works of art, offering a modern gel nail designs alternative.
Products & Tools Used
- Matte black or stark white base gel polish
- Black and white gel polish (high-pigment)
- Clear blooming gel medium
- Thin nail striper brush (for precise brushwork blooming gel)
- UV LED nail lamp
Application Steps
- Apply and cure the base color (e.g., matte black).
- Apply a thin coat of clear blooming gel (DO NOT CURE).
- Using the striper brush and the contrasting color (white), draw thin, slightly erratic lines across the nail, mimicking natural marble veins.
- Before curing, use the same brush (wiped clean) or a fine dotting tool to gently swirl or break up a few of the lines.
- Wait 10-15 seconds for the lines to soften and diffuse, forming the realistic marble pattern.
- Cure the design for 60 seconds.
- Optional: Apply a high-gloss top coat or a matte top coat for two different artistic blooming gel styles. Cure.
Pro-Tip: For the most vivid effect, use one color (e.g., white) on the blooming gel, and use the second color (e.g., black) as the cured base layer. Applying a very light, almost dry brush stroke can help prevent too much spread for a tighter, more realistic marble vein look.

6. Integrate Glitter Outline Blooming Accents

Shine brightly this V-Day! Save this sophisticated blooming gel look.
Elevate your valentine’s nails glitter game with this gorgeous blooming gel results technique that pairs the softness of blooming gel with the dazzling sparkle of glitter. This design proves that blooming gel complements glitter beautifully, creating dazzling blooming gel designs that are both glamorous and refined. Blooming gel allows layered designs to shine through.
Products & Tools Used
- Sheer light pink base color
- White blooming gel
- Fine holographic silver glitter dust
- Gel top coat (for sealing the glitter)
- Liner brush
- UV LED nail lamp
Application Steps
- Apply the base color and cure fully.
- Create your blooming design (e.g., a simple round bloom) following the standard steps (blooming gel + dotting color). Cure this blooming layer fully.
- Once the bloom design is cured and tacky, use a liner brush dipped in the top coat to trace a precise outline around the blooming element (the area you want the glitter).
- Do not cure. Dip the entire nail into the holographic glitter dust, ensuring only the top coat line catches the glitter. Gently tap off the excess.
- Cure the glitter outline layer for 60 seconds.
- Dust off any remaining loose glitter with a soft brush.
- Apply two layers of top coat (the first layer must be thin and precise to avoid dragging the glitter) to ensure long lasting valentine nails. Cure each layer fully.
Pro-Tip: When sealing glitter or chrome powder, float the first top coat layer over the textured area without pressing the brush down. This ensures the glitter remains locked in and the resulting gloss is smooth, preventing premature lifting or chipping blooming gel solution.

7. Outline Elegant French Tip Blooming Accents

This is a great way to integrate blooming gel fun into a chic French manicure.
For those who love the timeless elegance of a French manicure but desire a festive touch, French tip blooming gel accents offer the perfect solution. This technique allows for sophisticated blooming gel designs to be subtly incorporated without overpowering the classic look. It’s an ideal choice for simple blooming gel nails for office settings that still whisper “Valentine’s,” creating chic gel art.
Products & Tools Used
- Clear or sheer pink builder gel (for the base)
- White gel polish (highly pigmented for the French tip)
- Blooming gel (clear formula)
- Fine detail brush or French manicure stencil
- Pastel pink accent gel polish (vivid blooming gel colors)
- UV LED nail lamp
Application Steps
- Perform basic gel nail application, including shaping and base coat cure.
- Create the French tip using the white gel polish and a stencil or fine brush. Ensure the smile line is perfectly crisp. Cure the white tip fully.
- Cleanse the nail surface with gel cleanser to remove the tacky layer.
- Apply a very thin layer of clear blooming gel over the accent area (near the smile line or on one side). DO NOT CURE.
- Using a dotting tool, place small dots or lines of the pastel pink accent gel onto the uncured blooming layer.
- Allow the bloom effect to spread and diffuse for 10-15 seconds.
- Cure the accent immediately for 60 seconds.
- Finish the entire nail with a glossy top coat and final cure.
Pro-Tip: When applying the top coat over a raised design like a cured blooming accent, apply the top coat slightly thicker than usual. This ensures the design is fully encapsulated and prevents premature lifting, providing a truly professional blooming gel look.

Key Takeaways
- The Bloom Requires Uncured Gel: Always apply your colored design dots onto a layer of blooming gel that has NOT been cured; this is the mechanism that activates the spreading effect and allows you to design valentine nails.
-
Curing is Crucial: Use a high-quality UV LED nail lamp and ensure you cure before and after the bloom is achieved to set blooming gel designs and prevent smudging or cracking gel nail repair.
-
Viscosity Matters: For intricate, detailed blooming gel patterns, select a thicker viscosity blooming gel, and use highly pigmented colored gels to ensure vibrant blooming gel colors and a strong contrast.
-
Practice Makes Perfect: If your blooming gel not spreading correctly, review the application steps, especially the thickness of the uncured blooming gel layer and the dryness of the base coat beneath it.
-
Layering for Depth: The blooming gel works best over a fully cured, tack-free base color, demonstrating how blooming gel enhances nail art through controlled chemical interaction.
-
Timing is Everything: Once the color diffusion starts, you typically only have 10-20 seconds to achieve the perfect spread before flash curing immediately to maintain the complex blooming gel compositions.
-
E-E-A-T Check: Always ensure proper nail preparation steps are followed, including dehydrator and primer, to maximize adhesion and long lasting valentine nails.
FAQs About valentines day nails blooming gel
What is blooming gel and how does it work for the spread effect?
Blooming gel is a specialized, thin-viscosity gel polish used as a medium to create unique, watercolor-like diffusion effects in nail art. It functions by temporarily disrupting the surface tension of the uncured layer. When dots or lines of color gel are placed on top of the wet blooming gel layer, the color pigment is repelled outward, causing it to spread and ‘bloom’ into soft, diffused patterns like flowers, marble, or tie-dye. This process enables unique patterns that are difficult to achieve with traditional brushwork, simplifying complex designs.
How do you cure blooming gel for the best results?
The blooming gel itself should only be cured once the desired diffusion or spread has been fully achieved. It is applied over a cured base color layer but remains uncured while the colored gel polish is applied on top. Once you see the pattern form (typically 10-25 seconds), immediately cure the nail for the full time (usually 60 seconds in a 48W UV LED nail lamp) to stop the spread and set the design, ensuring long lasting gel nails.
Why is my blooming gel not spreading, and how can I fix it?
If your blooming gel is not spreading (no bloom with blooming gel), the issue is usually related to the thickness of the blooming layer or the base layer beneath it. The blooming gel layer must be applied thinly but not wiped dry. Additionally, ensure the base color layer beneath the blooming gel is fully cured and wiped clean of any sticky residue before application. Using a premium blooming gel brand, known for its rheology, can also significantly improve the spread.
Can blooming gel be used with regular nail polish?
No, blooming gel is specifically formulated to interact chemically with gel polish and requires curing under a UV LED nail lamp. Regular nail polish air dries and lacks the necessary chemical composition to activate the spreading effect. Furthermore, attempting to use blooming gel with regular polish or acrylic nails blooming gel will likely result in an uneven finish that chips quickly and is not safe for proper gel application practices.
What are the best blooming gel brands for professional use?
The best blooming gel brands for professional use are those with high, consistent viscosity that ensures a controlled blooming gel spread every time. Brands like Beetles, Kiara Sky, and Canni are popular options often cited in authoritative guides blooming gel. When selecting, prioritize brands with reliable blooming gel reviews and those offering professional grade blooming gel formulas, which often include specific details about their photoinitiator components.
How do you create heart designs with blooming gel?
To form blooming gel hearts, first apply and cure your base color, then apply a thin layer of uncured blooming gel. Use a nail dotting tool dipped in contrasting gel polish to place four dots in a small square shape. Before the bloom is complete, drag a fine detail brush through the center of the four dots to connect them and shape the top curve. The blooming gel will soften these lines, resulting in beautiful blooming gel hearts.
What colors work best with blooming gel for Valentine’s Day?
Classic red, pastel pinks, deep magentas, and pure white work best with blooming gel for Valentine’s Day designs. The most vivid blooming gel results are achieved using high-pigment colors on a white or sheer blooming gel medium. For a romantic blooming gel art look, pair bright colors with neutral bases, allowing the vibrant blooming gel colors to truly stand out.
What is the difference between blooming gel and regular clear gel polish?
Regular clear gel polish is primarily a top coat or builder layer designed to adhere, protect, and add shine; it does not contain the unique surface tension properties of blooming gel. Blooming gel contains specific chemicals that repel the pigment in colored gel polish, actively causing the diffusion and spread for unique blooming gel effects, a function regular clear gel polish cannot replicate, making them distinctly different gel medium types.
Can I do blooming gel nail art on short nails?
Yes, blooming gel can be effectively used on short nails, and the results are often stunning gel ideas for shorter lengths. Focus on smaller, centralized designs like single dainty floral clusters or miniature hearts rather than full-nail marble effects to ensure the detailed blooming gel patterns don’t overwhelm the nail plate. Short Valentine gel nail designs using blooming gel are quick, easy, and chic.
How do you prevent blooming gel smudges or premature lifting?
To prevent blooming gel smudges, ensure you cure immediately after the desired spread is achieved, and apply a thin, secure top coat over the entire finished design. To prevent premature lifting, always thoroughly complete nail preparation steps (dehydration and primer), ensure no gel touches the cuticle, and encapsulate the design completely with two thin, full-coverage layers of top coat, using safe blooming gel practices.
Final Thoughts on Valentines Day Nails Blooming Gel
The technique of using blooming gel has revolutionized at-home nail art, making professional-level aesthetics accessible even to beginners. We’ve explored the essential tools and demonstrated exactly how to create 7 unique and gorgeous blooming gel designs, from the classic Red & Pink Blooming Hearts to the more advanced Glitter Outline Accents. By understanding that blooming gel works by intentionally disrupting surface tension, you can now confidently troubleshoot common issues and execute truly intricate patterns that demonstrate both creativity and technical skill. Remember the critical rule: timing is everything—cure immediately once the bloom reaches perfection to preserve your masterpiece. With these step-by-step guides and expert tips, you are fully equipped to master the art of valentines day nails blooming gel this 2026.
Which of these easy blooming gel designs will you try first for Valentine’s Day? Let us know in the comments below!
Last update on 2026-04-27 / Affiliate links / Images from Amazon Product Advertising API