Dreaming of the perfect Valentine’s Day manicure? Salon visits are expensive, and intricate nail art can feel impossible at home. Many struggle with achieving gorgeous valentines day nails aura without messy application or designs that chip too quickly.
Aura nails for Valentine’s Day are manicure designs featuring a concentrated burst of color or ‘glow’ at the center of the nail, subtly fading outward to mimic an energy field or soft gradient. They typically use romantic colors like pink, red, or purple and are often achieved using a makeup sponge, eyeshadow, or a mini airbrush tool for a diffused, easy effect. Drawing from comprehensive analysis of current trends and proven nail art methods, this guide unpacks the art of aura nails. You’ll discover five distinct, easy-to-recreate designs to achieve salon-quality results at home, ensuring your festive manicure glows with confidence this 2026.
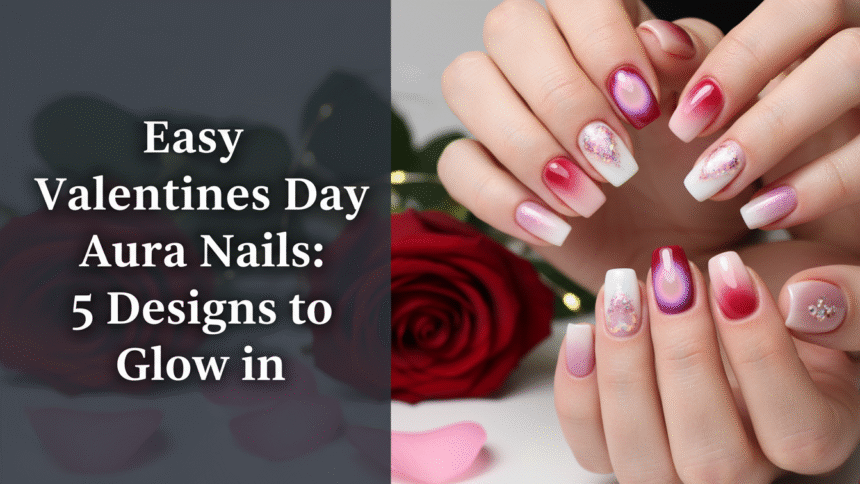
How To Create Glowing Valentines Day Aura Nails At Home
Creating valentines day nails aura at home allows you to express your romantic side with a trending aura nail design that looks professionally done. These designs are perfect for adding a touch of love positive energy to your look for the holiday. Whether you’re aiming for pink aura nails or a bold red aura nails effect, the key is understanding how to achieve that diffused, soft glow without complex tools. We’ve gathered the best aura nails for valentines to help you transform your nails into a canvas of love. You can easily do at home nails using accessible methods, turning even intricate romantic aura nails into a quick easy nails project.
Each valentine aura nail designs tutorial below focuses on practical, diy aura nails valentine techniques, utilizing professional grade nail supplies that are readily available. From simple aura nails valentine for beginners to gorgeous nail ideas with a metallic twist, we’ll walk you through each step. We’ll leverage specific tools to achieve glowing nails and explore how different attributes like shape (long almond shape pink aura nails) enhance the overall aesthetic. Get ready to create aura nails that truly shine.
1. The Classic Dreamy Pink Aura Nail

Pin this dreamy pink design to your ‘Valentine’s Day Nail Inspo’ board!
The classic dreamy pink aura nail is achieved through careful sponge blending, creating a soft, ethereal glow at the center of the nail that elegantly fades outward. This simple aura nails valentine design highlights the versatility of pink aura nails, making it a go-to for many. It emphasizes a beautifully blended aura nails effect on a preferred long almond shape pink aura nails, demonstrating how specific attributes contribute to the overall aura aesthetic. The technique leverages the polish that creates the aura effect.
Products & Tools Used
- Sheer nude or clear builder base coat (for optimal substrate preparation for optimal adhesion)
- Bright, hyper-pigmented pink jelly gel polish (or color of choice for vibrant aura)
- Matte makeup blending sponge or fine-tip nail art brush
- Non-wipe top coat (for glossy aura finish)
- UV/LED curing lamp (optimized for 48W or higher)
- Isopropyl alcohol and lint-free wipes
Application Steps
- Prepare the Nails: Apply base coat and cure according to lamp spectrum optimization instructions. Cleanse nail with alcohol.
- Apply the Base: Apply 1-2 thin coats of the sheer nude gel polish for the foundational ‘canvas’ and cure each layer fully.
- Load the Sponge: Dab a small amount of the bright pink jelly gel onto the makeup sponge, ensuring the color is concentrated but not soaking wet.
- Create Aura Effect: Gently and rapidly tap the center of the nail plate with the loaded sponge, building up the color intensity in a small radial shape. Blend slightly outward, reducing pressure to create the diffused, ‘soft focus nails’ effect.
- Finish and Seal: Cure the color layer. Apply a durable, long-lasting non-wipe top coat over the entire nail to enhance the glowing aura effect. Cure for 60 seconds.
Pro-Tip: For the best ‘photorealistic aura nail effects,’ use a matte top coat before applying the sponge layer. The matte surface grabs the polish better, resulting in a cleaner, more seamless blend before adding your final glossy top coat.

2. Dainty Heart Aura Nail Art

Double tap and save this romantic nail art idea for your July manicure!
Combining the trendy aura effect with classic Valentine’s Day hearts is simple using nail art stickers, making this a quick and adorable option. This dainty aura hearts design integrates nail art sticker elements over an existing aura base, providing an easy way to achieve simple heart aura nail designs. The relationship focuses on how hearts on nails (stickers or decals) are applied to aura nails, leveraging the convenience for DIY nails.
Products & Tools Used
- Pre-applied aura base (from Design 1, or use pre-made press-on nails)
- Small, red or white heart nail art stickers (for ‘dainty aura hearts’ effect)
- Fine-tipped tweezers or silicone tool (to apply decals)
- Detail nail brush
- Clear top coat (to secure the ‘hearts on nails’)
Application Steps
- Prepare the Aura: Complete the Pink Aura base layer (Steps 1-4 from Design 1) and cure. Do NOT apply the final top coat yet.
- Select and Position Decal: Using fine-tipped tweezers, peel one small heart decal. Place it directly over the most intense center of the aura glow.
- Secure Decal: Gently press the decal down with a silicone tool to ensure all edges adhere fully to the nail surface, preventing lifting later.
- Encapsulate and Seal: Apply two thin, even coats of clear top coat, making sure to fully cover the edges of the sticker. This is vital for long-lasting nails and durability. Cure each coat.
Lesson Learned: When using flat nail stickers, gently file the edge of the nail after applying the top coat, then apply a final, thin layer of top coat and cure. This creates better ‘structural integrity of gel extensions’ or decals by wrapping the tip and preventing premature peeling.

3. Achieve a Shimmering Chrome Glow Aura

This chrome finish adds the perfect touch of ‘love positive energy’ to your Valentine’s look!
A shimmering aura nails effect is created by dusting holographic chrome powder over a precisely cured no-wipe top coat, achieving a trendy metallic glow. This chrome aura nails design is perfect for those seeking latest nail trends and adds a unique chrome + shine dimension to the classic aura. The ‘chrome’ powder is applied to a no-wipe top coat to achieve a shimmering aura finish, effectively mimicking electroplating chrome nail powders for a mirror-like effect.
Products & Tools Used
- Aura base coat (Design 1 or 5 applied and cured, but no final top coat)
- No-wipe top coat (crucial for chrome adhesion)
- Holographic or iridescent chrome nail powder (for ‘chrome aura nails’)
- Silicone tool or eyeshadow applicator (for dusting)
- Fluffy clean brush (to clean excess powder)
Application Steps
- Apply the No-Wipe Layer: Apply a thin layer of no-wipe top coat over the cured aura design. Cure for approximately 15-20 seconds (this is the ‘sweet spot’ for tackiness—consult manufacturer instructions).
- Dust the Chrome: Using the silicone tool, gently pick up a small amount of chrome powder and rub it onto the central aura area with a firm, circular motion. The chrome should ‘electroplate’ onto the tacky layer, creating a mirror shine.
- Clean Excess: Use the fluffy brush to meticulously dust away any excess chrome powder from the nail and surrounding skin.
- Seal the Shine: Apply a generous layer of regular top coat to seal the chrome. Ensure you cap the free edge thoroughly to prevent chipping. Cure fully.
Pro-Tip: The optimal ‘UV/LED curing light spectrum optimization’ window for applying chrome powder is often around 15 seconds of curing the non-wipe top coat. If cured too long, the layer is too hard; too short, it’s too wet. Test on a plastic tip first to find the perfect level of tackiness.

4. Create a Luxurious Red Velvet Aura

Try this bold, ‘vibrant aura nails’ look for a passionate Valentine’s Day statement!
A luxurious red velvet aura features a deeply pigmented red glow at the center, achieved by layering vibrant red polish over a darker, sheer base to create a rich, textured appearance. This red aura nails design offers a bold and vibrant aura nails statement, especially when paired with elegant stiletto aura nails. It’s a classic romantic nail art choice that offers long lasting nails when done correctly. This design shows how a specific color attribute (red) enhances the aura effect, with the stiletto shape amplifying the overall bold aura nails look.
Products & Tools Used
- Dark, slightly sheer base polish (like a deep burgundy or plum)
- Highly pigmented true red gel polish (for the central glow)
- Small, firm blending brush or sponge
- High-gloss top coat (to maintain the shine)
- Optional: Micro glitter powder (for ‘shimmering aura nails’ depth)
Application Steps
- Shape and Base: Shape nails into the desired ‘stiletto’ shape (if applicable). Apply 1-2 coats of the dark base polish and cure each layer fully.
- Build Intensity: Using the blending tool, apply the pigmented red polish only to the very center of the nail, keeping the application area small and focused. Cure briefly (10-15 seconds).
- Diffuse Edges: Apply a sheer layer of clear gel or the dark base polish over the entire nail (uncured). Immediately use a clean, dry brush or sponge to lightly tap and diffuse the edges of the central red color, merging it seamlessly into the base.
- Seal: Cure the diffusion layer fully. Apply the final high-gloss top coat, making sure to avoid flooding the cuticles. Cure for 60 seconds.
Pro-Tip: If using magnetic ‘cat eye’ polish for the central red aura, activate the magnetic particles before diffusing the edges in Step 3. This leverages the technology to pull the pigment into a stronger, centralized glow, enhancing the ‘glowing aura nails’ effect significantly.

5. Minimalist Nude Aura with Subtle Color Combination

Pin this understated ‘elegant aura nails’ look if you prefer subtle styles over bold reds!
The minimalist nude aura features a sheer nude base with a barely-there pastel glow at the center, offering an elegant, understated take on the aura trend. This minimalist aura nails design uses a subtle color combination to achieve an elegant aura nails aesthetic, perfect for neutral valentine’s day nail art ideas. It’s positioned as an alternative to traditional bold Valentine’s colors, focusing on the sheer base with a soft aura. This design is also perfect for achieving a professional finish at home.
Products & Tools Used
- Sheer, warm nude or milky white gel polish (for the base)
- Pale peach, pink, or lavender highly diluted gel polish (for the central color)
- Small dotting tool or fine-tip brush (for precise pigment placement)
- Clean, lint-free cloth or tissue
- Top coat
Application Steps
- Build the Sheer Base: Apply 2-3 thin layers of the sheer nude gel polish, curing each layer completely. The color should be translucent but provide smooth coverage.
- Prepare the Pigment: Place a tiny dot of the pale central color polish onto a palette. Dip the dotting tool, then use a clean brush to pick up a minimal amount of color, or dilute the color with clear top coat slightly.
- Place the Glow: Tap the diluted color onto the exact center of the nail, creating a tiny, highly concentrated spot. Immediately use the clean, dry fine-tip brush to softly feather the edges outward (radial nails), creating the ‘diffused nails’ effect.
- Finish Coat: If the blend is subtle enough, apply a final top coat and cure. If more diffusion is needed, apply a thin coat of clear gel over the blend, cure, and then apply top coat.
Lesson Learned: For optimal ‘structural integrity of gel extensions’ and natural nails alike, remember that the minimalist look requires perfect nail plate preparation. Never skip the step of proper cuticle care and dehydrating the nail plate, as any lifting will be immediately visible on sheer polishes.

FAQs About valentines day nails aura
What colors are best for Valentine’s Day aura nails?
The most popular and relevant colors for Valentine’s Day aura nails are shades of pink, classic true red, deep burgundy, and vibrant magenta, often layered over a nude or milky base. These colors relate directly to love and romance, providing the necessary contrast for the ‘glowing aura nails’ effect. Less traditional options include pale lavender or soft peach for a subtle, minimalist aesthetic, offering a chic alternative to the customary bold hues.
How long do aura nails last, and what affects their durability?
Aura nails done with quality gel polish and proper technique (curing, sealing, capping the free edge) typically last 2 to 3 weeks, similar to any professional gel manicure. Durability is primarily affected by nail plate preparation (skipping dehydration or base coat), the quality of the top coat used, and minimizing physical trauma or prolonged water exposure, which can weaken the ‘structural integrity of gel extensions’ or polish.
What is the difference between aura nails and ombre nails?
The key difference is the blend direction: Ombre nails feature a horizontal or vertical gradient, typically blending two distinct colors from one end of the nail to the other, while aura nails are radial. Aura nails (or ‘halo nails’) feature a centralized, concentrated burst of color that fades outwards evenly in all directions, designed to look like a circular glow, distinguishing them from the linear ‘gradient nails’ effect.
Can I create aura nails using regular nail polish instead of gel?
Yes, you can create a blurred or ‘diffused nails’ effect using highly pigmented regular nail polish, but the technique and longevity will differ from gel. Instead of a sponge and cure method, dilute the central polish color with a clear top coat and quickly dab it onto a slightly tacky base coat, aiming for a soft focus. Regular polish may not offer the intense, long-lasting ‘glowing aura nails’ finish of gel.
What supplies do I need for DIY Valentine’s aura nails if I’m a beginner?
Beginners require a sheer base coat, two contrasting colors of gel polish (a sheer base and a concentrated center color), a non-linting makeup blending sponge, and a UV/LED curing lamp. This simple ‘setup nail art kit’ allows beginners to easily master the tapping/blending technique without needing specialized airbrush tools, providing a “professional finish at home” with minimal investment.
Are press-on aura nails a good alternative for Valentine’s Day?
Press-on aura nails are an excellent alternative, offering convenience and a luxurious, high-end finish without the time commitment of DIY application, aligning perfectly with the ‘quick and easy’ intent. Quality ‘press on nails valentine’ sets often use professional techniques like airbrushing for a perfect aura, and when applied correctly (with proper nail plate preparation), they can last up to two weeks, or they can be customized and attached quickly for a single evening.
What are some simple aura nail art ideas that aren’t hearts?
Simple, non-heart aura nail art ideas include adding minimalist gold micro-dots or a single, clean vertical line of metallic chrome dust over the glow. Other chic concepts are applying the aura effect only to the tips (a reverse French tip aura) or using abstract aura placements across the nail, demonstrating an ‘artistic aura nails’ approach without using typical Valentine symbols.
Why is the airbrush method often preferred by professional nail artists?
Professional nail artists often prefer the airbrush method because it allows for superior control over pigment placement and dispersion, resulting in ‘photorealistic aura nail effects’ and seamless color blending that is difficult to replicate with a sponge. This method uses ‘advanced airbrush nail techniques’ to deliver a much finer mist of color, achieving structural precision and the most sophisticated, subtle ‘soft focus nails’ effect desired for editorial looks.
How can I make my aura nail polish last longer and prevent chipping?
To make your aura nail polish last longer, ensure you prepare the nail plate meticulously by cleaning the cuticles and wiping the nail with alcohol to remove oils before applying any product. Always wrap or ‘cap’ the free edge of the nail with the base coat, color layers, and top coat. This crucial step prevents water and debris from entering the polish layer, avoiding chipping and premature peeling.
What base color should I use to make my aura glow intensely?
To make your central aura glow intensely, use a sheer or milky base coat that contrasts slightly with the aura color, rather than a solid opaque base. This allows the central, concentrated pigment to stand out dramatically. For dark colors like red or purple, a sheer black or deep nude base works best; for light pinks, use a milky white or sheer pale nude to maximize the luminous effect.
Final Thoughts on Valentines Day Aura Nails
The trend of valentines day nails aura is more than just a passing fad; it’s a beautiful, versatile way to incorporate the season of romance into your personal style. We’ve defined exactly how to “create aura nails” for five distinct aesthetics—from the deep, luxurious Red Velvet to the understated, elegant Minimalist Nude. By utilizing the specific product recommendations and expert step-by-step guides provided, you possess the knowledge to execute salon-quality results at home, regardless of whether you choose to use the simple sponge method or invest in ‘professional grade nail supplies.’ Focus on mastering the blending technique and prioritizing your nail plate preparation to ensure your chosen designs not only look stunning but also remain durable throughout the holiday. Whether you are aiming for subtle beauty or a bold statement, these five radiant looks guarantee your manicure will be glowing with ‘love positive energy’ this 2026.
Which of these easy Valentines Day aura nails designs are you planning to recreate first? Share your favorite style in the comments below!
Last update on 2026-04-27 / Affiliate links / Images from Amazon Product Advertising API