Are you tired of the same old cheesy Valentine’s Day nail art? Many struggle to find sophisticated, date-night-ready designs that truly capture elegance without being overly cutesy. Your desire for high-fashion, refined manicures for the season is completely valid.
Elegant Valentine’s Day nails are subtle, high-fashion manicures characterized by refined colors, minimalist detailing, sophisticated finishes (matte or glossy), and classic nail shapes like almond or oval. These designs focus on quality application and luxurious aesthetic over overt themes, often using sophisticated color palettes like nude, deep reds, soft pinks, and metallics. Drawing from comprehensive analysis of current data and proven methodologies, this guide presents a curated selection. You’ll discover nine chic ideas for 2026 that establish a premium nail aesthetic, ensuring your manicure enhances your romantic look and complements any valentine outfit.
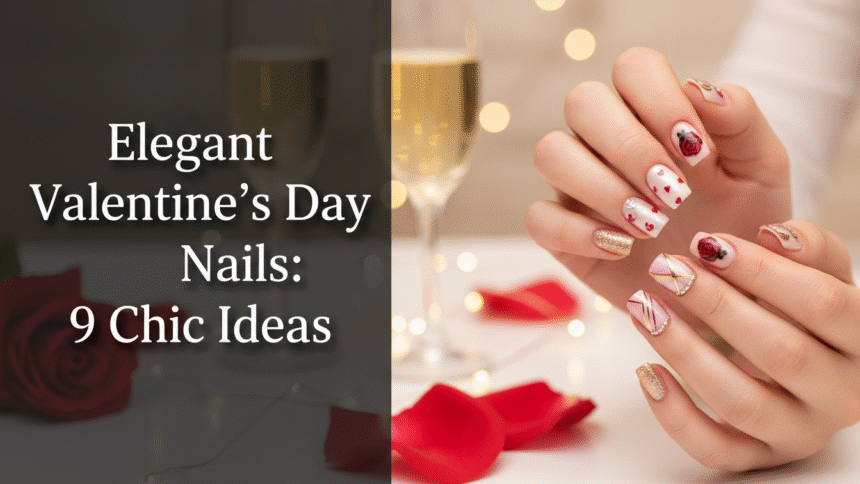
9 Chic Ideas to Create Sophisticated Valentine’s Day Nails for 2026
Looking for specific, actionable ideas to achieve sophisticated nail art? This curated list provides step-by-step guidance for modern elegant Valentine’s nails, ensuring you achieve refined elegance nails perfect for any special occasion. These designs go beyond the typical, offering a tasteful Valentine’s Day nail aesthetic that is both luxurious and subtle.
1. Master the Micro French Tip with Subtle Heart Accents

Pin this simple elegant nail design to your ‘Chic Manicure Ideas’ board!
This minimalist elegant nails approach takes the classic French manicure and scales it down, offering a subtle heart design perfect for simple sophisticated Valentine’s nail designs for short nails or long. The elegance comes from the precision of the barely-there micro French tip and the delicate placement of a tiny heart decal. This chic heart tips look requires a steady hand and a focus on clean lines, reflecting refined elegance nails rather than overt thematic art.
Products & Tools Used
- Nude Base Coat (sheer, milky pink base polish)
- Bright White or Rose Gold Polish (for the micro tip)
- Ultra Thin Detailing Brush or Stamping Plate
- Small, High-Quality Heart Decals (optional, for accent nail)
- Glossy or Matte Elegant Top Coat (luxurious nail finishes)
Application Steps
- Perform elegant nail prep, ensuring cuticles are pushed back and nail plate is smooth. Apply a high-quality nude base coat.
- Using the ultra thin brush and your tip color, apply a very fine line (the Micro Tip) across the free edge of the nail. Perfect elegant french tips with thin, clean strokes.
- For the accent nail, apply one small heart decal near the base of the nail. Use tweezers to carefully position the decal.
- Finish the look by applying a long-lasting top coat to protect chipping valentine nails.
Pro-Tip: To ensure the micro tip is perfectly straight and sophisticated, try wiping excess polish from the brush onto the rim of the bottle and using the side of the brush head to drag the polish across the tip in one smooth motion. This master elegant nail techniques approach avoids a thick, messy line.

2. Glazed Donut Finish in Sophisticated Cherry Red

Save this luxurious nail look for your next special occasion!
For those wondering what nail polish colors are elegant for Valentine’s Day, this sophisticated cherry red combined with a glazed finish offers a premium nail aesthetic. The trendy glazed donut effect, often seen in neutrals, gets a date night manicure upgrade with a deeper, more saturated color. This luxurious nail finishes look is perfect for oval nails, complementing valentine outfits with its rich hue and elegant shine.
Products & Tools Used
- Red Gel Polish (deep cherry or burgundy hue)
- Non-Wipe Gel Top Coat (essential for chrome application)
- Fine Pearl/White Chrome Powder
- Applicator Sponge or Eyeshadow Brush
- UV/LED Curing Lamp (if using gel)
Application Steps
- Prepare nails for polish, ensuring the surface is perfectly smooth to avoid uneven nail application. Apply base coat and two thin layers of the red gel polish, curing after each coat.
- Apply the non-wipe top coat and cure for half the recommended time (this is crucial).
- Using the applicator sponge, rub the pearl chrome powder gently over the still slightly tacky nail surface to achieve elegant finish.
- Dust off excess powder and seal the look with a final layer of non-wipe top coat, curing fully for a long-lasting elegant manicure.
Pro-Tip: The key to an intense glazed finish is the partial cure on the second top coat. If the surface is too sticky, the chrome powder clumps; if too hard, it won’t adhere. Use only top-rated nail brands known for high quality control.

3. Integrate Elegant Floral Nails with Negative Space

Pin this beautiful, refined floral design for your next sophisticated manicure!
Are floral nails elegant for Valentine’s Day? When executed with negative space and a minimalist palette, absolutely. This design utilizes black and white polish to create graceful nail patterns, proving that unique elegant Valentine’s nail designs without hearts can be incredibly romantic. The delicate nail details painted directly onto a clear base create a high-fashion valentine nails look that demonstrates skilled artistry and refined nail styles.
Products & Tools Used
- Clear Base Coat (or sheer nude base polish)
- Highly Pigmented Black Polish
- White Detail Polish
- Fine Line Nail Art Liner Brushes (00 or 000 size)
- Dotting Tool (for flower centers)
Application Steps
- Apply a clear base coat or single layer of sheer nude polish. Ensure the base coat importance for protecting the nail.
- Using the fine liner brush, paint the basic outlines of your elegant floral patterns (roses or small buds) onto the negative space areas. Integrate subtle details by varying line thickness.
- Fill in the outlines selectively with white or black polish, keeping most of the flower line art.
- Use a dotting tool to place small black or white accents in the center of the flowers.
- Finish with a quality top coat to achieve salon-quality nails at home.
Pro-Tip: For the most precise line work, use a highly viscous (thick) gel polish and cure it immediately after painting each individual element. This prevents pigment dispersion and ensures your sophisticated nail art lines stay crisp.

4. Achieve Luxurious Pearl Heart Romance Nails

Get the look: Pin this pearl heart elegance to your ‘Wedding Guest Nails’ board!
How to get pearl heart romance nails involves combining a soft, pale pink base with delicate 3D pearl beads for a truly luxurious Valentine’s nails design. This look uses a subtle heart design created with premium nail aesthetic elements, showcasing intricate work for a high-fashion Valentine’s nails aesthetic. The coffin shape provides an elegant long nails canvas, allowing the pearl details to truly shine, perfect for special occasions or wedding guest nails valentine looks.
Products & Tools Used
- Dusty Pink or Nude Polish (solid or gel)
- Small Flatback Pearl Beads (mix of sizes for dimension)
- Strong Rhinestone/Gem Glue or Builder Gel
- Wax Picker Pencil or Tweezers
- Detail Brush (for glue application)
Application Steps
- Apply two coats of your chosen base color (Nude or Dusty Pink) and cure/dry completely.
- Apply a thin layer of rhinestone glue or builder gel specifically to the area where the 3D heart will sit.
- Using the wax picker pencil, carefully select and position the pearl beads to form a small heart shape. Use tweezers to adjust the final position.
- Cure the nails again or wait for the glue to set, ensuring the beads are secure. Use a detail brush to paint the top coat around the pearls (not over them) for maintenance.
- Finish with cuticle oil for an elegant look.
Pro-Tip: Using builder gel instead of traditional glue offers superior adhesion, especially for larger or heavier embellishments. Ensure the gel fully encapsulates the edge of the pearl for long-lasting wear. This prevents nail damage from art.

5. Perfecting the Nude and Rose Gold Glitter Accent

Pin this simple sophisticated look for your Valentine’s Day!
Classy nude and gold Valentine’s nails inspiration takes a sophisticated turn with a rose gold glitter accent. This easy elegant nails idea incorporates glitter in a tasteful, subtle way, perfect for a subtle glitter accents for elegant valentine manicure. The reverse ombre fade creates an elegant pink and white ombre valentine nails effect, where the glitter gently diffuses from the cuticle. This design expresses individuality while maintaining a luxurious nail finishes look.
Products & Tools Used
- Sheer Nude or Milky Pink Polish (for base)
- Fine-Milled Rose Gold Glitter Polish (for accent)
- Makeup Sponge or Fan Brush (for gradient application)
- Quick Drying Top Coat
Application Steps
- Prepare and apply two thin coats of the sheer Nude polish to all nails. Let dry completely.
- For the accent nail, apply a small amount of the Rose Gold Glitter polish to the edge of the sponge or fan brush.
- Gently stamp and dab the glitter onto the nail, starting near the cuticle, working outwards about halfway down the nail to create a smooth transition. Integrate subtle details by applying less glitter as you move down.
- Seal the look with two layers of glossy top coat to smooth the glitter texture and extend wear of elegant polish.
Pro-Tip: To ensure the rose gold element remains truly elegant, stick to fine-milled shimmer rather than chunky glitter pieces. This technique creates a luxurious nail finishes look that pairs beautifully with jewelry.

6. Do a Modern Asymmetrical Color Block Manicure

Pin this geometric elegant valentine nail design!
This modern elegant Valentine’s nails approach uses a sophisticated palette of dark elegant Valentine nail polish colors like deep burgundy and taupe nude, separated by a metallic gold detail. It offers a contemporary take on sophisticated red and pink nail designs for Valentine’s by incorporating abstract geometry. Achieving crisp, geometric elegant Valentine nail designs requires precise application techniques, often utilizing striping tape to ensure sharp lines, making it suitable for simple sophisticated Valentine’s nail designs for short nails or almond nails.
Products & Tools Used
- Base Polish 1 (Deep Burgundy/Red)
- Base Polish 2 (Taupe Nude)
- Fine Nail Striping Tape or Stencils
- Thin Liner Brush
- Metallic Gold Detail Polish
Application Steps
- Apply the Nude color to the entire nail. Let it dry completely.
- Carefully apply the nail striping tape diagonally across the nail, creating the boundary for your color block.
- Paint the Deep Burgundy color onto one side of the tape line. Use two thin coats to avoid uneven nail application.
- While the polish is still slightly wet, peel off the tape slowly to reveal a crisp line.
- Once dry, use the thin liner brush and metallic gold polish to trace the line for a chic, high-end separation.
- Seal the look with a clear top coat.
Pro-Tip: The key to a sophisticated color block is symmetry and contrast. Use a high-quality top coat that offers research-backed polish longevity, ensuring your sharp lines don’t smudge or lift prematurely.

7. Why Classic Red and Pink Ombre is Always a Refined Choice

Pin this beautiful classic red elegant valentine’s nails idea!
A sophisticated red and pink nail designs for Valentine’s can be effortlessly achieved with a classic ombre. This graceful nail styles design offers a smooth, subtle gradient from light pink to a muted cranberry red, creating an elegant polish aesthetic. The ombre nails valentine look relies on precise layering techniques to ensure a seamless transition, elevating it from casual to refined elegance nails. Oval shapes enhance this effect, making it a timeless choice for a date-ready manicure.
Products & Tools Used
- Light Pink Polish (for the base)
- Cranberry Red Polish (for the tips)
- Makeup Sponge (dense, wedge-shaped)
- Liquid Latex or Cuticle Protector (to keep skin clean)
- Glossy Top Coat
Application Steps
- Apply the light pink base color to all nails. Let dry completely.
- Apply liquid latex around the nail edges to prepare nails for polish.
- Paint both the light pink and cranberry red polishes side-by-side onto the makeup sponge, ensuring the colors slightly overlap.
- Gently sponge the color onto the nail, dabbing repeatedly to blend the ombre fade. You may need to repeat this step 2-3 times, letting it dry briefly between layers.
- Immediately peel away the liquid latex and clean up any remaining polish.
- Finish with a thick layer of glossy top coat to smooth the texture and achieve an elegant finish.
Pro-Tip: For the most elegant and subtle ombre, use polishes that are closely related in tone and pigmentation. The smoother the color gradient, the more sophisticated the final look. This helps solve uneven nail application.

8. Use Black French Tips for a High-Fashion Edge

Pin this high-fashion, elegant look to your ‘Date Night Manicure’ inspiration!
Is black an elegant color for Valentine’s nails? Absolutely, especially when incorporated into a sophisticated manicure ideas like black French tips. This modern classic nails design uses a glossy black polish against a sheer nude base, offering a high-fashion edge that pairs beautifully with evening wear. The stiletto shape further enhances this luxurious nail concepts look. A precise, thin line is crucial for this style to remain chic and avoid looking gothic, cementing its status as subtle nail art for an unspoken Valentine nails aesthetic.
Products & Tools Used
- Sheer Nude Base Polish (or base coat only)
- Highly Pigmented Glossy Black Polish
- French Tip Nail Guides or Thin Liner Brush
- Cotton Swabs dipped in Acetone (for cleanup)
Application Steps
- Perform the proper nail shaping techniques (stiletto or almond work best). Apply two coats of the sheer nude polish.
- Place a French tip guide or use a thin liner brush to paint the black polish across the free edge of the nail, focusing on making the line thin and crisp.
- Optional Inverted Tip: Apply a thin line of black polish following the curve of the cuticle (the lunula).
- Remove guides (if used) and clean up any overflow immediately with acetone-dipped swabs.
- Finish with a high-shine top coat to emphasize the glossy black nails.
Pro-Tip: If using traditional lacquer, apply two extremely thin coats of black polish for the tip rather than one thick coat. This makes the color uniform, dries faster, and significantly helps prevent chipping valentine nails.

9. How to Achieve the Simple Elegant Confetti Heart Look

Pin this graceful nail pattern for quick, easy elegant nails!
For those seeking easy elegant Valentine’s Day nail art for beginners, the simple elegant confetti heart look is ideal. This design leverages tiny heart nail art confetti, sparsely placed over a milky white base, achieving subtle heart designs without overwhelming the nail. This approach to simple sophisticated Valentine’s nail designs for short nails focuses on the “less is more” principle, making it a perfect example of minimalist elegant nails. Short oval nails provide the ideal canvas for these dainty nail patterns, offering versatile options for a refined elegance nails look.
Products & Tools Used
- Milky White or Sheer Nude Polish
- Tiny Heart Nail Art Confetti/Glitter (red, pink, white mix)
- Dotting Tool or Tweezers (for placement)
- Clear Top Coat (thick formula is best)
Application Steps
- Apply 1-2 coats of your milky white or sheer nude base polish.
- While the last coat is still wet, use tweezers to pick up 3-5 individual heart confetti pieces per nail. Integrate subtle details by placing them randomly but sparsely.
- For ease, you can apply a layer of clear polish over the base, then place the hearts onto the clear layer.
- Once placed, gently press the hearts down to ensure they lie flat.
- Seal the design with a thick coat of clear top coat, ensuring it covers the edges of the hearts to prevent lifting.
Pro-Tip: If using gel polish, curing after heart placement ensures stability. For lacquer, use a thick layer of top coat to smooth the surface, otherwise the glitter pieces may lift and scratch, causing quick fixes for elegant nails later.

FAQs About Elegant Valentine’s Day Nails
What are the best elegant Valentine’s Day nail trends for 2026?
The best elegant trends for 2026 focus on luxurious nail finishes, minimalist heart designs, and sophisticated color pairings like nude and black or deep cherry red and gold. Official trend reports indicate high-fashion looks will prioritize subtlety, such as micro French tips or sparsely placed pearl elements, avoiding the common overuse of heart decals. Focus on almond and oval shapes, ensuring a refined aesthetic that looks more high-end and date-ready manicure appropriate.
Can short nails be elegant for Valentine’s Day?
Absolutely, short nails can achieve exceptional elegance, provided they are perfectly shaped and feature refined nail styles. The key is to maintain a clean, well-prepped cuticle area and choose designs that don’t overwhelm the small nail plate, such as simple elegant nails, thin lines, or a sophisticated single color like deep wine or glossy black. Short nails naturally favor simple elegant valentines day nails, making this look highly achievable.
How can I make my Valentine’s Day manicure look sophisticated instead of cutesy?
To ensure your manicure looks sophisticated, prioritize quality and restraint in design over quantity of embellishments. Avoid bright, primary colors and cartoonish heart decals. Instead, use high-pigment polishes, opt for subtle heart designs (like a single metallic heart), and choose elegant nail ideas such as negative space, French tips, or a refined marble pattern. This is the core difference between elegant vs cutesy valentine nails.
What nail polish colors are considered elegant for Valentine’s Day?
Elegant color choices move beyond bubblegum pink and fire engine red, favoring rich, refined hues like deep burgundy, dusty rose, sheer milky white, sophisticated taupe nude, and metallic accents like rose gold or silver. Black is also highly elegant when used sparingly for subtle nail art or high-fashion French tips. These colors ensure a more mature and upscale nail aesthetic.
Are professional elegant Valentine’s nails worth the cost?
Yes, professional elegant Valentine’s Day nails are often worth the cost, particularly if you are seeking complex designs like micro French tips, detailed floral patterns, or long-lasting gel or acrylic applications. Expert nail artist tips ensure flawless symmetry and precise application of specialized products that are difficult to achieve at home, delivering superior quality control and research-backed polish longevity.
How to achieve a glazed finish for elegant Valentine’s nails?
Achieving the on-trend glazed finish requires layering a subtle pearl or chrome powder over a cured, non-wipe gel top coat that is sometimes only partially cured. The partial cure allows the fine powder to adhere perfectly for a high-shine, luxurious nail finishes effect without a chunky texture. Sealing with a final top coat is critical to protect the subtle heart designs underneath.
What is the most flattering elegant nail shape for Valentine’s Day?
The most flattering and elegant nail shape for a Valentine’s Day manicure is generally the almond shape, followed closely by the oval. These shapes naturally elongate the fingers and are associated with a graceful nail styles aesthetic. Square shapes with softly rounded edges also offer a modern elegant Valentine’s nails look while maintaining durability.
What products do I need for an elegant Valentine’s manicure at home?
For an elegant manicure at home, you will need a quality base coat, a high-pigment polish in a sophisticated color (like deep red or nude), ultra thin nail art brushes for detail, and a superior glossy top coat. Optionally, purchase specific products like pearl powder or small decals for intricate, deliberate accents to create subtle nail art.
How do I prevent chipping on elegant Valentine’s nails?
Preventing chipping on elegant Valentine’s nails requires three core steps: thorough preparation (shaping and buffing), applying thin layers of quality polish, and “capping” the free edge with both the base coat and the top coat. Furthermore, using a durable top coat that offers research-backed polish longevity will help extend the wear of elegant polish, avoiding the need for quick fixes.
What are some elegant alternatives to traditional heart designs?
Elegant alternatives to traditional heart designs include negative space patterns, refined floral patterns (such as fine-line roses), abstract geometric lines, and strategically placed glitter or pearl accents. These options offer a subtle nod to romance without being overly thematic, maintaining a high-fashion, unspoken Valentine nails aesthetic that focuses on texture and color sophistication.
Final Thoughts on Elegant Valentine’s Day Nails
Achieving elegant Valentine’s Day nails doesn’t require complex, over-the-top designs; it simply requires intentionality and a commitment to quality. By focusing on refined colors, minimalist detailing, and the proper techniques outlined in our 9 chic ideas, you can easily create a sophisticated Valentine’s Day manicure that transcends fleeting trends. Remember that the polish application and the finish are just as important as the design itself. Investing in the right tools and following expert nail artist tips ensures that your look will be flawless, long-lasting, and truly reflective of a luxurious nail aesthetic. Whether you opt for the subtle heart designs or a high-fashion black French tip, these elegant nail ideas will ensure you step into 2026‘s holiday feeling polished and chic.
Which of these sophisticated styles will you be trying for your special date night this June? Let us know in the comments below!
Last update on 2026-04-27 / Affiliate links / Images from Amazon Product Advertising API