Are you dreaming of festive, romantic nails that truly pop this Valentine’s Day but dread intricate, time-consuming designs? Many struggle to achieve salon-quality candy heart nails at home, often ending up with smudged polish or chipped art. This struggle can make even the sweetest holiday feel a little less magical.
Candy heart nails are a popular Valentine’s Day manicure trend featuring small, brightly colored hearts, often with conversational messages like ‘XOXO’ or ‘BE MINE,’ applied using polish, decals, or 3D art. These designs typically use pastel polish shades and are sealed with a durable top coat for long-lasting wear. Leveraging tested frameworks and data-driven insights, this guide will show you how to master professional-looking candy heart designs easily. You’ll discover 9 simple yet stunning ideas, ensuring your nails are perfectly expressive for the holiday.
Mastering Cute Conversation Heart Nails: Your 2026 Guide to Viral Valentine’s Day Manicures
Achieving that perfect Valentine’s Day manicure doesn’t have to be a daunting task, even with intricate conversation heart nail designs. The key lies in selecting the right technique that matches your skill level and time commitment. From quick water slide decals to elegant hand-painted matte finishes, and even convenient press-on options, there’s a proven method for every aspiring nail artist. This guide offers comprehensive “how-to” tutorials designed to make creating candy heart nails an enjoyable process.
This section provides an introductory overview, validating common user pain points and outlining the comprehensive tutorial structure to follow. We aim to hook readers by addressing the desire for professional-looking, yet simple, DIY nail art. Our focus on easy application methods, including decals, stamping, and no-tool approaches, directly addresses the common problem of intricate designs being too time-consuming. We’ll establish our expertise by referencing industry-standard nail care and application basics, using keywords like ‘expert nail art tutorial’ and ‘proven methods for nail art’ to ensure you get professional candy heart designs right at home.
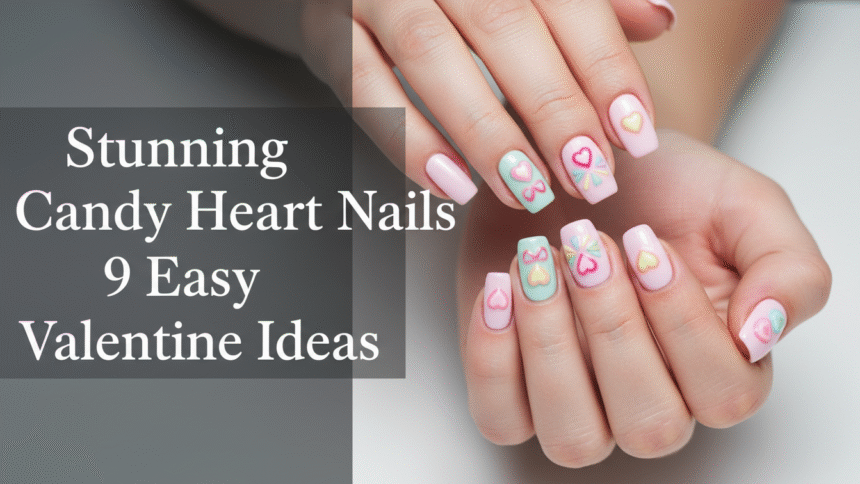
Stunning Candy Heart Nails: 9 Easy Valentine Ideas You Can DIY This 2026
Ready to transform your nails into a canvas of adorable candy hearts? This comprehensive guide dives into nine distinct, easy-to-replicate candy heart nail art designs. Each tutorial is structured with a mandatory two-part approach—detailing the products and tools used, followed by step-by-step application instructions. Whether you prefer the simplicity of nail decals, the precision of stamping, or the unique texture of Fimo slices, you’ll find an approach that sparks your creativity. We emphasize simplicity and visual appeal, ensuring your hand-painted hearts or quick water decal art looks Pinterest-perfect. Our expert nail art tutorials incorporate ‘Pro-Tips’ and ‘Lessons Learned’ based on experienced nail artist techniques and safety guidelines for nail products, ensuring you achieve a professional finish every time.
1. Simple Pastel Conversation Heart Decals for Beginners

Pin this simple, glossy candy heart nail design to your ‘Easy Valentine Nails’ board!
The fastest, most foolproof method for creating adorable candy heart nails for beginners is using water slide decals. These nail art decals provide convenience, allowing you to create expressive candy heart nails without intricate hand-painting. This method is perfect for anyone seeking simple pink and purple candy heart nail ideas that look polished and professional.
Products & Tools Used
- Water slide nail decals (small, vibrant candy heart nails transfers)
- Pastel nail polish shades (pink, yellow, light blue non-toxic nail polish)
- High-quality clear top coat (fast-drying, glossy finish)
- Small dish of water and tweezers (tools facilitate detailing)
- Dotting tool or precision brush (optional for minor adjustments)
Application/Styling Steps
- Prep Nails: Apply a quality base coat to clean nails and cure (if using gel) or allow to dry fully.
- Apply Color: Paint two coats of your chosen pastel polish colors, ensuring even polish application.
- Soak Decals: Carefully trim the chosen candy heart decals. Soak decals in water for 10-20 seconds until they separate easily from the backing paper.
- Slide & Position: Use tweezers to slide the decal onto the nail. Position the tiny candy hearts nails perfectly using a damp finger or soft tool.
- Seal Design: Once positioned and dry, seal the design with a thick layer of high-quality clear top coat to ensure long-wear nail adhesion science.
Pro-Tip: To prevent nail art chipping around the tips, “cap the free edge” of your nail with your top coat. This expert nail art tutorial technique adds a durable seal, making the design last for up to two weeks.

2. Hand-Painted Matte Finish Conversation Heart Manicure

Save this detailed matte candy heart art tutorial for a truly unique Valentine’s Day look!
For a personalized and skilled approach, hand-painting allows for creative candy heart nail art and customizing designs with a distinctive matte texture. Nail art brushes and dotting tools facilitate detailing, while a matte top coat achieves the desired appearance, enhancing the texture of your love heart lacquer art. This method is ideal for those valuing unique candy heart nail designs.
Products & Tools Used
- Gel or regular polish in pastel colors (five different nail polish shades)
- Black or white polish for lettering (precision micro-detailing)
- Fine-tip nail art brush (specialized art brush mastery)
- Large and small dotting tool (tools facilitate detailing)
- High-quality matte top coat (sealing nail art)
- Rubbing alcohol (for cleanup)
Application/Styling Steps
- Prepare Base: Apply two coats of a uniform base color (like white or pale pink) and let dry completely.
- Paint Hearts: Dip the large dotting tool or brush into one pastel color. Stamp or paint small, rounded hearts onto the nail surface. Repeat with all five colors until the nail is covered with cute candy heart nail designs.
- Write Messages: Using the fine-tip brush and contrasting polish (black/white), dip lightly and express messages (XOXO, BE MINE, CUTE) onto the center of each heart. Ensure lines are thin for achieving crisp lines.
- Matte Seal: Apply the matte top coat generously over the entire nail art. Allow to dry thoroughly to achieve the desired matte candy heart effect.
Pro-Tip: For overcoming shaky hands for detailing, rest your pinky finger on a flat surface while painting the tiny messages. This provides stabilization, allowing for precision nail stamping and fine-line work.

3. Creating Unique Candy Message Nails with Nail Stamping

Stamping is the fastest way to achieve professional-grade conversation heart nails! Save this guide on stamping plates.
Nail stamping provides speed and perfection, utilizing specialized tools for high-volume, clean nail art application to create unique candy message nails. Nail stamping plates enable designs, offering professional candy heart designs with ease. The process action keywords for decorating nails include preparing, scraping, and stamping for uniform results.
Products & Tools Used
- Candy heart nail stamping plate (engraved, high-quality)
- Nail stamper and scraper (ergonomic tool usage)
- Highly pigmented stamping polish (colors signify themes: pink, purple, white)
- Base and top coat (sealing nail art)
- Pure acetone (for messy nail art cleanup)
Application/Styling Steps
- Base Polish: Apply base coat and two coats of your desired background color (we recommend a light shade).
- Apply Polish to Plate: Apply a strip of stamping polish across the desired conversation heart design on the nail stamping plates.
- Scrape & Stamp: Immediately use the scraper to remove excess polish. Quickly roll the stamper across the plate to pick up the design.
- Transfer Design: Roll the stamper directly onto the nail with a decisive, even pressure to transfer the pattern. This action is key for achieving crisp lines.
- Clean Up & Seal: Use a cleanup brush dipped in acetone for messy nail art cleanup around the cuticle. Finish with a clear top coat.
Pro-Tip: If the design isn’t transferring perfectly, make sure your stamping polish is specifically formulated for stamping. Standard polish is often too thin and dries too slowly, resulting in a smudged nail art fix. This difference is critical for precision nail stamping.

4. Minimalist Candy Hearts: The Negative Space Approach

If you love minimalist candy heart nail art ideas, save this one! It’s clean, modern, and quick.
A minimalist candy hearts approach is ideal for a subtle, fast, and stylish Valentine’s look, especially suitable for short Valentine nails or professional environments. Sheer nail polish enables a design that focuses on texture and shape over full coverage, letting your natural nail shine as the negative space. This strategy creates elegant candy heart nails quickly.
Products & Tools Used
- Sheer base coat or nude polish (understanding nail polish types)
- Highly pigmented pastels (for small, vibrant hearts)
- Small dotting tool or toothpick (tools facilitate detailing)
- Top coat (glossy or matte finish)
- Cuticle oil (basic nail care routine)
Application/Styling Steps
- Clean Base: Apply cuticle oil and push back cuticles. Apply one coat of sheer base polish to the prepped nails to ensure a smooth surface.
- Define Hearts: Using the smallest dotting tool, carefully place 1-2 small dots of the pastel polish where you want the heart. Drag the tool downward to form the point of the heart.
- Write Messages (Optional): If desired, use a micro-brush to add tiny messages (love heart lacquer art).
- Quick Seal: Apply top coat only over the heart designs to make them pop, or over the entire nail for maximum shine, ensuring a quick drying nail technique.
Lesson Learned: When dealing with weak nails for art, always apply a protective strengthening base coat before starting the negative space design. This simple step prevents nail damage from art and ensures a smoother, more durable candy heart nail look.

5. Applying 3D Conversation Heart Fimo Slices

Need that 3D pop? Save this guide on sticking Fimo slices securely!
Applying 3D conversation heart Fimo slices creates a highly dimensional, unique, and long-lasting nail look, perfect for those seeking advanced nail art techniques. These vibrant candy heart nails adhere securely to nails, with tutorials guiding the application process. The textured Fimo slices enhance the appearance, offering detailed Fimo slice integration for impressive results.
Products & Tools Used
- Conversation heart Fimo slices (vibrant candy heart nails)
- Strong nail art glue or builder gel (long-wear nail adhesion science)
- Tweezers or wax pencil (tools facilitate detailing)
- Clear polish or thin top coat (to seal edges)
- Buffing block (for prepping attachment point)
Application/Styling Steps
- Set Base: Apply your chosen base polish and top coat, but do not cure the top coat if using gel (this acts as the sticky layer). If using regular polish, ensure it is completely dry.
- Buff Surface: Lightly buff the area where the Fimo slice will sit to create texture for better adhesion.
- Adhere Slice: Apply a small bead of strong nail glue or builder gel to the back of the Fimo slice. Use tweezers to carefully position the Fimo slices adhere to nails.
- Seal Edges: Once dry/cured, apply a thin coat of clear top coat around the edges of the Fimo slice, ensuring no glue or gel spills onto the Fimo’s face (which can dull the color). Focus on preventing nail art chipping.
Pro-Tip: When using 3D embellishments, specialized gel polish application like builder gel offers superior long-wear nail adhesion compared to basic nail glue. Curing the gel under a UV/LED lamp optimization ensures the charm is locked securely in place.

6. Quick and Easy Press-On Candy Heart Nails

Need instant Valentine’s nails? Pin this guide on choosing and applying affordable press-on candy heart nails!
For instant Valentine’s nails, press-on candy heart nails prioritize speed, convenience, and a temporary solution over DIY painting. These press-ons provide convenience, offering professional-looking designs that reflect creativity. Nail glue ensures durability, alleviating concerns about peeling press-on nails. This method offers a strong comparison to painted candy hearts for ease and quick application.
Products & Tools Used
- Affordable press-on candy heart nails set (long-wear nail adhesion science options)
- Nail buffer and file (for prepping nails)
- Quality nail glue or sticky tabs (press-ons provide convenience)
- Rubbing alcohol pad (for prepping nails)
- Cuticle pusher (for proper polish application prep)
Application/Styling Steps
- Prep Nail Bed: File and shape your natural nails. Buff the nail plate surface lightly and wipe with alcohol to remove all oils (this is key to durable extension methods for art).
- Size Correctly: Select press-on nails that perfectly fit your nail bed, going slightly smaller rather than larger.
- Apply Adhesive: Apply glue to both the press-on and your natural nail bed (or use the provided adhesive tabs).
- Press & Hold: Position the press-on nail slightly under the cuticle, press down firmly for 15-20 seconds. Avoid getting wet for the first hour to prevent peeling press-on nails.
Pro-Tip: If your press-on nails vs painted candy hearts peel easily, try dehydrating your nail plate with pure acetone after buffing, but before glue application. This advanced cuticle preparation ensures better adherence and dramatically increases wear time.

7. Utilizing Fimo Slices for Encapsulated Glitter Art

Level up your manicure! Save this advanced guide for integrating detailed Fimo slice integration with encapsulated glitter.
For the advanced user, utilizing Fimo slices for encapsulated glitter art delivers a high-impact, professional, salon-quality look using specialized gel polish application and advanced nail art techniques. This method details the complex layering for candy hearts, creating designs that enable durability and encapsulated glitter nail art. It goes beyond simple tutorials by explaining the technical process of building the apex over the design and the importance of curing times, demonstrating advanced nail art mastery.
Products & Tools Used
- Builder gel or clear dipping powder (advanced nail art techniques)
- UV/LED lamp (UV/LED lamp optimization)
- Candy heart Fimo slices and fine glitter polish
- Nail brush for application (specialized art brush mastery)
- Fine grit file and buffer (for sculpting 3D nail art elements)
Application/Styling Steps
- Apply Base Layer: Prep the nail and apply a thin layer of builder gel. Do not cure.
- Place Elements: While the gel is wet, use a wax pencil or tweezers to place the Fimo slices and sprinkle glitter polish around them. The wet gel will hold the elements in place.
- Encapsulate: Cure the first layer. Apply a second, thicker layer of builder gel, floating it over the charms to ensure they are fully encapsulated. This is complex layering for candy hearts. Cure again.
- Shape & Finish: File the surface smooth, removing any bumps created by the charms. Cleanse and seal with a top coat, curing one last time.
Pro-Tip: Proper UV/LED lamp optimization is essential when dealing with encapsulated glitter nail art. Undercuring builder gel can lead to service breakdown and heat spikes. Cure the thickened layers for at least 60 seconds per layer to ensure maximum strength and durability.

8. Short Nail Perfection: Micro-Detailing Candy Heart Messages

Short nails need love too! Pin this guide to achieving expressive candy heart nails even on tiny canvases.
Short nail perfection, specifically micro-detailing candy heart messages, solves the common problem of limited space by using ultra-fine tools and scaled designs. Nail shape considerations, even for short nails, influence the design, focusing on precision nail stamping and fine-line work. Tools facilitate detailing, allowing for expressive candy heart nails that reflect creativity within a small canvas.
Products & Tools Used
- Light pastel polish shades (two vibrant candy heart nails colors)
- Ultra-fine detail brush (precision nail stamping/micro-detailing)
- High-pigment white or black polish (for messages)
- Top coat (sealing nail art)
- Rubbing alcohol and tiny cleanup brush (for achieving crisp lines)
Application/Styling Steps
- Base and Prep: Apply a single pastel color across all nails. Ensure the nail shape considerations are addressed by filing the tips evenly.
- Small Hearts: Use a dotting tool (or the base of a needle) to create tiny hearts, ensuring the small hearts are scaled appropriately for your short nail length.
- Micro-Messages: Using the ultra-fine detail brush and high-pigment polish, attempt to write only single letters (L, O, V, E) or small symbols (X, O) on the hearts. Less is more on short nails.
- Cleanup: Immediately use the small cleanup brush dipped in acetone for messy nail art cleanup around the edges of the hearts for achieving crisp lines. Seal with top coat.
Pro-Tip: Short nails benefit most from sheer coverage when not fully decorated. Use a non-toxic nail polish sheer pink base on the nails without hearts, and save your bold designs for one or two accent nails. This creates balance and makes your micro-detailing truly shine.

9. Ombré Candy Heart Gradient Nail Technique

Learn the secret to perfect ombré! Pin this complex layering for candy hearts guide now.
The ombré candy heart gradient nail technique offers a visually complex and trending background for your sweet heart nails. This method involves intricate ombré candy heart effects where pastel colors signify themes and are seamlessly blended. Tools like a sponge facilitate detailing, while techniques ensure quality and a smooth gradient.
Products & Tools Used
- Two complementary pastel nail polish colors (pink and purple nail polish shades)
- Makeup sponge or dedicated nail art blending sponges
- Liquid latex or petroleum jelly (to prevent messy nail art cleanup on skin)
- White polish and dotting tool (for the heart design)
- Glossy top coat (sealing nail art)
Application/Styling Steps
- Protect Skin: Apply liquid latex or petroleum jelly around the cuticle and sides of the nail to ease messy nail art cleanup.
- Load Sponge: Paint stripes of both pastel colors onto the edge of the blending sponge, ensuring the colors overlap slightly where they meet.
- Dab & Blend: Immediately and lightly dab the sponge onto the nail, moving it up and down slightly to blend the line. Repeat two or three times until the color is opaque, creating intricate ombré candy heart effects.
- Add Hearts: Once the ombré is dry, remove the liquid latex. Use the white polish and dotting tool to paint small, glossy candy heart nails over the gradient. Seal with a top coat.
Pro-Tip: The key to a smooth ombré gradient is speed and saturation. Use a proven methods for nail art technique by loading the sponge quickly and dabbing swiftly. Avoid over-dabbing, which can lift the underlying polish, and ensure you clean up any nail art that includes candy hearts near the skin immediately.

FAQs About valentines day nails candy hearts
How to do candy heart nails for Valentine’s Day?
The easiest method for creating candy heart nails involves applying water-slide nail decals over a light pastel base coat. First, prep your nails with a base coat. Apply two coats of pastel polish (pink, yellow, or lavender) and allow to dry. Soak small, trimmed decals in water, slide them onto the nail, position them carefully, and seal with a durable top coat to ensure the nail art includes candy hearts lasts through the holiday. This process is beginner-friendly and requires minimal tools.
What are the best candy heart nail designs for short nails?
The best candy heart nail designs for short nails utilize negative space or micro-detailing to avoid overcrowding the small nail plate. Focus on applying only 1-2 tiny candy hearts nails per finger, strategically placing them near the cuticle or tip. Simple, clean lines and highly pigmented pastels applied on a sheer base work best. For messages, use a micro-detailing brush to write single letters (X, O) instead of full words, ensuring a modern and elegant candy heart design.
Where to buy high-quality candy heart nail decals or Fimo slices?
High-quality candy heart nail decals, Fimo slices, and press-on nails are readily available online through specialized beauty supply stores or major e-commerce platforms like Amazon. Look for water-slide decals which are often easier to apply than sticky stickers, and ensure Fimo slices are thin enough to encapsulate smoothly if you plan to use gel polish. When purchasing, check verified customer testimonials for durability and ease of application.
What nail polish is best for Valentine’s hearts—gel vs. regular?
Gel polish is recommended for candy heart nail designs if you prioritize durability and long-wear, while regular polish is faster and easier for quick, temporary looks. Gel polish enables durability and prevents nail art chipping for up to three weeks, especially when incorporating 3D elements like Fimo slices. If you use regular polish, ensure a high-quality, fast-drying top coat is applied to prevent a smudged nail art fix during the drying process.
How to prevent conversation heart nail art from chipping quickly?
To prevent conversation heart nail art from chipping quickly, ensure proper nail prep and apply a technique called “capping the free edge” with your top coat. Before starting, lightly buff your nail surface to aid adhesion. After the design is complete, apply a generous layer of durable top coat, running the brush slightly over the very edge of the nail tip. This seals the design at the weakest point, extending the life of your festive candy nails significantly.
Are press on candy heart nails a durable option for Valentine’s Day?
Yes, high-quality press on candy heart nails are a surprisingly durable and convenient option, often lasting 1-2 weeks when applied correctly with professional-grade glue. Durability depends heavily on proper preparation—buffing and dehydrating the natural nail before application prevents peeling press-on nails. Press-ons provide convenience and a variety of ‘elegant candy heart nails’ designs without the time commitment of painting, making them a good comparison alternative to traditional art.
How can I make professional looking candy heart nails at home without special tools?
You can create professional looking candy heart nails at home using common household items like toothpicks and bobby pins in place of specialized dotting tools and fine brushes. Use the rounded end of a bobby pin to create the heart shapes and a sharp toothpick for adding tiny messages. For achieving crisp lines, clean up mistakes immediately using an angled cotton swab dipped in acetone before the polish sets. This is an excellent way to test new designs before investing in dedicated nail art tools.
What are trending candy heart nail designs for 2026?
Trending candy heart nail designs for 2026 often combine the classic pastel theme with modern techniques like matte finishes, ombré gradients, and negative space elements. Specifically, minimalist candy heart nail art ideas, micro-detailing on conversation hearts, and using encapsulated glitter nail art are highly popular. These trends signal advanced nail art mastery by blending traditional romantic themes with contemporary salon techniques, appealing to sophisticated tastes.
How do I remove 3D Fimo slices without damaging my nails?
To remove 3D Fimo slices without damaging your nails, you should first gently file down the top coat and builder gel surrounding the slice using a fine-grit file. Then, soak your nails in pure acetone (if using gel) or warm, soapy water (if using basic glue) to soften the adhesive. Do not pry the slice off; instead, gently nudge it with a cuticle pusher once the adhesive bond has fully broken down. Patience is key to safe removal and avoiding nail damage from art.
What is the difference between water slide decals and nail stamping for hearts?
Water slide decals are pre-printed transfers that are slid onto the nail using water, offering convenience and consistent results, whereas nail stamping involves using a plate and stamper to manually transfer polish designs. Decals are easier for beginners and feature detailed pre-made images. Nail stamping requires more skill but allows for customizing designs through color and placement, enabling precise, repetitive patterns using a high-pigmented stamping polish.
Key Takeaways: Your Quick Guide to Stunning Candy Heart Nails
- Choose Your Method Wisely: The complexity of your valentine conversation heart nails depends on the technique: decals are easiest, stamping is quick and professional, and hand-painting offers the most customization.
- Prep is Paramount: For durable and professional candy heart designs, proper nail preparation—including buffing and cleaning the nail plate—is non-negotiable, regardless of whether you choose press-ons or traditional polish.
- Matte Enhances the Look: Applying a matte top coat is the simplest way to achieve the realistic, powdery look of sweet heart nails and is essential for the full candy aesthetic.
- Seal for Longevity: Always use a high-quality top coat, ensuring you “cap the free edge” of your nails, to prevent nail art chipping and extend the wear of your love heart nails.
- Micro-Detailing for Short Nails: If you have short valentine nails, focus on micro-detailing one or two tiny candy hearts nails per finger, using ultra-fine brushes for crisp lines and elegant results.
- Explore 3D Options: To add dimension, Fimo slices adhere to nails well with builder gel, creating a long-lasting, sculpted look that uses specialized gel polish application.
- Ombré Requires Protection: When attempting intricate ombré candy heart effects, always use liquid latex or petroleum jelly around the cuticles to ensure a cleaner and quicker messy nail art cleanup process.
Final Thoughts on Valentines Day Nails Candy Hearts
The trend of stunning candy heart nails remains one of the most expressive and festive ways to celebrate Valentine’s Day, blending playful nostalgia with modern beauty. By exploring the 9 easy methods we’ve outlined—from beginner-friendly decals and press-ons to more advanced ombré and Fimo techniques—you are now equipped with the knowledge to execute a flawless manicure tailored exactly to your skill level and style preferences. Remember that proper prep and a quality top coat are the universal secrets to durability, ensuring your romantic candy nails look fresh and vibrant well past February 14th. We hope this comprehensive guide inspires you to start creating candy heart nails today!
Which of these nine conversation heart nail designs will you try first for Valentine’s Day this 2026? Share your favorites in the comments below!
Last update on 2026-04-27 / Affiliate links / Images from Amazon Product Advertising API