Dreaming of the perfect Valentine’s Day manicure that truly sparkles? While salon appointments can be expensive and time-consuming, achieving that coveted metallic shimmer at home often feels like an impossible task, leaving you frustrated with dull, glittery finishes instead of true mirror effects.
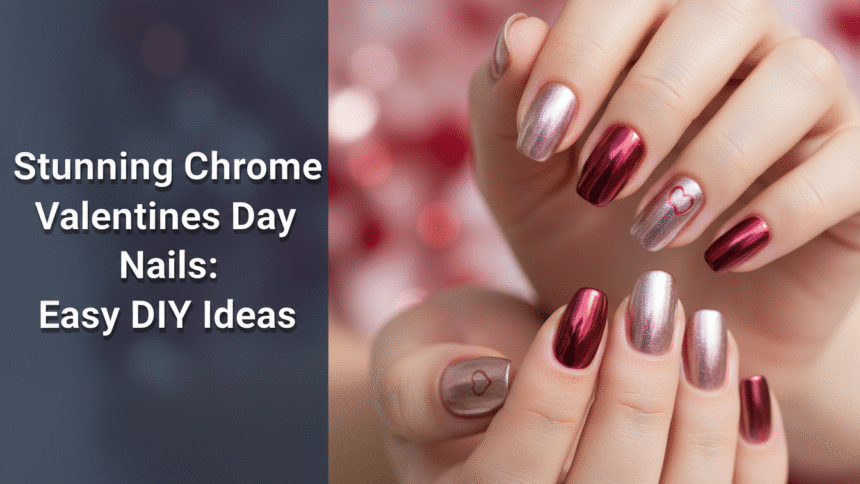
Chrome Valentine’s Day nails are trendy, highly reflective, metallic manicures achieved using fine chrome powder rubbed onto a cured ‘no-wipe’ gel top coat, often featuring romantic colors like pink, red, and rose gold with heart accents for the holiday. This technique delivers a lustrous, mirror-like finish that perfectly captures the romantic essence of the season.
Drawing from comprehensive analysis of current data and proven methodologies, this guide reveals the secrets to stunning chrome nails. You’ll discover 11 specific, DIY-focused designs, along with expert tips and product recommendations, empowering you to create a professional-quality Valentine’s Day look that shines.
11 Stunning Chrome Nail Designs You Can Create This Valentine’s Day 2026
Ready to elevate your manicure game this 2026? These 11 unique chrome valentines nails offer a range of styles and techniques, ensuring you find the perfect look for your celebration. From subtle glazed finishes to bold metallic statements, each design comes with step-by-step instructions and product guidance for a flawless at-home application.
1. Achieve the Glazed Donut Finish with Light Pink Chrome

Pin this stunning glazed donut look to your ‘Valentine’s Day Nail Inspo’ board!
Achieving the famous glazed donut nails with a pink chrome finish involves layering iridescent pearl chrome powder over a light pink gel base, resulting in a subtle, pearlescent sheen that catches the light beautifully. This elegant look is perfect for those who want a delicate yet trendy manicure for Valentine’s Day. The key is in the semi-cured state of the no-wipe top coat, which allows the finely milled powder to buff into a smooth, lustrous manicure.
Products & Tools Used
- Light Pink Sheer Gel Polish (highly pigmented, soak-off formula)
- Non-Tacky No-Wipe Gel Top Coat (essential for powder adhesion)
- Iridescent Pearl Chrome Powder (finely milled for smooth finish)
- LED/UV Curing Lamp (at least 48W)
- Disposable Eyeshadow Applicator or Silicone Tool
Application Steps
- Prep Nails for Chrome: Complete basic manicure prep (shaping, buffing, cleaning). Apply base coat and cure according to instructions.
- Apply Base Color: Apply 1-2 thin coats of the light pink gel polish, curing fully after each layer. This creates the ‘milk bath’ effect.
- Apply No-Wipe Top Coat: Apply a thin layer of no-wipe top coat and cure for only 15-30 seconds (or the exact time specified for your lamp/powder combo). This semi-cured state is critical.
- Buff in Powder: Immediately use the applicator to rub the pearl chrome powder onto the semi-cured surface using firm, circular motions until the glazed metallic finish appears.
- Seal the Look: Dust off excess powder carefully. Apply a final layer of no-wipe top coat and cure fully (60 seconds) to seal the ‘glazed donut finish’.
Pro-Tip: The most critical step is the partial cure of the final top coat before applying the chrome powder. Too long, and the surface is too hard for the powder to stick; too short, and the layer will smudge. Test on one nail first to find your lamp’s optimal time.

2. Crafting the Perfect Classic Red Mirror Chrome Manicure

Save this timeless red chrome look for your date night!
To achieve a classic red mirror chrome manicure, you’ll need a highly pigmented true red gel base and a quality silver mirror chrome powder, which, when rubbed over a semi-cured top coat, transforms into a vibrant, reflective red. This provides a striking shiny detail perfect for Valentine’s Day, creating a luxurious metallic nail finish. The quality of the base gel is paramount, as it dictates the final color saturation and depth of the chrome effect.
Products & Tools Used
- Highly Pigmented True Red Gel Polish (must be opaque in two coats)
- Silver Mirror Chrome Powder (finest grade for reflectivity)
- No-Wipe High Gloss Top Coat (UV-cured)
- Precision Eyeshadow Sponge or Clean Application Brush
Application Steps
- Color Build-Up: After prepping and applying base coat, apply two thin, even layers of the true red gel polish, curing each one fully.
- Apply No-Wipe Top Coat: Apply one thin coat of the no-wipe top coat and cure for the minimum time required for a semi-cured state (check your lamp—usually 15-30 seconds).
- Rub and Buff: Use firm pressure with the applicator to rub the silver mirror chrome powder rapidly over the nail until the red base turns into a reflective, metallic red.
- Clean Excess: Use a clean, soft brush to remove any residual powder from the cuticle line and skin.
- Encapsulate: Apply a standard base coat around the free edge (capping the nail) followed by a final, full layer of no-wipe top coat. Cure fully for 60 seconds to lock in the shine.
Pro-Tip: Use a dedicated silver chrome powder over the red base instead of a red-tinted chrome powder. The silver powder provides the highest reflectivity, and the red base color shines through the ultra-fine pigment to create the superior ‘red chrome’ effect.

3. Creating Minimalist Chrome Hearts on a Neutral Base

Pin this cute, subtle heart accent idea for a chic Valentine’s look!
To create minimalist chrome hearts on a neutral base, you first create a soft, neutral chrome background, then draw uncured heart shapes with a detail liner brush and sprinkle a contrasting chrome powder onto them. This technique allows you to make heart designs that pop with metallic shine against a subtle backdrop. It’s a great approach for simple chrome valentines day nails that offer a unique custom handmade touch.
Products & Tools Used
- Opaque Nude or Neutral Gel Polish
- Gold or Silver Fine Chrome Powder
- Non-Wipe Gel Top Coat
- Detail Liner Brush or Dotting Tool (if using heart stencils)
- UV/LED Curing Lamp
- Rubbing Alcohol and Lint-Free Wipes
Application Steps
- Prep and Base: Complete basic chrome prep (base coat, two coats of nude gel polish, fully cured).
- Apply Base Chrome: Apply a thin layer of no-wipe top coat and fully cure (60 seconds). Rub the neutral base chrome powder over the entire nail to create the background effect, then seal with a top coat and cure.
- Draw the Hearts: Using a highly pigmented, thicker black or white gel polish (or the top coat gel itself if you want translucent hearts), use the detail liner brush to carefully draw small heart outlines or solid shapes. Do not cure.
- Apply Heart Chrome: Sprinkle the colored chrome powder (gold or silver) directly onto the uncured heart shapes. Press lightly with a clean applicator to transfer the metallic pigment only to the wet areas.
- Brush Off and Seal: Gently brush away all excess powder. Apply a final layer of no-wipe top coat over the entire design and cure fully.
Pro-Tip: If you struggle with freehand drawing, draw the heart shapes using a stamping gel and then sprinkle the chrome powder directly over the sticky, uncured stamp. This guarantees crisp edges.

4. Designing Iridescent Pearl Chrome French Tips for Elegance

Pin this elegant French chrome twist to your ‘Wedding Guest Nail Ideas’ board!
Iridescent pearl chrome French tips combine the classic elegance of a French manicure with the modern allure of a chrome finish, achieving a subtle rainbow shift over a crisp white tip. This sophisticated look begins with a sheer nude base, followed by painting the French tip. The iridescent pearl powder is then applied precisely over the semi-cured white tip, ensuring a clean and delicate chrome effect for a fresh take on classic designs.
Products & Tools Used
- Sheer Nude or Pink Base Gel Polish
- Opaque Bright White Gel Polish
- Iridescent Pearl Chrome Powder (finely milled)
- Fine Liner Brush or French Tip Stencils
- Non-Wipe Gel Top Coat
Application Steps
- Sheer Base: Apply 1-2 coats of the sheer nude base coat, curing fully. (Do not apply a chrome layer yet).
- French Tip: Use the liner brush or stencil to paint a crisp smile line on the tip using the opaque white gel polish. Cure fully.
- Chrome Layer: Apply a thin layer of no-wipe top coat only over the white tip area. Cure for the optimal semi-cure time (15-30 seconds).
- Apply Iridescence: Rub the iridescent pearl chrome powder aggressively only on the white tip. Dust off excess.
- Seal: Apply a final, thin layer of no-wipe top coat over the entire nail (base and tip) to seal the ‘iridescent finish’. Cure fully.
Pro-Tip: If you apply the no-wipe top coat thinly over the sheer base before the French tip, you can use rubbing alcohol to wipe away mistakes from the white tip line without disturbing the base color.

5. Mastering the Technique for Luxurious Red Velvet Chrome Nails

Click to save this textured red velvet look for a sensual Valentine’s vibe!
Luxurious red velvet chrome nails are achieved using a specialized magnetic chrome powder or gel, which, when manipulated with a magnet before curing, creates a textured, plush shimmer effect rather than a smooth mirror finish. This unique technique results in a soft, almost three-dimensional appearance that resembles velvet fabric, making for a distinctive and glamorous Valentine’s Day statement. The magnetic particles are drawn to the surface, creating a line or shape that is then locked into place with a full cure.
Products & Tools Used
- Deep Red or Burgundy Gel Polish (or Magnetic Cat-Eye Gel)
- Red Velvet Chrome Powder
- Specialty Nail Magnet Wand (flat or dual-sided)
- Non-Wipe Gel Top Coat
Application Steps
- Base Color: Complete basic prep. Apply two cured layers of the deep red base color.
- Apply Powder (If using non-magnetic polish): Apply a semi-cured no-wipe top coat (15-30 seconds). Rub the velvet chrome powder over the surface and dust off excess, creating a standard red chrome base.
- Apply Final Gel Layer (The Critical Step): Apply a fresh layer of top coat or a layer of magnetic cat-eye gel (this layer must be thick enough to move). Do not cure.
- Magnetize: Hold the magnet wand over the nail (without touching) for 10-15 seconds. You will see the magnetic particles cluster into a velvet line or shape.
- Cure and Seal: Immediately cure the gel fully (60 seconds) to lock the magnetized pattern in place, creating the 3D velvet effect.
Pro-Tip: If using a magnetic powder/gel system, you must work quickly after applying the final top coat because the magnetic particles will begin to settle back down. Cure immediately after achieving the desired velvet texture.

6. Designing a Romantic Rose Gold Chrome Gradient

Save this beautiful gradient for a sophisticated Valentine’s dinner date!
Creating a romantic rose gold chrome gradient involves gently blending rose gold chrome powder onto a semi-cured top coat, often starting heavier at the free edge and fading towards the cuticle using a sponge applicator. This technique creates a seamless ombré effect where the metallic rose gold melts into the base color, providing a soft, lustrous manicure. It’s a popular choice for romantic nail styles, blending different types of chrome finishes for an elegant look.
Products & Tools Used
- Medium Pink or Nude Gel Polish Base
- Rose Gold Chrome Powder
- Small Makeup Sponge (or specialty gradient sponge)
- No-Wipe Top Coat
Application Steps
- Base Cure: Prep nails, apply base coat, and two coats of your chosen base color (pink or nude), curing fully.
- Semi-Cure Top Coat: Apply one layer of no-wipe top coat and semi-cure (15-30 seconds).
- Sponge Application: Load the rose gold chrome powder onto the edge of the sponge. Gently tap and drag the sponge onto the nail, focusing the heaviest application near the free edge and gradually lightening pressure as you move toward the cuticle.
- Buff and Blend: Use a clean, firm brush (like a blush brush) to gently buff and blend the line of demarcation where the powder meets the smooth base.
- Seal and Cure: Dust off thoroughly, cap the free edge, apply a final layer of no-wipe top coat, and cure fully.
Pro-Tip: For a soft, blurry gradient, use a soft silicone tool to rub the powder, or a fan brush to gently blend the line after the initial sponge application. Avoid using a sponge that is too dense, as it can leave harsh lines.

7. Applying Silver Chrome with Bold Red Drips for an Artistic Look

Pin this bold, artistic drip design to your ‘Edgy Nail Art’ board!
To achieve artistic silver chrome nails with bold red drips, you first create a flawless silver mirror chrome base over black gel, then use a high-viscosity red 3D or painting gel to craft the dimensional drip effect. This advanced design offers a striking contrast between the highly reflective silver and the thick, glossy red accents, making a statement for detailed chrome valentines nails. The key is using a gel with the right consistency to prevent running before curing.
Products & Tools Used
- Black Gel Polish (optimal base for true silver chrome)
- Silver Mirror Chrome Powder
- High-Viscosity Red 3D/Painting Gel
- Dotting Tool (for placing drip start points)
- Fine Liner Brush (for dragging the drips)
Application Steps
- Chrome Base: Apply black base gel, cure fully. Apply no-wipe top coat and semi-cure (20-30 seconds). Rub silver chrome powder over the entire nail and seal with a top coat, curing fully (60 seconds).
- Prepare Drips: Place small dollops of the high-viscosity red 3D gel polish near the cuticle line using the dotting tool.
- Create Drips: Use the fine liner brush to gently drag the red gel downwards at irregular lengths, creating the flowing ‘drip’ effect. Allow the gel’s surface tension to settle for a minute. Do not cure yet.
- Final Cure: Once satisfied with the drip shapes, cure the entire design fully for 60-90 seconds (longer needed for thicker 3D gels).
Pro-Tip: If the red gel is too thin, it will run over the sides. If you don’t have a thick 3D gel, mix a small amount of clear acrylic powder into your regular red gel polish to thicken the viscosity for a perfect drip consistency.

8. Achieving a Sophisticated Matte Chrome Finish (The Anti-Gloss)

Pin this unique matte metallic look to your ‘Alternative Nail Art’ board!
Achieving a sophisticated matte chrome finish involves applying a high-quality matte gel top coat over a fully cured and sealed glossy chrome layer, transforming the reflective surface into a muted, non-shiny metallic texture. This offers a unique contrast to traditional shiny chrome nails, providing the metallic effect without the high gloss. It’s an excellent option for subtle chrome valentines that stand out due to their unexpected texture.
Products & Tools Used
- Highly Pigmented Gel Base Color (Red or Pink)
- Chrome Powder of Choice (Silver or Gold)
- Non-Wipe Gel Top Coat (Standard Gloss)
- High-Quality Matte Gel Top Coat (The final step)
Application Steps
- Initial Chrome Application: Follow steps 1-4 of any standard chrome tutorial (base color, semi-cure no-wipe top coat, rub in powder). Dust off excess.
- First Seal: Apply a standard, glossy no-wipe top coat and cure fully (60 seconds). This step is essential to protect the delicate chrome pigment from the matte top coat.
- Apply Matte Finish: Apply a thin, even layer of the high-quality matte gel top coat over the sealed chrome.
- Final Cure: Cure the matte top coat fully (60-90 seconds, as matte gels sometimes require longer). Cleanse the tacky layer if necessary, although most quality matte coats are non-wipe.
Pro-Tip: If your matte finish comes out streaky, you likely applied the layer too thick, or the chrome layer beneath was not fully dust-free. Always ensure the matte coat is applied evenly and thinly over a clean, fully cured surface.

9. Optimizing the Look: Micro Chrome Designs for Short Nails

Pin this short nail optimization guide to your ‘Manicure Ideas for Short Nails’ board!
Optimizing micro chrome designs for short nails means focusing on minimalist accents like a subtle cuticle chrome outline or tiny heart patterns, which enhance the limited nail surface without overpowering it. These approaches are among the best chrome nail designs for short nails, providing a chic touch. Crucially, always wrap the free edge of the nail with a final top coat to seal chrome design and prevent chipping, ensuring a long lasting chrome effect even on shorter lengths.
Products & Tools Used
- Sheer Nude or Pink Gel Polish Base
- Rose Gold or Silver Chrome Powder
- Precision Liner Brush (with short bristles)
- No-Wipe Gel Top Coat
- Cuticle Oil
Application Steps
- Prep & Color: Shape nails (square or round) and prep cuticles. Apply base coat and 1-2 thin coats of the sheer base color, curing fully.
- Outline Design: Apply a non-wipe top coat and semi-cure. Use the precision liner brush to apply the chrome powder only along the cuticle line for a subtle ‘micro chrome’ outline.
- Alternative Micro Hearts: Alternatively, apply a fully cured chrome base (as in Step 1 of Section 3). Then, use a dotting tool and clear gel to make tiny heart shapes and sprinkle a contrasting powder color over the tiny wet shapes. Cure.
- Wrap and Seal: Crucial for short nails: Apply the final no-wipe top coat, ensuring you wrap the brush completely around the free edge of the short nail to cap the chrome. Cure fully.
Pro-Tip: Short nails benefit most from vertical designs, such as a single chrome stripe down the center, which helps elongate the nail bed. Avoid large, bulky stickers or designs that consume the entire nail surface.

10. Styling an Edgy Black Chrome Anti-Valentine’s Day Look

Pin this anti-Valentine’s Day statement to your ‘Gothic/Edgy Nail Inspo’ board!
To style an edgy black chrome anti-Valentine’s Day look, begin with a perfectly opaque jet black gel base, apply gunmetal gray or silver chrome powder for a deep, reflective finish, then add optional silver accents like broken hearts or chains. This bold chrome valentines approach uses the highest reflectivity silver or gunmetal chrome powder over black to achieve a unique, dark metallic effect. The secret lies in a flawlessly opaque and fully cured black base, which creates the deepest metallic finish.
Products & Tools Used
- Highly Opaque Jet Black Gel Polish (must be fully cured)
- Gunmetal Gray or Silver Chrome Powder (for deep reflection)
- Non-Wipe Gel Top Coat
- Fine Detail Liner Brush (for optional silver accents)
Application Steps
- Perfect Black Base: Prep nails. Apply 2-3 coats of jet black gel polish, curing each layer fully until completely opaque.
- Semi-Cure Top Coat: Apply no-wipe top coat and semi-cure (check for minimum stickiness—usually shorter than the full cure).
- Apply Chrome: Rub the chrome powder aggressively. The black base will transform the silver or gunmetal powder into a deep, dark, reflective chrome.
- Optional Accents: Apply another thin layer of top coat and cure fully. Use a silver or white gel polish with the fine liner brush to draw small anti-love accents (e.g., broken hearts, tiny chains) over the sealed chrome. Cure.
- Final Seal: Apply a final top coat over the entire design and cure fully.
Pro-Tip: If the black gel base is not completely cured before applying the no-wipe top coat, the entire manicure can lift or bubble. Ensure the UV/LED light cure is thorough on the dark pigments, often requiring an extra 15 seconds.

11. Step-by-Step Guide to DIY Chrome Press-On Nails

Pin this affordable DIY press-on hack to your ‘Budget Beauty’ board!
To create DIY chrome press-on nails, you first apply and cure all gel layers and chrome powder to the press-on tips before attaching them to your natural nails, making it a quick and mess-free process. This method allows for easy chrome application and curing, and is an affordable chrome press on nails solution, perfect for creating salon quality at home. The chrome powder is compatible with press on chrome nails via a gel application, transforming clear plastic tips into stunning works of art.
Products & Tools Used
- Clear or Neutral Full-Cover Press-On Tips (sized correctly)
- High-Quality Liquid Nail Glue or Adhesive Tabs
- Gel Base Coat, Top Coat, and UV/LED Lamp
- Chrome Powder and Applicator
- Small Clay or Putty (to hold tips during painting)
Application Steps
- Prep Tips: Place the press-on tips onto a blob of clay or putty (sticky tac) so they stand upright like a mini nail studio. Clean and lightly buff the surface of each tip.
- Design Chrome: Apply base gel, color gel (pink/red), no-wipe top coat, and the chrome powder to each press-on tip, curing at each step, following any of the 10 designs above. Ensure the chrome is sealed with a final top coat and cured fully.
- Natural Nail Prep: Prepare your natural nails by lightly buffing the surface and wiping with rubbing alcohol. Apply cuticle oil afterward.
- Apply Tips: Apply a small bead of nail glue to the back of the press-on tip and to your natural nail. Press firmly down and hold for 10-20 seconds, starting from the cuticle.
Pro-Tip: For maximum wear time (up to two weeks), dehydrate your natural nail completely with rubbing alcohol before applying glue. For quick, temporary wear (1-2 days), use adhesive tabs instead of liquid glue for easy removal.

FAQs About valentines day nails chrome
What kind of polish do you need for chrome nails?
For a true, lasting chrome effect, you must use a gel system that includes a quality gel base coat, a colored gel polish base, and a specialized non-tacky ‘no-wipe’ gel top coat. The no-wipe top coat is essential because its specific chemical formulation allows the ultrafine chrome powder to adhere and buff easily without creating smudges or streaks. Traditional lacquer polishes are too porous and cannot provide the smooth, non-porous surface required for the mirror finish, often leading to a dull or glittery result instead of the desired metallic sheen.
Can you do chrome nails at home successfully without professional tools?
Yes, you can absolutely create high-quality chrome nails at home, but certain professional-grade tools are necessary for the process to work, primarily a UV or LED curing lamp. While you don’t need salon-grade ventilation systems, you must have a dependable lamp for curing the gel polish layers and the chrome powder itself. Additionally, using high-quality chrome powder, a no-wipe gel top coat, and precision application tools like a silicone brush or eyeshadow applicator will greatly improve your results, ensuring a true ‘salon quality at home’ finish.
How long do chrome nails typically last?
When properly applied over a gel polish system and sealed correctly, chrome nails typically last between two to three weeks, similar to a standard gel manicure. Longevity is highly dependent on meticulous sealing of the edges, ensuring the final top coat fully encapsulates the chrome pigment, especially at the free edge of the nail. If the powder is applied without proper sealing or is applied to a natural nail instead of gel, you risk premature chipping and the chrome finish may only last a few days.
What causes chrome powder not sticking to the nail?
The most common reason for ‘chrome powder not sticking’ is incorrect curing time of the final no-wipe top coat layer. The top coat needs to be cured just long enough to be dry to the touch, but still slightly warm and receptive to the pigment. If cured too long, the surface becomes too hard and non-porous. Other causes include leaving lint or cuticle oil residue on the nail surface before applying the powder, which prevents proper adhesion and results in an uneven chrome finish.
What are the best chrome nail designs for short nails?
The best chrome nail designs for short nails focus on vertical patterns and minimalist accents to elongate the nail bed without cluttering the limited surface area. Excellent ideas include a subtle ‘micro chrome’ line tracing the cuticle, a single bold chrome stripe down the center, or a simple ‘pink chrome nails’ base with one small, centrally placed heart. Avoid large decals or complex ombré effects which can overwhelm the small canvas, utilizing ‘best chrome nail designs for short nails’ techniques for maximum visual impact.
How do I choose the right chrome powder color for my base polish?
You choose the chrome powder based on the desired final effect: if you want a color shift (iridescent/glazed), use a fine white pearl powder; if you want a true metallic mirror color (red, pink, blue), use a silver powder over a pigmented base gel. Silver powder offers the highest reflectivity, allowing the base color to shine through with a mirror finish. Colored chrome powders are typically less reflective and often result in a velvet or shimmer texture rather than a pure mirror sheen, offering different ‘types of chrome finishes’.
Are chrome nails damaging to natural nails?
Chrome nail application itself is generally not damaging to natural nails, but improper application and removal of the underlying gel polish is the primary risk. The chrome powder is inert and non-toxic. However, forcefully scraping off the gel polish or using harsh filing to remove the layers can cause significant ‘damaged nails from chrome’. Always follow proper removal protocols, like soaking the gel layers in acetone, to ensure ‘safe chrome nail removal’ and maintain nail health.
What’s the difference between gel chrome and acrylic chrome nails?
Gel chrome involves applying chrome powder over a cured, non-tacky gel polish layer, while acrylic chrome involves encapsulating the powder within the final acrylic or dip powder layer, or applying it over a sealed acrylic surface. Gel chrome provides a smoother, higher shine mirror finish due to the precision of the gel top coat. Acrylic chrome often yields a more textured or velvet finish, especially if the powder is mixed directly into the final acrylic layer, addressing the ‘gel chrome vs acrylic chrome’ debate.
How to fix chipped chrome nails before Valentine’s Day?
To quickly ‘fix chipped chrome nails’ before a holiday event, gently buff the chipped area to smooth any rough edges, then use a matching high-pigment nail lacquer to fill in the color gap. Once dry, apply a layer of clear top coat or a quick-cure gel top coat to reseal the area. This spot repair is temporary but effective. For small chips, the fastest solution is often applying a small sticker, charm, or a dot of glitter over the imperfection before resealing.
What are some good alternatives to chrome nails for Valentine’s Day?
If you prefer alternatives to the high-maintenance chrome look, excellent ‘valentines day nails inspiration other than chrome’ include traditional high-gloss red or pink gel manicures, subtle glitter ombré, or simple heart decals sealed under a standard top coat. Other trendy options include French tips with a red or pink smile line, or using ‘holographic nails’ polish which offers a similar metallic shift without requiring chrome powder and gel application steps, catering to a wider audience.
Final Thoughts on Stunning Chrome Valentines Day Nails
The trend of ‘valentines chrome nails’ offers a perfect blend of high-impact glamour and seasonal romance, allowing for incredible customization from the subtle ‘glazed donut finish’ to the bold ‘red mirror chrome’. By prioritizing meticulous nail prep, investing in a high-quality no-wipe top coat, and adhering to the precise semi-curing times detailed in our guide, you possess the knowledge to skip the salon and master any of the 11 stunning looks presented. The difference between a glittery finish and a true reflective chrome lies entirely in the technique—and now you have the proven methods used by ‘expert nail technicians’ at your fingertips.
This Valentine’s Day 2026, demonstrate your expertise and experience by creating a personalized manicure that truly shines. With the right tools and these ‘diy chrome valentines day nails’ instructions, achieving salon-quality metallic nail art is not only possible but entirely within your control.
Which of the 11 chrome designs are you trying first for your Valentine’s Day look? Let us know in the comments below!
Last update on 2026-04-27 / Affiliate links / Images from Amazon Product Advertising API