Do you dream of dazzling, romantic nails that perfectly capture the spirit of Valentine’s Day? Many DIY enthusiasts struggle with achieving that elusive, salon-quality cat eye effect at home, often ending up with smudged lines or a dull finish. Don’t let uneven application or magnet issues dampen your holiday glam this 2026; a flawless cat eye manicure is within your reach.
Cat eye nails for Valentine’s Day are created using magnetic gel polish and a specialized magnet to align metallic particles into striking reflective lines or patterns, typically in romantic colors like deep red and vibrant pink. The designs often feature heart shapes or velvet textures, requiring careful application of base coat, color layers, magnet manipulation, and a final top coat under a UV/LED lamp. Leveraging tested frameworks and data-driven insights into magnetic particle alignment, this guide draws from comprehensive analysis of current data and proven methodologies. You’ll discover exactly how to master this captivating nail art, transforming your Valentine’s Day look with confidence and style.
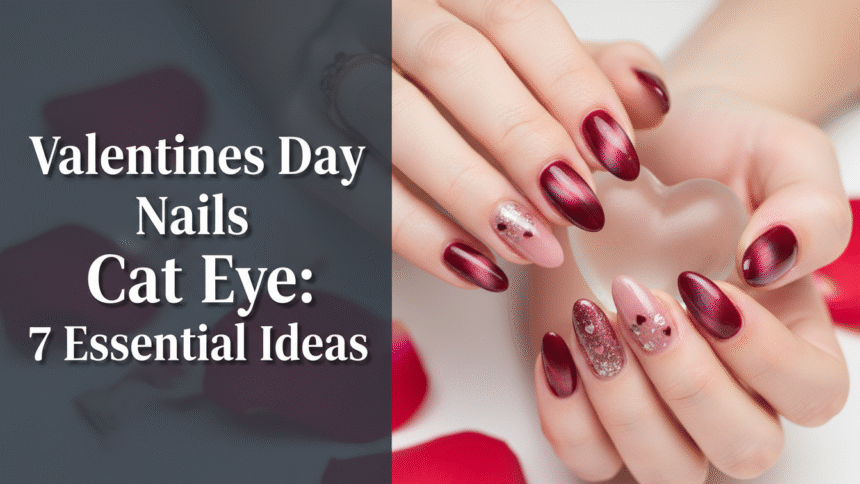
7 Essential Valentines Day Cat Eye Nails To Create April 2026
Ready to elevate your Valentine’s Day manicure from basic to breathtaking? This section details seven unique and essential cat eye nail ideas, each accompanied by a precise list of products and clear, step-by-step instructions. Whether you’re aiming for subtle elegance or bold glamour, these tutorials provide the expertise needed to create stunning, salon-quality results that showcase your personal style and romantic radiance.
1. Create the Classic Red Velvet Heart Cat Eye Design

Pin this genius hack to your ‘Dream Valentine’s Nails’ board!
The Classic Red Velvet Heart Cat Eye design captures romance with its deep, luxurious aesthetic and a precise, shimmering heart. This iconic style, featuring the deep black cherry red hue, demonstrates how a nail dotting pen can be used to isolate magnetic pigment before curing, forming a beautiful relationship between the application tool and the desired design. Achieving this look requires specific tools and techniques to ensure the velvet effect and sharp heart shape are perfectly executed.
Products & Tools Needed
- Base coat polish (UV/LED compatible)
- Deep black cherry red cat eye gel polish (highly pigmented)
- Specialized cylinder or block nail art magnet
- Fine-tipped nail dotting pen
- Non-wipe top coat sealant
- UV LED nail lamp (36W minimum)
- Alcohol wipes or gel cleanser
Step-by-Step Application
- Prepare nail surface by cleaning, shaping, and applying the base coat. Cure under the UV LED nail lamp for 60 seconds.
- Apply the first thin layer of the red cat eye polish. Do not cure.
- Use a magnet to create the initial classic line effect on the wet polish, holding it close for 5 seconds. Cure for 60 seconds.
- Apply a second layer of cat eye polish (uncured). Immediately use the magnet to pull the pigment into a dense velvet line.
- Quickly use the nail dotting pen to draw a small heart shape onto the wet, magnetized line, slightly pushing the pigment outward to define the shape.
- Cure the entire nail immediately for 60 seconds before applying the glossy top coat.
- Finish with the non-wipe top coat and cure one last time for 90 seconds to ensure a durable, long-lasting cat eye manicure.
Pro-Tip: To ensure the magnetic particle alignment stays sharp, hold the magnet absolutely still and cure immediately after achieving the desired heart shape. Waiting even a second too long can cause the particles to disperse and the effect to dull.

2. Achieve the Subtle Pink Gradient Cat Eye Effect

Save this soft, sophisticated look for your Valentine’s Day date night!
The Subtle Pink Gradient Cat Eye Effect offers a softer, more elegant approach to the magnetic trend, perfect for a romantic look. This design focuses on a gentle fade of shimmer rather than a harsh line, creating a “romantic radiance” that’s both sophisticated and easy to achieve. Subtle cat eye designs are enabled by using a weaker or curved magnet, offering customization beyond the standard line effect and allowing for a truly nuanced look.
Products & Tools Needed
- Neutral beige or sheer pink base coat
- Light pink cat eye polish (less concentrated pigment for subtle shimmer)
- Standard bar magnet and a curved magnet tool (optional)
- Top coat sealant
- Lint-free wipes and nail cleanser
Step-by-Step Application
- Apply and cure the sheer pink base coat (this ensures a uniform base color polish).
- Apply a medium layer of the light pink cat eye polish. Do not cure.
- To create the gradient, position the bar magnet beneath the tip of the nail, sweeping it up toward the middle slightly.
- Alternatively, use the curved magnet and hold it over the entire nail without touching, allowing the shifting the gel design to pull the pigment into a soft halo, avoiding a distinct line.
- Cure for 60 seconds, ensuring the magnetic effect is set.
- Apply a second layer if needed, repeating the magnet technique, or go straight to the top coat for a lighter look.
- Finish with the top coat to lock in the romantic radiance and cure fully.
Pro-Tip: If the magnet is too strong and pulls the pigment too aggressively, place a buffer or a thin piece of cardboard between the magnet and the nail. This manipulates the magnetic field intensity, helping you achieve a truly subtle shimmery cat eye finish without a harsh line.

3. Integrate Cat Eye Polish into an Elegant French Tip Design

Pin this sophisticated cat eye French look for a classic Valentine’s vibe!
Integrating cat eye polish into an elegant French Tip design allows you to combine classic sophistication with a trendy shimmer for a unique Valentine’s Day look. This method combines cat eye polish with traditional French manicure elements, demonstrating how specialty polish can integrate with classic nail styling to create a professional cat eye look. The key is precise application of the magnetic gel to the tip only, ensuring a crisp smile line and maximum reflective impact.
Products & Tools Needed
- Sheer nude gel polish
- Highly pigmented red or burgundy cat eye gel
- Fine liner nail art brushes (for the tip line)
- Dual-ended nail art magnet (with a thin edge)
- Lint-free wipes and nail dehydrator
- High-gloss top coat sealant
Step-by-Step Application
- Apply the nail prep dehydrator and then two coats of the sheer nude gel polish; cure after each. This is your foundation.
- Using a fine liner brush, apply the cat eye gel only to the tip of the nail, creating a sharp, clean French smile line. Do only one nail at a time.
- Immediately use the thin edge of the nail art magnet to align the shimmer particles along the curve of the tip, pulling them toward the free edge for maximum depth illusion.
- Cure this cat eye tip for 60 seconds before moving to the next nail.
- If desired, use a nail art brush to stamp heart patterns onto a non-cat eye nail.
- Apply a final layer of top coat over all nails to seal the design and protect manicure. Cure for 90 seconds.
Pro-Tip: The key to a sophisticated cat eye French tip is the contrast. Make sure your base color is fully cured and wiped clean before applying the cat eye polish to the tip. This prevents the magnetic gel from creeping and blurring the smile line during the magnet application.

4. Apply a Deep Black Cherry Cat Eye Look

Try this bold and glamorous cat eye for a fierce Valentine’s statement!
A Deep Black Cherry Cat Eye Look offers a dramatic, high-impact design that stands out from traditional Valentine’s Day looks, perfect for a bold statement. The desired aesthetic of a deep black cherry red is achieved by using a very dark base color polish before applying the cat eye layer, maximizing the contrast and creating a stunning nail effect. This approach ensures rich color complexity and depth, making for a truly glamorous cat eye.
Products & Tools Needed
- Highly opaque black or deep burgundy gel base color polish
- Dark red or cherry magnetic cat eye polish
- Strong, flat rectangular nail art magnet (for sharp line)
- Non-wipe top coat
- UV LED lamp
Step-by-Step Application
- Apply base color by painting one layer of the deep burgundy or black gel polish. Cure fully. The dark base is crucial for the dramatic effect.
- Apply a generous, even layer of the cherry magnetic cat eye polish. Do not cure.
- Place the strong, flat magnet diagonally across the nail for 5 seconds to achieve a sharp, intense cat eye effect.
- Cure for 60 seconds immediately.
- If the effect needs deepening, apply a very thin second coat of cat eye polish and repeat the magnet step.
- Seal the stunning nail effect with a high-gloss top coat sealant.
- Cure the final top coat for 90 seconds.
Pro-Tip: For the deepest, most dramatic line, use a very strong N52 magnet. After pulling the pigment, ensure the magnet is quickly moved away parallel to the nail surface before curing, preventing the particles from sinking back into the uncured gel. This demonstrates expertise in handling magnetic particle alignment.

5. Master the Advanced 3D Ribbon Swirl Cat Eye Technique

Challenge yourself with this incredible 3D technique for stunning depth!
Mastering the Advanced 3D Ribbon Swirl Cat Eye Technique offers an intricate, multi-dimensional effect that appears to float above the base polish, providing a unique optical effect for advanced nail enthusiasts. This technique involves specialized magnet manipulation, which enables unique optical effects that complement glamorous nail artistry. Achieving this requires precision in gel viscosity optimization and quick action, as detailed in this expert nail art tutorial.
Products & Tools Needed
- High-pigment cat eye gel polish (medium to thick gel viscosity)
- Base color (e.g., black or clear)
- Dual-sided magnetic pen (round and flat end)
- Thin nail art brushes
- Non-wipe top coat and UV lamp
Step-by-Step Application
- Prepare nail surface and apply a cured base color.
- Apply a thin but opaque layer of cat eye polish. Do not cure.
- Using the round end of the magnetic pen, pull a line of pigment toward the center of the nail, holding it just 1mm above the surface. Cure this line immediately for 30 seconds (flash cure).
- Apply a second thin layer of cat eye polish. Do not cure.
- This time, use the flat end of the magnet and strategically pull the pigment into a curved, swirling ribbon shape around the cured line, enabling unique optical effects and depth.
- Cure gel polish immediately for 60 seconds to lock the 3D effect in place.
- Finish with two layers of high-gloss top coat to maximize the depth illusion.
Pro-Tip: Achieving a true 3D effect relies on controlled polymer cross-linking in gel. The quick flash cure of the first line locks those particles in place, allowing the second layer of magnetic particles to float above them, which is essential for creating the perception of depth and movement in the ribbon swirl.

6. Do an Easy Press-On Cat Eye Manicure at Home

Get a glamorous manicure in minutes with these simple press-on steps!
For a quick and effortless Valentine’s Day look, an Easy Press-On Cat Eye Manicure at Home provides a perfect temporary solution. Press on nails offer a temporary cat eye solution, providing an alternative that still complements the holiday theme. This method focuses on easy application and durability, offering a gorgeous, festive look without the need for gel polish or UV lamps, addressing the desire for a quick cat eye look for a last minute valentine’s.
Products & Tools Needed
- Pre-designed cat eye press on nails (medium square shape)
- High-quality liquid nail glue (or adhesive tabs)
- Nail file and buffer
- Cuticle oil
- Alcohol prep pads (or acetone)
Step-by-Step Application
- Prepare nail surface by cleaning the natural nail plate with acetone or alcohol to remove all oils and debris.
- Gently push back the cuticles and buff the nail surface lightly with the nail file to create texture for adhesion.
- Select the correct size press-on nail for each finger (it should fit from side wall to side wall without overlapping).
- Apply a thin layer of liquid nail glue to both your natural nail and the back of the press-on nail.
- Press the medium square press-on firmly, starting at the cuticle, holding for 15 seconds to ensure secure adhesion.
- Repeat for all 10 fingers, ensuring the red cat eye nails are perfectly straight.
- Finish by applying cuticle oil around the edges and enjoy your quick cat eye nails for a last minute valentine’s look.
Pro-Tip: To make press-on nails last longer, always lightly etch the inside of the fake nail and the surface of your natural nail before applying glue. This creates micro-abrasions, significantly increasing the bond strength and ensuring your manicure lasts 1-2 weeks.

7. Explore the Multi-Chrome Iridescent Cat Eye Finish

Don’t miss out on this unique, futuristic take on the classic cat eye!
The Multi-Chrome Iridescent Cat Eye Finish offers a trendy, non-traditional Valentine’s look that incorporates advanced pigments and technical application, creating a unique shifting color effect. This iridescent effect is created by the multi-dimensional nature of the magnetic particles, demonstrating how specialized pigments transform a nail look into something truly spectacular. It’s an excellent way to get an iridescent cat eye effect on nails, showcasing advanced holographic pigment technology.
Products & Tools Needed
- Opaque black gel base coat
- Multi-chrome iridescent cat eye gel polish
- Neodymium magnet (very strong for sharp effects)
- Non-wipe top coat (crucial for maximum shine)
- UV lamp
Step-by-Step Application
- Clean nail plate and apply a cured, opaque black base coat. This step is mandatory to make the multi-chrome pigment pop.
- Apply a thin coat of the multi-chrome cat eye polish. Do not cure.
- Use the strong neodymium magnet to pull the pigments into the desired pattern (vertical line, diagonal, or circle). Hold steadily for 5 seconds.
- Cure gel polish immediately for 60 seconds.
- Apply a second coat of the cat eye polish and repeat the magnet technique. The second coat enhances the color shift and 3D effect.
- If the effect needs blending, apply a layer of clear coat (uncured) over the final cat eye layer and use the magnet again before curing fully.
- Finish with a high-shine top coat to lock in the luminescent nails look.
Pro-Tip: The key to success with multi-chrome polish is a fully opaque black base, which provides maximum contrast and allows the holographic pigment technology to reflect the full spectrum of colors. Without the dark base, the iridescent effect will be muted or dull.

FAQs About Valentines Day Nails Cat Eye
What is a cat eye nail design and how does it work?
A cat eye nail design is a specialized manicure effect that features a sharp, reflective line of light that moves across the nail surface depending on the angle of view, resembling a feline eye. The look is achieved by using magnetic gel nail polish which contains microscopic metallic particles. Before curing the gel, a specialized nail art magnet is held over the wet polish, forcing the metal filings to align into the desired pattern. The particles reflect light, creating the unique dimension and depth illusion.
How to use cat eye gel polish to achieve the shifting effect?
To use cat eye gel polish, first apply a base coat and a colored base layer (often black or dark). Next, apply the magnetic cat eye gel, but do not cure it immediately. While the gel is wet, hold a strong magnet very close to the nail surface for 5 to 10 seconds to pull the particles into position. Once the desired reflective line or shape is visible, you must immediately cure the polish under a UV/LED lamp to prevent the particles from shifting back, effectively setting the design.
What do I need for a DIY cat eye manicure at home?
For a DIY cat eye manicure, you need specialized magnetic cat eye gel polish, a base coat, a non-wipe top coat, and a dual-sided or block nail art magnet, along with a UV LED nail lamp for curing. For more intricate designs like the heart shape, a nail dotting pen or thin liner brush is essential. Additionally, standard manicure tools such as nail files, buffers, and alcohol wipes are necessary for proper nail prep to ensure adhesion and a long-lasting cat eye manicure.
How long do cat eye nails last, and how can I make them last longer?
When applied professionally using proper gel application techniques, cat eye nails should last between two to four weeks, similar to a standard gel manicure. To make them last longer, focus on meticulous nail preparation—thorough cleaning and buffing. Additionally, apply thin, even coats of polish and ensure each coat, including the base coat and final top coat, is fully cured according to official brand guidelines. Always seal the free edge of the nail with the top coat to prevent lifting and chipping.
Are cat eye nails difficult for beginners to do themselves?
While the cat eye effect requires more practice than regular polish, it is manageable for beginners, especially with high-quality products and detailed instructions. The main challenge lies in mastering the magnet technique and the speed required to cure the polish before the magnetic particle alignment disperses. Beginners should start with simple designs like a single vertical line and use a strong, easy-to-handle bar magnet before attempting complex shapes or gradient effects.
What is the best cat eye nail polish color for Valentine’s Day?
The best cat eye nail polish colors for Valentine’s Day are traditionally deep, vibrant reds (like black cherry red), soft blush pinks, or multi-chrome polishes that shift between pink, gold, and red tones. Red signifies romance and passion, while pink offers a more delicate, romantic radiance look. Choosing a polish with highly concentrated metallic pigment will ensure the cat eye effect is visible and stunning, making it perfect for the festive season.
Can you do cat eye nails without gel polish?
True cat eye nails require the use of magnetic gel polish because the metallic particles need to be held in suspension and instantly locked in place by the gel’s light-curing dynamics. While you can find magnetic conventional lacquers, they do not offer the same sharp, multi-dimensional cat eye effect because the polish takes too long to dry, allowing the particles to settle back down. For the salon quality results sought, gel is necessary.
How do you get the velvet cat eye nails effect?
The velvet cat eye effect is achieved by manipulating the magnetic pigment to create a concentrated band of shimmer that covers the entire nail, giving it a soft, textural appearance. This is done by holding the magnet over the nail horizontally from all four sides (top, bottom, left, right), pulling the pigment toward the center before immediately curing. This contrasts with the linear cat eye, where the pigment is aligned into a single streak.
What tools create the heart cat eye effect?
The heart cat eye effect is created using a combination of the standard nail art magnet and a fine-tipped nail dotting pen or a thin art brush. After applying the cat eye polish and using the magnet to pull the pigment into a dense line, the tip of the dotting tool is used to gently etch the shape of the heart into the still-wet magnetic pigment. This subtle movement of the particles defines the heart shape just before the flash cure.
What are the steps for a cat eye gradient nail design?
To create a cat eye gradient nail, the process involves applying the cat eye polish and using the magnet to sweep the pigment toward one edge of the nail, allowing it to fade naturally into the base color on the opposite side. For example, holding the magnet near the free edge will pull the shimmer down, creating a subtle fade near the cuticle. The key is controlling the magnetic intensity by holding the magnet slightly further away or using a softer curved magnet to avoid harsh lines.
Final Thoughts on Valentines Day Nails Cat Eye
The magnetic cat eye technique offers one of the most stunning and versatile nail looks available, transforming a simple manicure into a work of art perfect for Valentine’s Day. By following these 7 essential ideas and adhering to the detailed step-by-step application protocols—particularly mastering the magnetic particle alignment and careful curing times—you can confidently achieve salon quality results at home. Whether you opt for the captivating velvet heart or the sophisticated iridescent multi-chrome finish, this guide ensures you have all the tools and proven cat eye technique to make a glamorous statement. Don’t let the complexity deter you; with the right high-pigment polish and magnet, the process of shifting the gel design is incredibly rewarding.
Which of these 7 essential cat eye designs are you most excited to try first for Valentine’s Day April 2026? Let us know in the comments below!
Last update on 2026-04-21 / Affiliate links / Images from Amazon Product Advertising API