Dreaming of beautiful nails for Valentine’s Day but overwhelmed by endless design options? Finding a sophisticated yet easy-to-achieve look that truly complements your hands can be a challenge.
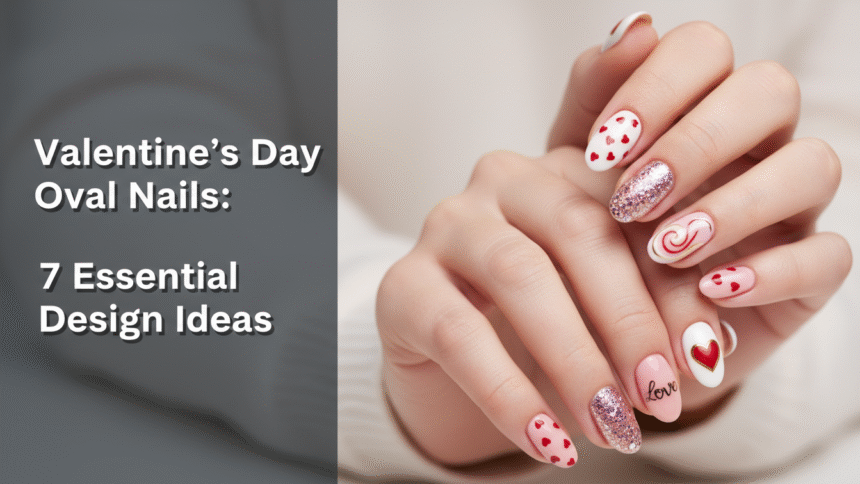
Oval nails are the chicest and most flattering choice for Valentine’s Day 2026 designs, offering a sophisticated look that elongates the fingers while providing an elegant canvas for classic romantic themes like red, pink, and minimalist heart art. This universally loved shape perfectly balances modern trends with timeless elegance. Drawing from comprehensive analysis of current data and proven methodologies, this guide presents the definitive selection for your holiday manicure. You’ll discover seven essential design ideas tailored for your oval nails, ensuring stunning, salon-grade finishes for 2026.
Perfecting Your 2026 Valentine’s Look: Why Oval Nails Are The Chicest Choice
As Valentine’s Day 2026 approaches, the quest for the perfect manicure often begins. While many nail shapes emerge and fade, oval nails consistently hold their ground as a top choice for fashion enthusiasts and beauty professionals alike. This shape, distinguished by its soft, rounded edges and elongated profile, offers a sophisticated oval nails aesthetic that beautifully complements any hand, making it the ideal canvas for festive valentine nails. Unlike more dramatic almond shape nails, the gentle curve of the oval provides a balanced and classy short oval nails look.
Choosing oval for your Valentine’s Day nails oval shape isn’t just about timeless appeal; it’s about achieving a visually enhancing effect. The shape naturally elongates your fingers, giving them a more slender appearance, which is why it’s a favorite for both short oval nails and longer extensions. This makes it particularly suited for romantic nail designs, from simple valentine day nails to more intricate oval designs. Whether you’re aiming for striking red nails or a subtle pink Valentine’s Day manicure, the oval foundation provides a polished finish. This guide will help you achieve a truly stunning romantic look, covering all styles from cute oval valentines day nails to truly elegant oval valentines nails that are durable valentine nails.
7 Essential Valentine’s Day Oval Nail Designs You Must Try 2026
Ready to transform your oval nails into a work of art this Valentine’s Day 2026? These seven essential design ideas are curated to provide inspiration, detailed instructions, and professional tips to ensure your manicure is nothing short of perfect. Each design highlights the versatility of the oval shape, making it easy to create valentine nail designs at home. From classic looks to modern twists, you’ll discover how to decorate oval nails with style and confidence, creating a long lasting manicure.
1. The Classic Red & White French Tip Oval

Pin this elegant French tip look to your ‘Classy Valentine’s Day Nails’ board!
The Classic Red & White French Tip Oval is a sophisticated twist on a timeless look, perfect for Valentine’s Day, combining the elegance of a traditional French tip with a subtle touch of romantic red. This design leverages the universally flattering oval shape, creating a chic and polished finish. It’s a simple valentine day nails choice that offers striking red nails without being overly bold, making it one of the best oval valentines day nails ideas.
Products & Tools Used
- Sheer nude or light pink base coat (to complement skin tone)
- Bright white polish (highly pigmented for crisp tips)
- Cherry red polish (striking red nails)
- Thin liner nail art brush or French tip guides (to create a perfect curve)
- High-gloss top coat (for a polished finish)
- Acetone cleanup brush
Application Steps
- Prep nails by shaping them into a perfect, symmetrical oval shape, ensuring smooth edges (shape oval nails).
- Apply one coat of sheer nude base and allow to fully dry.
- Using the stencil or liner brush, paint the classic white French tip along the free edge. Cure or allow to dry completely.
- Using the cherry red polish, carefully paint a thin, curved line just below the white tip to create a double-tip effect.
- Apply a high-gloss top coat to protect the art and give a durable finish.
Pro-Tip: For the crispiest French tip lines on short oval nails, apply the base color first, then use a specialized liquid latex barrier around the free edge. This allows you to stamp or paint the white tip without cleanup hassle, simplifying difficult designs.

2. Subtle Pink Glitter Gradient Oval

Don’t forget to Pin this effortless glamour look!
The Subtle Pink Glitter Gradient Oval provides an elegant and sophisticated look, transitioning a soft sheer pink base into a shimmering rose gold or holographic glitter near the cuticle. This design enhances hand beauty, creating a glittering oval nails effect that is both understated and captivating, proving to be a perfect, long lasting manicure choice for Valentine’s Day. It’s an excellent way to achieve elegant oval nails with a vibrant pink nails touch.
Products & Tools Used
- Sheer light pink gel polish (or regular polish)
- Fine-milled rose gold or holographic loose glitter (for a sophisticated oval nails look)
- Cosmetic sponge wedge (small, dense)
- Fan brush (for cleaning excess glitter)
- Cuticle oil
- No-wipe gel top coat (for professional nail design)
Application Steps
- Apply and cure the base color (sheer pink polish). This is the foundation layer.
- Pour a small amount of glitter onto a disposable surface. Dip the corner of the sponge into the glitter.
- Gently dab the glitter onto the nail, concentrating the highest density near the cuticle line.
- Continue dabbing lightly, moving towards the center of the nail, allowing the glitter concentration to naturally fade towards the free edge (create valentine nail designs).
- Use the fan brush to clean up any loose glitter from the skin and cuticle area.
- Seal with two generous coats of no-wipe top coat and cure to ensure a durable formula.
Pro-Tip: When dealing with fine loose glitter on gel manicures, use a specialized base coat or builder gel (polygel application for beginners) as an adhesive layer before placing the glitter. This prevents the glitter from clumping and ensures the “long lasting manicure” adheres properly to the nail plate, enhancing strength.

3. Hot Pink & Candy Heart Decals Oval

Try out this fun, festive nail art for Valentine’s Day!
For a truly playful nail design this Valentine’s Day, Hot Pink & Candy Heart Decals on oval nails offer a cute, vibrant, and incredibly easy-to-achieve look. This design is perfect for those who love hot pink nails and a touch of adorable nail art without needing complex painting skills. The decals provide a salon visit alternative and simplify difficult designs, making them ideal for cute oval valentines day nails.
Products & Tools Used
- Vibrant hot pink nail polish (gel or lacquer)
- Small, assorted candy heart nail decals or stickers
- Tweezers (for precise decal placement)
- Dotting tool (optional for small embellishments)
- Quick-dry top coat
Application Steps
- Apply two coats of the vibrant hot pink polish, curing or allowing to dry fully.
- Carefully pick up the candy heart decals using tweezers. For the best placement, plan where you want your heart design nails to fall on the oval shape.
- Gently press the decal onto the sticky inhibition layer of cured gel, or onto slightly tacky lacquer (decorate oval nails).
- Seal the entire design with a clear top coat, ensuring the polish fully covers the edges of the decals (protect nail art).
- For added durability, apply a second layer of top coat, focusing on the decal edges.
Pro-Tip: Decals can sometimes lift at the edges, causing a “chipped nails fix” issue. To prevent this on acrylic oval nails, use a thin layer of builder gel over the decal before applying the final top coat. This structured gel manicure provides maximum encapsulation and durability.

4. Minimalist Black Heart Outline Oval

Save this minimalist, sophisticated look for V-Day!
The Minimalist Black Heart Outline Oval design offers a chic and understated elegance for Valentine’s Day, moving beyond traditional reds and pinks with a modern, sophisticated oval nails aesthetic. This look focuses on precision and a chic matte finish, making it a perfect choice for those seeking unique oval designs that are simple oval valentines nails while still making a subtle statement. It’s a classy short oval nails option that exudes professionalism.
Products & Tools Used
- Milky white or nude base polish
- Opaque black gel polish (or acrylic paint mixed with top coat)
- Extra fine detail brush (000 size)
- High-quality matte top coat
- UV/LED lamp (if using gel)
Application Steps
- Apply and cure two coats of the base color (milk white or nude).
- Dip the fine detail brush into the black polish, ensuring the brush is almost dry to maintain control.
- Draw a tiny ‘V’ shape on the center of the nail, approximately one-quarter of the way down from the cuticle.
- Using two quick, curved strokes, complete the heart outline without filling it in (decorate oval nails).
- Cure the design. Seal the entire nail with the matte top coat and cure again for the “chic matte finish.”
Pro-Tip: Achieve the best “minimalist oval nail designs” by ensuring the black line is razor-thin. If the line is too thick, use an angled cleanup brush dipped in acetone immediately to sharpen the edges. This demonstrates precision and enhances the sophisticated oval nails aesthetic.

5. Reverse French Manicure Oval (Cherry Red)

Save this sophisticated V-Day twist on a classic!
The Reverse French Manicure Oval in Cherry Red is a striking and modern take on a classic, offering sophisticated oval nails with a bold and vibrant edge for Valentine’s Day. This design emphasizes the elegant, long oval shape by creating a sharp, clean line at the cuticle, providing a unique alternative to traditional French tips. It’s a look that promises long oval valentine’s nails with undeniable elegance, leveraging advanced nail sculpting techniques.
Products & Tools Used
- Sheer base coat (or nude polish)
- Opaque cherry red polish (provides perfect coverage)
- Half-moon guide stickers (or reinforcement hole stickers)
- Precision brush
- High-shine top coat
Application Steps
- Apply the base coat (which will serve as the color of the ‘moon’) and cure or allow to dry.
- Carefully apply the half-moon guide sticker right against the cuticle line, ensuring the curve follows the natural lunula of the nail (applies to short nails or long).
- Paint two coats of the opaque cherry red polish over the rest of the nail and the edge of the sticker.
- While the second coat is still wet (or immediately after curing), carefully peel the sticker away, leaving a clean line of negative space/base coat at the cuticle (create valentine nail designs).
- Seal the entire design with a high-shine top coat, ensuring the line remains crisp.
Pro-Tip: The key to a clean reverse French on long oval nails is ensuring the line is perfectly curved. If you don’t have stickers, use a fine detail brush and pull the deep red color down from the sides toward the center, following the natural curve of the nail bed health importance. This technique requires a steady hand but yields the best “salon-grade finishes.”

6. “Love Potion” Marbled Oval Nails

Try this creative nail art idea—it’s gorgeous for Valentine’s Day!
For a show-stopping Valentine’s Day statement, “Love Potion” Marbled Oval Nails offer intricate oval designs with a beautiful, swirling effect using deep magenta, light pink, and metallic silver accents. This advanced technique, often referred to as marbling nail designs, allows for incredible creativity and transforms your nails into unique oval designs. It’s a perfect way to demonstrate first-hand nail art experience and master nail artist tips.
Products & Tools Used
- Base coat
- Three contrasting polishes (deep magenta, light pink, metallic silver)
- Disposable cup of room-temperature water
- Toothpick or dotting tool (advanced nail art tools)
- Scotch tape or liquid latex (to protect skin)
- Top coat
Application Steps
- Prep nails and apply a base coat. Apply liquid latex around the skin surrounding the nail bed.
- Place a drop of each of the three polishes into the water, allowing them to spread (marbling nail designs).
- Quickly drag the toothpick through the layers of polish to create the desired swirl or heart pattern.
- Dip your oval nail into the water at the desired angle to pick up the design.
- Use the toothpick to remove the excess floating polish before pulling your finger out.
- Remove the latex barrier and seal the design with a high-gloss top coat (protect nail art).
Lesson Learned: Water temperature is critical for achieving successful intricate oval designs. Use room temperature water—if it’s too cold, the polish sinks; if it’s too warm, it dries too fast. Adjusting the technique based on environment demonstrates master nail artist tips and experience.

7. Press-On Oval Nails: Quick Rose Gold Accent

Pin this time-saving beauty solution!
Press-On Oval Nails with a Quick Rose Gold Accent offer the fastest and most convenient way to achieve a perfect Valentine’s Day manicure, providing a stunning salon visit alternative. High-quality oval press-ons are an easy application nails solution, making them ideal for anyone seeking a quick nail change with durable valentine nails. This option for fake nails valentine’s day designs features a chic accent, perfect for a busy schedule.
Products & Tools Used
- High-quality oval press-on nails set (pre-sized and pre-polished)
- Strong liquid nail glue (or adhesive tabs)
- Prep pad (alcohol wipe)
- Nail file and buffer (for customized fitting)
- Cuticle pusher (to ensure a clean fit)
Application Steps
- Gently push back cuticles and lightly buff the natural nail plate to ensure optimal adhesion. Clean nails thoroughly with the prep pad.
- Size the fake nails valentine’s day set to each of your natural nails. Lay them out in order.
- Apply a small drop of nail glue directly to your natural nail and a small bead to the back of the press-on.
- Align the press-on with your cuticle (do not place on the skin) and press firmly for 30 seconds. Repeat for all 10 fingers.
- If necessary, lightly file the edges of the press-ons to perfect the specific oval shape and ensure a seamless blend.
Pro-Tip: The number one reason press-ons lift is poor prep. Before applying, ensure you file nails for oval shape alignment if necessary and use a dehydrator or alcohol wipe. This ensures the best nail adhesion science and prevents moisture from compromising the nail glue.

Key Takeaways: Your Quick Guide to Valentine’s Day Oval Nails
The oval shape consistently proves to be the most versatile and elegant foundation for any Valentine’s Day look, allowing for maximum creativity while maintaining a universally flattering profile. From the timeless sophistication of the Reverse French Manicure to the playful charm of Candy Heart Decals, the “7 essential design ideas” we explored today ensure you have a style blueprint tailored perfectly for 2026. Whether you choose to leverage “high-quality oval press-ons” for convenience or master a complex marbling technique, remember that the key to a successful manicure is meticulous preparation and the confidence to rock your unique “valentine’s day oval nail design.” Use this “ultimate valentine nail guide” as your foundation for a truly stunning look that brings out your elegance.
- Oval Shape Versatility: The oval shape is highly favored for Valentine’s Day 2026 because it elongates the fingers and provides a perfect, sophisticated canvas for both “minimalist oval nails” and more intricate, layered art. This makes it an ideal choice for a polished, elegant oval valentines nails look that enhances any hand.
-
Prioritize Prep for Durability: Regardless of whether you use gel, acrylic, or press-ons, proper nail preparation (shaping, buffing, dehydrating) is the most critical step for a “long lasting manicure” and preventing common “chipped nails fix” challenges. This meticulous approach ensures your beautiful nails made easy last through all your Valentine’s plans.
-
Red, Pink, and Beyond: While classic red and pink remain dominant, integrating sophisticated neutrals (matte beige/black) or metallic accents (rose gold) provides unique oval designs that stand out, aligning with professional nail design trends. These elements allow for creative oval art that diversifies your festive valentine nails.
-
Press-Ons Offer Quality Alternatives: Modern, high-quality “oval press on nails” provide a fantastic, affordable “salon visit alternative” that allows for instant results without lengthy drying times, perfect for a “quick nail change.” They are a durable valentine nails option, especially for fake nails valentine’s day sets.
-
Use Tools for Precision: For detailed designs like French tips or heart outlines, investing in fine detail brushes or specialized moon guide stickers is essential to achieving a “salon-grade finish” and avoiding uneven shape solution issues. This ensures precision nail art that truly pops.
-
Encapsulate Art for Protection: Always ensure nail art (like glitter or decals) is fully encapsulated beneath at least one thick layer of top coat, or even builder gel, particularly on “acrylic oval nails,” to protect the design and maximize longevity. This advanced technique helps your intricate oval designs remain flawless.
-
Simple Designs Reign Supreme: The most popular “easy oval valentines nails” are often the most effective—focus on a high-quality color with a single minimalist detail, like a tiny heart, to achieve maximum impact with minimal effort. This approach delivers stunning results at home without complexity.
FAQs About valentines day nails oval
Are press-on oval nails good for Valentine’s Day?
Yes, high-quality press-on oval nails are an excellent and popular choice for Valentine’s Day, providing a quick, stylish, and durable alternative to salon visits. Modern press-on sets often feature “salon-grade finishes” and come in trendy V-Day designs like heart motifs and French tips. They are ideal for users seeking a “quick nail change” and usually last 1-2 weeks when applied correctly using professional nail glue and proper nail preparation techniques.
Why choose oval shape for Valentine’s Day nails over almond?
The oval shape is often preferred for Valentine’s Day because it is universally flattering, offers a softer, more classic aesthetic than the pointed almond shape, and is perceived as more ‘elegant’. While almond nails (related entities) are also popular, the symmetrical, rounded edge of the oval shape is especially well-suited for traditional romantic designs like “simple oval valentines nails” or delicate French tips, giving a polished finish that complements hand beauty.
How much do oval Valentine’s nails cost to achieve at home?
Achieving beautiful oval Valentine’s Day nails at home can cost anywhere from $10 to $50, depending on the products and techniques used. Simple designs using drugstore lacquer and basic nail art tools fall at the lower end. Utilizing reusable stick on press-ons or high-quality gel polishes (requiring a UV/LED lamp) increases the upfront cost, but offers a better long-term “affordable nail options” alternative compared to paying high prices at nail salons for manicures for valentine’s.
What are simple oval Valentine’s Day nail designs for beginners?
Beginner-friendly oval Valentine’s Day nail designs focus on minimalism and easy application, utilizing pre-made art elements. The simplest options include a solid coat of “hot pink nails” or classic red, accented with a single heart decal placed near the cuticle. Another great choice is the glitter gradient (ombre), which is easy to blend using a sponge and requires minimal precision, offering stunning results at home.
How long do oval acrylic Valentine’s nails last?
Oval acrylic Valentine’s nails, when professionally applied, typically last between two to three weeks before requiring a fill or removal. This “long lasting manicure” duration is standard for nail extensions. For maximum longevity and to prevent chipping, ensure the nail technician uses proper “advanced nail sculpting techniques” and maintain the integrity of the acrylic by applying cuticle oil regularly and using “durable nail formula” top coats to protect the design.
How to make my oval nails look classy for Valentine’s?
To make your oval nails look exceptionally classy for Valentine’s, opt for neutral bases (nude or sheer pink) combined with subtle, precise art. Choose “elegant oval nails” looks like the reverse French manicure or thin, precise heart outlines instead of chunky glitter or busy patterns. A high-shine glossy top coat or a luxurious velvet matte finish instantly elevates the look, ensuring a sophisticated oval nails aesthetic.
Can you do French tips on short oval Valentine’s nails?
Yes, French tips can absolutely be done on short oval nails, and they are incredibly popular for a chic, classy look. For “short oval valentines day nails,” keep the white tip line very thin to prevent shortening the appearance of the nail bed. Using guide stickers or a specialized liner brush helps “achieve the perfect romantic look” while maintaining the elegance and symmetry of the short oval shape.
Which colors are most popular for oval Valentine’s nails in 2026?
While traditional red and hot pink remain popular, the trending colors for oval Valentine’s nails in 2026 are softer blush pinks, deep cherry reds, and sophisticated neutrals. Metallic accents, particularly rose gold and silver foil flakes, are highly sought after for accent nails, providing a modern twist that complements the “classic oval valentines nails” aesthetic and integrates well with subtle glitter gradients.
What materials do I need for DIY oval Valentine’s nails?
For most DIY oval Valentine’s nail art, you need essential supplies including a quality base coat, your chosen polish colors, a precision detail brush (or dotting tool), and a strong top coat. If attempting complex art or using decals, include nail art supplies like tweezers, stickers, or stencils. For press-ons, ensure you have strong nail glue and a file for shaping and fitting the fake nails valentine’s day set perfectly.
Is almond shape better than oval for Valentine’s Day?
Neither almond nor oval is universally “better” for Valentine’s Day; the choice depends on the user’s desired style and nail length. The oval shape is traditionally softer, symmetrical, and better for “classy short oval nails.” The almond shape, which is slightly more pointed, is often chosen for longer nails and creates a more dramatic, high-fashion look. Both shapes beautifully accommodate Vday styles.
Final Thoughts on Valentine’s Day Oval Nails
The oval shape consistently proves to be the most versatile and elegant foundation for any Valentine’s Day look, allowing for maximum creativity while maintaining a universally flattering profile. From the timeless sophistication of the Reverse French Manicure to the playful charm of Candy Heart Decals, the “7 essential design ideas” we explored today ensure you have a style blueprint tailored perfectly for 2026. Whether you choose to leverage “high-quality oval press-ons” for convenience or master a complex marbling technique, remember that the key to a successful manicure is meticulous preparation and the confidence to rock your unique “valentine’s day oval nail design.” Use this “ultimate valentine nail guide” as your foundation for a truly stunning look that brings out your elegance.
Which of these “simple oval valentines nails” designs will you be trying first this year? Let us know in the comments below!
Last update on 2026-04-27 / Affiliate links / Images from Amazon Product Advertising API