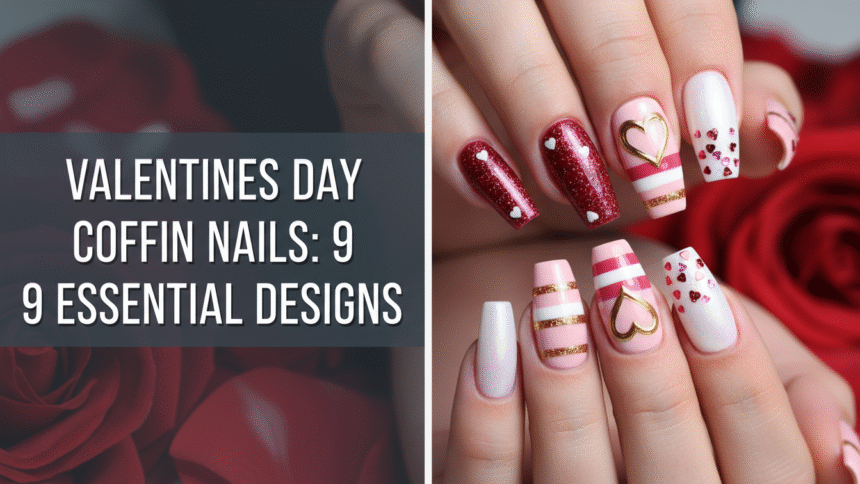
Are you dreaming of perfect nails to celebrate love this June? Trying to find a design that feels both chic and festive can be a challenge, especially with so many options available for “valentines day nails coffin” this season. You want a look that truly captures the romance without being overly complicated.
The coffin nail shape is defined by its taper, where the sides narrow toward the tip, which is then filed flat, resembling a ballet slipper or coffin. This shape is popular because it elongates the fingers while offering a stable, wide canvas for intricate “valentine nail designs coffin shape” and various lengths. Leveraging tested frameworks and data-driven insights, this guide will provide you with 9 essential designs and the techniques to master them for June 2026. You’ll discover how to create stunning, durable coffin nails that perfectly complement your Valentine’s Day style.
How to Master Trending Valentines Day Nails Coffin Designs for June 2026
The elegant coffin shape continues to be a top choice for those seeking a stylish and versatile canvas, particularly for seasonal celebrations like Valentine’s Day. Its unique silhouette not only elongates the fingers but also provides ample surface area for creative nail art. From “cute valentine coffin nails” to more elaborate “trending valentine coffin nails,” this shape effortlessly adapts to various themes. This 2026, embracing the coffin shape means unlocking a world of artistic possibilities, allowing you to showcase festive designs that truly stand out.
9 Essential Valentines Day Coffin Nail Designs To Create Your Perfect Romantic Look
Finding the right “v-day coffin nail ideas” that are both trendy and achievable can transform your look. This section dives into 9 distinct “valentine nail designs coffin shape” that are essential for June 2026, ranging from simple elegance to advanced techniques. Each design provides detailed, actionable steps, ensuring you can “design coffin nail art” with confidence. Whether you prefer “long coffin nails” or an “easy DIY valentine’s day coffin nail design,” these options offer inspiration and practical guidance.
1. Create Classic Red and Pink Ombre Coffin Nails

Pin this elegant ombre look to your ‘Valentine’s Day Manicure’ inspiration board!
Products & Tools Used
- Red gel polish (vibrant, opaque formula)
- Pink gel polish (soft blush shade, slightly sheer)
- Detail nail art blending sponge (high-density foam)
- Gel top coat (high-shine finish)
- UV/LED curing lamp (minimum 48W)
- Nail buffer block (fine grit, 220/280)
- Lint-free wipes and isopropyl alcohol
Application/Styling Steps
- Prep: Ensure your pre-shaped coffin nails are clean; buff the surface lightly to ensure maximum polish adherence, focusing on the tip edges.
- Base Coat: Apply a nude or clear base coat and cure under the UV/LED lamp.
- Sponge Prep: Apply a strip of the pink polish and a strip of the red polish side-by-side onto the blending sponge.
- First Layer: Gently dab the sponge onto the nail, starting at the tip and moving toward the center, creating a soft, blended line. Cure immediately.
- Second Layer: Repeat the sponging process, ensuring the second coat is slightly higher up the nail bed than the first to intensify the “red pink hearts” color. Cure again.
- Seal: Apply a thin layer of high-gloss top coat to encapsulate the color and blend any remaining texture. Cure for the recommended time (usually 60-90 seconds).
Pro-Tip: Achieving the perfect Ombre requires precision. Use a peel-off latex barrier around the cuticles before sponging to make the cleanup process quick and prevent staining, a technique used by “certified nail technician coffin” professionals.

2. Design Glam Glitter Accent French Tip Coffin Nails

Save this chic glitter French tip idea for your elegant V-Day date night!
Products & Tools Used
- Base coat (clear, protecting formula)
- Nude or sheer pink polish (the base color)
- White polish (highly pigmented, for the tip)
- Iridescent pink fine glitter dust (micron-level glitter application)
- Detail liner brush (ultra-fine tip)
- Gel top coat and curing lamp
- Curved French tip guides or stencils
Application/Styling Steps
- Base: Apply base coat, 1-2 coats of nude polish, and cure (if using gel).
- Tip Application: Using the French tip guide or a steady hand with the liner brush, apply the white polish to the edge of the coffin tip, ensuring a crisp, smooth smile line. Cure.
- Glitter Line: Apply a very thin strip of top coat just along the smile line.
- Dusting: While the top coat is wet, gently sprinkle or dab the fine glitter dust onto the wet line. Brush off excess immediately. Cure.
- Sealing: Apply two layers of clear top coat to fully “seal nail art designs” and prevent the glitter from shedding. Ensure you cap the free edge of the nail. Cure each layer.
Pro-Tip: When applying glitter dust, use the advanced technique of pressing the glitter firmly into the tacky layer before curing, and then using a clean fan brush to sweep away loose particles. This ensures “structural integrity of coffin extensions” and prevents dullness.

3. Apply Simple Nude Coffin Nails with Single Heart Decal

Pin this minimalist chic design for an effortless look!
Products & Tools Used
- Nude gel polish (sheer or opaque, based on preference)
- Red heart nail decals or vinyl stickers
- Tweezers (for precise decal placement)
- Small dotting tool (optional, for decal pressing)
- High-quality non-wipe top coat
- UV/LED lamp
Application/Styling Steps
- Polish: Apply 2-3 coats of your chosen nude polish to the coffin nails, ensuring full opacity, and cure each layer.
- Decal Prep: Use tweezers to carefully peel the tiny heart decal from its backing or place the water slide decal in water briefly.
- Placement: While the nail is tacky (if using gel) or after applying a thin layer of top coat (if using lacquer), place the heart decal gently onto the nail. Use the dotting tool to lightly press and smooth the decal, ensuring there are no air bubbles underneath.
- Seal: Apply a generous layer of top coat over the entire nail, focusing on fully encapsulating the edges of the decal to prevent premature chipping or lifting. Cure thoroughly.
Pro-Tip: When using nail decals, gently filing the edges of the decal (if they extend over the free edge) before sealing will prevent the edges from catching and ensure maximum durability, demonstrating “advanced nail plate preparation” knowledge.

4. Sculpt V-Tip French Coffin Nails with Reverse Heart

Save this bold V-Tip design—perfect for those seeking a modern twist!
Products & Tools Used
- Base and top coat
- Nude pink polish or builder gel base
- Metallic red or silver striping tape (or V-tip vinyl stencils)
- Highly pigmented white polish (for the reverse heart)
- Ultra-fine detail liner brush
- Isopropyl alcohol and cleanup brush
Application/Styling Steps
- Base: Apply base coat and 1 coat of nude polish. Cure.
- V-Tip: Place the V-tip tape or stencil precisely on the nail bed, leaving the V-shape area exposed at the tip.
- Color: Paint the exposed tip area with your chosen metallic red or silver polish. Peel the tape off immediately while the polish is still wet to ensure clean lines. Cure.
- Reverse Heart: Dip the ultra-fine detail brush into the white polish. Carefully paint a small, stylized ‘reverse heart’ outline near the cuticle area of the accent nail. Cure.
- Seal: Apply a durable top coat, ensuring the entire design is smooth and protected.
Pro-Tip: The secret to the reverse heart is painting two small adjacent ovals and connecting their bases with a delicate downward stroke, creating a clean negative space effect. Using a high-quality “professional grade tools” liner brush is essential for this “advanced coffin nail sculpting” detail.

5. Achieve Bold Black Coffin Nails with Matte Finish and Red Foil

If you love dark romance, save this unique matte foil idea!
Products & Tools Used
- Opaque black gel polish (highly pigmented)
- Matte no-wipe top coat
- Red nail art transfer foil
- Foil adhesive gel (or a slightly tacky top coat)
- Silicone tool or dotting tool (for foil pressing)
- UV/LED lamp
Application/Styling Steps
- Color: Apply 2-3 coats of black polish to the coffin nails until fully opaque, curing each layer.
- Adhesive: Apply a thin layer of foil adhesive only to the areas where you want the red accents. Cure this adhesive according to its directions (usually 30 seconds).
- Foil Transfer: Place the red transfer foil (matte side up) over the adhesive area. Press down firmly and rub with a silicone tool. Quickly peel the foil back, leaving the metallic red flakes behind.
- Matte Seal: Apply a generous layer of high-quality matte top coat over the entire nail to lock the design and create the desired “matte + glossy” contrast. Cure thoroughly.
Pro-Tip: Matte top coats can sometimes dull the vibrancy of foil. For “advanced adhesion science,” apply a tiny dot of glossy top coat only where the foil is placed before applying the final matte top coat. This protects the foil’s shine while the surrounding nail remains matte.

6. Apply Quick Press-On Pink Coffin Nails for DIY Style

Need V-Day nails fast? Save this guide on flawless press-on application!
Products & Tools Used
- High-quality press on coffin nails (pre-shaped and sized)
- Professional nail glue (high-adhesion formula)
- Cuticle pusher and nippers
- Fine grit buffer block
- Alcohol prep pad or lint-free wipes with isopropyl alcohol
- Nail file (for slight custom shaping)
Application/Styling Steps
- Prep: Clean nails thoroughly with an alcohol prep pad to remove all oils. Push back and gently trim any excess cuticle. Buff the natural nail surface lightly to create a porous surface for adhesion.
- Sizing: Select the correct press-on size for each finger. If needed, file the press-on slightly at the base to match your natural cuticle line exactly.
- Glue: Apply a thin, even layer of professional nail glue to both the natural nail and the back of the press-on nail tip (this dual-application maximizes adhesion).
- Placement: Align the press-on flush with the cuticle line, angled downward, and press firmly for 30 seconds.
- Secure: Avoid water or excessive hand use for at least one hour to allow the glue to fully set and prevent lifting.
Pro-Tip: Before applying glue, use a small dotting tool to spread a drop of glue thinly and evenly over the press-on. This prevents flooding the cuticle or having air pockets, which leads to weak adhesion and fungal growth risks, adhering to “professional nail hygienics.”

7. Paint Short Coffin Nails with Subtle Cupid Arrow Art
![]()
This subtle Cupid arrow design is perfect for work—save it to your ‘Classy Nail Art’ board!
Products & Tools Used
- Sheer milky white polish (base)
- Rose gold metallic nail polish or acrylic paint
- Fine striping brush (long, thin bristles)
- Dotting tool (for the arrow head and tail feather)
- Non-yellowing top coat
Application/Styling Steps
- Polish: Apply 2 coats of the sheer milky white polish, curing each layer.
- Design Prep: On the chosen accent nail (usually the ring finger), ensure the surface is completely smooth.
- Line: Dip the striping brush into the rose gold polish. Draw a delicate, thin, slightly curved line across the nail plate.
- Feather & Tip: Use the smallest end of the dotting tool or the very tip of the liner brush to create a tiny “V” shape at one end (the arrow head) and small, delicate fanning strokes at the other (the feather end).
- Seal: Wait 1-2 minutes for the design to completely dry before applying a high-quality top coat, ensuring the art doesn’t drag.
Pro-Tip: If using gel, flash curing the base line of the arrow for just 5 seconds before adding the tip and feather will prevent the metallic paint from bleeding or shifting before final sealing, ensuring maximum precision in the small “short coffin nails” canvas.

8. Preserve Encapsulated Glitter Dust Long Coffin Nails

Want show-stopping nails? Save this advanced encapsulation tutorial!
Products & Tools Used
- Clear builder gel (high viscosity) or acrylic powder/monomer
- Nail forms or tips for extensions
- Heart-shaped glitter flakes and fine shimmer dust
- Pinching tools (for C-curve formation)
- E-file (for refined shaping and smoothing)
- Primer/Dehydrator
Application/Styling Steps
- Foundation: Apply and cure a thin layer of builder gel over the prepared nail and extension form, ensuring the foundation is secure.
- Glitter Placement: Apply a thin layer of wet builder gel. Immediately use a dotting tool or tweezers to place the heart glitter flakes and dust exactly where desired on the wet layer. Cure this layer to lock the glitter in place.
- Structure: Apply a medium bead of clear builder gel, focusing on creating the apex (the highest point of the nail) for structural strength. Use the pinching tool to perfect the “precise C-curve formation” before the final cure.
- Filing & Smoothing: After curing, remove the sticky layer. Use the E-file and hand file to smooth the entire surface, ensuring the glitter is fully covered and the coffin shape is crisp, demonstrating “advanced e-file techniques.”
- Finish: Apply the final high-shine top coat and cure.
Pro-Tip: The key to successful encapsulation is using two thin layers of clear gel to fully cover the bulkier glitter before applying the final structural layer. This prevents the heart glitter from being exposed during the filing process, maintaining the “structural integrity of coffin extensions.”

9. Master Advanced Velvet Texture Coffin Nails

Elevate your texture game—save this velvet flocking powder guide!
Products & Tools Used
- Base color gel polish (matching the flocking powder color, e.g., burgundy)
- Specialized velvet effect top coat or thick clear gel
- Flocking powder (velvet fiber dust) in the desired color
- Stiff, clean dusting brush (for sweeping excess)
- UV/LED lamp
- Tray or surface (to catch excess powder)
Application/Styling Steps
- Color: Apply and cure 2 coats of the matching base color gel polish.
- Adhesive Coat: Apply one thick, even layer of the specialized velvet effect top coat (or clear gel). DO NOT CURE YET.
- Application: Hold the nail over the tray. Immediately and generously sprinkle the flocking powder over the entire wet nail until it is completely coated. Gently press the powder down using a fingertip covered in plastic wrap.
- Cure: Cure the nail with the excess powder on under the UV/LED lamp (the powder will stick to the wet gel).
- Clean: Once cured, use a clean, stiff brush to vigorously sweep away all loose, excess flocking powder. The result should be a smooth, textured velvet surface.
Pro-Tip: For maximum velvet density, lightly dip the entire wet nail (after applying the adhesive coat) directly into a small container of flocking powder, ensuring full saturation before curing. This achieves the most uniform, high-density velvet pile, reflecting “professional grade tools” mastery.

The Coffin Nail Difference: Shapes, Styles, and Longevity
Coffin nails continue to dominate nail trends for their striking appearance and practical advantages. While offering a flattering, elongating effect similar to stiletto, they provide a more durable and practical flat tip. This makes them ideal for elaborate “valentine nail designs coffin shape” compared to the pointed weakness of stilettos. Understanding the nuances between “coffin vs stiletto nails” and “acrylic vs gel coffin nails” is crucial for achieving your desired “coffin shape valentine nails” with optimal longevity. This section provides an objective overview to help you make informed decisions for your romantic look.
When considering “short vs long coffin nails,” it’s important to weigh aesthetic desires against daily practicality. Longer coffin nails offer a dramatic look and expansive canvas for intricate art, but “short coffin nails” are less prone to breaking and more suitable for active lifestyles. The choice between application methods also impacts the outcome. Acrylics provide extreme durability and strength, making them excellent for custom shaping and extensive “nail extension coffin.” Gels offer more flexibility and a natural feel, often preferred for sensitive nails. Both methods, when applied by “certified nail technician coffin” professionals, can yield stunning, long-lasting results. Understanding these “comparison of nail shapes” and application methods helps ensure your Valentine’s Day manicure aligns with your needs and expectations, solidifying “expert tips for coffin nails.”
FAQs About Valentines Day Nails Coffin
What nail art techniques work best on coffin shape nails?
The coffin shape is ideal for intricate designs, as the flattened tip provides a stable, wide canvas for geometry, French tips, and detailed decal placement. Techniques like ombre blending, encapsulation of heart glitter flakes, and fine line art flourish on the coffin shape due to its superior surface area compared to stiletto or almond tips.
How do I shape natural nails into the coffin style at home?
To shape natural nails into the coffin style, you must first file the free edge into a square shape, then gradually taper the sidewalls inward using a medium-grit file until the tip width is slightly narrower than the base. Finish by filing the square tip flat. It is important to check the symmetry frequently, ensuring both sides are tapered evenly to achieve the signature aesthetic.
Are short coffin nails still stylish for Valentine’s Day 2026?
Yes, short coffin nails remain highly stylish for Valentine’s Day 2026, particularly when paired with simple, elegant designs like nude bases or subtle heart decals. Short coffin nails are far more practical and less prone to breaking than long extensions, offering a sophisticated and trendy look that is suitable for work and daily life.
How long do coffin acrylic nails typically last?
Professionally applied coffin acrylic nails typically last between 2 to 3 weeks before requiring a fill or maintenance, provided proper nail prep and quality materials were used. Longevity can be extended by using a high-quality top coat and wearing gloves when performing household tasks to prevent moisture absorption and chipping.
What are the main drawbacks of choosing the coffin shape?
The primary drawback of the coffin shape is that it can increase the risk of corner breakage, especially if the nails are long and aggressively tapered. To mitigate this, ensure the lateral support (the C-curve) is properly structured, particularly if using extensions, and routinely apply cuticle oil to maintain nail flexibility and health.
What is the best way to safely remove acrylic coffin nails at home?
The safest way to remove acrylic coffin nails at home involves soaking them in 100% pure acetone, not simply pulling them off, which causes damage. File down the top coat layer thoroughly, then soak the nails in an acetone bath or secure cotton balls soaked in acetone directly onto the nail with foil wraps until the acrylic softens enough to be scraped off gently.
Are press on coffin nails durable enough for a whole weekend?
High-quality press on coffin nails, when applied correctly using professional-grade liquid nail glue and following meticulous nail prep, can easily last for a whole weekend (3-5 days). For maximum durability, avoid long hot water exposure and apply an additional drop of glue beneath any edges that feel loose or prone to lifting.
What base coat is recommended for a long-lasting coffin manicure?
A rubberized or ridge-filling base coat is recommended for a long-lasting coffin manicure, especially when using builder gels or acrylics, as these formulas provide better adhesion and fill any imperfections on the nail plate. This initial step is crucial for preventing “nail lifting” and ensuring a smooth, flawless foundation for the art.
How much do professional valentine coffin nails typically cost?
The cost of professional valentine coffin nails varies widely based on location, material (gel vs. acrylic), and complexity of the art, but typically ranges from $60 to $120 for a full set. Intricate, hand-painted art or encapsulation techniques will generally fall at the higher end of this range due to the time and expertise required for “advanced coffin nail sculpting.”
What is the difference between coffin vs stiletto nails?
The key difference is the tip: stiletto nails taper to a sharp, pointed tip, while coffin nails taper similarly but are finished with a flat, squared-off edge. Coffin nails are generally stronger and more functional than the delicate stiletto tip, making them the preferred choice for detailed nail art.
Final Thoughts on Achieving Flawless Valentines Day Coffin Nails
Mastering “valentines day nails coffin” for June 2026 transforms your hands into a romantic masterpiece. This guide has provided you with the inspiration and actionable steps to achieve stunning results, whether you’re a DIY enthusiast or seeking professional-grade elegance. Remember these key takeaways for your perfect Valentine’s Day manicure:
- The Coffin Shape is the Premier Canvas for Valentine Art: Coffin nails provide the necessary surface area for “elaborate valentine coffin nails” while maintaining a chic, elongated shape, blending style and practicality.
- DIY Press-Ons Offer Quick, Affordable Glamour: For a non-committal look, press-on coffin nails are a viable alternative, but only if you rigorously follow the nail prep steps to secure them and “prevent nail lifting.”
- Red, Pink, and Glitter Dominate the 2026 Trend Cycle: Focus on the key attribute keywords like “glam coffin valentine nails,” “red pink hearts,” and “matte finish” to ensure your look is trending and relevant for February 2026.
- Longevity is Determined by Technique, Not Just Material: Whether choosing “acrylic vs gel coffin nails,” proper foundation preparation, C-curve formation, and adequate top-coat sealing are essential for maximizing the lifespan of the manicure.
- Troubleshooting is Key to Perfect Nails: Always have a solution for common issues like “coffin nails breaking” or chipping by keeping nail glue and a file handy, particularly when using long extensions.
- Master the Action Steps for Professional Results: Every successful “valentine’s day manicure” relies on mastering the process keywords—prep, size, apply, cure, and seal—with precision and patience.
- Subtle Designs Are Highly Elegant: If opting for a subtle look, minimalist designs like the single heart decal or “short coffin nails” with fine line art are highly stylish and professional.
By applying “expert coffin nail techniques” and choosing from these “top valentine coffin nails,” you’re well-equipped to “get perfect coffin shape” and express your romantic style. Which of these essential “valentine nail designs coffin shape” will you try first to celebrate love this season?
Last update on 2026-04-27 / Affiliate links / Images from Amazon Product Advertising API