Ready to transform your plain coffee cups into spooky seasonal masterpieces this June? Nothing kills the creative vibe faster than spending hours on DIY halloween painted mugs only to have the design wash off after one use. This guide solves that frustration by providing you with tested techniques for creating durable, festive drinkware that lasts.
Creating durable, food-safe painted mugs for Halloween involves selecting the right ceramic paint (often oven-bake), applying proper sealing techniques, and following cure instructions to ensure longevity and safety. This process allows you to produce professional-quality Halloween painted mugs right from your kitchen table, ensuring your designs withstand both the dishwasher and daily use. By adhering to specific preparation and baking protocols, you can transform ordinary ceramic bisque into functional art.
Drawing from comprehensive analysis of current data and expert ceramic artist tips, this article delivers a complete roadmap for your seasonal crafting. We will explore the essential materials, safety protocols, and seven distinct design tutorials ranging from spooky ghosts to festive pumpkins. You will discover exactly how to achieve a durable finish that makes your custom creations safe for sipping your favorite autumn beverages.
Mastering Painted Mugs Halloween: 7 Essential DIY Spooky Designs for 2026
Painted mugs are an essential element of personalized Halloween decor, offering a unique blend of creativity and functionality that store-bought items simply cannot match. Whether you are an experienced crafter or a parent looking for a fun DIY halloween craft, the process of transforming plain ceramics into spooky treasures is incredibly rewarding. However, the key to success lies not just in the artistic design, but in understanding the technical requirements of working with ceramic bisque and food safe paint.
Many enthusiasts ask, “How to paint halloween mugs at home?” without realizing that the longevity of their project depends heavily on the materials used. To ensure your custom halloween mugs painted designs survive the season, you must prioritize proper surface preparation and the use of specific oven-bake ceramic paint. This section sets the stage for your creative exploration, ensuring you have the foundational knowledge to create safe, lasting, and beautiful pieces. We will guide you through the essential steps to master halloween mug painting, ensuring your festive mugs are ready for hot cocoa and spooky gatherings.
7 Essential DIY Spooky Designs for Your Painted Mugs Halloween Collection
Creating a diverse collection of Halloween painted mugs allows you to explore various techniques, from simple line work to intricate layering. The following designs range from beginner friendly projects to more detailed artistic expressions, ensuring there is something for every skill level. By using the right ceramic painting supplies, you can turn a plain ceramic mug into a canvas for your spooky mug designs.
Each tutorial below provides a comprehensive list of materials and precise instructions. We focus on ensuring you use food safe paint for DIY halloween coffee cups and follow the correct curing processes. These custom painted mugs are not just decorative; when executed correctly, they become durable, functional pieces of art. Let’s dive into these seven essential designs to elevate your Halloween festivities.
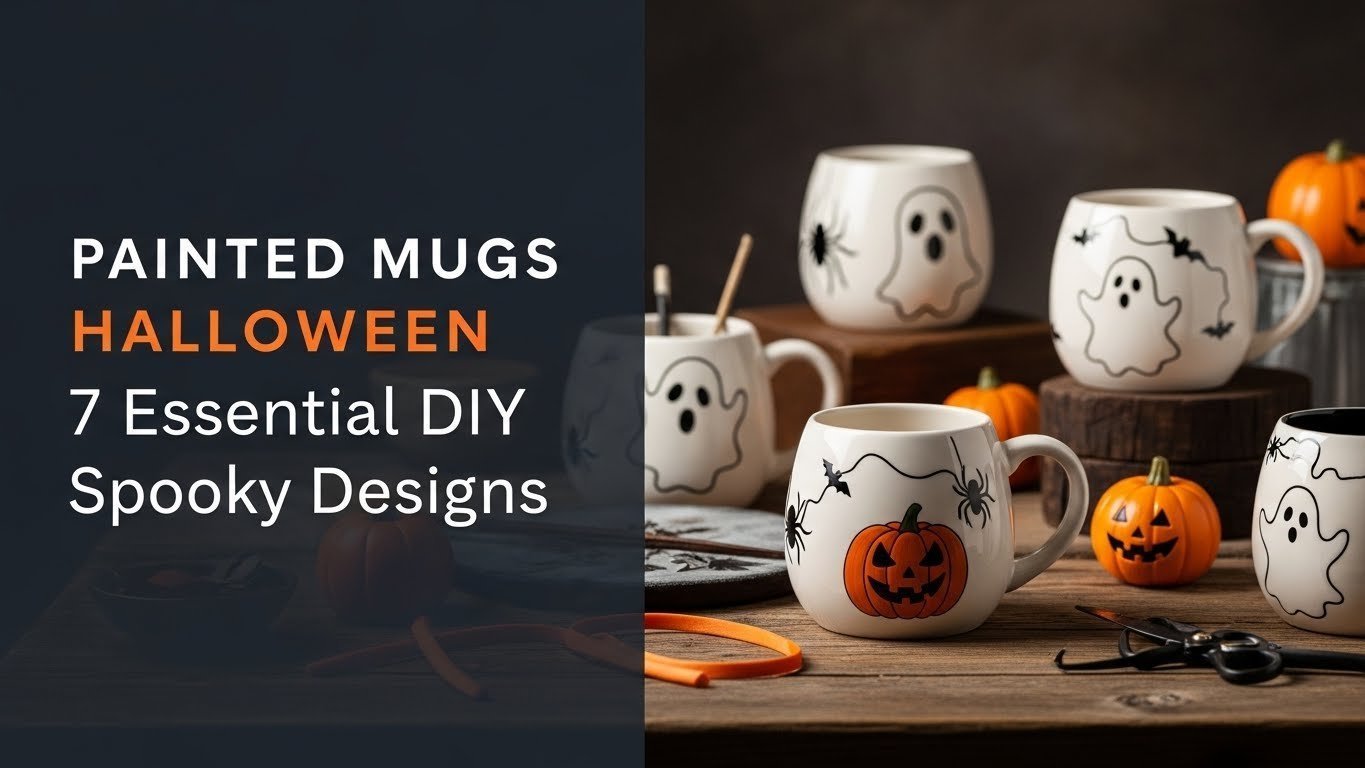
1. Paint a Spooky Ghost Face Mug

Pin this playful ghost mug idea to your “Halloween DIY” board!
This design is perfect for those seeking easy halloween mug painting ideas. The classic ghost face mug relies on minimalism, making it one of the most accessible beginner friendly halloween mug decorating projects. By using a high-quality black paint pen, you can achieve crisp lines without the mess of traditional brushes.
To ensure safety, especially if this is a project for children, always opt for non-toxic paint for kids halloween mugs. The simplicity of the design means the quality of your lines matters, so steady hands and good materials are key.
Supplies Needed
- 1-2 plain white ceramic mugs (pre-cleaned, unglazed for best adherence)
- Black ceramic paint pen (fine tip, oven-bake, food-safe)
- Optional: White oven-bake ceramic paint (for a base coat if desired)
- Rubbing alcohol (for surface prep)
- Cotton swabs or paper towels
Step-by-Step Directions
- Prep: Clean your plain white ceramic mug thoroughly with rubbing alcohol and let it dry completely.
- Sketch (Optional): Lightly sketch a ghost outline on your mug using a pencil if you’re not confident freehanding.
- Draw Eyes & Mouth: Use the black ceramic paint pen to draw two simple oval eyes and an ‘O’ or wavy mouth shape for your ghost.
- Fill In: If desired, outline the ghost shape and fill it in with white ceramic paint. Let dry according to paint instructions.
- Cure: Follow specific paint manufacturer instructions for curing (usually oven-bake at a low temperature for a set duration). This ensures a durable finish.
Pro-Tip: For the cleanest lines on your ghost face mug, use a fine-tip ceramic paint pen rather than a brush for the facial features. This prevents streaks and provides a crisp, professional look that ensures a long-lasting result if properly cured.

2. Craft a Creepy Crawly Spider Web Mug

Save this intricate spider web mug idea for a truly spooky touch!
For a more detailed aesthetic, the spider web mug design offers a sophisticated take on spooky mug designs. Utilizing a ceramic mug with a dark glaze as your background allows metallic or white paints to pop, creating a striking visual contrast. This project is ideal for those interested in halloween themed hand painted ceramic pottery.
Precision is vital here. A fine tip brush is necessary to create the delicate strands of the web. Remember, using oven bake paint is non-negotiable if you want to be creating durable halloween painted mugs at home that can withstand washing.
Supplies Needed
- 1 dark-colored ceramic mug (e.g., black, deep purple, or dark grey)
- White or metallic silver oven-bake ceramic paint (food-safe)
- Black ceramic paint (for the spider)
- Fine detail paint brush (e.g., 00 or 000 size)
- Optional: Round sponge for starry background
- Rubbing alcohol
Step-by-Step Directions
- Clean: Prepare your dark ceramic mug by cleaning it with rubbing alcohol and allowing it to dry.
- Concentric Circles: Using your fine detail brush and white/silver paint, draw 3-5 concentric circles on one side of the mug, starting from a central point. These don’t need to be perfectly round.
- Radial Lines: From the center point, draw straight lines outwards, connecting the concentric circles to form the spokes of the web.
- Spider: Once the web is dry, use black paint and the fine detail brush to create a small, simple spider on one of the web lines. Add 8 tiny legs.
- Cure: Follow paint instructions for oven-baking to make your painted mugs Halloween design permanent and dishwasher safe.
Pro-Tip: For a truly creepy crawly effect on your spider web mug, use a slightly raised texture paint for the spider’s body. This adds a subtle 3D element that enhances the spooky realism. Ensure all paints are compatible and food-safe certified paint.

3. Design a Delightful Dripping Blood Mug

Pin this chilling blood drip mug to make your Halloween drinks extra spooky!
If you want spooky painted mugs with a bit of an edge, the dripping blood mug is a perfect choice. This design relies on the dripping effect to create a gruesome yet playful aesthetic. The stark contrast of red paint on a white ceramic mug makes for a bold statement piece.
While the design looks complex, it is one of the more straightforward custom halloween mugs painted projects. The key is controlling the viscosity of the paint to ensure natural-looking drips. Using high-quality oven-bake ceramic paint is essential here to ensure the thick layers cure properly for durability.
Supplies Needed
- 1 plain white ceramic mug
- Deep red oven-bake ceramic paint (food-safe, slightly thicker consistency is ideal)
- Small squeeze bottle with fine tip (optional, for controlled drips)
- Small paintbrush or toothpick
- Rubbing alcohol
Step-by-Step Directions
- Prepare: Clean your white ceramic mug thoroughly with rubbing alcohol.
- Rim Application: Apply a band of deep red ceramic paint around the rim of the mug. You can use a brush or the squeeze bottle.
- Create Drips: While the paint is still wet, use your paintbrush or squeeze bottle to gently pull small drips down the side of the mug from the rim. Vary the length and thickness for a natural look.
- Dry & Cure: Allow paint to dry completely (several hours) before oven-baking according to manufacturer instructions. This cures the paint for a durable finish.
Pro-Tip: To make your dripping blood mug look more realistic, mix a tiny bit of black ceramic paint into your deep red paint for a darker, more viscous appearance. This subtle detail enhances the spooky painted mugs effect and demonstrates advanced understanding of ceramic pigment types.

4. Personalize a Playful Pumpkin Patch Mug

Pin this adorable pumpkin patch mug for a festive fall touch!
For a more wholesome approach, the pumpkin patch mug captures the essence of fall painted mugs. This design is versatile, allowing for cute painted halloween mugs that work well past October. It is an excellent canvas for creating personalized halloween mugs with names, making them ideal gifts.
Using a stoneware mug as your base adds a rustic charm, while orange and green paint bring the autumnal theme to life. These beginner friendly techniques are perfect for DIY crafting sessions with family, as the shapes are forgiving and easy to execute.
Supplies Needed
- 1 cream-colored ceramic mug (or any light color)
- Oven-bake ceramic paints in orange, green, and brown (food-safe)
- Small and medium paintbrushes
- Pencil (for sketching)
- Rubbing alcohol
Step-by-Step Directions
- Clean: Wipe down your mug with rubbing alcohol.
- Sketch Pumpkins: Lightly sketch various-sized pumpkin outlines around the mug using a pencil. You can add simple faces if desired.
- Paint Pumpkins: Fill in your pumpkin sketches with orange paint. Let dry completely before adding details.
- Add Details: Use green paint for vines and leaves. Use brown paint for pumpkin stems. For personalization, use a fine brush or paint pen to add names or small details.
- Cure: Once all paint is dry, cure in the oven following your paint’s instructions for a durable finish.
Pro-Tip: For a truly personalized pumpkin patch mug, consider adding subtle texture to your pumpkins by dabbing the orange paint with a sponge before it dries. This adds dimension and character, elevating your artistic expression beyond flat designs.

5. Bewitch with a Witches’ Brew Cauldron Mug

Brew up some magic by pinning this witch’s cauldron mug to your “Spooky Sips” board!
Transform your morning coffee into a magical potion with the witches brew mug. This design leverages the shape of the cup, turning a black ceramic mug into a simmering cauldron. It is a fantastic example of creative mug decor that feels both thematic and interactive.
The bubbling brew effect is achieved by blending green and purple paint near the rim. This requires some blending skill but results in highly artistic halloween mugs. As always, using oven-bake ceramic paint ensures your cauldron provides long-lasting results for many Halloweens to come.
Supplies Needed
- 1 matte black ceramic mug
- Oven-bake ceramic paints in green, purple, and a touch of white (food-safe)
- Small paintbrushes
- Pencil
- Optional: Alphabet stencils (for “Witch’s Brew” text)
- Rubbing alcohol
Step-by-Step Directions
- Prep: Clean your matte black ceramic mug with rubbing alcohol.
- Base: Paint a thick, wavy line of green paint just below the rim, creating the top layer of the brew.
- Blend: While the green is still wet, add touches of purple paint and gently blend them with the green to create a swirling, magical effect.
- Bubbles: Use a tiny dot of white paint to add small “bubbles” in the brew.
- Text (Optional): Once the paint is dry, use a stencil and green or white paint to carefully add “Witch’s Brew” to the side of the mug.
- Cure: Bake the mug following paint instructions for a durable paint finish.
Pro-Tip: To make your witch’s cauldron mug truly pop, consider adding a subtle shimmer medium to your green and purple paints for a mystical, bubbling effect. This specialized medium enhances the overglaze decoration and makes your brew look genuinely enchanting.
6. Create a Fluttering Bat Silhouette Mug

Catch this cool bat silhouette mug idea for your Halloween decor board!
The bat silhouette mug is a timeless classic in the world of spooky mug designs. By utilizing a bright orange ceramic mug, you create a high-contrast background perfect for black bat silhouettes. This project is ideal for those interested in halloween character painting on ceramic bisque.
Using a bat stencil can significantly aid in drawing consistent patterns, making this another great option for easy halloween mug painting ideas for kids. Whether you use stencils or freehand techniques, ensuring food safe paint compatibility is crucial for custom painted mugs that are safe to use.
Supplies Needed
- 1 orange ceramic mug (or any bright color like yellow or red)
- Black oven-bake ceramic paint (food-safe)
- Small paintbrush or ceramic paint pen
- Optional: Bat stencils or vinyl decals
- Sponge (for stenciling)
- Rubbing alcohol
Step-by-Step Directions
- Clean: Prepare your mug by cleaning with rubbing alcohol.
- Placement: If using stencils, adhere them firmly to the mug. For freehand, lightly sketch bat shapes.
- Paint Bats: Using a small paintbrush or sponge (for stencils), fill in the bat shapes with black ceramic paint. Ensure even coverage.
- Remove Stencils: If using stencils, carefully remove them while the paint is still slightly wet for cleaner edges.
- Dry & Cure: Allow paint to dry, then oven-bake according to the paint’s specific instructions. This will create a durable finish.
Pro-Tip: To prevent paint bleeding under your stencil for your bat silhouette mug, apply a thin layer of your mug’s base color over the stencil edges first and let it dry. This creates a seal, ensuring your black bat silhouettes are perfectly crisp against the vibrant background. This technique is part of professional mug painting guide best practices.
7. Paint a Festive Candy Corn Striped Mug

Sweeten up your feed by pinning this cheerful candy corn striped mug to your “Autumn Decor” board!
Finish your collection with the vibrant candy corn striped mug. This cheerful design turns a standard white ceramic mug into a festive drinking vessel using the iconic yellow orange white paint combination. It’s a fantastic seasonal craft project painting halloween cups that brightens up any kitchen.
The striping technique is simple but effective, creating bold visual impact. Using painter’s tape helps achieve clean lines, making this easy halloween mug painting accessible to everyone. Combined with oven bake paint, you get durable results that let you make your own mugs look store-bought.
Supplies Needed
- 1 plain white ceramic mug
- Oven-bake ceramic paints in yellow, orange, and white (food-safe)
- Medium paintbrushes
- Painter’s tape (optional, for crisp lines)
- Ruler or measuring tape
- Rubbing alcohol
Step-by-Step Directions
- Prep: Clean your white ceramic mug with rubbing alcohol.
- Measure: Use a ruler to lightly mark even sections around the mug for your stripes (e.g., three equal sections for yellow, orange, white).
- Tape (Optional): Apply painter’s tape to create crisp lines between your sections. Press firmly.
- Paint Stripes:
- Start with the yellow stripe at the bottom. Apply 2-3 thin coats, allowing each to dry slightly.
- Next, paint the orange stripe in the middle.
- Finally, paint the white stripe at the top (near the rim).
- Remove Tape: Carefully remove the painter’s tape while the paint is still slightly wet to avoid chipping.
- Dry & Cure: Allow all paint to dry completely (several hours) before oven-baking as per paint instructions. This ensures a durable finish for your painted mugs Halloween creation.
Pro-Tip: To achieve perfectly crisp lines for your candy corn striped mug, use painter’s tape specifically designed for delicate surfaces. After applying your paint, peel the tape off before the paint fully cures to prevent cracking or peeling of the painted edge, ensuring a professional, durable finish.

Key Takeaways: Your Quick Guide to Painted Mugs Halloween
Before you rush to the craft store, let’s recap the essentials for your painted mugs halloween success. Creating custom halloween mugs painted at home is a delightful way to celebrate the season, but ensuring they last requires adherence to specific protocols. The DIY painted mugs you create are a blend of creative expression and technical execution.
To guarantee your spooky designs withstand the test of time and remain safe for use, keep these critical points in mind. Mastering the balance between food safe paint and a durable finish is what separates a temporary craft from a lasting piece of decor.
- Prioritize Food-Safe, Oven-Bake Paint: Always choose food-safe ceramic paint that is designed for oven-curing to ensure your painted mugs Halloween designs are both durable and safe for beverages.
- Surface Preparation is Crucial for Adherence: Thoroughly cleaning mugs with rubbing alcohol before painting is a non-negotiable step to prevent paint chipping and ensure excellent adherence for your custom painted mugs.
- Layer Thin Coats for Best Results: Instead of thick, single coats, apply multiple thin layers of paint, allowing each to dry. This prevents streaky paint and cracking, contributing to a durable finish.
- Curing Process is Key to Longevity: Follow the paint manufacturer’s specific instructions for oven-baking to properly cure your painted mugs Halloween. This crucial step makes designs permanent and often dishwasher safe.
- Experiment with Tools and Techniques: Don’t limit yourself to brushes; paint markers for mugs, sponges, and stencils offer diverse ways to create spooky designs and achieve different effects.
- Troubleshoot Common Issues for Professional Finish: Addressing problems like fading colors or paint adherence issues proactively through proper material selection and technique ensures your painted mugs Halloween projects look professional and last for many seasons.
- Personalization Adds Unique Value: Whether simple ghost faces or intricate spider webs, adding your unique artistic touch makes each of your painted halloween cups a special item or a thoughtful gift, enhancing its artistic expression.
People Also Ask About Painted Mugs Halloween
Questions often arise regarding safety and durability when undertaking painted mugs Halloween projects. Below, we address the most common queries to ensure you have all the information needed to create safe, lasting art.
What kind of paint stays on ceramic mugs?
For durable and long-lasting designs on ceramic mugs, oven-bake ceramic paints are highly recommended. These paints are specifically formulated to bond permanently with ceramic surfaces when cured at high temperatures in a conventional oven, making them resistant to washing and light use. Acrylic enamel paints can also work if labeled for glass/ceramics and properly heat-set.
Can you paint a ceramic mug that is already glazed?
Yes, you can paint glazed ceramic mugs, but proper preparation is crucial for paint adhesion. Lightly sand the glazed surface with fine-grit sandpaper to create a slight “tooth,” then clean thoroughly with rubbing alcohol. This improves the paint’s ability to stick. Always use oven-bake ceramic paints or paint markers designed for glazed surfaces.
How to paint halloween mugs at home?
To paint Halloween mugs at home, start by selecting a clean ceramic mug and food-safe oven-bake ceramic paints or markers. Sketch your design, then apply thin, even coats of paint. Allow ample drying time between layers. Finally, cure the mug in a conventional oven according to the paint manufacturer’s specific instructions to ensure durability and food safety.
Is painted ceramic food safe?
Painted ceramic mugs are food safe only if specific non-toxic, food-grade paints and sealants are used correctly and cured properly. Always verify that your chosen ceramic paint is explicitly labeled “food-safe” and follow all manufacturer instructions for application and oven-curing, especially for areas that will contact food or drink. Avoid painting the rim or inside of the mug.
How do you seal painted mugs?
Painted mugs are primarily sealed through the oven-baking or heat-setting process specified by the ceramic paint manufacturer. This curing process creates a durable, often dishwasher-safe finish. While some acrylic enamel paints may benefit from a clear, food-safe sealant spray, most dedicated ceramic paints achieve their seal and durability through heat.
Can I put painted mugs in the dishwasher?
Whether painted mugs are dishwasher safe depends entirely on the type of paint used and how it was cured. High-quality oven-bake ceramic paints, when properly cured according to manufacturer instructions, are often designed to withstand dishwasher cycles. However, hand washing is generally recommended to maximize the longevity of any custom painted mugs.
Where to buy ceramic mugs for painting?
You can buy plain ceramic mugs for painting at various retailers, including craft stores like Michael’s or Hobby Lobby, online marketplaces like Amazon or Etsy, and even dollar stores. Look for unglazed ceramic bisque if you want the paint to absorb directly, or inexpensive glazed mugs that you can prepare by sanding for better paint adherence.
How long does ceramic paint need to cure?
The curing time for ceramic paint varies significantly by brand and type, typically ranging from 30 minutes to 2 hours in an oven after drying. It’s crucial to strictly follow the specific oven temperature and duration instructions provided by the paint manufacturer. Proper curing ensures your painted mugs Halloween designs are permanent and chip-resistant.
What supplies do I need to paint mugs?
To paint mugs, you’ll need a clean ceramic mug, food-safe oven-bake ceramic paints or paint pens, fine paintbrushes (or sponges/stencils), rubbing alcohol for preparation, and an oven for curing. Optional supplies include painter’s tape for stripes, pencils for sketching, and clear sealant if recommended by your specific paint.
Can you use acrylic paint on mugs?
While you can use acrylic paint on mugs, it’s generally not recommended for mugs intended for use, as standard acrylics are not food-safe or durable for washing. If using acrylic, opt for acrylic enamel paint specifically designed for glass/ceramics, and apply a heat-setting process followed by a food-safe sealant to ensure some durability and safety, avoiding the rim and interior.
Final Thoughts on Painted Mugs Halloween
Creating your own painted mugs Halloween collection is a rewarding way to infuse your home with personalized spooky charm for 2026. Beyond just an art project, it’s an opportunity to create functional, custom painted mugs that can be cherished for seasons to come. We’ve explored 7 essential DIY spooky designs, from playful ghosts to festive candy corn, emphasizing the critical importance of using food-safe, oven-bake ceramic paint and proper curing techniques to ensure both durability and safety.
Remember that patience and attention to detail during surface preparation and paint application are key to preventing common issues like paint chipping or fading colors. With the right supplies and our step-by-step guidance, you can confidently transform plain ceramic mugs into unique pieces of Halloween decor. Your handmade creations are not just festive additions; they are testaments to your creativity and skill, making each sip of your autumnal beverages even more special.
Which of these spooky mug designs are you most excited to try first for your painted mugs Halloween display?
Last update on 2026-04-27 / Affiliate links / Images from Amazon Product Advertising API