Are you tired of the same old pink hearts and cliché designs every February? If the traditional sugary-sweet aesthetic leaves you feeling uninspired, you aren’t alone in craving a manicure that reflects your darker, more authentic style. Valentines nails goth offer the perfect solution for expressing deep emotion without compromising your edge, blending romance with the mysterious allure you love.
Goth valentines nails: A unique nail art aesthetic that combines traditional romantic motifs like hearts and roses with dark, edgy elements characteristic of gothic subculture. Typically featuring a palette of deep reds, black, and purples, these designs often utilize stiletto shape nails or coffin shape nails to create a dark romantic nails look. They serve as an ideal “anti-Valentine” statement or a sophisticated, moody alternative to standard holiday manicures.
Drawing from comprehensive analysis of current trends and proven nail art methodologies, this guide explores sophisticated designs that balance elegance with edge. We will uncover nine distinct styles, from smoky marbling nails to intricate lace details, ensuring you find the perfect match for your personality. Get ready to master the art of dark romance and discover exactly how to achieve these stunning looks this June 2026.
Unveiling the Dark Romance: Mastering Valentines Nails Goth Trends for 2026
Valentines nails goth represent far more than just a color change; they are a deliberate fusion of two powerful aesthetic worlds. By marrying the soft, emotional symbolism of Valentine’s Day with the bold, mysterious attributes of gothic style, you create a visual language that speaks to dark romantic nails enthusiasts. This style validates the desire for an alternative expression of love—one that acknowledges depth, mystery, and perhaps a touch of the macabre. Whether you are drawn to the sharp precision of stiletto shape nails or the architectural elegance of coffin shape nails, this trend offers a versatile canvas for self-expression.
Understanding this aesthetic requires looking beyond simple black polish. It involves mastering textures like smoky marbling nails and integrating motifs that challenge the norm, such as anti valentines nails goth concepts. As we move into the specific designs, remember that the goal is to bridge the gap between traditional romantic imagery and your unique, edgy identity. The following ideas range from subtle nods to the genre to full-blown gothic statements, ensuring there is a technique here that aligns perfectly with your skill level and style preferences.
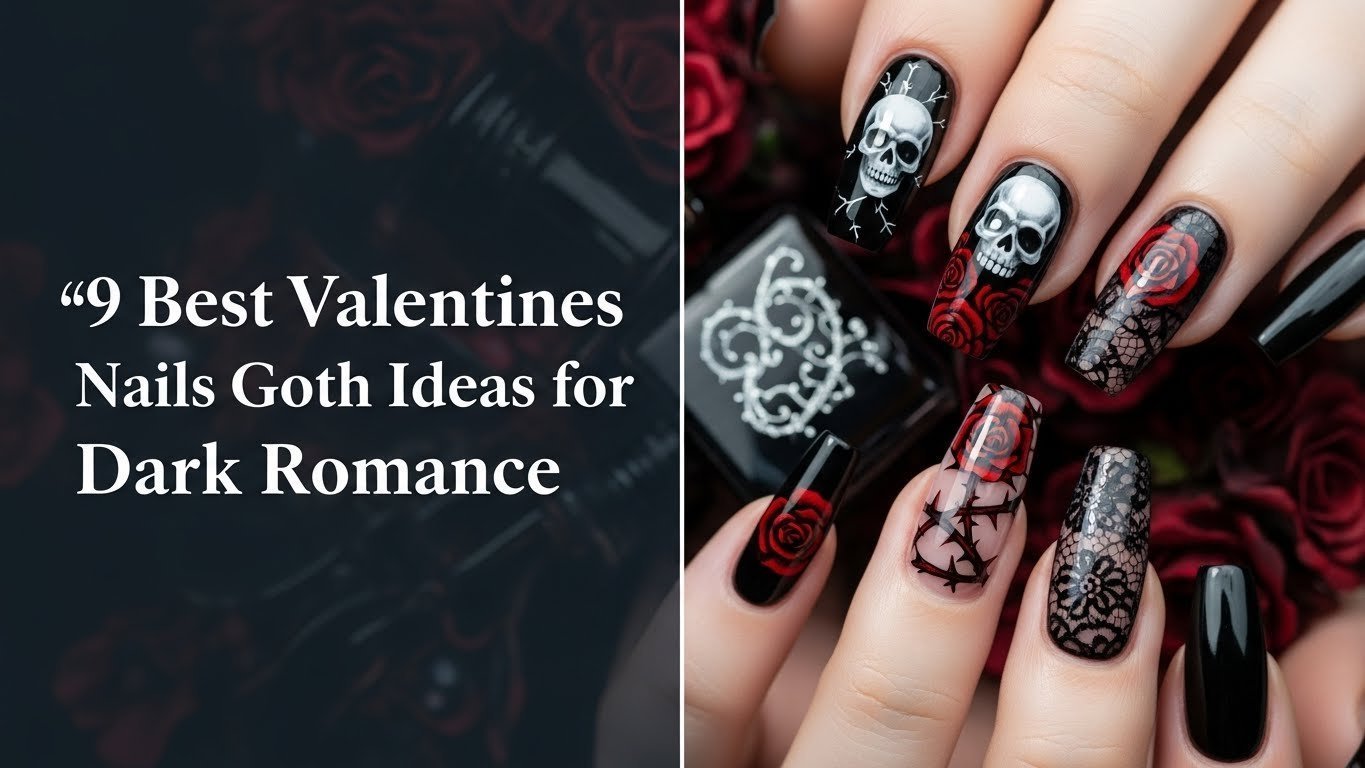
9 Best Valentines Nails Goth Ideas for 2026 Dark Romance
Here are the top distinct ideas to help you design gothic nail art that stands out. Whether you are looking for black heart nails or dramatic dripping blood nails, these step-by-step guides provide the actionable instructions and expert insights you need. We will explore how different shapes like stiletto coffin almond enhance these designs and how to execute them with professional precision.
1. Achieve Striking Black Heart Nails

Pin this elegant black heart nail design to your goth valentines nails board!
Black heart nails: An edgy take on the classic symbol of love, characterized by matte black hearts set against a contrasting glossy background, often styled on stiletto shape nails. This design perfectly encapsulates the gothic aesthetic by flipping the traditional red-heart script, offering a sophisticated and moody alternative.
To achieve this look, precision is key. The contrast between a deep, glossy red base and the flat, light-absorbing matte black heart creates a stunning visual depth. This design works exceptionally well on sharper nail shapes, which reinforce the “femme fatale” vibe often associated with handpainted gothic art.
Products & Tools Used:
- Deep red gel nail polish (highly pigmented, long-lasting)
- Matte black nail polish (quick-dry, opaque for crisp lines)
- Fine detail nail art brush (000 size for precision)
- Glossy top coat (UV/LED cure recommended for gel base)
- Matte top coat (for accent hearts)
- LED/UV nail lamp (if using gel polishes)
- Nail file and buffer (for desired stiletto shape nails)
Application Steps:
- Prepare Nails: File and shape nails into desired stiletto shape nails, buff surfaces gently, and clean with alcohol. Apply a base coat and cure if using gel.
- Apply Base Color: Apply two thin coats of deep red gel polish, curing each coat under the lamp.
- Draw Hearts: Using the fine detail brush and matte black nail polish, carefully paint small, symmetrical hearts on accent nails or strategically across several. Allow to dry.
- Seal & Finish: Apply a glossy top coat over all nails, including over the black hearts. Cure. For a contrast, apply a matte top coat only over the black hearts to achieve a subtle textural difference.
- Clean Up: Use a small brush dipped in nail polish remover to clean any edges or mistakes.
Pro-Tip: For truly crisp matte black hearts on a glossy base, paint the hearts first with regular polish (even over cured gel), allow to dry completely, then carefully apply a thin, glossy gel top coat around the heart, not on it. Finish with a matte gel top coat over the entire nail to seal. This utilizes advanced nail stamping goth designs principles for precision.

2. Craft Enigmatic Smoky Marbling Nails

Save this smoky marbling nails idea for your next goth vday nails manicure!
Smoky marbling nails: A mysterious and artistic design technique where black, gray, and white polishes are swirled together to create an ethereal, smoke-like effect, often displayed on coffin shape nails. This style evokes a mysterious aesthetic and is a cornerstone of dark romantic nails because of its fluid, dreamlike quality.
This technique is favored for its organic nature; no two nails will look exactly alike, which adds to the bespoke feel of your manicure. By layering translucent colors, you can build depth that mimics real smoke or rolling storm clouds, perfectly bridging the gap between elegance and the gothic black heart vibe.
Products & Tools Used:
- Gel polishes in black, deep gray, and white (highly pigmented)
- Clear top coat (non-wipe, for marbling effect)
- Thin nail art brush or dotting tool
- LED/UV nail lamp
- Base coat (gel recommended)
- Nail buffer and file (for coffin shape nails)
Application Steps:
- Prep & Base: Prepare nails, shape into coffin shape nails, apply base coat, and cure. Apply two thin coats of deep gray gel polish as the base and cure each.
- Wet Marbling: Apply a thin, even layer of clear top coat (do not cure).
- Dot & Swirl: While the top coat is wet, strategically place small dots or lines of black and white gel polish onto the nail.
- Create Smoke: Using a thin nail art brush, gently swirl and drag the colors through the wet top coat to create a smoky, marble effect. Be careful not to overmix.
- Cure: Once satisfied with the design, cure the nails under the LED/UV lamp.
- Seal & Finish: Apply a final layer of clear top coat over the cured design for gloss and protection, then cure.
Pro-Tip: For the most authentic smoke effect in smoky marbling nails, ensure your clear top coat layer is thin but sufficient to allow the colors to blend without drying. Work quickly before the top coat sets. This technique is often used by master nail artist for bespoke gothic nail designs.

3. Embrace the Edgy Blood Drip Nails

Dare to wear these blood drip nails for a truly gothic valentines nails statement!
Blood drip nails: A bold and dramatic design featuring glossy red polish cascading down the nail to mimic dripping blood, typically set against a contrasting matte black base on almond shape nails. This look is the epitome of edgy valentines nails, offering a striking visual that aligns with the dark romantic nails theme while making a fearless statement.
This design thrives on the juxtaposition of textures—the high-shine “blood” against the flat matte background creates a realistic wet look. It’s a favorite for those wanting to channel a vampire aesthetic or simply disrupt the sweetness of the holiday with a macabre twist.
Products & Tools Used:
- Matte black gel polish (for base color)
- Thick, self-leveling red nail art gel (for drips)
- Fine dotting tool or toothpick
- LED/UV nail lamp
- Base coat and non-wipe top coat (gel)
Application Steps:
- Base Coat: Prepare nails, shape into almond shape nails, apply base coat, and cure. Apply two thin coats of matte black gel polish, curing each.
- Create Drips: Using the thick red nail art gel and a dotting tool, apply a small bead of red polish near the cuticle line. Gently drag the polish downwards in varying lengths to create drip shapes.
- Form Drips: For more pronounced drips, add a small dot of red gel at the bottom of each dragged line and allow gravity to slightly pull it, creating a fuller look.
- Cure Carefully: Cure the nails under the LED/UV lamp, ensuring the drips hold their shape.
- Seal: Apply a thin layer of non-wipe top coat over the entire nail (including drips) to add gloss and durability, then cure.
Pro-Tip: For the most realistic blood drip nails, use a high-viscosity red gel polish and allow it to self-level slightly before curing. Don’t overwork the drips; let the polish do the work. This demonstrates proven goth nail techniques and creates a bold statement.

4. Design Intricate Gothic Lace Nails

Pin these exquisite gothic lace nails for a touch of romantic goth nails elegance!
Gothic lace nails: An intricate style that mimics the delicate patterns of black lace, often layered over a sheer or nude base on coffin shape nails. This design captures the essence of romantic goth nails by combining Victorian-inspired elegance with handpainted gothic details for a refined, sophisticated look.
Lace designs provide a softer, more sensual approach to the goth aesthetic. Whether created through meticulous hand-painting or the ease of stamping plates, the result is a textured, fabric-like appearance that pairs beautifully with formal wear or a romantic evening out.
Products & Tools Used:
- Sheer milky white or nude gel polish (for base)
- Black stamping polish or highly pigmented black gel paint (for lace)
- Fine detail nail art brush (for hand-painting) or nail stamping plate with lace patterns and stamper
- Tiny silver nail studs or pearls
- Nail art tweezers
- LED/UV nail lamp
- Base coat and glossy top coat (gel)
Application Steps:
- Base Layer: Prepare nails, shape into coffin shape nails, apply base coat, and cure. Apply two thin coats of sheer milky white or nude gel polish, curing each.
- Lace Design (Hand-Painted): Using the fine detail brush and black gel paint, delicately paint lace-like patterns. Start with simple curves and add small dots or cross-hatching to fill in. Cure.
- Lace Design (Stamping): If using stamping, apply black stamping polish to your lace design plate, scrape, pick up with stamper, and carefully transfer to the nail. Cure.
- Add Embellishments: While the design is still slightly tacky (or apply a thin layer of top coat), use tweezers to place tiny silver nail studs or pearls onto the lace pattern. Cure.
- Seal & Finish: Apply a glossy top coat over the entire nail, ensuring all studs are encapsulated, then cure.
Pro-Tip: For perfectly symmetrical gothic lace nails, consider investing in a high-quality nail stamping plate with intricate lace designs. Practice on a nail wheel first to master the technique. This allows advanced nail stamping goth designs even for beginners.

5. Create Luxurious Velvet Matte Nails

Consider these plush velvet matte nails for sophisticated dark aesthetic manicures!
Velvet matte nails: A tactile design that uses special top coats or flocking powder to create a plush, fabric-like texture on the nail surface, typically in deep shades like black or burgundy on almond shape nails. This style elevates matte finish nails to a new level of luxury, creating dark aesthetic manicures that beg to be touched.
The allure of velvet nails lies in their richness. They absorb light rather than reflecting it, creating a deep, void-like intensity that is perfect for a gothic vibe. Adding subtle glossy accents creates a striking interplay of textures that feels modern and high-fashion.
Products & Tools Used:
- Highly pigmented black gel polish
- High-quality matte gel top coat
- Small amount of black flocking powder (optional, for true velvet effect)
- Fine detail brush (for glossy accents)
- Glossy top coat (for accents)
- LED/UV nail lamp
- Base coat, nail buffer
Application Steps:
- Prep & Base: Prepare nails, shape into almond shape nails, apply base coat, and cure. Apply two thin coats of black gel polish, curing each.
- Matte Finish: Apply a thin, even layer of matte gel top coat over the entire nail. Cure under LED/UV lamp.
- Velvet Effect (Optional): If using flocking powder, apply a second layer of matte top coat (do not cure), then sprinkle black flocking powder onto the wet layer. Gently pat down and cure. Brush off excess.
- Glossy Accents: Using the fine detail brush and a glossy top coat, paint small, delicate shapes (e.g., tiny hearts, swirls) onto the matte surface. Cure.
Pro-Tip: To maintain the pristine matte finish nails and prevent shine, avoid cuticle oils or lotions immediately after application on the nail surface. This ensures long lasting goth nails and preserves the unique textures.

6. Incorporate Glimmering Crystal Embellishments

Adorn your nails with crystal embellishments for truly ornate nails this Valentine’s Day!
Crystal embellishments: A glamorous technique involving the application of rhinestones, gems, and micro-beads to create ornate nails, often on dramatic stiletto shape nails. This design merges the sparkle of high fashion with gothic glam valentines day nails, proving that dark can also be dazzling.
When you decorate with rhinestones on a dark base, the contrast makes the crystals pop with intensity. This style transforms your manicure into jewelry, perfect for those who want their nails to be the focal point of their ensemble.
Products & Tools Used:
- Base color gel polish (e.g., black or deep red)
- Variety of black and iridescent clear rhinestones (various sizes)
- Silver micro-beads (optional)
- Nail art gem glue or clear builder gel
- Wax pencil or rhinestone picker tool
- Nail art tweezers
- LED/UV nail lamp
- Base coat and glossy top coat (gel)
Application Steps:
- Base Layer: Prepare nails, shape into stiletto shape nails, apply base coat, and cure. Apply two thin coats of your chosen base color, curing each.
- Apply Adhesive: Apply a small bead of gem glue or a thin layer of builder gel to the area where you want to place the embellishments. Do one nail at a time.
- Place Crystals: Using a wax pencil or picker tool, carefully pick up rhinestones and place them onto the wet adhesive. Use tweezers for precise adjustments. Arrange smaller micro-beads around larger crystals for added texture.
- Cure & Seal: Cure the nails under the LED/UV lamp to set the glue/gel. Apply a thin layer of top coat around the base of the crystals to help secure them, but try not to cover the top of the crystals as it can dull their shine. Cure again.
Pro-Tip: For truly long-lasting crystal embellishments on goth valentines nails, use a non-acidic gel or resin adhesive specifically designed for nail art. Always encapsulate the edges of larger stones with builder gel for maximum security. This is an expert recommended design for durable nail solutions.

7. Explore Mystical Witchy Symbol Nails

Conjure some magic with these witchy symbol nails for your goth valentines nails!
Witchy symbol nails: A design style that incorporates occult and celestial motifs like crescent moons, stars, and pentagrams, painted on almond shape nails. This aesthetic bridges witchy valentines nails with gothic romance nails, appealing to those who find beauty in the mystical and arcane.
Using deep forest greens, purples, or blacks as a backdrop allows gold or silver symbols to shine, creating a look that is both grounded and ethereal. It’s a subtle way to signal a love for the magical side of life while maintaining an elegant manicure suitable for the holiday.
Products & Tools Used:
- Base color gel polish (e.g., deep forest green, black, or dark purple)
- Gold metallic gel paint or nail polish
- Fine detail nail art brush
- Witchy symbol nail decals/stickers or stamping plate (optional)
- Nail art tweezers (for decals)
- LED/UV nail lamp
- Base coat and glossy top coat (gel)
Application Steps:
- Base Layer: Prepare nails, shape into almond shape nails, apply base coat, and cure. Apply two thin coats of your chosen base color, curing each.
- Apply Symbols (Hand-Painted): Using the fine detail brush and gold metallic paint, carefully paint desired symbols like crescent moons, tiny stars, or simplified pentagrams. Cure if using gel paint.
- Apply Symbols (Decals/Stamping): If using decals, apply them over the cured base coat. If stamping, use a witchy symbol stamping plate with gold polish.
- Seal & Finish: Apply a glossy top coat over the entire nail to protect the design and add shine. Cure.
Pro-Tip: For perfectly crisp witchy symbol nails when hand-painting, use highly pigmented metallic gel paints. If using decals, ensure the nail surface is smooth and free of oils for optimal adhesion. This is a specialized gothic finish that can be achieved with precise application methods.

8. Embellish with Elegant Coquette Goth Nails

Discover the delicate charm of coquette goth nails for your goth aesthetic nails valentine!
Coquette goth nails: A trend that blends the hyper-feminine coquette aesthetic with dark gothic elements, featuring motifs like tiny bows and pearls on short goth nails or almond shape nails. This style proves that goth valentines nails can be soft and delicate while still retaining a moody edge.
This look relies on sheer textures and dainty accessories. It challenges the stereotype that goth must be heavy and aggressive, offering a playful and flirtatious option that fits perfectly with Valentine’s Day romance.
Products & Tools Used:
- Sheer black gel polish (for base color)
- Tiny black bow nail charms or water decals
- Small silver nail pearls or rhinestones
- Nail art gem glue or builder gel
- Wax pencil or rhinestone picker tool
- Nail art tweezers
- LED/UV nail lamp
- Base coat and glossy top coat (gel)
Application Steps:
- Base Layer: Prepare nails, shape into short goth nails or almond shape nails, apply base coat, and cure. Apply two thin coats of sheer black gel polish, curing each.
- Apply Charms/Decals: Apply a small dot of gem glue or builder gel where you want to place the bow charms. Using tweezers, place the bow charms onto the wet adhesive. If using water decals, apply them over the cured base coat and seal.
- Add Pearls: Place small silver nail pearls or tiny rhinestones around the bows or along the cuticle line for delicate accents, securing with gem glue.
- Cure & Seal: Cure the nails under the LED/UV lamp. Apply a glossy top coat over the entire nail, ensuring charms and pearls are sealed in for durability (avoid covering the very tops of pearls to retain texture if desired). Cure again.
Pro-Tip: For coquette goth nails, balance is key. If your base is a sheer black, ensure your bows and pearls are proportionally small to maintain the delicate aesthetic. This design blends with traditional elements while making a bold statement.

9. Elevate with Modern Negative Space Goth Nails

Showcase your contemporary style with negative space goth nails for a chic dark romantic nails statement!
Negative space goth nails: A modern, minimalist approach where parts of the natural nail are left exposed to create geometric patterns or sharp lines alongside dark polish, often seen on coffin shape nails. This design utilizes minimalist gothic geometry to create a clean, architectural look that feels fresh and high-fashion.
By incorporating the natural nail into the design, you create a striking contrast that emphasizes precision. It’s a sophisticated way to wear modern gothic nail designs that feels lighter than a full blackout manicure but equally edgy.
Products & Tools Used:
- Black and/or deep purple gel polish
- Nail art striping tape (various thicknesses) or fine detail nail art brush
- Clear builder gel (optional, for negative space protection)
- LED/UV nail lamp
- Base coat and glossy top coat (gel)
- Nail buffer and file (for coffin shape nails)
Application Steps:
- Prep & Base: Prepare nails, shape into coffin shape nails, apply base coat, and cure. No base color polish is needed for the negative space areas.
- Create Design with Tape: Apply thin striping tape to create your desired geometric pattern on the clean, prepped nail. Press down firmly to prevent bleeding.
- Paint: Apply your black and/or deep purple gel polish over the tape and exposed nail areas. Cure.
- Remove Tape: Carefully peel off the striping tape to reveal crisp lines and the natural nail (negative space).
- Seal Negative Space (Optional): If desired, apply a thin layer of clear builder gel over the exposed natural nail parts (negative space) and cure to add strength and a smooth finish.
- Top Coat: Apply a glossy top coat over the entire nail to seal and add shine. Cure.
Pro-Tip: For the sharpest lines in negative space goth nails, ensure your striping tape is pressed down perfectly flat. Remove the tape immediately after curing each polish layer to prevent the polish from setting with the tape and causing jagged edges. This innovative nail technology is a modern gothic nail design.

Key Takeaways: Your Quick Guide to Valentines Nails Goth
Before you dive into your manicure session, here is a quick summary of the essentials for mastering this aesthetic. These takeaways ensure you can confidently select the right products and techniques to bring your dark romantic vision to life.
- Embrace the Dark Romance: Valentines Nails Goth seamlessly blends traditional Valentine’s motifs with an edgy, gothic aesthetic, offering unique self-expression through designs like black heart nails and blood drip nails.
- Master Key Techniques: Designs like smoky marbling nails and negative space goth nails utilize specific application methods (wet-on-wet, striping tape) that can elevate your nail art from amateur to expert level.
- Choose the Right Shapes: Stiletto shape nails, coffin shape nails, and almond shape nails are ideal canvases for gothic valentine’s day nails, enhancing the dramatic and elegant flair of your chosen design.
- Product Selection Matters: Achieving long lasting goth nails and durable nail solutions relies on using high-quality gel polishes, appropriate nail art tools, and robust adhesives for crystal embellishments.
- DIY or Professional: Most goth valentines nails designs, from gothic lace nails to velvet matte nails, can be achieved at home with the right tools and patience, but knowing when to consult an experienced manicurist can prevent nail damage.
- Subtle or Bold: The spectrum of goth valentines nails allows for everything from subtle goth valentines nail ideas professional like coquette goth nails to bold nails like blood drip nails, catering to individual comfort levels.
- Pinterest is Your Inspiration Hub: Leveraging platforms like Pinterest and Instagram for gothic nail art valentine inspiration is crucial for discovering new nail ideas goth and keeping up with trending goth nails.
FAQs About Valentines Nails Goth
To ensure you have absolutely all the information needed to perfect your look, we have compiled answers to the most common questions about goth valentines nails. Whether you are a beginner or a seasoned DIY enthusiast, these answers will clarify techniques and trends.
What exactly are goth valentines nails?
Goth valentines nails are a unique aesthetic that combines traditional Valentine’s Day themes like hearts and romance with elements of gothic subculture, such as dark colors, edgy designs, and sometimes macabre motifs. They offer an alternative, dark romantic nails expression for those who prefer a moodier or more individualistic approach to holiday nail art. This style often features black, deep reds, and stiletto coffin almond shapes.
What nail shapes are best for gothic valentines?
Stiletto shape nails, coffin shape nails, and almond shape nails are generally considered the best choices for gothic valentines designs. These shapes inherently offer a dramatic, sharp, or elegant canvas that beautifully complements the edgy and sophisticated nature of goth valentines nails. The pointed or tapered tips enhance the overall dark aesthetic.
Can you wear black nails for Valentine’s Day?
Absolutely, black nails are perfectly suitable for Valentine’s Day, especially when styled as goth valentines nails. They provide a dramatic and sophisticated base for various dark romantic designs, from subtle black heart nails to bold blood drip nails. Black offers a powerful contrast to traditional reds and pinks, allowing for a unique and personal expression of the holiday.
Where can I find goth valentines nail inspiration?
You can find extensive goth valentines nail inspiration on visual platforms like Pinterest, Instagram, and TikTok. Searching for terms like “goth valentines nails,” “dark romantic nails,” or “anti valentines day nail designs” will yield a wealth of images and tutorials from expert nail artist tips and fellow enthusiasts in the alternative beauty community.
How do I make my valentines nails goth last longer?
To make your valentines nails goth last longer, always start with a clean, prepped nail surface and apply a high-quality base coat. Use durable gel polishes and seal your design with a strong top coat, curing properly if using gel. Avoid excessive water exposure and daily tasks that chip polish. Investing in durable nail solutions and performing good nail care routine will significantly extend wear.
What supplies do I need for DIY goth valentines nails?
For DIY goth valentines nails, essential supplies include quality black and deep red gel polishes, a fine detail nail art brush, a dotting tool, and potentially nail art striping tape or stamping plates for intricate designs. A good base coat, matte and glossy top coats, and an LED/UV nail lamp (for gel) are also crucial. You might also want crystal embellishments or nail charms.
What’s the difference between goth and alternative valentines nails?
While often overlapping, goth valentines nails specifically draw from traditional gothic aesthetics (Victorian, romantic macabre, dark elegance), often featuring black, deep purples, and defined symbols. Alternative valentines nails is a broader term that encompasses any non-traditional style, including punk, emo, or grunge, which might be less formal or more experimental than classic gothic.
How can I get stiletto goth valentines nails at home?
To get stiletto goth valentines nails at home, you’ll need a good quality nail file and buffer. Start with an almond shape, then gradually taper the sides further and sharpen the tip. Be patient and file slowly to avoid over-filing or creating weak points. If you struggle, consider press-on nails in a stiletto shape or polygel gothic nail extensions for a temporary solution.
Are press-on goth valentines nails a good option?
Press-on goth valentines nails are an excellent option for a quick, temporary, and cost-effective goth valentines look. They come in various shapes like stiletto shape nails or coffin shape nails and can feature intricate designs like gothic lace nails or smoky marbling nails. They are easy to apply and remove, offering easy application goth nails without commitment.
How to achieve a matte goth finish on nails?
To achieve a matte goth finish on nails, apply your chosen dark polish (e.g., black or deep red) and allow it to fully dry. Then, apply a high-quality matte top coat evenly over the entire nail. For gel polish, use a specific matte gel top coat and cure it under an LED/UV lamp. This will transform a glossy polish into a luxurious matte finish nails with a velvet-like texture.
Final Thoughts on Valentines Nails Goth
As we’ve explored the diverse and captivating world of valentines nails goth, it’s clear that this aesthetic offers a powerful way to express individuality and a unique sense of romance for June 2026. From the subtle elegance of black heart nails to the dramatic flair of blood drip nails, each design provides an opportunity to transform your fingertips into a canvas of dark aesthetic manicures. We’ve delved into specific techniques for achieving smoky marbling nails, intricate gothic lace nails, and even the modern appeal of negative space goth nails, equipping you with the knowledge and inspiration to create goth valentines nails that truly resonate with your personal style.
This guide aimed to empower you with actionable insights, ensuring that whether you opt for stiletto shape nails adorned with crystal embellishments or prefer the softer touch of coquette goth nails, you have the tools and confidence to design gothic nail art that is both stunning and long-lasting. Remember, the beauty of goth valentines nails lies in breaking free from convention and embracing the artistry of self-expression. By utilizing proven goth nail techniques and selecting high quality nail supplies, your edgy valentines nails will not only turn heads but also tell a story of unique dark romance.
Which of these goth valentines nails ideas will you be trying this Valentine’s Day to showcase your distinct style?
Last update on 2026-04-27 / Affiliate links / Images from Amazon Product Advertising API