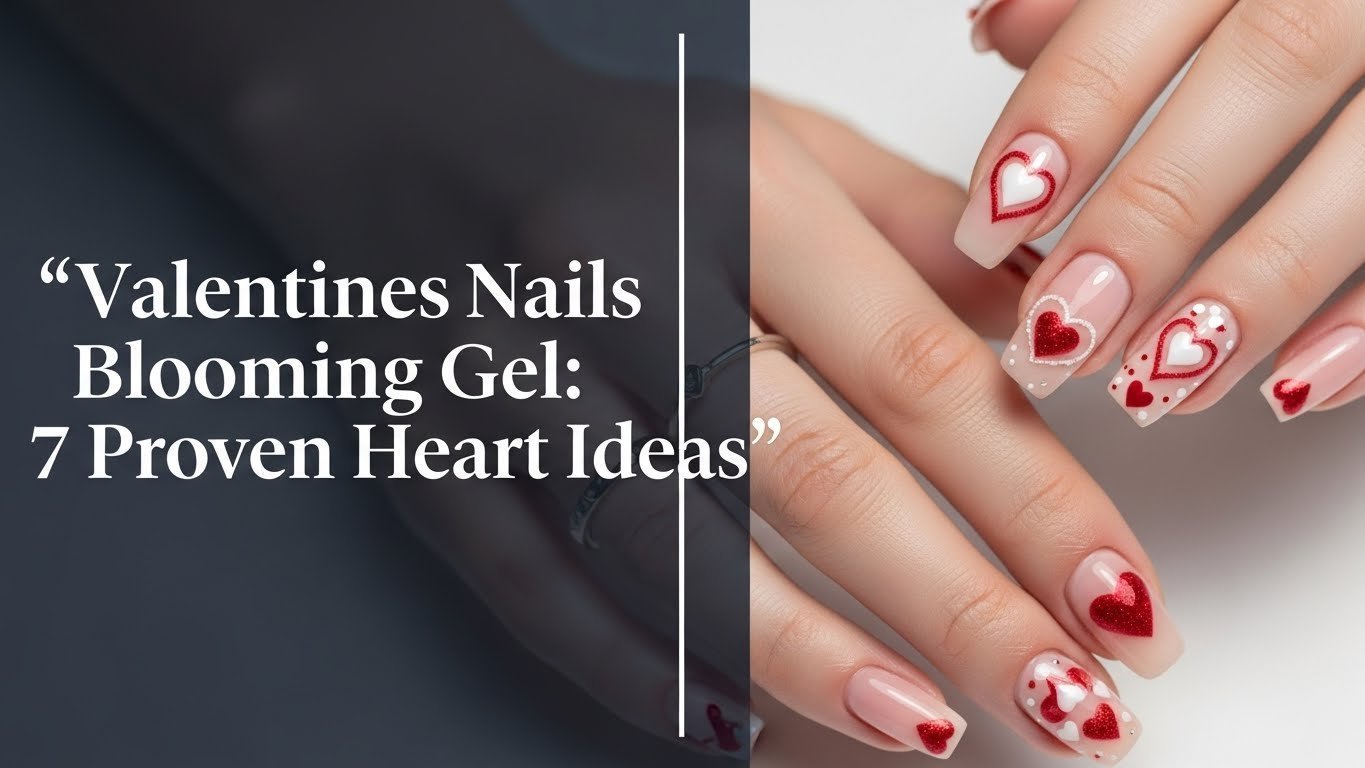
Does the thought of hand-painting tiny hearts make your hand shake before you even pick up a brush? You are not alone in wanting salon-quality art without the frustration of shaky lines or messy results.
Valentines nails blooming gel: A specialized clear gel polish that naturally disperses wet color to create effortless, intricate designs like hearts, marble, and watercolor effects without advanced painting skills. This forgiving medium allows the gel to spread automatically, delivering professional-looking “blooming effect nails” right from your home.
Drawing from expert application techniques and testing current top-rated products, we simplify this trending art form for you. You will discover exactly how to master seven distinct heart designs using this forgiving medium. Get ready to create the romantic manicure of your dreams.
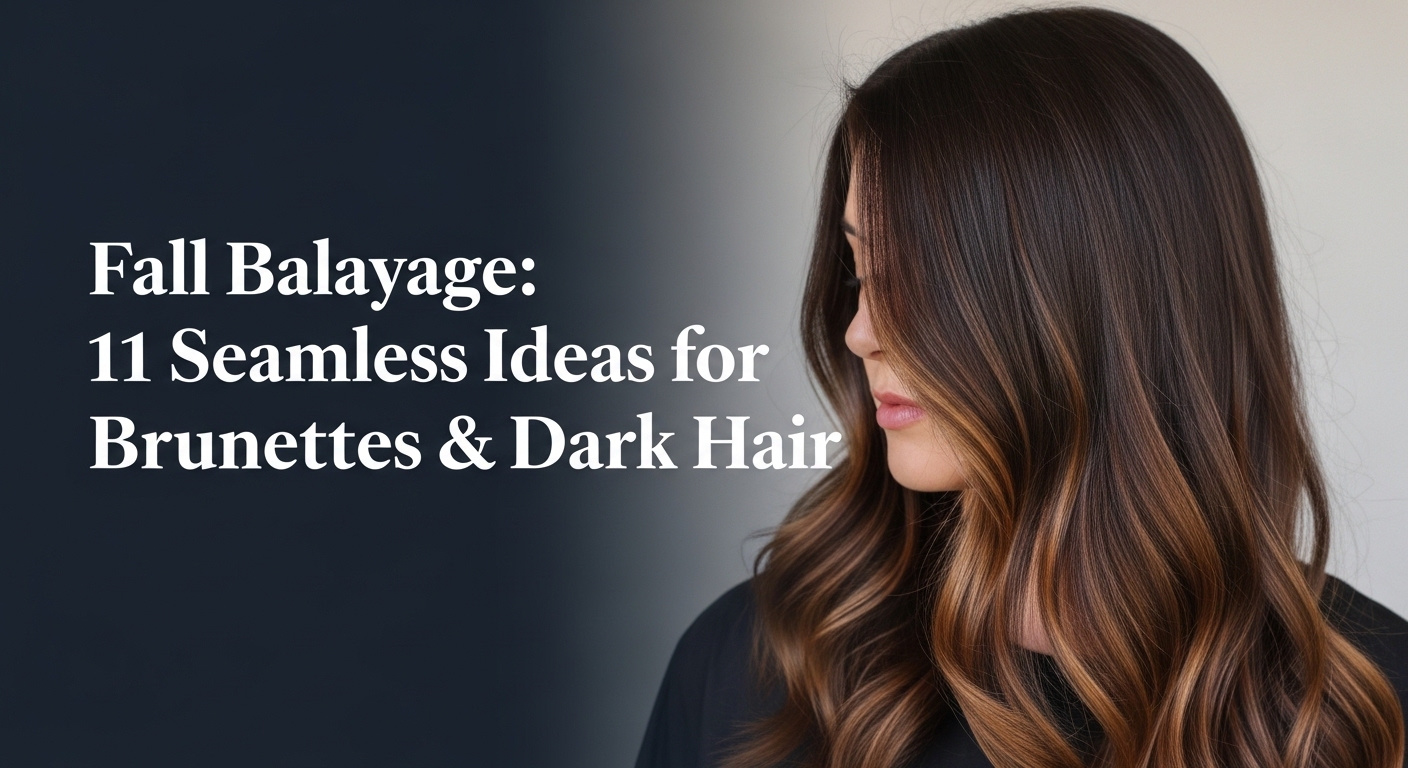
Transform Your Valentines Nails Blooming Gel with These 7 Proven Heart Ideas for 2026
Valentines nails blooming gel allows for effortlessly beautiful and intricate designs like hearts, perfect for celebrating the holiday with a personalized touch. This specialized gel spreads color to create unique, marble-like or watercolor effects, ideal for quick yet stunning nail art at home or in a salon.
If you have been searching for easy valentines blooming gel nails that actually look professional, you have found the ultimate solution. Blooming gel is a clear gel polish designed specifically to disperse wet color, creating “stunning blooming gel art” that looks incredibly complex but is surprisingly simple to execute. The magic lies in the chemistry; the blooming gel “works with” your standard colored gel polish to soften edges and blend pigments in ways a standard brush never could. This interaction “blooming gel creates” soft, romantic aesthetics perfect for Valentine’s Day nail inspiration.
Whether you are a DIY enthusiast or a pro looking for speed, using blooming gel requires just a few basics like a UV/LED lamp and your favorite colors. By following “professional nail artist tips,” you can bypass the difficulty of hand-painting precise shapes. Instead, you let the gel do the hard work for you. In this guide, we will move beyond basic concepts and dive into specific, proven ideas that bridge the gap between “cute nail art” and high-end salon designs.
7 Proven Heart Ideas for Valentines Nails Blooming Gel for 2026
Blooming gel hearts are the quintessential design for a romantic manicure, offering versatility ranging from subtle whispers of color to bold, artistic statements. While the technique is beginner-friendly, achieving distinct styles requires specific approaches.
Below, we detail seven unique heart blooming gel designs, guiding you through the exact steps to recreate them. These tutorials utilize “proven blooming gel methods” to ensure your success. Remember, this technique “utilizes” the wet layer of blooming gel to manipulate color, so having your nail art brushes and UV LED lamp ready is essential. From the “sweetest blooming gel” looks to more “intricate blooming gel patterns,” these gel nail designs cover every aesthetic for 2026.
1. Delicate Watercolor Blooming Gel Hearts

Pin this delicate blooming gel heart design to your “Valentine’s Nail Art” board!
This design focuses on “delicate blooming gel designs” that mimic the soft, diffused look of watercolor paintings. By using sheer gel polishes, the blooming gel “creates” a translucent effect that is perfect for a subtle, romantic vibe. Even beginners can achieve a “professional blooming gel finish” with this method because perfection is not the goal—softness is.
Supplies Needed
- High-quality blooming gel nail polish
- Sheer or translucent gel nail polish in pink, red, or purple hues
- Gel base coat and no-wipe top coat
- Fine-tip nail art brush
- Dotting tool
- UV LED lamp for curing
- Lint-free wipes and rubbing alcohol
Step-by-Step Directions
- Prepare nail surface by gently buffing and applying a thin layer of gel base coat, then cure under UV LED lamp (30-60 seconds).
- Apply two thin coats of your chosen light, neutral base color gel polish, curing each coat.
- Apply a thin, even layer of blooming gel nail polish over the cured base color. Do NOT cure this layer.
- Immediately, using your fine-tip nail art brush or dotting tool, place small dots or short lines of sheer colored gel polish in a heart shape onto the wet blooming gel.
- Watch as the blooming gel “spreads” the color, creating the delicate watercolor effect. Allow to bloom for 10-20 seconds.
- Once desired bloom is achieved, cure blooming gel design under the UV LED lamp (60 seconds).
- Finish with a layer of no-wipe top coat and cure for 60-90 seconds for a “glossy blooming gel effect.”
Pro-Tip: For truly delicate watercolor blooming gel hearts, ensure your blooming gel layer is very thin and even. Overloading the brush with colored gel can prevent the desired spread. Experiment with different pigment suspension in blooming gel for varied effects.

2. Gradient Ombre Blooming Gel Hearts

Save this stunning gradient ombre heart idea for your next Valentine’s Day manicure!
For those wanting a more complex look, gradient hearts offer a sophisticated twist on the classic icon. This technique uses “expert blooming gel techniques” to blend two complementary colors directly on the nail. The blooming gel “enables” this gradient effect by softening the transition line between the two shades as they expand.
Supplies Needed
- High-quality blooming gel
- Two complementary gel nail polish colors (e.g., deep red and light pink)
- Gel base coat and no-wipe top coat
- Fine-tip detail nail art brush
- Small mixing palette
- UV LED lamp for curing
Step-by-Step Directions
- Complete nail plate preparation science by applying gel base coat and two layers of a light base color, curing each layer as usual.
- Apply a thin, even coat of blooming gel over your cured base color. Do NOT cure.
- On your mixing palette, place a small drop of each of your two chosen gel polish colors.
- Dip your fine-tip detail nail art brush into both colors, picking up a small amount of each side-by-side.
- Carefully draw a heart shape onto the wet blooming gel, starting with the darker color at the bottom or one side of the heart, and allowing the lighter color to naturally blend as you move the brush.
- The blooming gel will spread the colors, creating a soft ombre effect within the heart. Allow to bloom for 15-25 seconds, adjusting with the brush if needed.
- Once the desired gradient is formed, cure blooming gel design under the UV LED lamp for 60 seconds.
- Seal blooming gel designs with no-wipe top coat and cure for 60-90 seconds.
Pro-Tip: Controlling the amount of gel polish on your brush is key for gradient effect blooming gel. Too much can cause pooling, while too little won’t bloom effectively. Viscosity and flow dynamics of blooming gel play a crucial role here; a medium viscosity blooming gel often works best.

3. Classic Red Blooming Gel Heart with Outline

Recreate this timeless Valentine’s Day look! Pin this blooming gel heart idea!
Combining the soft diffusion of blooming gel with the precision of a liner creates a “classic red blooming gel” look that pops. This design relies on “reputable nail supplies” to ensure the red blooms evenly while the white outline stays crisp. The blooming gel “creates” the base shape, and the liner “enhances” it, offering a structured yet artistic finish.
Supplies Needed
- High-quality blooming gel nail polish
- Vibrant red gel nail polish
- White or black gel liner polish (for outlining)
- Gel base coat and no-wipe top coat
- Fine-tip nail art liner brush
- Dotting tool (optional, for shaping heart)
- UV LED lamp for curing
Step-by-Step Directions
- Prepare nail surface with gel base coat and two cured layers of a light base color (e.g., nude or light pink).
- Apply a thin, even coat of blooming gel over the cured base color. Do NOT cure.
- Using a dotting tool or your nail art liner brush, place two dots of red gel polish side-by-side, then drag the brush down to form the point of the heart onto the wet blooming gel.
- Allow the red gel polish to bloom and soften for about 15 seconds. Once happy with the effect, cure blooming gel design under the UV LED lamp (60 seconds).
- With your fine-tip nail art liner brush and white gel liner polish, carefully draw a crisp outline around the now-cured red blooming gel heart.
- Cure the white outline under the UV LED lamp (30-60 seconds).
- Finish with top coat for ultimate protection and shine, curing for 60-90 seconds.
Pro-Tip: For clean outlines on your blooming gel hearts, ensure the blooming gel layer is fully cured before applying the liner. If the liner bleeds, the blooming gel was likely still wet underneath. This also applies to advanced blooming gel layering.

4. Minimalist Outline Blooming Gel Hearts

Keep it chic and simple! Pin these minimalist blooming gel hearts!
If you prefer understated elegance, “minimalist gel nail designs” are perfect. This method uses blooming gel to slightly diffuse a thin line, creating a “soft focus” effect that feels modern and chic. It creates “delicate blooming gel designs” where the negative space is just as important as the art itself.
Supplies Needed
- Clear blooming gel nail polish
- Gel nail polish in white, black, or a pastel color (e.g., lavender, mint)
- Gel base coat and no-wipe top coat
- Very fine-tip nail art liner brush
- UV LED lamp for curing
Step-by-Step Directions
- Start with proper nail prep techniques by applying gel base coat and two cured layers of a sheer nude or clear gel polish.
- Apply a thin, even coat of clear blooming gel over your cured base. Do NOT cure.
- Using your very fine-tip nail art liner brush, carefully draw a small, open heart outline onto the wet blooming gel using your chosen colored gel polish.
- Observe as the blooming gel subtly diffuses the lines, creating a soft, artistic edge to your heart outline. Allow to bloom for 10-15 seconds.
- Once the desired diffusion is achieved, cure blooming gel design under the UV LED lamp (60 seconds).
- Seal blooming gel designs with no-wipe top coat and cure for 60-90 seconds for a durable, minimalist finish.
Pro-Tip: For perfect minimalist outline blooming gel hearts, ensure your base color is fully cured before applying the blooming gel, and apply the blooming gel thinly. The key to this look is the controlled, subtle spread rather than a full bloom. Practice controlling the viscosity and flow dynamics of blooming gel for best results.

5. Romantic Rose Petal Blooming Gel Hearts

Fall in love with these romantic rose petal blooming gel hearts! Pin for later!
This advanced design layers dots of color to mimic the organic texture of rose petals. Rose petal hearts are “intricate blooming gel patterns” that add incredible depth to your manicure. The blooming gel “enables” this by blending the edges of each “petal” dot into the next, creating a seamless, floral look perfect for “romantic valentine designs.”
Supplies Needed
- High-quality blooming gel
- Multiple shades of red, pink, or burgundy gel nail polish
- Gel base coat and no-wipe top coat
- Fine-tip nail art brush and dotting tool
- UV LED lamp for curing
Step-by-Step Directions
- Begin with a cured gel base coat and two layers of your chosen neutral or light base gel polish.
- Apply a thin, even coat of blooming gel over the cured base. Do NOT cure.
- Using a dotting tool or your fine-tip nail art brush, place a central dot of your darkest gel polish color where you want the heart to be.
- Immediately place smaller dots of a lighter gel polish color around the central dot, creating the shape of the heart.
- Watch the blooming gel spread the colors, forming soft, layered “petals.” Allow to bloom for 15-25 seconds.
- For a more intricate look, you can lightly add even smaller dots of another color within the blooming areas and allow them to spread slightly before curing.
- Once the desired rose petal effect is achieved, cure blooming gel design under the UV LED lamp (60 seconds).
- Seal blooming gel designs with no-wipe top coat and cure for 60-90 seconds.
Pro-Tip: The key to romantic rose petal blooming gel hearts is to work quickly and allow each layer of dots to bloom before adding more, if desired. Don’t overwork the gel, as it can disrupt the spread. Understanding the osmotic effect in blooming gel art will help you anticipate the spread.
6. “String of Hearts” Garland with Blooming Gel

Adorn your nails with this adorable “string of hearts” blooming gel design! Pin it now!
Create a flowing, cohesive look across your hand with a “string of hearts” garland. This design connects multiple small hearts, using blooming gel to “integrate with” the base for a soft, dreamy appearance. It is one of the “sweetest blooming gel” concepts that works beautifully when extended across multiple nails.
Supplies Needed
- High-quality blooming gel
- One or two contrasting gel nail polish colors (e.g., pink, red)
- Gel base coat and no-wipe top coat
- Small dotting tool or fine-tip nail art brush
- UV LED lamp for curing
Step-by-Step Directions
- Apply gel base coat and two cured layers of your preferred base color (clear or nude work well for this).
- Apply a thin, even coat of blooming gel over the cured base. Do NOT cure this layer.
- Using a small dotting tool, place a series of small dots of your chosen colored gel polish in a curved or straight line across the nail, forming the top lobes of the hearts.
- Go back to each dot and drag a tiny amount of the gel polish downwards to form the bottom point of each heart, effectively creating a “string.”
- Allow the blooming gel to spread and form the soft edges of the hearts. This usually takes 10-20 seconds.
- Once you’re happy with your string of hearts garland, cure blooming gel design under the UV LED lamp (60 seconds).
- Finish with top coat and cure for 60-90 seconds.
Pro-Tip: For a beautiful “string of hearts” blooming gel garland, work on one nail at a time or in small sections if doing multiple nails, to ensure the blooming gel doesn’t dry prematurely. Consistency in the size of your dots will lead to more uniform hearts. This showcases advanced blooming gel layering principles.

7. Abstract Marble Blooming Gel Hearts

Unleash your inner artist with these abstract marble blooming gel hearts! Pin for unique inspo!
For a modern, edgy Valentine’s look, abstract marble hearts push the boundaries of traditional nail art. This design capitalizes on “unique blooming gel styles” by letting the gel swirl contrasting colors into stone-like patterns. The blooming gel “causes” the intermingling of pigments, doing the heavy lifting to create complex, organic veins within the heart shape.
Supplies Needed
- High-quality blooming gel
- Two or three contrasting gel nail polish colors (e.g., black, white, grey)
- Gel base coat and no-wipe top coat
- Dotting tool or fine-tip nail art brush
- UV LED lamp for curing
Step-by-Step Directions
- Prepare nails with gel base coat and two cured layers of a light, neutral, or clear base gel polish.
- Apply a thin, even coat of blooming gel over the cured base. Do NOT cure.
- Using a dotting tool or brush, place several small dots or lines of your contrasting gel polish colors onto the wet blooming gel in the shape of a heart.
- With a very fine brush or toothpick, gently swirl the colors within the heart area to encourage further blending and create a marble effect.
- Allow the blooming gel to spread and the marble pattern to develop for 20-30 seconds.
- Once the desired abstract marble look is achieved, cure blooming gel design under the UV LED lamp (60 seconds).
- Seal blooming gel designs with no-wipe top coat and cure for 60-90 seconds for a durable, artistic finish.
Pro-Tip: For truly abstract marble blooming gel hearts, don’t over-swirl the colors; let the blooming gel do most of the work to create natural-looking veins. Experiment with different pigment suspension in blooming gel for varied intensity. Using gel polishes of similar viscosity and flow dynamics of blooming gel will ensure a more even spread.

Key Takeaways: Your Quick Guide to Valentines Nails Blooming Gel
Before you start painting, here is a quick summary of the essentials for mastering these designs.
- Mastering blooming gel is key for effortless Valentines nails blooming gel designs. This specialized gel “creates” stunning diffused effects that are otherwise complex to achieve, making intricate heart designs accessible.
- Proper nail prep and a thin blooming gel layer are crucial for success. Always start with a cured base and apply the blooming gel thinly and evenly to ensure optimal spreading and avoid issues like “blooming gel not spreading.”
- Experiment with color combinations to personalize your blooming gel hearts for Valentine’s Day. Contrasting or complementary gel polish colors enhance the unique “blooming gel effect,” from “delicate watercolor blooming gel designs” to bold “gradient ombre hearts.”
- Utilize specific tools like fine-tip brushes and dotting tools for precision in your blooming gel nail art. These tools allow for controlled placement of gel polish to define shapes like the “string of hearts” garland or “abstract marble hearts.”
- Always cure your blooming gel designs thoroughly under a UV LED lamp to ensure longevity and prevent chipping. Insufficient curing can lead to “weak blooming gel adhesion” and dullness.
- Don’t forget the top coat to “seal blooming gel designs” for maximum shine and durability. A quality no-wipe top coat provides a “glossy blooming gel effect” and protects your beautiful Valentine’s Day nail art.
- Troubleshooting common blooming gel issues, like slow blooming, can be solved by adjusting gel thickness or lamp power. Consulting “proven blooming gel methods” helps overcome challenges, ensuring your blooming gel hearts are flawless.
People Also Ask About Valentines Nails Blooming Gel
What is blooming gel for nails?
Blooming gel is a specialized gel polish designed to create unique spread and diffusion effects, making it perfect for intricate nail art like watercolor, marble, or animal prints. When applied over a cured base color but not cured itself, it causes subsequent dots or lines of colored gel polish to spread, creating soft, artistic edges. It’s an easy way to achieve complex “blooming effect nails.”
How do you use blooming gel for Valentine’s Day?
For Valentine’s Day, blooming gel is primarily used to create various heart designs, from delicate watercolor hearts to abstract marble patterns. You apply a layer of blooming gel (without curing), then draw your heart shape with colored gel polish onto the wet layer. The blooming gel “spreads” the color, giving a soft, diffused look, before you cure the design. This creates “valentines nails blooming gel” art.
Is blooming gel worth it for DIY nail art?
Yes, blooming gel is absolutely worth it for DIY nail art, especially for those who want intricate designs without advanced brush skills. It simplifies complex techniques, allowing beginners to achieve a “professional blooming gel finish” with ease. For “easy blooming gel nails,” it’s an invaluable tool that opens up a world of creative possibilities, making it a great investment.
How to make blooming gel hearts?
To make blooming gel hearts, start with a cured base coat and base color, then apply a thin layer of blooming gel (do not cure). Immediately, use a dotting tool or fine brush to place two dots of colored gel polish side-by-side, then drag the brush down to form the heart’s point onto the wet blooming gel. Let it spread for a few seconds before curing under a UV/LED lamp.
What nail art supplies do I need for blooming gel?
Beyond the blooming gel itself, you’ll need gel base coat, a top coat, various gel polish colors, a UV LED lamp for curing, and fine-tip nail art brushes or dotting tools. Other helpful “nail art tool essentials” include lint-free wipes and rubbing alcohol. For “professional nail artist tips,” ensure your supplies are of “reputable nail brands.”
What colors work best with blooming gel for Valentine’s?
For Valentine’s Day, classic reds, various shades of pink, white, and even deep burgundies or purples work exceptionally well with blooming gel. Contrasting colors create more dramatic “blooming gel patterns,” while analogous colors yield softer, more blended “delicate blooming gel designs.” Experiment with “vibrant blooming gel colors” for impact.
How long does blooming gel last on nails?
When applied correctly with proper nail preparation and a quality top coat, blooming gel designs can last as long as traditional gel manicures, typically 2-3 weeks. The durability depends on the quality of the gel products used, proper curing under a “UV LED lamp,” and daily “nail care” practices. It contributes to “long-lasting salon quality” nails.
Can you use blooming gel with dip powder?
Yes, you can use blooming gel with dip powder, but it requires specific steps. After applying and curing your final dip powder layer and top coat (if using gel top coat), lightly buff the surface, cleanse, then apply your blooming gel as usual. Ensure the dip powder is fully sealed and smooth before applying the gel layers for best results.
What is the difference between blooming gel and spider gel?
Blooming gel creates a spreading, diffused effect, while spider gel creates thin, elastic lines that resemble spiderwebs. Blooming gel “causes” colors to spread for organic patterns, perfect for “blooming gel hearts.” Spider gel, in contrast, “enables” precise, sticky lines for geometric or web-like designs, offering distinctly different “nail art effect gel” outcomes.
How to get a perfect blooming effect?
To achieve a perfect blooming effect, ensure your blooming gel layer is thin, even, and uncured when applying the colored gel. Work quickly, use sufficient (but not excessive) colored gel, and allow adequate time for the “blooming effect” to spread before curing. A good quality “blooming gel nail polish” and controlled application are key to avoiding “patchy blooming gel effect” and getting a “perfect rose blooming gel” every time.
Final Thoughts on Valentines Nails Blooming Gel
As you have seen, Valentines nails blooming gel offers an incredibly versatile and forgiving way to create stunning, professional-looking heart designs for the romantic season. From “delicate watercolor blooming gel designs” to bold “abstract marble blooming gel hearts,” this technique empowers both beginners and experienced nail artists to express their creativity with ease. By understanding the properties of blooming gel and following “proven blooming gel methods,” you can achieve “long-lasting salon quality” nails right at home.
The detailed “step-by-step tutorial for blooming gel valentine nails” provided here, complete with “professional nail artist tips” and “reputable nail supplies,” ensures you have all the knowledge and tools to confidently “create blooming gel nails.” Whether you are opting for a subtle “minimalist outline blooming gel hearts” or a vibrant “string of hearts” garland, the “blooming effect nails” will undoubtedly add a special touch to your Valentine’s Day celebration. Embrace the unique “viscosity and flow dynamics of blooming gel” to transform your nails into a beautiful canvas of love.
What is your favorite blooming gel heart design to create for Valentine’s Day? Share your go-to look in the comments below
Last update on 2026-04-27 / Affiliate links / Images from Amazon Product Advertising API