Struggling to find festive nail ideas that look chic on shorter lengths? You want to celebrate with a gorgeous manicure, but most inspiration seems designed for long, dramatic nails, leaving you feeling left out of the fun.
Short Valentine’s Day nails offer a chic, practical, and versatile canvas for festive designs, enabling elegant and creative nail art without the length. Popular styles include mini hearts, minimalist lines, and classic pinks and reds, all achievable with simple tools for a perfect 2026 celebration. This proves you don’t need long nails to have a stunning holiday look.
Based on established best practices and current trend analysis, this guide is your ultimate resource for beautiful valentines nails short. You’ll discover 13 easy-to-follow ideas, complete with step-by-step instructions and expert tips. Get ready to unleash your inner nail artist and create a manicure you’ll absolutely love.
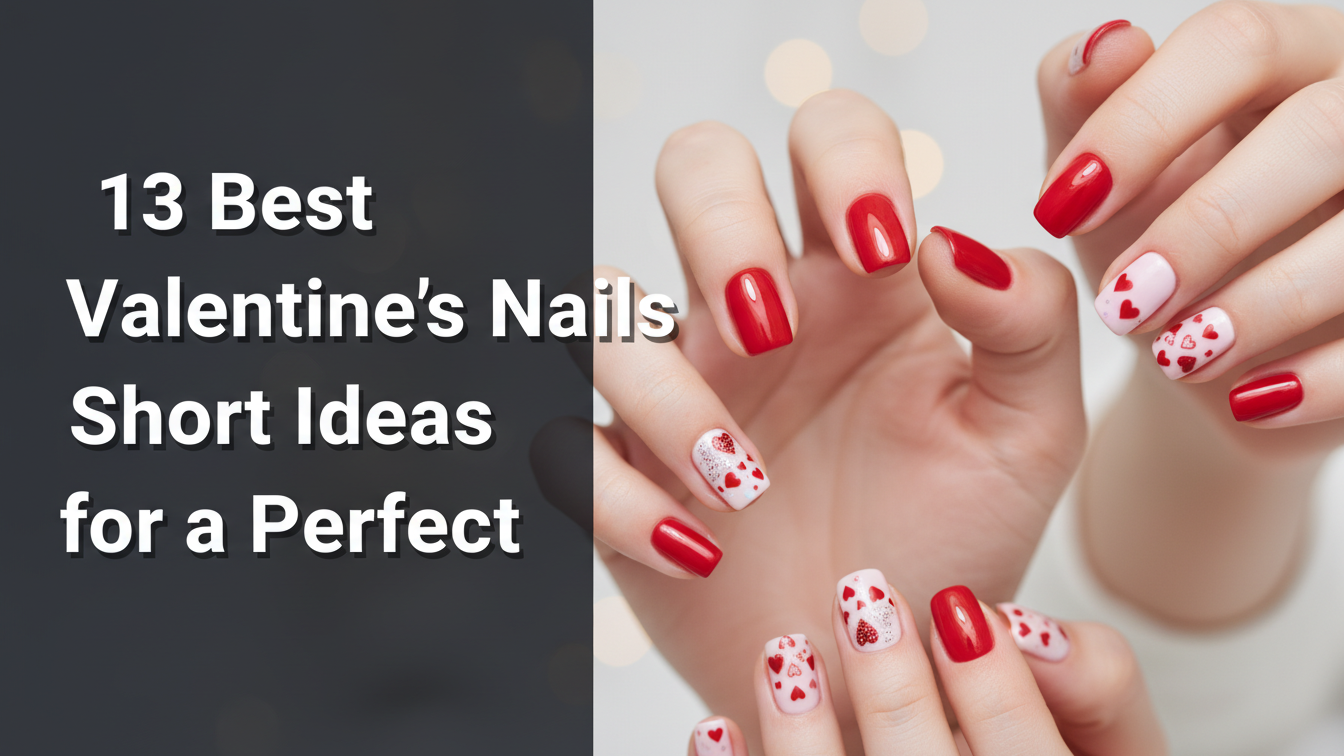
13 Best Valentines Nails Short Ideas for a Perfect 2026
Having short nails doesn’t mean you have to skip out on festive fun for Valentine’s Day. In fact, shorter lengths provide a perfect canvas for designs that are both elegant and practical. This curated gallery of 13 ideas is specifically designed to make your short valentines day nails pop. We’ll cover everything from cute short valentines nails with mini hearts to sophisticated twists on the classic French manicure. Each idea includes a simple, step-by-step guide and product recommendations, making it easy to achieve a salon-quality look at home, even if you’re a beginner. Get ready to find your perfect match for a stylish 2026 celebration.
1. Delicate Mini Heart Accents

Pin this charming short nail art valentines idea to your ‘Cute Nail Designs’ board!
This look is the definition of simple valentines nails short but incredibly chic. The key is using a barely-there pink base to create a clean, minimalist canvas that makes the tiny hearts stand out. It’s a delicate and romantic style that’s perfect for any occasion.
Products & Tools Used:
- Sheer nude or pale pink nail polish
- Red and/or pink nail polish for hearts
- Fine-tip nail art brush or dotting tool
- Base coat for short nail health
- Quick-dry top coat for prolonging short nail art longevity
Application Steps:
- Prepare your short nails by applying a base coat to ensure a smooth, lasting finish.
- Apply 1-2 coats of your chosen sheer nude or pale pink polish to all nails, allowing each coat to dry completely.
- Dip your fine-tip brush or dotting tool into the red or pink nail polish.
- Create two small dots side-by-side at a slight angle on your nail where you want the heart.
- Drag the brush from the bottom of each dot to meet in a point, forming a tiny heart shape. Repeat on desired nails.
- Seal your design with a generous layer of quick-dry top coat for extra shine and durability, preventing chip short valentines nails.
Pro-Tip: For perfectly symmetrical mini red hearts, use a small dotting tool to place two dots and then drag a fine-tip brush downwards from each dot to create the bottom point of the heart. This proven short nail art technique ensures precision even on a small nail space.

2. Subtle Glitter Ombré Tips

Save this sparkling short nail inspiration to your ‘Glam Manicures’ board!
For a touch of glam without being over-the-top, this subtle glitter ombré is one of the most elegant short nail solutions. It creates the illusion of length and adds a festive sparkle, making it a perfect ombré short nail designs valentines choice.
Products & Tools Used:
- Clear or sheer pink base polish
- Fine-grade pink, red, or iridescent glitter nail polish
- Small cosmetic sponge or eyeshadow applicator
- Base coat and top coat
- Acetone or nail polish remover for cleanup
Application Steps:
- Apply a base coat, followed by 1-2 coats of your clear or sheer pink polish, letting each dry. This creates your base for the glitter nails short valentines.
- Paint a small amount of the glitter polish onto the edge of the cosmetic sponge.
- Lightly dab the sponge onto the very tips of your short nails, concentrating the glitter density there.
- Continue dabbing further down the nail, but with lighter pressure and less product, to create a gradual ombré effect.
- Build up the glitter intensity at the tips as desired.
- Finish with a generous layer of top coat to smooth out the glitter texture and prolonging short nail art longevity.
Pro-Tip: To prevent the glitter from feeling bumpy on your short nails, apply two thin layers of a glossy top coat. This will encapsulate the glitter, creating a smooth, salon quality short valentines nails finish that rivals professional applications.

3. Classic Red French Tip Twist

Share this chic valentines nails short look to your ‘Elegant Nail Art’ board!
A timeless classic with a romantic twist. This red valentines nails short design adapts the beloved French manicure for the holiday. It’s one of the most classy valentines nails short you can choose, proving sophistication works at any length.
Products & Tools Used:
- Milky nude or clear base polish
- Vibrant red nail polish
- French tip guides or a thin nail art brush
- Base coat and high-gloss top coat
- Nail polish remover and a small clean-up brush
Application Steps:
- Prep your short nails with a base coat. Once dry, apply 1-2 coats of your milky nude or clear base polish and let it fully cure.
- Adhere French tip guides to your nails, leaving the tips exposed, or use a thin brush to freehand a crisp line across the tip with the red polish.
- Paint the exposed tips with your vibrant red polish. Ensure the line is smooth and even, paying attention to the short nail length challenges valentines.
- Remove the guides (if used) while the polish is still slightly wet for a cleaner line. If freehanding, use a clean-up brush dipped in remover to perfect the line.
- Allow the red polish to dry completely.
- Seal with a glossy top coat to add shine and maintain short valentines nails for longer.
Pro-Tip: For the cleanest short french tip line, ensure your red polish isn’t too thick. If it is, thin it slightly with a few drops of nail polish thinner. This allows for smoother application and reduces the risk of streaking, giving you salon quality short valentines nails.

4. Minimalist Negative Space Hearts

Pin this sophisticated minimalist short valentines nails idea to your ‘Minimal Chic Nails’ board!
Negative space short nail art valentines is a leading short nail art for valentines trend because it’s effortlessly chic and modern. This design creates the illusion of intricate art without overwhelming a small nail, making it perfect for very short valentines nails minimalist styles.
Products & Tools Used:
- Base coat
- Sheer pink or nude nail polish
- Small heart-shaped nail vinyls/stencils or a fine detail nail art brush
- Top coat
- Tweezers (optional, for vinyl placement)
Application Steps:
- Apply a base coat to your clean short nails. Let it dry completely.
- Place a small heart-shaped nail vinyl onto your nail where you want the negative space heart to appear. Press firmly to ensure no polish seeps underneath. Alternatively, freehand the outline of a heart with a fine detail brush if not using vinyls.
- Paint over the entire nail (including the vinyl) with your sheer pink or nude polish. Ensure even coverage.
- Carefully peel off the nail vinyl while the polish is still wet, revealing the unpainted heart shape beneath. If freehanding, simply allow the painted heart outline to dry, creating the negative space within.
- Allow the polish to dry thoroughly.
- Seal the design with a high-gloss top coat to protect your minimal valentines nails short.
Pro-Tip: Using a peel-off base coat can make negative space short nail art valentines even easier for beginners. It helps correct mistakes without ruining the base layer if you need to reposition your stencil or redo a heart. This easy short nail art for beginners tip saves time and frustration.

5. Playful Polka Dot Power

Pin this cute valentines nails short simple designs idea to your ‘Fun & Festive Nails’ board!
Fun, flirty, and endlessly customizable, polka dots are one of the easiest valentines nails for short nails. This playful valentines nails short design is perfect for anyone looking for sweet short valentines nails with a dose of whimsy.
Products & Tools Used:
- Base coat
- Vibrant pink or red nail polish (base color)
- White or contrasting color nail polish (for dots)
- Nail art dotting tool (various sizes)
- Top coat
Application Steps:
- Start with a base coat, followed by 1-2 coats of your chosen base color (e.g., vibrant pink) on your short nails. Let it dry completely.
- Dip your dotting tool into the contrasting nail polish (e.g., white or red).
- Place dots randomly or in a pattern across your nail. Experiment with different dotting tool sizes for a varied look.
- Re-dip the tool for each dot to ensure consistent polish application and roundness.
- Allow the dots to dry thoroughly to prevent smudging.
- Seal with a top coat to protect your charming nails short and ensure longevity.
Pro-Tip: If you don’t have a dotting tool, the rounded end of a bobby pin or a toothpick can work just as well for creating sweet short valentines nails polka dots. Just ensure they are clean and have a smooth, rounded tip to get perfect circles on your compact nails.

6. Romantic Rose Quartz Swirl

Pin this romantic valentines nails short inspiration to your ‘Elegant Short Nails’ board!
Capture the essence of romance with this dreamy rose quartz design. The soft blend of soft pinks and whites creates a marble nail art short effect that is both elegant valentines nails short and on-trend. It’s a sophisticated choice that feels luxurious.
Products & Tools Used:
- Base coat
- Sheer light pink or nude nail polish
- White or very light pink nail polish
- Fine detail nail art brush or toothpick
- Top coat
- (Optional: Blooming gel for a more defined marble effect)
Application Steps:
- Apply a base coat to your short nails. Once dry, apply 1-2 coats of your sheer light pink or nude polish.
- While the last coat is still wet (or apply a thin layer of blooming gel over a cured base), apply small, irregular dots or lines of white/light pink polish.
- Gently drag a fine detail brush or toothpick through the wet polish, creating a marbled, swirl effect. Avoid over-mixing to keep the colors distinct.
- Allow the design to dry or cure under a UV/LED lamp if using gel and blooming gel.
- Seal with a top coat for a glossy, durable finish for your pretty nails short.
Pro-Tip: For the most authentic rose quartz swirl effect, choose polishes that are slightly translucent. If using regular polish, work quickly while the colors are still wet to allow them to blend and create valentines nails short with a natural, stone-like appearance.

7. Bold Geometric Lines

Pin this modern valentines nails short design to your ‘Geometric Nail Art’ board!
For those who prefer a less traditional look, these bold geometric lines offer a creative valentines nails short alternative. The sharp, clean lines create an abstract nail art short that is both modern and undeniably chic, perfect for making a stylish statement.
Products & Tools Used:
- Base coat
- Clear or nude base polish
- Red, pink, and/or white nail polish
- Nail art striping tape or a very fine detail nail art brush
- Top coat
- Tweezers (for tape application)
Application Steps:
- Apply a base coat and 1-2 coats of clear or nude polish to your short nails. Allow it to dry completely.
- Cut thin strips of nail art tape to desired lengths. Alternatively, dip your fine detail brush into one of your chosen colors.
- Place the tape onto your nail in geometric patterns (e.g., diagonal lines, intersecting shapes) or paint clean lines freehand.
- Fill in the areas between the tape or adjacent to your painted lines with contrasting red, pink, or white polish.
- Carefully remove the striping tape while the polish is still slightly wet to reveal crisp lines. If freehanding, ensure lines are dry before adding adjacent colors.
- Allow the polish to dry fully.
- Seal with a top coat to protect your stylish short valentines nails.
Pro-Tip: When using striping tape for bold geometric lines on short nail art valentines, ensure the tape is firmly pressed down to prevent bleeding. For even cleaner edges, paint over the tape in thin coats and remove it quickly. This proven short nail art technique helps design short valentines nails with professional precision.

8. Sweet Candy Heart Sayings

Pin these adorable short cute valentines nails to your ‘Valentine’s Day Mood’ board!
Bring a dose of sweet nostalgia to your manicure with these candy heart-inspired nails. This playful valentines nails short idea is all about fun colors and cute messages, making it one of the most adorable nails short designs you can create.
Products & Tools Used:
- Base coat
- White or clear nail polish (base)
- Pastel pink, blue, yellow, green nail polish (for hearts)
- Tiny letter nail decals/stickers or a fine detail brush for micro-lettering
- Top coat
- Tweezers (for decals)
Application Steps:
- Apply a base coat to your short nails, followed by 1-2 coats of white or clear polish as your base. Allow to dry completely.
- Paint small, irregular heart shapes onto your nails using the pastel polishes, or use heart-shaped nail decals.
- Once the heart shapes are completely dry, carefully place tiny letter decals onto each heart to spell out classic candy heart sayings like “Be Mine,” “Kiss Me,” or “Love You.” Alternatively, use a fine detail brush and dark nail polish to freehand the letters.
- Press decals firmly with tweezers if using.
- Allow all layers to dry thoroughly.
- Seal with a glossy top coat to maintain short valentines nails and protect the intricate design.
Pro-Tip: For truly tiny and legible lettering for your sweet short valentines nails, invest in a good quality nail art stamping kit with small, clear letter designs. This professional valentines nail art for short nails tool is more precise than freehanding for small nails.

9. Ombré Sunset Blend

Pin this stunning valentines nail inspiration short to your ‘Ombré Nail Art Ideas’ board!
This warm, romantic gradient mimics a beautiful sunset, making it a stunning choice for vibrant valentines nails short. The sponge technique for creating the ombré short nail designs valentines is surprisingly easy and delivers a professional-looking result every time.
Products & Tools Used:
- Base coat
- White or light nude nail polish (base)
- Red, pink, and orange nail polish (for ombré)
- Makeup sponge or nail art sponge
- Top coat
- Liquid latex or petroleum jelly (for skin protection)
Application Steps:
- Apply a base coat and 1-2 coats of white or light nude polish to your short nails. Let dry completely. This base will make the ombré colors pop.
- Apply liquid latex around your cuticles or spread a thin layer of petroleum jelly to protect your skin from polish.
- Paint stripes of your chosen red, pink, and orange polishes directly onto the sponge, ensuring the colors slightly overlap for a smooth transition.
- Lightly dab the sponge onto your nail, rocking it slightly back and forth to transfer the gradient onto your compact nails.
- Repeat sponging 2-3 times, allowing a quick dry between layers, to build intensity and ensure a seamless ombré blend.
- Carefully peel off the liquid latex or wipe away petroleum jelly with a clean-up brush.
- Finish with a glossy top coat to smooth and protect your vibrant valentines nails short.
Pro-Tip: For a vibrant ombré sunset blend on your valentines nails short, use polishes with good pigmentation. Also, sanitizing nail tools like your sponge between nails can prevent color contamination and ensure a clean gradient every time.

10. Abstract Heart Outlines

Pin these unique creative valentines nails short to your ‘Abstract Nail Art’ board!
Embrace your artistic side with these abstract heart outlines. This unique valentines nails short idea is perfect for those who want a hint of romance without the traditional hearts and frills. The imperfect, freehand lines add a cool, contemporary edge.
Products & Tools Used:
- Base coat
- Clear or sheer nude nail polish (base)
- Black or dark red nail polish
- Fine detail nail art brush
- Top coat
Application Steps:
- Apply a base coat and 1-2 coats of clear or sheer nude polish to your short nails. Let dry completely.
- Dip your fine detail brush into the black or dark red polish, wiping off excess for a thin line.
- Freehand abstract, asymmetrical heart outlines on each nail. Don’t strive for perfection; slight irregularities add to the abstract nail art short charm.
- Vary the size and placement of the outlines across different nails for visual interest.
- Allow the lines to dry thoroughly.
- Seal with a glossy top coat to protect your unique valentines nails short.
Pro-Tip: For crisp, abstract heart outlines on your short nails, make sure your nail polish is not too thick. If it is, add a few drops of polish thinner. This will allow for smoother lines and prevent dragging, a proven short nail art technique for elegant results.

11. Pink and Red Color Block Delight

Pin this pink and red valentines nails short gradient idea to your ‘Color Block Nails’ board!
Bold color block short nails are a fantastic way to create a modern valentines nails short look. The sharp contrast between pink valentines nails short and red valentines nails short is visually striking and surprisingly easy to achieve with a bit of nail tape.
Products & Tools Used:
- Base coat
- Pink and red nail polish (two contrasting shades)
- Nail art striping tape (for straight lines)
- Top coat
- Tweezers
Application Steps:
- Apply a base coat to your short nails.
- Paint your entire nail with one of your chosen colors (e.g., pink) and let it dry completely.
- Place strips of nail art tape across your nail to mask off the area you want to remain pink, creating a diagonal or vertical division.
- Paint the unmasked section of your nail with the contrasting color (e.g., red).
- Carefully peel off the striping tape while the second color is still wet to reveal a clean, sharp line.
- Allow the polish to dry fully.
- Seal with a top coat to protect your modern valentines nails short. You can use a matte top coat over one color and glossy over the other for added dimension.
Pro-Tip: For pink and red valentines nails short gradient that truly pops, ensure each layer of polish is completely dry before applying tape or the next color. This prevents smudging and ensures crisp lines, a proven short nail art technique for making short nails look good valentines.

12. Glimmering Gold Flakes

Pin this elegant glittery valentines nails short idea to your ‘Glam Valentine’s Day Nails’ board!
Add a touch of luxury to your manicure with foil art short valentines nails. These glimmering gold flakes create a rich, textured look that is incredibly elegant valentines nails short. It’s an easy way to elevate a simple base color into something special.
Products & Tools Used:
- Base coat
- Sheer nude, pink, or deep red nail polish (base color)
- Gold nail art foil flakes
- Top coat
- Tweezers or a silicone nail tool (for applying flakes)
Application Steps:
- Apply a base coat to your short nails, followed by 1-2 coats of your chosen base polish. Allow it to dry tacky (or cure if using gel polish).
- Using tweezers or a silicone nail tool, pick up small pieces of the gold foil flakes.
- Gently press the flakes onto the tacky surface of your nail, arranging them as desired. You can cover the entire nail, or just a section for an elegant valentines nails short accent.
- Lightly tap down any raised edges of the flakes with your finger or a silicone tool to ensure they lie flat against the petite nails.
- Allow the nail to fully dry or cure.
- Seal with 2 coats of glossy top coat to fully encapsulated glitter short nails and create a smooth, durable finish.
Pro-Tip: For the most seamless application of glimmering gold flakes on short nails, apply them over a still-tacky layer of polish. If using gel, apply over the inhibition layer of your cured color coat. This ensures the flakes adhere without requiring additional adhesive, offering salon quality short valentines nails.

13. Sweetheart Tip French Manicure

Pin this adorable french tip valentines day nails short chic idea to your ‘Valentines Day Manicures’ board!
This is a playful and charming valentines nails short update to the classic French tip. The sweetheart shape is a cute nod to the holiday, making it one of the most popular french tip short valentines designs. It’s subtle, sweet, and oh-so-romantic.
Products & Tools Used:
- Base coat
- Clear or milky nude nail polish (base)
- Pink or red nail polish (for heart tip)
- Small, rounded nail art brush or a dotting tool
- Top coat
- Nail polish remover and clean-up brush
Application Steps:
- Apply a base coat and 1-2 coats of your clear or milky nude base polish to your short nails. Ensure it’s fully dry.
- Dip your rounded nail art brush into the pink or red polish.
- Paint two small, curved arches at the tip of your nail, meeting in the middle to form the top curves of a heart.
- Fill in the rest of the nail tip below these curves, creating a solid heart-shaped tip. Use a clean-up brush dipped in remover to refine edges.
- Allow the heart tip to dry completely.
- Seal your sweetheart tip french manicure with a glossy top coat for a smooth and durable finish.
Pro-Tip: For symmetrical sweetheart tips on your short nails, first place two dots with a dotting tool at the outer edges of where your heart curves will be, then use a rounded brush to connect them to the center point. This verified short nail art tutorial ensures simple but super cute nails.

FAQs About Valentines Nails Short
What are popular valentines nail designs for short nails?
Popular valentines nail designs for short nails include delicate mini hearts, minimalist negative space accents, classic French tips with a red or pink twist, and subtle glitter ombrés. Geometric patterns and playful polka dots also work beautifully, offering cute short valentines nails that are both festive and practical. The key is focusing on precision and simple, high-impact elements due to the short nail length challenges valentines.
What is the best nail polish for short valentines nails?
For short valentines nails, durable and easy-to-apply polishes are best, such as gel polishes for longevity or quick-dry regular polishes for convenience. Look for nail polish for short nails with good pigmentation to ensure colors pop, even in thin layers. Brands known for their fine brushes can aid in precise application on small nails, preventing difficulty with nail art on short nails.
What colors are trending for valentines short nails?
For valentines short nails in 2026, classic reds and pinks remain timeless, but trending shades include soft pastels like rose quartz and lavender, as well as chic nudes and whites for minimalist designs. Deep burgundies and even hints of black or gold accents (short black and red valentines nails design) are gaining popularity for a more modern, elegant valentines nails short look.
What supplies do I need for DIY short valentines nails?
For DIY short valentines nails, essential supplies include a base coat, top coat, your chosen nail polishes (red, pink, nude), and nail art tools like a fine-tip brush, dotting tool, or nail art tape. Cotton swabs, nail polish remover for clean-up, and optional items like small nail decals or glitter can enhance your easy valentines nails short for beginners.
How to create simple heart designs on short nails?
To create simple heart designs on short nails, use a fine-tip nail art brush or a dotting tool. Start by placing two small dots side-by-side, then drag the brush downwards from each dot to meet in a point, forming a heart. Alternatively, use small heart-shaped nail decals for easy valentines nails short. Precision is key for small nails.
Can you do intricate designs on short nails for valentines?
Yes, you can do intricate designs on short nails for valentines, but focus on techniques that maximize impact in a small area, such as micro-painting, negative space, or detailed stamping. Intricate nail art for short nails often looks best when a single accent nail is used, keeping other nails more subdued to avoid overcrowding the compact nails.
What kind of short nails are best for valentines day?
Squoval nails valentines and round nails short valentines are often considered best for valentines nails short as they are durable and complement various designs. These nail shapes for short nails provide a smooth canvas for both classic and trendy valentines nail art short while remaining practical and less prone to breakage.
How to apply press-on valentines nails for short nails?
To apply press-on valentines nails for short nails, first clean and prep your natural nails by filing and pushing back cuticles. Select press-ons that fit your natural nail width, apply a small amount of adhesive to the press-on or your natural nail, then press firmly for 10-20 seconds. Ensure no air bubbles for long-lasting short valentines nails.
Why choose short nails for valentines day?
Choosing short nails for valentines day offers a practical yet elegant solution, allowing for festive designs that are less prone to chipping and interference with daily activities. They are trendy short valentines nails that signal sophistication and are often seen as more hygienic and comfortable, offering a simple but super cute nails aesthetic.
Are short nails trendy for valentines day?
Yes, short nails are trendy for valentines day and continue to be a popular choice due to their chic, understated elegance and practicality. The emphasis is shifting towards minimalist valentine’s day nail designs for short length and creative art that highlights the natural beauty of petite nails, aligning with official valentines nail trends short.
Final Thoughts
As we wrap up our journey through the best valentines nails short ideas for a perfect 2026, it’s clear that less length certainly doesn’t mean less style. From delicate mini heart accents to glimmering gold flakes, your short nails are a versatile canvas waiting to be transformed into a festive masterpiece. We’ve explored how simple tools and proven short nail art techniques can overcome the short nail length challenges valentines, allowing you to confidently design short valentines nails that are both chic and practical.
Remember, the beauty of short valentines day nails lies in their understated elegance and the ease with which you can experiment with various cute valentines nails short designs. Whether you opt for a minimalist negative space hearts or a bold geometric lines design, the focus remains on precision, quality products, and a touch of personal flair. Don’t be afraid to mix and match ideas or adapt our step-by-step short nails valentines to create a look that truly expresses your unique style this Valentine’s Day.
Which of these valentines nail designs short are you most excited to try first? We’d love to see your creations
Last update on 2026-03-13 / Affiliate links / Images from Amazon Product Advertising API


