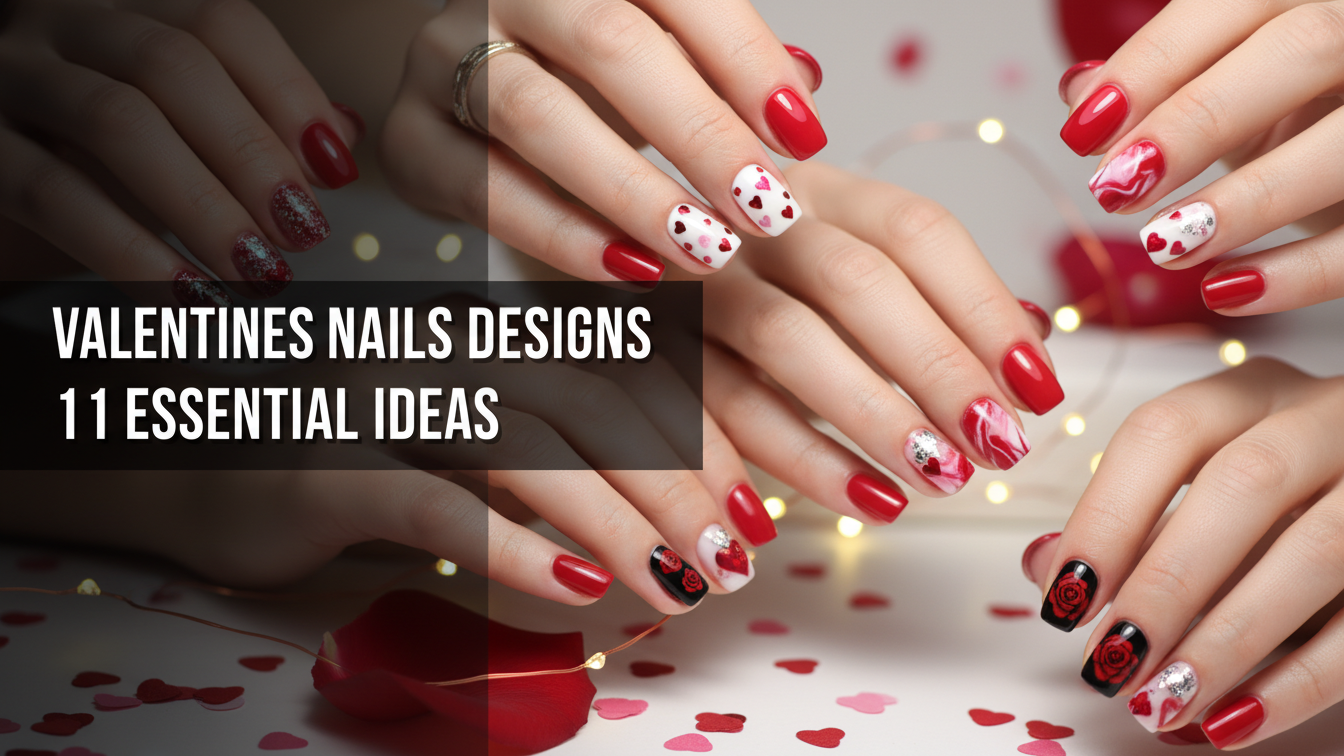
Tired of the same old romantic looks for February? Finding unique valentines nails designs that feel both fresh and festive can be a real challenge, leaving you scrolling endlessly for inspiration. You want a style that’s more than just a simple red coat of polish.
The best valentines nails designs for 2026 blend classic romance with modern trends, featuring delicate heart art, shimmering chrome finishes, and sophisticated minimalist styles for a personalized, stunning look. These designs go beyond basic colors to incorporate textures and creative patterns.
Based on an analysis of current nail art trends and proven DIY methodologies, this guide breaks down the 11 most essential looks for this season. You’ll discover step-by-step instructions to create everything from cute valentines nails to elegant abstract art, empowering you to achieve a salon-quality manicure at home.
11 Essential Valentines Nails Designs to Transform Your Look This Season
Get ready to fall in love with your nails this February. This curated list of 11 essential valentines nails designs offers something for everyone, whether you’re a DIY beginner or a seasoned nail art enthusiast. We’ll explore a range of styles, from the timeless elegance of classic hearts to the modern allure of chrome nails valentine. Each idea is a complete guide, providing you with the exact tools, products, and step-by-step instructions needed to transform your manicure. You’ll learn how to master popular looks seen on Pinterest and Instagram, all adapted for easy at-home application. Let’s dive into the inspiration you need for a stunning and romantic nail art look.
1. Paint Classic Red Heart Nails with Precision

Pin this classic red heart nails idea to your ‘Valentine’s Day Manicures’ board!
This timeless look is the epitome of Valentine’s Day. A vibrant red valentine nails design featuring delicate hearts is both romantic and chic, making it one of the most popular valentines nails year after year. It’s surprisingly easy to achieve a professional-looking finish at home with the right tools and a steady hand.
Products & Tools Used:
- High-pigment red nail polish for base coat, quick-drying for smooth application
- Crisp white or black nail art polish for fine detailing, non-streaky formula
- Fine-tipped nail art brush or dotting tool for precise heart shapes
- Base coat for nail protection and polish longevity, chip-resistant formula
- Glossy top coat for sealing design and adding shine, UV-protective properties
- Nail polish remover and lint-free wipes for cleanup
- Cuticle pusher and nipper for nail prep
Application/Styling Steps:
- Prep Nails: Begin by filing nails to your desired shape (almond shape valentine nails or oval is classic for this design). Gently push back cuticles and clean the nail surface with alcohol.
- Apply Base Coat: Apply one thin, even layer of base coat and allow it to dry completely to protect your natural nails.
- Paint Red Base: Apply two thin coats of your high-pigment red nail polish, letting each layer dry fully to prevent streaking and ensure opacity.
- Create Hearts: Dip your fine-tipped nail art brush or dotting tool into the crisp white or black nail art polish. Create two small dots close together, then drag the brush down from the center of the dots to form a point, shaping a perfect heart near the cuticle area of each nail.
- Seal with Top Coat: Once the heart designs are completely dry (allow at least 10-15 minutes to avoid smudging), apply a generous layer of glossy top coat to seal your red heart nails design and enhance their shine.
- Clean Up: Use a small brush dipped in nail polish remover to clean up any polish around your cuticles for a professional finish.
Pro-Tip: For perfectly symmetrical hearts, start by placing two small dots side-by-side using a dotting tool, then use your fine-tipped brush to connect them at the bottom to form the pointed tip. This expert nail artist technique ensures a clean, classic look every time.

2. Achieve Trendy Pink Chrome Finish with Aura Accents

Pin this glamorous pink chrome aura nails design to your ‘Trendy Nail Inspo’ board!
For a truly modern and trendy valentines nails look, combine two of the biggest nail art trends: chrome and aura. A pink chrome nails valentine design offers a high-impact, reflective finish, while the soft glow of an aura nails valentine accent adds a dreamy, romantic touch. This style looks particularly stunning on coffin shape valentine nails.
Products & Tools Used:
- Light pink gel polish as a base color, highly pigmented
- No-wipe gel top coat essential for chrome adhesion, specifically formulated for powders
- Pink chrome nail powder for iridescent, reflective finish, ultra-fine texture
- Small eyeshadow applicator or silicone tool for chrome powder
- White gel polish (optional) for the aura effect, or lighter pink gel
- Small, fluffy eyeshadow brush or sponge for aura blending
- UV/LED nail lamp for curing gel layers, at least 36W
- Base coat gel polish for nail adhesion and protection
- Alcohol wipes for surface cleaning
Application/Styling Steps:
- Prep & Base: Apply a thin layer of base coat gel polish to prepped nails and cure under a UV/LED lamp for 30-60 seconds.
- Pink Gel Base: Apply two thin coats of light pink gel polish, curing each layer under the lamp for 60 seconds.
- First No-Wipe Top Coat: Apply a thin layer of no-wipe gel top coat and cure for just 15-20 seconds (this slightly tacky surface helps the chrome adhere).
- Apply Chrome Powder: Using a small eyeshadow applicator or silicone tool, gently rub the pink chrome nail powder onto the slightly cured tacky surface until a smooth, reflective chrome finish appears.
- Aura Effect (Optional): If adding aura, use a tiny amount of white gel polish (or a lighter pink) on the fluffy eyeshadow brush or sponge. Lightly dab and blend from the center of the nail outwards to create a soft, diffused glow, then cure for 30 seconds.
- Seal with Top Coat: Apply a final, even layer of no-wipe gel top coat over the entire design to seal the chrome and aura, then cure for a full 60-90 seconds for maximum durability and shine.
Pro-Tip: The key to a flawless chrome finish is curing your first no-wipe top coat just enough for it to be slightly tacky but not fully hard. Experiment with cure times (15-20 seconds is a good starting point) to find the sweet spot for your lamp and polish combination. This professional manicure technique prevents clumping and ensures a smooth, mirror-like effect.

3. Design Minimalist Black & White Hearts on Short Nails

Save this chic minimalist black and white hearts idea to your ‘Short Nail Inspo’ board!
Who says Valentine’s nails have to be red or pink? This minimalist valentine nails design is perfect for those who love a modern, chic aesthetic. The high contrast of black and white is incredibly striking, and the tiny heart detail keeps it romantic. It’s an ideal choice for short valentines nails, proving that you don’t need length to make a statement.
Products & Tools Used:
- Matte white nail polish for base color, chip-resistant formula
- Fine-tipped black nail art pen or very thin brush for details, opaque pigment
- Base coat for protection and adherence
- Matte top coat to seal and finish, non-yellowing
- Dotting tool (optional) for initial heart shape
- Nail file for shaping short nails
- Nail cleanser or alcohol
Application/Styling Steps:
- Shape & Prep: File your short nails into a clean square or squoval shape. Clean nails thoroughly with a nail cleanser or alcohol.
- Base Coat: Apply one thin layer of base coat and let it dry completely.
- White Base: Apply two thin, even coats of matte white nail polish, ensuring each layer is fully dry before the next. The matte finish will provide a clean canvas.
- Draw Hearts: Using your fine-tipped black nail art pen or brush, carefully draw tiny, simple hearts near the cuticle or off-center on each nail. Focus on clean lines for a minimalist aesthetic. For uniformity, you can use a small dotting tool to place two dots then drag to a point.
- Matte Top Coat: Once the black hearts are completely dry, apply a layer of matte top coat to seal the design and provide a uniform, sophisticated finish.
Pro-Tip: When working with short nails for minimalist designs, less is often more. Choose a single, impactful element like these small hearts rather than overcrowding the nail. Using a fine-tipped nail art pen can be easier for beginners than a brush for precision on small canvases.

4. Master Elegant French Tip with a Subtle Love Detail

Pin this sophisticated French tip valentines nails idea to your ‘Elegant Nail Art’ board!
A french tip valentine nails design is the definition of timeless elegance. This classic look gets a romantic update with a tiny, almost-hidden detail, like a single red heart or a delicate script ‘love’ on an accent nail. It’s the perfect subtle valentine nail designs choice for those who want a festive touch that’s also sophisticated and work-appropriate.
Products & Tools Used:
- Sheer nude or pink nail polish for the base, fast-drying and self-leveling
- Opaque white nail polish for tips, high-pigment and smooth application
- Red or rose gold fine-tipped nail art pen or very thin brush for detail, precise and consistent flow
- French tip guides (optional, for beginners)
- Base coat for nail protection
- Glossy top coat for sealing and shine
- Nail cleanser/alcohol for prep
Application/Styling Steps:
- Nail Preparation: Ensure nails are clean and shaped into a classic oval or square shape. Apply a base coat and let it dry.
- Sheer Base: Apply one to two coats of your sheer nude or pink nail polish as the base for the French tip, allowing each layer to dry thoroughly.
- French Tips: Using the opaque white nail polish (and French tip guides if needed), carefully paint a thin, crisp white line along the free edge of each nail. Let it dry completely.
- Add Subtle Detail: On one accent nail (e.g., ring finger), use the red or rose gold fine-tipped nail art pen or brush to draw a tiny heart or write ‘love’ in delicate script near the cuticle or side of the nail.
- Seal It In: Finish with a generous layer of glossy top coat to protect the design and provide a long-lasting, elegant finish.
Pro-Tip: For the perfect French tip, try a technique called “stamping.” Apply white polish to a stamping plate with the French tip design, then transfer to your nail. This professional manicure technique can give very crisp lines. Alternatively, keep your natural tip length moderate for an easier freehand application.

5. Create Glitter Ombré Sparkle Nails for a Dazzling Effect

Pin these dazzling glitter ombré nails to your ‘Sparkly Nail Ideas’ board!
Bring on the sparkle! A glitter valentine nails look is all about celebration and glamour. Creating a seamless ombré valentine nails effect with glitter adds a layer of sophistication, transitioning from a soft base to a dazzling, concentrated tip. This sparkly valentine nails design is perfect for a date night or any festive occasion.
Products & Tools Used:
- Sheer pink or nude nail polish for the base, quick-drying formula
- Loose fine glitter in silver, pink, or iridescent shades, cosmetic grade
- Small makeup sponge or nail art sponge for application
- Fan brush for sweeping away excess glitter
- Base coat for nail protection
- Thick, clear top coat to encapsulate glitter, fast-drying and high-shine
- PVA glue or liquid latex around cuticles (optional, for easier cleanup)
Application/Styling Steps:
- Prep & Base: Apply a base coat to clean, shaped nails. Once dry, apply one to two coats of your sheer pink or nude nail polish and let dry completely.
- Protect Skin (Optional): Apply PVA glue or liquid latex around your cuticles to minimize cleanup after glitter application.
- Glitter Application: Apply a thin coat of thick, clear top coat to one nail. Before it dries, pick up some loose fine glitter with your small makeup sponge. Gently dab the glitter onto the tip of your nail, concentrating more at the free edge and gradually fading towards the middle to create the ombré effect.
- Repeat & Build: Repeat for all nails. You may need to apply another thin layer of clear top coat and dab more glitter to achieve your desired opacity and sparkle.
- Remove Excess: Once the glitter is somewhat set, use a fan brush to gently sweep away any excess loose glitter from your nails and skin. Peel off any liquid latex.
- Seal & Smooth: Apply two generous layers of thick, clear top coat to encapsulate the glitter, ensuring a smooth surface and preventing glitter from flaking off. Let dry completely.
Pro-Tip: When doing glitter ombré nails, apply a small amount of clear polish to your sponge before picking up glitter. This helps the glitter adhere to the sponge better and transfer more smoothly to the nail, ensuring a seamless gradient effect without harsh lines.

6. Master Sweet Aura Nail Art for a Dreamy Glow

Pin this dreamy aura nail art inspiration to your ‘Aesthetic Nail Designs’ board!
Aura nails valentine designs are one of the most ethereal and trendy valentines nails of the season. This style creates a soft, diffused glow from the center of the nail, resembling an aura. Using a milky pink or nude base with a pop of vibrant color in the middle results in a dreamy, airbrushed look that’s both modern and romantic.
Products & Tools Used:
- Milky pink or nude gel polish for the base, translucent and buildable
- Vibrant gel polish for the aura center (e.g., fuchsia, red, or even light blue), highly pigmented
- Small, fluffy eyeshadow brush or dense blending sponge, clean and soft
- No-wipe gel top coat for sealing, high-shine and durable
- Base coat gel polish for adhesion
- UV/LED nail lamp for curing
- Alcohol wipes for sticky layer removal
Application/Styling Steps:
- Prep & Base: Apply base coat gel polish to prepped nails and cure under a UV/LED lamp for 30-60 seconds.
- Milky Base: Apply two thin coats of milky pink or nude gel polish, curing each layer for 60 seconds. Remove any sticky inhibition layer with an alcohol wipe if needed.
- Create Aura: Apply a small dot of your vibrant gel polish to the center of each nail. Using a clean, small, fluffy eyeshadow brush or sponge, gently dab and blend the color outwards in a circular motion to create a soft, diffused glow. Cure for 30 seconds.
- Build Intensity (Optional): For a more vibrant aura, repeat step 3 with another thin layer of the vibrant gel polish, blending carefully, then cure again.
- Seal with Top Coat: Apply a final, even layer of no-wipe gel top coat over the entire aura nail art design and cure for 60-90 seconds. Cleanse nails if necessary.
Pro-Tip: For the most seamless aura effect, work quickly when blending the center color as gel polish can start to self-level. Use very little product on your brush and build up the color gradually. This specialized nail art technique creates the dreamiest, airbrushed look.

7. Adorn Short & Subtle Dot Designs for Sweet Elegance

Pin these understated short dot designs to your ‘Minimalist Nail Art’ board!
If you’re looking for simple valentines nails that are both chic and easy to create, this dot design is a perfect match. It’s one of the best easy valentines nails at home options and works beautifully on short valentines nails. The subtle pattern adds a touch of playful elegance without being overwhelming.
Products & Tools Used:
- Sheer nude or milky pink nail polish for base, streak-free formula
- Dotting tool set with various sizes, ergonomic grip
- Contrasting nail polish for dots (e.g., white, soft pink, light red), opaque and smooth
- Base coat for protection
- High-shine top coat for durability and gloss
- Nail polish remover and detail brush for clean-up
Application/Styling Steps:
- Prep & Base: Ensure your short nails are clean, shaped, and prepped. Apply a base coat and let it dry.
- Sheer Base Color: Apply one to two thin coats of sheer nude or milky pink nail polish, allowing each layer to dry completely.
- Dotting Design: Dip the smallest size of your dotting tool into the contrasting nail polish. Gently place tiny, evenly spaced dots on each nail. You can create a cluster near the cuticle, a single line down the center, or a scattered pattern.
- Let Dry Thoroughly: Allow the dots to dry completely. This is crucial to prevent smudging when applying the top coat.
- Seal with Top Coat: Apply a smooth, even layer of high-shine top coat to seal your subtle dot designs and add a glossy finish.
Pro-Tip: When placing dots, ensure you pick up a fresh, small amount of polish for each dot. If the polish is too thick, thin it slightly with a few drops of nail polish thinner. This expert nail artist technique helps avoid uneven or clumpy dots, ensuring a refined finish on short nails.

8. Explore Intricate Love Swirl Patterns for Artistic Flair

Pin these artistic love swirl nails to your ‘Creative Nail Art Ideas’ board!
For those who see their nails as a canvas, swirl valentine nails offer a chance to create something truly unique and artistic. These intricate valentine designs use flowing, organic lines in romantic colors to create an abstract, modern interpretation of love. This style is especially impactful on long almond shaped nails.
Products & Tools Used:
- Sheer or milky gel base polish, self-leveling formula
- Gel polishes in desired colors (red, pink, white, nude), high-pigment and smooth
- Ultra fine liner nail art brush, long and flexible bristles
- Dotting tool (optional, for starting points)
- Base coat gel polish
- No-wipe gel top coat
- UV/LED nail lamp
- Alcohol wipes
Application/Styling Steps:
- Prep & Base: Apply base coat gel polish to prepped nails and cure. Apply 1-2 coats of sheer gel base polish, curing each layer.
- Plan Swirls: Decide on your color palette. Apply a small dab of each chosen gel polish onto a palette.
- Draw Swirls: Dip your ultra fine liner nail art brush into one color. Starting from a point, gracefully draw flowing, organic swirl lines across the nail. You can create intertwining patterns with different colors.
- Build Layers: Cure each color layer briefly (5-10 seconds) before adding the next color swirl to prevent bleeding. Continue adding colors and swirls until satisfied with the intricate pattern. Cure fully after all colors are applied (60 seconds).
- Seal It: Finish with a generous layer of no-wipe gel top coat to seal the intricate design and add high shine. Cure for 60-90 seconds.
Pro-Tip: When creating intricate love swirl patterns, the consistency of your gel polish is key. If it’s too thick, it will drag; too thin, it will spread. Thin gel polish slightly with a drop of clear gel for better flow. This expert level detailing skill helps you master complex designs.

9. Incorporate Romantic Rose Gold Accents for a Shimmering Touch

Pin these luxurious rose gold accent nails to your ‘Romantic Manicure Ideas’ board!
Rose gold is the perfect metallic for romantic nail art. Its warm, shimmering tone adds a touch of luxury and sophistication to any design. You can incorporate rose gold nail art as subtle accents, like a delicate French tip, a sprinkle of glitter, or a stunning foil heart on an accent nail.
Products & Tools Used:
- Pale pink or nude nail polish for base, creamy or sheer
- Rose gold nail foil, delicate and easy to transfer
- Nail foil glue or a slightly tacky gel base/top coat
- Rose gold fine glitter polish or loose glitter (optional alternative)
- Base coat
- Glossy top coat
- Small silicone tool or rubber-tipped cuticle pusher for foil transfer
Application/Styling Steps:
- Prep & Base: Apply base coat and two coats of your pale pink or nude nail polish base. Allow to dry completely.
- Foil Application: Apply a thin layer of nail foil glue to the area where you want the rose gold accent (e.g., a strip across the tip, a small heart shape, or randomly scattered). Let it dry until tacky and clear.
- Transfer Foil: Press a piece of rose gold nail foil firmly onto the tacky area, shiny side up. Rub gently with a small silicone tool or finger, then quickly peel off the foil to transfer the design.
- Glitter Alternative (Optional): If using rose gold fine glitter polish, apply a coat to your desired area. If using loose glitter, apply a sticky top coat, dab glitter with a sponge, and sweep away excess.
- Seal It: Apply two layers of glossy top coat to completely seal the rose gold accents and provide a smooth, durable finish.
Pro-Tip: For the best rose gold nail foil transfer, ensure your nail foil glue is perfectly dry and tacky before pressing the foil. If it’s still wet, it won’t transfer cleanly. This specialized nail art technique guarantees a crisp, metallic accent.

10. Design Coffin Shape Abstract Art for Modern Expression

Pin this bold coffin shape abstract art to your ‘Modern Nail Design’ board!
Move beyond hearts and flowers with a bold, abstract valentine nails design. Using the long canvas of coffin shape valentine nails, you can create a modern masterpiece with color blocking, fluid lines, and negative space. This avant-garde nail designs approach is for those who want a unique and expressive manicure.
Products & Tools Used:
- Gel polishes in contrasting colors (e.g., burgundy, blush pink, black, or gold), highly pigmented and self-leveling
- Ultra fine liner nail art brush and/or dotting tools
- Base coat gel polish
- Matte or glossy gel top coat (no-wipe formula recommended)
- UV/LED nail lamp
- Optional: Coffin-shaped gel extensions or acrylics for desired length
Application/Styling Steps:
- Prep & Base: Ensure nails are shaped into the coffin shape. Apply base coat gel polish and cure. Apply one coat of your primary base color (e.g., blush pink) if not using negative space, and cure.
- Sketch Abstract Elements: Using your ultra fine liner nail art brush and contrasting gel polishes, begin to draw abstract shapes, lines, or color blocks. Embrace asymmetry and varied textures. You can use different colors on different nails for a cohesive but unique set.
- Incorporate Negative Space: Strategically leave some areas of the base nail or previous color visible to create interesting negative space elements.
- Cure Each Element: Flash cure each color or major design element for 10-15 seconds under the UV/LED lamp to prevent bleeding, then fully cure for 60 seconds once satisfied with the design.
- Seal It: Apply a thin, even layer of either matte or glossy gel top coat to seal your coffin shape abstract art and cure for 60-90 seconds for a durable, professional finish.
Pro-Tip: For truly artistic coffin shape abstract art, don’t be afraid to embrace imperfection. Work with fluid, intuitive lines. Using a matte top coat can enhance the modern, artistic feel of abstract designs by reducing glare and making colors appear richer.

11. Apply Press-On Perfect Manicure for Instant Glamour

Pin this quick press-on nails idea to your ‘Last-Minute Glam’ board!
Need a stunning manicure in a hurry? Press on nails are the ultimate solution for a quick valentine manicure. With endless valentines press on nails with heart designs and other styles available, you can get a flawless, salon-quality look in minutes. The key to a natural, long-lasting finish is all in the prep work.
Products & Tools Used:
- Valentine’s Day themed press-on nails in your preferred shape and design, high-quality and durable
- Nail glue or adhesive tabs (often included with press-ons), strong hold formula
- Small nail file and buffer (often included)
- Cuticle pusher stick
- Alcohol wipe or nail prep pad
- Cuticle oil (for aftercare)
Application/Styling Steps:
- Prep Your Nails: Start with clean, dry nails. Gently push back your cuticles using the cuticle pusher stick. Lightly buff the surface of your natural nails to create a rough texture for better adhesion. Cleanse with an alcohol wipe.
- Size Your Press-Ons: Lay out your press-on nails and match each one to your natural nail size. If a press-on is slightly too wide, you can gently file the sides for a better fit.
- Apply Nail Glue: Apply a thin layer of nail glue to your natural nail (or use the adhesive tabs, following package instructions). For extra security, you can also add a tiny drop of glue to the back of the press-on.
- Attach Press-On: Align the press-on nail with your cuticle line, then gently press down firmly for at least 15-20 seconds, ensuring there are no air bubbles.
- Repeat for All Nails: Repeat the process for all your nails.
- File & Finish: If needed, gently file the edges of the press-on nails to refine their shape or length. Apply a drop of cuticle oil around your cuticles for hydration.
Pro-Tip: For longer-lasting press-on nails, avoid washing your hands or submerging them in water for at least an hour after application. Also, applying a thin layer of dehydrator to your natural nails before glue can significantly improve adhesion and wear time. This professional application guide ensures your instant manicure stays perfect.

Key Takeaways
- Diverse Styles for Every Preference: Whether you prefer classic red heart nails, trendy pink chrome with aura accents, or subtle minimalist black & white hearts on short nails, there’s a valentines nails design to suit every taste and occasion.
- Actionable DIY Guides: Each of the 11 ideas comes with detailed “Products & Tools Used” and “Application/Styling Steps,” making even intricate designs like love swirl patterns achievable at home.
- Trend Integration is Key: Stay on-point for March 2026 by incorporating popular elements like chrome nails valentine and aura nails valentine, ensuring your look is fresh and fashionable.
- Elegance in Detail & Finish: Elevate your manicure with precise techniques for elegant French tip designs, shimmering rose gold accents, or the modern sophistication of matte top coats for a professional finish.
- Solutions for Every Skill Level: From beginner-friendly short & subtle dot designs to instant glamour with press-on perfect manicure, these valentines nails designs cater to all levels of expertise and time commitments.
- Embrace Your Nail Shape: Designs are optimized for various nail shapes, such as almond shape valentine nails for classic looks or coffin shape abstract art for bold, modern expressions.
- Long-Lasting Results with Pro-Tips: Follow expert advice on proper application, curing, and sealing with quality top coat to ensure your valentines nails designs last through all your romantic celebrations.
People Also Ask About Valentines Nails Designs
What are the best valentines nails designs for 2026?
For 2026, the best valentines nails designs blend classic romance with modern trends, featuring delicate heart art, shimmering chrome finishes, and sophisticated minimalist styles. Popular choices include pink chrome nails valentine, subtle aura nails, elegant French tips with love details, and bold coffin shape abstract art. These designs cater to both traditionalists and those seeking a more contemporary aesthetic for their Valentine’s Day look.
How to do easy valentines nails designs at home?
Creating easy valentines nails designs at home involves simple techniques like dotting, applying nail stickers, or using press-ons. For instance, short & subtle dot designs require only a dotting tool and two polish colors. Utilizing press-on perfect manicure kits provides instant salon-quality results without complex steps. Focus on clear instructions and minimal tools for effortless DIY application.
What are popular valentine nail colors?
Popular valentine nail colors traditionally include vibrant reds and soft pinks, but modern trends embrace more diverse palettes. Beyond the classic red valentine nails and pink valentine nails, metallic shades like rose gold and chrome, as well as chic black and white combinations for minimalist looks, are highly sought after. These diverse colors allow for both romantic and edgy expressions.
Can you do valentine nails on short nails?
Absolutely, many beautiful valentine nails designs are perfectly suited for short nails, proving that length is not a barrier to style. Designs like minimalist black & white hearts, delicate dot designs, or subtle accent nails are particularly effective on short valentines nails. These looks are often easier to maintain and can still make a significant festive statement without intricate length.
How to create heart designs on nails?
Creating heart designs on nails can be achieved with simple tools and a bit of practice for cute valentines nails. Use a fine-tipped nail art brush or a dotting tool to draw two small dots side-by-side, then drag the brush from the center of the dots down to a point, forming a classic heart shape. Practicing on paper first can help perfect your technique for painting classic red heart nails with precision.
What nail shapes are trendy for Valentine’s Day?
Trendy nail shapes for Valentine’s Day range from classic elegance to bold statements, allowing diverse valentines nails designs. Popular choices include the versatile almond shape, sophisticated coffin shape, and practical short square or oval nails. Each shape provides a unique canvas for designs, whether you opt for intricate art on long almond nails or minimalist patterns on short square nails.
How to incorporate chrome into valentine nails?
Incorporating chrome into valentine nails creates a stunning, reflective finish that adds a modern twist to classic romance. This involves applying a chrome nail powder over a slightly cured gel top coat, then sealing with a final no-wipe top coat. Designs like trendy pink chrome finish with aura accents showcase how metallic pigments can transform any base color into a shimmering, festive look.
What are some non-red/pink valentine nail ideas?
For a unique twist, non-red/pink valentine nail ideas offer sophisticated alternatives to traditional colors. Consider minimalist black & white hearts, elegant rose gold accents, or abstract designs in unexpected palettes like deep burgundy or soft lilac. These choices provide a modern, chic approach to valentines nails designs while still conveying a sense of love and celebration.
Are matte valentine nails still in style?
Yes, matte valentine nails are definitely still in style, offering a sophisticated and velvety finish that contrasts beautifully with glossy options. A matte top coat can transform any base color, making it appear richer and more modern. Designs like minimalist black & white hearts often benefit from a matte finish, providing a chic, understated elegance for your valentines nails designs.
How much do valentine nail designs cost at a salon?
The cost of valentine nail designs at a salon can vary widely based on the complexity, artist’s experience, and location, typically ranging from $40 to $100+ for specialized art. Simple designs like heart accents might be an add-on, while intricate techniques such as chrome or hand-painted swirls will incur higher fees. This is why many turn to DIY valentine nails for an affordable solution.
Final Thoughts on Valentines Nails Designs
As we’ve explored these 11 essential valentines nails designs for March 2026, it’s clear that expressing love and romance through your manicure offers endless creative possibilities. From the timeless charm of classic red heart nails to the cutting-edge appeal of pink chrome finish with aura accents and the understated elegance of minimalist black & white hearts, there’s a style to perfectly match every personality and occasion.
Remember, the true beauty of valentines nails designs lies not just in their aesthetic appeal, but in the joy of creating them and the confidence they inspire. Whether you opt for an intricate DIY project using love swirl patterns or choose the instant glamour of press-on perfect manicure, the key is to embrace the process and personalize your look. With the detailed steps and expert tips provided, you’re now equipped to create valentines nails that truly stand out. Don’t be afraid to experiment with different colors, textures, and techniques to make your Valentine’s Day nail art uniquely yours. What’s your favorite valentines nails design from this list, and why?
Last update on 2026-03-06 / Affiliate links / Images from Amazon Product Advertising API


