Struggling to find a nail design that feels both timelessly elegant and perfectly on-trend? You want a look that whispers luxury and sophistication, but it can be frustrating to sort through endless fleeting fads to find a truly show-stopping style. You’re searching for that perfect combination of classic glamour and modern edge for your black and gold nails.
Black and gold nails are a luxurious and versatile nail art choice, offering a sophisticated aesthetic that combines deep, opulent black with shimmering metallic gold in designs ranging from minimalist accents to intricate, glamorous patterns. This timeless color combination is perfect for elevating your look for any special occasion in 2026.
Drawing from established best practices and current trend analysis, this guide unlocks the secrets to achieving salon-quality results. We will explore 11 proven elegant designs that demonstrate exceptional style. You’ll discover actionable tips and expert techniques to create the perfect black and gold manicure that feels both personal and polished.
Unlocking the Opulence: Elevate Your Look with Black and Gold Nails in 2026
The combination of black and gold is more than just a color choice; it’s a statement of timeless allure and sophistication. For 2026, black and gold nail designs continue to dominate as a top trend for those seeking a look that is both elegant and glamorous. This classic pairing evokes a sense of luxury and confidence, making it the perfect accessory for special occasions, holiday parties, or any time you want to feel exceptionally chic. The deep, mysterious quality of black provides the perfect canvas for the radiant warmth of gold, creating a high-contrast visual that is undeniably eye-catching. By exploring various manicure techniques and decorative finishes like gold foil, glitter, and intricate nail art, you can transform your nails into a masterpiece of personal style. Our expert tips and curated designs will help you achieve that coveted salon-quality look.
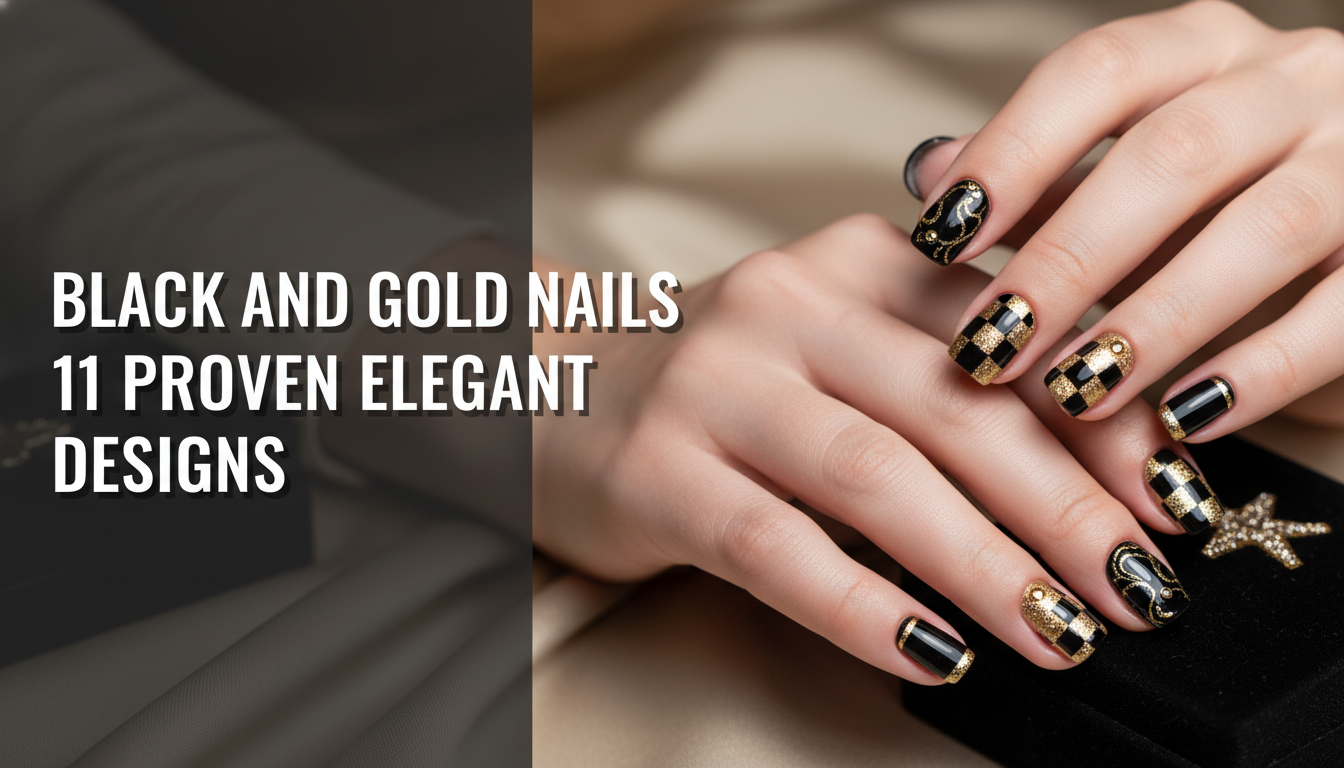
Black and Gold Nails 11 Proven Elegant Designs for 2026
Finding the perfect black and gold nail design can elevate your entire aesthetic, but knowing where to start is key. This curated list presents 11 proven elegant designs for 2026, each offering a unique take on this luxurious color combination. From the understated chic of a classic French tip to the dramatic flair of matte coffin nails, we provide actionable guidance for every style preference. Whether you prefer black and gold gel nails for their durability or are experimenting with black gold acrylic nails for added length and shape, you’ll find inspiration here. We will break down each design into the tools you’ll need and the precise steps to achieve a flawless finish, incorporating everything from gold foil and glitter to sophisticated marble effects.
1. Classic Black and Gold French Tip Nails

Pin this timeless elegance to your ‘Nail Goals’ board!
The black and gold french tip is the epitome of classic elegance with a modern twist. This design takes the timeless French tip format and elevates it by swapping the traditional white for a deep, opaque black gel polish base and a striking metallic gold line. The result is a high-contrast and incredibly sophisticated look, perfect for formal events or as a chic everyday style. The key to this elegant black gold manicure is precision—achieving a clean, crisp line for the gold accent nails is essential for a polished, professional finish.
Products & Tools Used
- Opaque black gel polish for a deep, rich base
- Metallic gold nail art liner polish with a fine brush for precision
- Base coat and no-wipe top coat
- UV LED lamp for curing gel polish
- Nail buffer block and nail file for prep
- Optional: French tip nail guides/tape
Application Steps
- Prep nails by filing, buffing, and degreasing. Apply a thin layer of base coat and cure under UV LED lamp.
- Paint two thin coats of the opaque black gel polish over the entire nail, curing each coat.
- Once the black is fully cured, apply a French tip nail guide sticker just below where you want your gold tip to begin, or freehand a curved line with a steady hand.
- Carefully paint the tip of each nail with the metallic gold nail art liner polish.
- Gently remove the guide (if used) before curing. If freehand, check for symmetry.
- Cure the gold polish under the UV LED lamp.
- Seal the design with a glossy no-wipe top coat and cure for the final time.
Pro-Tip: Achieving a truly crisp French tip requires proper nail plate dehydration before base coat application, and ensuring each polish layer is fully cured to prevent chipping or smudging. Using a builder in a bottle for a slight apex can also enhance durability.

2. Elegant Black and Gold Ombre Nails

Gradient goals! Save this stunning ombre idea to your ‘Glam Nails’ board!
A black and gold ombre creates a stunning gradient effect that is both dramatic and elegant. This technique involves blending an opaque black polish into a shimmering gold gel polish, resulting in a seamless transition of color that looks incredibly sophisticated. The beauty of gold gradient nails lies in their diffused, soft appearance, which can be achieved with a simple nail art sponge. This design is perfect for those who want a glamorous look that feels fluid and dynamic, making it one of the most sought-after elegant black gold nails styles.
Products & Tools Used
- Opaque black gel polish
- Shimmering gold gel polish
- Base coat and no-wipe top coat
- UV LED lamp
- Nail art sponge (or makeup sponge cut into small pieces)
- Tweezers (to hold sponge)
- Liquid latex barrier (optional, for easy cleanup)
Application Steps
- Prep nails, apply base coat, and cure. Then paint one coat of black gel polish and cure.
- On a palette, apply a strip of black gel polish next to a strip of gold gel polish.
- Lightly dab the nail art sponge onto both colors, picking up the gradient.
- Gently sponge the polish onto the nail, starting from the cuticle with black and fading towards the tip with gold, or vice-versa. Blend by dabbing repeatedly.
- Cure the layer. Repeat steps 3-4 for a second or third layer to intensify the ombre effect, curing after each layer.
- Clean around the cuticles with a clean brush dipped in rubbing alcohol.
- Seal with a glossy no-wipe top coat and cure fully.
Pro-Tip: For a seamless ombre effect, ensure both the black and gold gel polishes have similar viscosity control. Applying a thin inhibitory layer removal after the black base can help the sponge blend more smoothly without dragging the previous layer.

3. Sophisticated Black and Gold Marble Nails with Gold Veins

Marble magic! Pin this luxurious design to your ‘Elegant Nail Art’ board!
For a truly opulent and luxury black gold nails look, the black and gold marble effect is unparalleled. This design mimics the appearance of natural stone, with delicate gold veins nails swirling across a deep black base. The technique uses a fine liner brush to draw organic, flowing lines with metallic gold gel polish over a wet layer of clear gel, creating a realistic marble effect. The result is a highly sophisticated design that looks incredibly intricate and expensive, perfect for making a high-fashion statement.
Products & Tools Used
- Opaque black gel polish
- Metallic gold gel polish for veins
- Base coat and no-wipe top coat
- UV LED lamp
- Fine detail nail art liner brush (long, thin bristles)
- Clear gel polish (thin consistency, for marbling)
Application Steps
- Prep nails, apply base coat, and cure. Paint two coats of opaque black gel polish, curing each coat fully.
- Apply a thin layer of clear gel polish over the cured black, but do not cure yet. This will act as the “wet layer” for marbling.
- Dip the fine detail liner brush into the metallic gold gel polish and draw thin, organic lines and small clusters onto the wet clear layer, mimicking natural marble veins.
- Using the same brush (or a clean, dry one), lightly swirl or drag through some of the gold lines to soften and diffuse them, creating a more realistic marble effect.
- Once satisfied with the design, cure the entire nail under the UV LED lamp.
- Seal with a glossy no-wipe top coat and cure fully.
Pro-Tip: For truly organic gold veins, focus on irregular lines and varying thicknesses. Applying a thin layer of clear builder gel before the top coat can add depth and protect intricate designs, preventing chipping and ensuring long-lasting wear.

4. Dramatic Matte Black and Gold Foil Coffin Nails

Matte black magic! Pin this edgy foil design to your ‘Statement Nails’ board!
Combining a velvety matte finish with the raw texture of gold foil creates one of the most dramatic black gold nails looks. This design is especially striking on coffin nails black and gold, where the sharp angles of the nail shape complement the bold aesthetic. The contrast between the non-reflective black base and the metallic shine of the gold foil on black nails provides a unique textured appearance that is both edgy and opulent. It’s a fashion-forward choice for anyone looking to make a powerful style statement.
Products & Tools Used
- Opaque black gel polish
- Matte gel top coat
- Gold nail art transfer foil or gold foil flakes
- Foil glue/adhesive (if using transfer foil) or no-wipe top coat (for flakes)
- Base coat and glossy no-wipe top coat (for foil adherence)
- UV LED lamp
- Tweezers or silicone tool (for applying foil)
Application Steps
- Prep nails, apply base coat, and cure. Paint two coats of opaque black gel polish, curing each.
- For accent nails: Apply a thin layer of glossy no-wipe top coat (if using flakes directly) or foil glue (if using transfer foil) over the cured black. Cure the top coat (or let foil glue dry until tacky).
- Using tweezers, carefully press the gold foil flakes onto the sticky layer, or firmly rub the transfer foil onto the nail.
- Gently peel off the transfer foil backing, or continue to press down all flakes.
- Seal the foil with a layer of glossy no-wipe top coat and cure.
- For all nails, apply a layer of matte gel top coat over the entire nail. Cure fully under the UV LED lamp for a dramatic matte finish.
Pro-Tip: When working with gold foil, proper primer adhesion is key to preventing peeling. Always encapsulate the foil with a glossy, thin layer of top coat before applying the matte top coat to ensure it remains smooth and long-lasting, preventing chipping at the edges.

5. Glittering Black and Gold Flakes on Almond Nails

Sparkle and shine! Pin this gorgeous glitter design to your ‘Party Nails’ board!
For a truly glamorous and festive look, black and gold flakes or glitter on almond shaped nails are a perfect choice. This design features shimmering black gold by suspending gold glitter flakes within a glossy black or clear base. The elegant curve of the almond nail shape beautifully complements the sparkling, multi-dimensional effect of the glitter. The key to this look is encapsulation—sealing the flakes properly to create a smooth, glossy shine that prevents a rough texture and ensures a durable, chip-free manicure.
Products & Tools Used
- Opaque black gel polish
- Fine or chunky gold glitter flakes
- Clear builder gel or thick no-wipe top coat
- Base coat and glossy no-wipe top coat
- UV LED lamp
- Fan brush or silicone tool (for applying flakes)
Application Steps
- Prep nails, apply base coat, and cure. Paint two coats of opaque black gel polish, curing each.
- Apply a thin layer of clear builder gel or thick no-wipe top coat over the cured black base. Do not cure yet.
- Using a fan brush or silicone tool, carefully sprinkle or place the gold glitter flakes onto the wet layer. Focus on even distribution or creating an intentional cluster.
- Once satisfied, gently tap down any raised flakes, then cure under the UV LED lamp.
- Encapsulate the flakes by applying another layer of clear builder gel or thick no-wipe top coat to create a smooth surface, ensuring all flakes are sealed. Cure fully.
- File and buff any rough spots if necessary.
- Seal with a final glossy no-wipe top coat and cure for maximum shine.
Pro-Tip: To prevent gold flakes from peeling or creating a bumpy texture, it’s crucial to encapsulate them properly with a thick, clear gel or top coat. This method, often used by licensed technicians, ensures a durable and long-lasting finish that prevents chipping.

6. Bold Black and Gold Geometric Patterns

Shape up your style! Pin these geometric beauties to your ‘Modern Nail Art’ board!
Black and gold geometric designs offer a bold, contemporary aesthetic that is both chic and artistic. This style uses sharp lines, angles, and abstract shapes in metallic gold over a solid black base to create a modern black gold nails look. The beauty of this design lies in its precision and versatility, making it perfect even for geometric patterns for short nails. You can use nail art striping tape for perfectly straight lines or a fine detail nail art liner brush for more intricate, freehand patterns. The strong high-contrast effect is what makes this design so visually striking.
Products & Tools Used
- Opaque black gel polish
- Metallic gold gel polish (or gold nail art paint)
- Base coat and no-wipe top coat
- UV LED lamp
- Fine detail nail art liner brush or nail art striping tape
- Tweezers (for tape application)
Application Steps
- Prep nails, apply base coat, and cure. Paint two coats of opaque black gel polish, curing each.
- For striping tape: Once the black is fully cured, apply strips of nail art tape in your desired geometric pattern. Press down firmly to ensure no bleeding.
- Using the fine detail liner brush, paint within the taped-off sections (or freehand your geometric lines/shapes) with the metallic gold gel polish.
- Carefully remove the tape immediately after painting but before curing the gold. (If freehand, proceed to cure).
- Cure the gold design under the UV LED lamp.
- Seal the entire design with a glossy no-wipe top coat and cure fully.
Pro-Tip: To achieve crisp, bold geometric patterns, always ensure your black base coat is completely cured before applying tape or drawing with a liner brush. Using a gel with controlled viscosity for the gold detail will prevent streaking and ensure professional-results.

7. Celestial Black and Gold Nails with Star Accents

Reach for the stars! Pin this dreamy celestial design to your ‘Galaxy Nails’ board!
Embrace a touch of magic with black and gold celestial themed nail art. This whimsical yet opulent design uses a deep black base to represent a night sky, adorned with delicate black and gold stars and black and gold moons. You can achieve this look by hand-painting tiny details with a dotting tool and a fine brush, or by using pre-made nail stickers for perfect shapes every time. This celestial nail art is perfect for those who want a design that is both enchanting and sophisticated, blending mystical themes with the luxurious appeal of gold.
Products & Tools Used
- Opaque black gel polish
- Metallic gold gel polish (or gold nail art paint)
- Base coat and no-wipe top coat
- UV LED lamp
- Fine detail dotting tool or nail art stickers (stars, moons)
- Tweezers (for stickers)
Application Steps
- Prep nails, apply base coat, and cure. Paint two coats of opaque black gel polish, curing each.
- If using stickers: Once black is cured, use tweezers to carefully place gold star and moon stickers onto the nail in a celestial pattern.
- If hand-painting: Dip the dotting tool or fine liner brush into metallic gold gel polish. Create small dots, stars, and crescent moon shapes on the black base.
- Once the celestial design is complete, cure under the UV LED lamp.
- Seal the entire design with a glossy no-wipe top coat and cure fully, ensuring all stickers or painted details are encapsulated for long-lasting wear.
Pro-Tip: For tiny, intricate celestial designs, using a high-quality gold nail art paint (not polish) can offer better opacity and control. Always seal gold leaf on nails or stickers thoroughly with two thin layers of top coat to prevent premature chipping or peeling.

8. Minimalist Black and Gold Line Art Nails

Less is more! Pin this elegant line art to your ‘Minimalist Manicure’ board!
For those who believe less is more, minimalist black and gold line art nails offer an understated yet incredibly chic black gold nails option. This design focuses on clean, sharp lines and negative space, using an ultra-fine detail nail art liner brush to draw delicate gold lines over a solid black or even a sheer nude base. The result is a simple black and gold nails look that feels modern and sophisticated. It’s the perfect way to incorporate the black gold abstract nails trend without overwhelming the eye, proving that sometimes the simplest details make the biggest impact.
Products & Tools Used
- Sheer nude, clear, or opaque black gel polish for the base
- Metallic gold gel polish (highly pigmented, thin consistency)
- Base coat and no-wipe top coat
- UV LED lamp
- Ultra-fine detail nail art liner brush (e.g., 5mm or 7mm)
- Isopropyl alcohol (for cleaning brush)
Application Steps
- Prep nails, apply base coat, and cure. Paint one or two coats of your chosen base color (black, nude, or clear), curing each coat fully.
- Dip your ultra-fine liner brush into the metallic gold gel polish. Ensure only a small amount of product is on the brush for crisp lines.
- Carefully draw your desired minimalist gold lines or shapes (e.g., a single vertical line, horizontal lines, small dots, outlines of shapes) onto the cured base.
- Cure the gold line art design under the UV LED lamp.
- Seal with a glossy no-wipe top coat and cure fully for protection and shine.
Pro-Tip: The key to minimalist line art is a steady hand and a properly loaded ultra-fine liner brush. If your gold polish looks streaky or uneven, it may be too thick or the brush isn’t fine enough. Practice on a nail tip first.

9. Luxury Black and Gold Nails with 3D Charms

Beyond bling! Pin this opulent 3D design to your ‘Extravagant Nails’ board!
For the ultimate statement in opulent black gold nails, look no further than luxury black and gold nails with 3d charms. This extravagant design features 3d art, incorporating intricate gold nail charms like crowns, filigree, or other metallic shapes onto a glossy black base. This style of black gold 3d nail art is all about bold dimensionality and creating a truly glamorous and eye-catching look. Securing these charms properly with a strong nail art adhesive gel is crucial for a durable design that looks as luxurious as it feels.
Products & Tools Used
- Opaque black gel polish or acrylic powder/monomer for black nails
- Assorted gold 3D nail charms (e.g., crowns, intricate metallic shapes)
- Strong nail art adhesive gel or clear builder gel
- Base coat and no-wipe top coat
- UV LED lamp (if using gel)
- Tweezers or wax-tipped tool (for precise charm placement)
Application Steps
- Prep nails, apply base coat, and cure. Paint two coats of opaque black gel polish (or apply black acrylic), curing each gel coat.
- Apply a small dot of strong nail art adhesive gel or clear builder gel to the area where you want to place the 3D charm. Do not cure yet.
- Using tweezers or a wax-tipped tool, carefully pick up and position the gold 3D charm onto the wet adhesive.
- Once the charm is perfectly placed, cure under the UV LED lamp to secure it firmly. (If using builder gel, ensure it fully surrounds the base of the charm).
- For long-lasting wear, carefully apply top coat around the base of the charm, avoiding coating the charm itself to maintain its sparkle and texture. Cure fully.
Pro-Tip: When applying gold 3D charms, proper nail apex building is crucial, especially for longer nails, to ensure structural integrity and prevent chipping or premature charm detachment. Using a specialized nail art adhesive gel specifically designed for 3D art will provide the most durable bond.

10. Art Deco Inspired Black and Gold Swirl Nails

Vintage glam! Pin these Art Deco swirls to your ‘Retro Chic Nails’ board!
Channel the roaring twenties with retro black and gold art deco nails. This vintage black gold nails style is defined by its symmetrical, geometric lines, fan shapes, and elegant black and gold swirl patterns. Using a highly pigmented metallic gold gel paint and a fine liner brush, you can sketch these intricate designs onto a glossy black base for a look that is both intricate and undeniably elegant. This art deco nail art is perfect for anyone who loves vintage glamour and wants a design that matches formal attire with a historical nod.
Products & Tools Used
- Opaque black gel polish
- Highly pigmented metallic gold gel paint (for detailed art)
- Base coat and no-wipe top coat
- UV LED lamp
- Ultra-fine detail nail art liner brush
- Dotting tool (for small accents)
Application Steps
- Prep nails, apply base coat, and cure. Paint two coats of opaque black gel polish, curing each.
- Using the ultra-fine liner brush and metallic gold gel paint, carefully sketch your Art Deco-inspired swirls, geometric lines, or fan patterns onto the cured black base.
- Take your time to ensure clean, flowing lines and symmetrical patterns. Cure the gold design under the UV LED lamp once you are satisfied.
- Seal the entire design with a glossy no-wipe top coat and cure fully for protection and high shine.
Pro-Tip: For intricate Art Deco swirls, using a highly pigmented metallic gold gel paint offers superior control and opacity compared to polish. Proper polymerization process ensures the detailed art is fully cured and prevents chipping or smudging over time, leading to professional-results.

11. Gothic Black and Gold Nail Design Ideas

Embrace your dark side! Pin these gothic glam nails to your ‘Alternative Style’ board!
For a look that is both dark and dramatic, explore gothic black and gold nail design ideas. This aesthetic combines a deep black matte finish with ornate gold details to create black gold mysterious nails that are undeniably bold. Think gold filigree nail art, tiny skull charms, or distressed gold foil over a velvety black base. This style perfectly matches alternative fashion and is ideal for those who want their nails to be a powerful form of self-expression, blending dark, romantic elements with a touch of opulent gold.
Products & Tools Used
- Opaque matte black gel polish
- Metallic gold gel polish or gel paint
- Gold filigree nail stickers, small charms, or distressed gold foil flakes
- Base coat and matte no-wipe top coat
- UV LED lamp
- Fine detail nail art liner brush (for painting)
- Tweezers or wax-tipped tool (for applying charms/stickers)
- Nail adhesive gel (for charms)
Application Steps
- Prep nails, apply base coat, and cure. Paint two coats of opaque black gel polish, curing each coat.
- Apply a matte no-wipe top coat over the black and cure fully. This creates the dark, velvety base.
- For accents:
- Gold Filigree Stickers: Use tweezers to apply intricate gold stickers onto the matte black.
- Gold Charms: Apply a small dot of nail adhesive gel, place charm, and cure.
- Distressed Gold Foil: Lightly dab a bit of glossy top coat (or foil glue) in areas, press gold foil flakes onto it, and cure.
- Hand-painted details: Use a fine liner brush and gold gel paint to draw gothic symbols or intricate patterns. Cure the gold.
- Carefully apply a thin layer of matte top coat around charms or over foil/stickers, taking care not to dull the gold’s shine if desired. Cure fully.
Pro-Tip: For gothic black and gold nails, a flawless matte black finish is paramount. Ensuring correct cuticle prep protocol and smooth application of a high-quality matte top coat will prevent unevenness or staining. When adding elaborate details, consider a hema-free gel for longevity and reduced sensitivity.

Key Takeaways
- Black and gold nails offer unparalleled elegance and sophistication for any occasion in 2026, moving beyond basic polish to encompass a range of opulent designs from minimalist to extravagant.
- Mastering diverse techniques like gold foil application, seamless ombre blending, and intricate geometric patterns allows for truly customized and professional-results at home or in the salon.
- The key to long-lasting black and gold nail art lies in meticulous nail prep, using high-quality gel polishes, and proper sealing with durable top coats, which prevents common issues like chipping or peeling.
- Experiment with various nail shapes like almond, coffin, or stiletto, and integrate 3D charms or celestial accents to elevate your black and gold aesthetic and create a unique statement look.
- For a truly salon-quality finish, pay attention to advanced techniques such as proper viscosity control for line art or effective encapsulation of glitter and foils, ensuring every detail is perfectly executed.
FAQs About Black and Gold Nails
How do you do black and gold nails at home?
Doing black and gold nails at home involves choosing your design, prepping your nails properly, and using quality products like gel polish, fine liner brushes, or gold foil. Start by filing, buffing, and applying a base coat. Then, apply two coats of black polish, curing each. Add your gold design—whether it’s hand-painted lines, sponged-on ombre, or pressed-on foil—and cure again. Always finish with a durable top coat to seal your art and ensure a long-lasting, professional-looking manicure.
What are the best black and gold nail designs?
The best black and gold nail designs blend classic elegance with modern flair, with top choices including sophisticated French tips with a gold accent, shimmering ombre gradients, intricate marble with gold veins, and dramatic matte black with gold foil. Minimalist line art, celestial star patterns, and bold geometric shapes are also extremely popular. The ideal design ultimately depends on your personal style and the occasion.
How do you apply gold foil to black nails?
To apply gold foil, start with a cured black gel polish base, then apply a thin layer of foil glue or a no-wipe top coat and cure it until it’s tacky. Use tweezers to press the gold foil flakes or transfer sheet firmly onto the sticky surface. Gently rub to ensure it adheres, then peel off the transfer sheet backing. Finally, seal the design completely with a glossy top coat and cure to prevent peeling and ensure durability.
How to make black and gold ombre nails?
To create a black and gold ombre, you will need a makeup sponge. After applying your black base color, paint a stripe of black and a stripe of gold polish side-by-side on a palette. Dab the sponge onto the polish to pick up the gradient, then gently pat the sponge onto your nail, blending the colors. Repeat for more intensity, curing between layers, and finish with a glossy top coat.
Are black and gold nails professional?
Yes, black and gold nails can be very professional, especially when you choose understated and elegant designs. A minimalist style with simple gold line art, a chic black and gold French tip, or a subtle gold accent on a single nail are all excellent choices for a professional setting. The key is to favor clean lines and moderation over excessive glitter or large 3D charms.
How long do black and gold press-on nails last?
With proper application, high-quality black and gold press-on nails can last anywhere from one to two weeks. The longevity depends heavily on thorough nail prep (cleaning and buffing the natural nail) and the quality of the adhesive used, whether it’s strong nail glue or adhesive tabs. Avoiding prolonged water exposure can also extend their wear time.
What color dress goes with black and gold nails?
Black and gold nails are incredibly versatile and pair beautifully with classic colors like black, white, and of course, gold. They also create a stunning, luxurious look when matched with rich jewel tones such as emerald green, ruby red, and royal blue. For a bold, high-fashion contrast, you could even wear them with a vibrant fuchsia or cobalt blue dress.
How to keep gold foil from peeling on nails?
The key to preventing gold foil from peeling is proper encapsulation. After applying the foil, you must seal it thoroughly with a high-quality top coat. Apply a thin layer of top coat over the entire nail, making sure to “cap” the free edge by running the brush along the tip of the nail. Curing this sealing layer completely is crucial for a durable, long-lasting finish.
Can you do black and gold nails on short nails?
Absolutely! Black and gold designs look fantastic on short nails. Styles like minimalist line art, delicate geometric patterns, a simple gold accent nail, or a reverse French manicure are particularly flattering on shorter nail lengths. The high contrast of black and gold can make short nails appear chic and polished without needing extra length.
Where can I buy black and gold nail stickers?
You can find a wide variety of black and gold nail stickers online from retailers like Amazon and Etsy, as well as in most beauty supply stores or the nail art section of drugstores. Look for designs such as celestial patterns, geometric lines, intricate filigree, or Art Deco shapes to easily achieve a complex look at home.
Final Thoughts
As we’ve explored, black and gold nails offer an unmatched blend of elegance, drama, and timeless sophistication, proving their status as a luxury choice for 2026 and beyond. From the delicate artistry of celestial stars and minimalist line art to the bold statements of matte black and gold foil coffin nails or intricate Art Deco swirls, these designs cater to every taste and occasion. We’ve provided proven elegant designs and actionable steps, ensuring you have the inspiration and guidance to create your own salon-quality black and gold manicure at home. The versatility of this opulent color pairing ensures your nails will always make a statement, reflecting your unique style and a touch of glamour.
Remember, achieving truly long-lasting and professional-results with your black and gold nail art lies in a combination of meticulous prep, selecting high-quality products, and patiently following the detailed techniques. By integrating expert tips on everything from gold foil application to 3D charm adhesion, you can confidently overcome common challenges like chipping or peeling and enjoy your stunning designs for weeks. Whether you seek to express your personality with gothic glam or exude classic charm with a French tip, these 11 ideas serve as your ultimate guide to embracing the golden standard of nail fashion.
Which of these black and gold nail designs will you try first to elevate your style in 2026? Share your favorites in the comments below
Last update on 2026-04-27 / Affiliate links / Images from Amazon Product Advertising API