Struggling to get that perfect, liquid-metal shine with your chrome nail designs? If your at-home attempts end up looking more like a glittery mess than a flawless mirror, you are not alone. It’s a common frustration that keeps many from achieving that salon-quality reflective surface.
To achieve a flawless chrome nail finish, you must burnish ultra-fine chrome powder onto a partially cured, non-wipe gel top coat. The key is curing the top coat for only 15-30 seconds, creating a firm, non-tacky surface that the powder can polish into a mirror-like sheen. A full cure will prevent the powder from adhering correctly, resulting in a glittery mess.
Drawing from comprehensive analysis of current data and proven methodologies, this guide will transform your technique. You will discover the secrets to mastering everything from the viral glazed donut nails 2026 to advanced 3D textures. Get ready to create stunning, long-lasting chrome powder nails with a professional touch.
How Do You Get Flawless Chrome Nail Designs at Home?
Achieving that coveted mirror-like finish is a science, not a coincidence. The most common mistake DIYers make is treating chrome powder like simple glitter, but its application relies on a specific chemical process. The magic happens when the ultra-fine particles of the powder are polished—or “burnished”—onto the unique surface of a partially cured no-wipe top coat. Curing a no-wipe gel for just 15-30 seconds initiates the polymerization process just enough to create a firm, glassy, non-tacky surface. It is this specific canvas that allows the powder to flatten into a continuous, reflective sheet. If the top coat is fully cured or if it’s a standard top coat with a sticky dispersion layer, the powder particles will just stick without flattening, resulting in that disappointing shimmery or glittery look. Understanding this relationship between the chrome powder, the no-wipe top coat, and the UV curing time is the absolute foundation for success.
A huge part of mastering chrome nail art is understanding how the base color dramatically influences the final look. The same chrome powder can yield wildly different results depending on the color you place underneath it. Here’s a quick guide to help you choose:
| Base Color | Final Chrome Effect | Best For… |
|---|---|---|
| Jet Black | Intense, true mirror reflection. | Classic silver, gold, and holographic mirror nails. |
| Sheer White/Pink | Soft, opalescent, pearly glow. | The iconic glazed donut nails 2026 effect. |
| Bright White | Frosted, satin-like metallic finish. | A softer, less intense version of a silver chrome. |
| Nude/Neutral | Warm, sophisticated sheen. | Chocolate glazed donut and bronze effects. |
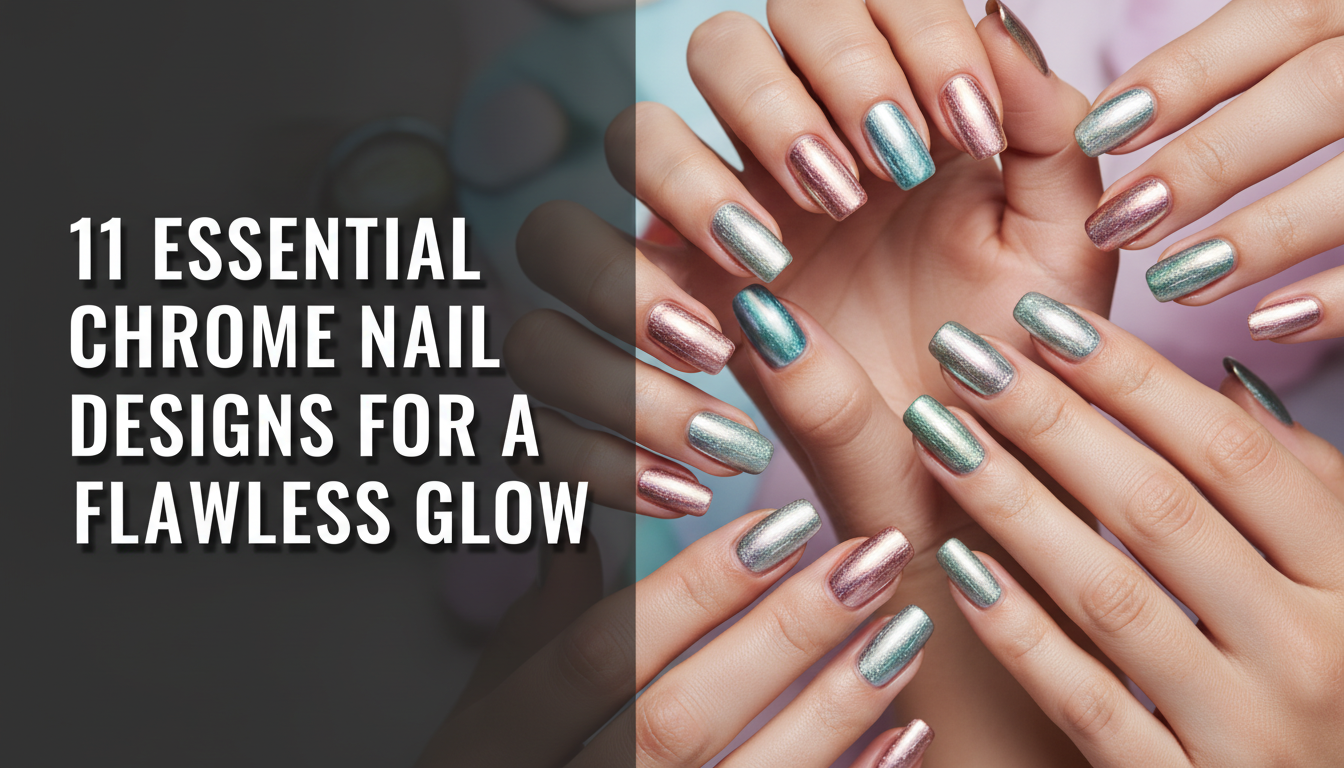
11 Essential Chrome Nail Designs for a Flawless 2026 Glow
Now that you understand the core principles, it’s time for the inspiration. The world of chrome nail designs in 2026 has moved far beyond a simple silver coating. Today’s trends are all about texture, layering, and “refined maximalism,” blending minimalist aesthetics with high-impact finishes. This list covers the most essential looks of the year, from the timeless classics that continue to dominate Pinterest to the advanced, cutting-edge techniques seen in high-end salons. Each design includes not just the inspiration but a full step-by-step guide with professional tips, ensuring you have everything you need to recreate these stunning looks at home.
1. Master the Classic Vanilla Chrome (Glazed Donut) Nail

Pin this chic minimalist look to your ‘Nail Inspo 2026‘ board!
The quintessential vanilla chrome nails, also known as glazed donut nails, remain one of the most requested looks. Its beauty lies in its subtlety—a delicate, pearly glow that looks clean, healthy, and effortlessly chic. This iconic look, popularized by celebrities, transforms sheer colors like a milky white or a soft pink into an opalescent dream with a luminous shine.
Products & Tools Used
- Milky white or sheer pink nails with glazed donut chrome gel polish (e.g., OPI Funny Bunny or a similar translucent base)
- No-wipe top coat
- White pearl chrome powder with ultra-fine particles
- Silicone applicator or eyeshadow sponge
- UV LED lamp
- Fine-lining brush (for cleanup)
- Isopropyl alcohol and lint-free wipes
Application/Styling Steps
- Prep the nail plate and apply your chosen sheer base color, curing as directed.
- Apply a thin layer of no-wipe top coat.
- Partial cure under your UV LED lamp for only 15-30 seconds (this is the key!).
- Burnish a small amount of white pearl chrome powder onto the nail surface using your silicone applicator until a mirror-like finish appears.
- Dust off any excess powder with a soft brush.
- Seal the free edge meticulously with a bonder or primer first, then float the gel top coat over the entire nail to avoid streaking and cure for a full 60 seconds.
Pro-Tip: For an authentic glazed donut nail, the base color is critical. A single coat of a milky white like OPI Funny Bunny creates the perfect translucent canvas. A more opaque white will result in a stark, less delicate finish.

2. Create Elegant Glass Chrome French Tips

Save this modern French manicure idea for your next special occasion!
A modern twist on a timeless classic, chrome french tips offer a pop of metallic brilliance for a sophisticated and clean look. This design replaces the traditional white tip with a sharp, liquid chrome nails line, creating a stunning contrast against a natural nail bed. It’s perfect for short almond nails and longer shapes alike, offering a touch of chic minimalist elegance. The key is creating a crisp, clean line.
Products & Tools Used
- Sheer pink or nude base gel polish
- No-wipe top coat
- Silver mirror chrome powder
- Ultra-fine liner nail art brush
- Silicone applicator
- UV LED lamp
- Dust brush
Application/Styling Steps
- Apply and cure your sheer pink base as usual.
- Apply a standard (tacky) top coat over the entire nail and cure fully. Cleanse the tacky layer with alcohol. This creates a non-stick surface for the next step.
- Using an ultra-fine liner brush, apply the no-wipe top coat only to the tip of the nail, creating your French manicure smile line.
- Partial cure this top coat for 15-30 seconds.
- Burnish the silver chrome powder onto the partially cured tip. The powder will only stick to the no-wipe top coat area.
- Dust off all excess powder meticulously.
- Float a final layer of no-wipe top coat over the entire nail to seal the design and cure for 60 seconds.
Pro-Tip: To prevent chrome dust from spreading, after burnishing the tip, use a lint-free wipe with a small amount of isopropyl alcohol to gently wipe the nail bed before applying the final top coat. This ensures a perfectly clean contrast.

3. Sculpt Stunning 3D Molten Gold Swirls

Pin this luxurious 3D nail art for a show-stopping manicure!
Enter the world of 3D chrome art. This advanced technique creates raised, textured designs that look like liquid metal has been poured onto the nail. Molten gold chrome accents on chocolate brown or a matte black base are especially popular, creating a look of pure opulence. The secret to this effect is a high-viscosity, non-leveling 3D builder gel which enables 3D textures by holding its shape perfectly during curing.
Products & Tools Used
- Base color of choice (e.g., chocolate glazed donut brown) with a matte top coat
- Thick, non-leveling 3D builder gel or embossing gel
- No-wipe top coat
- Gold mirror chrome powder
- Fine liner brush
- Silicone applicator
- UV LED lamp
Application/Styling Steps
- Apply your base color and a matte top coat, curing fully.
- Using a fine liner brush, pick up a bead of 3D builder gel and draw your swirl or line design on the nail. The gel should be thick enough to remain raised. Cure fully (60 seconds).
- With the same liner brush, carefully apply the no-wipe top coat directly on top of the cured, raised 3D design. Be precise and stay on the lines.
- Partial cure the no-wipe top coat for only 15-30 seconds.
- Burnish the gold chrome powder onto the raised design. It will stick only to the partially cured top coat.
- Gently dust off the excess powder. The design is now complete, as the base is matte and the rest of the nail is sealed.
Pro-Tip: For a true molten metal look, use a high-viscosity “embossing gel.” This type of 3D builder gel mimics molten metal because it doesn’t self-level at all, allowing you to create sharp, defined textures that hold their shape perfectly during curing.

4. Achieve the 2026 “Baccarat” Crystal Chrome Effect

Unlock the secret to the viral ‘Baccarat’ nail trend! Pin this for later.
One of the most advanced and sought-after trends for 2026 is the Baccarat crystal texture. This design mimics the multifaceted, light-refracting quality of expensive crystal glass. It’s achieved by creating a subtly uneven, textured surface with clear 3D builder gel, which is then enhanced with an iridescent chrome powder. This is the pinnacle of refined maximalism, providing incredible dimension and shine.
Products & Tools Used
- Sheer nude base polish
- Clear, hard 3D builder gel
- An old, rough nail art brush or a texturizing tool
- No-wipe top coat
- Pink/gold dual-tone iridescent chrome powder
- UV LED lamp
Application/Styling Steps
- Apply your sheer nude base and cure.
- Apply a medium layer of clear 3D builder gel over the nail.
- Before curing, use a stiff brush or tool to gently tap and press into the gel, creating a random, faceted, uneven texture.
- Cure the textured builder gel fully (60-90 seconds) until it’s rock hard.
- Apply a thin layer of no-wipe top coat over the entire textured surface.
- Partial cure for 15-30 seconds.
- Burnish the iridescent chrome powder all over the nail. The powder will highlight the high points of the texture, creating a crystal-like effect.
- Float a final top coat over the design to smooth it out slightly and give it a glassy finish, then cure fully.
Pro-Tip: The key to the Baccarat crystal texture is imperfection. Don’t try to make the facets perfect. The random, uneven surface is what creates the authentic, light-scattering effect similar to hand-cut crystal. This technique is all about managing the refractive index of pigments over a textured base.

5. Perfect the Rich Chocolate Glazed Donut Nail

Add this delicious chocolate glazed look to your Fall & Winter 2026 nail ideas!
The chocolate glazed donut nail is the sophisticated, autumnal sister to the original vanilla chrome. This trend uses a rich, deep brown base which intensifies a pearl or bronze chrome powder, creating a warm, decadent sheen. It’s one of the top winter nail ideas 2026 and is particularly stunning on dark skin tones, offering a luxurious and flattering non-boring neutral option.
Products & Tools Used
- Rich, chocolate brown gel polish
- No-wipe top coat
- White pearl or a soft bronze chrome powder
- Silicone applicator
- UV LED lamp
Application/Styling Steps
- Prep the nail and apply two coats of your chocolate brown gel polish, curing between each coat.
- Apply a thin layer of no-wipe top coat.
- Partial cure for 15-30 seconds.
- Burnish a very small amount of white pearl or bronze chrome powder onto the nail. Use a light hand; you want a sheen, not an opaque coating.
- Dust off any excess powder.
- Seal the free edge and float a final top coat over the nail, then cure for 60 seconds for a high-gloss finish.
Pro-Tip: The amount of powder is crucial for this look. Too much will make the nail look metallic bronze. Too little won’t show up. Practice on a swatch stick first to find the perfect amount to create a luminous sheen that elevates neutral nails without overpowering the brown base.

6. Design Ethereal Iridescent Aurora Nails

Capture the magic of the northern lights on your nails! Pin this dreamy design.
The aurora nail effect uses special pigments that create a dynamic, multi-tonal iridescent shift. Unlike standard chrome, these chameleon pigment powder options have a transparent, glass-like particle base that reflects different colors—often pink, green, and blue—depending on the angle of the light. An iridescent aurora chrome over milky white base creates an ethereal, magical look that is both subtle and eye-catching.
Products & Tools Used
- Milky white base polish (optional, can be done on a clear base)
- No-wipe top coat
- Aurora/chameleon chrome powder (with pink/green/blue shifts)
- Silicone applicator
- UV LED lamp
Application/Styling Steps
- Apply your base coat (e.g., one coat of milky white) and cure.
- Apply a thin layer of no-wipe top coat.
- Partial cure for 15-30 seconds. The timing is critical for these finer pigments.
- Burnish the aurora powder onto the nail. You’ll notice the color shifting as you move your finger. Focus on an even, glassy result.
- Dust off any excess powder.
- Seal the design by floating a final layer of top coat and cure for a full 60 seconds.
Pro-Tip: Unlike mirror chromes that look best over black, aurora chromes are designed for light bases. Applying them over black creates a completely different, darker “chameleon” effect. For the true ethereal aurora nail effect, stick to milky white, sheer pink, or a clear base.

7. Apply Isolated Chrome Stars on a Matte Base

A chic and edgy look! Pin this matte and chrome contrast idea.
One of the biggest challenges is learning how to do isolated chrome nail art without the powder creating a mess. This matte + contrast design provides the perfect solution. By creating a repellent matte surface first, you can paint on your design with a no-wipe top coat, and the chrome will stick only to that specific area. This technique opens up endless possibilities for clean, sharp, and high-impact graphic designs.
Products & Tools Used
- Black gel polish (or any color)
- High-quality matte gel top coat
- No-wipe top coat
- Silver mirror chrome powder
- A very fine liner brush or star-shaped nail stencils
- Silicone applicator
- UV LED lamp
Application/Styling Steps
- Apply your black base color and cure.
- Apply the matte top coat over the entire nail and cure fully (60 seconds).
- Cleanse the nail with an alcohol wipe. This removes any residue and creates a perfect non-stick surface.
- Using your fine liner brush and the no-wipe top coat, paint your star shapes onto the matte nail.
- Partial cure the no-wipe star shapes for 15-30 seconds.
- Burnish the silver chrome powder over the entire nail. It will only stick to the partially-cured stars.
- Use a fluffy brush to thoroughly dust off all the excess powder from the matte background.
- The design is finished and sealed! No final top coat is needed, as this preserves the matte + contrast effect.
Pro-Tip: The secret to a mess-free application is a high-quality matte top coat that cures without any chalky residue. A good matte finish provides the perfect repellent surface for the reflective dust, making cleanup effortless.

8. Try the “Liquid Light” Nuance Nail Trend

Get ahead of the curve with the 2026 ‘nuance nail’ trend. Pin for your minimalist board.
Originating from advanced Japanese nail art, what are nuance nails is a common question for 2026. This liquid light effect trend focuses on creating subtle, organic textures on a clear or translucent base with clear builder gel. A very sheer iridescent chrome is then applied, creating an effect that looks like pools of trapped light or reflections on water. It’s the ultimate in sophisticated, minimalist nail art.
Products & Tools Used
- Clear BIAB (Builder in a Bottle) or other clear builder gel
- No-wipe top coat
- A very sheer, translucent white or iridescent chrome powder
- Silicone applicator
- UV LED lamp
Application/Styling Steps
- Build a clear nail extension or apply a layer of clear builder gel over the natural nail for strength. Cure fully.
- Apply another thin layer of clear builder gel, but don’t cure.
- Using a fine brush, add small, subtle blobs of more builder gel to create a slightly uneven, watery texture. Cure fully.
- Apply a very thin layer of no-wipe top coat.
- Partial cure for only 10-15 seconds. You want it slightly more ‘wet’ than usual.
- Burnish a TINY amount of sheer iridescent powder. The goal is a subtle sheer finish, not an opaque chrome.
- Float a thick final top coat to encapsulate the design and create a smooth, glassy result. Cure for 60-90 seconds.
Pro-Tip: The liquid light effect is about subtlety. Less is more. The goal is to create the illusion of trapped light. This nuance nail layering technique enhances depth and is a hallmark of high-end salon techniques.

9. Execute a Seamless Chrome Ombre Gradient

Master the chrome ombre with this pro technique! Save it now.
Learning how to do a chrome ombre gradient is a key skill for any nail artist. The challenge is blending two powders seamlessly without creating a harsh line. The secret is to use a porous tool, like a disposable eyeshadow sponge, to gently tap and layer the pigments at their meeting point, creating a soft, airbrushed-like transition.
Products & Tools Used
- White or light pink base color
- No-wipe top coat
- Two chrome powders (e.g., hot pink and silver)
- A clean eyeshadow or sponge applicator
- UV LED lamp
Application/Styling Steps
- Apply your light base color and cure.
- Apply a thin layer of no-wipe top coat.
- Partial cure for 15-30 seconds.
- Using one side of a clean sponge applicator, pick up the pink chrome and dab it onto the top half of the nail (near the cuticle).
- Using the other side of the applicator, pick up the silver chrome and dab it onto the bottom half of the nail (the tip).
- With the clean center of the sponge, gently tap where the two colors meet to blend them. Work quickly and lightly.
- Dust off all excess powder.
- Seal the free edge and float a final top coat over the entire nail, then cure fully.
Pro-Tip: For a more advanced, artistic blend, try using blooming gel. Apply it before the no-wipe top coat. It will cause the chrome powders to “bloom” and spread slightly, creating a softer, more watercolor-like gradient.

10. Rock Edgy Black on Black Chrome Accents

For the ultimate chic look, try a black-on-black chrome design. Pin this edgy idea.
This chic minimalist design is the epitome of stealth wealth for nails. Using a black chrome powder over a glossy black background creates a subtle, textural contrast rather than a color one. The result is a sophisticated non-boring neutral that’s all about the play of light on different finishes—a glossy black base versus a metallic black accent.
Products & Tools Used
- High-gloss black gel polish
- No-wipe top coat
- Black chrome powder
- Fine liner brush
- Silicone applicator
- UV LED lamp
Application/Styling Steps
- Apply two coats of glossy black polish and cure.
- Follow the exact same steps as the “Glass Chrome French Tips” (Design #2), but use the black chrome powder instead of silver.
- First, apply and cure a tacky top coat and cleanse the nail.
- Then, use a liner brush to paint no-wipe top coat only on the tip.
- Partial cure the tip for 15-30 seconds.
- Burnish the black chrome powder onto the tip.
- Dust off the excess and float a final, high-gloss top coat over the entire nail to unify the shine and seal the design.
Pro-Tip: This look is all about the light. A high-gloss final top coat is essential. It creates a “wet” look that makes the textural difference between the regular black polish and the black chrome pop. This is a form of subtle, textured molten gilding.

11. Create Romantic White Pearl Chrome for Wedding Nails
The perfect bridal nail! Pin this romantic pearl chrome idea for wedding planning.
For brides or any special occasions, white pearl chrome for wedding nails offers a timeless and romantic option. It’s essentially a more refined and intentional version of the glazed donut look. A high-quality white pearl powder complements a soft pink or milky white base to create a soft-focus luminous sheen that is elegant and photographs beautifully. For an event, durability is key, making proper application a must.
Products & Tools Used
- Soft, sheer pink or milky white gel polish
- No-wipe top coat
- High-quality white pearl chrome powder
- Nail glue or gem gel
- Tiny flatback pearl embellishments
- UV LED lamp
Application/Styling Steps
- Apply your sheer pink or white base color and cure. For added strength, consider using a BIAB base.
- Apply a thin layer of no-wipe top coat.
- Partial cure for 15-30 seconds.
- Burnish the white pearl chrome powder onto the nail for a soft, pearly glow. Don’t over-apply; the effect should be subtle and opalescent.
- Dust off the excess powder.
- Float a final top coat and cure fully.
- To add the embellishment, place a tiny dot of gem gel or nail glue on the ring finger near the cuticle, place the flatback pearl, and cure under the lamp for 60 seconds.
Pro-Tip: For a wedding or any special occasion, longevity is key. Seal the free edge twice. Apply primer to the tip, apply top coat and cure, then apply a second layer of top coat and cure again. This extra step is a proven longevity secret to prevent chipping.

Key Takeaways: Your Quick Guide to Perfect Chrome Nails
Here’s a quick rundown of the most crucial points to remember on your journey to mastering chrome nail designs:
- The “Partial Cure” is Everything: The secret to a mirror-like finish instead of a glittery look is curing your no-wipe top coat for only 15-30 seconds before applying powder. This creates the perfect surface for the powder to adhere and polish.
- A No-Wipe Top Coat is Not Optional: Chrome powder requires a specific, non-tacky surface to work. A standard top coat with a sticky dispersion layer will not produce the desired mirror effect.
- Base Color Dictates the Final Look: The color you put underneath the chrome drastically changes the outcome. A black base intensifies the chrome for a dramatic effect, while a sheer white or pink base creates a soft, pearly glow.
- Seal the Free Edge Meticulously: To prevent chipping, the most common chrome nail problem, you must carefully cap the free edge of the nail with both a bonder/primer and the final top coat.
- Advanced Designs Use Builder Gel: Trends like 3D chrome art and Baccarat crystal texture are achieved by creating a raised texture with a thick 3D builder gel before applying the chrome powder.
- Use Silicone Tools, Not Your Fingers: For the smoothest, most professional application, use a silicone applicator or a disposable eyeshadow sponge. Oils from your fingers can cause smudges and patchy coverage.
People Also Ask About Chrome Nail Designs
Why is my chrome nail powder shimmery instead of a mirror finish?
Your no-wipe top coat was likely cured for too long before you applied the powder. A mirror effect requires the top coat to be in a unique, “partially cured” state—firm but still receptive. If you cure it for a full 60 seconds, the surface becomes too hard and slick, and the powder particles can’t flatten and polish into a reflective sheet, leaving you with a glittery look.
What is the best top coat for chrome powder?
You must use a high-quality, specifically formulated “no-wipe” or “non-cleanse” gel top coat. These top coats are designed to cure without a sticky “dispersion layer.” This clean, non-tacky surface is essential for the chrome powder to burnish into a smooth, mirror-like finish. A standard gel top coat that leaves a sticky layer will not work.
How do you keep chrome nails from chipping at the tips?
The most effective solution is to meticulously “seal the free edge” of the nail. After burnishing the chrome and dusting it off, apply a bit of gel bonder or acid-free primer just to the very tip. Then, when you apply your final top coat, make sure you swipe it across the free edge to cap it. This creates a durable seal that is the best long-lasting solution to prevent chipping.
Can you use chrome powder over regular nail polish?
No, traditional chrome powder does not work properly with regular, air-dry nail polish. The powder requires the unique, partially cured surface of a no-wipe gel top coat to adhere and create its signature mirror effect. While some “metallic polishes” exist, they cannot replicate the true, burnished mirror nails finish of a gel-based chrome application.
What base color is best for silver chrome?
For the most intense, true mirror effect, a black base color is the industry standard. The dark black + background intensifies the reflectivity of the silver chrome powder, making it look like liquid metal. A white or light-colored base will still work, but it will produce a softer, less dramatic “frosted” silver effect rather than a sharp mirror.
How do you fix patchy chrome application?
Patchy coverage is usually caused by an uneven top coat or inconsistent pressure during application. To fix this, ensure your no-wipe top coat is applied in a smooth, even layer. When burnishing, use firm, consistent pressure with a silicone applicator across the entire nail. If you still have a patch, you can sometimes apply a tiny bit more powder to that spot and blend carefully before top coating.
Are chrome nails still in style for 2026?
Yes, chrome nails are a dominant trend for 2026, but they have evolved. While classic silver mirror nails are timeless, the biggest trends include glass chrome manicures, vanilla chrome nails, and advanced 3D chrome art. The focus has shifted from simple full coverage to more textured, layered, and minimalist applications like chrome French tips.
How do I prevent chrome dust from spreading everywhere?
Work on a disposable surface and use the “isolated chrome” technique for detailed art. For full-coverage nails, a fluffy dust brush is your best tool for cleanup. For designs, always apply chrome over a cured and cleansed matte top coat. The chrome will only stick to the no-wipe design you paint on top, and the excess powder will brush off the matte areas cleanly, solving the problem of how to apply chrome powder without a mess.
Why does my final top coat streak the chrome finish?
This happens when the top coat brush drags and pulls the delicate chrome layer. To prevent this, you must “float the gel” top coat. Get a generous bead of top coat on your brush and gently guide it over the nail without letting the bristles make firm contact with the chrome surface. This floating the top coat technique protects the finish.
How do you create 3D chrome swirls?
You must use a thick, non-leveling 3D builder gel or embossing gel to create the raised texture. First, apply your base color and matte top coat. Then, paint your swirl design with the 3D builder gel and cure it. Finally, carefully paint a no-wipe top coat over the raised swirl, partial cure it, and burnish the chrome powder onto it.
Final Thoughts on Your 2026 Chrome Nail Journey
Moving from frustration to a flawless finish with chrome nail designs is entirely achievable. The journey begins with understanding the core relationship between the no-wipe top coat, the partial cure, and the chrome powder. Once you master that fundamental technique, a universe of creative possibilities opens up, from the understated elegance of vanilla chrome nails to the dramatic flair of 3D chrome art.
The key is to embrace the process. Don’t be afraid to experiment on a swatch stick to perfect your curing times and base color combinations. With the professional techniques and troubleshooting tips outlined here, you now have the knowledge to achieve durable, salon-quality results at home. You can create looks that are not only on-trend for 2026 but are also a true reflection of your personal style.
Which chrome design will you try first?
Last update on 2026-04-27 / Affiliate links / Images from Amazon Product Advertising API