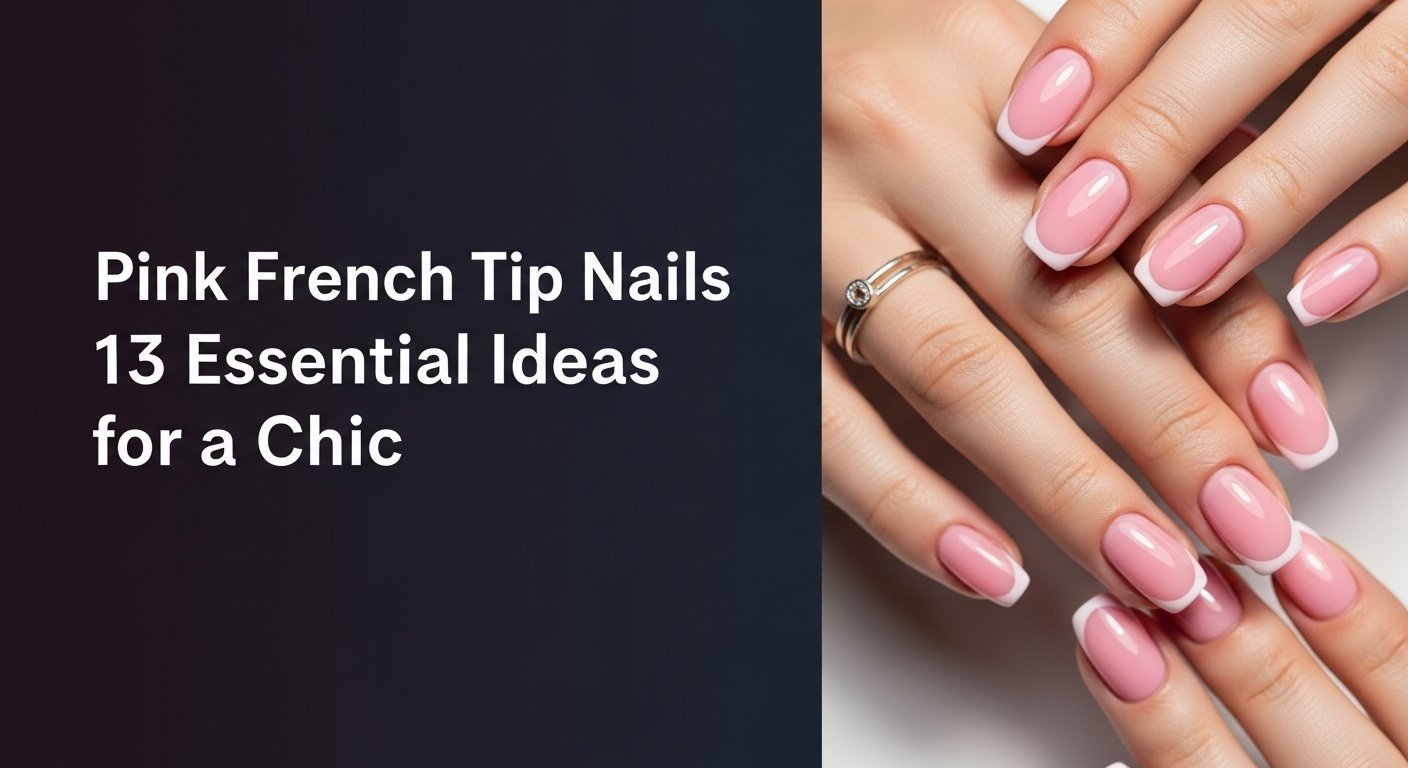
Tired of the same old manicure but want something that’s still timeless and chic? You’re looking for a style that feels both fresh and sophisticated, but it’s hard to find an option that isn’t either too boring or too flashy. This is where the modern elegance of pink french tip nails comes in.
Pink French tip nails are a modern twist on the classic French manicure where the traditional white tip is replaced with any shade of pink, from soft baby pink to vibrant hot pink. This versatile and chic style is popular because it can be customized to suit any nail shape, length, and personal aesthetic, making it a timeless yet trendy choice for 2026.
Drawing from comprehensive analysis of current data and proven methodologies, this guide unlocks the secrets to mastering this look. The pink french manicure is a nail art design that replaces the classic white tip with a pink one, offering endless versatility. In this guide, you’ll discover 13 essential ideas, from minimalist designs to bold statements, that will elevate your style.
What Are Pink French Tip Nails and Why Are They So Popular in 2026?
The pink french manicure is a simple yet transformative update to a universally beloved nail style. Instead of the stark white tip that defined the history of french manicure, this modern version uses shades of pink, instantly adding a touch of warmth, playfulness, or sophistication depending on the hue. It’s a design that feels both familiar and refreshingly new. The popularity of pink tip nail art in 2026 is directly tied to major fashion movements. It perfectly complements the ‘clean girl aesthetic’ with its soft, understated baby pink variations, while bold hot pink and neon pink french tips tap directly into the vibrant ‘Barbiecore’ and Y2K nostalgia trends seen across fashion week nail trends. This adaptability is why the classic pink french manicure has become a go-to choice; it allows for personal expression while remaining undeniably chic. Ready to find the perfect pink French for your style?
13 Essential Pink French Tip Nail Ideas for a Chic 2026 Look
From the boardroom to a night out, there’s a pink french tip nail design for every occasion. This guide serves as your ultimate visual gallery and DIY tutorial, showcasing 13 unique and actionable ideas to inspire your next manicure. Each style is broken down with the specific products you’ll need and step-by-step instructions, providing significant information gain over simple photo galleries. We’ll explore designs for every nail shape, including pink french tip nails almond and coffin, and integrate professional nail tech tips to help you achieve a salon-quality finish at home. Whether you’re a fan of cute pink french tip nails or edgy, modern designs, you’ll find the perfect look to elevate your style in 2026.
1. Achieve the Timeless Classic: Baby Pink French on Almond Nails

Pin this elegant look to your ‘Classic Manicure’ board!
Products & Tools Used
- Sheer Nude or light pink gel polish (e.g., OPI “Put It In Neutral” or a similar translucent pink).
- Opaque baby pink gel polish for the tips.
- Full Cover Almond Nail Tips (Gel-X or high-quality press-on style).
- UV/LED Lamp (36 watts or higher).
- Fine Liner Nail Art Brush for precision.
- Glossy No-Wipe Gel Top Coat.
Application/Styling Steps
- Prepare the nails by shaping the free edge, pushing back cuticles, and lightly buffing the nail plate. Cleanse with an alcohol wipe.
- Apply a base coat or, for extensions, properly adhere your almond full-cover tips.
- Paint one to two thin coats of the sheer pink french manicure base color over the entire nail, curing for 60 seconds after each coat.
- Using the fine liner brush, design the pink smile line by carefully painting the baby pink french tips. Perfect the curve on both sides. Cure for 60 seconds.
- Seal the design with a glossy top coat, making sure to cap the free edge to prevent chipped tips. Cure for a final 60 seconds.
Pro-Tip: For a flawless pink smile line, rest your painting hand’s pinky on your other hand for stability. Instead of drawing one long line, paint two diagonal lines from the corners and connect them with a gentle curve.

2. Design Bold & Confident: Hot Pink Coffin French Tips

Save this bold Barbie pink look for your next night out!
Products & Tools Used
- Nude Base Acrylic Powder or a matching gel polish.
- Vibrant hot pink or fuchsia pink acrylic powder.
- Long Coffin-Shaped Nail Tips or Forms.
- Monomer and an Acrylic Brush (Size #10 or #12).
- E-file with fine-grit sanding bands for shaping.
- High-Gloss, Non-Wipe Top Coat.
Application/Styling Steps
- Prepare the natural nail and apply the coffin tip or form. Apply a primer to the natural nail.
- Apply the nude acrylic to create the nail bed, fading it slightly where the tip will begin.
- Place a bead of hot pink acrylic at the free edge and build out the tip, creating a sharp pink smile line.
- Once hardened, shape the nail with an e-file and hand file, ensuring crisp, straight side walls and a flat top characteristic of the coffin shape.
- Seal with a high-gloss top coat and cure under a UV/LED lamp. Finish with cuticle oil.
Pro-Tip: For an ultra-sharp hot pink french tip line (a technique called ‘reverse French’), build a “wall” with the nude acrylic first, file it into the perfect smile line shape, and then apply the hot pink acrylic right up against it. This creates a flawless, crisp division.

3. Create a Dazzling Sparkle: Pink Glitter Ombré Tips

Pin this sparkly design for your next holiday party or special occasion!
Products & Tools Used
- Nude or transparent pink base gel polish.
- Loose pink glitter (holographic or iridescent works best).
- A No-Wipe Gel Top Coat.
- A small, fluffy brush or sponge eyeshadow applicator.
- A UV/LED Lamp.
Application/Styling Steps
- Apply your nude base color and cure. Do NOT wipe the inhibition (sticky) layer.
- Apply a thin layer of base coat or a clear builder gel only on the tip area where you want the glitter. Cure for only 10-15 seconds.
- Dip your fluffy brush into the pink glitter and gently tap it onto the tip of the nail, concentrating the most glitter at the very edge.
- Use the clean part of the brush to lightly drag a few flecks of glitter downwards, creating the glitter fade ombré effect.
- Dust off all excess glitter with a clean brush. Seal the design with two layers of top coat, curing for 60 seconds after each to ensure a smooth finish.
Pro-Tip: For an ultra-smooth finish that doesn’t feel gritty, apply a thin layer of clear builder gel over the glitter to encapsulate it before your final top coat. This C-curve structure trick creates a perfectly smooth surface.

4. Get the Edgy Look: V-Shaped Hot Pink French Tips

Pin this edgy V-cut design to your ‘Nail Art Inspo’ board!
Products & Tools Used
- A sheer nude or milky pink base gel polish.
- A highly pigmented hot pink gel liner or regular gel polish.
- Thin Nail Art Striping Tape (optional, for beginners).
- A long, thin liner brush.
- Glossy Top Coat.
Application/Styling Steps
- Apply and cure two coats of your sheer base color.
- (Beginner Method) Place two pieces of striping tape on the nail to form a “V” pointing towards the cuticle, leaving the tip exposed.
- Paint the exposed tip with the hot pink polish. Remove the tape before curing to ensure a crisp line. Cure for 60 seconds.
- (Advanced Method) Using a liner brush, design the V-shape freehand. Start by painting a thin diagonal line from the center of the free edge to one side wall. Repeat on the other side to form the “V”, then fill it in.
- Seal with a glossy top coat and cure.
Pro-Tip: The key to a flattering V-shape pink french tip is the angle. A deeper, narrower ‘V’ will elongate the nail more dramatically, while a wider ‘V’ gives a bolder, more graphic look. Experiment to see what best suits your nail shape.

5. Embrace the Future: Hot Pink Chrome French Tips

Save this futuristic chrome look to your ‘Statement Nails’ board!
Products & Tools Used
- A nude base gel polish.
- A black or hot pink gel polish to act as the base for the chrome tip.
- A No-Wipe Gel Top Coat (this is essential).
- Hot Pink Chrome Powder.
- A silicone applicator or eyeshadow sponge.
- A UV/LED Lamp.
Application/Styling Steps
- Apply and cure your nude base color.
- Using a liner brush, paint the French tip with your chosen base color (hot pink for a vibrant result, black for a deeper chrome effect). Cure for 60 seconds.
- Apply a thin layer of No-Wipe Top Coat only over the colored tip. This is the most critical step. Cure for only 30-45 seconds (do not fully cure).
- Immediately dip your silicone applicator into the pink chrome powder and rub it firmly onto the semi-cured top coat until a mirror finish appears.
- Dust off any excess powder. Seal the entire nail with a final layer of top coat (it can be the same no-wipe top coat) and cure for a full 60 seconds.
Pro-Tip: The key to a perfect chrome finish is the surface. The no-wipe top coat creates a non-porous, smooth surface that allows the chrome powder to burnish into a mirror effect rather than just sticking like glitter.

6. Play with Texture: Matte Base with Glossy Pink Tips

Pin this chic matte and gloss combo for a sophisticated, modern look!
Products & Tools Used
- A nude or soft pink gel polish.
- A contrasting pastel pink gel polish for the tip.
- A high-quality Matte Gel Top Coat.
- A high-shine Glossy Gel Top Coat.
- A fine liner brush.
Application/Styling Steps
- Apply and cure two coats of your nude base polish.
- Using a liner brush, paint the French tip with your chosen pastel pink color and cure for 60 seconds.
- Apply the Matte Gel Top Coat over the entire nail surface. Cure for 60 seconds. The whole nail will now be matte.
- Using a clean liner brush, carefully paint the Glossy Top Coat only over the matte pink tip.
- Be precise to keep the contrast sharp. Cure for a final 60 seconds, and you’ll have a matte base with a shiny, glossy pink tip.
Pro-Tip: For the best effect, use a true “velvet” or “no-wipe” matte top coat. Some standard matte top coats can have a slight satin finish, but a velvet matte provides the most dramatic and luxurious contrast against the high-shine tip.

7. Get the Soft & Blended Look: Pink Ombré “Baby Boomer” Nails

Pin this dreamy ombré look for the perfect romantic or bridal manicure!
Products & Tools Used
- A milky pink or neutral pink gel polish for the base.
- A soft white or light pink gel polish for the tip.
- A small, triangular makeup sponge.
- Liquid Peel-Off Latex for skin protection (optional).
- Glossy Top Coat.
Application/Styling Steps
- Apply one coat of your milky pink base color and cure.
- (Optional) Paint the liquid latex around your cuticle and side walls for easy clean up. Let it dry.
- On the makeup sponge, paint a stripe of the white/light pink polish and a stripe of the milky pink polish directly above it, slightly overlapping them in the middle.
- Gently dab the sponge onto the nail, moving it slightly up and down to blend the colors. The first layer will look sheer; this is normal. Cure for 60 seconds.
- Repeat step 4, reapplying polish to the sponge and dabbing onto the nail to build up the opacity and perfect the gradient. Cure again. Peel off the latex and seal with a top coat.
Pro-Tip: Before using the makeup sponge, press it onto the sticky side of a lint roller. This will remove any loose fibers that could get stuck in your polish and ruin the smooth pink ombré blend.

8. Add a Delicate Touch: Thin Pink French with a Heart Accent

Pin this super cute heart accent nail for a sweet, minimalist vibe!
Products & Tools Used
- A sheer nude base gel polish.
- A pastel pink gel liner.
- A very fine liner brush.
- A small dotting tool.
- Glossy Top Coat.
Application/Styling Steps
- Apply and cure two coats of your sheer nude base.
- Using the fine liner brush, paint a very thin “micro” line of pastel pink across the free edge of each nail. A thin line is key to the minimalist look. Cure for 60 seconds.
- For the accent nail, dip your dotting tool into the same pink polish.
- Place two dots side-by-side on the nail.
- Using the liner brush, drag the polish down from each dot to meet at a point, forming a perfect heart shape. Cure for 60 seconds.
- Seal all nails with a top coat and cure.
Pro-Tip: If you don’t have a dotting tool, the end of a bobby pin or the head of a pin works perfectly for creating the two initial dots for your heart design.

9. Create a Y2K Vibe: Pink French Tips with a Tiny Bow

Pin this adorable Y2K bow nail art for your next trendy manicure!
Products & Tools Used
- A milky pink base gel polish.
- A bubblegum pink gel polish for the tips.
- Small 3D Bow Charms.
- A thick rhinestone glue gel or clear builder gel.
- A wax-tipped pen for picking up charms.
- Glossy Top Coat.
Application/Styling Steps
- Apply and cure your base and tip colors as you would for a standard pink french manicure.
- Apply the final top coat and cure. The surface should be smooth and non-sticky.
- Place a small bead of rhinestone glue gel where you want the bow to sit (usually at the base of the nail).
- Use the wax pen to pick up the 3D bow charm and press it gently into the glue gel.
- Use a liner brush to spread the gel around the base of the charm to secure it. Cure for 60-90 seconds, ensuring the light reaches under the charm.
- For extra security, use a liner brush to seal the edges of the charm with top coat, then cure one last time.
Pro-Tip: To make your 3D charms last, ensure the glue gel creates a secure “cradle” around the base of the charm. Avoid getting the gel on top of the charm itself to maintain its texture and shine.

10. Go for Double the Fun: Dual-Color Pink French Tips

Pin this creative double French design for a unique and modern manicure!
Products & Tools Used
- A sheer nude base gel polish.
- A hot pink gel liner polish.
- A baby pink gel liner polish.
- A very fine, long liner brush.
- Glossy Top Coat.
Application/Styling Steps
- Apply and cure two coats of your sheer nude base color.
- Using the liner brush and the hot pink polish, paint the first French tip line at the very edge of the nail. Keep it moderately thin. Cure for 60 seconds.
- Clean your brush.
- Using the baby pink polish, paint a second, parallel line directly below the hot pink line, leaving a tiny sliver of the nude base visible between them (the “negative space”).
- Cure for 60 seconds. Seal the entire nail with a glossy top coat and cure for a final 60 seconds.
Pro-Tip: For perfectly parallel lines, use the first line as your guide. Keep your brush pressure consistent and your strokes long and smooth. If you make a mistake, wipe it away with a clean brush dipped in alcohol before you cure.

11. Design a Graphic Outline: Pink French with a Black Border

Pin this bold, graphic outline look for a manicure that truly pops!
Products & Tools Used
- A nude base gel polish.
- A vibrant neon pink gel polish.
- A high-pigment Black gel liner.
- An ultra-fine detailer brush (5mm or 7mm length).
- Glossy Top Coat.
Application/Styling Steps
- Apply and cure your nude base and neon pink french tips as you would for a standard French manicure.
- Dip your ultra-fine detailer brush into the black gel liner. Remove most of the polish from the brush so you have only a tiny amount on the very tip.
- With a steady hand, design a razor-thin black line directly along the smile line, separating the pink tip from the nude base. Use long, confident strokes.
- Cure for 60 seconds.
- Seal with a glossy top coat and cure.
Pro-Tip: The key to this look is pigment density. A high-quality black liner will allow you to create a crisp, solid line in one pass. A less pigmented polish will require multiple strokes, increasing the risk of a shaky, uneven line.

12. Create a Soft Haze: Pink Aura French Tips

Pin this mystical aura nail trend for a soft and dreamy look!
Products & Tools Used
- A nude base gel polish.
- Blooming Gel.
- A deep magenta or fuchsia pink gel polish.
- A dotting tool or fine liner brush.
- Glossy Top Coat.
Application/Styling Steps
- Apply and cure your nude base color.
- Apply a thin layer of Blooming Gel over the entire nail. Do not cure.
- Place a small dot of the magenta polish in the center of the nail tip area.
- Watch as the color “blooms” or spreads out into a soft-edged circle. Wait about 15-30 seconds for it to expand to your desired size.
- Once you’re happy with the aura effect, cure for 60 seconds to set the design.
- Seal with a glossy top coat and cure.
Pro-Tip: You can control the size of the aura by how much blooming gel you apply. A thicker layer of blooming gel will cause the color to spread faster and wider. For a smaller, more controlled aura, use a very thin layer.

13. Go Natural & Strong: Pink BIAB French Manicure

Pin this guide to BIAB for strong, healthy, and beautiful natural nails!
Products & Tools Used
- BIAB (Builder in a Bottle) in a transparent pink shade.
- A soft white or light pink gel liner for the tip.
- A fine liner brush for applying the BIAB and another for the tip.
- pH Bonder and Primer.
- Glossy Top Coat.
Application/Styling Steps
- Prepare the natural nail thoroughly. Apply a coat of pH Bonder, followed by a non-acidic primer.
- Apply a thin “slip layer” of the transparent pink BIAB over the entire nail. Do not cure.
- Place a larger bead of BIAB in the center of the nail (the stress area) and use your liner brush to gently guide it into place, building a slight curve or apex placement for strength. Allow it to self-level, then flip the hand upside down for a few seconds to help gravity perfect the apex. Cure for 60 seconds.
- Lightly file or buff the surface if needed to perfect the shape, then cleanse.
- Paint the light pink French tip over the cured BIAB base. Cure for 60 seconds.
- Seal with a glossy top coat and cure for the final time.
Pro-Tip: Perfect apex placement is the secret to strong BIAB nails. The apex should be the highest point of the nail when viewed from the side, located in the back third of your nail bed. This structure absorbs impact and prevents breakage.

Key Takeaways
- A Timeless Classic, Reimagined: Pink French tip nails are a versatile update to the traditional white-tipped manicure, with shades from baby pink to hot pink making it adaptable for any style or occasion in 2026.
- Shape Is Everything: The nail shape dramatically changes the vibe. Almond shapes offer an elegant look, coffin shapes are bold and modern, and short square nails are perfect for a clean, minimalist aesthetic.
- Texture Adds a Modern Twist: You can elevate a simple pink french manicure by experimenting with finishes. A matte base with a glossy tip creates a chic contrast, while chrome powder provides a futuristic, mirror-like shine.
- DIY-Friendly Techniques Exist: You don’t need to be a pro to create stunning designs. The makeup sponge method is perfect for a soft pink ombré, and nail art tape can help you achieve a sharp, geometric V-shape pink french tip.
- Advanced Finishes Are Accessible: Creating a chrome or aura look is all about the right products. A no-wipe top coat is essential for chrome powder, and blooming gel makes the hazy aura effect simple to achieve at home.
- Focus on Nail Health: For a long-lasting manicure on natural nails, consider using BIAB (Builder in a Bottle). It provides strength and structure, creating a perfect, durable base for your pink tip nail art.
FAQs About pink french tip nails
Are pink French tip nails in style for 2026?
Absolutely. Pink French tip nails are a timeless trend that remains incredibly stylish for 2026. Their popularity comes from their versatility; soft baby pink tips fit the ‘clean girl’ and minimalist aesthetic, while hot pink french tips align with the ongoing ‘Barbiecore’ and Y2K trends. They are constantly being reinvented with new finishes like chrome and matte, keeping them fresh and modern.
What is the best pink for a French manicure?
The best pink depends on your skin tone and desired look. For a classic, natural-looking manicure, a sheer, milky pink or a soft blush pink like OPI’s “Bubble Bath” or Essie’s “Ballet Slippers” are industry favorites. For the tip itself, a soft pink french tip offers a subtle look, while a vibrant fuchsia pink creates a bold, modern statement.
Can you do pink French tips on short nails?
Yes, pink French tips look fantastic on short nails, especially short square or soft round shapes. The key is to use a “micro” or minimalist thin pink french tip line. A thin tip makes the nail bed appear longer and keeps the manicure looking proportionate and chic rather than crowded or clunky.
How much are pink French tip acrylic nails at a salon?
The cost for pink French tip acrylic nails at a salon typically ranges from $50 to $95+ for a full set. The price varies based on the salon’s location, the nail technician’s experience level, the length of the nails, and any additional art like glitter or chrome powder, which can add $10-$25+ to the final cost.
How do you keep pink French tips from chipping?
To prevent chipping, proper sealing is crucial. Always “cap the free edge” by running your top coat brush along the very tip of the nail. This creates a seal that protects against everyday wear and tear. Using a quality gel top coat and reapplying a regular top coat every 3-4 days for a traditional polish manicure can also extend its life.
What nail shape is best for pink French tips?
Pink French tips are flattering on virtually all nail shapes, but some shapes enhance certain styles. Almond and oval shapes are perfect for an elegant, classic pink french manicure. Coffin and stiletto shapes create a modern, edgy look with hot pink french tips. Short square nails are ideal for a clean, simple pink french tip.
What is the difference between a pink French and a Baby Boomer nail?
A pink French manicure has a distinct, sharp line (the “smile line”) separating the pink tip from the nude base. In contrast, a Baby Boomer nail, also known as a pink ombré, has no sharp line. The white or pink on the tip is blended seamlessly into the base color for a soft, airbrushed gradient effect.
How do you make pink French tips with gel polish?
To make pink French tips with gel polish, start by applying and curing a sheer pink or nude base coat. Use a fine liner brush dipped in pink gel polish to carefully paint the tip of the nail, creating a clean smile line. Cure the pink tip, then seal the entire nail with a gel top coat and cure for a final time.
What color base for pink French tips?
The most common and classic base color is a translucent or sheer nude pink that complements your natural nail color. Popular choices include milky pinks, sheer beiges, or a transparent pink base. This creates a “your nails but better” look, allowing the pink tip to be the main focus.
How to apply pink French tip press on nails?
Properly prep your natural nails by cleaning them with an alcohol wipe, pushing back cuticles, and lightly buffing the surface. Select the correct size press-on for each finger. Apply a thin layer of nail glue to your natural nail and the back of the press-on. Press the nail on firmly, holding it for 10-20 seconds to ensure a strong bond and remove air bubbles.
Final Thoughts
The pink french manicure is more than just a trend; it’s a canvas for creativity. From a subtle soft pink french tip for daily wear to a bold hot pink chrome design, this style is endlessly adaptable. We’ve shown you how to create 13 distinct looks, proving that with the right techniques and a little practice, you can achieve a salon-grade manicure right at home. The beauty of the pink french tip lies in its versatility and how it enhances your personal style. Which look will you try first?
Last update on 2026-04-27 / Affiliate links / Images from Amazon Product Advertising API