Ever wonder why you’re always drawn to that classic blue and white vase or piece of pottery? That same timeless appeal applies to your nails, but it can be hard to find fresh, modern ideas beyond a simple solid color. You’re looking for stunning blue and white nails that feel both elegant and on-trend for 2026.
Blue and white nails are a timeless and elegant choice because the combination is incredibly versatile, suiting every season and occasion. From crisp Greek tile patterns perfect for summer to delicate winter snowflake art, the high contrast between blue and white creates a clean, sophisticated, and visually striking manicure that complements any style. This is a color pairing that truly never goes out of fashion.
Drawing from established design principles and current trends, this guide provides a masterclass in blue and white nail art. We’ll explore 11 stunning, achievable designs, complete with step-by-step instructions. You’ll discover how to create everything from intricate porcelain florals to dreamy cloudscapes, all while learning pro-level tips.
Why Are Blue and White Nails a Timeless Choice for Any Occasion?
The enduring popularity of blue and white nail designs stems from their remarkable versatility and deep-rooted cultural significance. This color combination is a cornerstone of design, seen everywhere from elegant porcelain patterns on fine china to the sun-drenched tiles of the Mediterranean. This connection gives the manicure an air of sophistication and artistry. The high contrast between a crisp white and a rich blue creates visual interest that is both clean and striking, making it suitable for any event. It can be adapted to fit countless aesthetics, whether you’re channeling a relaxed coastal grandmother style for a summer weekend or opting for an intricate, formal design for a wedding. Ultimately, this color harmony symbolizes peace and purity, offering a look that feels both classic and refreshingly modern.
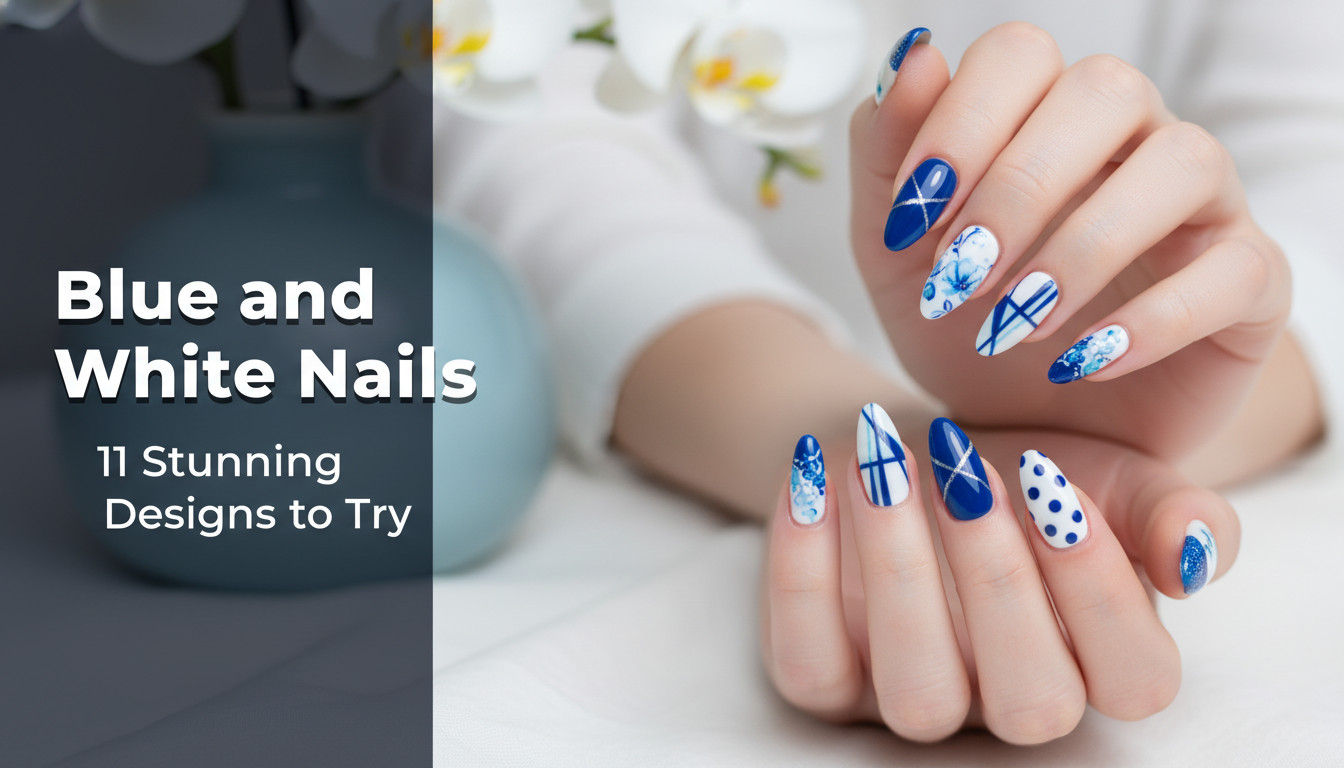
Blue and White Nails: 11 Stunning Designs to Try in 2026
Now, let’s dive into the inspiration you’ve been searching for. This curated gallery showcases 11 of the most beautiful and achievable blue and white nail art ideas. Each design includes a detailed guide, breaking down the exact products, tools, and techniques you need to get salon-quality results at home or to perfectly describe to your nail technician. From the ambitious artist who loves hand-painting designs to those looking for simple blue and white nails for beginners, there’s a style here for everyone. We’ll cover everything from modernizing a blue and white french tip to mastering the viral aura trend.
1. Creating Elegant Blue and White Porcelain Nails

Pin this elegant design to your ‘Dream Manicure’ board!
This fine china inspired look is the definition of elegance. The delicate, vintage blue and white floral nail patterns mimic classic pottery for a sophisticated and timeless manicure.
Products & Tools Used
- Milky white gel polish (for the opaque, porcelain-like base)
- A highly pigmented cobalt blue and white nail polish
- A super-fine detail nail art brush (000 size is ideal for painting fine lines)
- A gel base coat and a high-shine, no-wipe top coat
- UV/LED nail lamp
Application Steps
- Begin by prepping the cuticles and buffing the nail surface for a smooth canvas.
- Apply one thin layer of base coat and cure under your UV lamp for 60 seconds.
- Paint two coats of the milky white polish, curing under UV lamp for 60 seconds after each coat.
- Pour a small amount of the cobalt blue polish onto a palette. Dip your fine-liner brush in and begin hand-painting designs like delicate flowers and vines.
- Cure the blue artwork. Finally, apply the top coat, sealing with top coat to protect the design and give it a glossy finish, then cure one last time.
Pro-Tip: For ultra-fine lines, use a gel paint instead of regular polish. Its thicker consistency prevents bleeding and allows for more control, a manicurist recommended trick for achieving salon-quality results.

2. Mastering Mediterranean Greek Tile Nails

Save this look for your next summer vacation!
Capture the essence of a summer holiday with these stunning Greek tile patterns. This Mediterranean aesthetic is perfect for blue and white summer nails and brings a touch of worldly charm to your fingertips, reminiscent of beautiful Talavera pottery.
Products & Tools Used
- An opaque, stark white polish for the base
- A vibrant royal blue and white nails polish for the pattern
- A nail stamping kit with a Greek tile patterns plate, a scraper, and a stamper
- A dotting tool for minor touch-ups
- A non-smear top coat for stamping
Application Steps
- After your base coat, apply two layers of the crisp white polish, letting each coat dry completely.
- Apply the royal blue polish over your chosen design on the stamping plate.
- Quickly scrape the excess polish off the plate at a 45-degree angle.
- Press the stamper onto the plate to pick up the design, then immediately roll it onto your nail with firm, even pressure.
- Use a small brush and acetone for cleaning up messy edges. Wait 5 minutes, then apply a non-smear top coat to prevent the design from smudging.
Pro-Tip: If you struggle with stamping, try nail stencils or water-slide decals. They are a fantastic alternative for getting salon-quality results without the steep learning curve of freehand or stamping.

3. Styling a Modern Blue and White French Tip Manicure

Pin this modern take on a classic French manicure!
Elevate a timeless classic with this modern blue and white french tip. By using a deep navy blue and white nails combination and adding a crisp line detail, this look transforms into one of the most sophisticated French tip variations.
Products & Tools Used
- A sheer nude or pink base polish
- A dark navy blue and white nails polish
- A crisp white striping polish or pen
- Thin nail art striping tape
- A glossy top coat
Application Steps
- Apply your sheer base polish and let it dry completely.
- Use two pieces of striping tape to create a sharp “V” shape at the tip of your nail. Press the edges down firmly to prevent polish bleed.
- Paint the tip with the navy blue polish. Apply a second coat if needed for full opacity.
- Carefully remove the striping tape while the polish is still slightly wet to ensure a crisp line.
- Using the white striping polish, trace a very fine line just below the navy tip. This creates visual interest and makes the design pop. Seal with a top coat.
Pro-Tip: For a longer-lasting manicure, especially on natural nails, use a builder in a bottle (BIAB) in a sheer pink shade. It adds strength and creates a perfect, smooth canvas (C-curve apex) for your French tip design.

4. Designing Dreamy Blue and White Cloud Nails

Save this dreamy cloud nail art for a soft, aesthetic look!
This soft and whimsical cloud nail art is one of the most popular aesthetic blue and white nails trends. Using a simple dotting technique, you can create a dreamy sky on your fingertips with a baby blue and white nails palette.
Products & Tools Used
- A pastel baby blue and white nails polish for the sky
- An opaque white polish for the clouds
- A set of nail art dotting tools in various sizes
- A matte top coat (optional, for a dreamy finish)
Application Steps
- Apply two coats of the baby blue polish as your base and let it dry completely.
- Pour a small amount of white polish onto a palette.
- Take a large dotting tool, dip it in the white polish, and create a few connected, overlapping dots to form the base of your cloud.
- Use a smaller dotting tool to add smaller dots on top and around the edges of the first set. This blending colors technique creates a fluffy, uneven shape just like a real cloud.
- Repeat for 2-3 clouds per nail, varying their size and placement. Let it dry, then apply your chosen top coat (a matte blue + glossy white contrast can also look amazing if you only make the clouds matte!).
Pro-Tip: To create an even softer look, before the white polish fully dries, lightly tap it with a small piece of a makeup sponge. This will blur the edges slightly, enhancing the fluffy texture of the cloud nail art.

5. Achieving Chic Blue and White Marble Nails

Pin this luxurious marble nail idea to your ‘Elegant Nails’ board!
Get a high-end look with these chic blue and white marble nails. The secret to achieving realistic marble stone textures is easier than you think, especially when you add stunning accents like blue + gold leaf.
Products & Tools Used
- A crisp white gel polish
- A navy blue or royal blue gel polish
- A bottle of “blooming” gel polish
- A fine-liner nail art brush
- Small flakes of blue + gold leaf
Application Steps
- Apply two coats of white gel polish, curing after each.
- Apply a generous layer of the blooming gel over the white base. DO NOT CURE THIS LAYER.
- Using your fine-liner brush, draw a few random, squiggly lines with the blue polish onto the wet blooming gel.
- Watch as the blooming gel makes the blue lines spread and feather out, creating marble effects automatically. Wait about 15-20 seconds for the desired effect.
- Before curing, use tweezers to place a few tiny gold leaf flakes. Now, cure the entire design for 60 seconds. Finish with a glossy top coat and a final cure.
Pro-Tip: The key to a realistic marble look is imperfection. Vary the thickness of your lines and don’t try to make them symmetrical. Let the blooming gel do the work. This is a core principle of industry standard techniques for marbling.

6. Crafting Delicate Blue and White Winter Snowflake Nails

Get ready for winter with this cozy snowflake nail art!
Perfect for the colder months, these blue and white winter nails are both festive and elegant. The combination of dark blue and white nails with sparkly accents creates a beautiful backdrop for delicate winter snowflake art.
Products & Tools Used
- A dark blue and white nails glitter polish for the night sky effect
- A high-pigment white nail art gel or polish
- A long striping brush and a small dotting tool
- A sprinkle of white + silver glitter (optional)
Application Steps
- Apply two coats of the navy blue glitter polish and cure.
- Dip your long striping brush into the white art gel. Start by painting fine lines: draw a straight vertical line, then a horizontal line to make a cross.
- Add two more diagonal lines to create an eight-pointed star shape.
- Use the tip of the brush to add small “V” shapes to the end of each arm to create the classic snowflake look.
- Use a dotting tool to add tiny dots in the gaps. For extra sparkle, you can perform a flash curing for 10 seconds, then lightly dust on loose glitter before the full cure. Seal with a top coat.
Pro-Tip: To ensure your snowflakes are crisp, use a non-toxic nail products art gel that is thicker than regular polish. It won’t run, giving you more time to perfect your winter snowflake art before curing.

7. Applying an Edgy Blue and White Checkered Pattern

Pin this bold checkered look to your ‘Graphic Nails’ board!
Make a statement with these bold blue and white nails. A checkered pattern using an electric blue is a graphic and edgy choice that’s surprisingly achievable with a steady hand and the right brush.
Products & Tools Used
- A fully opaque white polish
- An electric blue polish
- A long, thin striping brush for lines
- A small square brush for filling in color
Application Steps
- Apply two coats of your white base polish and let it dry completely.
- Using the electric blue polish and your long striping brush, paint two vertical lines to divide your nail into three even sections.
- Next, paint two horizontal lines to create a 3×3 grid. Don’t worry about perfection, you can clean it up later.
- Use the small square brush to fill in the alternating squares with the blue polish to create the checkerboard pattern.
- Let the design dry, then use a cleanup brush and acetone for cleaning up messy edges. Seal with a glossy top coat.
Pro-Tip: For a perfectly symmetrical grid, use a nail art ruler or flexible tape. This is one of the industry standard techniques used by professionals for flawless geometric work and is a game-changer for DIY-ers.

8. Creating a Soft Blue and White Ombre Gradient

Save this easy ombre technique for a flawless blended look!
The sponging ombre technique is the key to a seamless gradient. This soft blend of baby blue and white nails creates a delicate and dreamy effect that looks airbrushed.
Products & Tools Used
- A baby blue and white nails polish
- A crisp white polish
- A latex-free makeup sponge, cut into a small piece
- Liquid latex or peel-off tape for skin protection
- A glossy top coat
Application Steps
- Apply a protective layer of liquid latex on the skin around your nail. Let it dry.
- Paint your entire nail with one coat of the white polish as a bright base. Let it dry.
- On a flat, non-porous surface, paint a stripe of the blue polish and a stripe of the white polish right next to each other, slightly overlapping.
- Dab the makeup sponge directly onto the polish stripes a few times to blend them.
- Gently dab the sponge onto your nail. The colors will transfer in a gradient. Repeat 2-3 times, letting it dry slightly between layers, to build up opacity.
- While the polish is still wet, peel off the liquid latex. Seal with a generous layer of top coat to smooth out the texture.
Pro-Tip: For an even smoother blend, try the French ombré technique with blooming gel. Apply a white tip, then use an ombre brush dipped in blooming gel to pull the white color down into the sheer pink base before curing.

9. Styling Dainty Blue and White Floral Nails

Pin this simple and dainty floral nail art idea!
You can’t go wrong with classic blue and white flower nails. This minimalist take uses a simple dotting technique and a negative space design to create delicate periwinkle + white flowers that are incredibly easy and chic.
Products & Tools Used
- A sheer nude or clear base polish for a negative space design
- A periwinkle + white flowers blue polish
- A bright white polish
- A small-tipped dotting tool
Application Steps
- Apply one or two coats of your sheer base polish and let it dry.
- Pour a small amount of the periwinkle blue polish onto a palette.
- Dip your dotting tool into the blue and create five small dots arranged in a circle to form the flower petals.
- Wipe the dotting tool clean. Dip it into the white polish and place a single, smaller dot in the center of your blue dots.
- Create 2-3 flowers per nail, scattering them randomly near the cuticle or tip. Seal with a glossy top coat.
Pro-Tip: To add more detail, use a fine liner brush to paint tiny green leaves next to some of the flowers. This simple addition makes the floral nail designs look much more intricate and professional.

10. Achieving Trendy Blue and White Aura Nails

Save this mesmerizing aura nail tutorial to your ‘Aesthetic Nails’ board!
Tap into the viral trend with these mystical aesthetic blue and white nails. The “aura” effect, created here with cobalt blue and white nails, looks like it was made with an airbrush but can be achieved with a surprisingly simple tool.
Products & Tools Used
- A milky, semi-sheer white polish for the base
- A vibrant cobalt blue and white nails polish
- A sponge-tip eyeshadow applicator
- A glossy top coat
Application Steps
- Apply two coats of the milky white polish and let it dry completely.
- Put a single drop of the cobalt blue polish onto a palette.
- Lightly dab the very tip of the eyeshadow applicator into the polish. You want a very small amount of product.
- Gently tap the applicator in the center of your nail. The goal is to create a soft, diffused circle of color that fades at the edges.
- Apply a second, slightly smaller layer of blue directly in the center to intensify the “aura” glow. This how to layer blue and white aura nails technique is key.
- Seal with a generous layer of top coat, which will help further blend the effect.
Pro-Tip: For gel polish users, the easiest way to achieve this is with blooming gel. Apply your white base, cure it, add a layer of uncured blooming gel, place a single drop of blue in the center, and let it spread for 10-15 seconds before curing.

11. Creating Blue and White Nails with Butterfly Accents

Pin this dreamy butterfly nail idea for a touch of Y2K magic!
For a truly effortless and cute blue and white nails look, embrace the Y2K trend with butterfly motifs. Using blue and white nails with butterfly stickers over a light blue and white nails base is the perfect shortcut to a whimsical, detailed manicure.
Products & Tools Used
- A base of light blue and white nails (ombre or solid color)
- A sheet of high-quality, ultra-thin blue butterfly nail stickers
- A pair of fine-point tweezers
- A rubber-tipped cuticle pusher or silicone tool
- A thick, glossy top coat
Application Steps
- Ensure your base polish is completely dry.
- Using tweezers, carefully peel a butterfly sticker from its backing sheet. Avoid touching the adhesive with your fingers.
- Position the sticker on your nail. Once you’re happy with the placement, press it down firmly.
- Use a silicone tool or your finger wrapped in a plastic baggy to smooth the sticker from the center outwards, removing any air bubbles.
- Apply two layers of a thick top coat, making sure to “cap” the free edge of your nail. This sealing with top coat technique is crucial to prevent the sticker from lifting.
Pro-Tip: For the ultimate easy application, find a set of blue and white press on nails that already feature butterfly designs. It’s the fastest way to get a perfect, durable manicure in minutes.

Key Takeaways
- Versatility is Key: Blue and white nails are not limited to one style. They can be adapted for any occasion, from elegant blue and white nails with porcelain patterns to fun, blue and white summer nails with a Greek tile aesthetic.
- Embrace Beginner-Friendly Tools: You don’t need to be a professional artist. Tools like dotting pens (for flowers and clouds), makeup sponges (for ombre), and stamping plates (for tile patterns) make intricate designs achievable.
- Blooming Gel is a Game-Changer: For professional-looking blue and white marble nails or aura effects, blooming gel is the secret weapon. It effortlessly spreads the color to create natural, blended patterns.
- Preparation and Sealing are Crucial: A good manicure starts with prepping the cuticles and using a quality base coat. Always finish with a durable top coat, making sure to “cap” the free edge to prevent chipping.
- Stickers and Decals Offer an Easy Win: For the quickest and most foolproof designs like butterflies or complex patterns, high-quality nail stickers or water-slide decals are a fantastic alternative to hand-painting designs.
People Also Ask About Blue and White Nails
What do blue and white nails symbolize?
Blue and white nails often symbolize peace, purity, and calmness. White is associated with new beginnings and cleanliness, while blue represents serenity, loyalty, and wisdom. Together, they create a harmonious and classic combination that evokes feelings of tranquility, much like a clear sky or calm ocean.
Are blue and white nails in style for 2026?
Yes, blue and white nails are a timeless trend that remains stylish in 2026. This combination is constantly being reinvented in new forms like porcelain patterns, aura nails, and modern French tip variations. Its versatility allows it to fit into current aesthetics, from the coastal grandmother style to Y2K-inspired looks.
How do you make blue and white marble nails easily?
The easiest way to create blue and white marble nails is by using blooming gel. After applying a white base coat, add a layer of uncured blooming gel. Then, draw blue lines on top with a fine brush; the blooming gel will automatically spread the lines into a natural marble pattern before you cure it.
Do blue and white nails look good on short nails?
Absolutely, blue and white nails can look stunning on short nails. For shorter nails, consider designs like a simple blue and white nails French tip, a vertical ombre to elongate the look, or dainty floral patterns. Designs with negative space design also work well to make the nail appear longer.
How can I prevent my white nail polish from turning yellow?
To prevent yellowing, always use a high-quality, UV-protective top coat. Yellowing is often caused by sun exposure or reactions with lotions and oils. Applying a stain-resistant, non-yellowing top coat provides a protective barrier, keeping your white and blue nails looking crisp and bright.
What is the best shade of blue for white nails?
The best shade of blue depends on the desired mood and season. For a classic, nautical, or Greek tile patterns look, a vibrant royal blue and white nails or cobalt blue is perfect. For a softer, dreamier feel like cloud nail art, a baby blue and white nails is ideal. For winter, a deep navy blue and white nails is very elegant.
How do you do a blue and white French manicure?
A modern blue and white French manicure can be done using striping tape. Apply a sheer nude base. Once dry, place tape in a “V” shape at the tip. Paint the tip with blue polish. For a special touch, add a super-fine line of white polish just below the blue V-shape before sealing with top coat.
Can I get blue and white nails with gel or acrylic?
Yes, blue and white designs are perfectly suited for both gel and acrylic. Gel is excellent for intricate, hand-painted art like porcelain patterns because it only dries when cured. Acrylic is great for creating durable extensions and can be used for 3D art or encapsulated glitter designs.
What are Greek style blue and white nails?
Greek style blue and white nails are inspired by the iconic architecture and pottery of the Greek islands. They typically feature geometric patterns, mosaic tile designs, or the “evil eye” motif using a distinct combination of a vibrant, deep blue and a stark, clean white, capturing a Mediterranean aesthetic.
How do I stop my nail art from smudging?
The key to preventing smudges is allowing layers to dry and using the right top coat. For regular polish, wait at least 5-10 minutes between layers. When your art is done, “float” the top coat over the nail: get a generous bead of polish on the brush and apply it without letting the bristles drag across the design.
Final Thoughts on Your Blue and White Manicure
The world of blue and white nails offers a universe of creative possibilities, far beyond a simple two-color combination. As we’ve explored through these 11 stunning designs, this classic pairing can be transformed to fit any personality, season, or occasion. Whether you’re drawn to the elegant intricacy of blue and white porcelain nails or the sunny, bold geometry of Greek tile patterns, there is a design waiting for you.
The key to a beautiful manicure is not just the idea, but the confidence to bring it to life. By using beginner-friendly tools like dotting pens and sponges, or mastering game-changing products like blooming gel, you have the power to create salon-quality results right at home. We hope this guide has not only inspired you but also empowered you with the techniques to make your next manicure your best one yet.
Now we’d love to hear from you! Which of these blue and white nail designs are you most excited to try first? Share your favorite in the comments below
Last update on 2026-04-27 / Affiliate links / Images from Amazon Product Advertising API