Ever feel like the cutest nail trends are only for long, almond-shaped nails? You see adorable cherry nail designs all over Pinterest, but worry they’ll just look crowded and messy on a shorter nail bed.
Creating beautiful cherry nail designs on short nails is easy with the right techniques. Focus on minimalist designs, single accent nails, or strategically placed small cherries. Using a dotting tool for the fruit and a fine-liner brush for stems ensures clean, proportional art that enhances, rather than overwhelms, shorter nail lengths.
Drawing from proven methodologies for nail art on limited space, this guide is curated specifically for you. We’ll explore 9 stunning yet achievable cherry nail ideas that make short nails look chic and intentional. Get ready to master this sweet trend, no extensions required.
How Can You Create Stunning Cherry Nail Designs on Short Nails?
The secret to making cherry nails for short nails work is all about proportion and placement. While it might seem counterintuitive, short nails provide a fantastic canvas for this trend because it forces a focus on clean, deliberate artistry. Instead of trying to shrink down designs meant for longer nails, the key is to choose designs that are inherently suited for a smaller space. This involves using simple cherry nail designs, focusing the art on a single accent nail, or using techniques like negative space to create an illusion of more room. With the right tools, like a nail art dotting tool for perfect fruit and a fine detail brush for crisp stems, you can achieve a professional-looking cherry manicure at home that looks intentional, chic, and perfectly scaled.
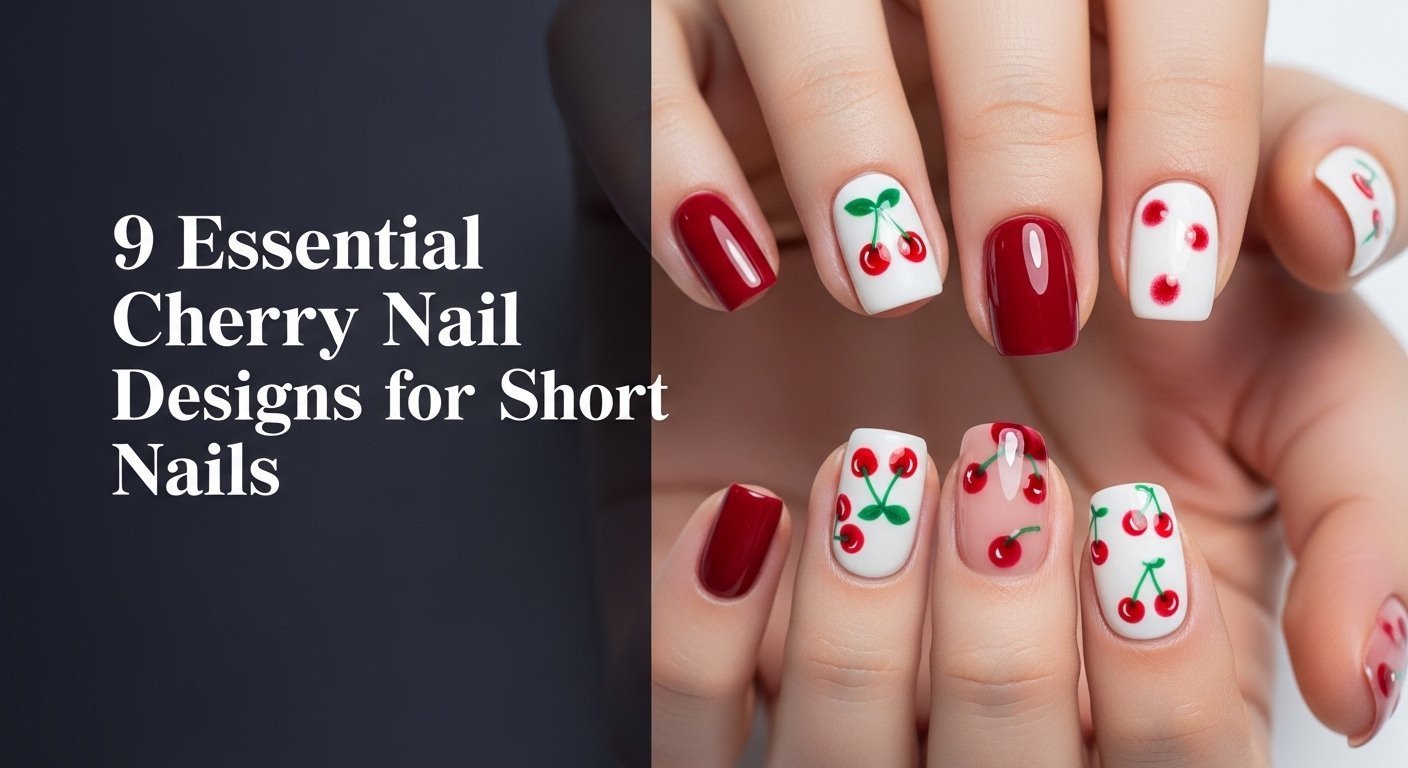
9 Essential Cherry Nail Designs Perfect for Short Nails in 2026
Ready for some inspiration? We’ve curated 9 essential cherry nail ideas that are specifically tested and proven to look amazing on short nails. From the ultra-minimalist to the trendy and bold, each design comes with a simple, step-by-step guide to help you recreate the look. These styles leverage different techniques—like strategic placement, color contrast, and texture—to make the cherry motif complement your nail length perfectly. Whether you prefer a cute cherry nail design for a sunny day or an elegant twist for a night out, you’ll find a style here that you can confidently create and wear.
1. Create a Minimalist Single Cherry Accent

Pin this elegant idea to your ‘Minimalist Nails’ board!
This is the perfect entry point into the trend. A single, delicate cherry on an accent nail is undeniably chic, office-appropriate, and incredibly easy for beginners at home. This minimalist cherry nails approach works so well for short nails because it doesn’t crowd the nail plate, creating an illusion of space and elegance.
Products & Tools Used
- Nude or sheer pink base coat polish
- A vibrant, classic red nail polish
- A deep, forest green nail polish
- A high-shine, quick-drying top coat
- A dual-ended nail art dotting tool (small and medium tips)
- A fine detail brush for nail art
Application Steps
- Prep and shape your short nails, then apply one to two coats of your nude base polish and let it dry completely.
- On your chosen accent nail (the ring finger is popular), dip the medium tip of your dotting tool into the red nail polish.
- Carefully press two dots side-by-side, slightly angled, to create the cherry shapes.
- Clean the tool, then dip your fine detail brush into the green polish. Draw two small stems originating from the top of the red dots, meeting at a point.
- Allow the design to dry for 5-10 minutes, then seal the entire nail with a generous layer of top coat for a glossy cherry nails finish.
Pro-Tip: For a hyper-realistic cherry design effect, add a tiny dot of white polish on each red circle before the top coat to mimic a light reflection. This simple step adds dimension.

2. Style a Classic All-Over Cherry Pattern

Save this sweet pattern for your next summer manicure!
For a more impactful look, a classic cherry pattern is playful and perfect for summer. The key to making this all-over cherry design work on shorter nails is to keep the cherry motifs small and spaced out. This gives a fun, retro cherry nails vibe without making the nails look busy or cluttered.
Products & Tools Used
- Opaque white or pale pink base coat polish
- A classic cherry red nail polish
- An emerald or leaf green nail polish
- A matte or glossy top coat
- A small-tipped nail art dotting tool
- An ultra-fine nail art brush
Application Steps
- Apply two coats of your white or light pink base color for a solid, clean canvas. Let dry thoroughly.
- Using the small tip of your dotting tool, plan your first cherry. Place two red dots close together near the cuticle.
- Move to the opposite side of the nail near the tip and place another cherry.
- Fill in the empty space with one or two more cherries, making sure to leave space between them. This prevents a crowded look on short nails.
- With your ultra-fine brush and green polish, draw the tiny stems for each pair of dots.
- Repeat on all nails. After drying, apply your chosen top coat to protect the cherry nail art.
Pro-Tip: To ensure the pattern looks balanced on short nails, start by placing one cherry at the top left and one at the bottom right. This creates a diagonal line that you can then fill in, preventing the design from looking too heavy on one side.

3. Embrace the Trendy Dark Cherry French Tip

Pin this chic and moody design to your ‘Elegant Nails’ board.
For a sophisticated and modern take, dark cherry nail designs are perfect. This cherry French tip style, often associated with the cherry cola nails trend, is incredibly chic and has an elongating effect on short nails. It offers an elegant cherry nail art option that feels less cutesy and more grown-up.
Products & Tools Used
- A sheer nude or milky pink polish for the base
- A deep, dark cherry or burgundy nail polish
- French tip guide stickers (optional, for beginners)
- A high-gloss top coat
- (Optional) A tiny dot of green polish and a detail brush for a micro-cherry accent
Application Steps
- Paint one coat of your sheer nude base on all nails and let it dry.
- For a clean line, place a French tip guide sticker on each nail, leaving the tip exposed.
- Carefully apply the dark cherry nail polish to the exposed tip of each nail. Paint a second coat for full opacity.
- While the polish is still slightly wet, gently remove the guide stickers.
- If adding the accent, create a minimalist single cherry near the cuticle of one finger.
- Finish with a high-gloss top coat to make the colors pop and ensure a long-lasting manicure.
Pro-Tip: No guide stickers? Use a flat, square nail art brush dipped in acetone to clean up the smile line after painting the tip freehand. This is a professional nail artist tip for achieving a perfectly crisp French manicure.

4. Achieve Simple 3D Gel Cherries

Ready to try 3D nails? Pin this simple tutorial!
3D cherry nails add a playful, tactile element to your manicure. This high-impact look is surprisingly easy to achieve with gel polish and requires minimal artistic skill, making it a great way to try DIY 3D nail art. When using gel, always follow safe nail art practices and cure properly with a UV/LED lamp.
Products & Tools Used
- Gel base coat and top coat
- A sheer nude or pink gel polish color
- Red builder gel or a thick, viscous red gel polish
- A dark green gel polish
- A UV/LED nail lamp
- A dotting tool and a fine-liner brush
Application Steps
- Prep nails and apply a gel base coat, curing under the lamp as directed.
- Apply one or two coats of your sheer nude gel color, curing after each coat.
- Using a dotting tool, pick up a small bead of red builder gel. Place it on the nail where you want the cherry. Don’t flatten it; let it remain a dome. Create two domes for a pair.
- Cure under the lamp immediately to set the 3D shape before it self-levels.
- With your fine-liner brush and green gel polish, draw the stems connecting to your cured red domes. Cure again.
- Apply a final layer of no-wipe gel top coat over the entire nail and the 3D design. Cure one last time.
Pro-Tip: For an even juicier, encapsulated cherry nail art look, apply the 3D cherries before your final layer of sheer nude color. Then, apply the color coat over them, and finish with a top coat. This gives the cherries a “suspended in jelly” appearance.

5. Design an Artsy Negative Space Cherry Outline

Pin this modern, artsy take on the cherry trend to your ‘Nail Inspo’ board.
This negative space cherry nails style is the epitome of cool and is a modern cherry nail design that feels incredibly fresh. It’s perfect for short nails because the bare space creates a lengthening effect. The outline cherry nail art is low-maintenance as it grows out, and a matte top coat enhances the chic, graphic vibe.
Products & Tools Used
- A nail strengthener or ridge-filling base coat
- A highly pigmented red nail art liner polish (with a built-in thin brush)
- A matte top coat
- A fine-tipped nail art brush for extra control (optional)
Application Steps
- Start with clean, buffed nails. Apply a clear base coat to create a smooth surface.
- Using the red nail art liner, carefully draw the outline of two small circles side-by-side to form the cherry shape. Do not fill them in.
- Connect the two circles at the top with a simple “V” shape for the stems.
- For a super clean look, you can stop there. Or, use a green liner to trace a tiny leaf off the stem.
- Let the thin lines dry completely. This is crucial to prevent smearing.
- Apply a matte top coat over the entire nail. The matte finish makes the glossy outline pop and emphasizes the negative space.
Pro-Tip: If your hand isn’t steady enough for a perfect circle, use a tiny dotting tool to create a “guide” dot for the top, bottom, left, and right of your circle, then use the liner brush to connect them. This is an easy fix for cherry nails when freehanding is a challenge.

6. Master a Dainty Cherry Blossom Hybrid

Love floral nails? Pin this unique cherry blossom twist!
This artistic design combines the beauty of cherry blossom nails with the classic cherry fruit for a unique, delicate cherry nail design. It’s a softer, more intricate interpretation perfect for the spring season. The fine, trailing branches are especially elegant on short nails, creating a beautiful, nature-inspired scene.
Products & Tools Used
- A milky white or sheer white base polish
- A dark brown nail art liner for the branches
- A soft baby pink polish for blossoms
- A bright red polish for the cherries
- A fine-liner brush and a small dotting tool
- A glossy top coat
Application Steps
- Apply two coats of milky white polish for a semi-translucent, dreamy base.
- Using the dark brown liner, draw thin, delicate branches across a few nails. Let them trail off the edges.
- On some branches, use the dotting tool and pink polish to create simple 5-dot flowers for the cherry blossoms.
- On other branches, use the red polish and dotting tool to create the classic two-dot cherry fruit.
- Add tiny green stems/leaves to the red cherries for contrast.
- Once all the tiny details are dry, seal with a glossy top coat to unify the design.
Pro-Tip: Don’t overload every nail. A proven design strategy is to have a full branch on your thumb and ring finger, and just a small wisp of a branch on the others. This creates a more balanced and sophisticated cherry nails look.

7. Add a Pop with a Sparkly Glitter Cherry

Pin this sparkly idea for your next night out!
For a glamorous and festive look, sparkly cherry nails are the answer. Using a dense glitter polish for the fruit and a metallic gold for the stems instantly elevates the design. This is the perfect festive cherry nail design for a holiday party or a night out, turning a simple shape into a luxe statement.
Products & Tools Used
- A creamy nude or beige base polish
- A high-density red glitter polish
- A metallic gold or green liner polish for the stem
- A “glitter grabber” or smoothing top coat
- A glossy final top coat
- A dotting tool or small brush
Application Steps
- Apply two coats of your nude base polish to all nails except the accent nail (or apply to all for a uniform look).
- On the accent nail, use a brush to paint the shape of two large circles for the cherries using the red glitter polish.
- For full opacity, let the first coat dry, then use a makeup sponge to dab a second layer of glitter polish onto the cherry shapes. This concentrates the glitter.
- Using the gold liner, draw the stems. The gold adds a luxurious touch that complements the sparkle.
- Let it dry, then apply a smoothing top coat over the glitter to tame the texture.
- Finish all nails with a final glossy top coat for a seamless, professional finish.
Pro-Tip: Chunky glitter can feel rough. After your glitter is dry, apply one layer of a “glitter smoothing” top coat. Let it dry, then apply your regular glossy top coat. This expert nail artist tip creates a perfectly smooth, glass-like finish over textured glitter.

8. Try a Subtle ‘Cherry Milk Bath’ Manicure

For a dreamy, subtle look, pin this ‘milk bath’ nail idea.
Milk bath nails are a huge trend, and they provide a beautifully subtle cherry design option. This ethereal look is created by encapsulating cherry nail decals or tiny dried flowers within layers of a milky white polish. The result is a dreamy, sophisticated manicure that whispers the cherry theme rather than shouting it.
Products & Tools Used
- A sheer, milky white or translucent pink nail polish
- Ultra-thin cherry nail decals or tiny dried red flowers
- A pair of fine-tipped tweezers
- A glossy top coat
Application Steps
- Apply one thin coat of your milky white polish and let it get tacky (not fully dry).
- Using tweezers, carefully place one or two tiny cherry nail decals onto the tacky polish. Press down gently.
- Apply a second coat of the milky white polish over the decals. This will make them look submerged and dreamy.
- If needed, apply a third coat to achieve the desired level of translucency.
- Wait for all layers to dry as much as possible, then apply a thick, glossy top coat to fully encapsulate the decals and create a smooth finish.
Pro-Tip: Don’t have decals? You can mimic the look with polish. After your first milky coat, use a dotting tool to create very simple red cherries. Before they dry, immediately paint your second milky coat over them. This will slightly blur and soften the design, creating a similar “submerged” effect.

9. Rock a ’90s Grunge Black & Cherry Look

Pin this edgy black and cherry combo for a cool, high-contrast manicure.
Tap into the ’90s revival with an edgy black and cherry nails combination. The high contrast between the glossy black polish and the bright red cherries creates a bold cherry nail art look that is striking and confident. This grunge-inspired aesthetic is a cool, alternative way to wear the trend, proving that cherry nails don’t always have to be sweet.
Products & Tools Used
- A high-quality, opaque black nail polish
- A vibrant, true red polish that will show up against black
- A bright, lime green polish for the stems
- A glossy, long-lasting top coat
- A dotting tool and fine-liner brush
Application Steps
- Apply two coats of black polish to all nails, ensuring a perfectly opaque and even finish. Let them dry completely.
- On your chosen accent nail, you may need to paint a small patch of white polish where your cherries will go to make the red pop. Let this white patch dry.
- Using your dotting tool, create two large red dots over the white patch (or directly on the black if your red is opaque enough).
- With the liner brush and bright green polish, draw bold stems. A brighter green provides better contrast against the black.
- After the design is fully dry, finish all nails with a super glossy top coat. This makes the black look like patent leather and the cherries look like candy.
Pro-Tip: For the red to be truly vibrant over black, use the “white base” trick mentioned in step 2. Alternatively, use a red stamping polish, as they are formulated to be highly opaque over dark colors. This is a secret from the nail art specialist community.

Key Takeaways: Your Quick Guide to Cherry Nails for Short Nails
- Scale is Everything: The key to successful cherry nail designs on short nails is to keep the cherry motifs small and proportional to the nail size to avoid a cluttered look.
- Tools Over Freehand: A nail art dotting tool is your best friend for creating perfectly round, even cherries quickly and easily, while a fine detail brush is essential for delicate stems.
- Strategic Placement Wins: An accent nail, a French tip, or a negative space design can make a bigger impact on short nails than an all-over pattern, creating a chic and uncluttered manicure.
- Contrast Creates Pop: For designs to be visible and striking, use contrasting colors. Cute cherry nails pop against a white or nude base, while bold cherries stand out against a dramatic black base.
- Don’t Fear Trends: Advanced styles like 3D cherry nails or dark cherry nail designs are achievable on short nails. Use gel for simple 3D effects and deep colors on tips to create an elongating illusion.
People Also Ask About Cherry Nail Designs
How do you paint small cherries on nails?
The easiest way to paint small cherries is by using a nail art dotting tool. Dip the small end of the tool into red polish and press two dots onto the nail side-by-side. Then, use an ultra-fine liner brush with green polish to draw two thin lines from the top of the dots, meeting in a “V” shape to form the stems.
Are cherry nail designs easy for beginners?
Yes, many cherry nail designs are perfect for beginners. A minimalist single cherry on an accent nail is one of the simplest forms of nail art you can try. Using tools like dotting tools and pre-made decals removes the need for difficult freehand drawing, making the trend accessible to everyone.
What tools do I need for cherry nail art?
For most DIY cherry nail art, you only need a few basic tools. The essentials are a small nail art dotting tool to create the round fruit shape and an ultra-fine liner brush to draw the thin stems. Tweezers are also helpful if you plan to use nail decals or other embellishments.
How can I make my cherry nail art last longer?
Proper preparation and a quality top coat are key to long-lasting nail art. Always start with a clean nail and a good base coat. After your cherry design is completely dry, apply a generous layer of a chip-resistant, long-wear top coat, making sure to “cap” the free edge of your nail.
What colors go well with cherry nails?
Classic cherry nail designs pair beautifully with neutral bases like white, nude, and sheer pink. These colors make the red and green of the cherry pop. For a moodier look, dark cherry and burgundy work well with black or deep brown, while for a modern twist, try a cherry design on a trendy sage green or periwinkle blue base.
Can I do cherry nail designs on short nails?
Absolutely! Cherry nail designs are fantastic for short nails. The trick is to keep the design proportional. Opt for smaller cherries, minimalist accent nails, or designs like a French tip that use the cherry motif sparingly. These approaches prevent the nail from looking overwhelmed and can even make it appear more elegant.
What’s the difference between cherry cola and dark cherry nails?
The terms are often used interchangeably, but they can have subtle differences. Dark cherry nail designs typically refer to any deep, burgundy-red polish. Cherry cola nails, a specific trend, often imply a slightly more brown or purple undertone and a super high-gloss, almost jelly-like finish, mimicking the color of the soda.
How do you prevent cherry nail art from smudging?
Patience is the most important tool for preventing smudges. You must let each layer of your design dry completely before moving to the next, especially before applying the final top coat. A quick-dry top coat can help, but applying it too soon over wet polish is the most common cause of smearing.
Can I use stickers for cherry nail designs?
Yes, cherry nail stickers or decals are a fantastic and easy alternative to hand-painting. They provide a perfect, detailed design every time and are ideal for beginners or anyone in a hurry. For a “milk bath” look, you can even encapsulate them within layers of sheer polish.
What’s the best top coat for glossy cherry nails?
For a super glossy, gel-like finish, look for a “plumping” or “gel-effect” top coat. These are slightly thicker and self-leveling, which helps to smooth over any minor texture from the nail art. If you’re using actual gel polish, a no-wipe gel top coat provides the highest shine and durability.
Final Thoughts on Your Chic Cherry Manicure
As you’ve seen, cherry nail designs are not just for long nails—they’re a versatile and fun trend that can be beautifully adapted for any nail length. By focusing on smart placement, proportional sizing, and the right tools, you can easily create cherry nails that are chic, stylish, and anything but cluttered. Whether you choose a simple accent, a trendy French tip, or a bold glitter look, you now have the techniques to make this sweet design your own. Which cherry nail design will you try first?
Last update on 2026-04-27 / Affiliate links / Images from Amazon Product Advertising API