Tired of the same old glittery snowflakes and cliché holiday reds? Finding truly classy winter nails that feel sophisticated, modern, and elegant can be a challenge. You want a look that’s polished and chic, not festive and flashy.
Classy winter nails are defined by their sophisticated and understated elegance, often featuring deep, rich colors like burgundy and navy, milky neutrals, and refined finishes such as velvet, chrome, or high gloss. These styles prioritize minimalist designs, impeccable application, and healthy nail condition over overtly festive or bold patterns to create a timeless and polished look suitable for the winter season.
Drawing from comprehensive analysis of current data and proven methodologies, this guide breaks down the core principles of winter nail elegance. You’ll discover the top 9 curated ideas that blend timeless style with 2026 trends. Get ready to find your perfect, sophisticated winter manicure.
What Defines Classy Winter Nails for a Sophisticated Look in 2026?
The concept of elegant winter nails has evolved beyond simple color choices. For 2026, a sophisticated look is defined by a combination of color depth, refined texture, and minimalist design. It’s about choosing deep, moody hues like burgundy or emerald, or embracing the “quiet luxury” of a perfect milky white classy winter nails manicure. The finish is just as important as the color; finishes like velvet, subtle chrome, and a strategic mix of matte and gloss create visual interest without shouting for attention. Ultimately, a sophisticated winter manicures prioritizes impeccable nail health and flawless application, proving that true elegance lies in the quality of the execution, not the complexity of the art. This approach ensures your nails complement your winter wardrobe with a timeless, polished aesthetic.
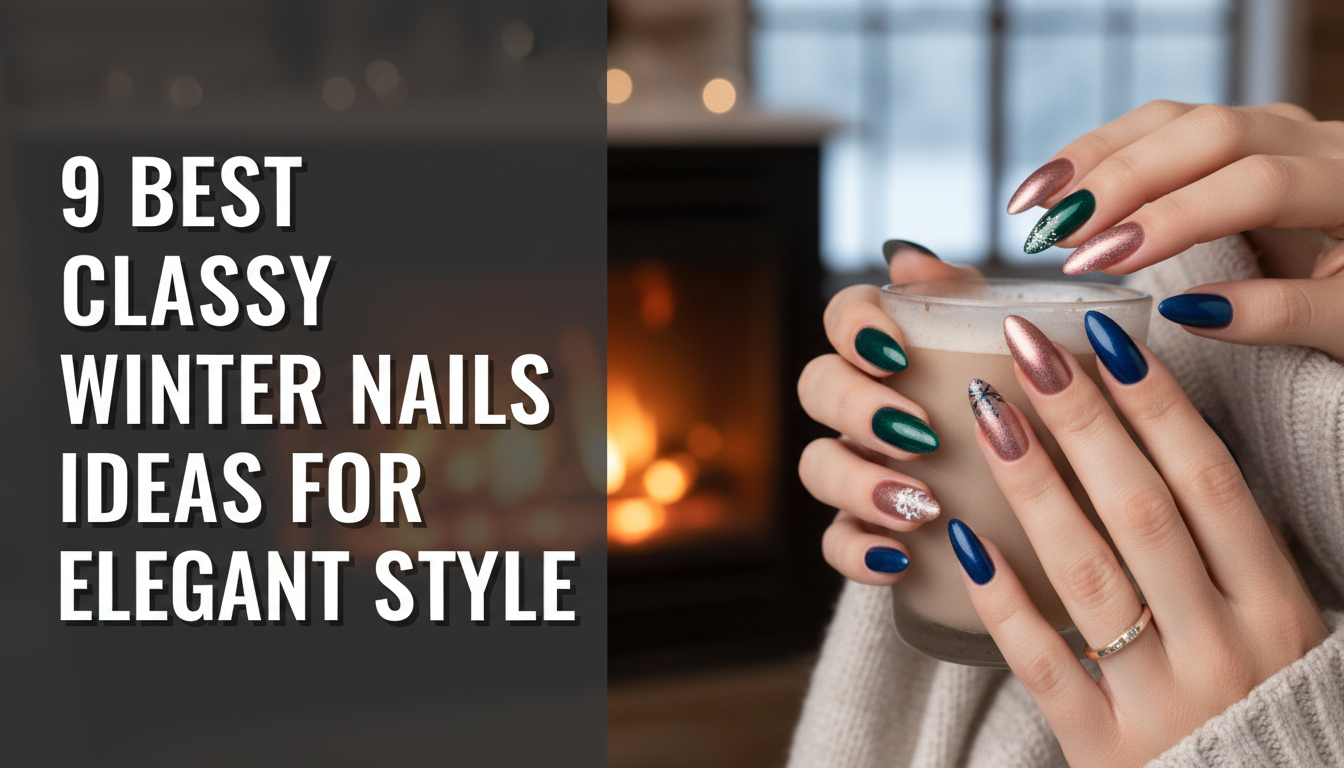
9 Best Classy Winter Nails Ideas To Recreate This Season
Ready for some inspiration? We’ve curated the top nine winter nail designs classy enough for any occasion. Each of these looks embodies the principles of modern elegance, focusing on rich color, interesting textures, and clean execution. From the luxe feel of a velvet finish to the timeless chic of a minimalist classy winter nails design, this list provides everything you need—including step-by-step instructions and pro tips—to achieve these winter nail ideas at home or as inspiration for your next salon visit.
1. Create a Moody Deep Burgundy Velvet Manicure

Pin this luxe nail idea to your ‘Winter Style’ board!
The velvet winter nails refined look is the epitome of cozy luxury. Unlike glitter, this effect, created with a magnetic nail polish, offers a deep, shifting shimmer that looks and feels incredibly high-end. The burgundy classy winter nails color is a winter classic, and the velvet texture gives it a modern, tactile twist. This design works because the velvet effect needs magnetic polish to create its signature light-reflecting line, a process that is surprisingly easy to master.
Products & Tools Used
- Dehydrator and pH Bonder for nail prep
- Gel Base Coat
- Deep burgundy classy winter nails magnetic (cat-eye) gel polish
- A strong nail art magnet wand (bar or cylindrical shape)
- High-gloss, no-wipe gel top coat
- UV/LED nail lamp
Application/Styling Steps
- Prepare Nails: Shape your nails, gently push back cuticles, and lightly buff the nail surface. Cleanse with a lint-free wipe soaked in isopropyl alcohol to remove dust and oils.
- Apply Base Coat: Paint a thin layer of gel base coat, ensuring you cap the free edge. Cure under your UV/LED lamp for 60 seconds.
- Apply First Polish Coat: Apply a thin layer of the burgundy classy winter nails magnetic polish. Do not use the magnet yet. Cure for 60 seconds.
- Apply Second Coat & Magnetize: Apply a second, slightly thicker coat of the magnetic polish. Immediately, before curing, hover the magnet wand close to the nail (without touching it) for 10-15 seconds. Hold it diagonally or vertically to create the velvet line.
- Cure Immediately: Once you are happy with the velvet effect, immediately cure for 60 seconds to lock the design in place.
- Seal with Top Coat: Apply a layer of no-wipe top coat, cap the free edge, and cure for a final 60-90 seconds for a durable, glossy winter nails classy finish.
Pro-Tip: For a more diffused, all-over velvet look, hold the magnet at the side of the nail instead of over the top. In my experience, this pushes the magnetic particles away from the center, creating a softer, more luxurious winter nails effect rather than a sharp line.

2. Achieve Timeless Elegance with a Micro-French Manicure

So chic! Pin this minimalist look for your next manicure.
The classic French manicure gets a modern, sophisticated update for winter. A Micro-French tip is the ultimate understated winter nails look, perfect for those who love a clean and polished aesthetic. This style is especially beautiful on short classy winter nails, as the razor-thin white line elongates the nail bed without looking dated. The beauty of this look is its simplicity; French tips offer timeless sophistication, and the “micro” update makes it feel current and fresh.
Products & Tools Used
- A sheer, natural pink or nude gel polish for the base color
- A highly pigmented, opaque white gel art paint
- An ultra-fine, long-bristled liner brush (often called a striping brush)
- Gel Base Coat and No-Wipe Top Coat
- UV/LED nail lamp
Application/Styling Steps
- Prep and Base: After standard nail prep, apply a base coat and cure. Apply one or two coats of your sheer pink base color, curing after each layer.
- Load the Brush: Place a small drop of the white art gel onto a palette. Lightly dip just the tip of your liner brush into the paint, ensuring it’s not overloaded.
- Paint the Tip: Start from one corner of the nail tip and gently drag the liner brush across to the other side in a smooth, single motion. Use very light pressure to create a “micro” thin line.
- Perfect the Line: Use the same brush, cleaned, with a tiny bit of alcohol to correct any mistakes and sharpen the smile line.
- Cure the Design: Once the thin white tip is perfect, cure under the lamp for 60 seconds.
- Seal and Shine: Apply the no-wipe top coat over the entire nail to seal the design and provide a high-gloss finish. Cure for 60-90 seconds.
Pro-Tip: Instead of trying to paint a curved line, paint a straight line across the very tip of the nail. Then, take a small cleanup brush dipped in alcohol and “carve out” the smile line from underneath. This technique, used by many experienced nail artists, often results in a cleaner, more symmetrical curve.

3. Embrace the “Quiet Luxury” Sheer Milky White Manicure

The definition of chic. Pin this for effortless winter elegance.
The quiet luxury nails trend is perfectly captured by a sheer milky white manicure. This look is all about a healthy, clean, and polished appearance that whispers elegance rather than shouts it. It’s the ideal natural classy winter nails choice because the milky white suits all occasions, from a cozy weekend to a formal event. The semi-translucent finish is forgiving and modern, offering a soft alternative to opaque white that enhances the natural beauty of your nails.
Products & Tools Used
- A high-quality sheer milky white or off-white nail polish (e.g., OPI Funny Bunny, Essie Marshmallow)
- A good quality base coat designed to smooth ridges
- A high-shine, long-lasting top coat
- Isopropyl alcohol and lint-free wipes
Application/Styling Steps
- Start with a Smooth Base: After nail prep, apply a ridge-filling base coat. This is crucial for an even finish with sheer polishes. Let it dry completely.
- Apply the First Thin Coat: Apply the first coat of milky white classy winter nails polish in as few strokes as possible. Make this layer very thin. Don’t worry about full coverage; the goal is an even, translucent layer.
- Let it Dry Completely: Wait at least 2-3 minutes before applying the next coat. Rushing this step is the primary cause of streaks and dragging.
- “Float” the Second Coat: For the second coat, get a slightly larger bead of polish on your brush. “Float” this layer over the nail with very minimal pressure, letting the polish self-level. This prevents the brush from disturbing the first layer.
- Add a Third Coat (Optional): If you desire slightly more opacity, repeat step 4 with a third floated coat.
- Seal with a Glossy Top Coat: Apply a generous layer of a glossy top coat to enhance the milky depth and provide a durable, polished winter nails look.
Pro-Tip: For a perfect sheer glazed winter nails look without buying a new polish, create your own. On a small palette, mix two drops of your favorite opaque white polish with five to six drops of a clear glossy top coat. Adjust the ratio until you have the perfect custom translucency.

4. Apply a Subtle and Sophisticated Winter Chrome Finish

Save this for a chic holiday party look!
Chrome nails are still very much in style, but the 2026 approach is all about subtlety. Instead of a high-mirror shine, opt for a chrome winter nails subtle pearlescent finish, often called the “glazed donut” look. This metallic winter nails elegant style offers a beautiful, iridescent glow that catches the light without being overpowering. The secret is that a chrome finish includes metallic sheen but requires a specific no-wipe top coat and application technique to achieve a smooth, pearly finish instead of a chunky, glittery one.
Products & Tools Used
- Gel Base Coat and a base color of your choice (a sheer white or pink works best for this look)
- A high-quality, no-wipe gel top coat (this is essential)
- White or pearl-finish chrome powder
- A small, disposable eyeshadow applicator or silicone nail tool
- A fluffy brush to dust off excess powder
- UV/LED nail lamp
Application/Styling Steps
- Apply Base and Color: After nail prep, apply and cure your base coat. Then apply one or two coats of your chosen base color, curing each layer.
- Apply No-Wipe Top Coat: Apply a thin layer of the no-wipe top coat. This is the crucial step.
- Cure Correctly: Cure the top coat for only 30 seconds (or half the manufacturer’s recommended full cure time). The surface should be cured but still slightly warm and receptive to the powder. This is the secret.
- Burnish the Chrome Powder: Dip your applicator into the chrome powder, picking up a small amount. Gently but firmly rub the powder onto the nail surface in a circular motion. The chrome effect will magically appear.
- Dust Off Excess: Once the entire nail is covered and has a mirror-like finish, use a fluffy brush to gently dust off all excess powder, paying special attention to the cuticle area.
- Seal for Durability: Apply another full layer of the no-wipe top coat to seal the chrome powder. Make sure to cap the free edge to prevent chipping. Cure for the full 60-90 seconds.
Pro-Tip: According to published winter nail research on adhesion, the surface energy of the top coat is highest right after a partial cure. If your chrome looks glittery instead of metallic, you likely cured the top coat for too long before application. Try reducing the cure time by 5-10 second increments.

5. Go Bold with an Elegant Dark Emerald Green

A perfect, sophisticated holiday color. Pin it now!
When you want a bold yet classy color, look no further than jewel tone winter nails. A sophisticated dark green winter nails almond shape look is a perfect example of a dark moody winter nails style that feels festive without being cliché. This deep, rich color is incredibly versatile, as it complements skin tone beautifully and provides a stunning backdrop for minimalist jewelry. The key to making a dark color look elegant is a flawless, high-gloss application.
Products & Tools Used
- A high-quality, stain-preventing base coat
- A rich, highly-pigmented dark emerald green polish (gel or regular)
- A small, angled clean-up brush
- 100% pure acetone (for clean-up)
- A high-shine, quick-dry top coat
Application/Styling Steps
- Don’t Skip the Base Coat: Apply a quality base coat. This is non-negotiable with dark colors to prevent staining your natural classy winter nails.
- First Coat Application: Apply the first coat of emerald green polish. Keep the application thin and stay slightly away from the cuticle line. Don’t aim for perfection on this coat.
- Second Coat for Opacity: Apply a second coat, getting a little closer to the cuticles for full coverage. The two thin coats will provide a richer, more even color than one thick coat.
- Crisp Up the Cuticle Line: Dip your angled clean-up brush in pure acetone and blot the excess. Carefully trace around your cuticle line to remove any stray polish and create a sharp, professional-looking line.
- Seal with a Glossy Top Coat: Apply a generous layer of glossy top coat to make the jewel tone pop and protect your manicure from chipping.
Pro-Tip: To make your jewel tone winter nails look exceptionally luxurious, pair them with minimalist gold jewelry. The warmth of the gold against the cool, deep green creates a stunning, high-contrast look that feels incredibly upscale winter manicures.

6. Experiment with a Matte Navy and Glossy Tip

A modern twist on a classic. Pin this texture play idea!
Playing with different textures on a single nail is a surefire way to create a sophisticated look. This design, featuring a deep navy matte finish winter nails base with a high-shine glossy tip, is a modern and edgy take on the French manicure. The contrast in finishes is visually striking yet remains incredibly chic. This design proves that a manicure doesn’t need intricate art to be interesting; it expertly combines two different finishes to create a dynamic and stylish effect.
Products & Tools Used
- A deep navy blue gel polish
- A high-quality matte gel top coat
- A high-quality glossy no-wipe gel top coat
- Gel base coat and UV/LED Lamp
- A thin striping brush for precision
Application/Styling Steps
- Apply Base and Color: After prep, apply and cure your base coat. Then apply two thin coats of the navy blue polish, curing each layer.
- Apply Matte Top Coat: Apply a layer of the matte top coat over the entire nail surface. Ensure even coverage and cap the free edge. Cure for the full 60 seconds.
- Cleanse the Nail: After curing the matte top coat, wipe the nail with a lint-free wipe and isopropyl alcohol. This removes the inhibition layer and creates a perfect canvas for the glossy tip.
- Paint the Glossy Tip: Using your thin striping brush, carefully paint a thin line of the glossy top coat across the tip of the nail, creating a French tip effect.
- Cure the Final Design: Cure for a final 60 seconds to set the glossy tip. The contrast between the velvety matte and the high-shine tip will be instantly visible.
Pro-Tip: It is critical to apply the matte top coat over the whole nail first. The cleansed matte surface gives you more control when painting the glossy tip and prevents the glossy polish from “bleeding” into the matte finish, ensuring a perfectly crisp, refined winter nail art line.

7. Master the “Quiet Luxury” Neutral Nail

Effortless sophistication. Pin this for a perfect everyday winter look.
The perfect neutral classy winter nails are the cornerstone of the minimalist neutral winter nails for quiet luxury aesthetic. This look is less about the color itself and more about the impeccable finish and healthy appearance of the nails. A sophisticated taupe, a warm greige, or a creamy beige are perfect classy winter nails for work or any other setting because they are endlessly versatile. The “luxury” feel comes from a flawless application and perfectly maintained cuticles.
Products & Tools Used
- A high-quality neutral polish in a sophisticated shade (taupe, greige, caramel nude)
- Ridge-filling base coat
- High-shine top coat
- Nourishing cuticle oil for winter
Application/Styling Steps
- Focus on Prep: For a neutral look to appear classy, nail prep is paramount. Ensure nails are perfectly shaped and cuticles are neat and hydrated.
- Smooth the Canvas: Apply a ridge-filling base coat to create a flawless surface. Let dry.
- Apply Two Even Coats: Apply two thin coats of your chosen neutral classy winter nails polish, allowing adequate drying time between coats to prevent streaking.
- Seal with Shine: Apply a high-shine top coat to give the neutral color depth and a liquid-like finish.
- Hydrate, Hydrate, Hydrate: The final, most crucial step for a quiet luxury nails look is cuticle care. Once the top coat is dry to the touch, generously apply a nourishing cuticle oil.
Pro-Tip: The secret to making a neutral nail look expensive is flawless application and impeccable nail health. The color itself is secondary. Spend more time on your prep and finishing with hand cream for nail health than on the color application itself. This is the core principle of the quiet luxury aesthetic.

8. Add Delicate Gold Foil Accents for a Touch of Glamour

Just the right amount of sparkle. Pin this for a classy party nail!
For a touch of festive glamour that remains sophisticated, delicate gold + leafing is the perfect solution. Unlike chunky glitter, tiny flakes of gold foil provide subtle, shimmering winter nails that catch the light beautifully. This accent is stunning over a neutral base or a dark color like black or emerald green. The key is that the gold leafing adds a festive touch without being overwhelming, and the abstract, scattered placement feels modern and artistic.
Products & Tools Used
- A base color of your choice (works beautifully on nude, black, or deep green)
- Nail art gold foil flakes (not sheets)
- A wax-tipped pencil or a pair of fine-point tweezers
- A gel top coat (recommended for a smooth finish)
Application/Styling Steps
- Apply Base Color: Apply and cure two coats of your chosen base color. Do not apply a top coat yet.
- Create a Tacky Surface: Apply a thin layer of top coat or a specific foil gel, but do not cure it. This will act as an adhesive for the foil.
- Apply the Foil: Using your wax pencil or tweezers, pick up tiny pieces of the gold foil. Gently place them onto the tacky nail surface.
- Break Up the Flakes: Use the tip of your tool or a clean, dry brush to gently tap and break up the foil pieces into smaller, more delicate flecks. Arrange them in an abstract, scattered pattern on one or two accent nails. Less is more.
- Cure the Foil: Once you are happy with the placement, cure the nail for 60 seconds to set the foil in place.
- Encapsulate with Top Coat: Apply one or two layers of a glossy top coat to fully cover the foil flakes. This is key to ensuring the nail feels perfectly smooth and the foil doesn’t snag. Cure each layer completely.
Pro-Tip: For an ultra-smooth finish, apply the first layer of top coat, cure, and then lightly buff the surface with a very fine buffer block. This will knock down any tiny edges of the foil. Cleanse with alcohol, then apply a final top coat. This professional winter manicure secret creates a glass-like finish.

9. Get Cozy with a Frosted Sweater-Knit Texture

The coziest manicure ever! Pin this for a unique winter look.
For a unique and tactile design, sweater-knit nails are the perfect choice for cozy winter fashion nails. This seasonal nail art mimics the texture of a cable-knit sweater, creating a 3D effect that is both charming and sophisticated. The design requires building up layers of gel and powder to get the raised pattern. To keep this 3D embellishment refined, it’s best executed in a soft, matte color like white, grey, or a pastel shade, and typically used on just an accent nail.
Products & Tools Used
- A gel polish for your base color (e.g., soft white, light grey, pastel pink)
- A fine-tipped liner brush
- Clear acrylic powder
- A matte gel top coat
- Gel base coat and UV/LED lamp
Application/Styling Steps
- Apply Base and Matte Coat: After prep, apply two coats of your chosen base color, curing each. Then, apply a layer of matte top coat and cure. This creates the non-shiny base for your sweater pattern.
- Mix Gel and Draw First Layer: On a palette, mix a small amount of your base color gel with your liner brush. Draw the first lines of your cable-knit pattern (e.g., simple “S” curves and straight lines). Do not cure.
- Add Texture: While the gel pattern is still wet, sprinkle clear acrylic powder over the entire nail. The powder will stick only to the wet gel. Tap off the excess powder.
- Cure the Texture: Now, cure the nail for a full 60 seconds. The acrylic powder will absorb the gel and create a raised, textured line.
- Repeat for Dimension: Use a fluffy brush to dust off any loose powder. Repeat steps 2-4, drawing the exact same pattern directly on top of your first textured layer. This second application builds the 3D height that makes the effect pop.
- Final Cure: After dusting off the excess powder from the second layer, cure one last time for 60 seconds. Do not apply a final top coat, as this would ruin the matte, textured effect.
Pro-Tip: To keep this 3D embellishment refined and classy, only apply the sweater-knit design to one or two accent nails per hand. Pairing it with simple, solid-colored nails on the other fingers prevents the look from becoming overwhelming.

Key Takeaways: Your Quick Guide to Classy Winter Nails
- Focus on Finish and Texture: The most sophisticated winter manicures in 2026 prioritize texture over complex patterns. Finishes like velvet, subtle chrome, and a mix of matte and gloss provide elegance.
- “Quiet Luxury” is Key: Understated looks like milky white classy winter nails and perfect neutral taupes are on-trend. Their classiness comes from flawless application and impeccable nail health, not loud design.
- Technique Defines Elegance: A minimalist classy winter nails look, such as a Micro-French tip, is elevated by precision. Mastering techniques with tools like fine-liner brushes is more important than the design’s complexity.
- Dark Colors Can Be Classy: Deep, jewel tone winter nails like emerald and burgundy are winter classics. Avoid staining and achieve a professional look by always using a base coat and cleaning up the cuticle line.
- Accents Should Be Refined: When adding sparkle, opt for delicate gold foil flakes or a fine shimmering winter nails effect rather than chunky glitter. This adds a touch of luxury without looking dated.
- Nail Health is Non-Negotiable: No design will look classy on brittle, dry nails. A consistent winter routine using cuticle oil for winter and hand cream is the foundation for any beautiful manicure.
FAQs About classy winter nails
What are the best classy winter nail colors for 2026?
The best classy winter nail colors for 2026 are deep jewel tones, sophisticated neutrals, and rich, moody hues. Think burgundy classy winter nails, emerald green, and deep navy for bold statements. For an understated look, milky white classy winter nails, sheer pinks, and warm taupes (greige) are incredibly chic and align with the “quiet luxury” trend.
What nail shapes are classy for winter?
Almond and short, soft square (squoval) shapes are consistently considered the classiest for winter. The almond shape enhances elegance and elongates the fingers, pairing beautifully with dark colors. Short, well-manicured squoval nails offer a clean, practical, and timeless look that is perfect for minimalist classy winter nails and professional environments.
How can I make my winter nails last longer and prevent chipping?
To prevent chipping, proper nail prep and sealing the free edge are crucial. Start with a clean, dehydrated nail plate and use a quality base coat. After applying color, make sure your top coat “caps” the free edge of the nail. Additionally, hydration prevents nail breakage; apply cuticle oil daily to keep nails flexible and less prone to the chipped nail prevention winter needs.
Are chrome nails still in style for winter?
Yes, but the trend has shifted towards more subtle and refined chrome finishes. Instead of full mirror-effects, sheer glazed winter nails (like the “glazed donut” look) with a pearlescent white or pink chrome powder are very stylish. This chrome winter nails subtle approach offers a sophisticated shimmer rather than a loud metallic look.
What are some simple classy winter nail designs I can do at home?
Minimalist designs are perfect for an elegant at-home manicure. Try a Micro-French tip, a simple accent nail with a few gold foil flakes, or a “negative space” design with a thin, curved line on a bare nail. A sheer milky white classy winter nails manicure is also simple yet incredibly chic and forgiving for beginners.
How do I care for my nails and cuticles in cold weather?
The key to winter nail care is combating dehydration caused by cold air and indoor heating. Use a thick, nourishing hand cream for nail health throughout the day, especially after washing your hands. Apply a high-quality cuticle oil for winter every night before bed to prevent dry, cracked cuticles and provide a brittle winter nails solution.
What’s the difference between velvet and metallic nails?
The difference is in the finish and the type of shimmer. Metallic nails have a uniform, flat, reflective shine. Velvet winter nails refined use a special magnetic polish where the shimmer particles are manipulated with a magnet to create a 3D, light-shifting effect that mimics the deep, textured appearance of velvet fabric.
Is matte or glossy finish classier for winter?
Both can be classy, but it depends on the context. A glossy winter nails classy finish on a deep color like emerald or burgundy looks luxurious and traditional. A matte finish winter nails look, especially in a dark navy or grey, appears modern, edgy, and sophisticated. A trendy option is to combine both, such as a matte nail with a glossy tip.
Can dark green and navy blue nails look classy?
Absolutely; dark greens and blues are a cornerstone of the sophisticated winter palette. An elegant dark emerald green or a deep navy blue is a chic and modern alternative to black or red. The key to keeping them classy is a flawless, high-shine application, perfect shaping, and neat cuticles.
What are “quiet luxury” nails?
“Quiet luxury” nails refer to manicures that look expensive and polished due to their perfect execution and understated style, rather than flashy designs. This trend focuses on healthy, impeccably groomed nails with sheer, natural-looking polishes like milky white classy winter nails, sheer pinks, or sophisticated neutrals. The luxury is in the quality of the manicure itself.
Final Thoughts on Achieving Elegant Winter Nails
This winter, achieving classy winter nails is less about intricate patterns and more about refined elegance, texture, and impeccable care. By focusing on sophisticated finishes like velvet and subtle chrome, embracing the “quiet luxury” of a perfect neutral, and mastering the techniques for crisp, clean lines, you can elevate your manicure from merely seasonal to truly sophisticated. The 9 ideas in this guide serve as a blueprint for creating elegant winter nails that are both on-trend for 2026 and timelessly chic.
Ultimately, the most important element is the confidence that comes from a polished look you love. Use these ideas as a starting point to express your personal style this winter.
What classy winter nail idea are you most excited to try first? Let me know in the comments below.
Last update on 2026-04-27 / Affiliate links / Images from Amazon Product Advertising API