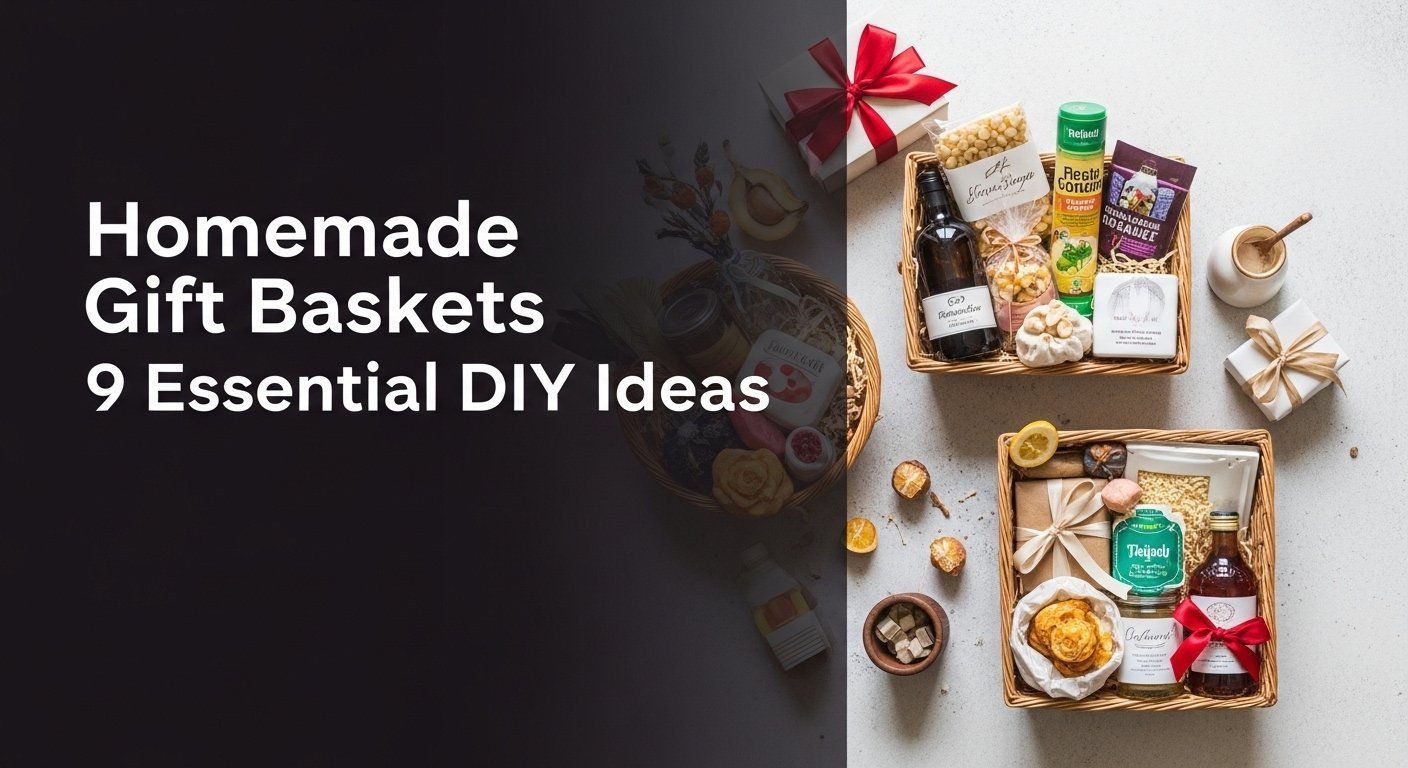
Struggling to find a gift that feels personal and truly special? You’re tired of giving the same generic gift cards and want to offer something that shows you genuinely care, a solution for avoiding generic gifts. Creating homemade gift baskets is the perfect way to give a thoughtful and impressive present.
To make a homemade gift basket, select a theme and a container, then fill the base with filler paper for height. Arrange the largest items in the back and smaller items in the front, filling gaps with decorative touches. Finish by wrapping the entire basket in cellophane and adding a bow for a professional look. This simple process allows for endless personalization.
Based on established best practices and proven gift crafting techniques, this guide provides everything you need. A homemade gift basket is a custom-curated collection of items designed to be a unique, affordable, and tailored present. You’ll discover how to create beautiful, professional-looking baskets for any occasion, transforming simple items into a truly memorable gift.
What Makes a Good Homemade Gift Basket?
The difference between a random assortment of items and a truly thoughtful homemade gift lies in three core principles: curation, presentation, and personalization. A great DIY gift basket isn’t just about what’s inside; it’s about the story it tells and the feeling it evokes. It serves as a direct solution to the common problem of finding a unique present, allowing you to create gift baskets that are deeply meaningful. Instead of just buying things, you’re curating an experience tailored specifically to the recipient. This thoughtful approach moves beyond the transactional nature of store-bought items and taps into the psychology of what makes a gift feel special—the visible effort and personal consideration.
Information Gain: The Psychology of a Great Homemade Gift
What most guides miss is that a successful homemade gift basket is a form of experiential gift design. It’s not just a collection of products; it’s a narrative. According to the principles of recipient-centric gift curation, the value isn’t in the individual items but in how they combine to reflect the recipient’s personality, needs, or desires. This synergistic gift item pairing—where the whole is greater than the sum of its parts—is what creates a “wow” moment. When you select items that tell a story (e.g., everything needed for a perfect cozy night in), you’re not just giving things; you’re giving an experience, a feeling of being deeply understood. This thoughtful present alternative demonstrates a level of care that a generic gift simply cannot match.
Homemade Gift Baskets: 9 Essential DIY Ideas for 2026
Now that you understand the principles, let’s dive into actionable inspiration. These nine DIY gift basket ideas are complete blueprints, providing everything you need to assemble gift baskets for various themes and recipients. From a relaxing spa day to a budget-friendly surprise, each idea is designed to be a comprehensive, easy-to-follow project that delivers a beautiful and meaningful homemade present.
1. Curate a Relaxing Spa Day Gift Basket

Pin this tranquil spa basket idea to your ‘DIY Gifts’ board!
What You Need
- A medium-sized woven basket or wooden crate
- Natural color crinkle-cut paper filler
- A high-quality scented candle (e.g., lavender or eucalyptus)
- A bag of Epsom salts or a set of unique bath bombs
- A rich body butter or lotion
- One or two sheet face masks for hydration
- A natural fiber washcloth or a soft exfoliating brush
- A small decorative item like a bundle of dried eucalyptus
Step-by-Step Directions
- Build Your Base: Fill the bottom third of your basket with a generous amount of crinkle-cut paper. Fluff it up to create volume and a sturdy base for your items.
- Arrange the Anchor Items: Place the tallest and heaviest items, like the candle and body lotion, in the back of the basket. This creates a backdrop for the other products.
- Layer in the Mid-Sized Items: Position the bath salts and face masks in front of the taller items. Angle them slightly so their labels are visible.
- Fill the Gaps: Tuck the smaller items, like the washcloth or a single bath bomb, into the remaining spaces to make the basket look full and abundant.
- Add a Finishing Touch: Place the dried eucalyptus bundle artfully to one side. Wrap the entire basket with clear cellophane, gathering it at the top and tying it with a beautiful ribbon.
Pro-Tip: In my experience, creating thematic coherence is key. Stick to a consistent color palette (like greens and whites) and scent profile (like lavender) throughout the products to make the spa gift basket feel more curated and luxurious.

2. Assemble a Cozy Coffee Lover’s Gift Basket

Know a coffee addict? Pin this perfect DIY gift idea!
What You Need
- A sturdy wire or metal basket
- Brown or kraft-colored crinkle-cut paper filler
- A bag of high-quality, locally roasted or gourmet whole bean coffee
- A brewing device, such as a French press or a pour-over cone with filters
- A stylish ceramic or double-walled glass mug
- A small bottle of flavored syrup (vanilla, caramel) or a gourmet chocolate bar
- A package of biscotti or shortbread cookies that pairs with coffee
Step-by-Step Directions
- Create a Foundation: Fill the wire basket with kraft paper filler, ensuring there’s enough to elevate the items.
- Position Key Items: Arrange the bag of coffee and the French press (or other brewer) first, placing them towards the back and center.
- Add the Accessories: Place the mug next to the coffee. If it’s in a box, you can leave it packaged for a more premium feel.
- Tuck in the Treats: Fill the surrounding spaces with the syrup bottle, biscotti, and chocolate bar. Make sure every item is visible from the front.
- Finalize the Look: Since this is often a rustic-themed basket, you can skip the cellophane. Simply tie a thick twine or burlap ribbon around the handle for a charming homemade finish.
Pro-Tip: To elevate this gift, craft a gift narrative. Include a small, handmade card explaining why you chose that specific coffee bean—perhaps it’s from a region they love, or it has tasting notes you think they’ll enjoy. This adds a deep layer of personalization.

3. Build the Ultimate Movie Night Gift Basket

Ready for a cozy night in? Pin this awesome movie night basket idea!
What You Need
- A large, reusable popcorn tub or a simple basket
- Red and yellow tissue paper or crinkle-cut filler
- A jar of unpopped popcorn kernels
- A set of popcorn seasonings (e.g., white cheddar, butter salt, kettle corn)
- Several boxes of classic movie theater candy (M&Ms, Junior Mints, Sour Patch Kids)
- Two bottles of retro-style craft soda
- A cozy throw blanket (optional, but a great addition)
Step-by-Step Directions
- Line the Container: If using a basket, line it with the colorful tissue paper. If using a popcorn tub, no liner is needed.
- Add the Foundation: If you’re including a blanket, fold it neatly and place it at the bottom to create a soft, elevated base. Otherwise, use filler paper.
- Position the Stars: Put together the main items by placing the popcorn kernel jar and soda bottles in the back.
- Fan Out the Candy: Arrange the candy boxes in a fan shape in front of the taller items. Make sure the iconic branding is visible.
- Top it Off: Place the popcorn seasonings in the gaps. If the basket is for a specific person, you could also include a gift card for a movie streaming service.
- Wrap It Up: This basket looks great unwrapped, but for transport, you can use a large cellophane bag and tie it with a fun, curly ribbon.
Pro-Tip: Instead of just a jar of kernels, include a microwave-safe silicone popcorn popper. It’s a reusable, eco-friendly item that adds significant perceived value and utility to the basket, aligning with sustainable gift basket practices.

4. Create a Charming & Cheap “Dollar Tree” Gift Basket

A thoughtful gift on a tiny budget! Pin this Dollar Tree DIY idea.
What You Need
- A small basket, bin, or even a large mug from the Dollar Tree
- 1-2 sheets of coordinating tissue paper
- A scented candle in a glass jar
- A stylish mug or tumbler
- A package of cookies, specialty chocolates, or flavored tea
- A non-food item like a journal, fuzzy socks, or a face mask
- A small floral pick or decorative ribbon
Step-by-Step Directions
- Prep Your Items: Carefully remove all price tags and any cheap-looking packaging. This is the most important step for an elevated look.
- Build the Base: Line your container with tissue paper, letting it puff up over the sides.
- Place the Tallest Item: Put the tallest item, like the journal or tumbler, in the back.
- Fill in Around It: Assemble the candle and mug in the middle ground.
- Tuck in the Smallest Items: Add the cookies, tea bags, or face mask into the front, making sure they are visible.
- Add a Decorative Flourish: Tuck the small floral pick into one side of the arrangement or tie a beautiful bow on the handle. This simple touch makes it look like a boutique gift.
Pro-Tip: The key to perceived value enhancement in DIY gifts from a dollar store is curation and presentation. Choose items within a strict 2-3 color palette (e.g., all blue and gold items). This creates a cohesive, intentional look that masks the low price point of these cheap diy gift baskets.
5. Design a Gourmet Foodie Gift Basket

For the foodie in your life! Pin this delicious and gourmet diy basket idea.
What You Need
- A shallow, high-quality basket or a rustic wooden board
- A clean linen napkin or tea towel for lining
- A bottle of gourmet olive oil or balsamic vinegar
- A jar of specialty jam, honey, or tapenade
- A box of artisanal crackers or a small baguette
- A hard cheese (like parmesan or aged cheddar) and/or a cured meat (like salami)
- A small bunch of grapes or a handful of olives
Step-by-Step Directions
- Line Your Base: Lay the linen napkin inside the basket, allowing it to drape over the sides.
- Position the Bottle: Place the bottle of olive oil or vinegar standing up in one of the back corners. This will be your height anchor.
- Add the Core Components: Arrange the cheese, salami, and jam jar in the center of the basket, clustering them together.
- Incorporate the Carbs: Lean the box of crackers or the baguette against the central items.
- Fill with Freshness: Fill any remaining gaps with the bunch of grapes or a small bowl of olives. This adds color and a fresh element.
- Secure and Wrap: Because of the fresh items, this food gift basket is best delivered in person. You can wrap it in cellophane, but leave the top open and tie the ribbon around the base of the basket.
Pro-Tip: Include a “tasting notes” card. For each item, write a short sentence describing its flavor or origin. This tested diy gift basket method transforms a collection of items into a guided culinary experience.

6. Welcome a New Baby with a Parent Survival Basket

The perfect, practical gift for new parents! Pin this thoughtful baby shower idea.
What You Need
- A felt diaper caddy or a foldable canvas storage bin to use as the “basket”
- A pack of high-quality, gentle baby wipes
- A beautifully packaged baby lotion or diaper cream
- A set of soft muslin swaddle blankets
- A wooden or silicone teether
- For the Parents: An insulated coffee tumbler, a bag of easy-to-prepare snacks (like granola bars), and a soothing lip balm.
Step-by-Step Directions
- Start with the Swaddles: Roll the swaddle blankets tightly and place them standing up inside the caddy. They will act as dividers and fillers.
- Add the Core Items: Arrange the pack of wipes and the baby lotion in the main compartments.
- Include the Parent’s Gift: Place the coffee tumbler prominently in one of the sections. It’s an important part of the gift!
- Tuck in the Small Extras: Fill the side pockets or remaining small spaces with the teether, lip balm, and snack bars.
- Finish with a Bow: Instead of wrapping in cellophane, which is noisy and impractical for a nursery, simply tie a large, soft satin ribbon around the entire caddy.
Pro-Tip: A truly experiential gift design for new parents focuses on saving them time and effort. Include a gift card for a food delivery service like DoorDash or Uber Eats. It’s often the most appreciated item in the whole baby gift basket.

7. Plant a Green Thumb Gardener’s Gift Basket

The perfect gift for the plant lover in your life! Pin this unique gardener’s basket.
What You Need
- A large terracotta pot or a galvanized metal bucket as the “basket”
- A small bag of potting soil to use as a base (optional, can also use filler paper)
- A high-quality hand trowel and cultivator
- A pair of durable gardening gloves
- Several packets of interesting heirloom seeds (vegetable, herb, or flower)
- A ball of garden twine
- A bar of exfoliating “gardener’s soap” to clean dirty hands
Step-by-Step Directions
- Prepare the Container: Fill the bottom of the pot or bucket with a layer of potting soil or filler paper to give the tools some height.
- Arrange the Tools: Place the handles of the trowel and cultivator sticking up out of the back of the pot, like a bouquet.
- Add the Gloves and Soap: Position the gloves and soap in the middle of the pot, in front of the tools.
- Fan Out the Seeds: Artfully fan the seed packets out in the very front so their beautiful illustrations are visible.
- Final Touches: Tuck the ball of twine into a gap. Tie a thick jute ribbon around the outside of the pot for a rustic, finished look.
Pro-Tip: For a more personalized touch, buy a set of blank wooden plant markers and use a wood-burning tool or permanent marker to label them with the names of the seeds you’ve included in the basket. It’s a simple DIY that adds a huge amount of charm.

8. Craft a Festive Holiday Themed Gift Basket

The perfect homemade Christmas gift! Pin this festive and easy DIY idea.
What You Need
- A medium-sized basket and a red or plaid cloth napkin for lining
- A glass jar for the hot cocoa mix
- Homemade Hot Cocoa Mix: (1 cup unsweetened cocoa powder, 2 cups powdered sugar, 1 cup powdered milk, 1 tsp salt – layer in the jar)
- A bag of mini marshmallows and chocolate chips to layer on top of the mix
- A festive holiday-themed mug
- A tin of shortbread cookies or a gingerbread man
- A single, beautiful Christmas ornament
Step-by-Step Directions
- Prepare the Homemade Element: Layer the hot cocoa mix ingredients in the glass jar for a beautiful striped effect. Top with marshmallows.
- Line the Basket: Place the cloth napkin in the basket as a festive liner.
- Position the Main Items: Put together the jar of cocoa mix and the mug in the center of the basket.
- Add the Treats: Place the tin of cookies next to the mug.
- The Final Touch: Gently place the Christmas ornament in the front of the arrangement, nestled into the cloth. Add a few cinnamon sticks or a small pinecone for a fragrant, woodsy touch.
- Wrap for Gifting: Wrap the basket in clear or gold-flecked cellophane and tie it with a wide, wire-edged ribbon to create a big, beautiful bow.
Pro-Tip: According to gift-giving etiquette, a holiday gift should be easy for the recipient to enjoy during a busy season. Attach a small tag to the hot cocoa jar with simple instructions: “Mix 3 tbsp with 1 cup of hot milk. Enjoy!”

9. Offer Comfort with a “Get Well Soon” Basket

Send some comfort and care. Pin this thoughtful ‘Get Well Soon’ gift idea.
What You Need
- A soft-sided basket or a simple gift box
- White or light yellow tissue paper
- A box of caffeine-free herbal tea (e.g., chamomile or peppermint)
- A small jar of local honey and a honey dipper
- An ultra-soft pair of fuzzy socks or slippers
- A paperback book (a light-hearted novel or a puzzle book)
- A high-quality, hydrating lip balm
Step-by-Step Directions
- Create a Soft Bed: Line the basket or box with several sheets of tissue paper, creating a soft, pillowy base.
- Place the Entertainment: Position the book standing up in the back of the basket.
- Add the Comforts: Arrange the box of tea and the jar of honey in front of the book.
- Tuck in the Coziness: Roll the fuzzy socks and tuck them into the side of the arrangement.
- Finish with the Essentials: Place the lip balm in the very front. This thoughtful, practical item shows you’ve considered all their needs.
- Keep it Simple: A simple ribbon tied around the basket is enough. Avoid noisy cellophane that might disturb someone who is resting.
Pro-Tip: The goal is multi-sensory gift experience creation focused on comfort. Choose items with pleasing textures (the fuzzy socks), soothing tastes (the honey and tea), and engaging but not overly-taxing entertainment (the book). This holistic approach shows deep thoughtfulness.

Key Takeaways
- Theme is Everything: A successful homemade gift basket starts with a clear theme (like “Spa Day” or “Movie Night”). This guides your choices and makes the final gift feel cohesive and intentional.
- Build from the Back, Tallest First: Always start assembling your basket by placing the tallest, heaviest items in the back. This creates a stable structure and a visually appealing backdrop for smaller items.
- Filler is Your Best Friend: Use crinkle-cut paper, tissue paper, or even folded fabric to fill the bottom of your basket. This elevates your items so they don’t get lost and makes the basket look full and luxurious.
- Mix Practical with Personal: The best baskets combine useful items the recipient needs with special treats they want. A mix of practical supplies and indulgent extras shows you’ve been truly thoughtful.
- Presentation Matters Most: Elevate even inexpensive gift basket ideas by focusing on presentation. Use a consistent color scheme, remove price tags, and finish with a beautiful ribbon or bow to give your DIY gift a professional, boutique feel.
- The Container is Part of the Gift: Choose a “basket” that the recipient can reuse, like a storage caddy for a new parent, a terracotta pot for a gardener, or a popcorn bucket for a movie lover.
FAQs About Homemade Gift Baskets
How do you make a gift basket look professional?
To make a gift basket look professional, focus on height, fullness, and finishing touches. Use plenty of filler to elevate items. Place tall items in the back and small items in the front. Stick to a cohesive color palette and fill every gap so the basket looks abundant. Finish by wrapping it in high-quality cellophane and tying a well-made bow with wire-edged ribbon.
What can I use for gift basket filler?
The best fillers are crinkle-cut paper, tissue paper, or wood excelsior (shredded wood). These are inexpensive and effective. For themed baskets, you can get creative: use a folded baby blanket for a new parent basket, a plaid scarf for a winter basket, or even uncooked pasta as a base for an Italian food theme. The key is to create a sturdy, elevated base.
How do you arrange items in a gift basket?
Arrange items by placing the tallest and heaviest items in the back-center first. This creates your anchor. Next, place medium-sized items on either side, working your way forward. Finally, tuck the smallest, lightest items into the gaps at the front. The goal is to create visual layers and ensure every item is at least partially visible from the front.
How do you wrap a homemade gift basket with cellophane?
Roll out a large sheet of cellophane, place your basket in the center, and bring all the edges up to meet above the tallest item. Gently gather the cellophane at the top, squeezing out excess air. Secure the gathered “neck” tightly with a piece of tape or a zip tie, then cover it by tying a large, decorative ribbon or bow around it.
What are good themes for homemade gift baskets?
Popular themes include relaxation (spa basket), hobbies (gardening, baking), and experiences (movie night, breakfast in bed). You can also base themes on a favorite color, a specific type of food or drink (coffee, wine, chocolate), or an occasion like a holiday or housewarming. The best theme is one that is personal to the recipient.
How much should a homemade gift basket cost?
A homemade gift basket can cost anywhere from $10 to over $100, depending on your choices. A charming basket using Dollar Tree items can easily be made for under $15. A gourmet food or high-end spa basket might cost $50-$75. The beauty of DIY is that you control the budget completely, and the value comes from the thought, not the price tag.
What kind of basket should I use for gifts?
Think beyond traditional wicker baskets and choose a container that’s part of the gift itself. Use a reusable storage bin for a home organization theme, a colander for a pasta-themed basket, a mixing bowl for a baker’s basket, or a diaper caddy for a new parent gift. This adds value and shows extra thoughtfulness.
What do you put in a homemade gift basket for a man?
Great items for a man’s gift basket include gourmet snacks, craft beer or whiskey, coffee, hot sauce, grilling tools, or high-quality socks. Consider his hobbies: a basket could be themed around golf (balls, tees, glove), grooming (beard oil, quality razor), or tech (portable charger, cable organizers).
How do you secure items in a gift basket so they don’t move?
Use double-sided tape or glue dots to secure lightweight items to heavier ones or to the basket itself. For tippy items like bottles, you can create “nests” in the filler paper to hold them steady. Packing the basket tightly, so there are no empty gaps, is the most effective way to prevent items from shifting during transport.
Can you make a gift basket without a basket?
Absolutely! You can use a gift box, a wooden crate, a galvanized bucket, a tote bag, or a large mixing bowl. Any container that can hold the items and fits your theme will work. Using an unconventional “basket” often makes the gift more unique and memorable.
Final Thoughts
Creating a homemade gift basket is one of the most rewarding ways to show you care. It’s a project where your thoughtfulness, creativity, and personal touch are the most important ingredients. This authoritative guide has shown you that whether you have a tiny budget or are aiming for a luxurious feel, the power to create gift baskets that look professional and feel deeply personal is entirely in your hands. A custom curated gift is more than just a present; it is a symbol of connection.
What has been your experience with giving or receiving a homemade gift?
Last update on 2026-04-27 / Affiliate links / Images from Amazon Product Advertising API