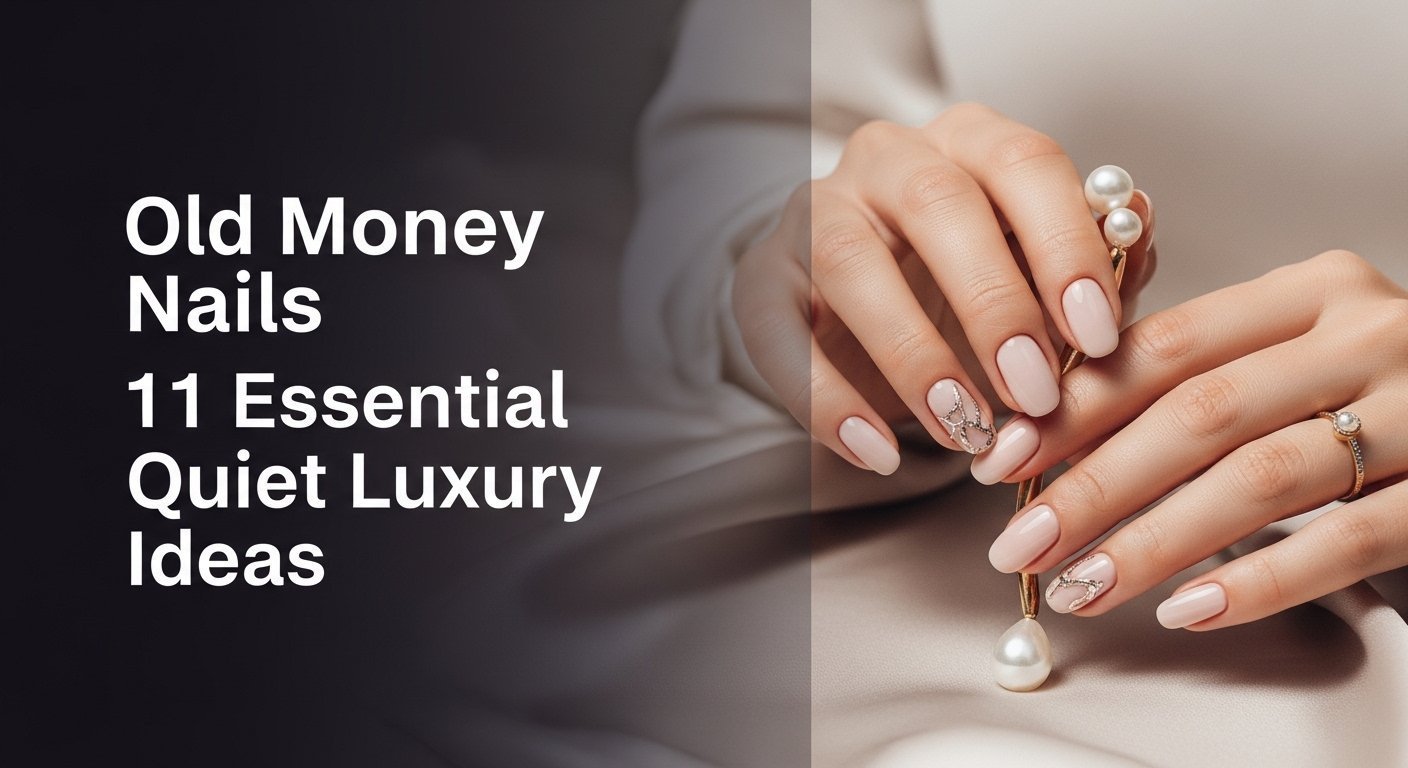
Tired of chasing the next fleeting nail trend that chips in two days? The endless cycle of bright colors, complex art, and high-maintenance appointments can be exhausting, leaving you craving a style that’s both chic and effortless. What if the secret to luxurious nails wasn’t about the design, but the quiet confidence of a perfect, timeless manicure?
Old money nails are a sophisticated nail style defined by understated elegance, natural shapes, and refined, neutral colors. This quiet luxury aesthetic focuses on meticulous grooming and high-quality, subtle manicures—like sheer pinks, milky whites, and classic reds—rather than bold, trendy nail art. It signifies timeless style and polish through impeccable care and restraint.
Drawing from proven methodologies and established best practices, this guide will serve as your definitive resource for achieving this refined nail style. We will explore the philosophy behind the old money manicure and provide you with 11 essential, actionable ideas. You’ll discover the exact colors, shapes, and expert techniques needed to cultivate an look of enduring elegance.
What Are Old Money Nails and Why Are They the Ultimate Symbol of Quiet Luxury?
The concept of old money nails has taken the beauty world by storm, but it’s far more than a fleeting trend—it’s a philosophy. At its core, this aesthetic represents a shift away from loud, conspicuous designs and towards an appreciation for subtlety, health, and impeccable quality. Old money nails are a sophisticated nail style defined by understated elegance, natural shapes, and refined, neutral colors. This quiet luxury aesthetic focuses on meticulous grooming and high-quality, subtle manicures—like sheer pinks, milky whites, and classic reds—rather than bold, trendy nail art. It signifies timeless style and polish through impeccable care and restraint. This style embodies sophisticated taste and reflects quiet luxury by focusing on what’s underneath. It prioritizes well-groomed nails and healthy cuticles, using color not to hide imperfections, but to enhance the nail’s natural beauty. Unlike trendy, high-maintenance looks, the old money manicure is all about a polished finish that looks intentional, healthy, and effortlessly chic, making it the ultimate symbol of quiet luxury nails.
11 Essential Old Money Nail Ideas for a Timelessly Chic Look in 2026
Ready to embrace the world of understated elegance? Moving beyond the ‘why’, let’s dive into the ‘how’. This section provides 11 distinct and actionable old money nail ideas that you can bring to your next salon appointment or master at home. Each look embodies the core principles of the aesthetic: classic colors, natural shapes, and a flawless, polished finish. We’ll cover everything from the quintessential sheer pink to the perfect classic red, complete with professional tips to ensure your manicure looks impeccably refined.
1. Achieve the Perfect Sheer Pink Manicure

Pin this iconic look to your ‘Classy Nails’ board!
The quintessential sheer pink nail polish is the foundation of the old money aesthetic. It’s clean, fresh, and universally flattering, creating the illusion of perfectly healthy, natural-looking nails. These classy nails are not about bold color, but about a translucent wash that evens out the nail plate and adds a glossy finish, making them look effortlessly polished and well-groomed.
Products & Tools Used
- Ridge-Filling Base Coat: Essential for a smooth canvas with sheer pink nails.
- Sheer Pink Nail Polish: Look for iconic shades like OPI ‘Bubble Bath’ or Essie ‘Ballet Slippers’.
- High-Gloss, Quick-Drying Top Coat: To achieve that glossy finish and prevent smudges.
- Cuticle Oil: For a perfectly hydrated, well-groomed finish.
Application Steps
- Prep Impeccably: Start with clean nails. Gently push back cuticles and cleanse the nail plate with rubbing alcohol to remove oils.
- Apply a Ridge-Filling Base: This is the secret to a non-streaky sheer pink manicure. Apply one thin coat and let it dry completely.
- Layer Thinly: Apply sheer nail polish in one to three very thin coats, depending on your desired opacity. Allow each coat to dry for at least two minutes.
- Seal with Shine: Finish with a generous layer of a high-gloss top coat to get that plump, gel-like look.
- Hydrate: Once dry, massage cuticle oil into the skin around the nail.
Pro-Tip: In my experience, the key to a perfect sheer pink application is patience. To avoid overgrown cuticles and ensure a clean line, leave a tiny, hairline gap between the polish and your cuticle. This professional technique prevents flooding and gives a more refined look.

2. Master the Understated Micro French Manicure

Save this subtle and chic nail idea for your next manicure!
The old money french nails are nothing like the thick, stark tips of the early 2000s. The modern, understated version is the micro french manicure, a subtle nail design that whispers rather than shouts. It features a razor-thin tip that delicately accentuates the nail’s edge, making it a sophisticated update to a classic french style.
Products & Tools Used
- Sheer Nude or Pink Base Polish: Choose a color that enhances natural beauty, like Essie ‘Mademoiselle’.
- Opaque White Polish: For the classic french tip.
- Ultra-Thin Nail Art Brush or a Silicone Nail Stamper: The key tool to design old money nails with precision.
- Glossy Top Coat.
Application Steps
- Build Your Base: After your base coat, apply one or two coats of your sheer nude polish and let it dry completely.
- Create the Tip: Pour a small drop of white polish onto a palette. Dip your ultra-thin brush in and carefully trace a delicate line along the free edge of your nail. Hack: For an easier method, use a silicone stamper. Paint a line of white polish on the stamper, then gently press the tip of your nail into it at a 45-degree angle.
- Clean Up: Use a small brush dipped in acetone to perfect the line and clean up any mistakes on the skin.
- Seal It: Apply a glossy top coat to smooth everything out and add that signature old money shine.
Pro-Tip: According to celebrity manicurist secrets, the key to a modern, quiet luxury micro french is proportion. The white tip should be barely there, almost like the natural white of a healthy nail. It should be a whisper, not a statement.

3. Embrace the Impeccable Milky White Nail

Pin this clean and chic look for year-round elegance!
A modern classic, milky white nails have become a staple of the clean nails aesthetic. The key is to choose a soft, semi-opaque white, not a stark, chalky one. This look offers a fresh and clean appearance that’s more contemporary than sheer pink but just as timeless. The right creamy nail bases provide a polished impression that is both modern and undeniably elegant.
Products & Tools Used
- A Soft, Milky White Polish: Look for shades described as “milky,” “cloudy,” or “sheer white,” like OPI ‘Funny Bunny’.
- Clear Top Coat: For the DIY milkiness hack.
- Smoothing Base Coat.
- High-Shine Top Coat.
Application Steps
- Start Smooth: A smooth base is critical for light colors. Use a ridge-filling or smoothing base coat.
- Get the Right Consistency: If your white is too opaque, mix nail polish for a custom shade. Place a few drops on a palette and mix in one drop of clear top coat to sheer it out.
- Apply in Thin Coats: Paint two to three thin coats, letting each one dry in between. This builds the color evenly and prevents the dreaded streaks common with white polish.
- Add Gloss: A super glossy top coat is non-negotiable. It gives the milky white color depth and that luxurious, gel-like appearance.
Pro-Tip: For a truly sophisticated nail style, the key is translucency. You should be able to see a hint of your natural nail line through the polish. This is what separates a chic milky white nail from a less refined, stark white manicure.

4. Perfect the ‘Your Nails But Better’ Nude

Find your perfect nude—pin this for your next salon visit!
Finding the perfect nude old money nails is a game-changer. The goal is a “your nails but better” effect, using neutral nail tones that complement your skin and create a seamless, finger-elongating look. Unlike a one-size-fits-all beige, the ideal classy nude nail colors are chosen based on your unique skin undertone, making the manicure look incredibly personal and impeccably chic.
Products & Tools Used
- A Nude Polish Matched to Your Undertone.
- A strengthening base coat.
- A plumping, gel-effect top coat.
Application Steps
- Find Your Undertone: Look at the veins on your wrist. Blue/purple veins mean you have cool undertones (look for nudes with pinkish hints). Greenish veins mean warm undertones (look for nudes with beige or peachy hints). A mix means you’re neutral and can wear most shades.
- Select Nude Polish: Based on your undertone, choose a nude that is one or two shades lighter or darker than your skin tone for a subtle contrast that looks intentional and refined.
- Apply Two Coats: Apply two even coats of your chosen nude polish.
- Add a Plumping Top Coat: This makes the nude color look richer and gives a flawless, impeccably chic finish.
Pro-Tip: An expert nail artist‘s secret for the ultimate ‘Your Nails But Better’ look is a color-enhancing sheer coat, like Dior’s Nail Glow. It deepens the pink of your nail bed and brightens the white of your tips for a hyper-natural, well-groomed look with a single product.

5. Rock the Timeless Classic Red Manicure

A true classic never fades. Pin this for a dose of confidence!
Many wonder, can red nails be old money? The answer is a resounding yes, provided it’s the right red. Classic red nails are a power move, a timeless statement of confidence that fits perfectly within the aesthetic. The key is to choose a pure, blue-based red with a cream finish—avoiding anything too orange, glittery, or neon. This is one of the most sophisticated nail colors you can choose.
Products & Tools Used
- A Classic, Blue-Based Red Polish: Think timeless shades like OPI ‘Big Apple Red’ or Essie ‘A-List’.
- A Stain-Preventing Base Coat.
- A “no-chip” style Top Coat.
- Angled cleanup brush and acetone.
Application Steps
- Prevent Stains: Red polish is notorious for staining. Never skip a quality base coat designed to prevent yellowing.
- Paint with Precision: Paint nails old money style by applying two thin, even coats. Because red is bold, a clean application is crucial. Use an angled brush dipped in acetone to create a sharp, clean line around the cuticle.
- Lock in the Color: Use a durable, chip-resistant top coat to maintain the color’s vibrancy and achieve a long-lasting manicure.
- Check for Perfection: Bold colors are unforgiving. Double-check for any smudges or unevenness before you finish.
Pro-Tip: A true old money red is never flashy. It’s a pure, cream-finish red. Avoid reds with shimmer, glitter, or strong orange undertones. The right red exudes confidence and is a power statement that is as timeless as a string of pearls.

6. Curate the Perfect Deep Burgundy Nail for Autumn

The perfect autumn shade. Pin this for your fall style board!
As the seasons change, so can your color palette. Deep burgundy nails are the perfect old money nail colors for fall. Dark, moody, and incredibly chic, shades of oxblood, wine, and even deep espresso nail polish are sophisticated alternatives to classic red. When worn on short, neat nails with a glossy finish, these sophisticated nail colors look intentional and luxurious.
Products & Tools Used
- A Rich, Deep Burgundy or Oxblood Polish: Think iconic shades like Essie ‘Wicked’ or Chanel ‘Rouge Noir’.
- A high-quality, stain-blocking base coat.
- A gel-like, high-gloss top coat.
Application Steps
- Protect Your Nails: Dark polishes are highly pigmented and can stain. Apply one or two coats of a reliable stain-preventing base coat.
- Build the Depth: Apply two coats of your burgundy polish. The first coat may look patchy; the second coat will deliver that rich, opaque color.
- Ensure Flawless Edges: With dark colors, mistakes are more visible. Use a cleanup brush dipped in acetone to create a crisp, perfect oval around your cuticle line.
- Amplify the Shine: A super glossy top coat is essential. It prevents the dark color from looking flat and adds that expensive-looking, luxurious nail care finish.
Pro-Tip: The secret to keeping dark polish looking old money is nail length. This color looks most sophisticated on short square nails or short, rounded oval nails. It keeps the look chic and intentional, rather than overly dramatic.

7. Shape the Nail: The Natural Soft Square

The foundation of every great manicure. Pin this shaping guide!
Before any polish is applied, the shape is paramount. Short square nails are one of the most popular classic nail shapes for the old money look. This shape is clean, practical, and strong. The key is to soften the corners slightly to create a “soft square,” which looks more natural and is less prone to snagging than a sharp, 90-degree corner. This is one of the most classic natural nail shapes.
Products & Tools Used
- A High-Quality Glass or Crystal Nail File: These seal the nail edge as they file, preventing peeling.
- Nail Clippers (optional, for length reduction).
- A 4-Way Buffer Block.
Shaping Steps
- Reduce Length: If needed, clip your nails to just past your fingertip. Clip straight across.
- File Straight Across: Shape nails for old money aesthetic by filing the tip in one direction (not sawing back and forth). File until you have a crisp, straight edge.
- Soften the Corners: This is the key to the ‘soft’ square. Gently swipe the file once or twice over each sharp corner at a 45-degree angle. The goal is to just round off the sharpness, not to create a full curve.
- Buff to a Shine: Use a 4-way buffer block to smooth the nail surface and create a healthy nail shine, even without polish.
Pro-Tip: As per proven nail strengthening methods, always file your nails when they are completely dry. Filing wet nails can cause them to peel and split. A glass file is your best investment for maintaining nail plate structure and growth.

8. Define Elegance: The Short Almond Shape

The secret to elegant-looking hands. Pin this guide!
For those who prefer a slightly softer, more feminine silhouette, the short almond nails are an ideal choice. This elegant nail shape has tapered sides that meet at a soft, rounded point, creating a beautiful elongating effect on the fingers. Almond old money nails are never overly long or sharp; they remain practical and graceful, embodying sophisticated taste.
Products & Tools Used
- A 180-grit nail file.
- A finer-grit glass file for finishing.
- A nail strengthening treatment.
Shaping Steps
- Find the Center: Mark a tiny dot in the very center of your nail tip. This will be your guide.
- File Towards the Center: Place your file at the corner where the nail meets the sidewall. File in one direction towards the center dot. Repeat on the other side.
- Taper Gently: Continue filing both sides evenly, creating a gentle taper that meets at the center point. Avoid creating a sharp, stiletto-like point.
- Round the Tip: Once you have your tapered shape, gently round the very tip so it resembles the curve of an almond. This is the key to a soft, elegant nail shape.
Pro-Tip: To promote nail health while wearing an almond shape, it’s crucial to keep the nails from becoming too long or pointy, which can lead to breakage. A “short almond” where the tip extends just a few millimeters past the fingertip is the ideal, functional nail shape for this aesthetic.

9. Master the High-Gloss “Expensive” Finish

It’s all in the details. Pin this secret to a luxury finish!
The single most important element that separates a good manicure from an expensive-looking one is the finish. Achieving that plump, ultra-shiny, glossy finish nails look is a non-negotiable part of the old money aesthetic. This polished finish not only looks luxurious but also protects your manicure, extending its life and maintaining shine on nails for days.
Products & Tools Used
- A High-Quality, Plumping “Gel-Effect” Top Coat (that doesn’t require a UV lamp).
- Your finished manicure (any color).
Application Steps
- Apply a Generous Coat: Don’t be shy. After your color is dry to the touch, apply a generous layer of your glossy top coat. Allow it to “float” over the color without dragging the brush too hard.
- Cap the Free Edge: This is the most important professional step. After painting the top coat on the nail surface, take the brush and swipe it horizontally along the very tip (the free edge) of your nail. This seals the polish and dramatically prevents nail damage and chipping.
- Allow to Dry Fully: Let the top coat dry completely in a safe place.
- Reapply Mid-Week: To maintain that polished appearance, reapply a thin layer of your top coat 3-4 days into your manicure. This will restore the high-gloss shine and extend the life of your color.
Pro-Tip: Not all top coats are created equal. Invest in a salon-quality nail product known for its high shine and durability. It makes a bigger difference to the final look of your old money manicure than almost any other product.

10. Prioritize Impeccable Cuticle Care

The secret to healthy nails starts here. Pin this essential care tip!
You can have the most beautiful polish color, but if your cuticles are dry and ragged, the entire look is compromised. A proper nail care routine for old money look is centered around healthy, hydrated cuticles. Perfectly well-groomed nails have neat, pushed-back cuticles, which provide a clean frame for your manicure and are a key signifier of meticulous self-care. This is the ultimate dry cuticles solution.
Products & Tools Used
- Cuticle Remover Gel/Solution.
- A Wooden or Rubber-Tipped Cuticle Pusher.
- Nourishing Cuticle Oil.
- Hand Cream.
The Routine
- Soften First: Apply a cuticle remover gel to the base of each nail and let it sit for 15-60 seconds (follow product instructions). This will soften the dead skin.
- Gently Push Back: Use a soft-tipped or wooden cuticle pusher to gently push the softened cuticle back into a neat, clean curve. Never use sharp metal tools.
- Wipe Clean: Wipe away the remover gel and any dead skin residue with a damp cloth.
- Hydrate, Hydrate, Hydrate: This is the most crucial step. Massage a high-quality cuticle oil into the cuticles and surrounding skin. Do this daily, especially before bed.
Pro-Tip: According to dermatologist recommended nail care practices, you should never cut your own cuticles. The cuticle is a protective barrier. Removing it can lead to infection and damage the nail matrix. The true old money approach is not removal, but meticulous, daily hydration and gentle maintenance.

11. Invest in a Builder Gel for Natural Nail Strength

The ultimate investment for naturally long, strong nails. Pin this expert tip!
For those with naturally weak or brittle nails, achieving the healthy look required for this aesthetic can be a challenge. Enter builder gel nails. This professional service involves applying a clear, durable gel over your natural nail, providing strength and a perfectly smooth surface. It’s the ultimate weak nails solution and a way to achieve flawless nail strengthening that allows your own nails to grow, protected, underneath.
Products & Tools Used
- Builder in a Bottle (BIAB) Gel Kit (includes pH bonder, base coat, builder gel, top coat).
- UV/LED Nail Lamp.
- Isopropyl Alcohol for cleansing.
The Process (To Discuss with a Professional)
- Professional Consultation: This is not a beginner DIY. The first step is to book an old money nail appointment with a technician skilled in builder gel.
- Nail Prep: The technician will meticulously prep your natural nail, ensuring it’s clean and dehydrated for optimal adhesion.
- Application: A thin layer of builder gel is applied to the natural nail. The technician will expertly create a subtle “apex” (a slightly thicker curve in the center of the nail) to provide strength and a beautiful, natural-looking contour.
- Curing: The gel is cured under a UV/LED lamp.
- Finishing: The nail can then be buffed smooth and left with a clear top coat for a hyper-natural look, or it can be used as the perfect, strong base for any of the old money nail colors mentioned above.
Pro-Tip: Builder gel is the ultimate weak nails solution. It’s a long-term investment in your nail health. It allows your natural nails to grow long and strong underneath a protective, durable layer, perfectly embodying the old money principle of investing in quality and foundational health.

Key Takeaways
Embracing the old money nail aesthetic is simple when you focus on its core principles. It’s less about a specific product and more about a philosophy of care and refinement. Here are the most important points to remember:
- Health Over Hype: The old money nail aesthetic prioritizes meticulously well-groomed, healthy nails over trendy, elaborate nail art. It’s about enhancing your natural beauty.
- Choose Classic Colors: Stick to a refined color palette. Sheer pink nail polish, milky white nails, skin-tone nudes, and classic red nails or deep burgundies are the cornerstones of this look.
- Shape is Everything: The foundation of the look is a natural nail shape. Opt for a short square with soft corners or a short almond shape that is practical and elongates the fingers.
- Maintenance is Key: This look requires meticulous care. Daily cuticle oil application and gentle maintenance (never cutting cuticles) are non-negotiable for a truly polished finish.
- Invest in Quality Finish: The secret to an expensive-looking manicure is the finish. A high-gloss, plumping top coat and the technique of “capping the free edge” are essential for shine and durability.
People Also Ask About Old Money Nails
What makes nails look “old money”?
Nails look “old money” due to their emphasis on health, subtlety, and impeccable grooming rather than flashy trends. This aesthetic is defined by natural nail shapes like a short square or almond, a refined color palette of sheers, nudes, and classic reds, and a flawless, high-gloss finish. The overall impression is one of effortless elegance and understated luxury, suggesting that one’s beauty is a matter of maintenance, not decoration.
What is the difference between old money and quiet luxury nails?
There is virtually no difference; the terms are often used interchangeably to describe the same sophisticated aesthetic. “Old money nails” specifically ties the trend to the broader old money aesthetic in fashion, while “quiet luxury nails” is a more modern term emphasizing high-quality minimalism. Both refer to the exact same principles: clean, healthy, well-groomed nails with timeless, understated colors and shapes.
Can you have long old money nails?
Generally, the old money aesthetic favors short to medium-length nails that are practical and look natural. Extremely long nails, especially sharp shapes like stilettos or long coffins, are not typically associated with this understated look. A modest length, where the nail extends just a few millimeters past the fingertip in an almond or oval shape, can still be considered elegant and within the aesthetic.
What nail polish brands are considered old money?
Brands known for their classic color palettes, high-quality formulas, and timeless appeal are considered old money. Iconic brands like Chanel, Dior, and Hermès are the epitome of this. However, trusted salon-quality brands like Essie and OPI are also staples, offering the perfect sheer pinks, nudes, and classic reds that are essential for the old money manicure.
Old money nails vs new money nails: what’s the difference?
The primary difference is subtlety versus statement. Old money nails are about understated luxury: short, natural shapes, sheer or classic colors, and flawless grooming. In contrast, “new money nails” often refer to more conspicuous styles: long acrylics, bold logos, bright neon colors, intricate nail art, and lots of “bling.” Old money whispers, while new money often shouts.
How do you do old money French tip nails?
You create a “micro French,” which features an extremely thin, delicate white line on a sheer nude or pink base. Instead of a thick, stark white band, the old money french nail tip is barely there, mimicking the natural white edge of a healthy nail. This is best achieved with a very thin nail art brush or a silicone stamper for a precise, subtle nail design.
Are milky white nails considered old money?
Yes, milky white nails are a popular and modern part of the old money aesthetic. The key is that the color is a soft, semi-translucent “milky” white, not a stark, opaque white like Wite-Out. Shades like OPI’s ‘Funny Bunny’ are perfect because they provide a clean, chic nail color that looks fresh and sophisticated without being harsh.
What is the best old money nail color for fair skin?
For fair skin, the best old money nail colors are sheer pinks with a cool, blueish undertone or nudes with a hint of pink. Shades like Essie’s ‘Ballet Slippers’ are iconic for a reason. These delicate nail shades complement the natural pink tones in fair skin, creating a very clean, elegant, and natural-looking manicure that never looks out of place.
How do you get a polished natural nail look without color?
Achieving a polished look without color relies entirely on shaping and buffing. First, shape nails perfectly into a soft square or oval using a glass file. Then, use a 4-way buffer block. Follow the steps from coarse to fine, finishing with the shine buffer. This smooths ridges and buffs the nail plate to a natural, high-gloss shine. Finish with daily cuticle oil application.
How do you maintain old money nails?
Maintenance is a consistent routine of care. This includes weekly manicures to maintain shape and polish, daily application of cuticle oil to keep skin hydrated, and using a gentle nail filing method with a glass file to prevent breakage. It also means reapplying a top coat mid-week to maintain shine and protect from chips, ensuring your nails always look impeccably well-groomed.
Final Thoughts on Achieving the Old Money Nail Aesthetic
The old money nail aesthetic is more than just a passing trend; it’s a timeless approach to beauty that champions health, quality, and understated elegance. By focusing on meticulous nail care routines, classic shapes, and a refined color palette, you can achieve old money nails that exude sophistication and polish in any setting. This look isn’t about expensive products, but about the investment of time and care into creating a foundation of healthy, beautiful nails.
Whether you choose a perfect sheer pink manicure, a classic red, or simply a buffed, natural shine, the core principle remains the same: true style is quiet, confident, and enduring. You now have all the essential ideas and techniques to embrace this look for yourself.
What is your go-to old money nail color or style? Share your favorite in the comments below
Last update on 2026-04-27 / Affiliate links / Images from Amazon Product Advertising API