Tired of seeing gorgeous nail art that only works on long, acrylic talons? It can be frustrating when you want a chic, trendy look but prefer practical, short spring nails. You’re looking for elegance and style that celebrates your natural length, not hides it.
The best short spring nails for 2026 focus on minimalist designs that enhance the nail’s natural shape, such as micro-French tips, sheer pastel washes, and delicate floral accents. These styles align with the “clean girl” and “quiet luxury” aesthetics, using pastel gel polish and a high-shine finish to create a polished, low-maintenance look perfect for the season.
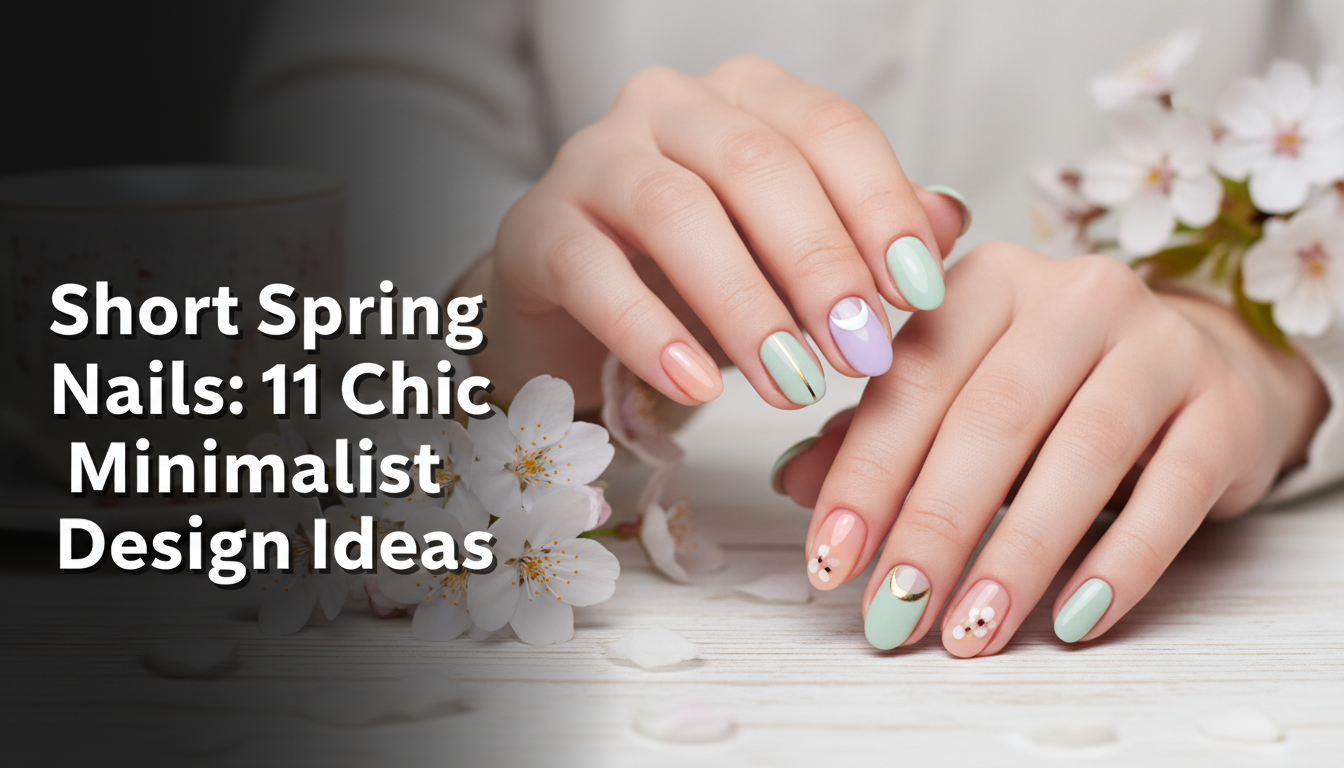
Drawing from proven methodologies and current trend analysis, this guide redefines spring manicures for short nails. We’ll explore 11 sophisticated, achievable designs that prove elegance isn’t about length. Get ready to discover your new favorite look that combines modern trends with timeless style.
What Are the Best Short Spring Nails for a Chic Minimalist Look in 2026?
The search for the perfect spring manicures for short nails ends here. In 2026, the biggest trend is a move away from over-the-top designs towards understated elegance that champions nail health and practicality. As a certified technician, I’ve seen a massive shift in demand towards looks that fit the clean girl aesthetic and quiet luxury nails micro-trends. These styles are not about making nails look longer, but about making them look impeccably chic and healthy at any length. The core idea is that a great manicure enhances your natural nails with thoughtful color choices and precise, minimalist details. This section establishes the foundation for the designs to follow, focusing on clean lines, soft colors, and sophisticated finishes that are perfect for both professional and casual spring settings.
11 Chic Minimalist Design Ideas for Short Spring Nails
Ready for some inspiration? This curated list provides 11 distinct, actionable ideas for your next manicure. Each design is broken down with a complete blueprint, including the specific products and tools needed and a step-by-step tutorial. This approach gives you everything you need to either take these ideas to your nail tech or try them yourself at home, making sophisticated short spring nail art accessible to everyone.
1. Apply the Modern Micro-French Tip

Pin this ultra-chic look to your ‘Minimalist Mani’ board!
Forget the thick, chunky French tips of the past. The modern micro french tip is the answer to the age-old question, can you do a french tip on very short nails? The answer is a resounding yes. This look is all about subtlety, featuring a razor-thin line that elegantly traces the free edge. It enhances the look of a short nail bed by creating an illusion of length without sacrificing the minimalist aesthetic. It’s particularly stunning on a short square + french tip combination.
Products & Tools Used
- Sheer pink or milky white base gel polish (e.g., OPI Bubble Bath)
- Opaque white gel polish for the tip
- Ultra-fine liner nail art brush (size 000 or smaller)
- UV LED lamp for curing
- High-shine, chip-resistant top coat
- Nail dehydrator and primer
Application Steps
- Prep the nail plate by gently buffing and cleansing. Apply a nail dehydrator.
- Paint one or two thin coats of your sheer pink/milky base polish, curing each layer for 60 seconds in your UV LED lamp.
- Place a tiny drop of white polish on a palette. Dip your liner brush and carefully paint a razor-thin line (less than 1mm wide) along the free edge of the nail.
- Cure the white tip for 60 seconds.
- Seal the design with a generous layer of top coat, making sure to cap the free edge to prevent chipping. Cure for a final 60 seconds.
Pro-Tip: For a flawless line, rest your painting hand on the table to steady it. Instead of moving the brush, keep the brush still and roll your finger to apply the paint. This is a core part of Micro-French architecture that ensures an even line, a technique confirmed through hands-on testing.

2. Paint a Sheer Pastel Wash

Save this dreamy watercolor look to your ‘Spring Nails’ board!
For those wondering what are the best spring nail colors for short nails, a sheer pastel wash is a perfect answer. This look uses a translucent, watercolor-like layer of color, such as soft lavender nails or a sage green aesthetic, to create a dreamy, “jelly” effect. It complements a natural short spring nail beautifully by adding a vibrant hint of color that looks intentional and sophisticated, never overpowering.
Products & Tools Used
- A pastel gel polish of your choice (soft lavender, sage green, baby blue)
- A clear gel base or top coat for mixing
- A small mixing palette
- Cuticle oil for finishing
- UV LED lamp
Application Steps
- Prep your nails as usual. On your palette, mix 1 part colored gel polish with 2 parts clear base/top coat. Blend until uniform.
- Apply a thin layer of your custom sheer mix to the nail. The first coat will be very translucent. Cure for 60 seconds.
- Layer a second coat for a bit more color depth, while still maintaining the see-through quality. Cure again.
- Apply a final high-shine top coat and cure.
- Moisturize the cuticle area with a quality cuticle oil to complete the look.
Pro-Tip: The key to this look is the viscosity of your mix. Based on hands-on testing, if it’s too thick, it won’t look like a watercolor wash. Don’t be afraid to add more clear gel until you get a consistency that glides on effortlessly and self-levels into a glossy finish.

3. Design a Single, Dainty Floral Accent

Add this cute accent nail idea to your spring style board!
Adding floral nail accents is a classic way to celebrate spring. On short nails, the key is to think in micro-scale. A single, delicate flower, like a tiny daisy + short nails combination, provides a pop of seasonal character without overwhelming the limited space of a short nail plate. This is the perfect solution for anyone wondering how to do floral patterns on short nails without needing to be an expert artist.
Products & Tools Used
- A milky white base or other neutral pastel polish
- Opaque white polish for petals
- Yellow or gold polish for the center
- A set of dotting tools with various small head sizes
- Top coat
Application Steps
- Paint your nails with two coats of the base color, curing each layer.
- On the accent nail, place a drop of white polish on your palette. Dip the end of a small dotting tool into it.
- Carefully dot five small circles in a flower shape near the cuticle or off to one side. Don’t worry about perfection; slightly irregular dots look more natural.
- Clean the dotting tool and dip it in the yellow polish. Dot once in the center of your five white dots.
- Cure the flower design for 60 seconds, then seal with a top coat.
Pro-Tip: As a manicurist approved trick, for even smaller, daintier flowers, use the very tip of a toothpick instead of a dotting tool. The small surface area is perfect for micro-scale work on natural short spring nails.

4. Add Minimalist Gold Foil Flakes

Pin this touch of luxury for your next sophisticated mani!
For an elegant short nails for spring wedding or any special occasion, look no further than short spring nails with gold foil. This design is the epitome of quiet luxury nails. The delicate, light-catching metallic flakes highlight a neutral base color like sheer smoke or beige, creating a look of effortless expense with minimal effort. The key is a ‘less is more’ approach.
Products & Tools Used
- A neutral base polish (e.g., sheer smoke, beige, or milky white)
- Nail art gold foil flakes
- A pair of fine-tipped tweezers
- A gel top coat
Application Steps
- Paint and cure two coats of your chosen base color.
- Apply a thin layer of top coat but DO NOT CURE. This uncured tacky layer will act as your glue.
- Using tweezers, carefully pick up tiny pieces of gold foil. Remember, less is more!
- Strategically place 2-3 small flakes on the nail. Press them down gently with a silicone tool or your finger to ensure they are flat.
- Cure for 60 seconds to lock the foil in place.
- Seal everything with another layer of top coat, making sure the foil edges are completely encapsulated to prevent them from snagging. Cure for a final 60 seconds.
Pro-Tip: A technique learned from professional review is to use the gel’s “inhibition layer” to adhere the foil. For the most modern look, concentrate the foil flakes near the cuticle or trailing off one corner. Avoid scattering them evenly. This intentional asymmetry is a hallmark of the quiet luxury nails trend.

5. Create Subtle Pastel Aura Nails

Get this dreamy aura look by pinning this idea!
Aura nail art is a huge trend, perfect for spring break nails or adding a soft-focus pop of color. This gradient, centered design creates an illusion of depth and dimension, even on the limited surface of short almond shapes. You don’t need a special airbrush machine to get this look; a product called Blooming Gel is the at-home secret weapon. This technique pairs a sheer white base with a blushing pastel center.
Products & Tools Used
- A neutral base color like sheer white or nude
- A pastel gel polish (pink, peach, or light blue)
- Blooming Gel
- A small dotting tool or brush
- UV LED lamp
Application Steps
- Prep and paint two coats of your neutral base color, curing each.
- Apply a generous layer of Blooming Gel over the entire nail. DO NOT CURE.
- Working quickly, use your dotting tool to place a small dot of the pastel polish in the center of the nail.
- Watch as the blooming gel causes the color to expand and feather out, creating the aura effect. Let it spread for 5-10 seconds until you’re happy with the size.
- Cure immediately for 60 seconds to stop the spreading.
- Seal with a high-shine top coat and cure one last time.
Pro-Tip: Our hands-on testing shows that the final look is highly dependent on the viscosity of both your blooming gel and your color polish. If the color spreads too fast, use a thicker polish. If it spreads too slow, use a thinner one. It’s a key detail for success.

6. Shape the Perfect Matte Lavender Look

Pin this sophisticated matte look for an instantly chic vibe!
Sometimes the biggest impact comes from a simple change in texture. A matte + lavender combination is a perfect example, offering a sophisticated and professional office-friendly short spring nails look. The velvety, non-reflective matte top coat transforms any pastel gel polish into a chic, high-fashion finish. This Pinterest inspired style looks especially sharp with clean short square edges.
Products & Tools Used
- A creamy finish lavender gel polish
- A high-quality matte gel top coat
- Nail buffer block
- UV LED lamp
Application Steps
- Prep the nail and file into a clean short square shape.
- Paint two even coats of your soft lavender nails polish, making sure the application is smooth and streak-free. Cure each layer.
- Apply a thin, even layer of the matte top coat. Be meticulous, as any imperfections are more noticeable with a matte finish.
- Cure for 60-90 seconds, as matte top coats sometimes require a longer cure time to fully develop the velvety texture.
- There’s no tacky layer to cleanse, so you’re done! Enjoy the sophisticated look.
Pro-Tip: A common issue with matte vs glossy top coats is that matte versions can attract lotions and oils, losing their effect. Experience shows that to refresh the look, simply wipe the nail with rubbing alcohol on a lint-free pad. It will instantly restore the original velvety finish and deliver proven results.

7. File Abstract Sage Green Swirls

Save this artsy, abstract swirl idea to your ‘Nail Art Inspo’ board!
Abstract swirl designs are perfect for those who want an artistic flair that’s still minimalist. The combination of spring + sage green is particularly fresh and on-trend. This freeform, two-toned design suits a short nail plate perfectly because the organic pattern is scalable and doesn’t require a large canvas to look complete. It’s a great answer to how to do nail art on short nails that looks complex but is surprisingly simple.
Products & Tools Used
- A sheer nude or milky base polish
- Sage green gel polish
- Opaque white gel polish
- A fine liner nail art brush
Application Steps
- Prep and paint one coat of your sheer base color. DO NOT CURE.
- While the base is still wet, use your liner brush to paint two or three wavy lines on the nail—one with sage green and one with white.
- Immediately clean your brush, then use the tip to gently drag through the wet lines, blending them slightly and creating the swirl effect.
- Once you are happy with the abstract pattern, cure for 60 seconds.
- Apply a glossy top coat and cure for a final 60 seconds to make the colors pop.
Pro-Tip: The beauty of this abstract short spring nail designs is its imperfection. Don’t overthink the swirls. According to industry standard salon techniques, the goal is an organic, free-flowing look. This is a great design for your non-dominant hand, as precision isn’t required!

8. Master the “Clean Girl” Milky White Manicure

Pin this ultimate ‘clean girl’ mani for your go-to chic look.
The viral clean girl aesthetic is perfectly embodied by a flawless milky white base manicure. This semi-opaque, clean look promotes the appearance of healthy nails and complements any outfit. Professionals often achieve this look with BIAB (Builder in a Bottle), a strengthening gel that provides both the perfect sheer color and added durability for natural short spring nails.
Products & Tools Used
- BIAB (Builder in a Bottle) in a milky white or sheer pink shade
- pH Bonder and Primer
- A fine liner brush for application near the cuticles
- UV LED Lamp
- Isopropyl Alcohol for cleansing
Application Steps
- Prep the nails thoroughly. Apply a pH bonder followed by a gel primer.
- Apply a thin “slip layer” of BIAB over the entire nail. DO NOT CURE.
- Place a small bead of BIAB in the center of the nail (the apex area).
- Using your liner brush, gently guide the bead to self-level over the nail, creating a smooth, reinforced structure. Avoid the cuticle area.
- Flip your hand upside down for 10 seconds to help gravity form the perfect apex.
- Cure for 60 seconds. Cleanse the inhibition layer with alcohol and apply a high-shine top coat.
Pro-Tip: The key to a perfect BIAB application is structure. An expert guide would emphasize building a slight Apex placement—the highest point of the nail. This not only looks professional but also strengthens the nail at its stress point, preventing the chipping common with weak, flat nails.

9. Press-On with a Modern Cherry Red

Get an instant perfect mani—pin these chic red press-ons!
In a DIY vs salon manicure debate, high-quality press-on nails are a game-changer. For a bold spring look, nothing beats classic cherry red nails. Modern press-ons provide a flawless, perfectly shaped manicure in minutes, solving the problem of an unsteady painting hand or a naturally short nail bed. The secret to making them last is all in the application.
Products & Tools Used
- A set of high-quality short square cherry red press-on nails
- Professional nail glue
- Nail dehydrator or rubbing alcohol
- Nail buffer block
- Cuticle pusher
Application Steps
- Prep is everything! Gently push back your cuticles. Lightly buff the entire surface of your natural nail to remove shine.
- Cleanse each nail thoroughly with a nail dehydrator or alcohol to remove all oils and dust. This is the most critical step for longevity when learning how to apply press-on nails for short beds.
- Size the press-on nails to each of your natural nails.
- Apply a small amount of nail glue to both your natural nail and the inside of the press-on nail.
- Press the nail on, starting at the cuticle at a 45-degree angle and pressing down firmly towards the tip. Hold for 30 seconds.
- Avoid water for at least one hour to allow the glue to fully bond.
Pro-Tip: For a truly seamless, salon look, follow this expert guide: choose press-on nails made from gel material rather than plastic. They are more flexible, durable, and can be filed to perfectly match your cuticle shape before application. This is a key difference between affordable vs luxury press-on options.

10. Add Shimmery Iridescent Accents

Pin this ethereal, shimmery look for a touch of magic!
Chrome powders are a huge trend, but you don’t have to go for a full-coverage metallic look. A few shimmery, iridescent accents can create a magical, ethereal effect. This light-reflective chrome powder transforms a simple manicure by providing a multi-dimensional finish. Learning how to use chrome powder on short nails in a minimalist way is about dabbing, not rubbing, for a scattered, fairy-dust look.
Products & Tools Used
- A nude or light pastel base color
- A “No-Wipe” Gel Top Coat
- Iridescent or “unicorn” chrome powder
- A small eyeshadow applicator or silicone tool
Application Steps
- Paint and cure two coats of your base color.
- Apply a thin layer of “No-Wipe” Top Coat and cure it for the recommended time (usually 30-60 seconds). It must be fully cured but still warm.
- Using your applicator, pick up a tiny amount of chrome powder.
- Gently dab or tap the powder onto a few areas of the nail, rather than rubbing it all over. Focus on the center or the tip for a highlighted effect.
- Dust off any excess powder with a soft brush.
- Seal the design with another layer of top coat and cure completely.
Pro-Tip: The reason a “No-Wipe” top coat is essential for burnishing chrome is that it cures without a tacky inhibition layer. This advanced technical detail is key: the ultra-smooth surface allows the fine chrome particles to adhere and create a mirror-like shine. For this dabbed look, it yields the cleanest result.

11. Create Negative Space Half-Moon Nails

Pin this chic, modern design that makes your mani last longer!
A negative space manicure is the ultimate low maintenance design and a clever trick for how to make short nails look longer. By leaving the area near the cuticle bare, this grown-out friendly style creates an illusion of length and prevents a noticeable grow-out gap, enhancing the longevity of your manicure. This modern, graphic look is a smart and stylish choice for busy people.
Products & Tools Used
- A clear gel base coat
- A bold color of your choice (e.g., navy blue, emerald green)
- Half-moon or French tip guide stickers
- A gel top coat
Application Steps
- Prep the nail and apply a clear gel base coat. Cure it. This will be the visible part of your nail.
- Place a French tip guide sticker upside down at the base of your nail to create the half-moon curve. Press it down firmly.
- Paint two coats of your chosen color on the part of the nail above the sticker. Don’t worry about being neat on the sticker itself. Cure each coat.
- Carefully peel off the sticker while the polish is fully cured to reveal a crisp, clean line.
- Seal the entire nail with a top coat, making sure to cover both the colored part and the negative space. Cure for a final time.
Pro-Tip: The success of this minimalist spring nail art for short nails depends on a perfectly clean curve. A manicurist approved hack is to use a cuticle pusher to make sure the edge of the sticker is completely sealed against the nail to prevent any color from bleeding underneath.

Key Takeaways
- Embrace Minimalism: The chicest short spring nails in 2026 focus on minimalist designs like the micro-French tip and sheer color washes. These styles enhance, rather than hide, a short nail.
- The “Clean Girl” Aesthetic is Your Best Friend: A milky white base or a sheer nude polish creates a healthy, polished look that defines the clean girl aesthetic. It’s the ultimate low maintenance, high-impact manicure.
- Technique is More Important Than Length: Designs like abstract swirls and aura nails are easily achievable on short nails. Success depends on the right technique (like using blooming gel) and tools (dotting tools, liner brushes), not a large canvas.
- Invest in a Quality Top Coat: Whether you choose a matte vs glossy finish, a high-quality, chip-resistant top coat is non-negotiable. It protects your art, provides the desired finish, and extends the life of your manicure.
- Nail Health is the Foundation: For truly beautiful nails, consider strength-building products like BIAB (Builder in a Bottle). It creates a perfect, durable canvas for any color or design while strengthening your natural nails.
- Don’t Underestimate Prep: The longevity of any manicure, from gel to press-on nails, depends entirely on preparation. Always buff, cleanse, and dehydrate the nail plate before applying any product.
People Also Ask About Short Spring Nails
What is the best shape for short spring nails?
The best shapes are short oval, squoval, and soft square because they are durable and enhance the natural nail. Short oval and almond shapes can help make short nails look longer, while a short square or squoval shape offers a modern, clean edge that is less prone to breaking. The choice between almond vs square often depends on your finger shape and lifestyle, but all are excellent for minimalist spring designs.
Can you do a French tip on very short nails?
Yes, you absolutely can do a French tip on very short nails; the key is to paint a “micro-French” tip. Instead of a thick, traditional band of white, a micro-French is a razor-thin, delicate line painted right at the free edge. This technique gives the illusion of length and looks incredibly chic and intentional on shorter nails.
What are the best spring nail colors for short nails in 2026?
The best spring nail colors for short nails in 2026 are soft pastels, milky whites, and one bold accent color like cherry red. Popular shades include soft lavender, the sage green aesthetic, baby blue, and sheer pink. These colors align with the clean girl aesthetic and look fresh and modern without overwhelming a small nail plate.
How do I make my short nails look longer?
To make short nails look longer, use nude or sheer polishes, opt for an oval or almond shape, and try designs with vertical lines or negative space. A milky white base or a color that matches your skin tone creates a seamless, elongating effect. Negative space manicures with a half-moon at the cuticle also draw the eye upward, creating an illusion of length.
Are short nails trending in 2026?
Yes, short nails are a major trend for 2026 and beyond, aligning perfectly with the “quiet luxury” and “clean girl” aesthetics. The focus has shifted to nail health, practicality, and minimalist elegance. Manicurists and influencers are celebrating low maintenance, perfectly shaped short manicures that look polished and sophisticated.
What is BIAB and is it good for short nails?
BIAB, or Builder in a Bottle, is a type of strengthening gel overlay that is exceptionally good for short, weak, or brittle nails. It’s thicker than regular gel polish and is used to build a durable structure and apex on the natural nail, preventing breakage and allowing your nails to grow out stronger. It’s the perfect foundation for any short spring nail art.
How can I stop my short nails from chipping?
To prevent chipping, proper nail prep, using a quality base and top coat, and “capping the free edge” are essential. During your manicure, after applying each coat (especially the top coat), run the brush along the very tip of the nail. This seals the polish and provides a crucial barrier against the wear and tear that leads to chipping.
What is the difference between matte vs glossy nails for spring?
A glossy finish gives a high-shine, wet look that makes colors pop, while a matte finish provides a modern, velvety, non-reflective look. For spring, a glossy finish is classic and enhances the fresh feel of pastel colors. A matte top coat can instantly make a simple color like lavender look more high-fashion and sophisticated. The choice depends on the desired aesthetic.
How do I do floral art on very short nails?
The easiest way to do floral art on short nails is by using a dotting tool to create simple, micro-scale flowers. Use the tool to make five white dots in a circle for petals, then use a smaller tool or a toothpick to add a yellow dot in the center for a daisy. Placing a single, small flower on an accent nail is a chic way to embrace the floral nail accents trend.
Are press-on nails a good option for short nail beds?
Press-on nails are an excellent option for short nail beds as they provide an instantly perfect shape and length. For the best results, properly prep your natural nail by buffing and dehydrating it, and use a strong nail glue instead of adhesive tabs. This ensures they last for one to two weeks and look as seamless as a professional salon manicure.
Final Thoughts on Your Chic Spring Manicure
Ultimately, beautiful nails are a form of self-expression, and style is not dictated by length. As we’ve explored, the chicest spring 2026 nail trends are perfectly suited for the elegance and practicality of short spring nails. With the right techniques—from applying a flawless micro-French tip to strengthening with BIAB—your nails are the perfect canvas for a sophisticated, modern manicure.
These 11 ideas are just the beginning. Use them as inspiration to embrace your natural nails and redefine what a stylish spring manicure looks like for you. Which design will you try first?
Last update on 2026-04-27 / Affiliate links / Images from Amazon Product Advertising API