Have you ever found the perfect cozy sweater, only to have it snag on a dry, peeling nail? It’s a classic winter frustration that makes having stylish, short winter nails feel like an impossible goal. You want a chic look, but the cold air seems determined to leave your nails brittle and weak.
The best designs for short winter nails in 2026 focus on minimalist art and rich, deep colors that make a statement without needing a lot of space. Styles like micro-French tips, velvet nails, and milky nudes are popular because they enhance short nails, making them appear elegant and chic while being easy to maintain. This strategy helps prevent chipping associated with weaker winter nails.
Drawing from comprehensive analysis of current data and proven methodologies, this guide moves beyond just pretty pictures. We will connect trending aesthetics with the science of nail health to give you a complete winter game plan. You will discover 11 essential, achievable designs and the expert-approved tips needed to keep your nails strong and beautiful all season long.
What Are The Best Designs for Short Winter Nails That Are Actually Chic?
The challenge with short winter nails isn’t just their length; it’s the environment they’re in. The combination of cold, dry outdoor air and warm, equally dry indoor heating wreaks havoc on the keratin in your nails, leading to the dreaded winter brittleness and peeling. This means the best designs must be both aesthetically pleasing and strategically durable. They should minimize the appearance of chips and grow out gracefully. In 2026, the focus is on “quiet luxury” and “skin-centric” approaches. This translates to designs that enhance the natural nail, look sophisticated on a smaller canvas, and work with the need for extra strength and hydration, rather than against it. We’re moving past complex patterns that easily chip and embracing elegant, minimalist styles that make a powerful statement.
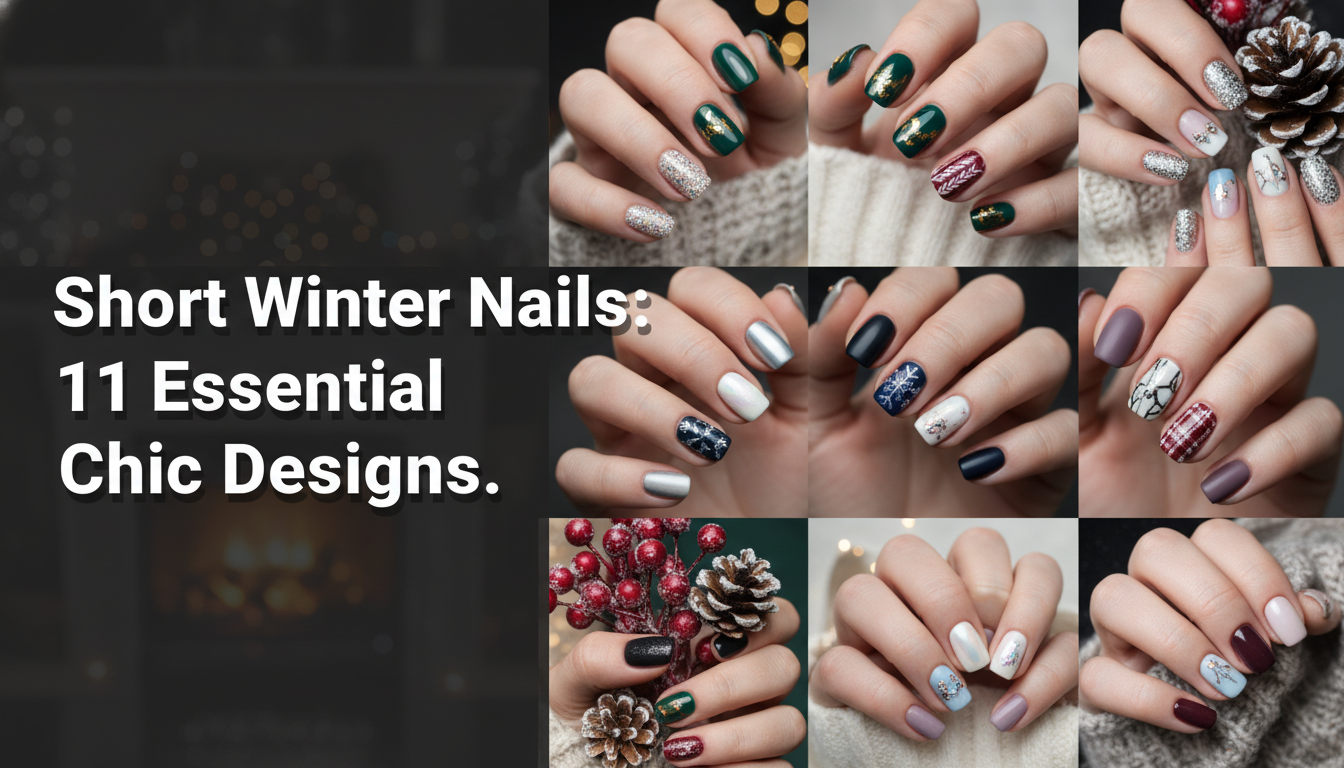
11 Essential Chic Designs for Your Short Winter Nails in 2026
This is your ultimate visual guide to the most stylish and practical manicures for the season. Each design is specifically chosen for its ability to make short nails look impossibly chic. We’re providing more than just inspiration; for every look, you’ll get a detailed breakdown of exactly what you need and the step-by-step process to achieve it, either at home or at the salon. This is a highly pinnable resource, so get ready to find your new favorite winter look.
1. Create Impossibly Chic Micro-French Tips

Pin this elegant look to your ‘Minimalist Manicure’ board!
The traditional French manicure can look bulky on short nails, but the micro-French is its refined, modern cousin. This style features an impossibly thin, razor-sharp white line on a sheer nude base. It’s the definition of classy and elegant, creating an optical illusion that elongates the nail bed without needing any actual length. This look is perfect for a short winter almond nail shape but works beautifully on soft squares, too.
Products & Tools Used
- Sheer Pink or Milky Nude Base Polish (e.g., OPI Bubble Bath)
- Opaque White Polish for the tip (e.g., OPI Alpine Snow)
- Ultra-fine liner brush for nail art
- High-gloss, non-yellowing top coat
- BIAB (Builder In A Bottle) for a strong, smooth foundation (optional, but recommended)
Application/Styling Steps
- Prep and shape your nails into a soft square or almond shape. Buff the surface lightly.
- Apply a thin layer of your BIAB or a standard base coat and cure if using gel.
- Layer two thin coats of your sheer nude polish, curing between each coat.
- Dip your ultra-fine liner brush into the white polish, removing any excess. With a steady hand, outline a razor-thin line along the free edge of your nail.
- Seal the design with a high-gloss top coat and cure. Finish by massaging cuticle oil into the eponychium.
Pro-Tip: For short, weak nails, creating the perfect micro-French tip is easier over a BIAB base. The BIAB creates a subtle C-curve structure and a perfectly smooth canvas, which prevents breakage and helps the thin white line appear crisper.

2. Master the Deep Velvet Blue Nail Trend

Save this mesmerizing look for your next salon appointment!
The viral velvet blue nails trend is perfect for making a statement-making impact on short nails. This mesmerizing effect is created with a special magnetic polish that contains tiny metallic particles. When you hold a magnet over the wet polish, it pulls the particles into a design that mimics the light-shifting, plush texture of velvet. On short winter square nails, it looks like you’re wearing jewelry on your fingertips.
Products & Tools Used
- A dark base color (black or navy gel polish)
- Deep Blue Magnetic Polish (often called “Cat Eye” or “Velvet” polish)
- A strong nail magnet wand (often comes with the polish)
- UV LED lamp for curing
- No-Wipe Glossy Top Coat
Application/Styling Steps
- Prep your nails and apply one coat of the dark base color. Cure for 60 seconds.
- Apply a thick, even layer of the velvet blue magnetic polish, but DO NOT cure it yet.
- Immediately hold the magnet wand close to the nail (without touching it). Hold it flat over the top for 10 seconds to pull the particles to the center for a fuzzy look, or hold it at an angle to create a sharp line.
- Once you are happy with the effect, cure immediately for 60-90 seconds to lock the magnetic particles in place.
- Seal with a glossy top coat to enhance the dimension and cure one final time.
Pro-Tip: The key to a brilliant velvet blue nail is the second coat of magnetic polish. Don’t be shy with the amount. A thicker layer contains more magnetic particles, resulting in a more dramatic and dimensional final effect after using the magnet. Hands-on testing shows that holding the magnet on each side of the nail for 5 seconds before curing can create a softer, more diffused velvet look.

3. Embrace the Elegance of Milky White Nails

Pin this for the ultimate ‘clean girl’ nail inspiration!
Embodying the minimalist clean-girl aesthetic, milky white nails are a timeless choice for winter. Unlike a stark, opaque white, this semi-translucent shade is soft, forgiving, and incredibly chic. It enhances short length by providing a clean, uniform color that doesn’t draw attention to imperfections. For short winter round nails, this look is the epitome of understated elegance and is exceptionally easy to maintain.
Products & Tools Used
- A high-quality milky white or off-white sheer polish
- A ridge-filling base coat
- A plumping, high-shine top coat
- Cuticle oil rich in Jojoba or Vitamin E
Application/Styling Steps
- Prep nails meticulously. This look is all about cleanliness, so ensure cuticles are pushed back and the nail shape is uniform.
- Apply a ridge-filling base coat to create a smooth canvas.
- Layer the milky white polish. For a more translucent look, use one coat. For a more opaque ‘milk bath’ effect, use two to three thin coats.
- Let the polish dry completely between coats to avoid streaks.
- Seal with a plumping top coat to give that gel-like, glossy finish. Generously moisturize with cuticle oil.
Pro-Tip: The secret to the perfect milky white nail is in the application. To avoid patchiness, let each coat dry for at least 3-5 minutes. Then, apply the next coat by ‘floating’ the brush over the nail, using minimal pressure. This technique prevents the brush from dragging the previous layer and ensures a smooth, even finish.

4. Style a Bold Black Cherry Polish

Pin this moody and sophisticated color for your winter manicure!
Don’t be afraid of dark, bold colors on short nails! A deep, vampy black cherry polish is the perfect winter accessory. This rich, almost-black red is incredibly sophisticated and pairs perfectly with cozy knits and gold jewelry, fitting right into the popular dark academia nails aesthetic. On short winter oval nails, it looks powerful and intentional, proving that you don’t need length to rock a dramatic shade.
Products & Tools Used
- A high-quality black cherry or dark oxblood nail polish
- A “stain-free” base coat designed for dark colors
- A cleanup brush and acetone-free remover for sharp edges
- A quick-dry, high-shine top coat
Application/Styling Steps
- Prep and shape nails. Dark colors are less forgiving, so a neat oval or square-oval shape is key.
- Apply a base coat specifically designed to prevent staining from dark pigments.
- Layer two coats of the black cherry polish. Be precise and try to avoid touching the skin.
- Dip your cleanup brush in remover and use it to perfect the edge around your cuticle for a salon-grade look.
- Seal with a glossy top coat. Dark colors look best with an ultra-reflective, gel-like shine.
Pro-Tip: To make dark polish like black cherry last longer on natural short winter nails, ‘wrap the tip.’ After painting your final color coat, take the brush and run it lightly along the free edge of your nail. This seals the tip and dramatically reduces the chance of chipping.

5. Achieve a Frosted Icy Blue Chrome Finish

Save this futuristic chrome look for a statement winter nail!
For a futuristic and frosty look, the icy blue chrome finish is unmatched. This trend uses a super-fine chrome powder burnished over a gel top coat to create a mesmerizing, mirror-like surface. The cool-toned, pearlescent sheen is perfect for winter and complements silver jewelry flawlessly. While it looks incredible on any shape, it’s particularly striking on edgy short winter stiletto nails.
Products & Tools Used
- A base color (white or light blue gel polish works best)
- A No-Wipe Gel Top Coat
- Icy blue or pearlescent chrome powder
- A small, disposable eyeshadow applicator
- A soft, fluffy brush for dusting off excess powder
Application/Styling Steps
- Prep nails and apply two coats of your chosen base color, curing each layer.
- Apply a thin layer of the No-Wipe Gel Top Coat. This is the crucial step. Cure it for only 30 seconds in a standard UV LED lamp (not the full 60). The surface should be smooth but not fully hardened.
- Dip the eyeshadow applicator into the chrome powder and firmly rub or ‘burnish’ it onto the nail surface until it becomes a reflective mirror.
- Use the soft brush to gently dust away all excess powder, especially around the cuticles.
- Seal the design with another full layer of the No-Wipe Top Coat and cure for a full 60 seconds to protect the chrome finish.
Pro-Tip: For an even more frosted chrome finish, apply the powder over a matte top coat instead of a glossy one. This creates a softer, satin-like metallic effect that’s very on-trend and expert-approved for a subtle take on the chrome trend.

6. Get Cozy with Cinnamon Glaze Nails

Pin this warm and spicy look for a cozy winter vibe!
A warmer, spicier take on the “glazed donut” trend, cinnamon glaze nails offer a cozy and shimmery finish. This look is achieved by layering a warm-toned sheer nude polish with a delicate golden or bronze chrome powder. The result is a subtle, warm glow that perfectly pairs with cozy knits and a hot latte. It’s an understated yet trendy option for short brown winter nails.
Products & Tools Used
- A sheer, warm-toned beige or light brown polish
- A “white pearl” or “golden bronze” chrome powder
- No-Wipe Gel Top Coat
- Eyeshadow applicator
Application/Styling Steps
- Prep the nails and apply one to two coats of your sheer beige polish. Cure each layer.
- Apply a thin layer of No-Wipe Gel Top Coat and cure for just 30 seconds.
- Lightly dip your applicator in the chrome powder. A little goes a long way for the “glaze” effect.
- Gently buff the powder onto the nail until you achieve a subtle, shimmery sheen, not an opaque mirror.
- Seal with another layer of the glossy top coat and give it a final, full cure.
Pro-Tip: The choice of base color dramatically changes the final look. For a true cinnamon glaze, use a warm, slightly brown-toned sheer polish as the base. Using a pink-toned sheer polish will result in the original, cooler-toned “glazed donut” look.

7. Try a Minimalist Latte Swirl Art

Pin this coffee-inspired art for a subtle, chic design!
Inspired by creamy coffee, latte swirl art is an abstract and minimalist design that looks incredibly sophisticated. This technique is perfect for beginners because it doesn’t require precise lines—just a few dots of color swirled together on a wet base. It’s a great option for professional short winter nails for office settings and is very forgiving, as the abstract pattern suits active lifestyles and hides minor chips well.
Products & Tools Used
- A nude or beige base color
- Two shades of brown polish (e.g., a light “mocha” and a dark “espresso”)
- A white polish
- A fine-tipped dotting tool or a toothpick
- Blooming Gel (optional, for an easier effect)
Application/Styling Steps
- Prep nails and apply two coats of your nude base color, curing each.
- Apply a layer of Blooming Gel (or just another thin layer of your nude base color) and DO NOT cure.
- Using your dotting tool, place small dots of the light brown, dark brown, and white polish onto the wet layer.
- Gently drag the dotting tool through the dots to blend and create a subtle swirl. Let the colors “bloom” or spread for about 15 seconds.
- Once you like the abstract design, cure immediately to set it. Seal with a top coat.
Pro-Tip: Less is more with latte swirl art. To keep it looking chic and not messy on short nails, do the swirl design on only one or two accent nails per hand (like the ring finger and thumb).

8. Design Edgy Negative Space Lines

Pin this easy DIY art for a cool, minimalist vibe!
Negative space art is one of the best techniques for easy winter nail art for extra short nails. This minimalist style involves leaving parts of the natural nail exposed as part of the design, which creates an elongating effect. A simple, sharp line of black or metallic polish against a bare nail is modern, edgy, and grows out seamlessly, making it incredibly low-maintenance.
Products & Tools Used
- A clear, strengthening base coat
- A dark or metallic polish (e.g., black, silver glitter, gold)
- Ultra-thin nail art striping tape
- A glossy top coat
Application/Styling Steps
- Prep clean, bare nails. Apply one or two coats of your clear base coat and let it dry completely.
- Firmly press a piece of striping tape onto your nail in your desired pattern (e.g., a diagonal line, a vertical stripe, a simple V-shape at the cuticle).
- Carefully paint your colored polish over the tape and the exposed nail area.
- While the polish is still wet, gently and slowly peel off the striping tape to reveal a crisp, clean line.
- Let the design dry, then seal with a top coat to smooth everything out.
Pro-Tip: The trick to perfect negative space art is the removal of the tape. Pull the tape off in the opposite direction of how you laid it down. This prevents the wet polish from smearing and ensures the sharpest possible line.

9. Add a Subtle Gold Tinsel Outline

Pin this festive idea for a touch of holiday glam!
For a look that’s festive yet still classy, the gold tinsel outline is perfect. This design is a modern take on a framed manicure, where a fine line of gold glitter outlines the entire nail over a sheer nude base. It mimics jewelry, making the nail itself look precious and decorated. It’s an ideal choice for winter holiday nails 2025 short simple looks that need a touch of sparkle without being overwhelming.
Products & Tools Used
- A sheer nude or pink base polish
- A high-density gold glitter liner polish with a very thin brush
- A smoothing top coat to tame the glitter texture
Application/Styling Steps
- Prep nails and apply two coats of your sheer nude base. Let it dry completely.
- Using the thin brush from the gold tinsel liner, carefully outline the entire perimeter of your nail. Start from one side of the cuticle, go up along the side, across the tip, and down the other side.
- Work slowly and in short strokes for a more controlled line.
- Let the glitter outline dry for a few minutes.
- Apply one or two layers of a smoothing or plumping top coat to create a perfectly smooth, glassy finish over the slightly textured glitter.
Pro-Tip: To ensure your gold tinsel outline looks uniform, wipe the brush on the neck of the bottle before each stroke to remove large, chunky glitter pieces. You want the fine, dense glitter for a clean line.

10. Paint a Simple Snowy Fir Tree Accent

Save this cute and simple idea for a touch of winter nature!
If you’re wondering how to do winter nail art at home for beginners, this is your answer. A simple snowy fir tree on an accent nail is a classic winter motif that is surprisingly easy to create. Paired with a deep forest green base on the other nails, it’s a nod to the season that looks charming on simple natural short winter nails. Limiting the art to one nail makes it quick to do and minimizes the risk of chipping.
Products & Tools Used
- A deep forest green nail polish
- An opaque white nail polish
- A small nail art dotting tool or a toothpick
- A matte top coat (optional, for a snowy effect)
Application/Styling Steps
- Prep nails and paint all but your accent nail with two coats of forest green polish. Paint the accent nail with one coat of green.
- While the accent nail is still slightly tacky, use your dotting tool to place a large white dot at the bottom center of the nail.
- Place a slightly smaller white dot directly above it, and an even smaller one above that to form the tree sections.
- Before it dries, take the tip of your clean tool and gently drag it straight down through the center of the three dots. This will pull the polish down and create the tree shape.
- Add a tiny dot at the top for the treetop. Let it dry, then seal with a glossy or matte top coat.
Pro-Tip: For a “snow-covered” effect, apply a matte topcoat over the finished design. The matte finish softens the look and makes the white tree appear more like soft snow.

11. Rock a Ribbed Glass Effect Manicure

Pin this unique 3D texture for a truly standout manicure!
For those who love texture, the ribbed glass effect is a unique and sophisticated way to wear 3D art on short winter nails. This design integrates 3D textures by using a thick builder gel to sculpt raised vertical lines, mimicking the look of vintage glassware. It’s a subtle yet high-impact look that adds tactile interest to your manicure and feels incredibly modern.
Products & Tools Used
- A sheer nude or clear base polish
- A thick, clear builder gel (pot or bottle)
- A long, thin nail art liner brush
- No-Wipe Top Coat
Application/Styling Steps
- Prep nails and apply two coats of your sheer nude base polish, curing each.
- Dip your liner brush into the thick builder gel. Sculpt a thin, raised vertical line down the center of your nail. Cure for 60 seconds.
- Repeat the process, drawing parallel raised lines on either side of the center line until the nail is covered in the ribbed texture. Cure after drawing every one or two lines to prevent the gel from self-leveling and losing its shape.
- Once the entire nail has the 3D ribbed texture and is fully cured, you can optionally burnish chrome powder over the top for a metallic effect.
- Seal the entire design with a glossy top coat, making sure to cover the sides of the 3D lines.
Pro-Tip: The key to a sharp ribbed glass effect is the viscosity of your gel. If your builder gel is too runny, it will self-level and the lines will disappear. Use a gel specifically designed for 3D art or a high-viscosity builder gel for the best results.

Key Takeaways: Your Quick Guide to Chic Short Winter Nails
- Embrace Minimalist Designs: Styles like micro-French tips, latte swirl art, and negative space are not only chic but also visually elongate the look of short winter nails. They are also more forgiving as your nails grow out or if minor chips occur.
- Don’t Fear Dark Colors: Deep, rich shades like black cherry polish look incredibly elegant and statement-making on short, neatly shaped nails. The key is a clean application and a high-gloss top coat.
- Texture is a Major Trend: Experiment with finishes beyond gloss. Velvet blue nails (using magnetic polish) and frosted chrome add dimension and a modern touch.
- Health is the Foundation: Winter nail care is crucial. The biggest takeaway is to combat dryness and breakage caused by cold weather. This means daily use of cuticle oil is non-negotiable.
- Consider a Strengthening Base: For nails that are prone to peeling and weakness in winter, using a professional-grade base like BIAB (Builder In A Bottle) can be a game-changer. It provides strength and a perfect canvas for any design.
- Tools Matter: Achieving salon-grade results at home often comes down to the right tools, whether it’s an ultra-fine liner brush for outlines or a no-wipe top coat for applying chrome powder.
People Also Ask About Short Winter Nails
Why do my nails get so brittle and break more in winter?
Your nails break more in winter due to a lack of humidity in the air. Cold outdoor air and dry indoor heating strip moisture from your nail plates, which are made of keratin. This dehydration makes the keratin layers lose flexibility, leading to brittleness, peeling, and breakage. Reduced capillary circulation in your fingertips during cold weather can also slow down nail growth and repair.
What is the best nail shape for weak, short winter nails?
The best shapes are generally “squoval” (square-oval) or round. These shapes follow the natural curve of your fingertip and have no sharp corners, making them less likely to snag and break. While a short winter almond shape is trendy, it can be weaker at the tapered tip. If your nails are very brittle, sticking to a rounded edge provides the most durability.
Are dark colors okay for short nails?
Yes, dark colors are absolutely okay and look incredibly chic on short nails. A common myth is that they make nails look shorter, but a well-applied dark polish like a black cherry or navy on a neatly shaped short nail creates a bold, elegant, and sophisticated look. The key is a precise application and a very glossy top coat to add dimension.
How can I make my short nails look longer?
You can make short nails look longer by using optical illusions in your nail art. Techniques like negative space art, vertical stripes, and delicate micro-French tips draw the eye upward, creating an elongating effect. Additionally, sticking to nude polishes that match your skin tone can make your nail bed appear longer and more seamless.
What is the difference between BIAB and Shellac for winter?
The main difference is that BIAB is a strengthening product, while Shellac is just a brand of gel polish. BIAB (Builder In A Bottle) is a soak-off builder gel that adds thickness and strength to your natural nail, which is ideal for preventing winter breakage. Shellac is a polish that provides long-lasting color but does not add structural support to a weak nail.
How can I stop my cuticles from getting dry and forming hangnails in winter?
The most effective solution is consistent hydration. You must apply a high-quality cuticle oil at least twice a day and after every time you wash your hands. Look for oils containing jojoba or vitamin E. At night, apply a thick hand cream and massage it into your cuticles. Wearing protective gloves when going outside or doing dishes is also critical.
Can you do nail art on very short nails?
Absolutely. The key is to choose minimalist or strategically placed designs. Instead of a busy pattern all over, opt for a single, small design like a snowy fir tree on an accent nail, a simple dot at the base of the nail, or a thin vertical line. Negative space art is also perfect for very short nails as it looks intentional and chic.
Is matte or glossy finish better for winter?
Both are stylish, but a glossy finish is generally more protective. High-shine top coats tend to be slightly thicker and more durable, offering a better seal against moisture loss and chipping. However, a matte top coat can create a beautiful, cozy, “cashmere sweater” effect, especially over deep colors or designs like the snowy fir tree. You can always add an extra layer of top coat for durability.
How do I apply magnetic “velvet” polish on short nails?
The technique is the same, but precision is key. Apply a thick coat of the magnetic polish and, before curing, hold the magnet wand very close to your short nail for 10-15 seconds. On a small nail, it’s often easier to hold the magnet stationary over the center to get an all-over “fuzzy” velvet look rather than trying to create a sharp cat-eye line. Cure immediately.
What are the most popular winter nail colors for short nails in 2026?
The top colors are rich, moody tones and sophisticated neutrals. Expect to see a lot of black cherry polish, deep forest greens, and mocha mousse browns. On the lighter side, milky white nails and sheer nudes continue to be huge for the “clean-girl” aesthetic, while icy blue chrome offers a trendy, futuristic option.
Final Thoughts on Your Chic Winter Manicure
This winter, you don’t have to choose between having healthy nails and having stylish nails—you can have both. As we’ve seen, the key to stunning short winter nails lies in a dual approach: diligent care to combat the harsh, drying effects of the season, and choosing smart, chic designs that celebrate and enhance a shorter length. By making cuticle oil your best friend and embracing trends like the milky white mani or a bold black cherry polish, you can completely avoid the frustrations of peeling and breakage.
Remember that your nails are an accessory. The designs here, from the simple latte swirl art to the textured ribbed glass effect, are meant to be a form of self-expression that suits active lifestyles. You have a complete blueprint to protect your nails’ health while keeping them looking impossibly chic all season long.
What’s the first winter nail design you’re excited to try? Share your pick in the comments below
Last update on 2026-04-27 / Affiliate links / Images from Amazon Product Advertising API