Struggling to find a nail design that’s both timelessly elegant and perfectly on-trend? You want a look that feels sophisticated for any occasion but still has that touch of modern glamour. Achieving that perfect balance with white and gold nails can feel like a challenge.
White and gold nails represent a versatile aesthetic that blends the purity of a white base with the luxury of gold accents to create elegant, sophisticated manicures. This combination offers endless design possibilities, from minimalist details to elaborate artistry, ensuring a chic look for 2026.
Drawing from current nail trends and proven professional techniques, this guide unlocks the secrets to achieving a flawless manicure. We will explore 11 stunning designs, complete with step-by-step instructions. Get ready to create a look that perfectly captures both classic elegance and modern luxury.
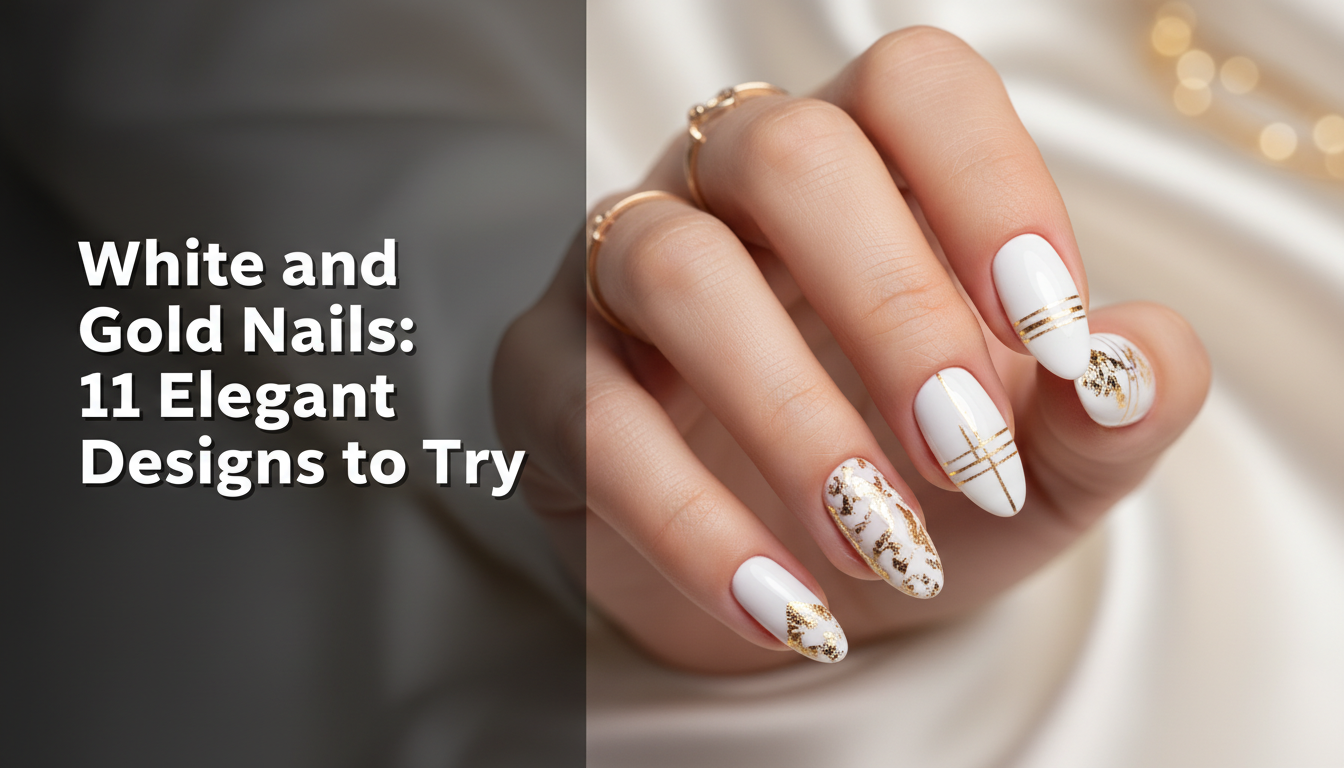
The Enduring Elegance of White and Gold Nails: Your Ultimate Guide for 2026
The combination of white and gold nails is more than just a fleeting trend; it’s a timeless statement of elegance that consistently finds its way into bridal fashion, holiday celebrations, and everyday sophisticated style. This aesthetic is defined by the beautiful interplay between a clean white base—whether a crisp, opaque white, a soft creamy white, or a translucent milky white—and the opulent touch of gold accents. These accents can range from delicate gold foil and shimmering gold glitter to bold gold chrome, each transforming the manicure in a unique way. The versatility of this color palette means it pairs with and enhances any nail shape, from a classic almond shape to a modern coffin shape. Based on insights from professional nail artists, achieving a clean, long-lasting manicure with this combination is all about technique and using the right materials, turning your nails into a true fashion accessory.
11 Elegant White and Gold Nail Designs to Try in 2026
Diving into the world of white and gold nail designs reveals a universe of creative possibilities. This section serves as your ultimate inspiration gallery, showcasing 11 distinct styles that you can replicate at home or request from your nail technician. Each design is a sub-entity of the broader white and gold nails topic, exploring different application methods like gel nails or acrylic nails and incorporating decorative elements such as nail foil or rhinestones. We will break down how gold, as the accent entity, complements and enhances the white base in each unique look. From the subtle shimmer of a gold glitter ombre to the bold statement of gold line art, you’ll find actionable step-by-step guides to create these elegant white gold nails yourself.
1. Glamorous Gold Glitter Ombre Nails

Pin this dazzling white and gold glitter ombre design to your ‘Nail Goals’ board!
A gold glitter ombre offers a truly glamorous take on the white and gold trend. This design features a seamless gradient effect, with dense gold glitter at the tips fading into a soft and delicate milky white base. It’s a popular choice for almond shape nails but looks equally stunning on any shape, providing a glamorous and eye-catching finish that’s perfect for a special event or a long-lasting manicure with a bit of sparkle.
What You Need
- Milky white gel polish (for a soft, translucent base)
- Fine gold glitter powder (for a seamless gradient)
- Gel top coat (high-gloss, non-wipe formula)
- Fluffy nail art brush or sponge applicator
- UV/LED lamp for curing
- Nail file and buffer
- Cuticle oil
Instructions
- Prep nails by filing, buffing, and applying a base coat, then cure under UV/LED lamp.
- Apply one coat of milky white gel polish and cure. Repeat for desired opacity.
- Dip the fluffy brush into the gold glitter powder.
- Gently tap and blend the glitter onto the tip of the nail, working downwards towards the center to create the ombre effect. Build up intensity at the tip.
- Once satisfied with the gradient, apply a thin layer of gel top coat to seal the glitter.
- Cure under UV/LED lamp. Apply a second coat of top coat for extra durability and glossy finish, then cure again.
- Finish with a nourishing cuticle oil.
Pro-Tip: For a truly seamless gold glitter ombre, use a very fine glitter and gently blend it onto the nail in thin layers, curing between each layer to prevent glitter migration. This apex placement technique ensures a smooth, professional gradient that avoids chipping.

2. Elegant White Marble with Gold Veins

Save this luxurious white marble with gold veins look to your ‘Classy Mani’ board!
The white marble gold design is the epitome of luxurious nail art. This look features a sophisticated marble effect with delicate gold veins that snake across an opaque white base. It creates incredibly sophisticated fingertips that mimic the look of real stone. This design is particularly striking and complements the sharp lines of coffin shape nails, offering a high-end, artistic manicure.
What You Need
- Opaque white gel polish
- Very thin gold nail art polish or gel paint
- Gel top coat
- Fine nail art brush (detailer brush)
- Dotting tool (optional, for subtle marbling)
- UV/LED lamp
- Alcohol wipe or cleanser
Instructions
- Prep nails and apply two coats of opaque white gel polish, curing after each coat.
- While the last white coat is still slightly tacky (if using regular polish, otherwise use a blooming gel), or after applying a blooming gel for gel polish, use the fine nail art brush to draw irregular, wispy lines with the gold polish, mimicking marble veins.
- Quickly use the same brush (or a clean one) to gently feather out the edges of the gold lines for a softer, more natural marble effect. A dotting tool can also be lightly dragged through for a smoky look.
- Allow the design to dry (or cure blooming gel if used, then skip this step for regular gel).
- Seal the design with a generous layer of gel top coat and cure.
- Wipe off any sticky residue with an alcohol wipe.
Pro-Tip: For incredibly realistic white marble with gold veins, try using a blooming gel over your cured white base. Apply the gold lines onto the blooming gel, and it will naturally spread and blur, creating an organic marble effect before curing. This advanced technique dramatically elevates the design.

3. Delicate Gold French Tips on White

Pin this classic yet modern gold french tip manicure to your ‘Bridal Nails’ board!
A french tip gold manicure is a modern twist on a timeless classic. This elegant design features a soft, subtle milky white base with a crisp, precisely applied gold french tip. This combination symbolizes sophistication and is incredibly popular for bridal fashion or for anyone wanting an everyday look with elegant gold accents. The design highlights the clean, beautiful smile line of the french tip, making it a perfect choice for short white nails.
What You Need
- Milky white or sheer pink gel polish (for the base)
- Metallic gold gel polish or gold nail art paint
- Fine striping brush or french tip guides
- Gel top coat
- UV/LED lamp
Instructions
- Prep nails and apply two thin coats of milky white gel polish, curing after each.
- Using a striping brush (or french tip guide for beginners), carefully paint a thin, even line of gold gel polish along the free edge of each nail to create the french tip. Ensure the smile line is smooth and symmetrical.
- Cure the gold tips under the UV/LED lamp.
- Seal the entire nail with a layer of gel top coat and cure.
- Finish with cuticle care.
Pro-Tip: For perfectly crisp gold french tips, paint the tip on a slightly curved nail art brush, then “roll” your finger against the brush to create a uniform smile line. This professional nail artist technique minimizes mistakes and ensures a clean, elegant finish, transforming your everyday manicure.

4. Chic White and Gold Abstract Lines

Pin this minimalist white and gold abstract lines look for modern elegance!
For a modern and chic look, gold line art on a white base is a perfect choice. This design features dynamic abstract gold lines—either flowing curves or sharp geometric lines—drawn over a crisp opaque white or even a trendy matte white base. It’s a stunning example of minimalist design that makes a big impact. The clean aesthetic of this design pairs with short square white nails beautifully, offering a sophisticated and artistic feel.
What You Need
- Opaque white gel polish (or matte white top coat)
- Gold striping polish or gold gel paint
- Very fine striping brush
- Gel top coat (glossy or matte, depending on desired finish)
- UV/LED lamp
Instructions
- Prep nails and apply two coats of opaque white gel polish, curing after each. Apply a matte top coat and cure if a matte white base is desired.
- Using the fine striping brush and gold gel paint, draw abstract or geometric lines onto the nails. Experiment with thin, thick, straight, or curved lines.
- Cure the gold lines under the UV/LED lamp.
- Seal the design with your chosen gel top coat (glossy or matte) and cure.
Pro-Tip: For the cleanest white and gold abstract lines, ensure your striping brush is perfectly clean and only lightly saturated with gold gel paint. Drag the brush steadily in one motion for each line, avoiding going over it multiple times to prevent blurring. This technique helps create a sharp, minimalist nail art finish.

5. Luxurious Gold Flake White Nails

Pin this opulent gold flake white nails design for instant glam!
The gold flake white nail design is pure luxury. This style features delicate pieces of gold flakes or gold leaf that are encapsulated within a translucent milky white gel base. The result is a rich, multi-dimensional look that creates a stunning opulent nails effect, especially on long acrylic nails. This technique highlights the depth and shimmer that gold flakes provide, making for a truly luxurious nail art statement and a long-lasting manicure that won’t chip.
What You Need
- Sheer milky white builder gel or gel polish
- Gold nail flakes or gold leaf
- Gel top coat
- Tweezer or dotting tool (for placing flakes)
- UV/LED lamp
- Nail buffer
Instructions
- Prep nails and apply a base coat, then cure.
- Apply a thin layer of milky white builder gel (do not cure).
- Using tweezers or a dotting tool, carefully place individual gold nail flakes onto the wet gel, distributing them evenly for a natural look.
- Cure the layer with flakes under the UV/LED lamp.
- Apply another thin layer of milky white builder gel to encapsulate the flakes, ensuring a smooth surface. Cure.
- Gently buff the surface to remove any roughness from the flakes, then wipe clean.
- Seal with a tack-free top coat and cure for a high-shine finish.
Pro-Tip: When encapsulating gold flakes in gel, ensure the flakes lie as flat as possible before curing. If they stick up, gently press them down with a silicone tool or a gloved finger. A slightly thicker builder gel helps prevent the flakes from creating bumps, ensuring the apex placement is perfect and the finish is truly salon-grade.

6. Minimalist White Nails with Gold Dots

Pin this effortlessly chic white and gold dot design for daily elegance!
Sometimes, the most simple white gold nails are the most stunning. This minimalist nail art design features tiny, perfectly placed gold dots over a clean, opaque white base. It’s an easy yet incredibly effective way to create a chic and sophisticated fingertips look. The beauty of the gold dot on white nails is its versatility; it’s perfect for short natural nails and provides a polished, clean manicure aesthetic for everyday wear.
What You Need
- Opaque white gel polish
- Gold nail art polish or gel paint
- Dotting tool (various sizes)
- Gel top coat
- UV/LED lamp
Instructions
- Prep nails and apply two coats of opaque white gel polish, curing after each.
- Dip the dotting tool into the gold nail art polish.
- Carefully place single gold dots on the nail. You can place one at the base of each nail, create a line, or a scattered pattern.
- Cure the gold dots under the UV/LED lamp.
- Seal the design with gel top coat and cure.
Pro-Tip: To ensure perfectly round gold dots with your dotting tool, use enough gold nail art polish for each dot, but don’t overload the tool. For consistent size, redip for each dot. This simple white gold nails technique transforms a basic manicure into something truly chic.

7. Sophisticated White and Gold Negative Space

Pin this avant-garde white and gold negative space art for a modern twist!
The negative space design is an advanced nail art technique that offers a truly modern and artistic look. This style features patterns made from opaque white and gold geometric lines, where parts of the natural nail are left bare, becoming part of the design itself. This intentional use of empty space highlights a modern aesthetic that beautifully contrasts with traditional full-coverage manicures, resulting in chic white gold nails that are both creative and sophisticated.
What You Need
- Clear base coat (or builder gel for negative space)
- Opaque white gel polish
- Gold nail striping tape or gold gel paint with a thin brush
- Gel top coat
- UV/LED lamp
- Tweezers (for striping tape)
Instructions
- Prep nails and apply a base coat, then cure. For a true negative space look, ensure the rest of the nail is bare or has a clear builder gel.
- If using gold nail striping tape, apply it in your desired geometric patterns directly onto the cured base.
- Paint the areas around the tape with opaque white gel polish, filling in the shapes you want to be white. If freehanding with gold gel paint, draw your desired geometric lines to create the negative space pattern.
- If using tape, carefully remove the tape while the polish is still wet (if using regular polish) or after a flash cure (if using gel).
- Cure the white polish (and gold lines if freehanded) under the UV/LED lamp.
- Seal the entire design with gel top coat and cure.
Pro-Tip: When creating negative space design with gold nail striping tape, press the tape down firmly to prevent polish from bleeding underneath. For geometric lines, use a tack-free top coat after curing your white base before applying gold lines, as it provides a smooth, non-sticky surface for sharp drawing, transforming minimalist nail art into something truly refined.

8. Regal White and Gold Rhinestone Accents

Save this lavish white and gold rhinestone design to your ‘Luxury Manicures’ board!
For a touch of regal opulence, nothing beats white and gold nails with rhinestones. This luxury nail design features sparkling gold rhinestones or gold gems meticulously placed on an opaque white base. The strategic placement of these gems, often near the cuticle or as a focal point, transforms the manicure and enhances its regal aesthetic. This look pairs with dramatic nail shapes like coffin shape nails perfectly, creating a truly lavish and eye-catching result.
What You Need
- Opaque white gel polish
- Assorted gold rhinestones or gold gems
- Strong nail art gem glue or builder gel
- Wax picker tool or tweezers (for picking up rhinestones)
- Gel top coat
- UV/LED lamp
Instructions
- Prep nails and apply two coats of opaque white gel polish, curing after each.
- Apply a small dot of nail art gem glue or builder gel where you want to place each gold rhinestone.
- Using a wax picker tool or tweezers, carefully adhere the gold rhinestones onto the wet glue/gel.
- Once all gems are placed, cure the nails under the UV/LED lamp.
- Seal the entire nail with gel top coat, ensuring to go around the base of the rhinestones but not directly over them (as this can dull their sparkle). Cure again.
Pro-Tip: For the most secure gold rhinestone application, use a small amount of builder gel instead of traditional nail glue, as it provides a stronger bond and allows for repositioning before curing. Encapsulated glitter beneath clear rhinestones can also create an extra dimension, elevating your luxury nail design.

9. Bridal White and Gold Accents

Pin this enchanting bridal white and gold look for your special day!
A white and gold bridal manicure is the essence of wedding day elegance. This design typically features subtle gold accents, like a delicate gold foil accent or a hint of fine glitter, curated to perfectly complement a soft pearl white or creamy white base. A classic bridal manicure symbolizes timeless sophistication and pairs with a wedding dress and jewelry beautifully. It’s the perfect look for your special day and for stunning engagement photos.
What You Need
- Pearl white or creamy white gel polish
- Gold nail foil or very fine gold glitter
- Nail foil glue (for foil application)
- Detailing brush (for glitter placement)
- Gel top coat
- UV/LED lamp
Instructions
- Prep nails and apply two coats of pearl white gel polish, curing after each.
- If using gold nail foil: Apply a thin layer of nail foil glue to the desired accent nails. Allow it to dry until tacky. Press the gold nail foil onto the tacky surface, then quickly peel it off to transfer the gold design.
- If using gold glitter: On accent nails, apply a thin layer of gel top coat (do not cure). Lightly sprinkle or apply fine gold glitter to the wet top coat with a detailing brush. Flash cure.
- Seal all nails with a gel top coat and cure.
Pro-Tip: For the perfect bridal white and gold look, consider a milky white base for a softer aesthetic. When applying gold nail foil, ensure the glue is perfectly tacky—too wet, and the foil will smear; too dry, and it won’t stick. This attention to detail transforms a simple manicure into a truly luxurious wedding manicure.

10. Festive White and Gold Christmas Nails

Pin these sparkling white and gold Christmas nails to your ‘Holiday Glam’ board!
When the holidays arrive, a festive white and gold aesthetic nails look is the perfect way to celebrate. This style of christmas nail art features cheerful gold accents, like sparkling gold glitter accents or festive decals, applied over a crisp opaque white base. It transforms a simple manicure into something ready for any holiday party and even works well for new years nails. The combination enhances the celebratory mood and pairs with any holiday glam.
What You Need
- Opaque white gel polish
- Gold glitter, gold nail stickers (stars, snowflakes) or gold stamping polish
- Stamping plate (if using stamping)
- Gel top coat
- UV/LED lamp
- Tweezers (for stickers)
Instructions
- Prep nails and apply two coats of opaque white gel polish, curing after each.
- For gold glitter: Apply a thin layer of gel top coat (uncured), sprinkle fine gold glitter onto the desired area, then flash cure.
- For gold nail stickers: Using tweezers, carefully apply gold nail stickers (stars, snowflakes) onto the cured white base.
- For gold stamping: Use a gold stamping polish and a Christmas-themed stamping plate to stamp designs onto the nails.
- Seal all nails with a gel top coat and cure.
Pro-Tip: When creating festive white and gold Christmas nails with gold nail stickers, ensure the nail surface is clean and dry for optimal adhesion. After applying the sticker, gently press it down with a silicone tool to remove any air bubbles before sealing with top coat. This helps prevent premature lifting and keeps your holiday glam looking fresh.

11. Edgy White and Gold Chrome Nails

Pin this bold white and gold chrome statement to your ‘Baddie Nails’ board!
For a bold, futuristic look, gold chrome nails are the ultimate statement. This edgy design, often referred to as white and gold baddie nails, features mirror-like gold chrome powder rubbed over an opaque white base or on accent nails. The technique transforms classic white nails into a high-fashion look that highlights a striking metallic finish. It’s an incredibly popular style for long acrylic nails and provides a dramatic gold vs silver accents contrast that is undeniably cool.
What You Need
- Opaque white gel polish
- Gold chrome nail powder
- Non-wipe gel top coat (crucial for chrome application)
- Eyeshadow applicator or silicone tool
- Gel top coat (for sealing)
- UV/LED lamp
Instructions
- Prep nails and apply two coats of opaque white gel polish, curing after each.
- Apply a thin layer of non-wipe gel top coat to the white nails and cure for only 30-45 seconds (it should be slightly warm but not sticky). This specific tackiness is key for chrome.
- Using an eyeshadow applicator or silicone tool, firmly rub the gold chrome nail powder onto the nail surface until a mirror-like metallic finish appears.
- Gently dust off any excess powder with a soft brush.
- Seal the entire nail with a regular gel top coat and cure thoroughly.
Pro-Tip: The secret to flawless gold chrome nails is the exact curing time of the non-wipe gel top coat before powder application. It needs to be just tacky enough for the powder to adhere but not so wet that it creates a muddy finish. Experiment with a small test patch first. This attention to detail in polymerization makes a huge difference in preventing gold chrome from chipping.

Key Takeaways: Your Quick Guide to White and Gold Nails
- White and gold nails offer unparalleled elegance and versatility, making them a timeless trend for any occasion. – From simple white gold nails to elaborate luxury nail design, this color combo truly elevates your look.
- Achieving salon-quality white and gold nail art is possible at home with the right tools and techniques. – Focusing on proper prep, quality products, and precise application steps ensures a long-lasting manicure.
- From gold glitter ombre to delicate french tips, each design offers unique ways to incorporate gold accents. – The choice of gold (rose gold vs yellow gold) and its application (foil, glitter, chrome) transforms the base white nails.
- Expert tips, especially regarding product selection and precise application, are crucial for flawless results. – Using a tack-free top coat for chrome or understanding polymerization for encapsulated glitter enhances durability and finish.
- White and gold designs are highly adaptable, complementing various nail shapes and styles from minimalist to glamorous. – Whether you prefer short square white nails or long acrylic nails, this aesthetic adapts beautifully.
- Proper nail health practices, including cuticle care and strengthening treatments, are fundamental for any beautiful manicure. – Healthy nails provide the best blank canvas nails for your white and gold nail art.
- Incorporating specific design elements like gold flakes, rhinestones, or abstract lines allows for personalized expression. – This allows for unique white and gold aesthetic nails that truly reflect individual style.
FAQs About White and Gold Nails
How to do white and gold nails at home?
To create white and gold nails at home, start with a well-prepped base of your chosen white polish, then carefully apply gold accents using tools like striping brushes, dotting tools, or nail foil. The process typically involves a base coat, two coats of white polish, the gold design element, and a sealing top coat, ensuring each layer is dry or cured before the next. This DIY approach allows for personalization while achieving elegant white gold nails.
What are the best white and gold nail designs for weddings?
For weddings, the best white and gold nail designs are typically elegant and understated, such as delicate gold French tips on a milky white base, subtle gold glitter accents, or encapsulated gold flakes. Bridal looks often favor softer whites like pearl white or sheer, with gold elements that complement rings and attire rather than overpowering them. Designs featuring white and gold bridal elements are always a popular choice.
How to apply gold foil to white nails?
To apply gold foil to white nails, first apply a thin, even layer of nail foil glue over your cured white polish and let it dry until it becomes tacky. Once tacky, press the gold nail foil sheet firmly onto the nail, ensuring good contact, then quickly peel it away to transfer the gold design. Seal with a top coat to prevent peeling foil and secure your gold foil accent.
What white nail polish is best for gold glitter?
An opaque, creamy white gel polish provides the best base for gold glitter as it allows the glitter to stand out vibrantly and offers a clean canvas. For a softer look, a milky white or sheer white polish also pairs with fine gold glitter effectively, especially for an ombre effect. High-quality pigments in the white polish ensure the glitter’s true color shines through.
Are white and gold nails in style for 2026?
Yes, white and gold nails remain a popular and highly fashionable choice for 2026, known for their timeless elegance and versatility. This classic combination frequently appears in Pinterest and Instagram trends, adapting to various styles from minimalist nail art to bold statements, making them a consistent favorite for their luxurious and sophisticated appeal.
Can you do white and gold nails on short nails?
Absolutely, white and gold nails are exceptionally well-suited for short nails, with minimalist designs like gold dots, subtle line art, or delicate gold French tips being particularly effective. These designs highlight the clean aesthetic of shorter nails and can make them appear elegant and refined without requiring extensive length, making them perfect for short white nails.
How to prevent gold chrome from chipping?
To prevent gold chrome from chipping, it is crucial to use a high-quality, non-wipe gel top coat before applying the chrome powder, ensuring it’s cured for the exact recommended time for optimal tackiness. After rubbing in the powder, properly seal the gold chrome nails with another durable gel top coat, thoroughly covering the edges, to create a protective barrier. This approach ensures a long-wear formula and prevents premature wear.
What goes best with white and gold nails?
White and gold nails beautifully complement classic and elegant aesthetics, pairing exceptionally well with gold jewelry, neutral-toned outfits, and sophisticated accessories. They are particularly suitable for formal events like weddings and holiday parties, where their luxurious appeal can truly shine, enhancing any ensemble with a touch of glamour.
How to make white and gold marble nails?
To create white and gold marble nails, apply an opaque white gel base, then while the surface is still slightly wet (or with a blooming gel), use a fine brush to draw irregular gold lines, gently feathering them to mimic natural marble veins. Flash cure the design, then seal with a top coat. This technique ensures a realistic and elegant white marble gold effect.
Which gold is best for white nails: rose or yellow?
Both rose gold and yellow gold can look stunning on white nails, with the choice depending on your desired aesthetic and skin tone matching. Yellow gold provides a classic, opulent contrast that makes white nails pop, while rose gold offers a softer, more romantic shimmer that complements warmer skin tones beautifully. Consider the overall look you aim to create.
Final Thoughts on White and Gold Nails
In 2026, white and gold nails continue to stand out as a pinnacle of sophistication and versatility in nail art. From the dazzling sparkle of gold glitter ombre to the understated charm of milky white nails with delicate gold french tips, this classic color combination offers an endless array of possibilities to suit every style and occasion. We’ve explored 11 distinct designs, demonstrating that whether you’re aiming for bridal white and gold accents or an edgy gold chrome nails statement, the elegance of white complements and highlights the luxury of gold flawlessly.
Achieving these stunning white and gold nail designs is more accessible than ever, with detailed instructions and product recommendations empowering both seasoned DIY enthusiasts and beginners. Remember that high-quality products, precise application, and a touch of expert advice (especially for techniques like encapsulated glitter or preventing chipping paint) are your keys to a long-lasting manicure that truly shines. Embrace the white and gold aesthetic nails to elevate your look and showcase your personal style in 2026.
What’s your favorite white and gold nail design to try next? Share your thoughts in the comments below
Last update on 2026-03-06 / Affiliate links / Images from Amazon Product Advertising API


