Tired of the same old bright florals and bold patterns for spring? You’re looking for something that feels fresh and seasonal, but also polished and sophisticated. You want classy spring nails that elevate your style without shouting.
Classy spring nails for 2026 are defined by soft, understated elegance, moving away from bright neons towards sophisticated palettes. Key trends include creamy butter yellow shades, minimalist micro florals, subtle pearl and chrome finishes, and modern variations on the classic French manicure. These styles focus on fresh, airy, and refined looks perfect for professional settings.
Drawing from comprehensive analysis of current data and proven methodologies, we’ve curated the most elegant looks for the season. This guide will walk you through 11 chic, achievable designs that embody sophistication. Prepare to discover your new signature spring manicure.
What Defines Classy Spring Nails in 2026?
In 2026, the definition of elegant spring nails has shifted towards a “quiet luxury” aesthetic, emphasizing refined details and high-quality finishes over bold, attention-grabbing designs. The core principle is sophistication through subtlety. This means moving away from the bright, saturated colors of past seasons and embracing a more muted and pastel color palette. Think of shades that are soft, airy, and feel like a natural extension of your personal style. Attributes like a minimalist approach, a flawless glossy finish, and understated artistry are paramount. These designs are meant to complement spring fashion trends and are versatile enough for everything from bridal preparations to daily professional wear, becoming a key part of a polished self-care routine. The trend is less about intricate, complex nail art and more about the perfection of a simple color or a single, well-placed detail.
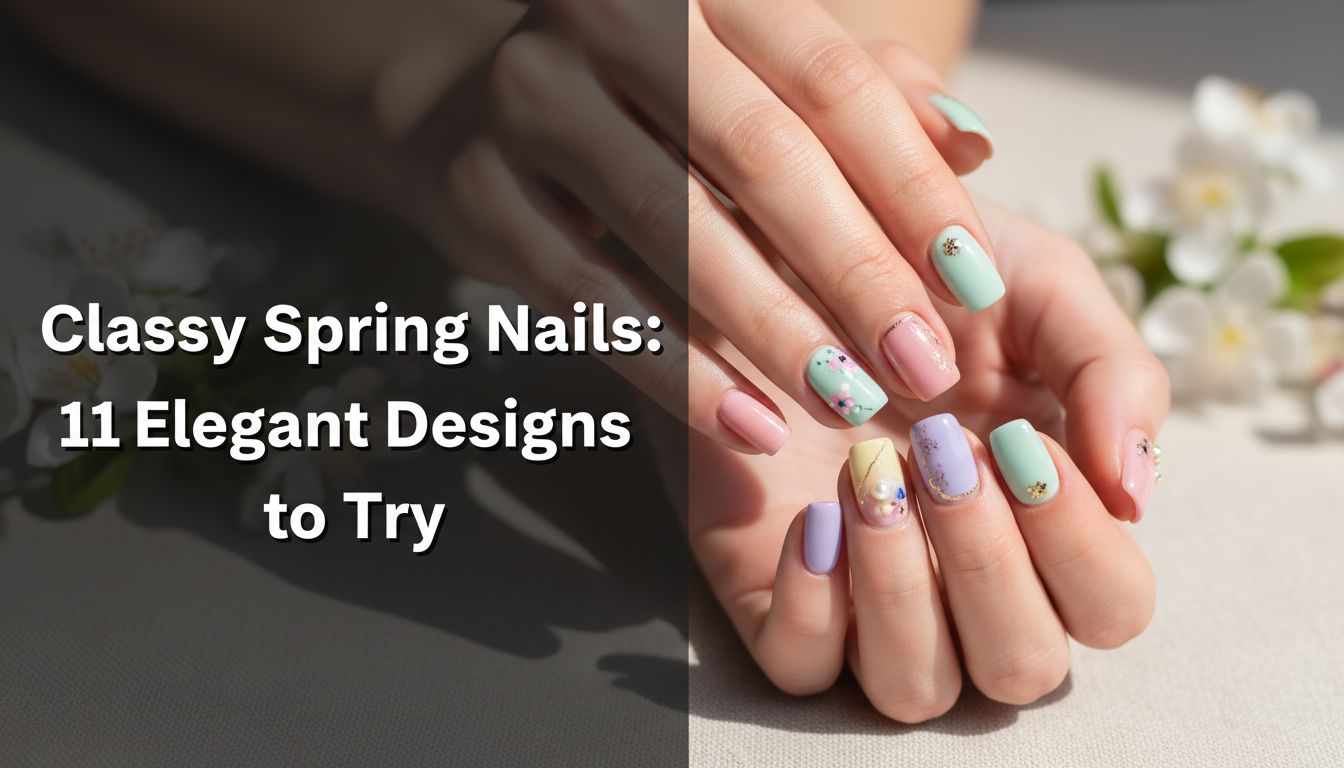
11 Elegant Spring Nail Designs to Try This Season
Now that we understand the principles of chic, understated design, let’s explore them in practice. The following 11 designs are the perfect embodiment of classy spring nails for this season. Each look is curated to be both on-trend and timelessly elegant, offering specific inspiration you can take to your salon or try at home. From the must-have color of the season to modern takes on classic art, this list showcases a range of chic spring manicure ideas that are both beautiful and practical.
1. Embrace the Understated ‘Butter Yellow’ Manicure

Pin this chic color to your ‘Spring Style’ board!
This season, the standout shade is undeniably butter yellow nails. Seen across Spring/2026 runway shows, this color strikes the perfect balance between being a fresh, seasonal pastel and a sophisticated, versatile neutral. Unlike vibrant yellows, this creamy, milky hue is minimalist and chic, pairing beautifully with simple gold jewelry and professional attire. It offers a pop of color that feels intentional and grown-up, making it perfect for short classy nails and longer almond nail shapes alike. Achieving the perfect look is all about finding a polish with an opaque, non-streaky formula and sealing it with a high-glossy finish.
Products & Tools Used
- Nail file and buffer
- Cuticle pusher and cuticle oil
- A high-quality, long-wear base coat to protect from staining
- A creamy, opaque butter yellow gel polish (e.g., OPI ‘Blinded by the Ring Light’ or a similar pastel shade)
- A high-glossy top coat for a salon-grade finish
- UV lamp for curing gel polish
Application/Styling Steps
- Prep the nails by shaping them into a soft oval or almond nail shape, gently pushing back cuticles, and lightly buffing the nail surface.
- Apply a thin layer of base coat and cure under the UV lamp as directed.
- Paint the first thin layer of butter yellow polish, ensuring even coverage. Cure completely.
- Apply a second coat for full opacity and cure again.
- Seal the design with a generous layer of high-gloss top coat, making sure to cap the free edge to prevent chipping. Cure for the final time.
- Moisturize with cuticle oil to finish.
Pro-Tip: For the most sophisticated spring nails, choose a yellow with creamy, milky undertones rather than a vibrant, primary yellow. My experience shows these softer shades are more versatile and align better with the ‘quiet luxury’ aesthetic.

2. Modernize with a Subtle Micro French Manicure

The perfect minimalist look. Pin it for your next salon visit!
The classic French manicure gets a sophisticated update with french tip variations like the micro french manicure. This modern take is the epitome of understated elegance and is one of the best examples of sophisticated pastel nail art for office wear. Instead of a thick, prominent white band, this style features a razor-thin, barely-there line painted right at the nail’s edge. It’s a minimalist nail design that is perfect for professional settings and looks exceptionally beautiful on short classy nails, elongating the fingers without needing extensions. This look requires a steady hand and a fine-liner brush to achieve its signature dainty appearance.
Products & Tools Used
- A sheer, neutral pink or nude base polish (e.g., Essie ‘Ballet Slippers’)
- A highly pigmented, crisp white nail lacquer for the tip
- An ultra-fine, long-bristled nail art liner brush
- A high-shine top coat
Application/Styling Steps
- Prep nails and apply one to two coats of your sheer pink or nude base polish. Let it dry completely.
- Pour a small drop of white polish onto a palette. Dip the very end of your liner brush into the white.
- With a light, steady hand, paint a razor-thin line across the free edge of your nail. The key to the ‘micro’ look is making this line as dainty as possible.
- Clean up any mistakes with a small brush dipped in acetone-free remover.
- Finish with a glossy top coat to seal the design and add shine.
Pro-Tip: A manicurist secret for a perfectly straight line is to hold the brush still and roll your finger into it, rather than trying to draw the line across. This technique provides superior control, especially for your non-dominant hand.
3. Add a Touch of Whimsy with Delicate Micro Florals

So dainty! Pin this floral idea for a fresh spring look.
Florals for spring can be groundbreaking when done with a minimalist touch. The trend for minimalist floral nail art for spring 2026 is all about micro floral art—tiny, delicate flowers that add a hint of whimsy without overwhelming the nail. A popular execution is daisy + negative space, where a few tiny daisies are painted on an accent nail over a sheer nude base. This design enhances a simple pastel manicure, adding a feminine and airy detail. To create this look, you will utilize a dotting tool for the petals and a fine brush for the leaves and stems, ensuring the final result is dainty and sophisticated.
Products & Tools Used
- A nude or sheer pink base polish
- White, yellow, and green nail art paint or polish
- A small nail art dotting tool
- An ultra-fine detail brush
Application/Styling Steps
- Apply your nude base color and let it dry completely.
- Using the dotting tool, place five small white dots in a circle to create the petals of a daisy.
- Clean the tool and use the smallest tip to place a single yellow dot in the center of the white petals.
- Using the detail brush, paint one or two tiny green leaves next to your flower.
- Repeat to create a few scattered minimalist florals, or confine the design to an accent nail.
- Once the art is fully dry, seal with a top coat.
Pro-Tip: To ensure your florals look dainty and not cartoonish, use the smallest dotting tool you have and leave a tiny bit of negative space between each petal dot. This keeps the design looking airy and sophisticated.

4. Elevate Your Look with a Single, Chic Pearl Accent

The essence of elegance. Pin this for a touch of luxury.
For a touch of instant sophistication, nothing beats a pearl nail design. This trend embodies the essence of elegant spring nails by adding a single, understated 3D element. A tiny, flat-back pearl placed near the cuticle of an accent nail creates a look that is both sophisticated and surprisingly practical. This type of pearlized accent complements almost any base color, from a sheer nude to a soft pastel. It’s an ideal choice for a chic spring manicure idea for wedding guests or anyone looking to add a touch of luxury to their everyday look. The design requires a strong nail glue or a thick gel to properly adhere the pearl and ensure it lasts.
Products & Tools Used
- Your base polish of choice (a sheer nude or pastel works best)
- Small, flat-back nail art pearls (2mm or 3mm)
- Nail glue or a thick, clear builder gel
- A wax-tipped pencil or tweezers for picking up the pearl
- Top coat
Application/Styling Steps
- Paint your nails with your chosen base color and let it dry completely.
- Place a tiny dot of nail glue or builder gel where you want to adhere the pearl (near the cuticle of an accent nail is a chic choice).
- Using the wax pencil, pick up a single pearl and gently press it onto the glue/gel.
- If using builder gel, cure under a UV lamp to set the pearl.
- Carefully apply top coat around the pearl to seal it in, without covering the pearl itself to maintain its natural luminous quality.
Pro-Tip: To make your pearl accent last, apply two layers of top coat around the base of the pearl. This creates a secure prong-like setting, similar to how a jeweler sets a stone, which dramatically reduces the chance of it catching or popping off.

5. Achieve a Luminous Glow with a Soft Chrome Finish

Get the glow! Pin this ‘glazed donut’ nail inspo.
One of the biggest spring nail trends 2026 is the soft chrome finish nails, popularly known as the “glazed donut look.” This isn’t a chunky glitter; it’s a fine, iridescent shimmer that gives the nails a healthy, luminous glow. The effect is achieved when a special powder is buffed over a no-wipe gel top coat, which transforms a simple base color into a reflective, multi-tonal surface. While it can be done over any color, a sheer white or light pink base creates that classic, ethereal glazed effect. This is a fantastic way to make a minimalist manicure feel special and on-trend.
Products & Tools Used
- A base color (a sheer white or light pink like OPI ‘Funny Bunny’ is classic for this look)
- A no-wipe gel top coat
- A pearlized or iridescent white chrome powder
- A small eyeshadow applicator or silicone tool
- A fluffy brush for dusting off excess
- A final top coat to seal
Application/Styling Steps
- Apply your base color and cure.
- Apply a thin layer of the no-wipe gel top coat and cure for the exact recommended time (usually 30-60 seconds). Do NOT wipe the tacky layer.
- Dip your applicator into the chrome powder, picking up a very small amount.
- Gently but firmly buff the powder onto the nail surface until the mirror-like, iridescent finish appears.
- Use the fluffy brush to gently dust away all excess powder, especially around the cuticles.
- Seal the design with another layer of top coat (it can be the no-wipe one or a regular one) and cure for the final time.
Pro-Tip: The secret to a perfect chrome application is the cure time of the no-wipe top coat. As an expert guide, I recommend curing for only 30 seconds. If it’s under-cured, it will be patchy; if it’s over-cured, the powder won’t stick. Test your lamp’s timing on one nail first.

6. Play with Minimalist Negative Space Designs

Modern art for your nails. Pin this negative space idea.
A minimalist nail design that is both modern and incredibly chic is the use of negative space. This technique utilizes the bare nail as a key component of the art, creating an airy and sophisticated feel. These are some of the best simple classy spring nail designs for short nails because they look intentional and are very low-maintenance. The design pairs with simple organic swirls, a single dot, or a fine line of a pastel color like soft lavender. Because much of the nail is bare, there is no obvious grow-out line, extending the life of your manicure.
Products & Tools Used
- A clear, nail-strengthening base coat
- A pastel polish of your choice (e.g., a soft lavender or mint green)
- A fine-liner nail art brush
- A glossy top coat
Application/Styling Steps
- Prep nails and apply one or two coats of a high-quality strengthening base coat to create a flawless, healthy-looking canvas.
- Dip your liner brush into the pastel polish.
- Paint a simple design, leaving plenty of the natural nail exposed. Ideas include: a single swooping line, a small half-moon at the cuticle, or a colored tip that starts halfway up the nail.
- The key is to keep the design minimalist and intentional.
- Let the art dry completely.
- Finish with a glossy top coat over the entire nail to make the negative space look just as polished as the colored part.
Pro-Tip: The success of a negative space manicure depends on the health of the visible nail. I always advise clients to focus on hyponychium health and use cuticle oil daily for a week leading up to this manicure. It makes a world of difference.

7. Opt for Ethereal ‘Milk Bath’ Nails

A dreamy, ethereal look. Pin this milk bath nail idea now!
If you’re wondering what are milk bath nails, think of a soft, dreamy, and utterly feminine manicure. This classy spring nails style features a semi-translucent, sheer milky white polish that creates a delicate, ethereal quality. The look can be kept simple with just the milky color, or it can be enhanced by encapsulating tiny dried flowers or gold foil within the layers of polish. This design is a top-rated choice for spring weddings and provides a romantic alternative to a standard opaque white manicure. The key is building up sheer layers to create a sense of depth.
Products & Tools Used
- A sheer, milky white or off-white polish (e.g., OPI ‘Funny Bunny’ or a dedicated ‘milky’ shade)
- Optional: Tiny, dried, pressed flowers for nail art
- Optional: A clear builder gel
- Tweezers
- A high-shine top coat
Application/Styling Steps
- Apply a base coat. Then, paint one very thin layer of the milky white polish and cure.
- Apply a second thin layer. While it’s still wet (if using regular polish) or before curing (if using gel), use tweezers to gently place a few tiny dried flower fragments onto the nail.
- If using gel, cure to set the flowers in place.
- Layer another one or two coats of the milky white polish over the flowers. This creates the ‘submerged in milk’ effect. For a smoother finish, encapsulate the flowers in a layer of clear builder gel before the final milky coat.
- Finish with a glossy top coat to create a smooth, glass-like surface.
Pro-Tip: The key to an expensive-looking milk bath manicure is the sheerness. Mix a drop of your milky white polish with a few drops of clear top coat on a palette to create a custom, ultra-sheer wash of color for your layers. This gives you more control over the opacity.

8. Try a ‘Skittles’ Manicure with a Muted Pastel Palette

A playful pop of color. Pin this muted pastel idea!
The ‘Skittles’ manicure, which features a different color on each nail, can absolutely be chic and sophisticated. The secret requires careful color selection. For classy spring nails, choose a seasonal palette of tonally similar colors, such as five different muted pastels. A combination of dusty rose, sage green, butter yellow, soft lavender, and creamy peach creates a look that is playful yet cohesive and elegant. It’s a wonderful way to wear a pastel color palette without committing to a single shade.
Products & Tools Used
- A collection of 5 complementary muted or pastel nail polishes. (Think sage green, dusty blue, soft lavender, creamy peach, and butter yellow).
- Base coat and top coat.
Application/Styling Steps
- Prep all nails and apply a base coat.
- Plan your color order. A good technique is to arrange them from lightest to darkest or follow a cool-to-warm progression.
- Paint the thumbnail with the first color.
- Paint the index finger with the second color, and so on, until each nail has a different color.
- Apply a second coat to each nail for full opacity.
- Seal all nails with a high-gloss top coat to unify the look.
Pro-Tip: To ensure your palette is cohesive, buy a pre-made salon-grade collection from a single brand. These sets are curated by professionals to have the same undertone and viscosity, ensuring a harmonious and high-end result.

9. Experiment with Dainty Gold Foil Flakes

A touch of gold. Pin this luxe minimalist idea.
For a touch of luxury spring nail inspiration for 2026, look no further than gold foil. This embellishment adds a beautiful texture and a hint of metallic shine, perfect for elevating a simple minimalist nail design. The key to keeping it classy is to use the foil sparingly. A few dainty flakes artfully scattered on an accent nail or near the tips over a neutral base is all you need. This look requires a tacky polish layer for the flakes to adhere to and must be thoroughly encapsulated with a top coat to create a smooth finish and prevent flaking.
Products & Tools Used
- A neutral base polish
- Cosmetic-grade gold foil flakes
- A pair of fine-tipped tweezers
- A thick top coat or clear builder gel
Application/Styling Steps
- Paint your nails with the neutral base color.
- While the second coat is still tacky (or over a cured but un-wiped gel layer), use tweezers to pick up tiny pieces of gold foil.
- Gently place the flakes onto the nail in a scattered, organic pattern. Less is more. Focus them on one area, like the tip or the base.
- Gently tap the foil down with a a finger or a silicone tool to ensure it lays as flat as possible.
- Seal everything with one or two thick layers of top coat. Make sure all edges of the foil are completely encapsulated to prevent snagging.
Pro-Tip: For a truly integrated, ‘suspended in glass’ look, apply the foil, then a layer of clear builder gel, cure, and then apply your final top coat. This adds depth and ensures a perfectly smooth C-curve structure.

10. Master the ‘Clean Girl’ Sheer Neutral Aesthetic

The ultimate in chic simplicity. Pin this ‘clean girl’ nail guide.
The clean girl nail aesthetic is perhaps the most timeless and sophisticated look of all. This neutral spring aesthetic emphasizes pristine natural nail care over color. The look is defined by perfectly shaped short classy nails, immaculate cuticles, and a single coat of a sheer, healthy-looking polish that enhances your natural nail tone. It’s a ‘your-nails-but-better’ vibe that radiates health and effortless elegance. The final touch is an ultra-glossy + clean top coat that gives a plump, hydrated appearance.
Products & Tools Used
- A gentle cuticle remover/softener
- A high-quality glass nail file
- A nail buffer block
- A sheer, flattering nude or pink polish (e.g., Dior Nail Glow)
- A high-shine, ‘plumping’ top coat
- Cuticle oil and hand cream
Application/Styling Steps
- Begin by applying cuticle remover and gently pushing back the cuticles. Do not cut them.
- Shape your nails into a neat, short, rounded or ‘squoval’ shape with the glass file.
- Lightly buff the nail surface with the buffer block to create a smooth canvas, then cleanse the nail.
- Apply one single, thin coat of the sheer polish. The goal is a hint of color that evens out your natural nail tone, not opaque coverage.
- Let it dry, then apply a generous layer of a plumping, high-shine top coat. This is the key to the aesthetic.
- Finish by massaging cuticle oil into the surrounding skin, followed by a rich hand cream.
Pro-Tip: The secret weapon for a true ‘clean girl’ manicure is a ridge-filling base coat. Even if you don’t have prominent ridges, it creates an impossibly smooth surface that makes your single layer of sheer polish look flawless and professionally done.

11. Choose a Single, Sophisticated Accent Nail

Simple elegance. Pin this accent nail idea for inspiration.
If you want to dip your toes into nail art without committing to a full set, a single accent nail is the perfect solution. This classic technique remains one of the most sophisticated spring nails ideas because of its versatility and restraint. The concept is simple: one nail (typically the ring finger) features a design that contrasts with yet complements the solid color on the other nails. For a chic spring look, try pairing a dusty rose manicure with a rose quartz marble effect on the accent nail. This creates a point of interest while maintaining an overall elegant and cohesive look.
Products & Tools Used
- A main polish color (e.g., a dusty rose)
- For a rose quartz accent: a sheer milky pink polish, a darker pink polish, and a fine liner brush.
- A top coat.
Application/Styling Steps
- Paint the four main nails on each hand with two coats of your chosen solid color.
- On the accent nail (usually the ring finger), apply one coat of the sheer milky pink polish.
- While it’s still wet, use the liner brush to draw a few random, squiggly lines with the darker pink polish.
- Immediately, use a clean, dry brush (or one dipped in a bit of acetone) to gently blend and soften the lines, creating a marble effect.
- Let the art dry, then apply a second coat of the sheer milky pink on top to add depth.
- Finish all ten nails with a glossy top coat.
Pro-Tip: The easiest way to create a flawless quartz or watercolor effect is with ‘blooming gel’. Apply your base color, cure, then apply a layer of blooming gel (do not cure). Dot your colors into the uncured gel and watch them spread out beautifully. Cure when you’re happy with the design. It’s a manicurist secret for effortless art.

Key Takeaways
- Embrace Soft, Muted Palettes: This spring, classy spring nails are all about subtlety. Swap brights for sophisticated shades like butter yellow, dusty rose, and sage green for a chic and modern look.
- Texture is the New Art: Elevate simple manicures with textural finishes. A pearl nail design adds a touch of luxury, while a soft chrome finish provides a luminous, ‘glazed’ effect that’s both trendy and elegant.
- Minimalism Reigns Supreme: Less is more. Opt for micro french tips on short classy nails or delicate micro floral art on a single accent nail for a design that is professional and understated.
- Nail Health is the Foundation: The ‘clean girl’ aesthetic proves that the most elegant spring nails start with excellent nail care. Focus on perfect shaping, cuticle health, and a high-shine finish on a sheer, neutral base.
- Upgrade Your Classics: You don’t have to abandon timeless looks. Simply modernize them. A french tip variation like the ‘micro’ French feels fresh, while adding dainty gold foil to a nude manicure gives it a luxurious spring update.
FAQs About Classy Spring Nails
What are the classiest nail colors for spring 2026?
The classiest nail colors for spring 2026 are soft, muted, and sophisticated shades. Instead of brights, opt for creamy butter yellow, dusty rose, sage green, soft lavender, and timeless sheer nudes. These colors are versatile, professional, and align with the season’s ‘quiet luxury’ fashion trends.
How do you choose a spring nail design for work?
To choose a work-appropriate spring nail design, prioritize subtlety and minimalism. Opt for short classy nails with designs like a micro french manicure, a sheer neutral polish embodying the clean girl nail aesthetic, or a single, dainty accent nail. Avoid overly bright colors, excessive glitter, or large 3D embellishments.
Can you do classy spring nails on short natural nails?
Absolutely, many classy spring designs are actually enhanced by short nails. Styles like the micro French, the ‘clean girl’ sheer nude, a simple pastel ‘Skittles’ manicure, and negative space designs look incredibly chic and intentional on well-groomed short, natural nails. The key is perfect shaping and cuticle care.
What is the difference between gel vs dip for spring nail art?
Gel and dip powder are both excellent long-lasting options, but they suit different types of spring nail art. Gel polish is better for fine, painted details like micro florals or swirls, as it doesn’t dry until cured. Dip powder is exceptionally durable and great for solid colors, glitter effects, or creating a strong base for 3D accents like pearls.
How do I make my spring manicure last longer?
To make your manicure last, proper prep and sealing are crucial. Always start by cleansing the nail plate with alcohol to remove oils. Use a quality base coat, apply polish in thin coats, and most importantly, “cap the free edge” by running the brush along the very tip of the nail with both your color and top coat. Re-applying your top coat every 2-3 days can also significantly extend its life and shine.
Final Thoughts
This spring, finding your perfect classy spring nails is less about chasing fleeting fads and more about embracing a refined, personal aesthetic. As we’ve explored through these 11 elegant designs, sophistication lies in the details: the creaminess of a butter yellow polish, the delicate precision of a micro french manicure, or the understated luxury of a single pearl accent. These looks prove that you don’t need loud colors or complex art to make a stylish statement.
By focusing on high-quality products, immaculate nail preparation, and designs that complement your personal style, you can create a manicure that feels both fresh for the season and timelessly chic. Whether you take these ideas to your trusted nail technician or embark on a creative DIY session, we hope this guide has inspired you to welcome spring with hands that look and feel truly beautiful.
What classy spring nail design are you most excited to try first? Let us know in the comments below.
Last update on 2026-04-27 / Affiliate links / Images from Amazon Product Advertising API