Tired of the same old tacky Halloween nails that clash with your personal style? You want to celebrate the spooky season, but cliché orange and black designs just don’t feel like you. You’re searching for truly elegant halloween nail designs that are both festive and sophisticated.
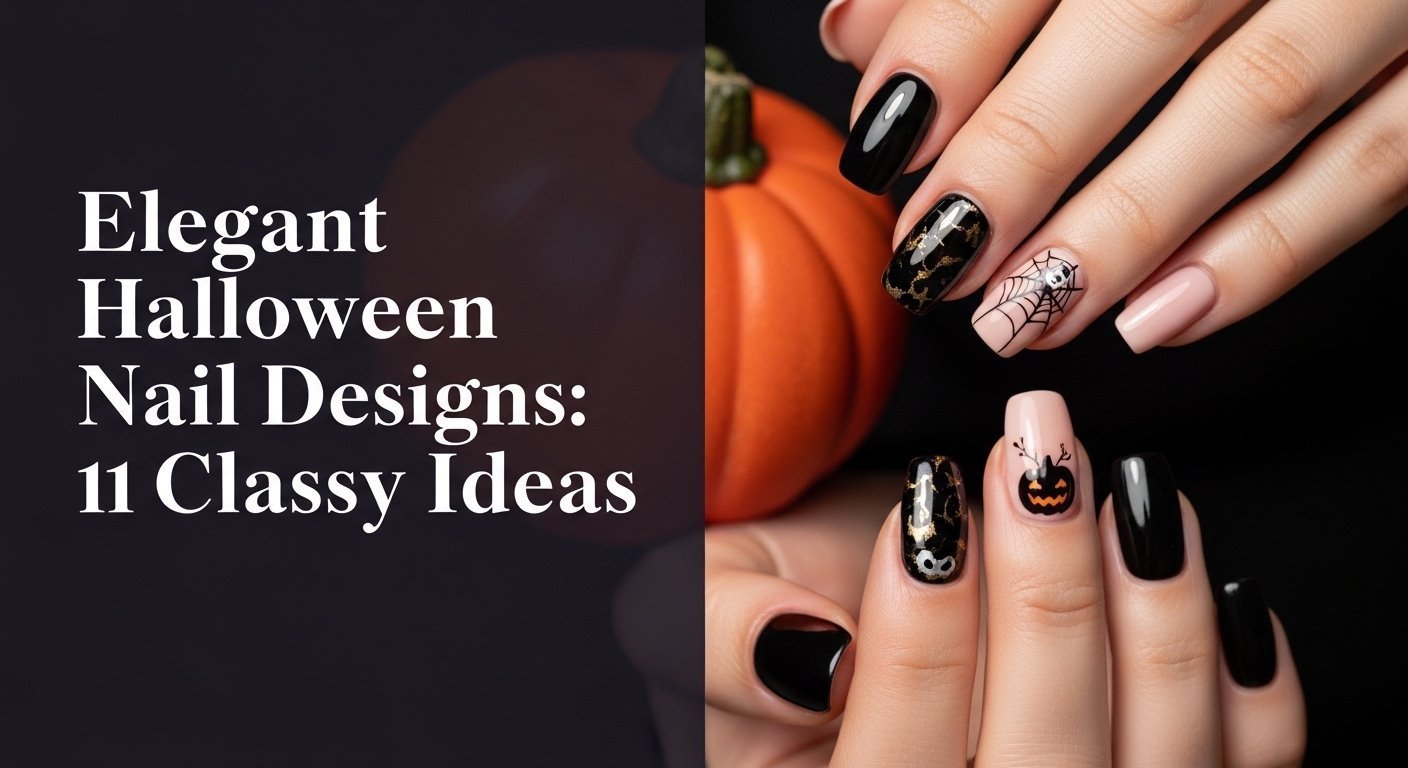
Elegant Halloween nail designs combine subtle spooky motifs with sophisticated aesthetics like matte finishes, metallic accents, and minimalist patterns to create a chic and refined seasonal manicure. These designs prioritize style over overt fright, often utilizing a muted color palette of blacks, golds, burgundies, and nudes. This approach allows you to embrace the holiday with a touch of class.
Drawing from comprehensive analysis of current Pinterest trends and the insights of pro artists, this guide is your key to unlocking a world of chic spooky style. We’ll explore 11 classy and creative ideas that transform traditional themes into wearable art. Get ready to discover your new favorite refined halloween manicure for 2026.
Mastering Elegant Halloween Nail Designs: 11 Classy Ideas for 2026
The desire for a more sophisticated halloween nails aesthetic marks a significant shift away from the loud, costume-like nail art of the past. Today, the focus is on creating a stylish halloween nails look that feels intentional, modern, and aligned with a high-fashion sensibility. This involves using advanced techniques and a more refined color palette to interpret spooky themes. Instead of overt gore, think subtle spider webs on a nude base or a rich deep burgundy matte that hints at a darker theme. The goal is a polished halloween manicure that seamlessly complements your professional and personal style, proving that holiday spirit and elegance can absolutely go hand-in-hand. This guide focuses on exactly that: providing inspiration and actionable steps for high-end halloween nail designs that are tasteful, chic, and anything but tacky.
11 Classy Elegant Halloween Nail Designs for 2026: Your Guide to Chic Spooky Style
Here, we present a curated gallery of 11 elegant halloween nail ideas designed to inspire your next manicure. Each look is broken down with step-by-step instructions and pro tips to help you or your professional manicurist achieve a flawless, chic halloween nail art finish. From the moody vibes of dark academia nails to the playful charm of chic ghost silhouettes, these designs showcase how modern halloween nails can be both festive and incredibly sophisticated. We’ll explore how to use elements like a matte finish, celestial gold accents, and negative space geometry to create a high-end halloween nail design that feels both current and timelessly elegant.
1. Matte Black & Gold Leaf Accents: A Dark Academia Elegance

Pin this chic matte look to your ‘Fall Nail Inspo’ board!
This look perfectly captures the dark academia nails aesthetic, combining a deep, velvety matte black finish with the luxurious touch of gold leaf details. The stark contrast creates a visually stunning and sophisticated halloween nail design that is both moody and opulent. It’s an ideal choice for an almond shape nail, where the elegant taper enhances the design’s refined classy gothic nail art appeal, making it a top contender for luxury gold and black halloween manicure ideas.
What You Need
- High-quality matte black gel polish
- Gold leaf nail art flakes
- No-wipe matte top coat
- Base coat
- Fine-tipped striper brush
- UV lamp or LED lamp
- Cuticle oil
Routine Steps
- Prep nails by filing into desired almond shape, pushing back cuticles, and buffing the nail surface.
- Apply a thin layer of base coat and cure under the UV lamp.
- Paint two thin coats of matte black gel polish, curing each layer.
- While the final black gel polish layer is still slightly tacky (or after applying a thin, tacky gel layer), use tweezers or a striper brush to delicately apply small gold leaf details onto selected areas.
- Gently seal the gold leaf with a thin layer of no-wipe matte top coat and cure thoroughly.
- Finish with a nourishing cuticle oil to maintain healthy nails and a polished look.
Pro-Tip: For the most durable matte finish that truly enhances dark academia nails, ensure your matte top coat is evenly applied and completely cured. Skipping this step can lead to premature chipping, a common problem with long lasting manicure challenges, particularly with deep colors and intricate designs.

2. Subtle Spider Web French Tips: Minimalist Spooky Chic

Save this chic spider web look for your next salon visit!
This french manicure twist is the epitome of minimalist spider web nail art for work. By layering delicate spider web accents over a classic nude base, you achieve a chic + eerie look that is perfectly suited for subtle spooky nail designs for professional settings. This design transforms traditional french tips into a work of classy halloween nail art that is both simple and sophisticated, making it an excellent choice for those wondering how to achieve a subtle spider web look.
What You Need
- Sheer nude gel polish (or a transparent base coat)
- Fine-tipped striper brush
- Black gel polish (or white for a frosted look)
- Top coat
- UV lamp or LED lamp
- Rubbing alcohol and lint-free wipes
Routine Steps
- Prep nails and apply a thin layer of base coat, curing it completely.
- Paint one or two coats of the sheer nude gel polish, curing each layer until you achieve your desired base color.
- Dip your striper brush into the black gel polish and remove excess.
- Carefully design the spider web accents at the tip of the nail, mimicking the classic french tips curve. Start with a thin line across the tip, then add 2-3 small radiating lines connecting to it, and finally tiny arcs to create the web effect.
- Cure the spider web design.
- Seal the design with a generous layer of top coat and cure thoroughly.
- Cleanse any tacky residue with rubbing alcohol.
Pro-Tip: To keep the spider web accents truly delicate and prevent a messy look, use a minimal amount of polish on your striper brush. Wipe the brush frequently to ensure your lines are crisp and free of blobs, which is essential for micro-painting and achieving salon quality at home.

3. Celestial Gold & Deep Burgundy: Starry Night Mystique

Pin this mystical manicure for a luxurious halloween nail design!
This celestial nail art creates a magical starry night nails effect that is undeniably chic. The rich deep burgundy matte base complements the shimmering celestial gold accents perfectly, resulting in an elegant + dark aesthetic. This look is stunning on coffin nails or an almond shape, offering a truly graceful halloween nail art style for anyone wanting chic celestial halloween nails with gold stars.
What You Need
- Deep burgundy gel polish (or desired dark shade like obsidian or charcoal)
- Celestial gold nail art elements (stickers, glitter, or fine gold polish)
- Top coat (matte or glossy, depending on preference)
- Fine-tipped striper brush (if hand-painting)
- UV lamp or LED lamp
- Base coat
Routine Steps
- Prep nails and apply base coat, curing.
- Paint two to three thin, even coats of deep burgundy gel polish, curing each layer to ensure a rich, opaque color.
- Once the base color is cured, carefully apply the celestial gold elements. This could involve placing individual nail stickers, using a stamping kit for intricate patterns, or hand-painting tiny stars with the striper brush.
- Cure the gold accents.
- Seal the entire design with your chosen top coat (glossy for a classic shine, matte finish for added drama) and cure thoroughly.
- Finish with cuticle oil for a polished look.
Pro-Tip: When working with dark polishes and delicate accents like gold leaf details, applying a high-quality no-wipe top coat is crucial. This helps to encapsulate the design and prevent smudging, ensuring a long lasting manicure and preserving the intricate details.

4. Glossy Noir with Negative Space: Modern Gothic Chic

Pin this modern gothic look for your ‘Chic Halloween’ inspo!
For those who love elegant gothic almond shape nail designs, this glossy noir look with negative space geometry is the perfect modern statement. The high-shine black contrasts with the bare nail to create a minimalist + spooky design. This technique is key for a contemporary clear night nail design and answers the question of how to use negative space in halloween art? by showcasing its power to create a bold yet modern halloween nail look.
What You Need
- High-shine black gel polish (glossy noir)
- Base coat
- Top coat
- Striper brush or nail art striping tape
- UV lamp or LED lamp
- Rubbing alcohol and lint-free wipes
Routine Steps
- Prep nails and apply base coat, curing.
- Carefully apply nail art striping tape or use a striper brush to outline the areas where you want negative space.
- Paint two thin coats of glossy noir gel polish, ensuring crisp lines around the taped/outlined areas. Cure each coat.
- Gently remove the striping tape (if used) before the polish fully cures for sharp edges.
- Seal the design with a generous layer of top coat to lock in the shine and cure thoroughly.
- Cleanse any tacky residue.
Pro-Tip: For truly crisp negative space geometry, apply and cure the base coat first. Then, use nail art striping tape or a very fine striper brush for your unpolished areas. Removing the tape before the glossy noir is fully cured can help prevent pulling and achieve sharper lines, crucial for micro-painting and structural integrity.

5. Velvet Emerald Green: Luxe Goth Opulence

Pin this opulent velvet look for your ‘Luxe Halloween Nails’ board!
Nothing says luxurious halloween nail designs quite like the rich, tactile appeal of emerald green velvet. This design features a unique velvet texture that complements a classy gothic nail art aesthetic perfectly. It transforms a simple color into a sophisticated, multi-dimensional experience, answering the question, “are velvet nails still in style for 2025?” with a resounding yes. This look is pure opulence.
What You Need
- Emerald green gel polish
- Velvet flocking powder in matching green
- Base coat
- No-wipe gel top coat
- Fan brush or fluffy makeup brush
- UV lamp or LED lamp
Routine Steps
- Prep nails and apply base coat, curing.
- Paint two thin coats of emerald green gel polish, curing each layer.
- After the second coat, apply a generous layer of no-wipe gel top coat. Do not cure this layer yet.
- Immediately sprinkle the velvet flocking powder liberally over the wet top coat, ensuring full coverage.
- Gently pat the powder into the top coat for better adhesion.
- Cure under the UV lamp or LED lamp.
- Once cured, use a clean fan brush to gently brush away any excess velvet flocking powder.
Pro-Tip: To ensure the velvet texture is consistent and vibrant, make sure your emerald green gel polish base is fully opaque before applying the flocking powder. The velvet texture is achieved by the powder adhering to the sticky inhibition layer of the top coat, so choosing a no-wipe top coat is crucial for this technique.

6. Chic Ghost Silhouettes: Playful Yet Polished

Pin these adorable, classy ghosts to your ‘Elegant Halloween’ board!
This design answers the question, how to make cute ghosts look high-end? The key is using minimalist white ghost silhouettes on a transparent or nude base. This approach creates a playful yet chic + eerie look that is perfect for elegant halloween nail designs for short nails. It’s a prime example of minimalist halloween nail art that enables a fun and festive vibe without sacrificing sophistication.
What You Need
- Sheer nude gel polish (or a clear base)
- White gel polish (highly pigmented)
- Fine-tipped striper brush or dotting tool
- Black gel polish (for tiny eyes, optional)
- Base coat
- Top coat
- UV lamp or LED lamp
Routine Steps
- Prep nails and apply base coat, curing.
- Paint one to two coats of sheer nude gel polish, curing each layer.
- Using the striper brush or dotting tool dipped in white gel polish, create small, simple ghost shapes. These can be tiny, floating figures or subtle outlines.
- If desired, use a tiny dot of black gel polish for eyes (keep them small for elegance).
- Cure the ghost designs.
- Seal with a top coat and cure thoroughly.
Pro-Tip: The key to keeping chic ghost silhouettes elegant is in their size and simplicity. Avoid overcrowding the nail. For a truly sophisticated halloween nails look, aim for negative space around the ghosts, letting them float subtly rather than dominating the design. This creates an understated yet impactful look.

7. Marbled Effect in Dark Tones: Eerie Abstraction

Pin this artistic marbled design to your ‘Abstract Nail Art’ board!
This stunning marbled effect is the perfect way to achieve an abstract, elegant + dark aesthetic. Using shades like onyx and charcoal, this design transforms into a sophisticated halloween nails look that feels both artistic and moody. It’s an excellent option for a dark academia nails vibe and shows how to get the ‘eerie but cute’ look without any literal spooky imagery.
What You Need
- Two to three complementary dark tone gel polishes (e.g., onyx, charcoal, deep purple)
- Base coat
- Top coat
- Fine-tipped striper brush or dotting tool
- Small piece of plastic wrap or silicon mat
- UV lamp or LED lamp
Routine Steps
- Prep nails and apply base coat, curing.
- Paint one coat of your lightest chosen dark shade (e.g., charcoal) and cure.
- Apply a thick, uncured layer of your primary dark shade (e.g., onyx).
- Immediately drip small dots of your secondary dark shades onto the wet polish.
- Using a striper brush or dotting tool, gently swirl the colors together to create a marbled effect. Work quickly before the polish self-levels too much.
- Cure the marbled design.
- Seal with a top coat and cure thoroughly.
Pro-Tip: The key to a beautiful marbled effect is to blend the colors while the second layer of polish is still wet. Don’t overwork the design; a few gentle swirls are often enough to achieve a natural, fluid marble look. Experiment with different pigment density polishes for varied effects, demonstrating advanced color theory in nail art.

8. Blood Drip French Tips: Elegant & Eerie

Pin this sophisticated **blood drip look to your ‘Classy Spooky Nails’ board!**
This elegant gothic almond shape nail designs classic uses blood drip tips to create a stunning french manicure twist. The design features a deep crimson or deep burgundy matte polish that creates an elegant + dark yet chic + eerie aesthetic. This look perfectly demonstrates how to do a blood drip french tip? in a way that is refined and sophisticated, not gory, making it a perfect polished halloween manicure.
What You Need
- Sheer nude gel polish (or light pink for base)
- Deep crimson gel polish (or deep burgundy matte)
- Fine-tipped striper brush
- Dotting tool (optional, for shaping drips)
- Base coat
- Top coat
- UV lamp or LED lamp
Routine Steps
- Prep nails and apply base coat, curing.
- Paint one to two coats of sheer nude gel polish, curing each layer.
- Dip your striper brush into the crimson gel polish.
- Paint a thin line across the tip of your nail, mimicking a traditional french tips.
- Before curing, use the striper brush or dotting tool to gently drag small amounts of polish downwards from the tip line, creating subtle drips. Keep them even and natural-looking.
- Cure the blood drip design.
- Seal with a top coat and cure thoroughly.
Pro-Tip: To keep the blood drip french tips looking elegant + dark rather than overtly gory, less is more. Aim for 2-3 small, well-placed drips per nail. Using a gel polish with good viscosity management will give you more control over the drip shape, which is a key factor in achieving salon quality at home.

9. Tortoise Shell Patterns: Warm & Witchy Neutral

Pin this **warm & witchy pattern to your ‘Fall Nail Trends’ board!**
For those seeking neutral halloween nail ideas, tortoise shell patterns are a perfect choice. This design features layers of translucent amber and brown, creating a refined halloween manicure that is warm, rich, and subtly mystical. It’s a fantastic fall palette option that aligns with a neutral + halloween aesthetic, proving that you don’t need spooky motifs to look festive, especially for elegant halloween nail designs for short nails.
What You Need
- Translucent amber gel polish
- Translucent dark brown gel polish
- Black gel polish (for spots)
- Base coat
- Top coat
- Fine-tipped striper brush or dotting tool
- UV lamp or LED lamp
Routine Steps
- Prep nails and apply base coat, curing.
- Paint one thin, even coat of translucent amber gel polish and cure.
- Apply a second, slightly thicker coat of translucent amber gel polish but do not cure.
- Immediately drip small, irregular dots of translucent dark brown gel polish and tiny dots of black gel polish onto the wet amber layer.
- Using a striper brush or dotting tool, gently swirl the colors together to create a marbled effect that mimics the tortoise shell pattern. Work quickly.
- Cure the tortoise shell pattern.
- Seal with a top coat and cure thoroughly.
Pro-Tip: The key to a realistic tortoise shell pattern lies in using truly translucent gel polishes and layering them. Don’t let your spots be too symmetrical; the beauty of this design is its organic, natural look. This advanced layering technique creates depth and a truly sophisticated halloween nails effect.

10. Chrome Accents on Dark Base: Industrial Glam

Pin this sleek chrome look to your ‘Modern Nail Art’ board!
Strategic chrome accents on a dark base like glossy noir create a stunning industrial glam look. This chic + eerie aesthetic is achieved by the sharp contrast between the deep base and the reflective metallic accents. The question “is chrome powder good for halloween designs?” is answered here: absolutely, as it transforms a simple manicure into a futuristic and elegant halloween nail design.
What You Need
- Dark gel polish (e.g., glossy noir, deep navy, or forest green)
- Chrome powder (silver, gold, or holographic)
- No-wipe gel top coat (specific for chrome powder)
- Base coat
- Top coat (regular, for sealing)
- Applicator sponge or silicone tool
- UV lamp or LED lamp
Routine Steps
- Prep nails and apply base coat, curing.
- Paint two coats of your chosen dark gel polish, curing each layer.
- Apply a thin, even layer of the no-wipe gel top coat (crucial for chrome adhesion) and cure for precisely 30-60 seconds (check product instructions). The layer should be slightly tacky but not wet.
- Immediately buff the chrome powder onto the nail surface using the applicator, rubbing firmly until a mirror-like shine appears.
- Use a soft brush to remove any excess chrome powder.
- Seal the entire design with a final layer of regular top coat and cure thoroughly.
Pro-Tip: The secret to flawless chrome accents is the perfect curing time of the no-wipe gel top coat before buffing the powder. If it’s too wet, the chrome will look clumpy; if too dry, it won’t adhere. Practice on a nail pop stick first to perfect the timing, a proven technique by professional manicurists.

11. Gothic French Ombré: Subtle Dark Gradient

Pin this seamless gradient to your ‘Elegant Gothic Style’ board!
This gothic french manicure twist uses a subtle dark gradient to achieve a stunning elegant + dark effect. The design transforms a simple nude base by blending it seamlessly into a matte black gel polish or glossy noir tip. This ombre effect highlights a sophisticated halloween nails aesthetic that is perfect for those who love nude and black elegant halloween nail art.
What You Need
- Sheer nude gel polish (for the base)
- Dark gel polish (e.g., matte black gel polish, deep gray, or glossy noir)
- Base coat
- Top coat
- Makeup sponge or ombré brush
- UV lamp or LED lamp
Routine Steps
- Prep nails and apply base coat, curing.
- Paint one to two coats of sheer nude gel polish to create your base, curing each layer.
- On a small piece of foil or a palette, drip a small line of the sheer nude gel polish and immediately adjacent to it, a line of the dark gel polish.
- Use an ombré brush or makeup sponge to gently blend the two colors where they meet, creating a gradient.
- Dab the blended sponge onto the tip of your nail, working upwards slightly to create the gradient. Repeat 2-3 times, curing each layer, for desired intensity.
- Seal with a top coat (either glossy or matte) and cure thoroughly.
Pro-Tip: The secret to a perfect gothic french ombré is to apply thin, buildable layers and ensure each layer is thoroughly cured. Using a slightly dampened sponge can also help blend the colors more seamlessly, achieving that subtle dark gradient that transforms a simple nail into a sophisticated halloween nails statement.

Key Takeaways
- Embrace Subtle Sophistication: Elegant Halloween nail designs prioritize minimalist details and muted colors over overt gore, ensuring a classy halloween nail art aesthetic that’s perfect for any setting.
- Master Key Design Elements: Techniques like negative space geometry, celestial gold accents, and a glossy noir finish are essential for achieving a sophisticated halloween nails look that stands out.
- Leverage Professional Techniques: Utilizing gel polish and proper application steps for elements like chrome powder are vital for achieving salon quality at home results.
- Prioritize Durability: For a long lasting manicure, especially with dark polishes, proper prep and top coat application are crucial to maintain the integrity of your high-end halloween nail designs.
- Think Beyond Traditional Colors: Consider deep burgundy matte, emerald green velvet, and tortoise shell patterns as elegant alternatives to orange and black for a richer fall palette.
FAQs About elegant halloween nail designs
How to make halloween nails look elegant?
To make Halloween nails look elegant, focus on subtle details, sophisticated color palettes, and professional finishes rather than overt, cartoonish designs. Opt for a nude base with delicate accents like gold leaf details, minimalist spider web nail art, or chic ghost silhouettes. Utilizing a matte finish or a high-shine glossy noir also significantly elevates the overall aesthetic.
What are the best classy halloween nail colors?
The best classy Halloween nail colors extend beyond traditional orange and black to include deep burgundies, emerald greens, charcoals, ivories, and various metallic accents like **celestial gold and silver chrome.** These richer hues provide a more sophisticated backdrop for elegant halloween nail designs, allowing for subtle spooky motifs without sacrificing polish.
What is the most popular nail design for halloween 2026?
For 2026, **elegant halloween nail designs are trending, with a focus on sophisticated interpretations of classic spooky themes.** Designs like matte black and gold accents, subtle spider web french tips, celestial gold with deep burgundies, and glossy noir with negative space are highly popular for their chic and refined appeal.
Are velvet nails still in style for 2026?
Yes, **velvet nails, particularly in deep, rich jewel tones like emerald green velvet or sapphire, remain a sophisticated choice for 2026 and beyond.** Their luxurious velvet texture adds a unique tactile dimension that enhances elegant halloween nail designs, making them a chic statement that signals opulence and refinement.
How to pair halloween nails with professional outfits?
Pair **elegant halloween nail designs with professional outfits by opting for understated and minimalist styles that align with your workplace dress code.** Designs like a subtle dark gradient or tortoise shell patterns on short nails, or a single accent nail with a delicate white ghost silhouette over a nude base, can add a festive touch without being distracting.
What are elegant alternatives to orange and black for Halloween nails?
Elegant alternatives to traditional orange and black for Halloween nails include deep **crimson or burgundy (for blood drip tips), forest greens, muted purples, dark grays like charcoal and onyx, and metallic accents in celestial gold or silver.** These palettes offer a richer, more subdued approach to seasonal nail art.
How to incorporate ghosts into a classy manicure?
Incorporate ghosts into a classy manicure by using **minimalist white ghost silhouettes on a sheer or nude base nail, keeping the ghost figures small and delicate.** Avoid large, cartoonish images; instead, opt for simple outlines or tiny, floating forms that hint at the spooky theme rather than dominating the design. This creates an eerie but cute effect.
Which nail shape is most sophisticated for halloween nail designs?
For **sophisticated halloween nail designs, nail shapes such as almond shape, coffin nails, and a refined squoval shape are generally considered the most elegant.** These shapes elongate the fingers and provide a sleek canvas that enhances the intricate details and minimalist aesthetics of classy halloween nail art.
How to use gold leaf for halloween nails elegantly?
To use **gold leaf details elegantly for Halloween nails, apply delicate, irregular flakes sparingly over a deep, dark base like matte black gel polish or deep burgundy matte, focusing on subtle accents rather than full coverage.** Placement near the cuticle or as a scattered element on one or two nails creates a luxurious, high-end effect without being gaudy.
What is a ‘glossy noir’ nail design?
A ‘glossy noir’ nail design refers to a high-shine, jet-black nail polish finish, often combined with **negative space or subtle design elements, to create a sophisticated and mysterious aesthetic.** The term emphasizes the deep, reflective quality of the black, evoking a sense of classic elegance mixed with a hint of dark allure, perfect for a classy gothic nail art.
Final Thoughts
Ultimately, elegant Halloween nail designs offer a sophisticated way to embrace the spooky season without sacrificing style. By focusing on subtle details, rich color palettes like deep burgundy matte and emerald green velvet, and professional finishes such as a matte finish and glossy noir, you can curate a look that is both festive and utterly chic. The key is to transform traditional Halloween motifs into refined statements, whether through minimalist spider web nail art, celestial gold accents, or a gothic french ombré. Each of these 11 classy ideas provides a blueprint for a refined halloween manicure that will have you celebrating in style this 2026.
Remember, the goal is always a polished halloween manicure that reflects your personal aesthetic while subtly nodding to the holiday. Whether you’re opting for a DIY vs salon approach, armed with expert advice and the right tools, you can achieve salon quality at home results. We hope this guide inspires you to explore beyond the basic and discover the beauty of truly sophisticated halloween nails. Which of these elegant halloween nail designs will you try first?
Last update on 2026-04-27 / Affiliate links / Images from Amazon Product Advertising API