Tired of seeing amazing Halloween nails that only work on long acrylics? It can be frustrating when you want to be festive but feel limited by a small canvas, leaving you with uninspired halloween nail designs short nails.
The best halloween nail designs for short nails are simple, high-contrast ideas like tiny ghosts, minimalist spider webs, or a single spooky accent nail. These designs utilize negative space and fine-line details to create a chic, festive look without overwhelming a small nail bed. Look for easy DIY designs that focus on one or two key elements.
After testing dozens of designs, I’ve curated the ones that offer maximum impact with minimal space. This guide provides actionable, step-by-step tutorials specifically designed to solve the “small canvas” problem. You’ll discover how to create salon-quality spooky nails right at home.
What Are The Best Halloween Nail Designs For Short Nails?
The struggle is real: you want to rock a festive manicure for Halloween, but most inspiration photos feature long, almond-shaped acrylics. Don’t worry—short nails can be the perfect canvas for spooky, cute, and elegant designs. The secret lies in using clever techniques like negative space, focusing on a single ghost accent nail, or mastering simple tools to create micro nail art. After testing dozens of ideas on my own short nails, I’ve curated a list of the 9 best designs that are not only achievable but look incredibly chic and professional. This isn’t just a gallery; it’s a promise of actionable, step-by-step guides specifically designed to solve the “small canvas” problem and give you a manicure you’ll be proud to show off.
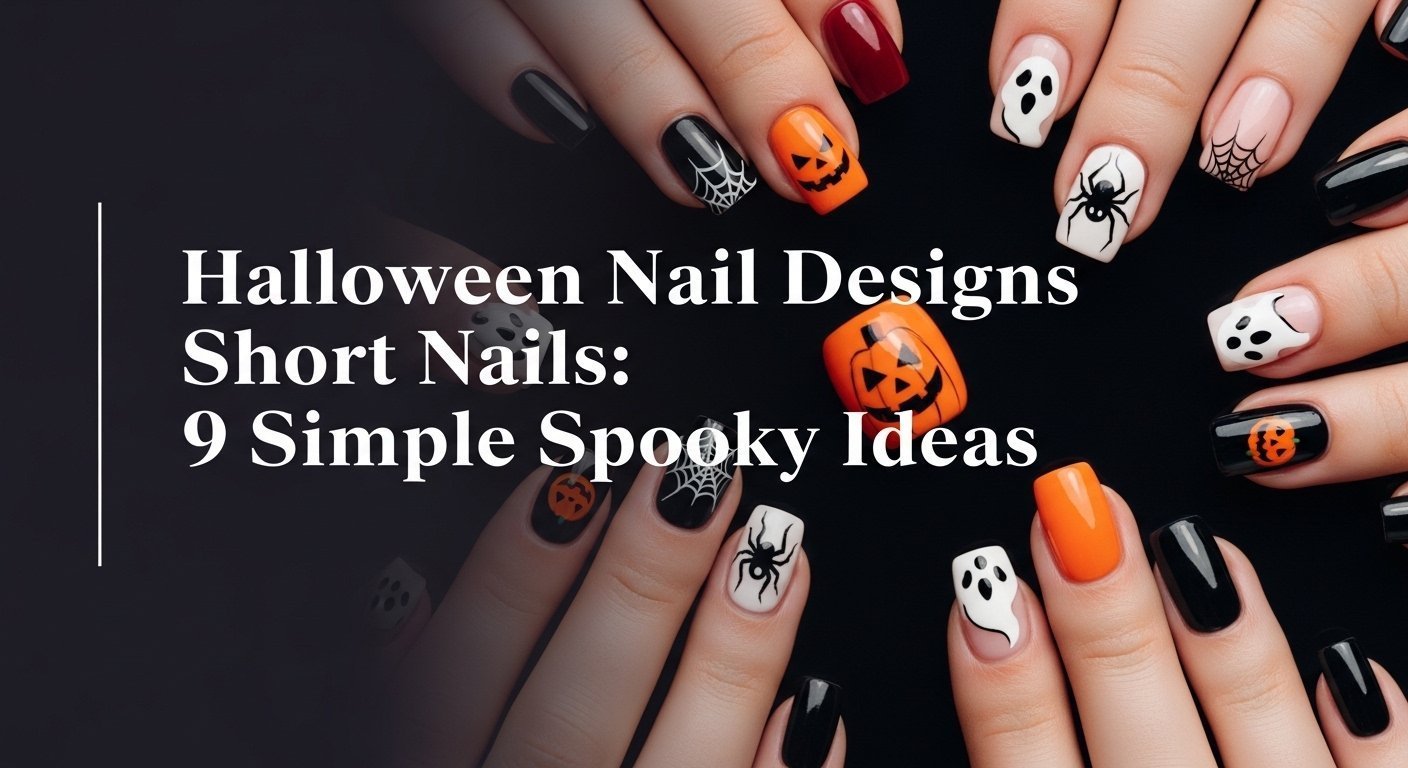
9 Simple & Spooky Halloween Nail Designs for Short Nails in 2026
This curated list is your ultimate resource for creating stunning Halloween manicures for short nails. Each idea is broken down into a simple, two-part tutorial: “Products & Tools Used” and “Application/Styling Steps,” making it perfect for both beginners and seasoned DIYers. We’ll focus on how specific application techniques, like dotting or using a striper brush, enable the creation of classic Halloween motifs like ghosts, spiders, and pumpkins on a smaller nail. These easy DIY designs prove you don’t need a lot of space to make a big impact.
1. Create a Spooky-Cute Ghost Accent Nail

Pin this adorable ghost nail idea for your October manicure!
This classic design is arguably the easiest way to get into the Halloween spirit. By focusing the art on a single accent nail and using a ghosts + matte black theme, the look stays chic and modern. The key is using a dotting tool to create a perfect ghost shape, which is a foolproof method for beginners.
Products & Tools Used
- Matte black nail polish (e.g., OPI “Lady in Black” with a matte top coat)
- Opaque white nail art polish with a thin brush
- A dual-ended dotting tool
- Glossy top coat
- Base coat for nail health first
Application/Styling Steps
- Prep your nails by filing to a neat square or squoval shape and applying a base coat.
- Paint your accent nail (typically the ring finger) with two coats of matte black polish. Paint the other nails with a color of your choice or leave them bare for a negative space look.
- Using the white nail art polish, create a small, irregular blob for the ghost’s body. Drag the polish down slightly with the brush tip to create a wavy “tail.”
- Dip the smallest end of your dotting tool into the black polish and carefully dot two tiny eyes onto the ghost.
- Seal the non-accent nails with a glossy top coat, but leave the accent nail matte for a cool mixed-finish effect.
Pro-Tip: For an ultra-steady hand when creating the eyes, rest your painting hand’s pinky on the surface your other hand is on. This proven technique from professional technician tips stabilizes your movements for perfect micro-dots.

2. Weave a Minimalist Spider Web Corner

Save this chic spider web design for a subtle, spooky look!
Spider web art is a Halloween staple, but it can look messy on a small surface area. The solution is a minimalist corner web. This design is incredibly elegant because it doesn’t cover the whole nail, making it perfect for an office-appropriate spooky look. The right striper brush is essential for this technique.
Products & Tools Used
- Sheer nude or light gray nail polish
- A high-pigment white nail art polish or gel liner
- An ultra-thin, long striper brush
- Glossy top coat
- Base coat
Application/Styling Steps
- Apply two coats of your sheer nude base polish after your base coat has dried. This creates a clean canvas.
- Dip your striper brush in the white polish. Paint three thin, straight lines radiating from the top corner of your nail.
- Clean your brush. Now, starting from the outermost line, create delicate curved lines connecting the “spokes” of your web. Work your way inward.
- Don’t worry about perfection; slight shakiness can look more authentic.
- Once dry, seal your design with a high-shine glossy top coat to protect the intricate lines and prevent chipping.
Pro-Tip: The key to a perfect line is to load your striper brush with enough polish, place the tip down, and pull in one single, confident motion. Don’t “sketch” the line. This is a proven technique for achieving salon-quality results at home.

3. Paint a Patch of Micro Pumpkins

How cute is this tiny pumpkin patch? Pin it for your fall look!
Instead of one large pumpkin that can look distorted on a curved, short nail, a patch of micro nail art pumpkins looks far more modern and cute. This short nails + pumpkins design relies on a dotting tool to simplify the pumpkin shape into two overlapping dots, making it surprisingly easy to create.
Products & Tools Used
- A creamy off-white or beige nail polish
- A vibrant, classic orange nail polish
- A dark green nail polish
- A dotting tool (medium and small size)
- Glossy top coat
Application/Styling Steps
- After a base coat, paint all nails with two coats of the off-white polish. Let it dry completely.
- Pour a small amount of orange polish onto a piece of foil. Using the medium side of your dotting tool, create two slightly overlapping dots to form the main body of your first pumpkin.
- Repeat to create a small patch of 2-3 pumpkins on one or two accent nails.
- Clean the tool. Using the smallest side of the dotting tool and the green polish, dot a tiny stem on top of each pumpkin.
- Let the micro nail art dry for at least 10 minutes before sealing with a glossy top coat to avoid smudging.
Pro-Tip: For more dimension, add a tiny curved line of a slightly darker orange on one side of the pumpkin before you add the stem. This micro-painting technique gives a 3D effect that makes the design pop, even on short natural halloween nails.

4. Master the Elegant Blood Drip Effect

Pin this chic blood drip design for a seriously spooky-glam vibe!
Blood drip nails can be scary, but when done correctly, they can also be incredibly elegant. The modern way to wear this look on short nails is with the drips coming from the cuticle down, over a clean nude base. This technique is more sophisticated and makes the nail appear longer.
Products & Tools Used
- A full-coverage nude polish that matches your skin tone
- A deep, blood-red nail polish (a “jelly” formula works great)
- A dotting tool
- A high-shine top coat
Application/Styling Steps
- Prep and apply two coats of your chosen nude polish. This is your nude base. Let it dry completely.
- Working one nail at a time, paint a wavy, uneven line of red polish along your cuticle line.
- Before it dries, use your dotting tool to pull down 2-3 “drips” from the red line. Vary the lengths to make them look more realistic.
- Add a larger dot of red at the end of each drip to create the illusion of a droplet.
- Let the design set, then apply a thick, glossy top coat to give it a wet, spooky look.
Pro-Tip: For the most realistic drips, use a slightly older polish that is a bit thicker, or let a new polish sit open for a minute to increase its viscosity. This expert advice helps the drips hold their shape instead of running too thin.

5. Design a Cute & Simple Candy Corn Gradient

A sweet treat for your nails! Pin this easy candy corn gradient.
A candy corn + gradient is a playful and festive short nail art idea that screams Halloween. Creating a smooth gradient on short nails might seem intimidating, but the makeup sponge technique makes it incredibly simple. The key to a clean look is prepping your cuticles to avoid a mess.
Products & Tools Used
- Yellow, orange, and white nail polishes
- A disposable makeup sponge
- Liquid latex or tape for cleanup
- A quick-dry glossy top coat
Application/Styling Steps
- Prep your nails and apply a base coat. Then, apply two coats of the yellow polish as your base color and let it dry completely.
- Apply the liquid latex around your nail on the skin and cuticle.
- On the flat surface of your makeup sponge, paint horizontal stripes of yellow, orange, and white polish, slightly overlapping them.
- Gently dab or “stamp” the sponge onto your nail. Repeat 2-3 times to build up the opacity of the gradient.
- Before the polish dries, peel off the liquid latex. Use a small brush with acetone to clean up any remaining mess. Seal with a top coat.
Pro-Tip: To get a seamless blend, lightly dampen your makeup sponge with water and squeeze it out before painting the polish on. This proven technique prevents the sponge from absorbing too much polish and helps the colors melt together.

6. Try a Spooky Eyeball Manicure

All eyes on you! Pin this spooky-fun eyeball design.
An eyeballs + neon green (or blue) manicure is a fun, graphic design that’s surprisingly easy. The entire look is created with a dotting tool, breaking the design down into simple, layered dots. It’s one of the most effective easy DIY designs for a big impact.
Products & Tools Used
- A bright, opaque white polish
- A colored polish for the iris (blue, green, or brown)
- A black polish for the pupil
- A red nail art striper polish
- A dual-ended dotting tool
- Glossy top coat
Application/Styling Steps
- Paint your nails with two coats of opaque white polish and let dry fully.
- Using the larger end of your dotting tool, place a large dot of your chosen iris color in the center of the nail.
- While it’s still slightly wet, use the smaller end of the tool and the black polish to place a smaller dot in the center of the iris for the pupil.
- Using the red striper, paint a few fine, squiggly lines radiating outward from the iris to create a bloodshot effect.
- Wait for the intricate design to dry, then seal with a glossy top coat.
Pro-Tip: For a glow in the dark nails for short length twist, use a glow-in-the-dark polish for the iris color. Charge it under a UV lamp or bright light before you go out for a truly spooky surprise in the dark.

7. Go Celestial with Moons & Bats

For a witchy, celestial vibe, pin this moon and bats design!
If you have shaky hands, this design is for you. Creating elegant black and gold halloween nails short is effortless with the use of nail stickers and decals. A bats + moon theme with celestial gold accents over a deep, shimmery blue base creates a sophisticated, witchy vibe without any drawing required.
Products & Tools Used
- A deep navy blue or black polish with a slight shimmer
- Gold crescent moon nail decals
- Tiny black bat nail stickers
- A pair of fine-tipped tweezers
- A thick, smoothing top coat
Application/Styling Steps
- Paint two coats of your dark, shimmery base color and let it dry completely. A shimmering base looks like a night sky.
- Using tweezers, carefully peel a gold moon decal and place it on your chosen accent nail. Press down firmly from the center outwards.
- On another nail, apply two or three tiny bat stickers, arranging them as if they’re flying.
- Feel free to add tiny star decals on other nails for a full celestial look.
- CRITICAL STEP: Seal the stickers immediately with two layers of a thick top coat. The first layer seals the sticker, the second smooths over the edge.
Pro-Tip: Don’t place stickers too close to the edge of your nail or the cuticle. Leaving a tiny border of polish around the sticker allows the top coat to fully encapsulate it, which is the secret to a long-lasting sticker manicure and prevents chipping.

8. Try a Moody Matte Potion Finish

For an easy, high-impact look, pin this matte potion manicure!
This is the easiest design on the list, requiring zero artistic skill. The trend of mismatched halloween nails (or “skittle” nails) combined with a matte top coat creates an instantly moody and spooky look. A palette of deep purples, greens, and blacks evokes a witch’s brew or potion bottle aesthetic.
Products & Tools Used
- A selection of 2-3 deep, moody polishes (e.g., deep purple, forest green, black, burgundy)
- A high-quality matte top coat
- Base coat
Application/Styling Steps
- Prep your nails and apply your base coat.
- Paint each nail with a different color, or create a pattern (e.g., purple, green, black, purple, green). Apply two coats for full opacity.
- Let the colored polish dry for at least 5-10 minutes. This is crucial to prevent smearing.
- Apply one even coat of your matte top coat. The magic happens as it dries, transforming the glossy finish into a velvety, non-reflective potion look.
- There’s no need for a final glossy coat; the matte finish is the design.
Pro-Tip: To avoid streaks with a matte top coat, use a generous amount on the brush and apply it in as few strokes as possible—ideally three (one down the middle, one on each side). Don’t go back over areas that are already starting to dry.

9. Create a Black Glitter Ombré Effect

Pin this sparkly and spooky black glitter ombré for an elegant Halloween look!
A black glitter ombre is a glamorous and shimmering take on Halloween nails. Using a makeup sponge to apply the glitter polish is the secret to achieving a seamless fade from a dense tip to a sparse base, which solves the common problem of clumpy glitter.
Products & Tools Used
- A sheer nude or pink polish
- A dense black glitter polish
- A disposable makeup sponge
- A thick, “gel-effect” smoothing top coat
Application/Styling Steps
- Prep nails and apply two coats of your sheer nude base color. Let dry completely.
- Paint the black glitter polish directly onto the corner of a makeup sponge.
- Gently dab the sponge onto the tip of your nail, concentrating most of the glitter there. As you move the sponge up towards your cuticle, use a lighter touch so the glitter becomes more sparse.
- Repeat the dabbing motion until you are happy with the ombré fade.
- To solve the problem of clumpy glitter texture, apply a thick, gel-like top coat. It will fill in the gaps between glitter particles and create a perfectly smooth, glassy finish.
Pro-Tip: For an even more intense glitter tip, you can dip the very tip of your nail directly into a pot of loose cosmetic glitter while the polish is still wet, then use the sponge to blend it upwards. This is an advanced topical_authority_advanced technique for encapsulated art.

Key Takeaways
- Focus on Accent Nails & Negative Space: You don’t need to cover all ten nails in complex art. A single, well-executed ghost accent nail or a design that utilizes negative space has a greater and more elegant impact on short square nails.
- The Right Tools Are Essential: A dotting tool and a thin striper brush are not optional for micro nail art; they are the key to creating simple, clean designs and overcoming the challenge of a small surface area.
- Stickers & Decals Are a Smart Hack: For intricate designs like celestial gold accents or bats, high-quality nail stickers provide a perfect, salon-quality result with no artistic skill required. The trick is to seal them properly.
- Matte Finishes Add Instant Spookiness: The quickest way to make any dark color feel like Halloween is to use a matte top coat. A matte potion finish on mismatched colors is both trendy and incredibly easy.
- Technique Matters More Than Nail Length: Whether it’s a black glitter ombre applied with a sponge or blood drip nails created from the cuticle down, the right proven techniques will make any design look professional on any nail length.
People Also Ask About Halloween Nail Designs for Short Nails
What are the easiest Halloween nail art for beginners with short nails?
The easiest designs are those that use a dotting tool or stickers. A simple ghost accent nail made with two dots for eyes, a spooky eyeball manicure, or applying pre-made bat and moon nail stickers are all foolproof methods. These techniques don’t require a steady hand for drawing and look incredibly cute and clean on short nails.
Do dark colors make short nails look shorter?
This is a common myth; dark colors can actually make short nails look chic and intentional. Colors like matte black, deep purple, or navy blue create a striking contrast that defines the nail shape. The key is a clean application and a well-groomed cuticle line. A matte potion finish in dark shades is a very popular and elegant look.
How can I do a spider web on a very short nail?
Focus on a corner web instead of a full-nail design. Use a very thin striper brush to paint 2-3 lines radiating from a top corner. Then, connect them with small, curved lines. This minimalist approach utilizes negative space, suggesting a full web without taking up the entire small surface area, which prevents the design from looking crowded.
Are nail stickers or press-ons better for short nails?
Both are great options, but they serve different purposes. Nail stickers are perfect for adding a small design element (like a pumpkin or ghost) to your natural nails. Halloween press-on nails are better if you want to temporarily add length or get a very complex, professional design instantly without going to a salon.
How do you prevent chipping on a detailed manicure?
Proper prep and sealing are crucial. Always start with a clean, buffed nail and a quality base coat. After your design is completely dry, “wrap the tip” by running your top coat brush along the free edge of your nail. This seals the edge where chipping most often begins and improves durability.
Is matte or glossy better for spooky nails?
It depends on the look you want, but matte is often considered spookier. A matte finish absorbs light, giving colors a deep, velvety, and mysterious look perfect for a matte potion or ghosts + matte black design. Glossy is better for designs you want to look wet or slick, like blood drip nails.
What tools are essential for DIY Halloween nail art?
A dual-ended dotting tool and a long, thin striper brush are the two most important. The dotting tool is perfect for making eyes, pumpkins, and polka dots. The striper brush is essential for creating clean lines for spider webs or lettering. These two tools will allow you to create over 90% of easy DIY designs.
How do I make my Halloween nail art last longer?
Apply a top coat every 2-3 days to maintain the manicure. This adds a fresh layer of protection against daily wear and tear, keeps the shine (or matte finish) looking fresh, and helps reseal the edges of any nail stickers or decals, preventing chipping and extending the life of your art.
Can you do a gradient on short nails?
Yes, a gradient can make short nails look longer. The key is to use a makeup sponge. Apply your polish colors in stripes on the sponge and dab it onto the nail. This creates a soft, blended candy corn + gradient effect. A vertical gradient, where colors blend from left to right, can also create an elongating illusion.
How do I remove stubborn glitter polish easily?
Use the foil method for damage-free removal. Soak a piece of a cotton ball in acetone, place it on your nail, and wrap the fingertip in a small square of aluminum foil. Wait 5-10 minutes. The foil traps heat and allows the acetone to break down the glitter polish, so it slides right off without harsh scrubbing.
Final Thoughts on Your Spooky Short Nail Manicure
This Halloween, remember that stunning halloween nail designs for short nails are not only possible but are often more chic, modern, and stylish. By focusing on minimalist details, mastering tools like the dotting tool, and using techniques like negative space and accent nails, you can create a manicure that is both festive and sophisticated.
You don’t need long nails to participate in the spooky fun. You have the expert advice and comprehensive tutorials to design a look you love, whether it’s a spooky-cute ghost accent nail or an elegant blood drip effect. Embrace the small surface area as a canvas for creativity.
Now I’d love to hear from you—which of these 9 designs are you most excited to try for Halloween 2026? Share your favorite in the comments below
Last update on 2026-04-27 / Affiliate links / Images from Amazon Product Advertising API