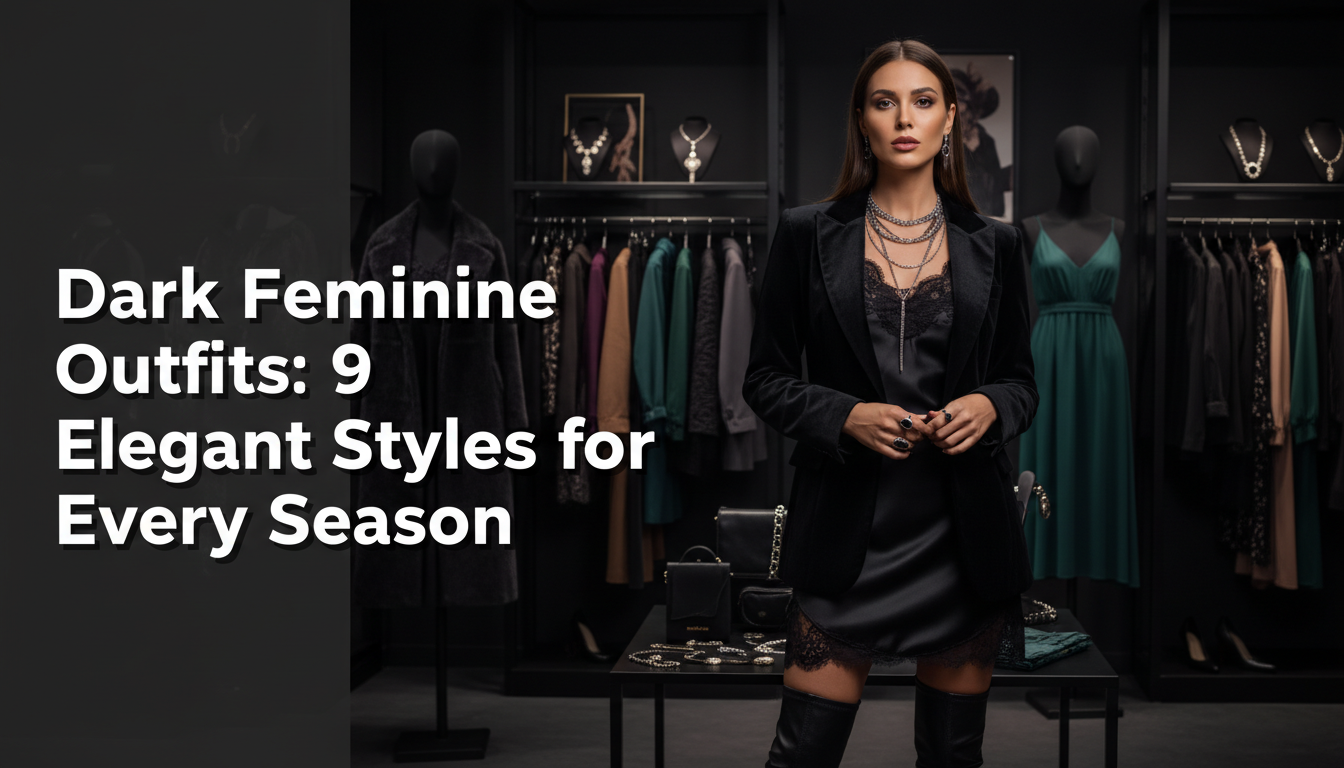
Tired of chasing nail trends that feel dated in a month? You want a look that’s timeless, sophisticated, and effortlessly chic, a style that whispers elegance instead of shouting for attention.
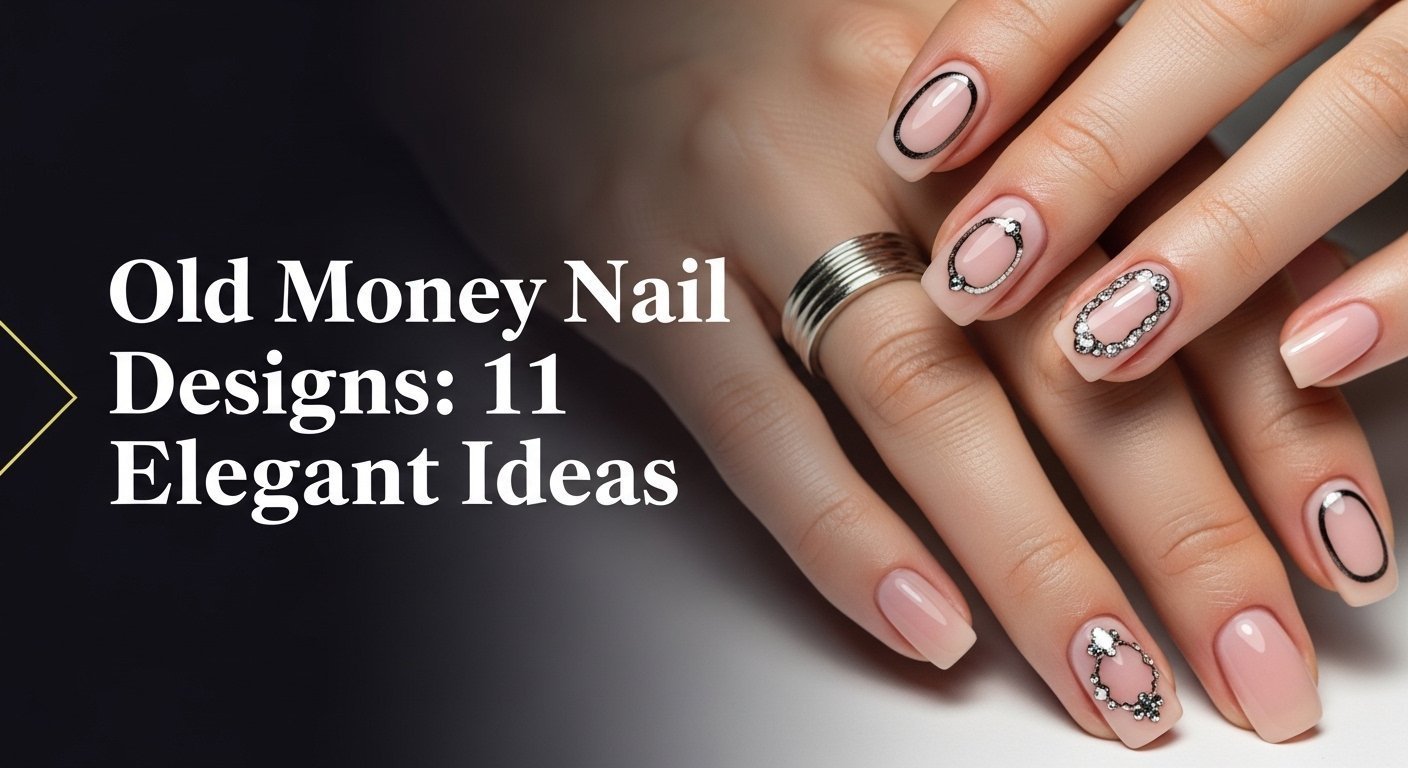
Old money nails are a minimalist and timeless manicure style characterized by clean, short-to-medium nail shapes, a neutral color palette, and a high-gloss, healthy-looking finish. This aesthetic, part of the “quiet luxury” trend, prioritizes understated elegance over conspicuous designs, focusing on colors like sheer pink, milky white, and classic reds to create an effortlessly polished and sophisticated look.
Drawing from established best practices and proven methodologies, this guide breaks down the core principles of the old money nail designs aesthetic. You’ll discover 11 elegant, replicable ideas and learn the exact steps to achieve a flawless, expensive-looking manicure at home or at the salon.
What Defines the Elegant Old Money Nails Aesthetic?
The old money nails aesthetic is less of a fleeting trend and more of a timeless philosophy applied to personal grooming. It revolves around the principles of subtlety, impeccable quality, and intentional restraint. This look, often associated with the broader quiet luxury trend, is the direct opposite of flashy, logo-heavy styles. It’s about investing in the health and perfection of your natural nails to create a finish that looks effortlessly polished and inherently expensive-looking. The core idea is that true luxury doesn’t need to announce itself; it’s felt in the quiet confidence of a perfectly executed, simple manicure using classy nail designs. This style complements a capsule wardrobe and signifies a “stealth wealth” approach to beauty, where the focus is on quality and maintenance over ornamentation.
Old Money vs. New Money Nails: A Quick Guide
* Shape: Old money prefers short, practical shapes like squoval nails or a short almond shape. New money often favors long, dramatic stiletto or coffin shapes.
* Color: Old money sticks to a neutral palette—sheer pinks, nudes, milky whites, and classic reds. New money embraces neons, bold colors, and intricate patterns.
* Art: Old money avoids art, with the rare exception of a delicate micro-French tip. New money welcomes gems, 3D art, logos, and glitter.
* Finish: Old money is always about a clean, glossy finish. New money might explore matte, chrome, or textured finishes.
11 Elegant Old Money Nail Designs for a Timeless Look in 2026
Ready to find your signature look? These 11 ideas represent the pinnacle of the old money aesthetic. Each one is designed to be timeless, sophisticated, and achievable. We’ll break down the exact products, tools, and steps you need to master each of these elegant old money nail designs, transforming your manicure from trendy to timeless.
1. Achieve the Perfect Sheer Pink Manicure

Pin this subtle and chic look to your ‘Nail Inspo’ board!
This look is the epitome of “your nails but better.” A coat of sheer pink nail polish doesn’t hide your natural nail; it enhances it, evening out the tone and adding a healthy, polished glow. It’s the secret to looking put-together with minimal effort, making it a cornerstone of understated nails.
Products & Tools Used
- A high-quality sheer pink nail polish (e.g., Essie ‘Sugar Daddy’ or ‘Fairy Tailor’)
- A high-shine, quick-dry top coat
- A smoothing base coat
- Nail polish remover and a small cleanup brush
- Cuticle oil with jojoba or sweet almond oil
Application/Styling Steps
- Prep nails by filing into a soft short almond shape or squoval shape. Gently push back cuticles.
- Cleanse the nail plate with isopropyl alcohol to remove oils for better adhesion.
- Apply a thin layer of your base coat to create a smooth canvas.
- Layer the sheer pink polish in 2-3 very thin coats, allowing each to dry for a few minutes to prevent streaking.
- Finish with a generous layer of a glossy finish top coat, making sure to “cap” the free edge of the nail to prevent chipping.
- Once dry, moisturize with cuticle oil for a healthy, expensive-looking finish.
Pro-Tip: The key to a flawless sheer polish application is patience. Applying multiple thin layers builds color gradually and prevents the streaks and bubbles common with thicker coats.

2. Master the Classic Milky White Look

Save this for your next salon visit—the perfect milky mani!
A modern classic, milky white nails offer a fresh, clean look that’s softer than a stark, opaque white. This semi-translucent shade, famously achieved with polishes like OPI Funny Bunny, provides a creamy finish that’s both contemporary and timeless. It’s the perfect choice for a sophisticated yet modern manicure.
Products & Tools Used
- A classic milky white nail polish (e.g., OPI ‘Funny Bunny’)
- A gel-like, high-shine top coat
- A ridge-filling base coat
- A fine-grit nail buffer
- Cuticle oil for a pristine finish
Application/Styling Steps
- Shape nails into a clean short square or “squoval” shape, ensuring the edges are crisp.
- Buff the nail surface lightly to create a smooth foundation for the polish.
- Apply a ridge-filling base coat to prevent streaks.
- Coat the nail with your milky white polish. The key is balance: two coats for a more translucent, “your-nail-but-brighter” look, or three thin coats for a more opaque, creamy finish.
- Seal with a plump, glossy finish top coat to give it that expensive, gel-like appearance.
- Maintain the look by applying cuticle oil daily to keep the surrounding skin hydrated and healthy.
Pro-Tip: For a true quiet luxury feel, consider a structured manicure using a builder gel like BIAB under your milky polish. This adds strength and creates a perfectly smooth, curved apex, making the manicure look exceptionally professional and last for weeks.

3. Embrace the “Your Nails But Better” Glow

The ultimate low-maintenance chic: the ‘nail glow’ secret. Pin it now!
For the ultimate low-maintenance yet polished look, a nail enhancer is the answer. Products like the iconic Dior Nail Glow offer a one-step solution that optically brightens your natural nails, making the nail beds appear pinker and the tips whiter. It’s an instant French manicure effect in a bottle, perfect for achieving healthy-looking, well-groomed nails.
Products & Tools Used
- A nail enhancer polish like the iconic Dior Nail Glow
- Nail file and buffer
- Cuticle pusher
Application/Styling Steps
- Shape your nails neatly. This look is particularly stunning on natural nails with a rounded or squoval shape.
- Prep by ensuring nails are completely clean, dry, and free of oils.
- Apply one coat of the nail enhancer. You’ll notice it has a cool-toned pink tint that counteracts yellowing and brightens the nail bed.
- Apply a second coat for a more pronounced “French manicure effect,” making the pinks of your nail bed appear pinker and the tips look whiter.
- Let it dry—no base or top coat is required. The result is a super glossy finish that looks effortlessly well-groomed.
Pro-Tip: A nail glow product is perfect for in-between full manicures or for those who want a polished look with minimal effort. It’s the secret to making your natural nails look their absolute best.

4. Perfect the Modern Micro-French Manicure

The French manicure, but make it 2026 chic. Pin this micro-French inspo!
The micro-French manicure is a modern, minimalist evolution of the classic French manicure. It features an incredibly thin, delicate white line at the tip, offering a whisper of contrast rather than a bold stripe. This clean girl nails favorite is the height of minimalist nail art and perfectly exemplifies the understated nails pillar of the old money aesthetic.
Products & Tools Used
- A sheer nude or pink base color
- An opaque white polish for the tip
- An ultra-fine nail art striping brush OR a silicone nail stamper
- A high-gloss top coat
- Isopropyl alcohol and lint-free wipes for cleanup
Application/Styling Steps
- Prep nails and apply 1-2 coats of your sheer nude base color. Let it dry completely.
- Technique 1 (Brush): Pour a small drop of white polish onto a palette. Dip your fine-line brush and, keeping your hand steady, apply a very thin line across the nail’s free edge. Use “less product for more control”.
- Technique 2 (Stamper): Paint a thin line of white polish onto the silicone stamper. Gently press the tip of your nail into the polish at a 45-degree angle to “stamp” a perfect, curved line onto the tip.
- Cleanse any mistakes on the skin with a small brush dipped in acetone.
- Finish with a glossy top coat to seal the design and provide a unified, high-shine look.
Pro-Tip: The key to the “micro” French is that the white tip should be barely there—a delicate whisper of a line rather than a thick band. It should be thinner than the natural white tip of your nail.

5. Perfect a Timeless Classic Red Manicure

Some things are classic for a reason. Pin this perfect red nail inspiration.
A classic red manicure is a power move that signifies confidence and timeless glamour. The key to the old money red is choosing a true, blue-toned red—not too bright, not too dark—and pairing it with immaculately groomed, shorter nails. Iconic shades like CHANEL ‘Pirate’ define this look, offering a bold yet sophisticated statement.
Products & Tools Used
- A true, blue-toned classic red nail polish (e.g., CHANEL ‘Pirate’)
- A high-adhesion base coat to prevent staining
- A high-gloss, chip-resistant top coat
- An angled cleanup brush and acetone
Application/Styling Steps
- Shape nails meticulously. A classic red is most elegant on shorter, well-groomed nails, like a short square or soft oval.
- Apply a base coat. This is non-negotiable with reds to prevent the pigment from staining your natural nail plate.
- Coat with the red polish in two thin, even layers. Work in three strokes: one down the center, then one on each side.
- Detail with your cleanup brush. Dip it in acetone and trace carefully around your cuticle line for an incredibly sharp, professional-looking edge.
- Finish with a high-shine top coat. This not only adds gloss but also makes the red color appear deeper and richer.
Pro-Tip: The “old money” red is never orangey or neon. It’s a deep, true red that looks just as appropriate at a board meeting as it does at a black-tie event. The key is impeccable application and a short, clean nail shape.
6. Style a Sophisticated Deep Burgundy Manicure

The perfect nail color for autumn and winter. Pin this chic burgundy look.
For a moodier, more autumnal take on classic color, a deep burgundy is unparalleled. These rich, vampy nails signify quiet confidence and sophisticated taste. A legendary shade like CHANEL ‘Rouge Noir’ is the benchmark—a deep, almost-black wine color that is regal, dramatic, and eternally chic.
Products & Tools Used
- An iconic deep burgundy polish (e.g., CHANEL ‘Rouge Noir’ or Essie ‘Wicked’)
- Stain-blocking base coat
- A super glossy top coat
- A precision cleanup brush
Application/Styling Steps
- File nails into a sleek short almond or oval shape to complement the dramatic color.
- Apply your base coat, paying special attention to cover the entire nail to prevent staining from the dark pigments.
- Layer the burgundy polish. The first coat may look patchy; the second coat will deliver that rich, opaque, expensive-looking color. Ensure the layers are thin.
- Perfect the cuticle line. A clean edge is critical with dark polish. Use a small brush with remover for a flawless boundary.
- Gloss it up. A thick, glossy top coat is essential to give the deep color dimension and prevent it from looking flat.
Pro-Tip: Dark polishes are less forgiving of chips. Reapply your top coat every 2-3 days to maintain the high-shine finish and extend the life of your manicure.

7. Adopt the Clean and Polished Sheer Nude

The ultimate ‘stealth wealth’ manicure. Pin this perfect nude nail guide.
The perfect sheer nude polish is the foundation of the clean girl aesthetic and a staple of the “stealth wealth” manicure. The goal is to find a shade that flawlessly complements your skin tone, creating an illusion of naturally perfect, elongated nails. This is one of the most essential neutral nail colors for a truly understated nails look.
Products & Tools Used
- A sheer nude polish that complements your skin tone
- A smoothing or ridge-filling base coat
- A high-shine, long-wear top coat
- A nail buffer block
Application/Styling Steps
- Prep by buffing the nails to a smooth surface; this is key for sheer polishes that can highlight imperfections.
- Choose your nude. For cool undertones, pick nudes with pinkish hints. For warm undertones, lean towards beige or peachy nudes. For neutral undertones, most nudes will work.
- Apply your base coat to create an even canvas.
- Coat with 2-3 thin layers of your chosen nude tones until you reach the desired level of subtle coverage.
- Finish with a glossy top coat to make the neutral color look intentional and polished, rather than unfinished.
Pro-Tip: The perfect “old money” nude shouldn’t be an opaque, concealer-like color. It should be a translucent shade that evens out your nail color and adds shine, making your fingers look longer and more elegant.

8. Create the Perfect Short Almond Nail Shape

Your guide to the most elegant nail shape. Pin this short almond tutorial!
The short almond shape is considered one of the most elegant and flattering nail shapes. It has slender sides that taper towards a soft, rounded peak, which elongates the fingers beautifully. Learning how to shape almond nails properly is a fundamental skill for achieving the old money aesthetic on natural nails.
Products & Tools Used
- A 180-grit nail file
- A fine-grit buffer
Application/Styling Steps
- Mark the center point at the very tip of your nail with a small dot. This will be your guide.
- File from the side wall where the nail meets the skin, moving in a curved motion up towards the center point. Always file in one direction, not back-and-forth, to prevent damage.
- Alternate sides every few strokes to ensure the shape remains symmetrical. Look at the nail from different angles as you work.
- Once both sides are tapered, gently round off the sharp point at the center to create the soft, elegant almond peak. The tip should be slim but not sharp.
- Smooth the edges with a buffer for a clean finish.
Pro-Tip: For short almond nails, the key is subtle tapering. Don’t try to make them too long or pointy. The goal is an elegant, elongated look that’s still practical and understated.

9. Get a Flawless, High-Shine Glossy Finish

The secret to expensive-looking nails? The top coat. Pin this tip!
The single most important element for achieving an expensive-looking manicure is a flawless, glossy finish. A plump, high-shine top coat transforms any polish, giving it depth, dimension, and that coveted wet look. It’s the final step that seals the manicure and creates the signature shine of the old money aesthetic.
Products & Tools Used
- A high-shine, “gel-like” or “diamond finish” top coat
- Your completed color manicure
- Cuticle oil
Application/Styling Steps
- Wait until your final color coat is dry to the touch (about 5-10 minutes).
- Load your top coat brush with a generous bead of product.
- Float the brush over the nail. Don’t press down hard; let the top coat glide over the color and self-level. This prevents dragging or smearing the polish underneath.
- Seal the manicure by swiping the brush along the free edge of your nail tip. This “cap” dramatically reduces chipping.
- Apply a second layer of top coat after 24 hours to boost and prolong the glossy finish.
- Finish with cuticle oil once the top coat is fully set to hydrate the surrounding skin and add to the overall polished look.
Pro-Tip: For a truly durable, glass-like shine, use a “no-wipe” gel top coat over your regular polish (after it’s 100% dry) and cure it under an LED lamp. This salon technique locks in mirror-like shine for weeks.

10. Invest in a Structured Manicure for Nail Health

For strong, beautiful natural nails. Pin this guide to structured manicures.
A structured manicure is a professional technique that uses a builder in a bottle (BIAB) gel to add strength and a perfect shape to natural nails. It creates a subtle apex (the highest point of the nail’s curve) that reinforces the nail’s stress area, preventing breakage and allowing nails to grow healthily. It’s the ultimate foundation for nail health.
What You Need
- Builder in a bottle (BIAB) or structure gel in a clear or sheer nude shade
- LED/UV nail lamp
- pH bonder and primer
- Isopropyl alcohol and lint-free wipes
Routine Steps
- Prep nails meticulously: push back cuticles, lightly buff the surface, and shape.
- Dehydrate the nail plate by wiping with isopropyl alcohol. Apply a pH bonder and a non-acidic primer.
- Apply a thin “slip layer” of the builder gel over the entire nail. Do not cure.
- Build the apex: Place a small bead of builder gel in the center of the nail (the stress area) and gently guide it to create a subtle, strengthening curve. Turn the hand upside down for a moment to let gravity help form the perfect shape.
- Cure under an LED lamp according to the product’s instructions.
- Apply your chosen old money nail design color on top, or simply apply a top coat for a natural, structured manicure look.
Pro-Tip: A structured manicure is the secret to making natural nails look perfectly shaped and resilient. It’s an investment in nail health and the ideal base for any quiet luxury polish, as it ensures a flawlessly smooth application.

11. Refine Your Look with the Iconic Chanel Ballerina

The one and only. Pin this homage to the most iconic old money nail polish.
Some products don’t just fit an aesthetic; they define it. CHANEL Le Vernis Ballerina is one such product. This iconic, super-sheer baby pink polish is the holy grail of the old money aesthetic. Beloved by celebrity manicurists and editors, it exemplifies the pinnacle of quiet luxury, delivering a chic, polished look that is instantly recognizable to those in the know.
Products & Tools Used
- CHANEL Le Vernis in shade #111 Ballerina
- CHANEL Le Gel Coat (top coat)
- CHANEL La Base Camélia (base coat)
- L’Huile Camélia (cuticle oil)
Application/Styling Steps
- Moisturize and push back cuticles with L’Huile Camélia.
- Protect and smooth the nail with a layer of La Base Camélia.
- Apply your coats of Ballerina. This polish is famously sheer. One coat gives a barely-there glow. Two coats provide a classic sheer pink. Three coats create a milkier, more noticeable finish, as seen on celebrities like Sofia Richie Grainge.
- Seal with the Le Gel Coat top coat to boost the glossy finish and staying power, giving it that signature luxury look.
Pro-Tip: Chanel Ballerina is more than a nail polish; it’s a statement of taste. It is the quintessential quiet luxury shade, beloved by editors and celebrities for its ability to make hands look instantly more elegant and put-together.

Key Takeaways
- Shape Is Paramount: The foundation of the look is a neat, practical nail shape. Opt for a short square, squoval, or a soft short almond shape. Avoid extreme lengths and sharp stiletto or coffin styles.
- Embrace Understated Color: Stick to a neutral palette. Sheer pink, milky white, and sophisticated nude tones are staples. For color, choose a classic red or deep burgundy, never neons or loud brights.
- It’s All About the Glossy Finish: A healthy, high-shine look is non-negotiable. Invest in a quality, gel-like top coat and reapply it every few days to maintain that expensive-looking luster.
- Minimalism Is Key: Old money nail designs avoid conspicuous art, glitter, and gems. The elegance comes from the perfection of the manicure itself, not from add-ons. A micro-French tip is the most art you’ll typically see.
- Nail Health Underpins Everything: This aesthetic prioritizes healthy, well-groomed nails and cuticles. Regular use of cuticle oil and investing in strengthening treatments like a structured manicure are crucial.
FAQs About old money nail designs
What are old money nails?
Old money nails are a style of manicure that emphasizes timeless elegance and subtlety over trends. They are characterized by short, perfectly groomed nail shapes, a neutral color palette (like sheer pinks, nudes, and classic reds), and a flawless, high-gloss finish. This aesthetic is about looking polished and put-together in an effortless, “quiet luxury” way.
What is the difference between old money and new money nails?
The primary difference is subtlety versus statement. Old money nails are understated, with short shapes, neutral colors, and minimal to no art. They whisper elegance. “New money” nails tend to be louder, often featuring long, dramatic shapes (like stiletto or coffin), bright colors, logos, heavy gems, and bold nail art to make a conspicuous statement of wealth.
Are French tips old money?
Yes, but with a specific look. A classic or micro-French manicure with a thin, crisp white line on a short, natural-shaped nail is quintessentially old money. However, thick, chunky French tips, colored tips, or deep “smile lines” on long acrylics are generally not associated with this aesthetic and lean more towards a trendier, “new money” style.
What is the most timeless nail color?
A sheer, natural pink is arguably the most timeless nail color. Shades like Chanel ‘Ballerina’ or Essie ‘Mademoiselle’ enhance the natural beauty of the nail without being overt. Other timeless choices that fit the old money aesthetic include a classic, true red and a deep, sophisticated burgundy.
Which nail shape is most elegant?
The short almond and squoval (square-oval) shapes are widely considered the most elegant and timeless. They elongate the fingers gracefully without being impractical or trendy. A neat, short square shape is also a classic and sophisticated choice that aligns perfectly with the functional yet polished old money aesthetic.
Why do old money nails look expensive?
They look expensive because they imply consistent, high-quality maintenance rather than a one-time, trendy application. The focus on impeccable nail health, perfectly shaped cuticles, a flawless polish application, and a high-gloss finish signals time and care. This attention to detail creates a look of effortless perfection that is associated with luxury.
Are long nails considered old money?
Generally, no. The old money aesthetic favors practical, short-to-medium length nails that are well-maintained. Extremely long nails, regardless of shape, are seen as less practical and more of a statement, which moves away from the understated philosophy of this style. A slight extension beyond the fingertip is acceptable, but “claws” are not.
Can you have nail art with old money nails?
Very rarely, and it must be extremely minimalist. The most acceptable form of “art” is a micro-French tip. Occasionally, a single, tiny, well-placed dot at the base of the nail might be seen, but intricate patterns, decals, chrome powders, and rhinestones are definitively not part of the old money nail design ethos.
What are the best nail polish brands for an old money look?
Luxury brands known for their classic color palettes are favored. Brands like CHANEL, Dior, and Hermès are iconic for this aesthetic due to their heritage and famous neutral shades. However, high-quality salon brands like Essie and OPI offer many of the most popular and classic shades that perfectly capture the look.
How do you maintain old money nails?
Maintenance is key and focuses on health and perfection. This includes regular, gentle cuticle care, keeping nails neatly filed, reapplying a top coat every few days to maintain a high-shine finish, and consistently using cuticle oil and hand cream. For those with weaker nails, getting a structured manicure provides a long-lasting, durable base.
Final Thoughts
Ultimately, mastering the old money nail designs aesthetic is about shifting your mindset from chasing fleeting trends to investing in timeless quality and health. It’s the realization that true sophistication lies in the perfection of the simple things: a flawless shape, a healthy nail bed, and an impeccable, glossy finish. This approach doesn’t require a limitless budget; it requires care, attention to detail, and an appreciation for understated elegance. By focusing on these core principles, you can achieve a look that is perpetually chic and effortlessly luxurious.
Last update on 2026-04-18 / Affiliate links / Images from Amazon Product Advertising API