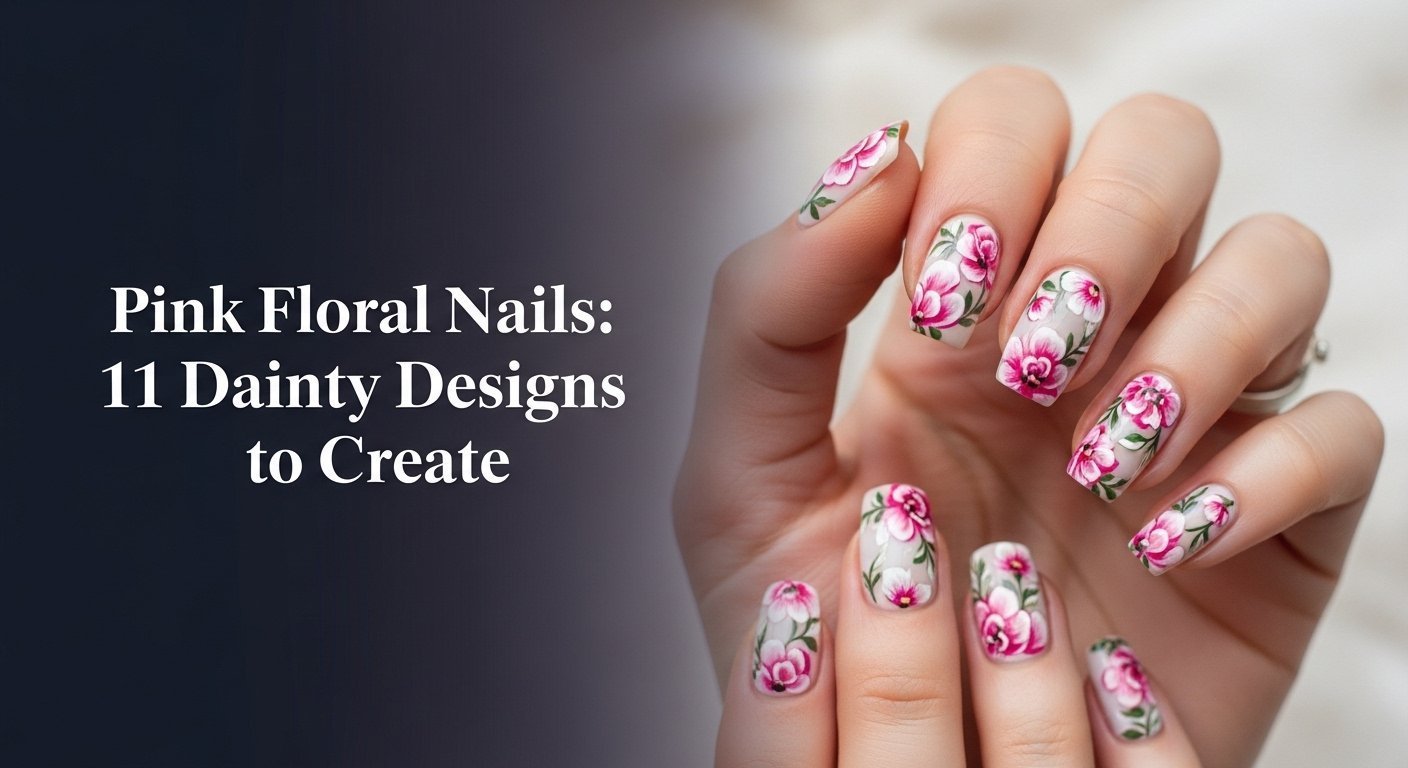
Struggling to get your hand-painted flowers to look just right? You want beautiful, dainty pink floral nails, but they end up looking smudged or clumsy. It’s frustrating when your vision for an artistic manicure doesn’t match the reality.
Creating dainty pink floral nails involves starting with a clean, prepped nail and applying a base coat, often a milky or sheer pink polish. Using a fine detail brush or a dotting tool, you can paint simple flowers like daisies or intricate roses. The key is to work in thin layers, cure each step if using gel, and seal the design with a glossy top coat for a long-lasting, professional finish.
Leveraging proven techniques and data-driven insights, this guide will demystify the process. Pink floral nails are a versatile nail art style, perfect for expressing everything from minimalist elegance to boho charm. You are about to discover 11 achievable designs that will give you a salon-quality look at home.
How Do You Create Dainty Pink Floral Nails?
The appeal of pink flower nails lies in their delicate and feminine aesthetic, but achieving that polished look can feel out of reach for DIY enthusiasts. Many struggle with creating symmetrical petals, preventing smudging, or making the manicure long-lasting. The secret isn’t just artistic talent; it’s about using the right tools and proven techniques. Whether you’re aiming for a single floral accent nail or a full set of hand-painted florals, success starts with a perfectly prepped nail and an understanding of how to layer products. This guide will break down the essential steps, from applying a flawless milky base to sealing your art with a chip-resistant top coat, ensuring your pink floral designs look professional and stay beautiful.
11 Dainty Pink Floral Nail Designs to Create in 2026
Now that you understand the foundational principles, it’s time for the inspiration. This list goes beyond a simple gallery of images. It delivers on the promise of “11 Dainty Designs” by providing a comprehensive mini-tutorial for each look. You’ll find everything from a beginner-friendly daisy chain to an advanced watercolor technique. Each section includes a list of products and tools, followed by a detailed step-by-step tutorial. This format is designed to empower you to move from inspiration to creation immediately, whether you’re using gel polish, working with nail stickers, or embellishing your favorite short almond nails.
1. Create a Minimalist Daisy Chain on a Milky Pink Base

Pin this easy design to your ‘DIY Nails’ board!
This design is the perfect entry point for simple pink floral nails for beginners. The daisy chain is effortlessly chic and looks especially beautiful on short nails. Its beauty lies in its simplicity, relying on dotting tools rather than complex brushwork. The milky pink base provides a soft, dreamy background that makes the white petals pop.
Products & Tools Used
- Milky pink gel polish (e.g., a sheer, buildable formula)
- Bright white gel art paint for petals
- Sunny yellow gel art paint for the center
- A set of nail art dotting tools with various small head sizes
- High-shine, no-wipe gel top coat
- UV/LED nail lamp
Application Steps
- Prep the nails by filing, buffing, and cleansing. Apply a base coat and cure.
- Apply two thin coats of your milky pink gel polish, curing for 60 seconds after each coat.
- Using the smallest dotting tool, dip it in white paint and create 5-6 dots in a small circle to form the daisy petals. Don’t worry about perfection; slight irregularity looks more natural.
- Create a “chain” by painting 2-3 daisies across the nail or along the cuticle.
- With an even smaller dotting tool, dip it in the yellow paint and place a single dot in the center of each white flower. Cure for 60 seconds.
- Seal the entire design with a glossy top coat and cure for a final 60 seconds. Finish with cuticle oil.
Pro-Tip: For perfectly even petals, wipe your dotting tool clean on a lint-free wipe after creating every 1-2 dots. This prevents the paint from getting gummy and ensures each petal is the same size.

2. Design a Classic Pink Rose Accent Nail

Save this romantic rose idea for your next special occasion!
A timeless classic, the pink rose nails design is perfect for a statement floral accent nail. This technique for hand-painted florals is slightly more advanced but incredibly rewarding. Creating a single, detailed rose is a beautiful way to add an artistic touch to a simple manicure, and it requires a fine detail brush to achieve those delicate petals.
Products & Tools Used
- A base color of your choice (e.g., sheer nude or solid pastel pink)
- Dusty rose gel polish for the rose base
- A deeper magenta or red for shading
- A light, almost white pink for highlights
- Olive or forest green for leaves
- Ultra-fine detail brush (often labeled 5mm or 7mm)
- Glossy top coat and UV lamp
Application Steps
- Apply and cure your chosen base color on all nails.
- On your chosen accent nail, use the detail brush and dusty rose polish to create a small, C-shaped swirl for the center of the rose.
- Working outwards, paint curved, parenthesis-like strokes around the center to build the petals. Don’t connect them fully; leave small gaps.
- Add a tiny amount of the deeper magenta shade to one side of your brush and blend it into the base of some petals to create depth.
- Use the light pink to add small highlights to the outer edges of a few petals.
- With the green polish, paint 2-3 small, pointed leaves around the base of the rose. Cure for 60 seconds.
- Seal with a top coat and cure.
Pro-Tip: For a more realistic rose, use the one-stroke painting technique. Load one side of a flat brush with your base pink and the very tip with the darker shade. In one sweeping, curved motion, you can create a petal with built-in shading. This is an advanced technique worth practicing.

3. Apply Vintage Pressed Flower Nails with a Sheer Pink Overlay

Pin this beautiful pressed flower nails idea for a boho wedding or spring event!
For a truly unique and vintage look, learn how to use dried flowers for nail art. This technique, known as encapsulated flowers, creates a stunning 3D effect. The real pressed flower nails are delicately placed on the nail and sealed under a layer of sheer pink or clear gel, giving the manicure an ethereal, garden-inspired quality.
Products & Tools Used
- A set of tiny, flat, pressed flowers for nail art
- Sheer pink or clear builder gel in a pot
- A fine-tipped tweezer
- A small silicone tool or orange wood stick to press flowers flat
- Gel base coat, top coat, and UV lamp
Application Steps
- Prep nails and apply a base coat. Cure.
- Apply one thin layer of your sheer pink gel and cure. This gives the flowers a colored background to sit on.
- Apply a second, slightly thicker layer of the pink or a clear builder gel, but DO NOT CURE. This is your adhesion layer.
- Using the tweezers, gently pick up a pressed flower and place it onto the wet gel.
- Use the silicone tool to gently tap the flower down, ensuring all edges are flat against the nail. Arrange as desired.
- Once all flowers are placed, cure for 60 seconds to lock them in place.
- Seal with a layer of builder gel to ‘encapsulate’ the flowers and create a smooth surface. Cure. If the surface is bumpy, you can gently buff it smooth, cleanse, and then apply a final glossy top coat. Cure.
Pro-Tip: Some dried flowers can bleed their color when they come in contact with gel. Before committing to a full manicure, test one flower on a practice tip to see if the color holds. If it bleeds, the encapsulated flowers may be better suited for placement between two cured layers of gel.

4. Paint a Hot Pink Floral Design for Summer

Ready for vacation? Pin this hot pink floral look to your ‘Summer Nails’ board!
When the weather warms up, it’s time for hot pink floral nails. This design is all about vibrant energy and is a perfect example of fun summer nail art. Using a bold neon pink as the base, the stylized white flowers create a high-contrast look that’s guaranteed to stand out by the pool.
Products & Tools Used
- A highly pigmented hot pink or neon pink gel polish
- Opaque white gel art paint
- A fine detail brush
- Optional: A touch of lime green or turquoise for leaves/accents
- Glossy top coat and UV lamp
Application Steps
- Prep nails, apply a base coat, and cure.
- Apply two to three coats of the hot pink polish until fully opaque, curing between each layer.
- Using the white paint and your detail brush, paint a simple, five-petal hibiscus or plumeria-style flower. These are less detailed than a rose.
- Think of each petal as a slightly teardrop shape, meeting at a central point.
- You can place one large flower on an accent nail or smaller flowers scattered across all nails.
- Use the tip of your brush to pull a small line of white from the center out into each petal for a stylized look. Add a small dot in the center. Cure for 60 seconds.
- Seal with a glossy top coat and cure.
Pro-Tip: Neon pink polishes can sometimes be less opaque. To make your color truly pop, apply a single coat of solid white polish as your base color before you apply the hot pink. The white base will make the neon appear much brighter and more vibrant.

5. Achieve an Elegant Floral French Tip

A modern twist on a classic! Pin this floral French tip idea now.
Combine two timeless styles with this pink floral french tip almond nails design. This look enhances the classic French tip by adding a dainty vine of tiny pink and white flowers along the smile line. It’s a sophisticated and modern update that looks particularly elegant on almond nails.
Products & Tools Used
- A sheer blush pink for the nail bed base
- Crisp white gel polish for the tip
- A thin liner brush for the French tip
- Pastel pink and green gel paints for the flowers
- A tiny dotting tool
Application Steps
- Prep nails and apply a base coat. Cure.
- Apply one or two coats of the sheer pink base color over the entire nail. Cure.
- Using the liner brush and white polish, paint a classic French tip. Perfect the smile line. Cure for 60 seconds.
- Using a tiny detail brush and the pastel pink paint, design a few very small, simple flowers along one side of the white tip. These can be simple 4-dot flowers.
- Use the dotting tool to place a tiny white dot in the center of each pink flower. Add 1-2 tiny green leaves.
- Cure the floral details for 60 seconds.
- Seal the entire nail with a high-gloss top coat and cure.
Pro-Tip: To get a perfect, crisp smile line for your French tip, use the “stamper hack.” Paint polish onto a silicone nail stamper, then gently push the tip of your nail into it at a 45-degree angle. This creates a flawless curve every time.

6. Create Ethereal Watercolor Blossom Nails

Unleash your inner artist! Pin this watercolor blossom technique.
This artistic watercolor blossom look is achieved using a special watercolor technique. This style requires a blooming gel, which allows pigmented colors to gently spread and blend on the nail, creating a soft, ethereal blossom effect. It’s a stunning way to create unique designs that look like miniature paintings.
Products & Tools Used
- A base color (white or a milky base works best)
- “Blooming” gel polish
- A highly pigmented sheer pink or magenta gel polish
- A fine detail brush
- Acetone and a small cleanup brush (optional)
- Top coat and UV lamp
Application Steps
- Prep nails and apply your base color. Cure.
- Apply a generous layer of the “blooming gel” over the entire nail. DO NOT CURE.
- Dip your detail brush into the pink polish. Gently dot the color onto the wet blooming gel where you want your flowers to be.
- Watch as the color “blooms” and spreads out, creating a soft, watercolor effect. You can add a dot of a darker pink in the center for depth.
- Work quickly, designing all the blossoms before the gel spreads too much.
- Once you are happy with the blended effect, cure immediately for 60 seconds to stop the blooming process.
- Seal with a top coat and cure.
Pro-Tip: No blooming gel? You can achieve a similar effect with acetone. On a cured base color, paint your flower shapes. Then, dip a cleanup brush in a tiny bit of acetone and gently tap the edges of the flowers to blend and blur them.

7. Add Gold Leaf Accents to a Dusty Rose Design

For a touch of luxury, pin this gold leaf floral idea!
Elevate your manicure with pink and gold floral nail art. This design enhances a soft dusty rose base and simple white flowers by featuring delicate gold leaf accents. The combination creates a sophisticated and vintage rose look that is perfect for weddings, holidays, or any time you want your nails to feel extra luxurious.
Products & Tools Used
- A dusty rose gel polish
- White gel art paint
- A fine detail brush
- A pot of nail art gold leaf flakes
- A wax-tipped pen or tweezer
- Gel top coat and UV lamp
Application Steps
- Prep nails and apply two coats of dusty rose polish, curing between each coat.
- Using the detail brush and white paint, paint some simple vintage rose outlines or small blossoms on the nail. Cure for 60 seconds.
- Apply a thin layer of top coat, but DO NOT CURE.
- Using the wax-tipped pen, pick up small flakes of gold leaf and gently place them near the flowers or scattered sparsely across the nail.
- Gently tap the foil down with a silicone tool to ensure it’s flat.
- Now, cure for 60 seconds to lock the foil in place.
- Seal with one or two final layers of top coat to ensure the surface is perfectly smooth over the foil. Cure.
Pro-Tip: Gold leaf is extremely delicate and will stick to everything. Work in an area free from drafts. For precise placement, use a wax-tipped pen, which picks up the flakes more gently than tweezers.

8. Design a Matte Pink Manicure with a Glossy Flower

Love texture? Pin this matte and glossy combo!
Playing with different finishes is a simple way to create a high-impact pink flower mani. This technique creates a beautiful contrast by pairing a velvety matte pink finish with a shiny, glossy flower. The magic requires using two different types of top coat to achieve the textured effect, which looks incredibly modern and professional.
Products & Tools Used
- A solid carnation pink gel polish
- White gel art paint
- A detail brush
- A matte gel top coat
- A regular glossy gel top coat
- UV lamp
Application Steps
- Prep nails and apply two coats of the pink polish. Cure.
- Paint your white flower design on top of the cured pink layer. This can be a simple daisy or a more intricate blossom. Cure the flower design for 60 seconds.
- Apply the matte top coat over the entire nail, covering both the pink background and the white flower. Cure for 60 seconds. The whole nail will now have a flat, matte finish.
- Now, take your glossy top coat and a very fine detail brush.
- Carefully paint a thin layer of the glossy top coat only over the white flower petals. Be precise and stay within the lines of the flower.
- Cure one final time. The result is a matte background with a raised, glossy flower that catches the light.
Pro-Tip: This technique is also stunning in reverse. Apply a glossy top coat over the whole nail, and then use a detail brush to apply a matte top coat just to the background, leaving the flower shiny. The effect is equally beautiful.

9. Master the Pink and White Ombre Floral Nail

The dreamiest combo! Pin this pink ombre floral look.
This design for pink and white ombre floral nails is pure elegance. It features a soft pink and white ombre base—often called “baby boomer” nails—which is a type of gradient that seamlessly blends the two colors. The addition of tiny, dainty white flowers complements this beautiful blended background, creating a romantic and sophisticated look.
Products & Tools Used
- A sheer, natural pink gel polish
- An opaque white gel polish
- A small piece of makeup sponge or an ombre brush
- White gel art paint and a detail brush for the flowers
- Top coat and UV lamp
Application Steps
- Prep nails. Apply one coat of the sheer pink over the entire nail and cure.
- On a palette, place a drop of the pink and a drop of the white next to each other. Use a brush to slightly blend the area where they meet.
- Dip your makeup sponge into the blended polish and gently dab it onto the nail. The white should be concentrated at the tip and the pink at the base. Build the gradient in 2-3 thin layers, curing between each.
- Once the ombre is smooth, cure it.
- Using the white art paint and a detail brush, paint a few very dainty, small flowers, perhaps trailing down from the cuticle.
- Cure the flower art for 60 seconds.
- Seal with a glossy top coat and cure.
Pro-Tip: For a flawless sponge ombre, the sponge should be slightly damp with water (and squeezed out completely) before dipping in polish. This prevents the sponge from absorbing too much product and helps create a smoother blend on the nail.

10. Try a Negative Space Floral Design

Modern and chic! Pin this negative space floral idea.
Negative space floral nails are a modern and minimalist take on the trend. This popular technique utilizes the bare nail (or a clear base) as part of the design itself, creating a chic contrast with the painted pink floral pattern. The result is one of the most classy pink floral nails styles, perfect for an understated yet fashionable look.
Products & Tools Used
- A high-quality, non-yellowing clear base coat
- A blush pink gel paint
- A green gel paint for leaves
- A fine detail brush
- Glossy top coat and UV lamp
Application Steps
- Prep your nails to perfection. Since the natural nail will be visible, cuticle maintenance is key.
- Apply a clear gel base coat. For a more finished look, you can use a sheer nude or blurring base coat. Cure.
- Using your detail brush and pink paint, design your floral pattern directly onto the base coat. You could paint a branch creeping up the side of the nail or a few flowers floating near the tip.
- Leave plenty of the “negative space” (the clear base) showing.
- Add green leaves as desired.
- Cure the entire design for 60 seconds.
- Seal with a glossy top coat, making sure to cap the free edge. Cure.
Pro-Tip: The success of a negative space manicure depends heavily on the health of your natural nails. Before trying this design, focus on nail health for a week. Use cuticle oil daily and keep your nails well-shaped.

11. Apply Easy Pink Floral Nail Stickers

The ultimate hack for perfect florals! Pin this nail sticker guide.
For the quickest and most easy pink floral nails, floral nail stickers are the answer. These decals are a fantastic alternative to hand-painted art, offering intricate designs with zero artistic skill required. Knowing how to apply floral nail stickers properly is key to making them look seamless and last without peeling stickers.
Products & Tools Used
- A base color of your choice (e.g., light pink, white, or nude)
- A sheet of high-quality pink floral nail stickers or water decals
- Fine-tipped tweezers
- A small bowl of water (if using water decals)
- A silicone tool or your finger to press the sticker down
- Two layers of glossy top coat
Application Steps
- Prep nails and apply two coats of your chosen base color. Cure completely. The surface must be dry and non-tacky.
- Using tweezers, carefully peel a nail sticker from its backing. If using a water decal, cut out the design and soak it in water for 10-15 seconds until it slides off the backing paper.
- Position the sticker on the nail.
- Gently press the sticker down, starting from the center and smoothing outwards to remove any air bubbles. Use a silicone tool for a perfectly smooth application.
- If any part of the sticker hangs over the edge of the nail, use a small file in a downward motion to gently remove the excess.
- Seal immediately with a layer of top coat. Make sure to “cap” the free edge of the nail to prevent the sticker from peeling. Cure.
- Apply a second layer of top coat for extra durability. Cure.
Pro-Tip: For water decals, a “sticky” base can help with placement. After curing your color, apply a thin layer of base coat, cure it, and then place the decal on the slightly tacky surface. This gives you a little more “play time” to slide it into the perfect position before pressing down.

Key Takeaways
- Preparation is Paramount: A beautiful pink floral manicure begins with healthy nails. Always prep by filing, buffing, and cleansing the nail plate before applying any polish to prevent chipping.
- Thin Coats are Key: Whether you’re applying a milky base or hand-painted florals, work in multiple thin layers and cure each one fully. This ensures durability and prevents smudging.
- Master Your Tools: For dainty designs, a fine detail brush is for lines and intricate work, while a dotting tool is perfect for creating simple petals and polka dots quickly and consistently.
- Top Coat is Non-Negotiable: A high-quality top coat is what transforms your design from amateur to salon-quality. It adds shine, provides a smooth finish, and is the most critical step to making your manicure long-lasting.
- Don’t Fear the Sticker: For a flawless look with zero stress, floral nail stickers or decals are a professional-level hack. The key is to seal them under two layers of top coat, capping the free edge.
- Play with Texture: A simple way to create an artistic, high-impact design is to combine finishes. Try a matte pink finish with a glossy flower detail for a modern, textured look.
People Also Ask About Pink Floral Nails
Can you do floral nails on short nails?
Absolutely, floral nails look incredibly chic on short nails. The key is to scale the design down. Opt for minimalist styles like a single dainty daisy, a “daisy chain” along the cuticle, or tiny “negative space” blossoms. Avoid large, overwhelming flowers, as they can make short nails appear even shorter.
How do you paint simple flowers on nails for beginners?
The easiest way to paint simple flowers is with a dotting tool. On your cured base color, use a small dotting tool to place five dots in a circle to create petals. Then, use an even smaller tool to place a different colored dot in the center. This technique requires no brush skills and creates a perfect daisy or forget-me-not every time.
What tools do I need for floral nail art?
For most hand-painted floral designs, you need just two essential tools. A set of dotting tools in various sizes is perfect for simple flowers and dots. For more intricate petals and leaves, you’ll need an ultra-fine detail brush, often sold in a set with varying lengths (e.g., 5mm, 7mm, 11mm).
How do you make hand-painted floral nails long-lasting?
To prevent chipping, proper sealing is crucial. After your floral art is fully cured, apply a quality gel top coat, making sure to “cap the free edge.” This means running the brush along the very tip of the nail to create a seal. For extra protection, especially over textured art like encapsulated flowers, use two layers of top coat.
Is gel or acrylic better for floral designs?
Gel is generally better for hand-painted floral designs. Gel polishes don’t dry until they are cured in a UV lamp, giving you unlimited time to perfect your art, blend colors, and fix mistakes. While you can paint on acrylic nails, the fast-drying nature of acrylic monomer itself is not suitable for painting intricate details.
How do I get a milky pink base for flowers?
To get a milky pink base, you need a sheer, buildable pink or white polish. True “milky” polishes are semi-translucent. Apply one thin coat for a very sheer look, or build it up with two to three thin coats for a more opaque but still soft finish. This creates the perfect, dainty background for your pink floral designs.
How do you use dried flowers for nail art?
You must encapsulate dried flowers within the gel. After a cured base color, apply a layer of builder gel or a thick top coat (don’t cure). Gently press the flat, dried flower into this wet layer. Cure it, then apply another layer of builder gel over the top to make the surface smooth before your final top coat.
How do you prevent floral nail stickers from peeling?
The secret is a strong seal. After placing the sticker on a fully cured, non-tacky nail surface, apply your first layer of top coat and be sure to “cap the free edge” by brushing along the nail tip. Cure, and then apply a second full layer of top coat. This double seal locks the sticker’s edges down.
What is the easiest flower to paint on nails?
By far, the easiest flower to paint is a daisy. Using only a dotting tool, you can create five simple white dots for petals and one yellow dot for the center. This design is quick, requires no complex brushwork, and looks clean and dainty on any nail length.
Are pink floral nails in style for 2026?
Yes, pink floral nails are a perennial trend that is always in style, especially for spring and summer. For 2026, popular variations include milky base colors, pressed flower nails, floral French tips, and designs with gold leaf accents. The style’s versatility from minimalist to intricate keeps it fresh.
Final Thoughts on Your Beautiful Pink Floral Nails
You now have 11 unique and dainty designs in your nail art arsenal, from a simple pink floral nail for beginners to an elegant watercolor blossom for the more artistic soul. We’ve covered how the right tools, like a fine detail brush or a simple dotting tool, can elevate your manicure from homemade to salon-quality. The key to every stunning pink floral nail is patience, working in thin, cured layers, and finishing with a durable, high-gloss top coat.
Whether you’re recreating a floral french tip for a wedding or trying a bold hot pink floral design for summer, the techniques in this guide are your foundation for success. Don’t be afraid to experiment with color, texture, and placement. The most beautiful manicure is one that you had fun creating.
What pink floral design are you most excited to try first? Let me know in the comments below
Last update on 2026-04-27 / Affiliate links / Images from Amazon Product Advertising API