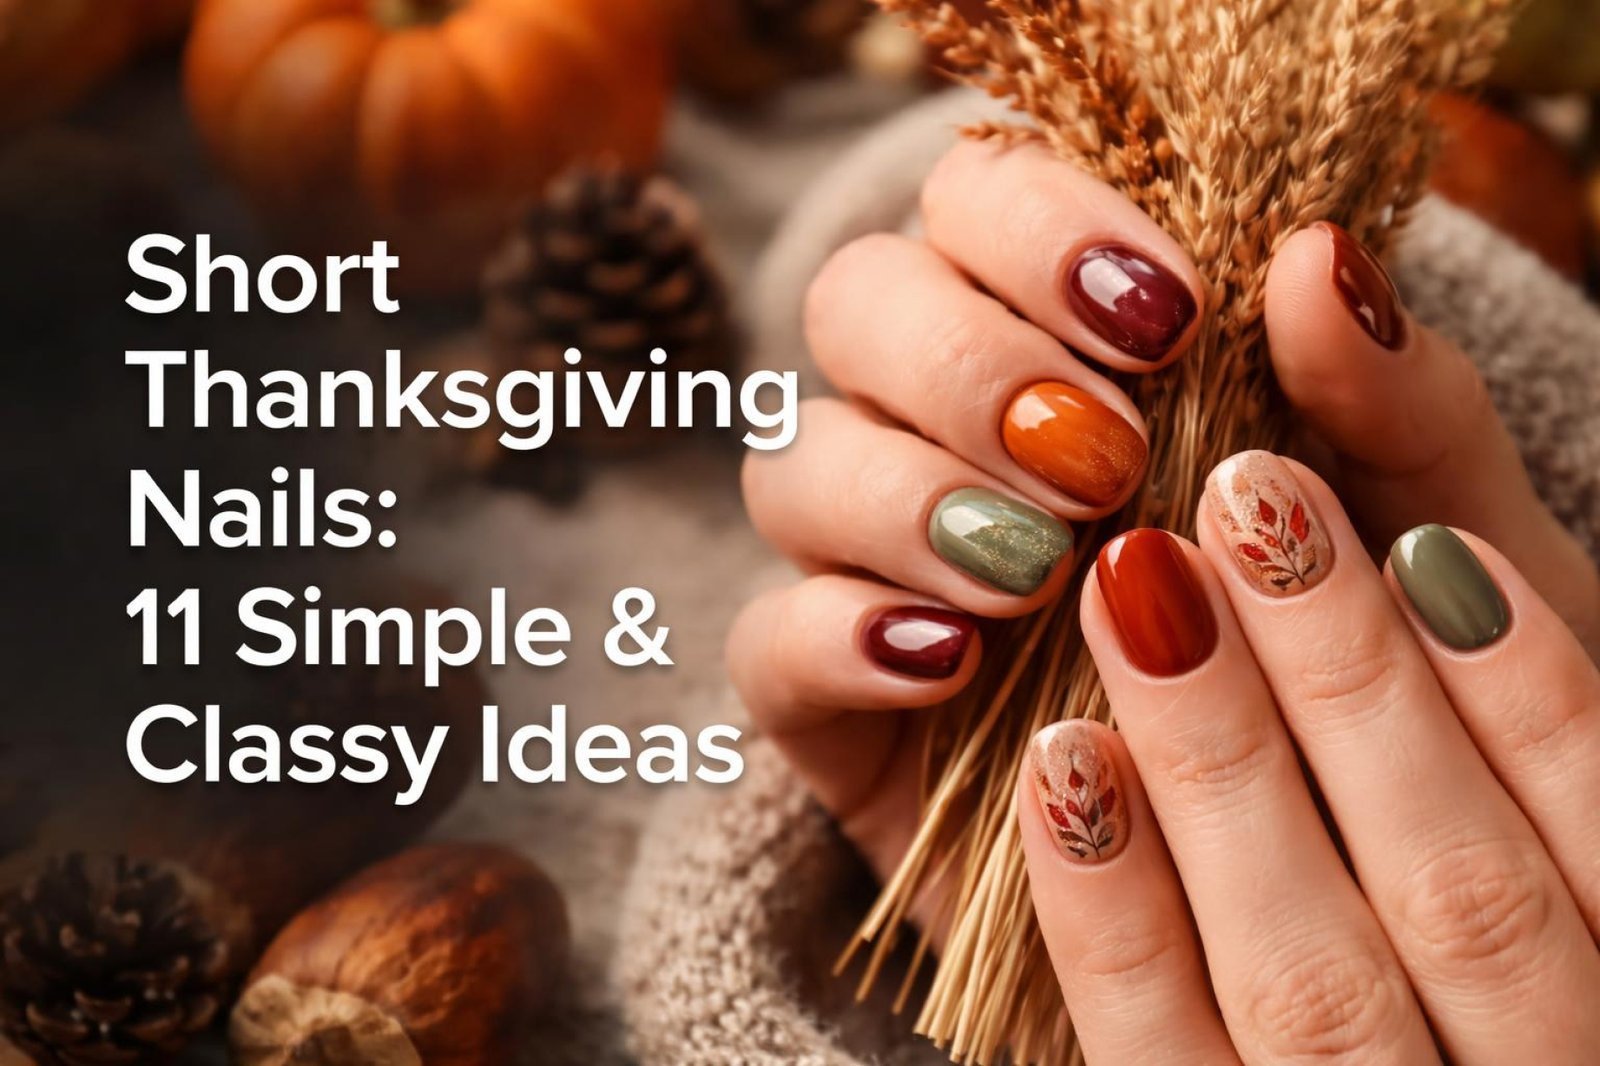
Think short nails can’t be the star of the holiday dinner? If you’ve been scrolling for inspiration only to find designs on long stilettos, you know the frustration. It’s easy to feel like you’re missing out on all the festive fun when it comes to short thanksgiving nails.
The best ideas for short Thanksgiving nails focus on minimalist designs, rich autumnal colors, and single accent nails to create an elegant and uncluttered look. Designs like simple pumpkin-colored tips, a single nail with gold foil, or a cozy matte brown finish are perfect because they add a festive touch without overwhelming the small nail space. These styles are trendy for 2026 and easy for beginners to achieve.
Leveraging tested frameworks and data-driven insights, this guide is your answer to chic, manageable holiday manicures. We’re moving beyond basic polish to give you 11 simple and classy ideas specifically designed for shorter lengths. You’ll discover how to make your nails a sophisticated part of your Thanksgiving look.
What Are The Best Ideas for Short Thanksgiving Nails?
The common belief that short nails are limiting is simply not true, especially during a season as rich and textured as autumn. The key is to shift your perspective from what you can’t do to what looks exceptionally chic on a shorter canvas. While long nails can handle sprawling designs, short festive fall nails excel with clean lines, bold colors, and intentional, minimalist art. This guide is built on the expert principle that a well-executed design on a short nail is far more elegant than a cluttered design on a long one. We’ve curated 11 diverse and simple ideas that prove short nails can be the perfect canvas for holiday creativity.
The best ideas for short Thanksgiving nails focus on minimalist designs, rich autumnal colors, and single accent nails to create an elegant and uncluttered look. Designs like simple pumpkin-colored tips, a single nail with gold foil, or a cozy matte brown finish are perfect because they add a festive touch without overwhelming the small nail space. These styles are trendy for 2026 and easy for beginners to achieve at home, proving that you don’t need length to have stunning holiday nails. Each concept is designed to be achievable, whether you’re a DIY beginner or looking for inspiration to take to your nail technician.
11 Simple & Classy Short Thanksgiving Nail Ideas in 2026
Now, let’s dive into the practical, beautiful solutions that will make your nails the talk of the table—for all the right reasons. This isn’t just a gallery; it’s a complete blueprint for achieving 11 distinct, classy short thanksgiving nails, complete with product recommendations and step-by-step instructions. Each idea is chosen to flatter shorter lengths, turning a perceived limitation into a style advantage. Whether you love subtle elegance, a pop of glitter, or a touch of playful art, you’ll find the perfect look to complement your holiday style.
1. Create a Classic Pumpkin Spice Ombre

Pin this cozy gradient for your perfect fall manicure!
This design captures the essence of autumn in a single, beautiful gradient. The ombre fall short nails techniques are surprisingly simple for such a professional-looking result. The vertical fade from a creamy nude to a warm terracotta orange is particularly flattering on short square thanksgiving nails because it draws the eye upward, creating a subtle illusion of length. It’s the perfect way to wear iconic fall colors in a soft, modern way.
Products & Tools Used
- A creamy nude or beige nail polish
- A warm, pumpkin or terracotta orange nail polish
- A liquid latex barrier or tape for easy cleanup
- A small, disposable makeup sponge
- A glossy, quick-dry top coat
Application Steps
- Apply a base coat and let it dry completely. Paint one full coat of the lightest color (the creamy nude) on all nails and let it dry.
- Protect the skin around your nails by applying a liquid latex barrier. This will make cleanup much faster.
- On a flat, disposable surface, paint a stripe of the nude polish and a stripe of the orange polish right next to each other. Use a toothpick to gently swirl the line where they meet.
- Press your makeup sponge directly onto the polish stripes a few times.
- Gently dab the polish-loaded sponge onto your nail. Repeat 2-3 times, moving the sponge slightly up and down, to build up the color and blend the gradient.
- While the polish is still wet, peel off the liquid latex. Apply a generous layer of your glossy top coat to smooth out the texture from the sponge and make the colors pop.
Pro-Tip: For an even smoother blend on short nails, use a sponge with very small pores. After dabbing the polish on the sponge, dab it once on a piece of paper to remove excess polish before applying to your nail.

2. Add a Subtle Gold Foil Accent

Want a touch of glam? Pin this elegant gold foil idea!
This is the ultimate hack for achieving classy short thanksgiving nails with minimal effort. A few strategically placed flakes of gold foil can elevate a simple manicure into something truly special. This design works beautifully with a variety of base colors, from a creamy white to a deep, moody short black thanksgiving nails with gold accents. The beauty of this look is its subtlety; it adds a festive shimmer without being overpowering, making it a perfect example of a chic short thanksgiving nails look.
Products & Tools Used
- Your favorite fall base color (e.g., deep burgundy, forest green, or creamy white)
- Gold nail foil flakes
- A clear top coat (or a specialized foil adhesive)
- A pair of fine-tipped tweezers or a wax pencil
Application Steps
- Apply your base coat and two coats of your chosen fall color. Let the second coat dry until it’s slightly tacky, but not fully wet.
- Using tweezers, pick up tiny pieces of the gold foil.
- Gently place the foil flakes onto your nail. You can create a small cluster near the cuticle, a cascade from the tip, or scatter them randomly. For short nails, less is more. Focus on just one or two accent nails.
- Once you’re happy with the placement, gently tap the foil down with your fingertip or a silicone tool to ensure it’s flat.
- Apply one to two thick layers of a glossy top coat. This is crucial to seal the foil completely and prevent it from snagging or flaking off.
Pro-Tip: For a more “suspended” look, apply one layer of top coat before placing the foil. While it’s still wet, place your foil flakes. Then, seal with a final layer of top coat. This advanced short nail art technique adds incredible depth.

3. Rock a Cozy Matte Brown Manicure

Simple, chic, and so cozy. Pin this matte brown look now!
There’s something incredibly sophisticated about a matte finish. It transforms a standard manicure into a high-fashion statement. A rich, chocolate short brown thanksgiving nails simple and elegant look is the nail equivalent of a cozy cashmere sweater. The magic is in the matte top coat short nail effects, which can instantly update any of your favorite fall colors nails. This look is effortlessly chic and speaks volumes with its texture rather than intricate art.
Products & Tools Used
- A rich, chocolate brown nail polish
- A high-quality matte top coat
- A smoothing base coat or ridge filler
Application Steps
- Start with a smoothing base coat. Matte finishes can emphasize ridges or imperfections, so a smooth canvas is key.
- Apply two thin coats of your chocolate brown polish. Make sure each coat is fully dry to prevent smudging.
- This is the magic step: Apply one even coat of the matte top coat over the brown polish.
- Watch as the glossy finish transforms into a velvety, non-reflective matte look within about 60 seconds.
- Allow it to dry completely. Avoid applying lotions or oils immediately, as they can reduce the matte effect.
Pro-Tip: To add a touch of interest, you can paint the very tip of your nail with a regular glossy top coat after the matte has dried. This creates a subtle “matte French” look that is incredibly sophisticated short thanksgiving nails chic.

4. Try a Modern Autumn French Manicure

Pin this modern take on a classic French manicure for Thanksgiving!
“Can I get a French tip on short Thanksgiving nails?” is a question we hear all the time, and the answer is a resounding yes! The secret is to go modern. Forget the thick white stripes of the past; the key to a minimalist short thanksgiving nails look is a “micro” French tip using an autumnal color. This updated French Manicure is incredibly flattering on shorter lengths like short almond thanksgiving nails, as the fine line adds a touch of definition without visually shortening the nail.
Products & Tools Used
- A sheer nude or pink base polish
- An autumnal tip color (e.g., burnt orange, deep red, forest green)
- An ultra-thin nail art brush or nail striping tape
- A glossy top coat
Application Steps
- Apply your sheer nude base color and let it dry completely. This creates the classic, clean French manicure foundation.
- Now for the modern twist. Using your thin nail art brush, carefully paint a very thin line of the autumn color along the free edge of your nail.
- Alternatively, place a piece of nail striping tape just below where you want the tip to end, paint above it, and remove the tape while the polish is still wet.
- The key for short nails is to keep the line extremely thin (a “micro” French tip). A thick line can make short nails appear even shorter.
- Clean up any mistakes with a small brush dipped in acetone.
- Finish with a glossy top coat to seal the design and add shine.
Pro-Tip: According to professional short thanksgiving nail art standards, a thinner French line creates the illusion of a longer nail bed. Always err on the side of a finer line for the most flattering look on short nails.

5. Design a Minimalist Turkey Accent Nail

The cutest little turkey! Pin this easy DIY nail art idea.
Learning how to paint a turkey on short nails doesn’t require an art degree. This minimalist turkey nail art is all about simple dots, making it one of the most cute short thanksgiving nails designs you can create. The key is to keep it playful and place it on a single accent nail, while the rest of your nails sport a solid, complementary color. This dot art technique is perfect for beginners and looks adorable on easy short round thanksgiving nails with turkey accents.
Products & Tools Used
- A neutral base color (cream, beige, or light grey)
- Nail polishes in: brown, yellow, orange, red, and black
- A set of nail art dotting tools (or the end of a bobby pin/toothpick)
- A glossy top coat
Application Steps
- Apply your neutral base color to all nails and let it dry. Choose one nail to be your accent nail (the ring finger is a popular choice).
- On your accent nail, use a larger dotting tool to place a brown dot in the center for the turkey’s body.
- Use a smaller dotting tool to place a slightly smaller brown dot (or a tan color if you have one) on top for the head.
- Now for the feathers! Dip your dotting tool in the red polish and place a dot behind the body. Repeat with orange and yellow, fanning them out like a tail.
- Use the smallest dotting tool or a toothpick to add two tiny black dots for eyes and a small orange triangle for the beak.
- Let the art dry for at least 10-15 minutes before sealing with a glossy top coat.
Pro-Tip: The key to cute short thanksgiving nails is scale. Keep your turkey small and centered. Don’t try to fill the entire nail; the negative space around the art is what makes it look modern and intentional.

6. Go for a Simple, Elegant Burgundy

Timeless elegance. Pin this perfect burgundy shade for the holidays.
Never underestimate the power of a single, flawless color. For an instantly elegant short thanksgiving nails look, a deep burgundy or wine red is a timeless choice. This solid color manicure requires no art, but delivers maximum impact. It’s a look that is both sophisticated and festive, making it perfect for classy short squoval thanksgiving nails for adults. When choosing between opi vs essie thanksgiving nail colors, look for a shade with rich, warm undertones that feels luxurious and inviting.
Products & Tools Used
- A high-quality burgundy or wine-colored nail polish
- A smoothing base coat
- A high-shine, chip-resistant top coat
- A cleanup brush and acetone (optional, for a perfect finish)
Application Steps
- Never skip the base coat! It prevents dark colors from staining your natural nails.
- Apply the first coat of burgundy polish. Keep it thin and even. Don’t worry if it looks patchy.
- Apply a second coat. This will provide the full, rich, opaque color you’re looking for.
- For a professional-looking finish, dip a small, flat brush in acetone and carefully trace around your cuticle line to clean up any polish on the skin.
- Finish with a super glossy top coat. This not only protects your manicure but also gives it that “gel-like” shine and depth.
Pro-Tip: Dark, bold colors like burgundy look exceptionally chic on short round nails or square shapes. The dark shade draws attention to the neat shape of the nail, making them look sharp and well-groomed rather than “small.”

7. Apply Easy Thanksgiving Press-On Nails

Instant manicure! Pin these gorgeous Thanksgiving press-on nails.
Looking for intricate designs without the time, skill, or salon visit? Press on nails thanksgiving short styles are your answer. Modern press-on nails are a game-changer, offering professional-looking nail design ideas that you can apply in minutes. They are the ultimate solution when you have no time for thanksgiving nails. You can find them in various shapes, including trendy short coffin thanksgiving nails, adorned with beautiful, ready-made art. Are press-on nails good for Thanksgiving? Absolutely. They’re a stress-free way to guarantee a perfect manicure.
Products & Tools Used
- A set of short Thanksgiving-themed press-on nails
- The included nail glue or adhesive tabs
- An alcohol prep pad
- A cuticle pusher and nail file
Application Steps
- Prep is everything! Gently push back your cuticles and lightly buff the surface of your natural nails. This helps the adhesive grip better.
- Wipe each nail with the alcohol prep pad to remove any oils.
- Size the press-on nails by matching each one to your natural nails. Lay them out in order so you’re ready to go.
- Apply a thin layer of nail glue to your natural nail AND a small dot of glue to the back of the press-on nail.
- Align the press-on nail with your cuticle and press down firmly from the base to the tip. Hold for 20-30 seconds.
- Repeat for all nails. Avoid contact with water for at least an hour to allow the glue to fully cure.
Pro-Tip: For a temporary wear (1-3 days), use the adhesive tabs. For a longer wear (1-2 weeks), use a quality brush-on nail glue. This trusted advice for short thanksgiving nails lets you customize the manicure to your needs.

8. Paint a Simple Plaid Accent Nail

Cozy plaid vibes! Pin this easy fall nail art.
Nothing says “cozy” quite like plaid. This iconic pattern is one of the quintessential fall nail designs and is surprisingly easy to simplify for an accent nail. You can create the look with a thin brush or, for a foolproof method, use a stamping plate short thanksgiving nails kit. The combination of a creamy base with intersecting lines of dark green and burnt orange creates a look that is pure autumn and a perfect example of easy nail art.
Products & Tools Used
- A light base color (e.g., cream or beige)
- Two plaid colors (e.g., dark green and orange)
- A very thin striping brush
- OR: a plaid-patterned nail stamping plate, scraper, and stamper
- A matte or glossy top coat
Application Steps
- On your chosen accent nail, apply two coats of your light base color and let it dry completely.
- Freehand Method: Dip your thin striping brush in the first plaid color (dark green). Paint two thin vertical lines. Then, paint two thin horizontal lines, creating a grid.
- Clean your brush. Dip it in the second plaid color (orange) and paint one horizontal and one vertical line, slightly offset from the first set.
- Stamping Method: Apply the plaid color polish over the plaid design on your stamping plate. Scrape off the excess with the scraper. Quickly press the stamper onto the plate to pick up the design, then roll the stamper firmly onto your nail.
- Let the plaid design dry for a few minutes before finishing with your favorite top coat (a matte top coat looks especially cozy with plaid!).
Pro-Tip: When free-handing lines on short nails, don’t aim for perfection. Slightly rustic, hand-drawn lines add to the cozy, flannel-shirt charm of the design.

9. Master a Dotted Fall Flower Design

So cute and easy! Pin this dotted flower tutorial.
Who knew that adorable cute nail ideas could be so simple? These creative short thanksgiving nail designs using dots prove you don’t need a brush to create something beautiful. This dotted flower is entirely made with a dotting tool, making it one of the most beginner friendly short thanksgiving nails designs possible. Using autumnal colors like rust and mustard on a sheer nude base gives a subtle nod to the season in a sweet, feminine way.
Products & Tools Used
- A sheer pink or nude base color
- A petal color (e.g., rust, mustard yellow, or deep red)
- A center color (e.g., brown or gold)
- A dotting tool
- A glossy top coat
Application Steps
- Apply two coats of your sheer base color and let it dry.
- Place a small drop of your petal color onto a piece of foil or a palette.
- Dip your dotting tool into the petal color. Create the flower by placing five dots in a small circle on your accent nail.
- Wipe your dotting tool clean. Place a drop of your center color on your palette.
- Dip the clean tool into the center color and place one dot in the middle of your five petals.
- You can add one or two flowers per nail, or keep it to a single accent nail for a minimalist short thanksgiving nail art look. Let it dry completely before adding a top coat.
Pro-Tip: For a slightly more advanced look, as soon as you place a petal dot, use a clean toothpick to gently drag the polish from the center of the dot outwards to create a more defined petal shape. This is a proven technique for short nail art that elevates a simple design.

10. Try a Negative Space Half-Moon Manicure

Chic, modern, and perfect for short nails. Pin this negative space look!
If you want to know how to make short nails look longer, this is the design for you. Negative space thanksgiving nails short styles are a game-changer. By leaving the half-moon at the base of your nail bare, this modern short thanksgiving nails look creates a powerful vertical illusion. It’s a piece of advanced short nail art thanksgiving that is surprisingly easy to achieve with a common office supply, making it a go-to for a chic, elongating effect.
Products & Tools Used
- A clear base coat
- A rich fall nail color (like forest green, navy, or deep plum)
- Paper reinforcement stickers (the kind used for hole-punched paper)
- A glossy top coat
Application Steps
- Apply a clear base coat to your clean, bare nails and let it dry completely. This is the “negative space.”
- Take a paper reinforcement sticker and place it over the base of your nail, leaving the half-moon (lunula) area exposed. The curved edge of the sticker will create the clean line.
- Paint the rest of your nail, from the sticker to the tip, with your chosen fall color. Apply two coats for full coverage.
- Important: While the second coat is still wet, carefully peel off the sticker. This ensures a crisp line.
- Let the design dry for a few minutes, then apply a glossy top coat over the entire nail to seal the design and add shine.
Pro-Tip: The negative space at the base of the nail draws the eye upward, making the colored portion of the nail seem longer. This is an authoritative design principle used by nail artists to flatter short nail beds.

11. Add a Simple Diagonal Glitter Line

A touch of sparkle! Pin this quick and glamorous nail idea.
Need glamorous short thanksgiving nails in a flash? This is it. A single, crisp line of glitter is the definition of quick short thanksgiving nails. It’s an incredibly simple piece of easy nail art that instantly elevates a dark, solid base color from everyday to holiday-ready. This design proves that short nails for Thanksgiving with glitter accents don’t have to be complicated to be stunning.
Products & Tools Used
- Any solid fall nail color (e.g., navy blue, dark purple, black)
- A glitter nail art striper polish (a polish with a built-in thin brush)
- OR: Nail striping tape and loose glitter with a top coat.
- A glossy top coat
Application Steps
- Apply two coats of your solid base color and let it dry completely. This is important for a clean glitter line.
- Take your glitter striper polish. Start at one side of the nail near the cuticle and paint a single, clean line diagonally across to the other side near the tip.
- If you don’t have a striper, place a piece of striping tape diagonally across your nail. Paint a clear top coat in the exposed area, sprinkle with loose glitter, and immediately remove the tape.
- The key is one confident stroke. Don’t try to go back over it multiple times, as this can make the line thick and bumpy.
- Let the glitter line dry for a minute, then seal the entire nail with a glossy top coat to smooth everything out and add shine.
Pro-Tip: A diagonal line visually cuts the nail at an angle, which can create an illusion of length and movement. This makes it a more dynamic and flattering choice for short square nails compared to a simple horizontal line.

FAQs About Short Thanksgiving Nails
What colors are popular for short Thanksgiving nails?
For 2026, popular colors for short Thanksgiving nails include rich, earthy tones. Think warm chocolate browns, deep burgundy and wine reds, rustic terracotta oranges, and cozy olive or forest greens. Metallic shades like gold, bronze, and copper are also perfect as accents. These colors are sophisticated and complement the autumn season beautifully.
How can I make my short nails look classy for Thanksgiving?
To make short nails look classy, focus on minimalist designs and impeccable application. A perfectly applied dark color, a delicate “micro” French tip with a fall color, or a simple accent nail with a single gold foil flake looks incredibly elegant. The key is to avoid cluttering the nail; a clean, intentional design on a well-groomed nail is the definition of class.
Is it hard to do nail art on very short nails?
No, it’s not hard, but it does require choosing the right design. Instead of trying to fit a large, complex scene, focus on patterns that work well in small spaces. Simple dots, thin lines, single accent nails, and negative space designs are all proven techniques for short nail art. The trick is to work with the space you have, not against it.
Are press-on nails a good option for a quick Thanksgiving look?
Yes, press-on nails are an excellent solution for a quick and flawless Thanksgiving manicure. Modern press on nails for a short Thanksgiving look come in numerous trendy shapes and designs, offering salon-quality art in minutes. They are perfect for those who are short on time or not confident in their DIY skills. Proper prep of the natural nail is key to ensuring they last.
What is the best nail shape for short nails?
The best shape for short nails is one that mirrors the shape of your cuticle, which is often a soft “squoval” (square-oval). A short square shape can look very chic and sharp, while a short round shape is classic and helps prevent snagging. Ultimately, the best shape is a personal preference, but squoval is widely considered the most flattering and durable for shorter lengths.
How do I paint a simple turkey on a short nail?
The easiest way to paint a turkey on a short nail is by using a dotting tool. Create a large brown dot for the body and a smaller one for the head. Then, use smaller dots of red, orange, and yellow fanned out behind the body for feathers. Add two tiny black dots for eyes. This minimalist approach is cute, easy, and perfectly scaled for a small nail.
Should I use a matte or glossy top coat for my fall nails?
Both matte and glossy top coats are stylish, and the choice depends on the look you want. A glossy top coat gives a classic, high-shine finish that makes colors pop. A matte top coat provides a modern, velvety, and cozy texture that is very on-trend for fall. For a creative twist, you can combine them, such as a matte nail with a glossy tip.
How can I prevent my Thanksgiving manicure from chipping?
Proper prep and sealing are the keys to preventing chips. Always start by wiping your nails with alcohol to remove oils. Use a quality base coat, apply thin coats of polish, and “wrap the tip” by running the brush along the free edge of your nail. Most importantly, reapply your top coat every 2-3 days to reinforce the protective seal.
What nail designs look good on short square nails?
Short square nails look fantastic with bold, graphic, and geometric designs. Dark, solid colors, modern French tips, and crisp linear art like plaid or diagonal glitter lines are particularly flattering. The sharp angles of the nail shape complement the clean lines of these designs, creating a very chic and intentional look.
Can a French manicure look good on short nails?
Absolutely, a French manicure can look great on short nails if you adapt the technique. Instead of a thick, classic white band, opt for a “micro” or “skinny” French tip. Using a thin line of a fall color like burnt orange or burgundy instead of white also modernizes the look and makes it incredibly chic and flattering for shorter nail lengths.
Final Thoughts on Your Short Thanksgiving Nails
Hopefully, you’re now feeling inspired and confident about rocking your short Thanksgiving nails. The most important takeaway is that style isn’t about length; it’s about making intentional choices that flatter what you have. From rich, solid colors to minimalist art, the possibilities for creating an elegant and festive look are endless.
Remember these key principles:
* Embrace Accent Nails: They allow you to be festive without overwhelming your nails.
* Master the Top Coat: A high-quality matte or glossy top coat is the secret to a professional finish.
* Utilize Smart Techniques: Designs like negative space or vertical ombre can visually elongate your nails.
* Prioritize Prep: A clean, well-prepped nail is the foundation of any long-lasting manicure.
So, go ahead and try that modern French tip or the cozy matte brown. Your nails are the perfect accessory for your holiday celebrations, no matter their length. Which design will you be trying first for Thanksgiving?
Last update on 2026-04-27 / Affiliate links / Images from Amazon Product Advertising API