Tired of the same old red and green holiday manicures? You’re searching for a festive look that feels chic, modern, and uniquely you, but finding a sophisticated alternative can be a real challenge. You want holiday glam without sacrificing elegance.
The Baby Pink Christmas Bow Nail aesthetic is a high-fashion holiday trend that merges the soft elegance of pale pinks with festive 3D bow ornamentation, offering a chic, modern alternative to traditional holiday manicures. This style leverages the delicate “Balletcore” and “Coquette” trends, transforming your nails into a sophisticated festive statement.
Drawing from established best practices and current 2026 trend analysis, this guide unlocks the secrets to the perfect pink bow manicure. We’ll explore 9 LNT (Licensed Nail Technician) approved designs, from minimalist decals to glamorous 3D sculpting. You’ll discover how to achieve a long-lasting, trend-forward look that’s perfect for the holiday season.
Are Baby Pink Christmas Bow Nails The Ultimate Holiday Mani Alternative?
Absolutely. The shift in 2026 seasonal trends has moved beyond the traditional red and green palette, embracing softer, more personalized colors that feel both festive and high-fashion. Baby pink, once reserved for spring, has emerged as a chic holiday powerhouse, especially when combined with the elegant bow motif. This trend is a direct reflection of the larger “Coquette” and “Balletcore” aesthetics dominating fashion, which champion hyper-feminine details like ribbons, pearls, and soft hues.
This aesthetic offers incredible versatility. A sheer, milky baby pink with a tiny white bow can be a subtle nod to the season, perfect for the office. A vibrant pink with a reflective chrome bow, on the other hand, becomes a glamorous statement piece for holiday parties. It’s a sophisticated nail solution that proves festive glam can be elegant, modern, and completely personalized. This guide will provide the technical depth you need to master the look, from matching the perfect pink to your skin tone to ensuring your 3D bows last through every celebration.
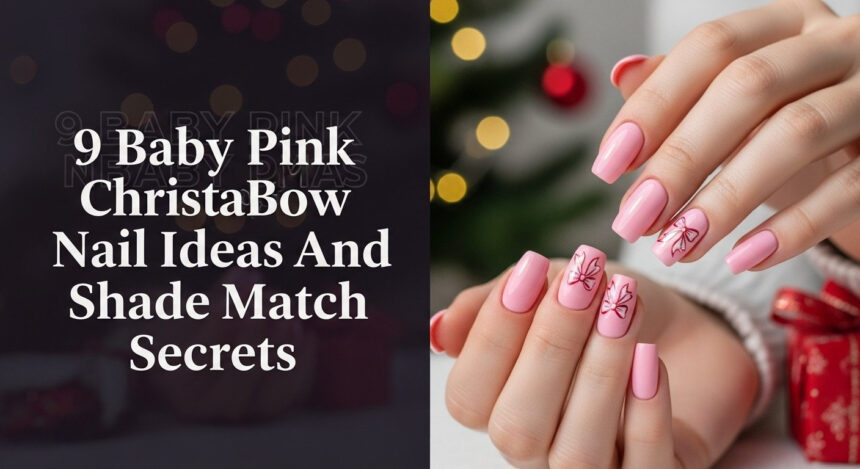
9 Baby Pink Christmas Bow Nail Ideas And Shade Match Secrets
Here is a curated gallery of nine baby pink Christmas bow nail ideas, approved by licensed nail technicians for both their aesthetic balance and structural integrity. We’ve included options for every skill level and style preference, from beginner-friendly decals that offer a quick holiday fix to advanced 3D sculpting techniques for a truly custom, salon-quality finish.
1. Classic Almond Nails with Small 3D White Bow (The Dainty Look)

Pin this dainty hack to your ‘2024 Holiday Nails’ board!
This elegant pink holiday look is the definition of timeless. The classic almond shape elongates the fingers, while the sheer, milky baby pink polish provides a clean and sophisticated canvas. A single, small 3D white bow charm placed near the cuticle of an accent nail adds a festive touch without overwhelming the minimalist aesthetic. It’s the perfect choice for a subtle yet celebratory manicure.
Products & Tools Used:
- Sheer, cool-toned milky baby pink gel polish (3-5 shades lighter than natural nail bed)
- Small flat-back 3D resin bow charms in white or pearl
- Highly viscous nail art glue or clear builder gel for adhesion
- Non-wipe gel top coat with UV inhibitor
- UV/LED Curing Lamp
Application/Styling Steps:
- Prep nails (clean, buff, dehydrate) and apply 2-3 thin coats of the milky pink gel, curing each layer fully.
- Apply a thin layer of the high-viscosity builder gel or strong nail art glue exactly where the bow will sit (usually near the cuticle or apex of the accent nail).
- Using tweezers or a dotting tool, carefully place the 3D white bow charm onto the gel/glue and adjust for symmetry.
- Flash cure the nail for 10-15 seconds to lock the bow in place without shifting.
- Apply a final non-wipe top coat, taking care to seal around the base of the charm without completely covering it (which can dull the dimension). Fully cure.
Pro-Tip: For the cleanest look on light colors, use a fine liner brush dipped in acetone to clean the edges of the polish before the final cure.

2. Glam Coffin Nails with Reflective Pink Chrome Bow (Maximalist Vibe)

Save this clever organization idea!
For those who believe more is more during the holidays, this glamorous pink look is a showstopper. The combination of long, bold coffin shape nails and a vibrant, highly pigmented baby pink sets a dramatic stage. The centerpiece is a large, sculpted 3D bow covered in a reflective pink chrome powder, creating a high-impact metallic bow that’s perfect for holiday parties and formal events. This advanced 3D bow technique requires precision but delivers an unforgettable maximalist vibe.
Products & Tools Used:
- Highly pigmented, warm baby pink gel polish
- Clear builder gel or acrylic powder/monomer for sculpting the bow
- Pink or white chrome powder and dedicated silicone applicator
- Non-wipe gel top coat (crucial for chrome adhesion)
- Fine-tipped dotting tool or sculpting brush
Application/Styling Steps:
- Apply and cure base color (coffin shape preferred).
- Sculpt the bow shape onto the accent nail using builder gel or acrylic. Cure the 3D element fully.
- Apply a thin layer of non-wipe top coat over the sculpted bow ONLY and cure for exactly 15-20 seconds (under-curing is key for chrome).
- Immediately and gently rub the pink chrome powder onto the tacky surface of the bow using the applicator until fully metallic.
- Dust off excess chrome, then carefully apply a regular non-wipe top coat over the entire nail, ensuring edges of the bow are sealed without dulling the chrome’s reflection. Full cure.
Pro-Tip: Chrome powder adheres best to a slightly under-cured non-wipe top coat. Experiment with your UV lamp’s timing to find the perfect “tacky but not wet” surface for a mirror finish.

3. Minimalist Sheer Pink French Tip with Micro Bow Decal

This is the perfect subtle holiday work mani!
This design proves that festive can also be office-friendly. A classic French manicure gets a subtle holiday upgrade with a sheer baby pink base instead of the traditional nude. The look is completed with a tiny, flat micro bow decal placed discreetly at the base of the nail. It’s a non-bulky, minimalist pink bow design that is quick to execute, elegant, and perfectly appropriate for conservative environments or for those who prefer a subtle pink touch.
Products & Tools Used:
- High-quality sheer baby pink polish or gel (e.g., jelly or milky finish)
- Opaque white polish or gel for the French tip
- Water-slide bow decals (micro size)
- Fine liner brush for French tip (optional, can use silicone stamper)
- Sealant top coat (fast-drying for polish or UV cure for gel)
Application/Styling Steps:
- Apply 2 thin coats of the sheer baby pink base and cure/dry fully.
- Apply the white French tip line to the free edge (use a liner brush or stamper for perfect symmetry) and cure/dry.
- Cut out the micro bow decal and soak briefly in water to loosen it from the backing.
- Carefully slide the decal onto the nail, usually centered near the base, and gently press out any water or air bubbles.
- Wait until the decal is completely dry, then apply 1-2 coats of a high-quality sealant top coat to encapsulate the decal and prevent peeling.
Lesson Learned: Always ensure the bow decal is fully sealed by the top coat, especially around the edges, or it will lift quickly, ruining the manicure.

4. Sculpted Matte Baby Pink Ribbon Bow Design

Pin this glamorous textured look!
This sophisticated holiday pink design is all about texture and monochrome elegance. The nails are coated in a velvety matte baby pink finish, giving them a modern, luxurious feel. Instead of a separate charm, the bow is intricately sculpted directly onto an accent nail using the same pink color, creating a seamless, textured ribbon effect. It’s a high-end look perfect for those who appreciate detailed, integrated nail art.
Products & Tools Used:
- Medium viscosity baby pink sculpting/builder gel
- High-quality matte top coat (must be non-yellowing)
- Small silicone sculpting tool or metal dotting tool
- Clear glass mixing palette for the gel
- Fine-grit buffer/sanding block
Application/Styling Steps:
- Apply 2 coats of your pink gel base and fully cure.
- Apply and cure the matte top coat to all nails except the accent nail (this helps prevent sculpting gel from running).
- On the accent nail, use the pink sculpting gel and your silicone tool to build the ribbon bow shape, working in two symmetrical halves.
- Once the desired 3D structure is achieved (it should look like a ribbon folded), carefully cure the sculpted gel element fully.
- Finish the accent nail by applying the matte top coat over the entire nail, including the sculpted bow, and cure for maximum longevity.
Expert Tip: Using the same pink color for the base and the sculpted bow creates a high-end, monochromatic effect that is incredibly chic and prevents color clashing.

5. Pink Glitter Gradient Base with Simple Decal Bow

Perfect festive sparkle for the holidays!
This festive baby pink bow manicure combines soft color with high-impact sparkle. The look starts with a solid baby pink base and transitions into a dense silver or holographic glitter gradient that cascades down from the tips. A simple, flat white bow decal is placed near the cuticle on the solid pink portion of the nail. This budget-friendly bow nails option is eye-catching and achievable at home without complex sculpting.
Products & Tools Used:
- Basic baby pink nail polish or gel
- Fine-grade silver or holographic glitter polish (high density)
- Small flat bow decals/stickers
- Makeup sponge or dedicated nail art sponge for gradient
- Glossy top coat
Application/Styling Steps:
- Apply 2 coats of the pink base and cure/dry.
- Paint a layer of the glitter polish onto a corner of the makeup sponge.
- Gently dab the sponge onto the top third of the nail, moving toward the center, creating a diffused gradient effect. Re-apply a thin layer of glitter to the tip for density. Cure/dry.
- Place the small bow decal near the cuticle or the base of the nail, avoiding the densest glitter area.
- Seal with a thick layer of high-shine top coat to smooth over the texture created by the glitter and fully protect the decal.
Pro-Tip: Applying the glitter gradient with a sponge gives a much smoother, airbrushed transition than trying to brush it on. Always finish with a thick top coat to smooth the rough texture of the glitter.

6. Short Square Baby Pink with Side-Placed Pearl Bow

Pin this practical chic look for short nails!
This is the perfect solution for those who love festive designs but need a practical look for short nails. A durable, short square shape is painted with an opaque, warm-toned baby pink. The magic is in the accent nail, which features a delicate bow shape created entirely from tiny white pearl beads. Placing the pearl cluster vertically along the side of the nail plate adds a festive touch without creating excessive bulk, making it manageable and chic.
Products & Tools Used:
- High-pigment, opaque warm baby pink gel polish
- Mini pearl bead assortment (1mm to 3mm sizes)
- Specialized strong adhesion nail glue or highly viscous clear gel
- Wax-tip picker tool or fine tweezers
- LED Curing Lamp
Application/Styling Steps:
- Apply 2 coats of the opaque pink base and cure fully.
- Working on the accent nail, apply a thin line of adhesive gel/glue vertically along the side of the nail plate, where the bow will be placed.
- Using the wax-tip picker tool, quickly arrange the pearl beads to form the symmetrical shape of a bow (using two larger pearls as the center knot and smaller pearls for the loops/ribbons).
- Once arranged, flash cure the nail to lock the pearls in place.
- Do NOT apply top coat over the pearls, as it dulls their shine. Instead, apply a small amount of extra gel adhesive around the base of the pearls to reinforce the bond without covering the tops.
Lesson Learned: For short nails, side or vertical placement of the bow prevents the decoration from taking up too much of the limited nail bed space, maintaining an elegant look.

7. Pink and White Snowflake Accent with Bow Integration

A perfectly festive look for December!
This design beautifully integrates the soft pink bow aesthetic with a more traditional Christmas element. A crisp, cool-toned baby pink serves as the base color. On an accent nail, a delicate white snowflake is hand-painted, and a tiny, sheer pink bow decal is placed centrally over the pattern. This festive aesthetic integration creates a layered, intricate look that feels undeniably wintry without sacrificing the soft color palette.
Products & Tools Used:
- Cool-toned, creamy baby pink polish or gel
- Highly pigmented white gel polish for the snowflake art
- Ultra-fine detail liner brush (000 size)
- Small, sheer pink bow decals
- Standard glossy top coat
Application/Styling Steps:
- Apply 2-3 coats of the cool-toned baby pink base and cure/dry.
- On the accent nail, use the ultra-fine detail brush and white gel to paint a small, intricate snowflake pattern (starting with a central dot and branching lines). Cure the white gel fully.
- Place a small, sheer pink bow decal subtly over the center of the snowflake (or slightly beside it) to create a layered effect.
- Apply a final glossy top coat, ensuring the art and decal edges are perfectly sealed.
Pro-Tip: If hand-painting is too difficult, substitute the painted snowflake with a white vinyl sticker or stencil. Always use a high-contrast white (not off-white) for the snowflake to stand out against the pink.

8. Balletcore Blush Pink with Double Bow Detail

Pin this beautiful trend-forward design!
Leverage the height of the Balletcore and Coquette trends with this hyper-feminine holiday manicure. The base is a natural, sheer blush pink that mimics the look of a ballerina’s slipper on an elegant almond shape. The standout feature is the double bow detail on the accent nail, where two tiny, delicate 3D bows are placed vertically down the center. This stacked bow manicure is sophisticated, trend-forward, and utterly charming.
Products & Tools Used:
- Natural, highly sheer ballet-slipper pink gel polish
- Two sets of mini 3D clear or white bow charms (must be symmetrical)
- Professional-grade nail charm adhesive (gel or strong resin glue)
- Protective cuticle oil for post-application care
Application/Styling Steps:
- Prep and apply 2 coats of the sheer blush pink gel base, curing fully for a translucent effect.
- Apply a thin line of charm adhesive down the center of the accent nail where the bows will sit.
- Using tweezers, place the first mini bow near the cuticle, and the second mini bow directly below it, centered on the nail.
- Once placement is perfect, cure the adhesive fully.
- Finish the entire manicure with a high-shine top coat, ensuring the free edge is capped, but avoid thick pooling around the 3D elements to maintain definition.
Pro-Tip: The key to the Balletcore aesthetic is luminosity. Choose a base polish that is slightly sheer and build up thin layers for a natural, milky glow rather than flat opacity.

9. DIY Baby Pink Press-Ons with Ready-Made Bow Charms

This is the quickest holiday nail fix!
For a fast, affordable, and zero-commitment holiday look, nothing beats a high-quality press-on kit. These DIY pink bow press-ons come pre-finished with a perfect baby pink color and securely attached, ready-made bow charms. It’s the ideal solution for achieving a glamorous manicure for a specific event without a salon visit. With proper application, they can look just as professional as a full set of acrylics.
Products & Tools Used:
- High-quality baby pink press-on nail kit (pre-decorated with bows, preferably almond shape)
- High-strength liquid nail glue (avoid adhesive tabs for maximum longevity)
- Buffing block and alcohol wipe (provided in most kits)
- Cuticle pusher
Application/Styling Steps:
- Gently push back all cuticles and use the buffing block to lightly remove the natural shine from the nail plate (this is crucial for adhesion).
- Cleanse the natural nail surface thoroughly with the alcohol wipe or dehydrator, ensuring zero natural oils remain.
- Select the correct size press-on for each nail (it should not overlap onto the skin).
- Apply a generous bead of high-strength liquid nail glue to both the natural nail and the back of the press-on nail.
- Immediately align the press-on with the cuticle line and press down firmly for 30 seconds. Repeat for all 10 nails. Avoid submerging hands in water for the first 2-3 hours.
Pro-Tip: To make your press-ons last up to two weeks, avoid getting water underneath them, especially during the first 24 hours. Wear gloves when cleaning or doing dishes.

Shade Match Secrets: Choosing The Perfect Baby Pink For Your Skin Tone
The secret to ensuring your baby pink nails look sophisticated and not washed out lies in color theory. A skin tone mismatch is often why light pink polish can sometimes look dull or unflattering. The key is to match the undertone of the polish to the undertone of your skin for a harmonious and elegant result. This is an often-overlooked strategy that makes a significant professional difference.
To find your skin’s undertone, look at the veins on the inside of your wrist in natural light.
* Cool Undertones: If your veins appear blue or purple, you have cool-toned skin. You should choose baby pinks that also have cool, blue-ish, or violet undertones. Think of milky, icy pinks.
* Warm Undertones: If your veins appear green or olive, you have warm-toned skin. You should select baby pinks with warm, peachy, or golden undertones. These shades will have a richer, creamier appearance.
* Neutral Undertones: If you see a mix of blue and green, you have neutral undertones and can wear most shades of baby pink beautifully.
Choosing the right undertone will complement your natural coloring, making your hands look brighter and the manicure more intentional and chic, avoiding any yellowing or clashing effects.
Key Takeaways: Your Quick Guide to Baby Pink Bow Longevity
To ensure your beautiful baby pink bow manicure lasts through the entire holiday season, focus on these four critical elements for success: preparation, adhesion, finishing strategy, and aftercare.
- Prep is Non-Negotiable: Flawless cuticle care and nail plate buffing are required, especially for light colors, to ensure the pink base doesn’t highlight imperfections and to maximize the adhesion of the polish/charms.
- Master 3D Adhesion: Never use regular top coat for 3D elements. Use a specialized, highly viscous sculpting gel or professional-grade nail charm adhesive and ensure it is fully cured (or flash cured) immediately after placement to prevent snagging.
- Finish Strategy Matters: If using chrome, use a non-wipe top coat and under-cure slightly. If using a matte finish, apply the matte top coat over the entire nail and the sculpted bow for a uniform, velvety texture.
- Moisture Maintenance: Use cuticle oil daily, particularly in the dry winter March and 2026, to prevent nail beds from drying out and minimize the risk of the gel/acrylic lifting.
People Also Ask About Pink Bow Nail Application
How long do 3D bow charms typically stay on without falling off?
Professionally applied 3D bow charms secured with builder gel or specialized resin adhesive typically last 2 to 3 weeks, which matches the standard lifespan of a quality gel or acrylic manicure. Longevity heavily depends on proper sealing and avoidance of constant snagging on clothes or hair.
Is it better to use a sculpted gel bow or a pre-made resin charm?
Sculpted gel bows offer maximum durability and a truly customized, integrated look, but require advanced skill and a UV lamp. Resin charms are far easier and faster for DIY or beginner use, but they may feel bulkier and are slightly more prone to snagging or popping off prematurely if not secured with professional-grade glue.
Do I need to be a licensed nail technician to apply chrome powder successfully?
While professional techniques yield the best results, chrome powder application can be achieved at home if you use the proper products. The critical component is a specific, non-wipe gel top coat applied correctly (often slightly under-cured) to give the chrome powder the ideal tacky surface to adhere to.
Final Thoughts
The Baby Pink Christmas Bow aesthetic proves that holiday glam doesn’t need to rely on traditional reds and greens. By selecting the correct pink shade for your undertone and mastering the proper technique for securing 3D elements—whether through professional application or a high-quality DIY kit—you can achieve a chic, long-lasting, trend-forward manicure this March 2026.
Which of the 9 Pink Bow designs are you booking with your nail tech, or trying at home, first? Let us know in the comments
Last update on 2026-03-03 / Affiliate links / Images from Amazon Product Advertising API


