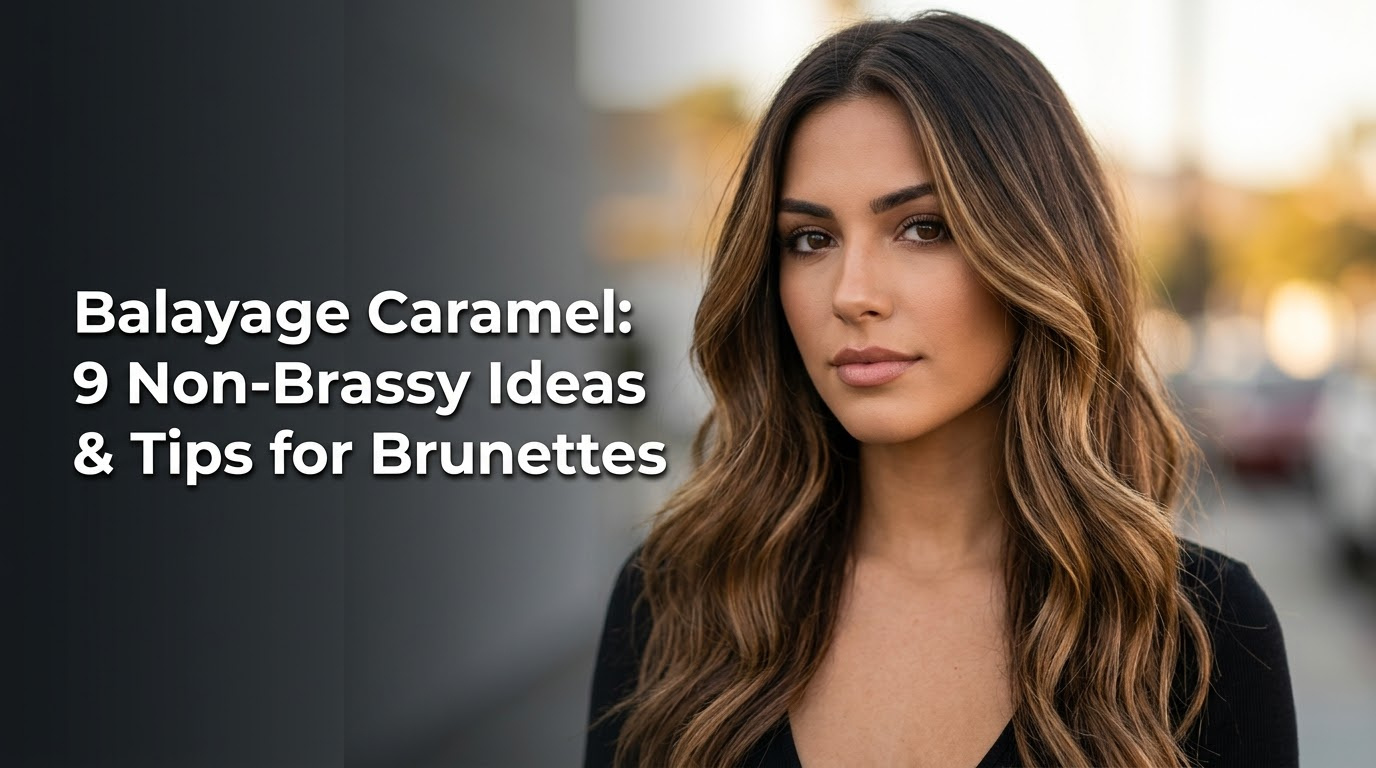
Dreaming of those gorgeous, sun-kissed caramel hair streaks but terrified of the brassy, orange nightmare? You’re not alone; it’s the number one fear for brunettes wanting to dip their toes into lighter, warmer tones. You want dimensional, rich color, not a high-maintenance headache.
Balayage caramel is a hand-painted hair coloring technique that creates natural, golden-brown highlights on brunette hair for a low-maintenance, sun-kissed effect. To avoid brassiness, a skilled colorist lifts the hair past the underlying orange pigment and then applies a specific blue-based toner to neutralize any unwanted warmth. This creates a rich, dimensional, and long-lasting result.
Drawing from proven methodologies and an analysis of professional hair industry standards, this guide provides the exact roadmap you need. We will explore nine distinct, non-brassy balayage caramel ideas specifically for brunettes. You’ll learn the expert tips and maintenance secrets to achieve and keep the beautiful, salon-fresh color you’ve been dreaming of.
What is Balayage Caramel and How Can Brunettes Avoid Brassy Tones?
The term balayage caramel refers to a specific look achieved through a freehand hair coloring technique. Unlike traditional foils that can create stark, striped lines, balayage involves a stylist hand-painting a lightener onto the hair to create a soft, graduated effect. The “caramel” aspect defines the target shade: a beautiful, warm, golden-brown that sits between blonde and brunette. For those with a brunette base, this technique offers a way to add brightness and dimension without a dramatic, full-head color change, resulting in a natural-looking, sun-kissed glow. The primary goal is to create a seamless blend that grows out gracefully, making it an incredibly low-maintenance option.
The biggest challenge and primary concern for brunettes is avoiding brassiness—the unwanted orange or reddish tones that can appear as toner fades. This happens because all dark hair has a red or orange underlying pigment that is revealed during the lightening process. According to color wheel theory, the key to a non-brassy result is a two-part process. First, a professional colorist must lift the hair light enough, past the vibrant orange stage to a golden-yellow. Second, they must apply the correct toner. A blue-based toner is essential because blue is opposite orange on the color wheel, effectively neutralizing it and leaving behind a pure, rich caramel shade.
9 Gorgeous, Non-Brassy Caramel Balayage Ideas for Brunettes
Finding the right inspiration is the first step toward achieving your dream hair. These nine distinct caramel balayage hair ideas are curated specifically for brunettes, each with a detailed “recipe” for success. This isn’t just a gallery of photos; it’s a guide to help you understand the techniques involved, communicate effectively with your stylist, and learn how to maintain caramel balayage to keep it looking flawless. From a subtle whisper of color to a bold face-framing money piece, here are the top non-brassy looks for 2026.
1. Achieve a Subtle, Sun-Kissed Glow with Fine Caramel Ribbons

Pin this subtle caramel balayage to your ‘Dream Hair’ board!
This is the perfect entry point for anyone new to balayage or seeking an incredibly natural-looking enhancement. The goal with subtle caramel balayage on natural brown hair is to create whisper-soft fine highlights that mimic the way hair naturally lightens in the sun. It’s a truly lived-in color that adds just enough dimension without any noticeable root grow-out, making it the ultimate in low-maintenance color.
What You Need
- Professional Lightener: A gentle clay-based or cream lightener suitable for open-air processing.
- 20 Volume Developer: To provide a controlled, gentle lift on dark hair.
- Bonding Treatment: An additive like Olaplex No.1 mixed into the lightener to protect hair health.
- Beige/Neutral Toner: A demi-permanent gloss in a level 7 or 8 with a natural base to create a toffee hue.
- Blue Shampoo: For at-home maintenance to neutralize brassiness.
How to Achieve This Look
- Consult: Discuss achieving a look that is only 2-3 levels lighter than your natural base color. Request ultra-fine, hand-painted “ribbons” or babylights.
- Section & Paint: Your stylist will take very fine sections, focusing the application more on the mid-lengths and ends, leaving natural depth at the root.
- Process: The lightener will be processed in open air until it reaches a golden-yellow stage (not orange).
- Tone: To achieve this soft toffee shade, stylists often use a demi-permanent gloss with a neutral or beige base, like Redken Shades EQ 07N or 08NB. This is applied at the shampoo bowl for 10-15 minutes to refine the lifted sections into a perfect, non-brassy caramel.
- Finish: Follow with a deep conditioning treatment like Olaplex No.2 to seal the cuticle and add shine.
Pro-Tip: The key to this subtle look is avoiding over-saturation. In my experience, the stylist should leave at least 50% of the natural hair untouched to create that soft, dimensional contrast and ensure a graceful grow-out.

2. Rock a Bold, Face-Framing Caramel Money Piece

Want to brighten your look? Pin this caramel money piece idea!
For a high-impact update that instantly brightens the face, the caramel balayage with money piece is an unbeatable choice. This look concentrates the color on the two front sections of hair, creating bold, face-framing highlights. It gives the illusion of an all-over brighter look without the commitment or cost of a full balayage, making it a trendy and strategic way to refresh your style.
What You Need
- Foil & Lightener: Standard foils and a cream lightener for a controlled, brighter lift around the face.
- 30 Volume Developer: For the money piece only, to achieve more lift. Use 20 volume for any other subtle pieces.
- Gold/Beige Toner: A toner with a gold base will create a vibrant, warm caramel that pops against dark hair.
- Heat Protectant Spray: Crucial for styling and preventing fading on the most visible part of the hair.
- Gloss Treatment: An at-home or in-salon gloss to refresh the tone and shine every 4-6 weeks.
How to Achieve This Look
- Isolate: Your stylist will section out two ½-inch to 1-inch pieces of hair on either side of your part at the front hairline.
- Paint & Incubate: The lightener will be painted heavily on these sections and incubated in foils for maximum, even lift to a pale yellow. Unlike the rest of the balayage, the money piece is often isolated in foils to achieve a brighter lift safely.
- Blend: A few subtle, hand-painted pieces may be added to the mid-lengths to connect the money piece to the rest of the hair, ensuring it doesn’t look like a stripe.
- Tone: A vibrant gold-beige toner (e.g., Redken Shades EQ 09G or 08WG) is applied to the lifted front pieces to create the bright caramel pop.
- Style: Always apply a heat protectant before styling. Style with waves directed away from the face to showcase the face-framing effect.
Pro-Tip: The success of a money piece hinges on the blend. I always recommend adding a few “connector” pieces around the temples and crown. This small step prevents the harsh, disconnected ’90s stripe and creates a more modern, seamless look.

3. Go Rich and Dimensional with Deep Chocolate and Toffee Swirls

Save this rich, dimensional toffee swirl idea for your next salon visit!
For the brunette who loves their dark base but craves richness and movement, rich chocolate brown with subtle caramel balayage is the ultimate luxury. This look focuses on creating toffee brown highlights that swirl through a Deep Chocolate base. It doesn’t aim to make the hair look blonde, but rather to enhance it, add dimension, and create the illusion of thicker, healthier hair with a brilliant, glossy finish.
What You Need
- Clay Lightener: Ideal for creating soft, blended “swirls” without harsh lines.
- Low-Volume Developer (10-20 Vol): The goal is a subtle lift, not dramatic blonde.
- Moisture-Rich Hair Mask: Essential for keeping color-treated brunette hair from feeling dry.
- Neutral/Cool Caramel Toner: To create a toffee shade that isn’t too warm, a toner with a slight ash/violet base is needed to counteract the underlying warmth from a dark base.
- Shine Serum: To enhance the glossy finish and make the dimensions pop.
How to Achieve This Look
- Base Color: If needed, start by refreshing the base to a rich, deep chocolate brown (Level 4-5).
- Paint: The stylist will use a “V” or “W” painting pattern on wider sections to create the “swirl” effect that moves with the hair’s natural texture.
- Process: Lift the hair to a gold/orange stage. Since the target is a deeper toffee, lifting to pale yellow is unnecessary and avoids excess damage.
- Tone Correctly: This is critical. Use a level 7 toner with a blue or violet base (e.g., Wella Professionals Color Touch 7/89) to neutralize the orange undertone and produce a true, non-brassy toffee.
- Hydrate: Finish with a deep conditioning moisture-rich hair mask for 10-15 minutes to replenish lipids and seal the cuticle.
Pro-Tip: For brunettes with a very dark (level 2-3) base, asking for a “root tap” with a demi-permanent color one shade lighter than your natural color can make a world of difference. It blurs the line where the highlights begin, creating an ultra-premium, seamless blend that grows out flawlessly for months.

4. Create a Warm and Radiant Honey and Caramel Blend

Love warm tones? Pin this honey and caramel balayage inspiration!
This look combines two distinct but related shades, Honey and Caramel, to create a multidimensional, warm, and radiant result. While caramel has a beige-brown base, honey is distinctly more golden-yellow. By placing golden Honey tones next to neutral Caramel tones, you create visual complexity and a more natural, truly sun-kissed effect. This honey and caramel balayage is especially flattering for those with neutral to warm skin undertones.
What You Need
- Two Different Toners: One gold-based toner (for honey) and one neutral/beige-based toner (for caramel).
- Clay Lightener: For a soft, blended application.
- 20 or 30 Volume Developer: Depending on the desired brightness and natural hair level.
- Color-Depositing Conditioner: A product with warm gold or caramel pigments to refresh the color at home.
- UV Protectant Spray: To prevent warm tones from fading or turning brassy in the sun.
How to Achieve This Look
- Strategic Painting: The stylist will hand-paint sections, alternating the placement for the two different tones. Brighter, honey pieces are often placed higher and around the face.
- Full Lift: To support a true honey blonde, the hair must be lifted to a clean pale yellow (Level 9).
- Dual Toning: This is the key step. The stylist will apply the gold-based (honey) toner to certain ribbons of hair, and the beige-based (caramel) toner to others, creating the multidimensional blend.
- Process & Gloss: The toners are processed, often followed by an all-over clear gloss treatment to blend the tones seamlessly and add immense shine.
- Protect: Advise clients to use a UV protectant spray daily, as the golden tones in honey highlights are more susceptible to fading.
Pro-Tip: The secret to a high-end honey and caramel blend is “tonal variation.” I instruct my team to use a slightly darker caramel formula at the root and transition to a brighter honey formula on the ends. This mimics how hair naturally lightens in the sun and provides a superior, lived-in result.

5. Style a Chic and Modern Caramel Balayage Bob

Short hair goals! Pin this chic caramel balayage bob.
Yes, balayage looks incredible on short hair! A caramel balayage on short curly hair or a straight Bob Haircut can enhance the texture and sharp lines of the cut, making the style look more intentional and dimensional. The key to success on a bob + cut is precise placement, as every highlight is more visible. This is a truly modern hair look that proves you don’t need long hair to rock a beautiful balayage.
What You Need
- Precision Painting Tools: Smaller brushes are needed for controlled application on shorter lengths.
- Clay Lightener: Provides a tackier consistency that won’t bleed onto other sections.
- Neutral Toner: On a bob, overly warm tones can look dated. A neutral or cool-toned caramel is more modern.
- Texturizing Spray: The key to achieving the piecey, lived-in waves that make balayage on a bob look so good.
- Sulfate-Free Shampoo: To gently cleanse without stripping the color.
How to Achieve This Look
- Cut First: The bob should be cut and shaped before any color is applied. The colorist needs to see the final shape to place the highlights correctly.
- Strategic Placement: The stylist will paint fewer, but more impactful, pieces. Highlights are often concentrated around the face and on the ends to mimic natural lightening and enhance the haircut’s shape.
- Gentle Lift: On short hair, damage is more visible. Use a 20 volume developer and process carefully.
- Cool Tone: Apply a neutral or slightly cool-toned caramel toner (e.g., Level 7 or 8 with a violet or blue base) to ensure a modern, non-brassy finish.
- Style for Texture: To style, create loose waves with a flat iron, leaving the ends straight. Finish with a texturizing spray to break up the waves and show off the dimensions in the color.
Pro-Tip: On a one-length bob, I always place the brightest pieces an inch above the baseline. This draws the eye upward and prevents the ends from looking transparent or thin, which can happen if the very bottom edge is heavily lightened.

6. Embrace a Low-Maintenance Grow-Out with Sun-Kissed Caramel Ends (Sombré)

The ultimate low-maintenance color! Pin this caramel sombré idea.
If your top priority is low maintenance caramel balayage, look no further than the sombré, or “soft ombré.” This technique concentrates the caramel balayage color primarily on the mid-lengths and ends, leaving the roots entirely natural. This enables an extremely graceful grow-out, allowing you to go many months—sometimes even a full year—between major appointments. It’s the perfect choice for the low maintenance caramel balayage for busy moms or anyone who wants beautiful color without the frequent salon visits.
What You Need
- High-Lift Lightener: Needed to achieve brightness on the ends of very dark hair.
- Bonding Treatment: Non-negotiable to protect the ends, which are the oldest and most fragile part of the hair.
- Multiple Toners: A darker formula for the transition zone and a lighter one for the ends to create a seamless gradient.
- At-Home Gloss Treatment: The key to keeping the ends looking fresh and toned between long appointment intervals.
- Leave-in Conditioner: To keep ends hydrated and prevent split ends.
How to Achieve This Look
- Section Horizontally: The hair is sectioned, and the stylist will determine where the transition from dark to light should begin (typically below the jawline).
- Backcomb & Paint: Each section is backcombed or teased at the root before lightener is applied from the mid-lengths to ends. A master colorist will use this teasing (teasy-lights) technique in the transition area to create an ultra-diffused blend with no lines of demarcation.
- Saturate Ends: The very ends of the hair are fully saturated with lightener for the brightest result.
- Melted Tone: The stylist will apply a deeper caramel toner to the upper transition area, “melting” it into a brighter caramel toner on the ends.
- Maintain with Gloss: To keep the color fresh for 6+ months, use an at-home gloss treatment every 4-6 weeks to re-tone the ends and add shine.
Pro-Tip: The most common mistake with sombré is creating a horizontal line. To combat this, I always pull a few fine, hand-painted pieces up higher around the face and crown. This breaks up the transition and connects the color, making it look like a true balayage rather than a dip-dye.

7. Make a Statement with High-Contrast Caramel Ribbons

Feeling bold? Pin this high-contrast caramel balayage look.
For those with very dark or caramel balayage on black hair, a high-contrast look can be incredibly striking. This style features thicker, more defined bold highlights or “ribbons” of caramel against a dark base. It’s an edgier, more fashion-forward take on balayage that makes a confident statement. With this look, preventing brassiness is more critical than ever, as the high level of lift required to get caramel on black hair can easily expose strong red and orange undertones.
What You Need
- High-Performance Lightener & Foils: A strong lightener is needed to lift through dark color, and foils are required to provide heat and maximum lift.
- 40 Volume Developer: May be required for the darkest hair, used with extreme caution by a professional.
- Protein Treatment: Essential to restructure and strengthen hair that has undergone a high level of lift.
- Violet/Blue Based Toner: Absolutely critical. A toner with a strong cool base is the only way to neutralize the strong red/orange underlying pigment in black hair.
- Bonding Treatment (e.g., Olaplex): Mandatory for every step of the process.
How to Achieve This Look
- Strand Test: A stylist must perform a strand test to see how the hair lifts and to ensure its integrity can handle the process.
- Chunky Weaves: Instead of fine painting, the stylist will take thicker, ½-inch “ribbons” or slices and fully saturate them in lightener inside foils.
- Lift to Pale Yellow: This is non-negotiable. The hair must be lifted past orange and red to a level 9 (pale yellow) to achieve a clean caramel tone. For clients with black or box-dyed hair, achieving a clean, non-brassy caramel may require two or more sessions.
- Heavy Toning: A strong, cool-based toner (e.g., Level 7 or 8 with a blue/violet base) is applied to completely neutralize any remaining warmth.
- Repair: Follow the service with a professional-grade protein treatment to rebuild the hair’s protein bonds.
Pro-Tip: Patience is the key to high-contrast color on dark hair. Rushing the process with high developer for too long is what causes “fried,” brassy hair. A true professional will recommend splitting the service into two appointments 4-6 weeks apart to maintain hair cuticle health.

8. Get a Cozy Vibe with a Warm Cinnamon and Caramel Melt

Pin this cozy and warm cinnamon-caramel melt for autumn!
This look is for the brunette who isn’t afraid of warmth. Instead of fighting the red and orange tones, this style embraces them to create a rich, cozy blend of cinnamon brown and caramel. It’s the perfect autumnal look, offering warm brunette accents that feel rich and dimensional. Instead of neutralizing all orange tones, the stylist will lift the hair to a golden-orange and tone it with a copper-gold gloss to create a deliberate, rich cinnamon shade.
What You Need
- Copper/Gold Based Toners: The key is using toners that enhance, rather than neutralize, warmth.
- Clay Lightener: For a soft, melted application.
- 20 Volume Developer: A gentle lift is all that’s needed.
- Color-Safe, Hydrating Shampoo: To prevent the vibrant red/copper tones from fading quickly.
- Shine-Enhancing Oil: To make the warm tones appear rich and glossy.
How to Achieve This Look
- Low-Level Lift: The stylist will hand-paint sections but only lift them to a Level 7 (orange-gold). This becomes the perfect canvas for cinnamon.
- Melted Application: The key is to melt different formulas together. The stylist might apply a deeper cinnamon toner near the root, blending it into a brighter caramel toner on the ends.
- Tone with Warmth: Use a toner with a copper and/or gold base (e.g., Wella Professionals Color Touch 7/43) to transform the lifted base into a rich, intentional cinnamon-caramel.
- Gloss Over: Finish with an all-over clear gloss to seal in the color and add a vibrant, reflective shine.
- Home Care: Use a sulfate-free shampoo and rinse with cool water to maximize the longevity of the warm tones.
Pro-Tip: This look is stunning but can fade faster than neutral tones. I always advise clients to get a custom-mixed color-depositing conditioner from their stylist. This at-home treatment can re-infuse the specific cinnamon and caramel pigments lost during washing.

9. Master the Lived-In Look with a Caramel Balayage and Root Smudge

The secret to a perfect grow-out! Pin this root smudge balayage.
The root shadow or root smudge is the professional secret to creating the most seamless, expensive-looking, and lived-in color imaginable. After the balayage highlights are complete, the stylist applies a demi-permanent color to the root area, “smudging” it down to blur the line where the highlights begin. This technique ensures there is absolutely no line of demarcation as the hair grows, making it the ultimate hack for low-maintenance color.
What You Need
- Standard Balayage Supplies: Lightener, developer, toner for the caramel ends.
- Root Smudge Color: A demi-permanent acidic color that is ½ to 1 shade lighter than the natural root color.
- Applicator Bottle: For a fast, precise application of the root smudge at the bowl.
- Wide-Tooth Comb: To gently blend the root smudge down into the highlights.
- pH Balancing Conditioner: To close the cuticle after multiple chemical processes.
How to Achieve This Look
- Perform Balayage: The stylist first performs a standard caramel balayage, lifting the mid-lengths and ends to the desired level.
- Rinse & Towel Dry: After the lightener is rinsed, the hair is towel-dried well.
- Apply Root Smudge: At the shampoo bowl, the stylist quickly applies the root smudge color to the first 1-2 inches of the root area, overlapping slightly where the balayage begins. A root smudge is done using a demi-permanent acidic hair color, like Redken Shades EQ, that processes for 5-10 minutes.
- Smudge & Process: The stylist uses their fingers or a wide-tooth comb to gently “smudge” or pull the root color down slightly into the highlights. This is processed for only 5-10 minutes.
- Tone Ends & Finish: While the root smudge is on, the caramel toner is applied to the mid-lengths and ends. Everything is then rinsed out together, followed by a pH-balancing conditioner.
Pro-Tip: The biggest mistake is choosing a root smudge color that is too dark or too ashy. This creates a dark, dull band. I always formulate the smudge to be slightly lighter and warmer than the client’s natural color. This creates a soft shadow, not a heavy root.

Key Takeaways: Your Quick Guide to Perfect Caramel Balayage
- Brassiness is Preventable, Not Inevitable: Unwanted orange tones on brunette hair are caused by not lifting the hair light enough. To get a true caramel, the hair must first be lifted to a golden-yellow stage.
- Toner is Not Optional—It’s Everything: Balayage is a two-step “lift and tone” process. The toner is what creates the final caramel shade and, crucially, neutralizes brassiness using color wheel theory.
- Use Blue Shampoo, Not Purple: For caramel tones on a brunette base, the enemy is orange. Blue cancels out orange. Purple shampoo is for blonde hair to cancel out yellow and can make caramel look dull.
- Communicate with Pictures: The best way to get the exact caramel balayage hair you want is to bring multiple photos to your stylist. Use the ideas in this guide to show them the specific tone and placement you love.
- Invest in Aftercare for Longevity: Professional caramel balayage is an investment. Protect it with sulfate-free shampoos, regular deep conditioning masks, and at-home gloss treatments to keep it looking fresh and non-brassy.
- A “Root Smudge” is the Pro Secret: For the softest grow-out and a truly low-maintenance, lived-in look, ask your stylist for a root smudge or root shadow service.
FAQs About Balayage Caramel
Why did my caramel balayage turn orange or brassy?
Your caramel balayage likely turned orange because the hair was not lightened enough before the toner was applied. For brunettes, hair must be lifted past the red and orange stages to a golden-yellow. If toning is done on an orange base, the underlying warmth will overpower the toner as it fades, revealing the brassiness.
What is the best toner for a non-brassy caramel balayage?
The best toner has a blue or blue-violet base to actively neutralize the underlying orange and yellow pigments in lifted brunette hair. Professional acidic demi-permanent glosses like Redken Shades EQ (e.g., the NB or T series) or Wella Professionals Color Touch (e.g., the /89 series) are industry standards for creating long-lasting, non-brassy caramel tones.
How much does caramel balayage cost in 2026?
The cost of caramel balayage varies significantly by location, salon, and stylist expertise, but you can typically expect to pay between $250 and $500+ in 2026. The price reflects the service’s complexity, the time required (often 3-5 hours), and the amount of product used. High-contrast looks on very dark hair may cost more.
How long does caramel balayage last?
While the highlights themselves are permanent, the toned color can last anywhere from 3 to 6 months before needing a refresh. The “lived-in” placement with a soft root means you won’t have a harsh grow-out line. Most people get a touch-up or a toning gloss every 4-6 months to maintain the desired shade.
Is caramel balayage low maintenance?
Yes, caramel balayage is considered a very low-maintenance color option, especially compared to traditional highlights. Because the color is feathered up to the root, there is no harsh line of demarcation as your hair grows. You can go months between salon visits, often only needing a gloss or toner refresh.
Can you do caramel balayage without bleach?
On very dark brown or black hair, it is not possible to achieve a true caramel shade without using bleach or a similar lightener. Lightener is required to lift the natural dark pigment out of the hair to create a light enough canvas for the caramel toner to show up. For light brown hair, a “high-lift” color might be used for a very subtle result.
Should I use blue or purple shampoo on caramel hair?
You should use a blue shampoo for caramel balayage on brunette hair. Color wheel theory dictates that blue cancels out orange tones, which are the primary cause of brassiness in lifted brown hair. Purple shampoo cancels out yellow tones and is best for blondes; it can make caramel hair look dull or muddy.
What’s the difference between caramel and honey balayage?
Caramel balayage is a richer, deeper shade with a neutral or beige-brown base, resembling toffee. Honey balayage is brighter and lighter, with a distinct golden or yellow-blonde base. Caramel is often used for a more subtle, dimensional look, while honey provides a brighter, more sun-kissed pop.
How often do I need to get my balayage touched up?
Most clients touch up their caramel balayage only one to three times per year. The main maintenance is a “toning” or “gloss” appointment every 3-4 months to refresh the caramel shade and boost shine. The actual balayage reapplication is often done just once a year.
Can I do caramel balayage at home?
While there are DIY kits available, achieving a seamless, non-brassy caramel balayage at home is extremely difficult and not recommended. Professional stylists are trained in strategic placement, managing processing times, and complex toning. The risk of patchy, uneven, and brassy results is very high with at-home kits.
Final Thoughts on Your 2026 Caramel Balayage Journey
Achieving the perfect dimensional, sun-kissed caramel balayage is a transformative experience, especially for brunettes looking for a refresh that is both stunning and low-maintenance. The fear of ending up with brassy, orange streaks is valid, but as we’ve explored, it’s also completely avoidable. The secret lies in a combination of a skilled stylist who understands the “lift and tone” process and your own knowledge to care for your color at home.
By choosing an inspiration photo from this guide, discussing the importance of lifting past the orange stage, and committing to a maintenance routine with a quality blue shampoo and regular gloss treatments, you are setting yourself up for success. This isn’t just about color; it’s about investing in a look that makes you feel confident and beautiful for months on end.
Now that you’re equipped with these nine ideas and expert tips, which caramel balayage look are you inspired to try for 2026? Share your favorite in the comments below.
Last update on 2026-03-29 / Affiliate links / Images from Amazon Product Advertising API