Ever dreamed of that perfect, sun-kissed balayage look without the salon price tag or fear of bleach damage? You want gorgeous, dimensional color, but the thought of brittle, over-processed hair holds you back. Achieving that seamless, natural-looking blend feels like a professional secret you’re not in on.
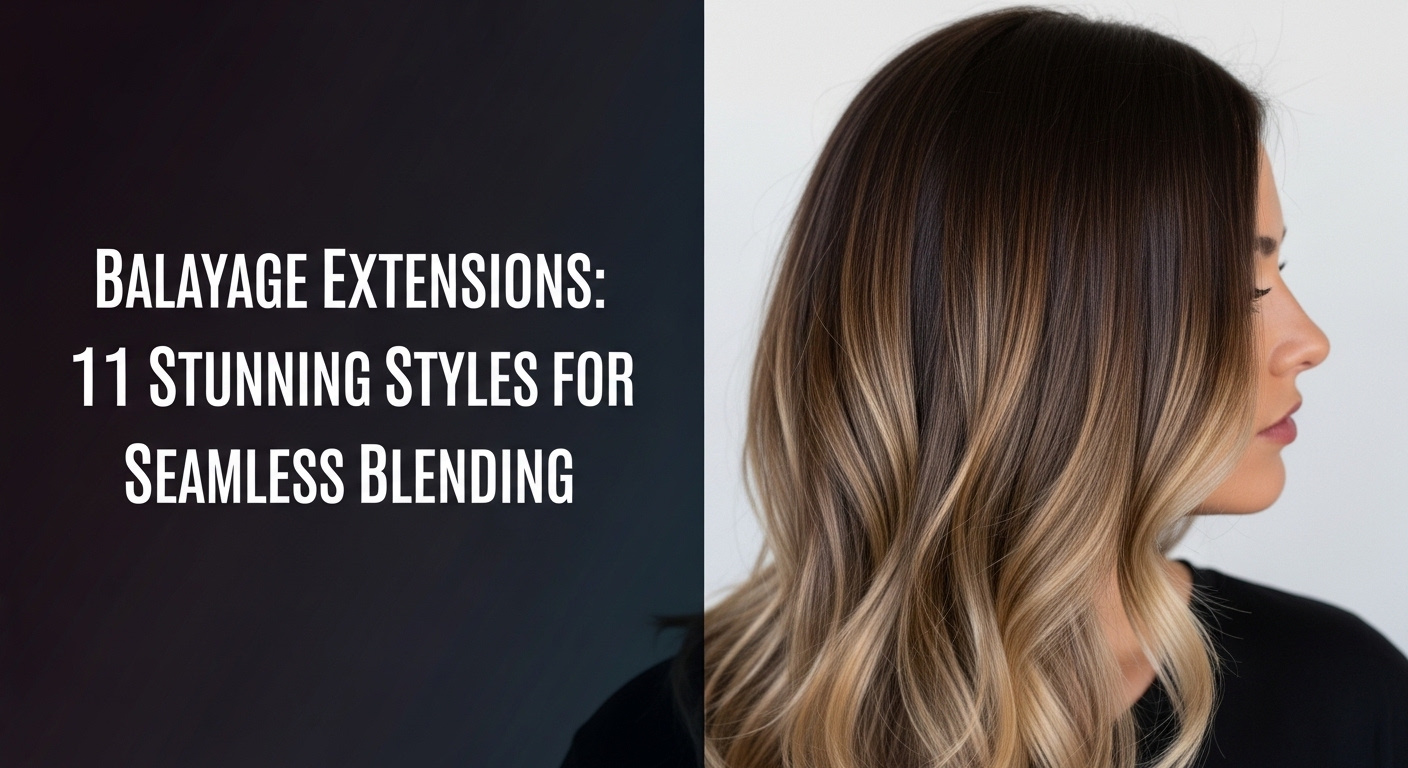
Balayage extensions are pre-colored hair pieces designed to mimic a natural, sun-kissed look with hand-painted highlights, allowing you to add instant length, volume, and dimensional color to your hair without bleach or permanent dye. This method provides a seamless blend and a damage-free way to achieve the popular balayage style.
Drawing from established best practices and proven methodologies, this guide will unlock the world of balayage hair extensions. We will explore 11 stunning styles you can achieve today, transforming your look instantly and safely. Get ready to discover how to get that salon-perfect finish right at home.
What Are Balayage Extensions and Why Are They So Popular?
The desire for a sun-kissed hair glow without the commitment and potential damage of chemical processing has led to a surge in popularity for balayage extensions. These aren’t your standard, single-toned hair pieces. They are a form of hair augmentation where each extension is pre-colored using the French balayage technique, which involves hand-painting highlights for a graduated, soft, and incredibly natural-looking effect. Unlike traditional foils that can leave harsh lines, this salon professional technique creates a gentle transition from your natural root color to lighter ends. The primary appeal lies in their ability to provide a complete hair transformation—adding instant length and add volume—while perfectly mimicking the coveted balayage look. They integrate with your own hair through various methods, from temporary balayage clip ins to semi-permanent balayage tape ins, offering a damage-free highlights solution that protects your natural hair’s integrity.
11 Stunning Balayage Extensions Styles for a Seamless Blend in 2026
Ready for some major hair inspiration? The beauty of balayage hair extensions is their incredible versatility. Whether you’re looking to add subtle dimension to a bob or create a dramatic, flowing mane of sun-kissed waves, there’s a style and method for you. In this guide, we’ll explore 11 breathtaking looks you can achieve, breaking down exactly what you need and how to do it. We will cover everything from temporary balayage clip ins that you can apply for a night out, to semi-permanent balayage tape ins for a longer-lasting transformation. The key to all these styles is using high-quality, 100% Remy human hair, which ensures the extensions look, feel, and move just like your own, creating that truly seamless color blend you’re dreaming of.
1. Create the Classic Honey Blonde Waterfall

Pin this gorgeous hair goal to your ‘Dream Hair’ board!
What You Need
- 1 set of 20-22 inch Honey Blonde Balayage Clip-In Extensions (look for a natural root melt that matches your base color).
- A rat-tail comb for clean sectioning.
- A wide-tooth comb or extension-safe brush.
- Heat protectant spray.
- 1.5-inch barrel curling iron.
Styling Steps
- Section your natural hair horizontally, starting from the nape of your neck. Clip the top section up and out of the way.
- Apply the first weft by securely clipping it onto the root of your sectioned hair. Ensure it’s flat against your scalp.
- Release another horizontal section of your hair (about an inch thick) and blend it over the weft.
- Continue this process, working your way up your head and applying wefts to the back and sides to add volume and length.
- Once all wefts are installed, use a curling iron to create loose ‘waterfall’ waves. Make sure to curl pieces of your natural hair and the extensions together to create a seamless color blend.
- Gently brush through the curls with your fingers to finish the look.
Pro-Tip: When selecting a color, always match the extensions’ root color to your natural root color. The seamless blend is more dependent on the root match than the highlight match. In my experience, cuticle aligned hair is essential for a long-lasting, tangle-free style.
2. Style an Edgy Ash Blonde Contrast

Save this chic look to your ‘Short Hair Inspo’ board!
Products & Tools Used
- 1-2 packs of Ash Blonde Balayage Tape-In Extensions (14-16 inches). Choose a style with a dark root that blends with your natural color.
- A rat-tail comb.
- Tape-in pliers (optional, for extra security).
- Rubbing alcohol and a cotton ball to prep.
Application Steps
- Wash and dry your hair completely without any conditioner near the roots. This ensures the tape adhesive will stick properly.
- Section your hair neatly. Plan where you want to place the pops of ash blonde color, typically framing the face and scattered through the mid-lengths.
- Take a thin, clean horizontal slice of your hair (as wide as the tape weft).
- Remove the protective backing from one tape-in weft and apply it underneath the slice of your hair, about a quarter-inch from the scalp.
- Place a second tape-in weft directly on top of the first, “sandwiching” your natural hair in between. Press firmly.
- Continue applying in rows. For a bob, you often only need 10-20 “sandwiches” to add volume and color.
- Once installed, you can have a stylist trim the extensions to blend perfectly with your bob’s length and layers.
Pro-Tip: To prevent tension alopecia prevention, never place tape-ins too close to your hairline or scalp. A quarter-inch gap is the industry standard and allows for natural movement without pulling.

3. Achieve the Rich Chocolate & Toffee Melt

Adding this rich, decadent color to my ‘Hair Color Ideas’ board!
What You Need
- 1-2 bundles of Chocolate and Toffee Balayage Weft Extensions. Ensure it’s 100% Remy human hair to handle styling.
- C-curve needle and weaving thread that matches your root color.
- Sectioning clips.
- A professional stylist for installation (recommended).
Installation Steps (Stylist Recommended)
- Your stylist will begin by creating a clean, braided foundation (cornrows) with your natural hair. This will be the base the wefts are sewn onto.
- The sew-in weft hair is measured to fit the length of the braid.
- Using the needle and thread, the stylist will carefully sew the weft onto the braid, ensuring it lies flat and is secure.
- This process is repeated, working up the head until the desired volume and color effect is achieved. A section of your own hair is left out at the top and around the hairline to blend over the wefts for a natural-looking finish.
- Once installed, the stylist will trim and layer the extensions to melt seamlessly into your own hair.
Pro-Tip: This method is a fantastic thin hair solution. For optimal scalp health, ensure your braids are not too tight. A proper installation by a certified stylist is the best way to ensure the weight distribution of the wefts is even and non-damaging.

4. Get the Sun-Kissed California Blonde Look

Pinning this ultimate beachy vibe to my ‘Summer Hair’ board!
What You Need
- 1 set of Blonde Balayage Clip-In Extensions with a mix of sandy and bright blonde tones.
- Sea salt spray for texture.
- A hair straightener for creating beachy waves.
- Light-hold hairspray.
Styling Steps
- Install your full set of clip-in extensions for maximum volume and length, following the method in Style #1.
- Lightly mist your hair (natural hair and extensions) with a sea salt spray. This will give it that signature beachy grit and texture.
- Take a 2-inch section of hair. Clamp the straightener near the root, turn it 180 degrees away from your face, and glide it down the hair shaft.
- Leave the last 1-2 inches of the hair straight. This is the key to a modern, lived-in color beach wave.
- Alternate the direction of the waves (some towards your face, some away) for a more natural, less uniform look.
- Once all hair is waved, run your fingers through it to break up the curls and blend everything together.
Pro-Tip: To prevent color oxidation and keep your blondes bright, wash your extensions as infrequently as possible. When you do, use a purple shampoo sparingly, followed by a deep conditioning mask specifically formulated for color-treated hair. This maintains pigment longevity.
5. Add Subtle Face-Framing Dimension

The perfect subtle change! Pinning to ‘Easy Hair Hacks’.
What You Need
- 10-20 strands of Balayage Nano Ring (or I-Tip) Extensions in a shade 2-3 levels lighter than your base color.
- A loading tool/loop.
- Nano rings/beads.
- Pliers for clamping.
- A professional stylist for precise application.
Application Steps (Stylist Recommended)
- Your stylist will section out the front pieces of your hair that naturally frame your face.
- They will take a tiny, equal-sized piece of your natural hair.
- Using the loading tool, they’ll slide a nano ring onto the section of your hair.
- The tip of the nano extension strand is then inserted into the ring.
- The stylist positions the ring about a half-inch from the scalp and uses pliers to clamp it securely flat. This is a form of cold-fusion bonding.
- This process is repeated, placing 5-10 strands on each side of your face to create a soft, brightening effect that mimics a foilyage look.
Pro-Tip: This is a fantastic no-bleach highlights solution. The key to a natural look is hair porosity and extensions compatibility. Using premium grade human hair ensures the extensions absorb moisture and style just like your own hair.

6. Master the Golden Brunette Blend

This golden glow is everything! Saving to my ‘Brunette Goals’ board.
What You Need
- 1 set of Golden Brunette Balayage Clip-In Extensions. Look for a set that blends multiple warm brown and golden tones.
- A thermal protectant spray with a light hold.
- A 2-inch curling iron or large hot rollers.
- A paddle brush.
Styling Steps
- Install the full set of clip-in extensions, ensuring the wefts are placed to distribute volume evenly around your head.
- Brush through all the hair—your own and the extensions—with a paddle brush to create a single, unified canvas.
- Taking large 2-3 inch sections, style the hair with a large barrel curling iron or hot rollers to create big, bouncy curls.
- The key to the ‘blend’ is to curl large sections together, forcing the different tones to mix and merge visually.
- After letting the curls cool completely, gently brush them out with the paddle brush. This will soften them into a glamorous, flowing wave and complete the seamless color blend.
- Finish with a light mist of shine spray.
Pro-Tip: When shopping, look for the term “double drawn quality.” This industry standard means the majority of hair strands are the full length of the weft, creating a much thicker, healthier, and more luxurious look from root to tip.

7. Rock a High-Impact Ponytail Pop

This power pony is a whole mood! Pinning immediately.
What You Need
- 1 Balayage Wrap-Around Ponytail Extension.
- Hair gel or edge control.
- A strong hair elastic.
- Bobby pins.
- A fine-tooth comb.
Styling Steps
- Gather your natural hair into a tight, sleek ponytail at your desired height (high, mid, or low). Secure it firmly with a hair elastic.
- Apply gel or edge control around your hairline and smooth it down with a fine-tooth comb for a polished finish.
- Take the balayage ponytail extension. It will have a small comb attached. Clip this comb into the top of your natural ponytail’s base.
- The extension will have a long, separate strand of hair attached to the weft. Wrap this strand tightly around the base of the ponytail, covering the elastic and the extension’s join.
- Once fully wrapped, secure the end of the strand underneath the ponytail with 2-3 bobby pins.
- Brush through the full ponytail to blend the extension with any of your own hair that’s showing and add a final layer of shine spray.
Pro-Tip: For an ultra-secure hold that lasts all night, use two hair elastics on your natural ponytail. For extra realism, look for a ponytail extension made with a polyurethane weft technology base, which lies flatter and is more discreet.

8. Try the Lived-In Beige Blonde Look

This is the definition of effortlessly chic. Saving this to my ‘Low-Maintenance Hair’ board.
Products & Tools Used
- 1-2 packs of Beige Blonde Balayage Tape-In Extensions. Choose a set with a pronounced root stretch for that lived-in vibe.
- Clarifying shampoo.
- A flat iron for creating soft, bent waves.
Application Steps
- Begin by washing your hair with a clarifying shampoo to remove any product buildup. Do not use conditioner near the roots.
- Following the ‘sandwich’ method described in Style #2, apply the tape-in extensions. Focus the placement on the sides and back, leaving your natural crown and parting to fall over the top.
- For the ‘lived-in’ style, ask your stylist to place them slightly lower than you would for a high-contrast look, enhancing the root stretch effect.
- Once all extensions are installed, it’s time to style. Take a vertical section of hair and clamp a flat iron in the middle.
- Create a ‘bend’ in the hair by turning the iron 180 degrees and sliding down a few inches, then turning it back 180 degrees the other way. This creates a loose ‘S’ wave rather than a curl.
- Leave the ends straight and alternate the direction of the bends for a perfectly imperfect, lived-in color finish.
Pro-Tip: The most natural-looking extensions often undergo silicone-free processing. While silicone can make hair feel silky initially, it’s an artificial coating. Silicone-free, cuticle aligned hair will behave more like your own and accept color or toner more evenly if you ever decide to customize them.
9. Create a Bold Black & Caramel Ribbon Look

This contrast is incredible! Pinning to my ‘Bold Hair’ board.
What You Need
- 3-5 individual Caramel Balayage Clip-In Wefts. (You don’t need a full set).
- A flat iron.
- Shine serum.
Styling Steps
- Straighten your natural black hair so it is sleek and smooth. This will make the caramel ribbons stand out more.
- Section your hair where you want the ribbons to appear. For a bold look, concentrate them in the mid-layers on the sides.
- Clip in the individual caramel wefts one by one. Don’t place them too close together; you want to see distinct ‘ribbons’ of color against the black.
- Let down a layer of your own black hair to cover the top of the weft.
- Straighten the extension piece along with the surrounding natural hair to fully blend them into the sleek style.
- Finish with a small amount of shine serum on the ends to make the colors pop and control any flyaways. This is the ultimate no-bleach highlights technique for dark hair.
Pro-Tip: For this look, a premium grade synthetic extension can sometimes work as well as human hair, provided it is heat-resistant. However, 100% Remy human hair will always provide the most natural-looking movement and longevity.

10. Perfect the Silver & Grey Transition

Embracing grey has never looked so chic. Saving to my ‘Elegant Hair’ board.
What You Need
- 1 set of Silver/Grey Balayage Extensions. Choose a set with a dark “shadow root” that mimics a natural grey root, transitioning to bright silver.
- Purple or silver toning shampoo.
- Volumizing mousse.
- A round brush for blow-drying.
Styling Steps
- Apply your clip-in or tape-in extensions, concentrating them in areas where you need to blend the line between your natural grey roots and older colored hair.
- Once a month, wash the extensions with a purple shampoo to neutralize any yellow tones and keep the silver vibrant. Do not leave it on for more than 2-3 minutes to avoid staining.
- On damp hair (your own and the extensions), apply a golf-ball-sized amount of volumizing mousse.
- Using a round brush, style your hair with a bouncy blowout. The volume and movement are key to creating a seamless blend and a youthful, modern look.
- The goal isn’t to hide the greys, but to celebrate them by blending them into a cohesive, multi-tonal silver style.
Pro-Tip: This is an excellent method for color correction during a grey transition. A stylist recommended approach is to choose extensions that combine several shades—like charcoal, silver, and platinum—to perfectly mimic the natural dimension of grey hair.

11. Emulate the Warm Auburn & Copper Melt

This fiery color is stunning! Pinning this to my ‘Red Hair Dreams’ board.
What You Need
- 1 set of Auburn/Copper Balayage Clip-In Extensions. Look for a set that features a deep auburn root melting into bright copper ends.
- A curling wand.
- A light-hold finishing spray.
Styling Steps
- Apply the full set of clip-in extensions, distributing the wefts evenly for a full-bodied, dimensional look.
- Take 1-inch sections of hair and wrap them around the curling wand, holding for 5-7 seconds.
- Alternate the- Key Takeaways:
- Achieve Color Without Damage: Balayage extensions are the ultimate non-damaging color solution, allowing you to get a sun-kissed, highlighted look without applying a single drop of bleach to your natural hair.
-
Quality is Everything: Always choose 100% Remy human hair extensions. This ensures the cuticles are aligned, which dramatically reduces tangling and allows the extensions to blend, wash, and style just like your own hair.
-
Match the Root, Not the Ends: The secret to a seamless color blend is matching the root color of the extension to your own natural root color. This creates a flawless natural root melt that is far more important than a perfect end-color match.
-
Choose the Right Type for Your Goal: Use seamless clip-in hair for temporary style changes and maximum versatility. Opt for semi-permanent tape-in hair extensions for a flatter, more discreet application, especially on short or fine hair.
-
Blending is a Styling Technique: The final blend happens during styling. Curling or waving your natural hair together with the extension hair is a non-negotiable step that physically merges the two, creating a truly undetectable finish.
People Also Ask About Balayage Extensions
What are seamless balayage extensions?
Seamless balayage extensions refer to wefts, typically clip-ins, that have a thin silicone or polyurethane base instead of a traditional stitched fabric one. This allows the weft to lie much flatter against the scalp, making it more comfortable and significantly less detectable, especially in thin hair. This technology helps create a truly seamless blend with your natural hair.
How do you blend balayage extensions?
Blending is primarily achieved through styling after the extensions are installed. By curling or waving your natural hair and the extension hair together in the same section, you physically mix the strands, making the transition invisible. It also helps to choose an extension with a natural root melt that closely matches your own root color.
Can you get balayage with extensions already in?
It is strongly advised not to chemically treat (color or bleach) extensions while they are installed in your hair. The chemicals can damage the bonds, tape, or thread, causing slippage. Furthermore, the chemicals can damage your natural hair that is held within the attachments. If you want to customize your extensions, do so before they are installed.
Balayage vs ombre extensions: which is better?
Neither is “better,” they are just different styles. Balayage vs ombre comes down to the look you want. Balayage offers a more natural, “swept-on” highlight effect with a softer, more blended grow-out. Ombre is a more defined, two-toned look with a distinct transition from a dark top to a light bottom. Balayage is generally considered more modern and lower-maintenance.
How long do balayage tape-ins last?
With proper care, balayage tape-in extensions can last for 6-8 weeks before they need to be moved up. The 100% Remy human hair itself is reusable for multiple applications (often up to a year). A certified stylist will remove the wefts, add new tape, and reinstall them closer to your scalp to account for new hair growth.
Do balayage extensions damage your hair?
When installed and removed correctly by a professional, balayage extensions are a safe, damage-free highlights solution. Damage typically occurs from improper installation (placing wefts too close to the scalp, using too much tension) or incorrect removal. Clip-ins are the safest option as they are a temporary method with zero commitment or bonding agents.
How do I choose the right balayage shade?
Always prioritize matching the root color of the extension to your natural hair color at the root. This creates the most seamless blend. For the highlight color, consider your skin tone. If you have warm undertones, opt for honey, caramel, or golden blondes. If you have cool undertones, ash, beige, or platinum blondes will be more flattering. When in doubt, order a color match sample kit.
How many grams of hair for balayage?
The amount of hair you need depends on your goal. For adding color and a little volume, 120-150 grams is usually sufficient. To add significant length and create a dramatic transformation, especially for a full, thick look, you will want 180-220 grams. The best balayage clip in hair extensions for thin hair might be a lighter set (around 120g) to avoid weighing down natural hair.
Can I use purple shampoo on balayage extensions?
Yes, you can use purple shampoo on blonde balayage extensions to combat brassiness, but do so with caution. Only use it when you see yellow tones appearing, and never leave it on for more than 2-3 minutes as extensions can absorb color quickly. Always follow up with a deep conditioning mask, as toning shampoos can be very drying.
How do you wash balayage extensions?
Wash your extensions as infrequently as possible, and always use a sulfate-free shampoo. Hold the top of the weft with one hand and gently wash downwards in one direction to prevent tangling. Never scrub or bunch the hair together. Always follow with a hydrating conditioner on the mid-lengths and ends, and let them air dry whenever possible.
Final Thoughts on Achieving Your Dream Hair
Ultimately, balayage extensions represent freedom and creativity in your hair journey. They empower you to achieve the rich, dimensional color and luxurious volume you’ve always wanted, completely on your own terms. The fear of commitment and damage is replaced by the excitement of temporary transformation and the confidence that comes from a flawless, seamless blend. By prioritizing quality—always opting for 100% Remy human hair—and mastering a few simple styling tricks, that salon-perfect, natural-looking balayage is no longer a dream, but an accessible reality.
Last update on 2026-03-29 / Affiliate links / Images from Amazon Product Advertising API